QuickBooks errors can be extremely annoying. However, they can be rectified easily using some basic set of steps. One such error that we are going to highlight in this segment today is QuickBooks error code 6000, 80. This error code is basically a 6000 series error that is often related to the company file. You can see this issue when you try to open and work on your company file. Experiencing this issue in QuickBooks is common. However, if you are interested in learning what can fix this error from its root cause, make sure to stick around this piece of writing till the end. Or you can further get in touch with our technical support team at. +1-844-499-6700, and let them help you with the rectification of such errors.
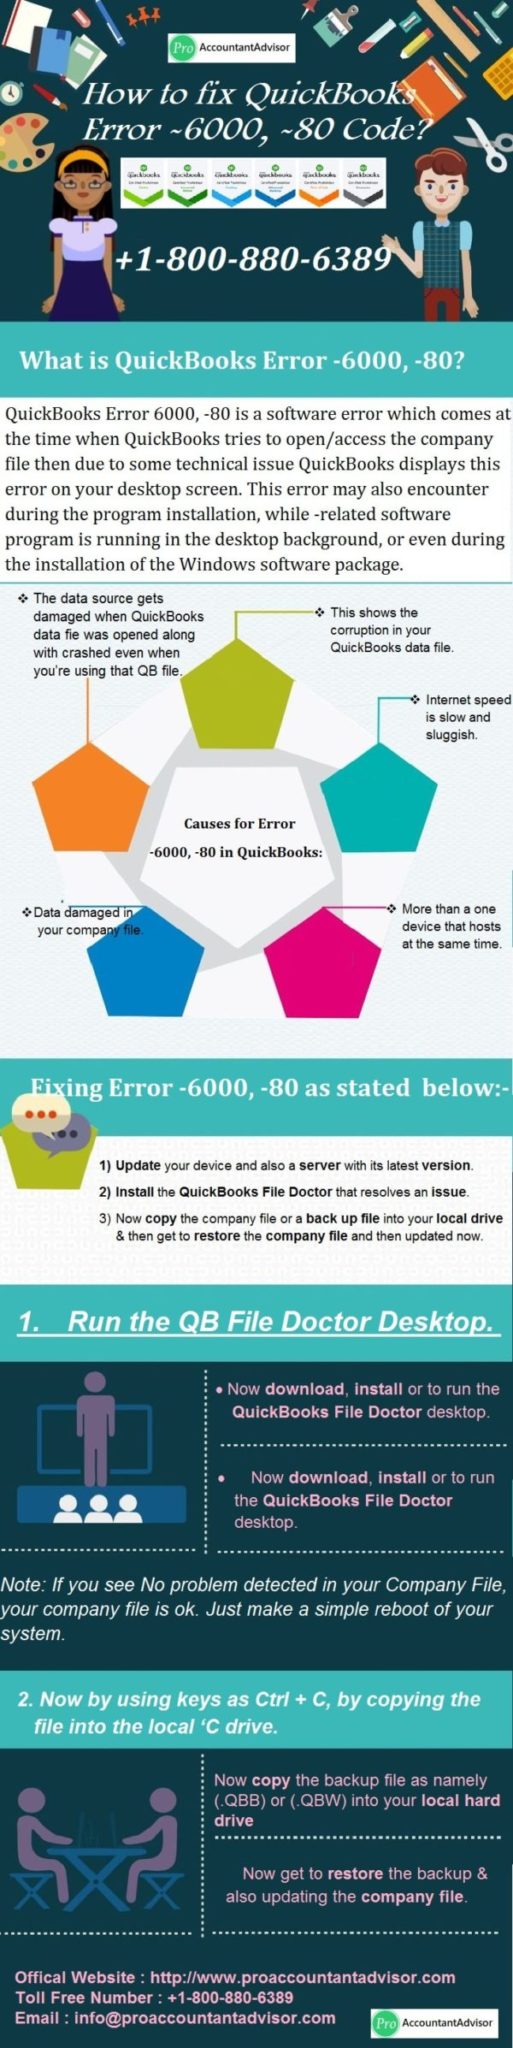
QuickBooks Error -6000, -80 is a software error that generally occurs when a user gives a command to QuickBooks to open or access the company file but due to some technical issues QuickBooks displays an error on your desktop screen. This error may also be encountered during the program installation, while a related software program is running in the desktop background, or even during the installation of the Windows software package.
Due to this error, the software restricts the user, and the workflow of their business is interfered with.
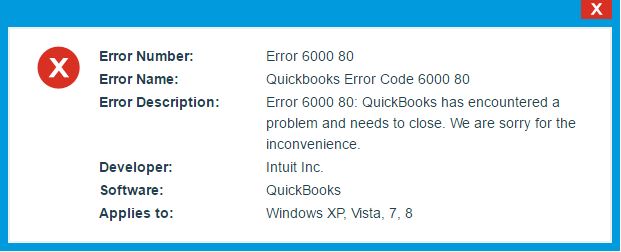
You may see the following error message on your desktop screen:
Error Number
6000 80
Error Name
QuickBooks Error Code 6000 80
Description
“Error 6000, 80: An error occurred when QuickBooks tried to access the company file.”
Developer
Intuit Inc.
Software
Intuit QuickBooks
Applies to
Windows XP, Vista, 7, 8, 8.1, 10 and Windows 11
QuickBooks shows an error while opening the QB company file:
Error -6000, -80: An error occurred when QuickBooks tried to access the company file
What Causes Error -6000, -80 in QuickBooks?
Check
out the possible reasons due to QB Error Code -6000, -80 appear:
This shows the corruption in your QuickBooks data file.
The data source gets corrupt when the QuickBooks data file is opened along crashes even when you’re using that QB file.
Internet speed is slow and sluggish.
In case, numerous systems are acting as a host for the QuickBooks data file(s).
If the data is restored or converted over the network or if the QB software is not able to communicate with the server.
You can share your data with Intuit’s Data Recovery team & request them to recover it. Or you can get in touch with our certified ProAdvisors for QuickBooks support.
Important: Follow the next solution if you see any error that persists.
Solution 2: Copy/replicate the QB file(s) to the local drive
Copy/replicate the QuickBooks backup file with the .qbb extension. Or you can do the same with the QB company file(s) with .qbw extension that you wish to update to a local hard drive.
To download the tool, type in the email address & select “I agree” in the “Term and Condition”.
Install & use the tool by pursuing the wizard.
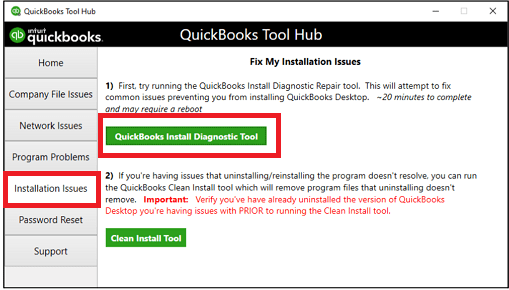
In case, you notice the “File Open successful” in the green check-mark under the “Advanced” option it implies that the network connection is ‘OK’. If the error persists, go to solution 2. You can also download QuickBooks install diagnostic tool using QuickBooks tool hub.
Solution 2: Copy/replicate the QB file to the local C drive
Copy/replicate the QB Company file(s) with the .qbb extension or backup file that you desire to update to a local hard drive.
Restore/update the backup QB Company file(s).
Copy/replicate the restored/updated QB Company file(s) back to its original location.
Solution 3: Manual Fixation of Error -6000, -80 (Optional)
This solution is especially for a situation where none of the online tools such as QuickBooks Connection Diagnostic Tool or the QuickBooks File Diagnostic Tool can run successfully. Use this solution in such circumstances:
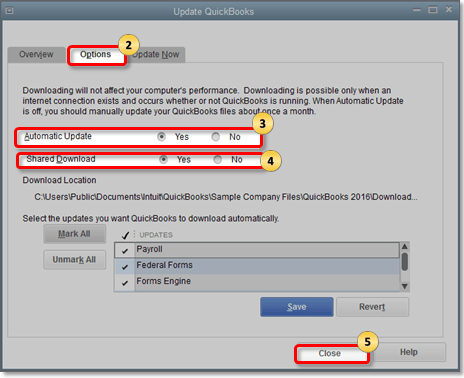
Step 1: Update the QuickBooks to the latest release:
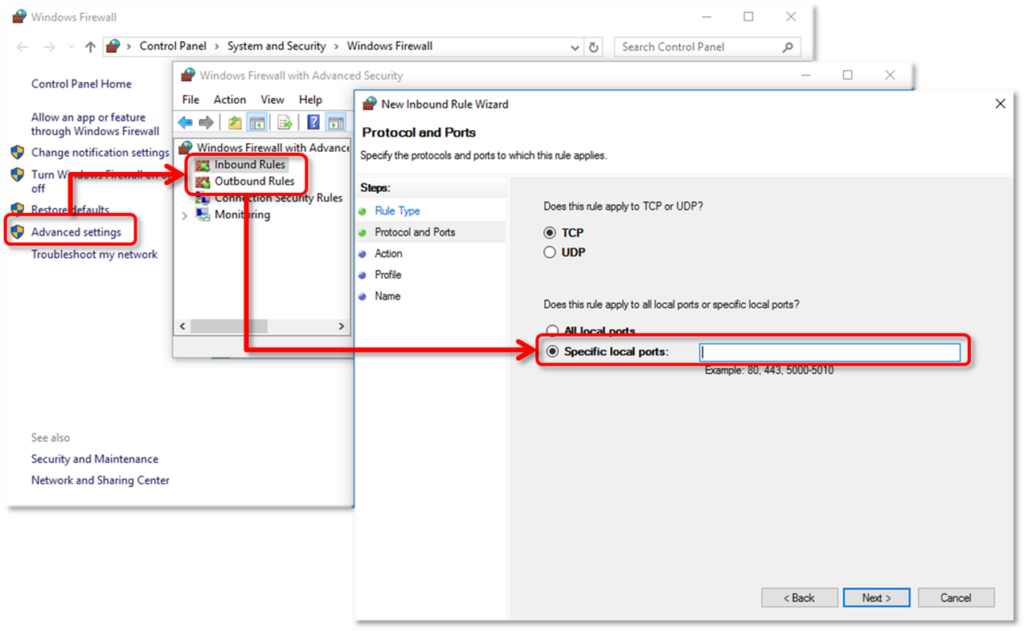
Step 2: Configure the firewall & system security application for the QuickBooks file:
Note: Intuit Inc. does not offer support/help for firewall issues due to firewall application complexity. You can ask your firewall application provider to troubleshoot the firewall problem.
See the firewall & internet security updates if needed.
To create the Network Descriptor (.nd) file, scan the folder where QuickBooks Company file(s) are stored. This .nd file generally stores all the host files in the computer.
Hit the “Windows” or “Start” icon.
Go to the “Programs” tab => “QuickBooks” tab => “QuickBooks Database Server Manager” tab.
Choose the second option – “I’ll be using QuickBooks on this computer, AND I’ll be storing our company file here so it can be shared over our network”.
If the error persists even after performing the scan process over the folder then, follow step 5.
Under the network environment, the machine (server) with the hosting feature turned on is supposed to be the only computer where the QuickBooks Database Server Manager (QBDSM) is installed. Scan the QuickBooks Company file(s) while the hosting is turned on.
Computer workstations
Server
Step 6: Open/access the QuickBooks Company file & verify the data damage
You can follow any of the two steps to open or access the QuickBooks company file & verify the data damage:
Use the host computer to open/access the QB file(s)
Navigate to the system where the QB Company file is present.
In case, the Server Install only on the host computer..! Then, you must move the ‘Copy file to another location’.
Open/access the QuickBooks software & QB Company file receiving an error warning message.
If the QuickBooks Company file opens/accessed via computer..! Then, check the QuickBooks Company file.
If it doesn’t, then replicate/copy the file to another location.
Note: In case, QuickBooks identifies no issues in the QB Company file(s), but the error exists. In such a scenario, navigate to the ‘Copy file to another location’.
Open/access the folder that contains the QB company file.
Perform click the “file name” & then, choose the “Copy” icon.
Moreover, hit the empty area on the “Windows Desktop” icon & choose the “Paste” icon.
Open/access the QuickBooks application & then, open/access the QB company file on the Desktop:
If you still encounter the QB error warning message, you might have the QuickBooks data damage.
Restore the newly backed-up QB company file.
Send/share the QB company file to the QuickBooks Data Recovery Team. To request data recovery service from Intuit Data Services, contact QuickBooks Technical Support. (Fees may apply).
If the QB company file opens successfully, copy the file back to its original location.
Important: Ensure to rename the original company file before you copy the file last file you open. Do not paste over the existing company file.
Open/access the folder that contains the original (damaged) QB company file, & rename the file by adding OLD or DAMAGED in the file name prefix.
For instance, if the original QB company file is CompanyFile, rename it OLD_CompanyFile orDAMAGED_CompanyFile.
Significantly close the QuickBooks.
Hit onto the QB Company file & select the “Copy” tab.
Furthermore, open/access the folder where the QB company file originally stored.
Right-click on the empty area in the folder window & select the “Paste” tab.
Open/access the QuickBooks & later, open the QB company file from its original location.
Hopefully, you will be happy to see the manual way to resolve the QuickBooks Error -6000, -80…! But if still, some QuickBooks problem persists, then you can go to the QuickBooks enterprise customer service team. In case, you are looking for instant help for QuickBooks – you can just dial the toll-free support number of QuickBooks ProAdvisors .i.e. +1-844-499-6700.
Some FAQs Related to QuickBooks Error -6000 -80
What is QuickBooks Error -6000 -80 and how does it occur?
This error is a common QuickBooks data file error that occurs when the software is unable to open a company file. It can occur due to various reasons such as damaged or corrupt company files, incorrect file permission settings, or network issues.
How can I resolve QuickBooks Error -6000 -80?
There are several ways to resolve this error, including restoring a backup of your company file, repairing the damaged file, or reconfiguring your network settings. If you need further assistance, you can reach out to QuickBooks Support at +1-844-499-6700 for expert help.
What should I do if I get QuickBooks Error -6000 -80 while trying to open my company file?
You should first try to restore a backup of your company file. If that doesn’t work, you can try repairing the damaged file or reconfiguring your network settings. If you’re still encountering the error, it’s recommended to contact QuickBooks Support at +1-844-499-6700 for expert assistance.
Is it possible to recover data from a company file that is showing QuickBooks Error -6000 -80?
In most cases, data can be recovered from a company file that is showing this error. However, it’s recommended to seek help from a QuickBooks expert to ensure the best possible outcome. You can reach out to QuickBooks Support at +1-844-499-6700 for further assistance.
Can QuickBooks Error -6000 -80 be resolved without professional help?
While some users can resolve this error on their own by restoring a backup or repairing the damage file, we suggest to seek professional help if you’re not familiar with these procedures or if the error persists. You can contact QuickBooks Support at +1-844-499-6700 for expert assistance and resolution.
Facing QuickBooks Error Code 193 when opening or using QuickBooks in multi-user or when starting QuickBooks database server manager? Well, if that is the case, then this segment is something that you need to keep an eye on. Such an error doesn’t let you access programs and features of the accounting software. Furthermore, the Quickbooks error 193:0xc1 is a store exchange error that can be seen when you try to use the database server manager. This error message shows up with the following warning message:
You may see the following error message when it occurs: Error 193:0xc1 Windows could not start the QuickBooks DBXX service on Local Computer Services: Windows could not start the QuickBooks DBXX service on Local Computer.
In case you are facing the same issue again and again, then going through this segment will surely help. To learn further, stick around this segment carefully, or you can also contact our tech support team at +1-844-499-6700, and we will provide you with instant support and guidance.
The fixation of QB error 193 can only be possible once you know the reasons behind to it. When this error occurs, your system receives a pop up message- ‘Error- 193 Primary key for dept keywords is not unique’. This pop up appears every time you try to send a mailbag from headquarters to remote store.
The error can occur because of the following reasons:
Troubleshooting for Store Exchange Errors (193, 175305, 175411 and 175414)
Follow the given steps instructed below in order to fix these error codes. If you have any problems while following the instruction, our technical support for QuickBooks error codes is always available to assist you.
Solution 1:Manually do windows 10 version 1803 update
Focusing on the Remote Store, these steps send a mailbag to headquarters and receive the same:
First of all, go to Customer > Customer List.
Now, choose the names and delete them (if you wish to choose more than one customer, then you can click on first one with Shift key pressed and click on the last name.
Solution 2:Update point of sale
Go to Point of Sale
Click on Help > Software Updates > Check for Updates
Solution 3:Delete .qbt files in headquaters and remote store
This solution focuses on deleting the .qbt files in both the Headquarters and Remote store. Now create a new remote .qbt file.
Step 1: Delete the .qbt files at Headquarters
You can do the same by following the path on your Windows OS: C:/Program Data/ Intuit/ QuickBooks Point of Sale x.x / STex
Check all the folders and if you find any .qbt files there, then delete them.
Step 2: At the Remote Store
Type .qbt in the search box
Delete the .qbt files which you find in result
Now, close the windows and also empty the recycle bin.
Step 3: Create a new remote file
Choose Files > Company Operations > Create New Company
Type Company Name> Choose Remote Store> Fill the store number
Resend the mailbag from Headquarters to Remote Store
Note: Following troubleshooting steps are only for Windows OS, which is not an Intuit product. So, If you are not comfy with these steps on your own, Intuit suggests you speak with your computer’s manufacturer or an IT specialist.
Solution 4: Clean install QuickBooks
The very first step is to click on the windows start tab on the system.
After that, click on control panel and open it.
Now, select the programs and features tab or uninstall a program
Select QuickBooks desktop from the list of installed programs
Select uninstall/change option and select remove
The last step is to click on next and reinstall the QuickBooks desktop.
Solution 5: Delete customers in QuickBooks
The very first step is to choose the reports tab after launching QuickBooks
And then, select customer lists
At list will show up on the screen, then pick the very first client
Now, click on the customer twice
The next step is to open the list of this customer
Also, choose all options and choose I want to
The next step is to choose delete the customer
And also select the file menu and also opt for the utilities and resend
The mailbag of the store must then be examined
The last step is to demand launching QuickBooks and examine if the error is fixed
The above given three solutions will help in resolving the QuickBooks error code 193. If you are facing any difficulty while following these steps, in this process, you can contact our QuickBooks Point of Sale support experts at +1-844-499-6700.
FAQs – QuickBooks error 193
How to fix connection error in QuickBooks?
The user can try to fix the issue using the steps below: 1. Select the Reload button or press F5 on your keyboard (Command + R if you’re using a Mac) to download the entire page. 2. If the problem persists, restart your browser and then log in to QuickBooks Online.
How to resolve QuickBooks error 193?
This error is typically caused by an outdated driver, a corrupted system file, or incompatibility with NordVPN. You can try to fix this error by running the Hardware and Devices Troubleshooter, the System File Checker scan, or uninstalling NordVPN (if applicable).
How to fix windows firewall is blocking in QuickBooks?
If QuickBooks File Doctor didn’t fix your firewall issue, you can set things up manually. 1. Add Firewall port exception for QuickBooks. 2. Create Windows firewall exceptions for QuickBooks programs. 3. Check your antivirus or firewall settings. 4. Add QuickBooks ports exception on your antivirus or firewall. 5. Restart your computer.
Came across: Can’t communicate with the company file due to a firewall error in QuickBooks and can’t find the right ways to fix it? Well, the QuickBooks cannot communicate with the company file error shows up on the screen when the network firewall is interrupting the connection. This is often seen when the user tries to connect to the network company file. Moreover, you can come across similar issue when updating the operating system or the software. It shows up on the screen with the following error message:
Error:
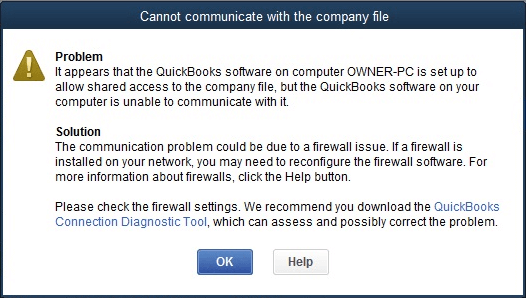
Cannot communicate with the company file due to a firewall
Problem
It appears that the QuickBooks software on computer QWNER-PC is set up to allow shared access to the company file, but the QuickBooks software on your computer is unable to communicate with it.
This error can be a bit annoying to handle. Thus to help you in dealing with such an error, here we are with this piece of writing sharing the complete set of steps and procedures that you can implement to successfully get rid of the QuickBooks unable to communicate with the company file issue. However, in case you are seeking for any sort of technical guidance, then reaching out to our technical support team at +1-844-499-6700, and our technical support professionals will clear all your clouds of confusion.
What causes QuickBooks unable to communicate with the company file due to firewall?
A bunch of factors can stop your company file to communicate with QuickBooks. The common reasons include:
A firewall latest version is not present in any network.
How to Solve “Error: QuickBooks Cannot Communicate with the Company File”?
Getting rid of the QuickBooks cannot communicate with the company file issue becomes easier, once you implement the steps and procedures discussed below. Let us evaluate each of the measures one by one:
Solution 1: Use the QuickBooks File Doctor tool
You can follow the steps to download the QuickBooks tool hub program and further QuickBooks file doctor tool. The tool will perform a mini repair of the server and the firewall. Once it is completed, you need to open the company file in QuickBooks desktop. The steps that can be performed over here are:
Step 1: Download and install QuickBooks tool hub
The QuickBooks tool hub usually helps in fixing a bunch of errors. You simply need to close QuickBooks to make use of the tool hub. Note that, use Tool Hub on Windows 10, 64-bit.
Also, note that if you have installed the tool hub earlier, then you can find what version you have.
Choose the home tab and the version will be on the bottom.
Open the file downloaded in the previous step.
Perform the onscreen steps to install and agree to the terms and conditions.
After the installation ends, double-click the icon to open the tool hub.
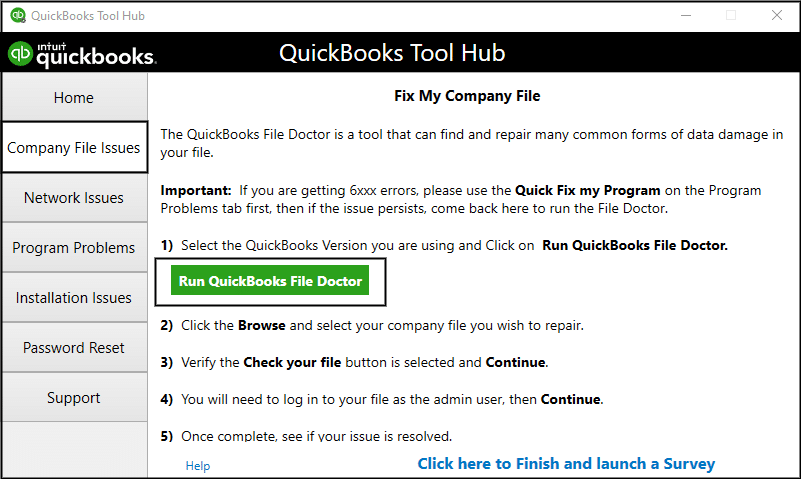
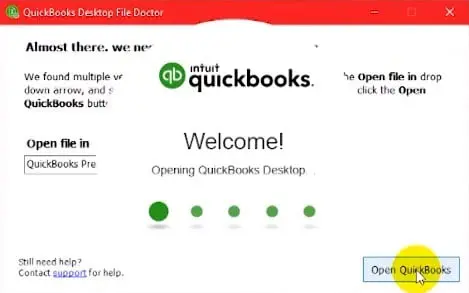
Step 2: Run QuickBooks file doctor
You need to open the tool hub and select the company file issues tab.
Once done with that, choose Run QuickBooks, file doctor.
It can take up to one minute for the file doctor to open.
It should be noted that if QuickBooks File Doctor doesn’t open, then you need to look for QuickBooks File Doctor and open it manually.
In QuickBooks File Doctor, you need to choose the company file from the drop-down menu.
In case you do not see your file, then choose browse and search to find the file.
Now, choose Check your file and then hit the Continue tab.
The next step is to enter the QuickBooks admin password and choose next.
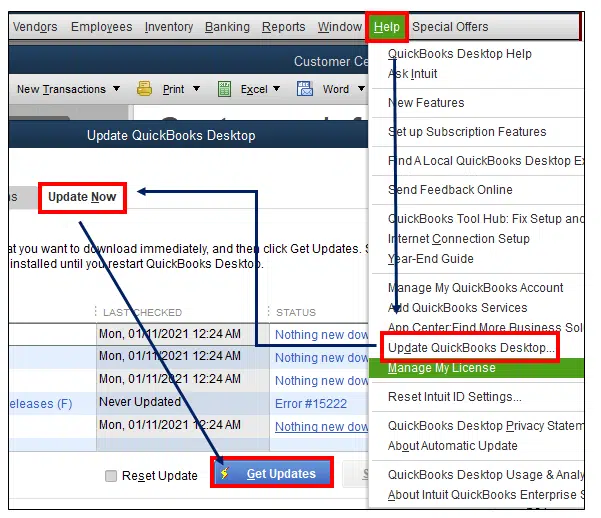
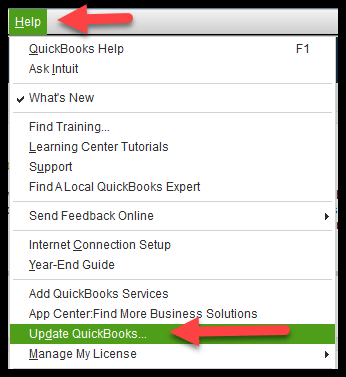
Solution 2: Update QuickBooks to the Latest Release
QuickBooks automatically downloads updates whenever they are available. When the update is downloaded, you will see the update available on the status bar in the top right corner. The next step is to install the update. It will install on its own if you close the software and keep the system turned on. To manually install it, you need to perform the steps below.
Choose update available and go for install now to install the update.
Now, wait for update to get installed. This might take some time.
Open QuickBooks once the update is installed.
In case you have a payroll subscription, you need to download the latest payroll tax table to process payroll in QuickBooks.
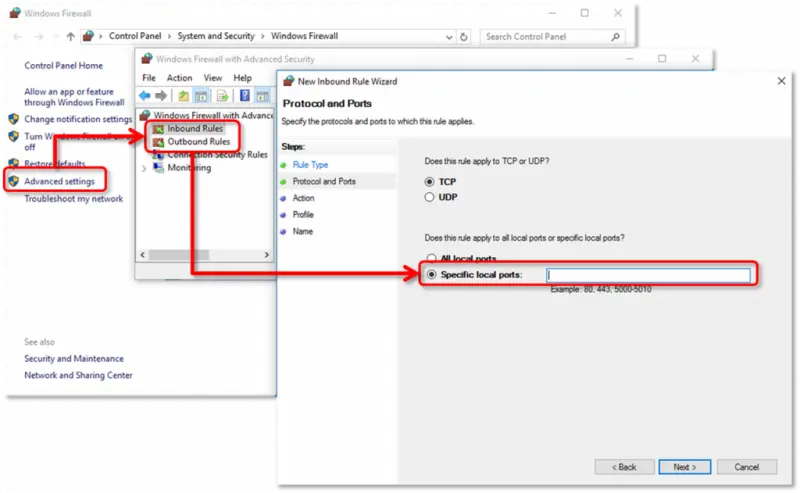
Solution 3: Configure Windows and third-party Firewall
Note: Intuit does not provide support for firewall or anti-virus programs. You may need to take help from the service provider for assistance with installing and setting up of your program. Here are the steps that can be performed to configure firewall for QuickBooks
Step 1: Click on QuickBooks Setup
First ensure that you’ve installed QB software in your PC. It has the latest QuickBooks updation that has been applied and allow to open the company file.
Then log in to your QuickBooks as an administrator with admin permissions.
This will promote by QB users and gives the Axis permission to access the QuickBooks company files.
If QuickBooks is running as Administrator or it has elevated mode (shield on the desktop icon) then please run Axis as Administrator too.
Note: If you are using Microsoft Windows XP, Vista, 7, 8 or 8.1 then please ensure that you have User Account Control (UAC) set to ON or Always Notify. (If changing UAC, you will need to reboot Windows for the change to take affect).
However, if you are using a 64-bit version of Windows operating system & receives an unable to connect a message that you should make it as turn UAC as turned off and then try to reboot it in a normal mode and then try a connection to connect it freshly.
Close any crashed instances of QuickBooks (qbw32.exe), by using the Windows task manager icon that is labeled as on the desktop.
Ensure you have only one QuickBooks company file open.
If a user connects directly to QuickBooks and are unable to remove or delete the old connection, then select it as:
Click on Edit
Choose Preferences list
And then Integrated Application list
Finally retry to establish a new connection.
If errors continue then follow the next step as explained below:
Step 2: Refresh your QuickBooks Interface files Rapidly
If you want to connect with QuickBooks and is unable to launch the connection. In case the files are not compatible with QuickBooks.
You need to refresh it by following the below steps as indicated here:
Get to take back up as safely the Company Data File.
Then find the file Reboot.bat (it was found in C:\Program files\Intuit\QB).
Run in as administrator or give one right click.
Reboot your PC & then try to connect your system to another.
If you are using QuickBooks in a multi-user mode, only one computer should host the company file. Scanning the company file using the Database Server Manager turns hosting on.
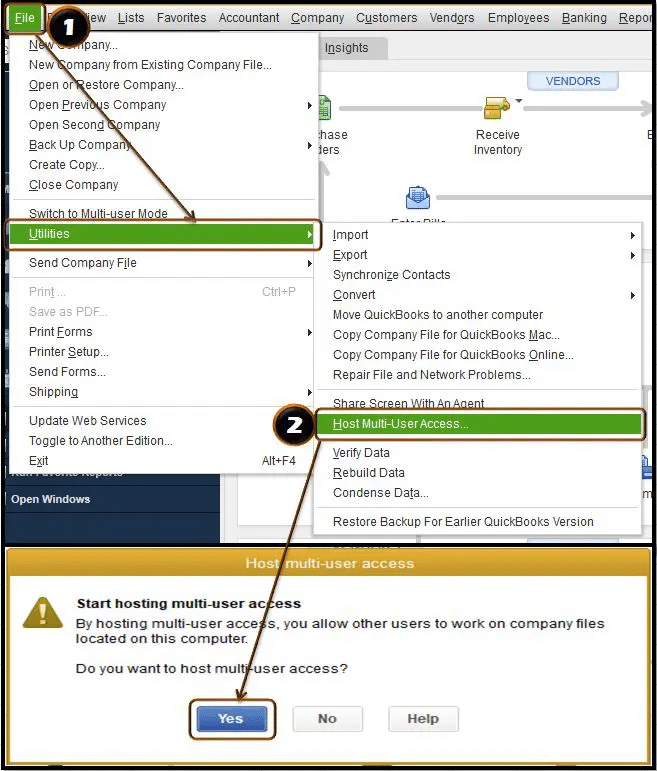
Turn off hosting in all Workstations:
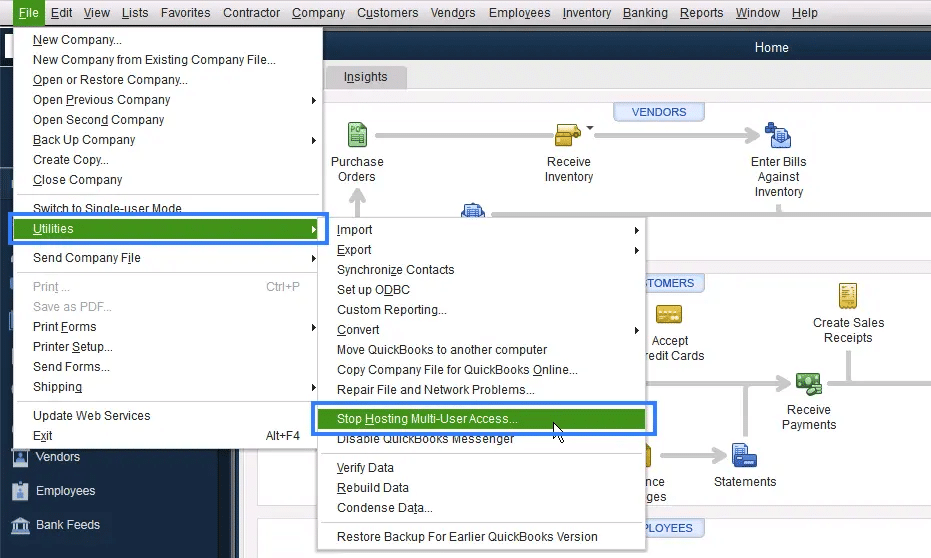
Select Utilities from the QuickBooks File menu.
Click Stop Hosting Multi-User Access.
Click Yes on the confirmation message.
Ensure that Hosting on the server system is on:
On your keyboard, Open the task manager by Pressing the Ctrl+ Alt+ Delete keys to open the task Manager.
Now search the QBDBMgrN.exe in the Image Name column
If you are not able to search the QBDBMgrN.exe file, ensure that QuickBooksXX service is running on your server.
Important: You may need to log in as the system administrator to perform the following steps.
Type Windows+R to open the Run window, on your keyboard.
Now Type in services.msc and then click OK.
Find the running file QuickBooksDBXX of your QuickBooks. (For example: QuickBooks 2017: QuickBooksDB27, QuickBooks 2016: QuickBooksDB26)
Ensure that the startup type is Automatic.
Verify that the entry in the User Name is correct, in the QBDBMgrN.exe row
The user’s name depends on your QuickBooks version. (Example: QuickBooks Desktop 2017: QBDataServiceUser27, QuickBooks Desktop 2016: QBDataServiceUser26)
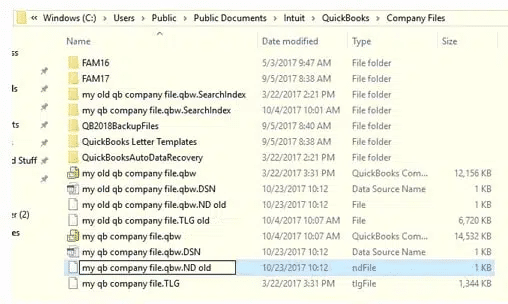
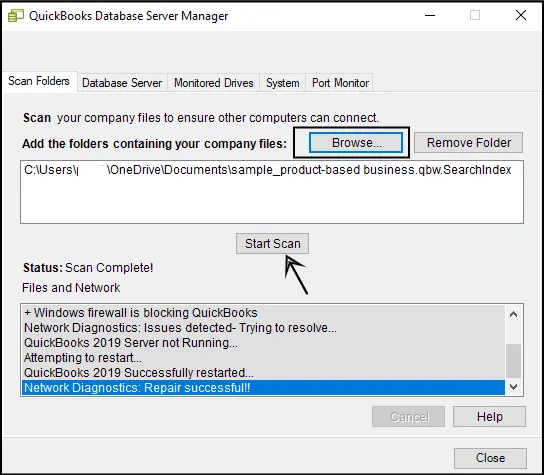
Solution 5: Create/build the Network Data (.ND) file(s)
For information, we would like to inform you that Network Data (.nd) file is a type of QuickBooks file that stores or keeps all the data/information of the host computer that contains QuickBooks company files. This particular file is a self-generated or automatically created when the user scans the QB folder or any open QuickBooks company files.
On the keyboard, tap on the “Windows” or “Start” key once & enter the ‘QuickBooks Database Server Manager’ (QBDSM) in the search box. Choose the ‘QuickBooks Database Server Manager’ (QBDSM).
NOTE: In the ‘Program List’, if you are unable to see the QuickBooks Database Server Manager (QBDSM) then it is suggested that you should uninstall & reinstall QuickBooks application. Ensure that you choose the second option, “I’ll be using QuickBooks on this computer, AND I’ll be storing our company file here so it can be shared over our network to guarantee the installation of QuickBooks Database Server Manager”.
Go to the ‘QuickBooks Database Server Manager (QBDSM) display, click on the “Add Folder” tab, and search to locate the folder containing the QB company file(s).
Once adding all folders, click on the “Scan” tab.
Once you scan all the QB folders, go to the ‘QuickBooks Company Files’ section to see it.
Go to the ‘QuickBooks Company File’ location and make sure to create .nd extension files for each QB data file.
Ensure that the host multi-user access option is off on the workstations. These are basically the systems that are connected to the network that don’t host the company files. The server system should be the only one hosting.
You need to first open QuickBooks on one of the workstations.
Avoid opening the company file. Rather choose the file menu and then hover over utilities.
The next step is to head to the next workstation, in case you see the host multi-user access option.
In case stop hosting multi-user access is an option, then go for it.
After you have verified all the workstations, you need to head to the server system and reset the hosting settings.
You need to open the QuickBooks on the server.
Head to the file menu and hover to the utilities tab.
In case the host multi-user access option is available, then this will reset the multi-user mode.
The next step is to repeat the process one more time and choose host multi-user access.
Winding Up!
I hope you found this article helpful. For more queries, just ask your doubts about the error QuickBooks Cannot Communicate With the Company File then connect to our Certified Advisors at our QuickBooks technical help department number +1-844-499-6700. We are available round the clock and get quality assistance over email or by call.
Some FAQs Related to QuickBooks cannot communicate with the company
What to do if QuickBooks is not communicating with my company file?
First, try restarting both your computer and QuickBooks. If that doesn’t work, try opening the company file in multi-user mode. If the problem persists, make sure that your QuickBooks software and Windows operating system are up to date. If none of these steps solve the issue, contact QuickBooks support at +1-844-499-6700 for further assistance.
How can I resolve the error message “QuickBooks is unable to communicate with the company file”?
Try opening the company file in multi-user mode. If that doesn’t work, make sure that your QuickBooks software, Windows operating system, and firewall settings are all up to date. If you continue to receive the error message, it may be a network issue. Contact QuickBooks support at +1-844-499-6700 for help resolving network issues.
What causes QuickBooks to not communicate with the company file?
There are a number of reasons why QuickBooks may not be able to communicate with the company file, including outdated software or operating systems, network issues, and firewall restrictions.
Is it possible to access my company file if QuickBooks is not communicating with it?
No, if QuickBooks is unable to communicate with the company file, you will not be able to access it until the issue exists.
If you are currently using QuickBooks 2018 version and planning to upgrade to QuickBooks Desktop 2019, then here is what you need to know. The latest available version is QuickBooks Desktop 2024. So, if you are planning to update, you can check out the latest version out there. You must be wondering – what are the new and updated features for your business to grow smoothly? Here in this segment, we will help you learn how the features in QuickBooks Desktop Pro, Premier 2019, and Enterprise 19.0 can benefit you and your business.
To run your business smoothly, QuickBooks 2019 desktop is one of the easiest and most productive versions. Let us explore further about QuickBooks Desktop 2019 in this segment. Or you can also get in touch with our technical support professionals, in case you have any queries related to QuickBooks. Give us a call at +1-844-499-6700, and our certified ProAdvisors will clear all your clouds of confusion!
QuickBooks product line has numerous accounting & bookkeeping solutions. You have to make a choice about which QuickBooks download 2019 suits you the most depending on your business type and the task you need to perform. The most preferred QuickBooks product for small businesses is QB Pro & QB Premier.
QuickBooks Pro vs. QuickBooks Premier
As we all know QuickBooks Pro & QuickBooks Premier both are targeted to small size businesses with up to $1 M in revenue per year & less than 20 employees. Both QuickBooks Pro 2019 with payroll and Premier have the capability of payroll with basic bookkeeping & reporting features. Some of the major differences between QuickBooks 2019 Pro & Premier are – QB Pro allows 3 unique users whereas QuickBooks Premier allows 5 users. QB Premier is the most suitable software for the industries given below:
Non-Profitable
Manufacturing
Professional services
Contractors
Wholesale
Retails
QuickBooks Enterprise Solutions
QuickBooks Enterprise has widely used accounting software in the huge business sector. This software is capable of containing millions of customer, vendor, sales, and expense data to keep track. Moreover, QuickBooks Enterprise Solutions is 6 times more efficient than the QB Pro or Premier. However, it allows 30 individual users to access the QuickBooks Enterprise. Below are some of the significance of this product over the QB Premier & Pro.
Advanced sales order management system.
Automatic price control.
Ability to integrate & fuse reports from multiple company files.
Being an accountant for multiple clients and companies is a tough job. The best way to handle and track the company files of your clients’ – to use QuickBooks Accountant Desktop. The QuickBooks Accountant 2018 is loaded with immense new features that involve bulk deletion, merge vendors, a quick search feature, report filters, and a user-friendly bill tracker. The Accountant Toolbox provides you the ability to access & work within your clients’ QuickBooks software.
QuickBooks for Mac
For a QuickBooks Mac user, it is important to know that Intuit has released its previous and last 2016 desktop version and they will provide QuickBooks support for Mac versions till May 31, 2019. This implies that the QB Mac users can no longer process payroll or payment through QuickBooks software after that date.
QuickBooks Online
QuickBooks Online is a cloud-based accounting application which simply means that you don’t have to download or install it on your computer. All you need is a good internet connection to use QuickBooks Online anytime anywhere. It allows the user to operate it on a Phone, Mac, iPad, PC, or any device with an internet connection and operating system. You will be able to perform all the basic tasks like:
In this month, Intuit released the upgrades and features with QuickBooks 2019. Check out the list of the standard upgrades below:
✔ Switch to a different computer
One of the prominent features that Intuit QuickBooks 2019 contains is – that the QB user can transfer all the QuickBooks programs and files to another computer. All you require to do that is the old computer, a good internet connection, a new computer, and a USB flash drive.
✔ Advanced Backup System
We cannot be sure that technology will support us all the time and that it will not fail. In such a scenario, we have to confirm that the information stored in a device is safely stored. Hence, Intuit has introduced an advanced and enhanced Data Protection system so that the QB user can create the backup and receive its confirmation email.
✔ Enhanced Sick & Vacation Time Tracking
The previous versions of QuickBooks were unable to ensure that overpay on the sick or vacation time to your employees. For the reason that QuickBooks 2019 has features that give you a notification or warning message when an employee goes over their sick or vacation pay limit. It also allows the user to see the left time on the employee’s pay stub to inform the employee about their sick or vacation time status.
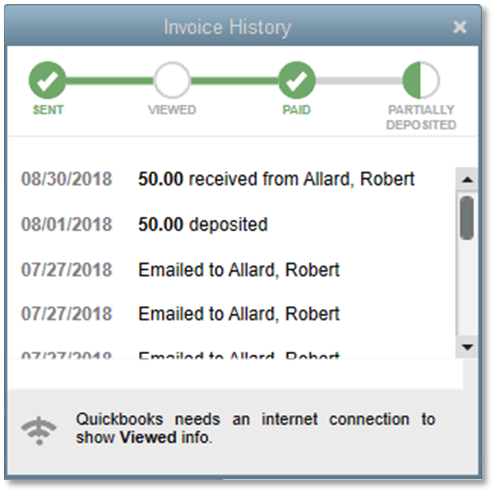
✔ Invoice History
QuickBooks Desktop 2019 has a feature to check out the invoice history in one place without clicking on different places in your account. You can see the invoice creation date and time, customer view time, payment completion date & time, and others. QuickBooks 2019 has an easier way to track the status of an invoice. You need to simply open an invoice and check the see history link. This will show up in the invoice history window and a status flow.
✔ Inventory Tracking
The advanced inventory tracking system in the QuickBooks 2019 is also a big hit feature. It allows the QB user to keep track of the inactive inventory. It counts the entire inventory as inventory total no matter if some of the inventory had been taken out of circulation. This upgraded feature allows you to mark the inventory as inactive no matter if you still have some units available. By doing this, when you take a look at the Inventory Valuation Summary – the inactive inventory will appear highlighted in yellow.
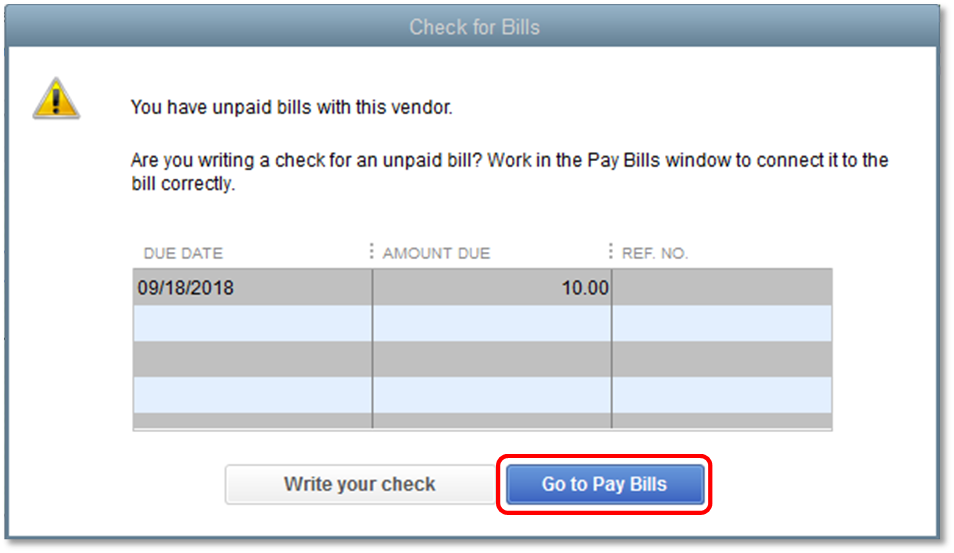
✔ Bill Pay Default
It could be possible that mistakenly QuickBooks makes double payments for a single transaction while paying the bills. Possibly, QuickBooks users write a check to pay a bill & forget to make an entry in the Pay Bills to reflect the payment. There is a huge chance that you think that you haven’t paid that bill. In QuickBooks 2019, while putting a vendor name onto the check, it reflects all the unpaid bills related to that vendor.
✔ User Permissions Warning
The QuickBooks Admin will always receive a permission alert while assigning any job or role to any additional users. Once the Admin allows the additional user, the additional user can access QuickBooks.
✔ Improved Sales Order Worksheet
In QuickBooks 2019, go to the sales order dashboard to see the number of sales orders, picked orders, packed orders, shipped orders, and open orders. It also allows the user to make modification in multiple orders in just one click by using the batch feature. The QuickBooks pro 2019 desktop user can pack & print the shipping label right from the account.
✔ Easy Upgrades
The QuickBooks 2019 software upgrades are streamlined in 2 simple click options. The user just has to click on Update, and an auto-save feature will create a backup of the company files so that nothing will be lost in the middle of a transfer. In the latest released 2019 version, you don’t have to search for your company files as they will be waiting for you to open them for the first time. You can update QuickBooks desktop 2019 to the latest release by simply carrying out the necessary steps.
✔ Credit Transfers
QuickBooks Desktop 2019 has an amazing feature with which you can transfer the credit between multiple jobs/tasks for a specific customer & there is no need to create separate credit for every single job. To perform this, you have to use the Credit Transfer charts in your accounts. Intuit QuickBooks makes this feature unable or inactive with the purpose that no one would accidentally use this feature for some other tasks. There is only one potential problem that could occur – that the user cannot undo the transfer once you complete the transfer process.
QuickBooks Online is most likely to be compared with the QuickBooks pro 2019 or Premier. This is because the features present in the QB 2019 already exist in QuickBooks Online (QBO). In general terms, QuickBooks Enterprise has a lot of features that QuickBooks Online does not have.
Benefits of cloud QB cloud over the desktop applications
Below are some of the benefits of using the QuickBooks cloud application over a desktop application.
If you are wondering about switching from a desktop version to a cloud-based system of QuickBooks, then here are some of the points that are enough to go on in this direction.
✔ Access Anywhere
Using the cloud-based QuickBooks application is the best choice that you have ever made. With this application, you can log into your QuickBooks account remotely from any device that has an internet connection such as a Desktop, laptop, cell phone, or iPad. A desktop version allows you to use QuickBooks only on the device where it is installed.
✔ Multiple users
QuickBooks Desktop allows the user to provide access to a limited number of users but not simultaneously for the same program/file. Furthermore, the Cloud-based desktop application enables the admin to provide access to an unlimited number of users simultaneously. Also, multiple users can access the same QB program/file at the same time. Moreover, it is more safe, secure, and effective to send sensitive company data via email or USB drive.
✔ Quick Updates
The QuickBooks Desktop software receives yearly updates for the fixes & improvements that are required. On the other hand, the cloud-based QuickBooks application receives the update in real-time and updates continuously.
✔ Security
The desktop application will keep your business information as safe as the security you choose to implement on your PC & network. However, if we talk about the cloud-based QB application – the entire information of your business is safely secured in the large data centers which are monitored 24×7. No hacker can access your information and data as the connections are highly secured & encrypted.
You don’t even need to worry about the device from which you access the QuickBooks accounts if it gets stolen. All you have to do is remember the login information such as username, password, and registered email ID.
✔ Integration
The QuickBooks cloud-based application allows you to integrate with the other applications to uplift your business swiftly & seamlessly. With the QuickBooks integration feature, you can integrate the payment method with the QuickBooks software to keep the records of payments of the customers.
System Requirements of QuickBooks Pro/Premier 2019 and Enterprise 19.0
Get the best experience of QuickBooks Desktop, by keeping up with the system requirements.
Operating System
Windows 10, including all editions along with 64-bit, natively installed
Windows 8.1 (Update 1), all editions with 64-bit, natively installed
Windows 7 SP1, come with all editions including 64-bit, natively installed(it will only be continued until January 2020)
Windows Server 2016
Windows Server 2012 R2
Windows Server 2011, Standard and Essentials
Windows Server 2008 R2 SP1 (only supported until January 2020)
Browser Requirement
You require Internet Explorer 11 (32-bit)
Database Server
Windows Natively Installed – Required Windows Server 2012 R2Need Windows Server 2016Windows Server 2011Note: Windows Small Business Server 2011 is not perfect for QuickBooks DesktopShould have Windows 10Require Windows Server 2008 R2 SP1Windows 7 SP1(Enterprise and Professional editions only)Windows 8.1 (update 1)
Linux – Fedora 27OpenSuse 42.3Red Hat Enterprise 7 (RHEL 7.4)
Hardware and Operating System
Processor- Minimum 2.4 GHz is required
Disk Space Requirement – Specific software: 60 MB for Microsoft .Net 4.6 Runtime, get on the QuickBooks CD 2.5 GB of disk space.
RAM – A minimum of 4 GB is required and 8GB is recommended.
Windows Requirement – Natively Installed – This means it was installed on a system or under the conditions for which it was designed. This implies it doesn’t require virtualization or emulation software to run. Windows versions from the United States (US) are required. When hosting Multi-User Access, the server system requires administrator rights.
Screen Resolution – Up to two outspread monitors should have display resolutions of 1280 x 1024 or greater.
It is quite possible that you want to update your old QuickBooks version to QuickBooks Desktop 2019 or want to purchase the QuickBooks 2019 software. In such case, we suggest you contact the authentic & authorized QB distributor .i.e., Host Docket. You can get the same services from Intuit. For any inquiry or information related to QuickBooks desktop 2019 software, you can directly get in touch with our ProAdvisors team at +1-844-499-6700. We will be happy to help you out with this. Thanks for giving your precious time to this post.
FAQs Related to QuickBooks Desktop 2019
How do I activate QuickBooks Desktop 2019?
In order to activate QuickBooks Desktop 2019, you need to perform the following steps: 1. The very first step is to open QuickBooks and head to help menu. 2. Choose about QuickBooks 3. You now have to hit enter tab along with R and P keys when the QuickBooks logo shows. 4. A manual activation Windows will open up, where you need to enter your validation code in the window.
Can I still use QuickBooks Desktop 2019?
In case you are using QuickBooks 2019, then you won’t be able to use certain services and features after May 31, 2022. This is particularly essential when you consider that Intuit announced that starting with QuickBooks 2022, the desktop version will only be available as a subscription.
How long will QuickBooks 2019 work?
After 31st May, 2022, the access to add-on services got discontinued for QuickBooks desktop for Windows 2019. This further includes all versions of QuickBooks Desktop Pro, Premier, and Enterprise Solutions v19.
How do I upgrade QuickBooks 2019 to 2023?
You can upgrade QuickBooks 2019 to 2023 using the steps below: 1. You need to first open Discovery hub 2. After that, choose upgrade to QuickBooks 2023 3. Click on proceed to upgrade and click on upgrade now. 4. In case you want both versions, click on keep old version on my computer. 5. Make sure to leave it blank 6. After that, click on open QuickBooks.
Often QuickBooks users get confused between the terms upgrade and update. Upgrading QuickBooks generally means upgrading to the latest release like moving from the 2023 version of QB to QuickBooks Desktop 2024. However, switching the versions is considered as updating as well by a majority of QuickBooks users. In case you need to upgrade QuickBooks Pro, Premier, or Enterprise, then here is how you can do it. After buying QuickBooks, you can simply start using the upgrade tool.
This article will brief you on the procedure to upgrade QuickBooks software and other important aspects related to QuickBooks upgrades. However, if you need any sort of technical assistance related to QuickBooks at any point in time, feel free to contact our technical support team at +1-844-499-6700, and they will provide you with instant assistance.
We have listed a few reasons related to the upgradation of QuickBooks software:
In order to enable yourself to enjoy the latest versions of QuickBooks like QuickBooks Desktop 2023, it is essential to upgrade the software. It is known to all QuickBooks users that a new product is introduced every consecutive year by QuickBooks that has all the new, stimulating, and exclusive features. These features not only make your work easy but enhance your performance as well.
Microsoft keeps on updating its versions and thus, QuickBooks updates its versions to maintain compatibility with the operating system. We suggest you do not ignore upgradation for a longer period.
Moreover, it is important to remember that every QuickBooks Tech Support comes with the latest versions and that too with the service discontinuation policy, thus, to get optimum and reliable tech support, you would need to upgrade to the latest version to get all the support facilities.
Users have an advantage with the availability of an amazing feature- a free QuickBooks upgrade. You can get this free upgrade if you have launched the latest series within 60 days when you have obtained QuickBooks. Along with this, you can also get a free upgrade if you register for QuickBooks within 60 days of the launch period of the latest version.
After all this, you would fill in the criteria, you can do this. But in any case, if you are facing any problem, then you can connect to our QuickBooks Customer Service at toll-free +1-844-499-6700 for assistance.
When a new version of QuickBooks is out in the market, you will surely get a message when you open QuickBooks. This makes upgrading easier for QuickBooks users.
Once you are ready, you can opt for the Upgrade Now tab.
Followed by selecting Keep the old version on my computer, in case you want to keep your current QuickBooks.
Further, choose let’s go.
Now, QuickBooks will download, install, and activate the new version for you.
After the upgrade is done, choose Open QuickBooks.
Note that the upgrade might take some time. It completely depends upon your internet speed and the size of your company file.
In case you do not see a prompt to upgrade your QuickBooks subscription:
Bring back all one-time messages – In case you don’t get a prompt to upgrade then simply change your one-time message prompts. This can be done as follows:
Move to the edit tab and further choose preferences.
Once done with that, go for general.
And also opt for My preferences.
Now, select Bring Back all one-time messages and hit the OK tab.
Close and reopen QuickBooks.
You will have the prompt to upgrade your QuickBooks subscription.
You can get the latest version of QuickBooks Desktop from the QuickBooks desktop manager. Further, choose and install all your QuickBooks products.
Upgrade QuickBooks Desktop without a Subscription
In case you do not see a prompt upgrade, need not worry. This simply means that you have made a one-time purchase of QuickBooks. You can upgrade with an easy upgrade tool. This can be done as follows:
Choose help and further move to upgrade QuickBooks.
Now, go for the version you want to upgrade to and also choose upgrade now.
You can keep a copy of your current version of QuickBooks.
And also choose keep the old version on my computer and then select Let’s go.
QuickBooks downloads, installs, and activates the new version for you. It will further update the company file as well.
Here, you need to open the discovery hub, and further choose upgrade to QuickBooks 2022.
Once done with that, choose Proceed to upgrade and click on upgrade now.
In case you want both versions, then opt for keep the old version on my computer. Or else leave it blank.
After that, choose open QuickBooks.
Upgrade Tool Can’t Find my QuickBooks Desktop Purchase
Find and enter your license number
Just in case you do not get a prompt to select a new QuickBooks version, then simply enter your QuickBooks license info. This happens when you buy QuickBooks with a different email than you use for your QuickBooks account. You need to continue with the steps below:
Find the purchase confirmation email that you received from QuickBooks.
After that, enter the license number and product number and hit continue to complete the upgrade.
In order to find the license info, you need to sign in to the customer account maintenance portal (CAMPs). You can also get the latest version from QuickBooks Desktop Manager. And further you can also choose and install all your QuickBooks products.
Upgrade QuickBooks within the RightWorks hosting environment
As the account admin, you can install QuickBooks for others as well as for yourself. In case you are a standard user, then you do not have the right to install it for others. You can install QuickBooks RightWorks account owners and admins using the steps below:
First, sign in to the RightWorks My account with your email address and password.
Once done with that, opt for users.
You now have to choose the specific user you want to apply for the license.
Now, within the user detail page, choose apps you can install.
Also, note that RightWorks displays all QuickBooks versions available to you.
You can use the search bar to quickly find the version.
After that, select the correct QuickBooks version, and choose install.
After it installs, you will receive a prompt and you will see a shortcut on your desktop.
Lastly, sign off and on again to access the new QuickBooks installation.
Install QuickBooks for RightWorks standard users:
This can be done by signing in to RightWorks My account with your email and password.
After that, select Apps you can install.
Now, use the search bar to quickly find the QuickBooks version you need to install and choose the app.
After that, select the Install App option.
After it installs, you will get a prompt and you will see a shortcut on your desktop.
The next step is to sign in to the remote environment, you will see QuickBooks on your desktop. In case not, try re-adding the app. You might also be required to sign off and on again to access the new QuickBooks installation.
QuickBooks is the best accounting software that also provides a few add-on services which are upgraded once every three years. These services can include QuickBooks Number services, tracking, reporting, remote access, online banking, bill payments, credit card processing, QuickBooks merchant service, treasury software positive pay for QuickBooks, and many more.
For every user, it is also important to know that QuickBooks comes with a strict sunset policy that provides support services for the latest versions. This service is provided only for the first two years thus, to use these initial free support services, you must ensure that QuickBooks is upgraded within the stipulated time frame.
What are the benefits of upgrading QuickBooks to the latest version?
Upgrading to the latest version of QuickBooks offers several advantages, such as improved performance, enhanced security features, and access to the latest tools and functionalities to streamline your business operations. With regular updates, Intuit ensures that your accounting software remains compatible with the latest technological advancements and compliant with the most recent tax regulations.
How do I know when it’s time to upgrade my QuickBooks software?
Intuit typically releases new versions of QuickBooks annually, so it’s recommended to consider upgrading at least once a year. However, it’s essential to assess your business needs and check for any critical updates or features that could impact your operations. If you’re unsure about the right time to upgrade, feel free to reach out to our support team at our toll-free number +1-844-499-6700, and our experts will guide you through the process.
Will upgrading QuickBooks affect my existing data and settings?
No, upgrading your QuickBooks software will not affect your existing data and settings. The upgrade process is designed to preserve your company file, ensuring that your financial data, reports, and settings remain intact. It’s always a good practice to create a backup of your company file before upgrading, in case you need to revert to the previous version for any reason.
Can I upgrade directly from an older version of QuickBooks to the latest one?
Yes, you can upgrade directly from an older version to the latest version of QuickBooks. However, if you’re using a version that’s more than three years old, you might need to perform intermediate upgrades to ensure a smooth transition. If you need assistance with the upgrade process, call our toll-free number +1-844-499-6700, and our QuickBooks experts will be more than happy to help you.
How can I ensure a smooth and hassle-free QuickBooks upgrade experience?
To ensure a smooth QuickBooks upgrade, follow these simple steps: a. Check your system requirements and ensure that your hardware and software meet the minimum requirements for the latest version. b. Create a backup of your company file before starting the upgrade process. c. Follow the step-by-step instructions provided by Intuit for upgrading your QuickBooks software. d. After upgrading, verify your data and settings to ensure everything is working correctly. e. If you face any issues or have questions, don’t hesitate to reach out to our support team for assistance.


![QuickBooks cannot communicate with the company file – [Fixed]](https://www.hostdocket.com/wp-content/uploads/2018/04/Resolve-error-cannot-communicate-with-the-company-file-due-to-firewall-1.jpg)