

Mistakes happen in bookkeeping even experienced accountants occasionally post a journal entry to the wrong account, enter the wrong amount, or create a duplicate entry that shouldn’t be there. In QuickBooks, the good news is that both QuickBooks Desktop and QuickBooks Online give you a way to fix these mistakes either by deleting the entry entirely or by reversing it, depending on what the situation calls for.
Knowing which option to use matters a lot. Deleting removes the entry permanently, which is the right move when the entry was created by mistake and shouldn’t exist at all. Reversing creates a new offsetting entry that cancels out the original which is the better option when you need to correct a period-end entry, fix a debit/credit error, or make an adjustment without losing the audit trail. This article covers both options for both versions of QuickBooks so you can handle either situation with confidence.
If you’re unsure whether to delete or reverse, or if you’re worried about how the change will affect your books, our certified QuickBooks ProAdvisors are available 24/7 at +1-888-510-9198, give us a call before making any changes to reconciled entries.
Also Read: How to Download Bank Feed transactions in QuickBooks Desktop?
Important points to consider
Before you directly jump on to the steps to reverse or delete journal entries, it is essential to understand the difference between the two.
- Reverse a journal entry: This can be done when you need to allocate a transaction between two accounting periods or fix a debit/credit error. Note that, reversing simply reverses the debits and credits and doesn’t delete the original entry.
- Delete a journal entry: In case you create it by mistake and need to get rid of the entry permanently.
How to delete a journal entry in QuickBooks Desktop?
The procedure to delete a journal entry in QuickBooks Desktop is different from QuickBooks Online. Let us understand the steps in detail:
- Initially, you need to head to the company menu.
- Now, choose make general journal entries.
- Once done with that, find and choose the journal entry that you want to delete:
- In QuickBooks for Windows, choose find and enter the name, date, entry no, or amount, and then choose find.
- In QuickBooks for Mac, choose the journal entry you wish to reverse from the list on Make general journal entries window.
- In order to delete the journal entry:
- You need to double-click the journal entry in QuickBooks for Windows and then choose delete, or void and click on the ok tab.
- In QuickBooks for Mac, you need to choose Delete General Journal from the edit menu.
- And the last step is to choose save and close.
You might find this helpful: How to Delete Duplicate Transactions in QuickBooks?
Steps to reverse a journal entry in QuickBooks Desktop
In order to reverse a journal entry in QuickBooks desktop, you need to carry out the following steps:
- At first, navigate to the company menu and choose Make general journal entries.
- After that, find and choose a journal entry that you want to reverse.
- In QuickBooks for Windows: You will have to choose find and enter the name, date, entry no, or amount and choose find.
- Whereas in QuickBooks for Mac, you simply have to find and select the journal entry you wish to reverse on the left side of the Make general journal entries window.
- Now, go for the reverse option.
- And lastly, choose save and close.
How to Delete a journal entry in QuickBooks Online?
Note that, deleting a wrong journal entry can unbalance the accounts immediately. Thus, you must be absolutely sure to delete the journal entry. In case you invited your accountant to review your books, then instead of deleting the entry, it is possible to make an adjusting journal entry. Having said that, let us check out the steps to delete a journal entry in QuickBooks Online.
- To begin with, you simply need to choose the settings tab and then go for the chart of accounts.
- Once done with that, find the account you create the journal entry for.
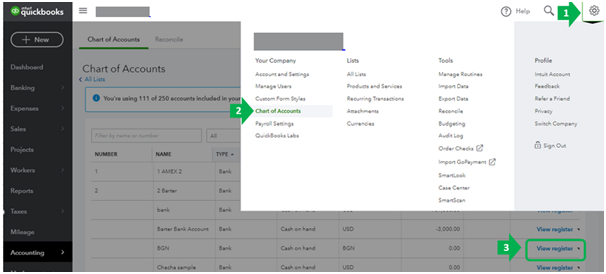
- Now, choose the account history tab.
- And find the journal entry in the account register.
- The word journal should be present in the Ref no. or type column.
- The next step is to choose a journal entry to expand the view.
- Then, simply click on delete and yes to confirm.
- This would delete the entry successfully.
Steps to reverse a journal entry in QuickBooks Online
Reversing a journal entry usually reverses the debits and credits and doesn’t delete the original entry. The steps involved in reversing a journal entry in QuickBooks online are as follows:
- You need to first choose the settings tab and go for the chart of accounts in QuickBooks.
- Once done with that, find the account you created the journal entry for.
- Now, go for the account history.
- And find the journal entry in the account register.
- The word journal should be in the Ref no. or type column.
- The next step is to choose the journal entry to expand the view and click on the edit tab.
- Now, choose reverse and click on save to end the process.
When you reverse an entry in QuickBooks, the software creates a new journal entry to balance it. This is a record of the changes that you made.
The new journal entry in QuickBooks might show slightly different information.
- The reversed journal entry keeps the original journal no. and further adds the letter R indicating Reconciled.
- The new entry is dated the first day of the month following the original journal entry date.
- It further keeps the same info, such as account, name, and description as the original journal entry.
Also Read: Compile Error in Hidden Module – QuickBooks [FIX]
Conclusion!
Once you’ve deleted or reversed the journal entry, run a quick check to make sure your books are still balanced. In QuickBooks Desktop, go to Reports > Company & Financial > Balance Sheet and verify the totals look correct. In QuickBooks Online, go to Reports > Balance Sheet and do the same. If anything looks off after the deletion especially if the entry was part of a previous reconciliation you may need to make an adjusting entry or review that period’s reconciliation.
If you’re ever unsure whether deleting or reversing is the right call for a specific entry, or if your books show unexpected balances after a change, our certified QuickBooks ProAdvisors are available 24/7 at +1-888-510-9198. Journal entry corrections are one of the most common things we help with reach out before making changes to reconciled or tax-period entries, and we’ll make sure it’s done cleanly.
Frequently Asked Questions (FAQs)
Go to the Company menu and choose Make General Journal Entries. Find the journal entry you want to delete using the Find function (search by name, date, entry number, or amount). Once located, double-click to open it, then choose Delete (or Void) and click OK. Select Save and Close to finish. In QuickBooks for Mac, open the entry and choose Delete General Journal from the Edit menu instead.
Go to Settings > Chart of Accounts and find the account the journal entry was created for. Click Account History to open the register. Locate the journal entry it will show “Journal” in the Ref No. or Type column. Click the entry to expand it, then select Delete and confirm by clicking Yes. The entry will be permanently removed.
Deleting permanently removes the journal entry from your books with no record remaining use this only for entries created by mistake that should never have existed. Reversing creates a new offsetting entry that cancels the original while keeping both entries in your records use this for period-end corrections, debit/credit errors, or any situation where you want to maintain an audit trail. Reversing is generally the safer option, especially for entries that have already been included in a reconciliation.
You can technically delete a reconciled journal entry, but it will cause your previous reconciliation to become unbalanced. This creates a discrepancy that will need to be corrected before your next reconciliation. For reconciled entries, reversing is almost always the better approach it corrects the error going forward without disturbing the closed period’s reconciliation.
Go to Settings > Chart of Accounts and find the relevant account. Click Account History, locate the journal entry in the register, and click on it to expand the view. Select Edit, then choose Reverse, and click Save. QuickBooks will create a new journal entry dated the first day of the following month that reverses the debits and credits of the original entry.
When you reverse a journal entry in QuickBooks, the software creates a new entry to offset the original. The reversed entry keeps the original journal number and adds the letter “R” to indicate it was reconciled/reversed. The new entry is automatically dated the first day of the month following the original entry’s date, and carries the same account, name, and description information as the original.
If you deleted the wrong journal entry, you’ll need to recreate it manually QuickBooks doesn’t have an “undo delete” function for journal entries. Go to Company > Make General Journal Entries (Desktop) or + New > Journal Entry (Online) and re-enter the original entry with the same date, accounts, amounts, and description. If the entry was part of a completed reconciliation, you may also need to review that reconciliation to make sure it’s still balanced after recreating the entry. For complex cases, our team at +1-888-510-9198 can help you sort it out.
Other Related Articles:
Create Custom Email Templates in QuickBooks Desktop
How to merge accounts in QuickBooks?
Complete Guide to Write Off Bad Debts in QuickBooks Desktop and Online