Random errors in QuickBooks can often disrupt your smooth working process, and not just the working process but they are a potential threat to your data. All this makes it extremely important to work on to fixation of such issues right away. This segment would brief you about the QuickBooks backup error 248, which is basically a backup issue that pops up after you rebuild the data in QuickBooks. The error might seem to be a bit new to many QuickBooks users, and it would show up with a warning message indicating: QuickBooks found some problems with your company file.
The error code 248 in QuickBooks isn’t too complicated, once taken care of well. Though majority of errors that show up in QuickBooks have some or the other factors triggering them, but in case of QuickBooks error code 248, there aren’t many triggers identified. Therefore, with this segment, we have tried to cover the fixation processes for such issues. To get a better grip on to such error, you just need to go through the informative guide with much attention.
As we mentioned earlier, there aren’t any specified or identified factors causing such error, but definitely you can try fixing such an error using the right solution steps, which we have managed to cover below:
Solution 1: Try Configuring Employee Info
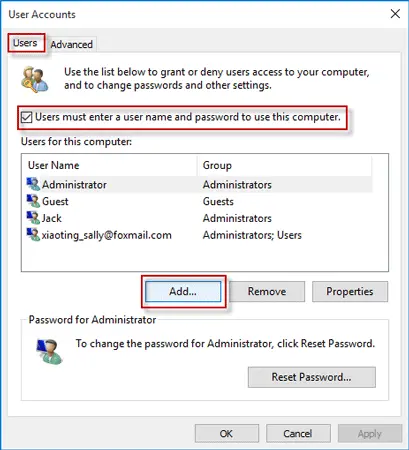
You just need to work on your payroll taxes and liabilities under this procedure at first
Pick up the option from the employee menu
You would further have to put in the date and effective date post hitting adjusting payroll liabilities
Now pick the employee and employee’s name right away
You would further have to opt for the payroll item that you would find under the taxes and liabilities
The next step requires you to simply adjust and enter the value
Towards the end, tap on the tab that states Ok and save it.
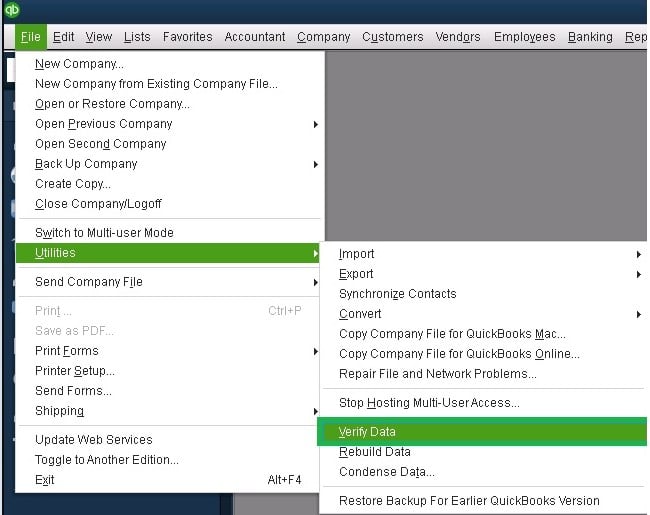
Solution 2: Running the Verify and Rebuild Utility to fix QuickBooks error 248
While you managed to cross the first method, here is another thing that you can try to fix such errors in QuickBooks is to run the verify and rebuild utility.
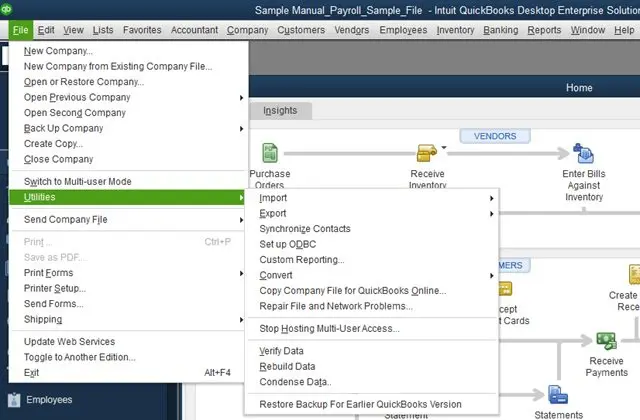
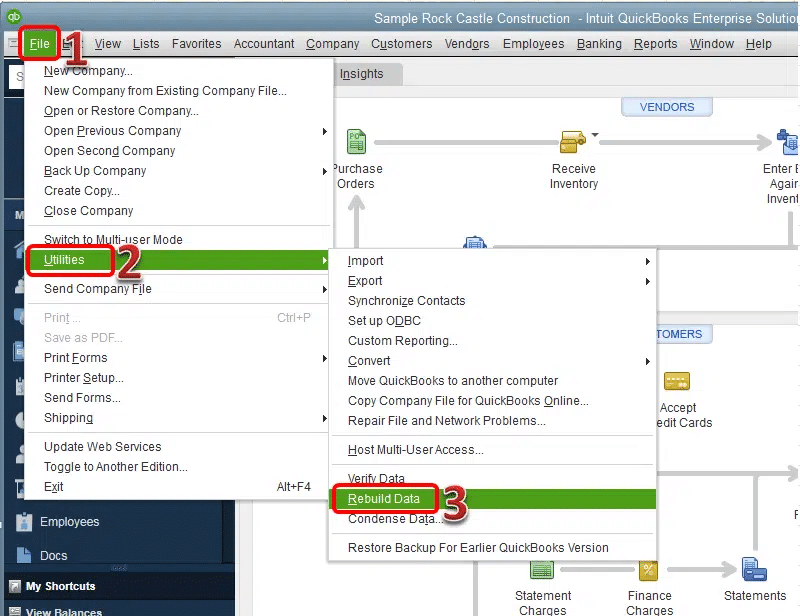
Step 1: Run Rebuild Tool
This process asks you to go for QuickBooks at first
Later, opt for the file tab
You would then have to pick utilities option
Tap on the rebuild data option
You would be asked to perform the process to save a backup company file, make sure to do that.
Have patience as this might take some time
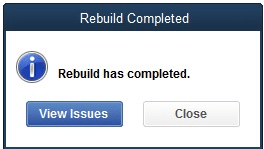
You are then supposed to tap on ok tab and you would see the message rebuild has completed on your screen.
Step 2: Verifying the data
Begin by proceeding to utilities
This will be seen under file tab
You would then have to pick verify data
Go for the ok tab and then you will be provided a message asking QuickBooks detected no problem with your data.
Pick the rebuild now option and tap on close to conclude the process.
Solution 3: Trying to build additional item for reimbursing payment
The last process demands for opening QuickBooks at first
Later, you would have to tap on the list section
Once done, navigate to the payroll list
Post which, you need to go for custom setup option
And then, tap on next tab
You would then be required to go for new item
And later, pick the right account
The step ahead requires you to select none
This is for the tax tracking type option
And go ahead by clicking twice
You would also have to click on neither and then the tab asking for next
Towards the end, do not skip to enter the amount overpaid and finish tab needs to be tapped for sure.
Not every issue in QuickBooks needs to be treated on your own, at times you might require expert guidance, even after performing the described steps and solutions. And this is where our QuickBooks error support team comes to rescue you. Dial our toll-free support number +1-888-510-9198, and your queries will be well taken care of by our technical support professionals. They understand what it actually takes to rectify such errors in QuickBooks, especially permanently. Do not hesitate in connecting with us for any sort of technical expertise.
Is something like the QuickBooks error code 1606 bothering you? Well, running into such random errors when trying to work on QuickBooks isn’t a new thing, rather many users often reach out to us for help. The errors in QuickBooks can be segregated into multiple categories, and one of the common categories is the update and install errors in QuickBooks, while these errors are the common ones at the same time they need to be treated immediately, as they won’t let your software function well. QuickBooks error 1606 tends to be one such update rather install error that would highlight any issues with the Windows user account and the QB setup file. While the error is a straightforward one, fixing it might seem complicated to many.
Thus, considering the fact that you need to tackle through the error as soon as possible, here we are with this segment curated to help you through the QuickBooks error 1606 in detail.
What is QuickBooks error code 1606?
While you need to fix the error immediately to avoid any further trouble, understanding the error first is something you can’t skip. As much as our experts have researched and understood about the error, it tends to be an install error that shows up when your registry location points to a non-existent location. As a result of which the software fails to locate the network, and it in turns display an error message “Could not access network location”. Though this error is coded as 1606, you might see similar errors like the 1601 or QuickBooks error 1603 in such scenarios.
What might cause QuickBooks error 1606?
You can be bumped into such random errors due to a couple of factors, out of which we have tried to cover the major reasons leading to QuickBooks error 1606:
One of the triggers can be if your Windows registry subkeys are showing any signs of damage or issues
Another factor can be if you have any third-party application interrupting the install process.
Not just that, but not having the required permissions to get the access to the files and the installation
Your CD having the installation file is either scratched or damaged, then it won’t take you to the installation
Real time fixes to QuickBooks error 1606
Eliminating the error right away is extremely essential, so as to ensure that it doesn’t bother you in the long term. So, here are some real time fixes to QuickBooks install error 1606 and we believe you might be able to fix such errors using the below steps smoothly:
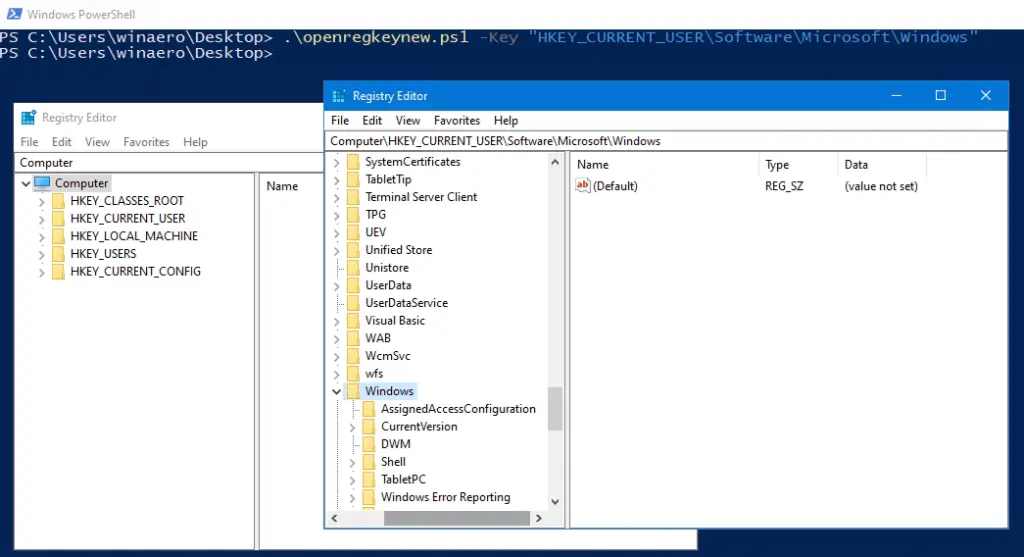
Solution 1: Fix Wrong Registry Subkey
As we tried to cover this cause in the above list, it is essential to work on it, so you can actually try fixing any wrong registry subkey with the help of the following steps.
The process needs you to focus on the admin segment, and it further requires you to edit the registry as it is a serious matter in QuickBooks.
Solution 2: Install QuickBooks in Selective Startup Mode
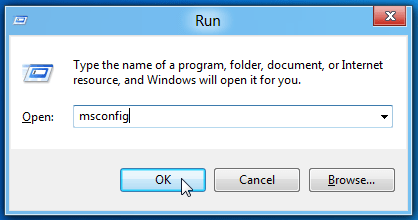
You probably need to simply press the Windows and R keys to simply open the run command
And further, try entering in Msconfig and choose ok tab
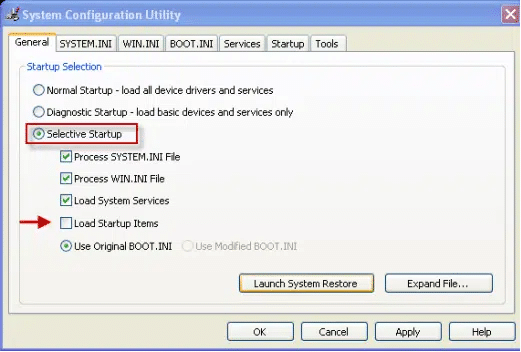
You need to move to the general tab, and later pick the option that shows selective startup
Do not miss out on the load system services
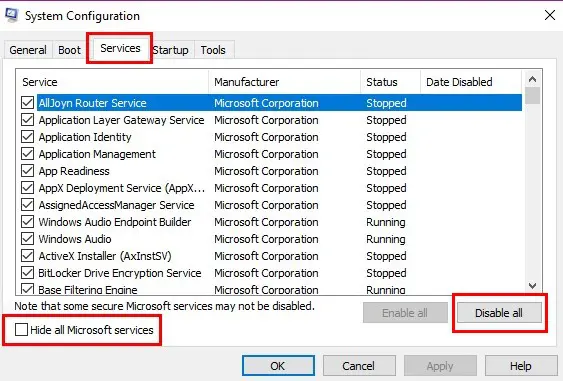
Furthermore, you would have to proceed to the services tab and also pick the hide all Microsoft services
The next step is to choose disable all icon
Later, you are supposed to choose hide all Microsoft services checkbox
Proceeding to the next step you need to verify the services list and also ascertain that the Windows installer checkbox is opted for
This process needs you to log out of the parallel and then log in the same
Post that, you would have to pick devices and choose shared folders
The user will further have to click on disconnect all
The last step here is to sign in and install QuickBooks desktop
Conclusion!
Getting rid of errors in QuickBooks isn’t that complicated, especially when you have the right steps in handy. But when you fail to implement the steps to rectify issues like QuickBooks error 1606. If this segment didn’t help much, then you just need to contact our tech support professionals at and of course you will be accompanied with the right fixes immediately.
Getting dragged into errors is something none of us would tolerate, especially when it comes to working on something really important on QuickBooks. The software seems to manage the crucial financial activities, but when the software breaks down due to some random errors like QuickBooks error 15221, it turns out to be a huge disaster for your financial management. The QuickBooks error code 15221 is nothing new, especially if you are working with your software for the longest time, and have witnessed certain other errors that fall under the same category of QuickBooks 15000 error series. Just like other errors, this one is also all about the update error that pops up at the time of update.
fix quickbooks payroll error 15221″,
When the QuickBooks error code 15221 appears it restricts you from working on your software and its update. It not just shows while updating QuickBooks, but also will appear when trying to download payroll tax table update. And so, it becomes unavoidable to fix the error as soon as possible. We have curated this informative guide, discussing as to how you can fix the error, and not just that but also the factors that can be triggering such error in QuickBooks.
While the error isn’t something different from the rest of the 15xxx errors, the factors causing the issue aren’t identified well. Here are some reasons that can bother you with QuickBooks error 15221:
Your installation file being damaged can be a core reason behind the QuickBooks error 15221.
The digital signature facing compatibility issues with the browser is another active factor leading to QuickBooks error 15221
Not just that, but your crucial company files being corrupt is also something that would bother you
As I told you earlier, the factors aren’t much spotted yet, but the solutions are surely well identified and tested. Let us move on to the fixes that you can opt for.
Methods to Fix QuickBooks Error Code 15221
Of course, every error in QuickBooks is accompanied by its fixes. Here we have the right fixes that you can try out to get done with QuickBooks error 15221:
Method 1: Installing Digital Signature Certificate
You are supposed to head to the file location window and there find out the Application file
Later, pick up the properties tab
And you would then find out the application file properties window
The user would then require to opt for the digital signatures tab
And later, navigate to the signature list field
The next step is to pick the details option
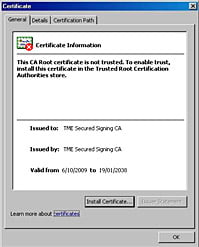
And there, go for view certificate
This will probably open up the certificate window
And later, you would need to go for the general tab
Pick the install certificate
And there, you need to choose the certificate import wizard welcome screen
Ascertain that store location is set as current user
And there, you would have to tap on next
This would take you to the certificate store window
Go for next tab and pick the finish tab also
If asked to confirm the import, tap on ok and you are good to go
Moving ahead, you would have to go for windows start menu
And then, look for QuickBooks and tap on icon and right click for run as admin
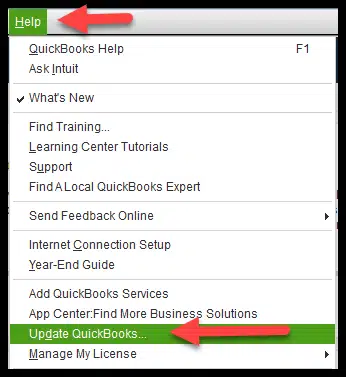
You would then have to proceed to the help menu after you see no company open screen
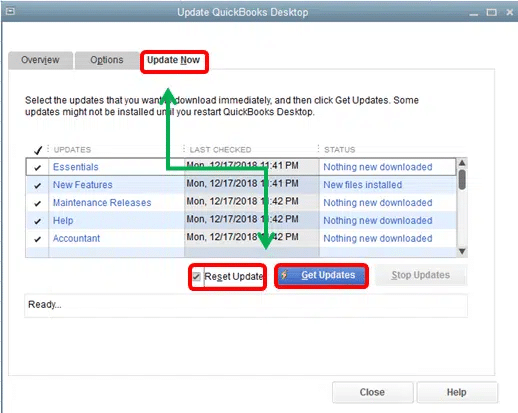
The next step is to select update QuickBooks
You then have to pick the option tab
And later, this would show mark all option and save option, go for both respectively
The step ahead requires you to click on update now and pick reset update checkbox
This ends the process, and you need to go for get updates
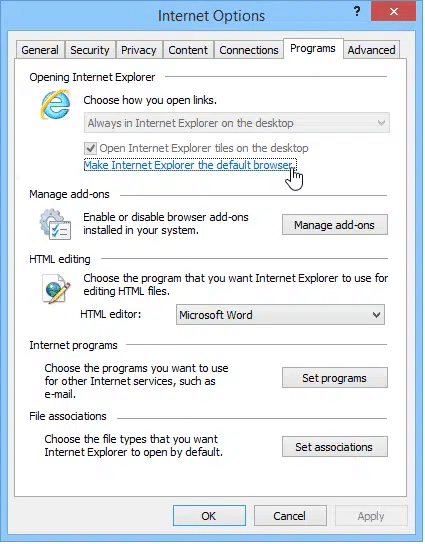
Method 3: Configure your Microsoft Internet Explorerto fix QuickBooks error 15221
Misconfiguration of your Internet Explorer can be a core reason leading to QuickBooks error 15221. Thus, you need to work on your internet explorer configuration and make it as a default browser. Moreover, you would have to fix the issue that shows up like the files aren’t matching with the C-run time files of the internet explorer. Once these errors are no more, getting rid of the QuickBooks error 15221 becomes quite possible.
Try opting for customize and control Google chrome
Pick the settings tab
You would then have to select privacy and security
Go for the site settings
And then, pick the cookies and site data
You would then have to select add that is present in the allow section
Towards the end, pick Intuit.com and click on add
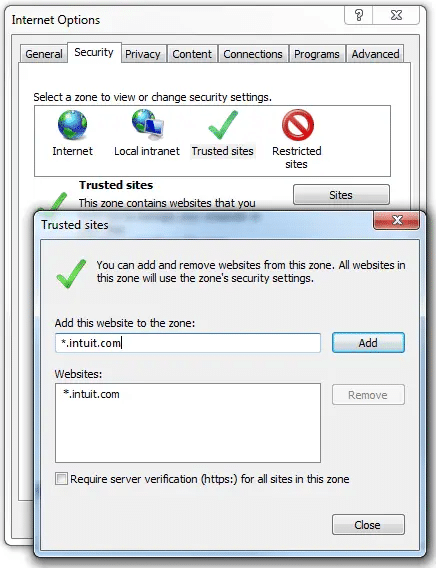
Method 5: Manual Method
The step here is to reinstall QuickBooks
Go for Internet Explorer
Move to the Gear option
Pick Internet options
Proceed to security tab
Go for trusted sites
Tap on site and add the website
You need to select close tab
Go for apply tab and hit ok tab
Try running Windows update and also reboot the system
Conclusion!
The segment reaches its end, and we believe that you might be able to treat the QuickBooks error code 15221 well using the solutions we have tried to elaborate above. If in case you are suffering with the same error even after you tried hard, then you definitely need to talk to our QuickBooks error support professionals. Connect with our team right away at +1-888-510-9198, and your queries will be well answered by our experts immediately and they would help you fix QuickBooks error 15221.
Often when you try working on your QuickBooks accounting software, you might be bothered by some unwanted errors like QuickBooks error 1749, which might show up out of nowhere. Random errors like this one might occur when there are some issues with your QuickBooks company file or even the Windows Registry. Talking about this particular issue, it actually can be a huge hurdle, as it is associated with the QuickBooks internal files or some sort of technical snags related to the background programs. While the error involves registry files and other related files, it gets very important for the QuickBooks user to get it fixed immediately. So, here we are with this technical guide sharing the entire information that might work for you in getting through the QuickBooks error code 1749.
Every error is experienced due to some or the other reason, and finding the actual reason behind the occurrence of the issue is extremely important, so as to ensure that these errors do not hinder your smooth working later on. So, here are some quick factors that might bother you with QuickBooks error 1749.
If you haven’t downloaded your QuickBooks software in the right manner, then it probably might bring you in QuickBooks error 1749
Another possible cause can be if the Windows Registry file is damaged for some reason
You can further experience QuickBooks error 1749, if the internet connection is bringing you in some trouble
Moreover, some sort of viruses might bring you such errors in QuickBooks
You can also experience similar error, when there is some issue with the antivirus or third party software
What might help you identify QuickBooks error code 1749?
Spotting the QuickBooks error code 1749 becomes easy, once you have the right signs and symptoms in handy.
You can probably spot the error easily, once you see the error message itself showing up on the screen
Effective Measures to Rectify QuickBooks error 1749
After you have found out the causes and signs, it is time for you find the actual resolutions to the error code 1749 in QuickBooks, so as to ensure that you work smoothly ahead in QuickBooks:
Method 1: Fix QuickBooks
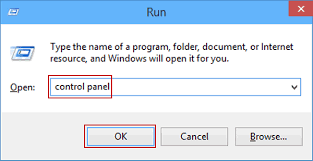
This process requires you to tap on the start tab
Further, go for control panel that might be available in search bar
You would then have to click on open
The steps ahead require you to find add or Remove programs
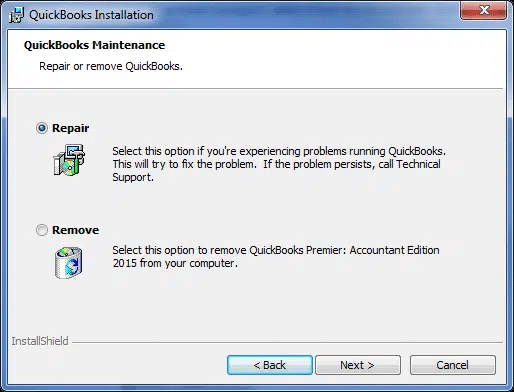
After this, you need to find QuickBooks
And there, you can right click and tap on repair option
All you need is to further wait for the system to repair
The step ahead is to tap on reboot
And towards the end, you can open QuickBooks and check for the issue
Method 2: Run QuickBooks using Safe Mode
At times when your software isn’t working fine, you probably require to run your software in safe mode. And this is how you can do it:
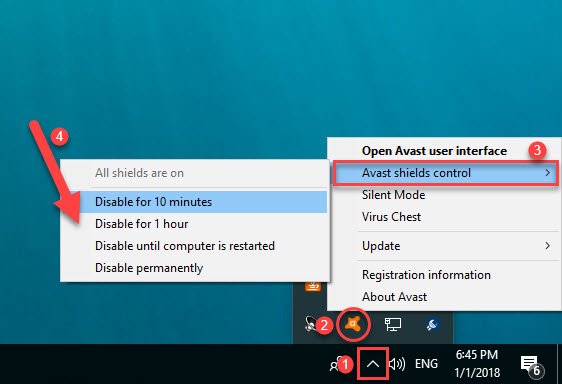
Begin with looking for the antivirus software on the taskbar
Later, right click the Antivirus icon
You would then have to proceed to the options tab
Now, choose Disable
Here, you probably need to tap on ok tab
And further, proceed by opening the software again in safe mode and checking if the issue continues to show up
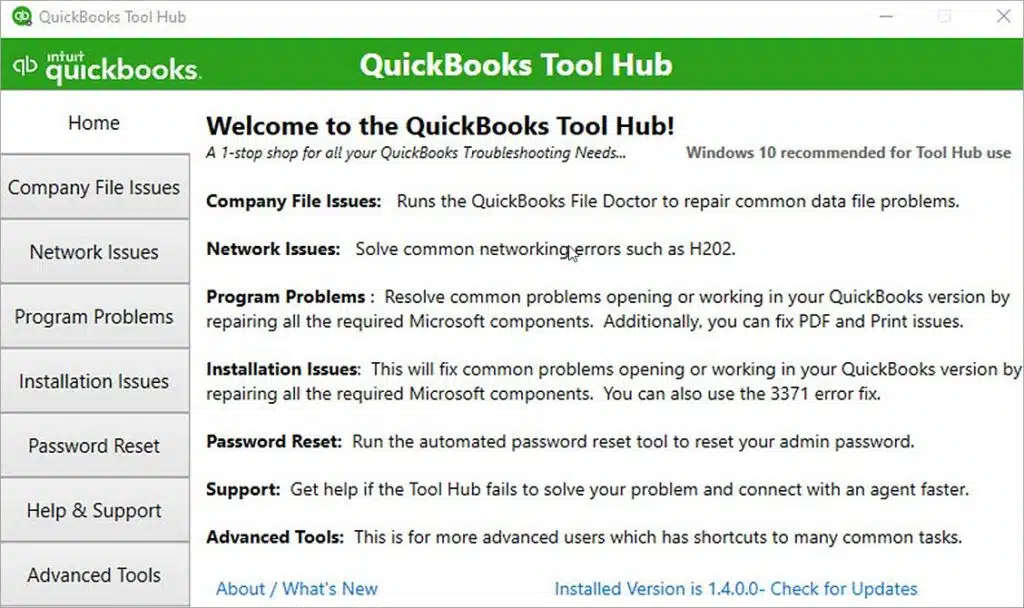
The QuickBooks tool hub has the potential to tackle out maximum issues in QuickBooks. Here, you can use the QuickBooks tool hub and find a tool inside it to fix your QuickBooks error 1749.
You can try closing all your background apps
And further, go for the official website and get access to QuickBooks tool hub. The file that would see would be QuickBooksToolHub.exe
Later, you need to head to the official website download QuickBooks tool hub and further save the file
The next step is to open the file and begin with the installation
You would then have to agree to the terms and conditions
And hence, double click the tool hub icon
Let the tools fix the issue for you
And then, open QuickBooks and check if the error is fixed
Method 4: Update your QB software
After the above steps are all done, you probably need to update your QuickBooks software with the help of the steps below:
After you are done with the above solutions and still facing the issue, here is how you can fix the QuickBooks error code 1749 by clean installing QuickBooks.
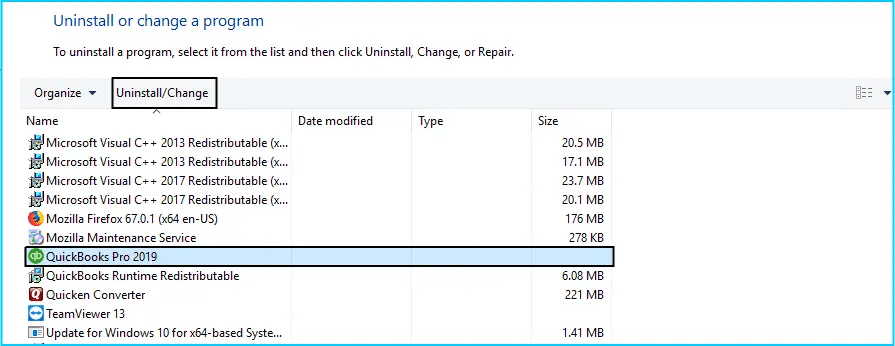
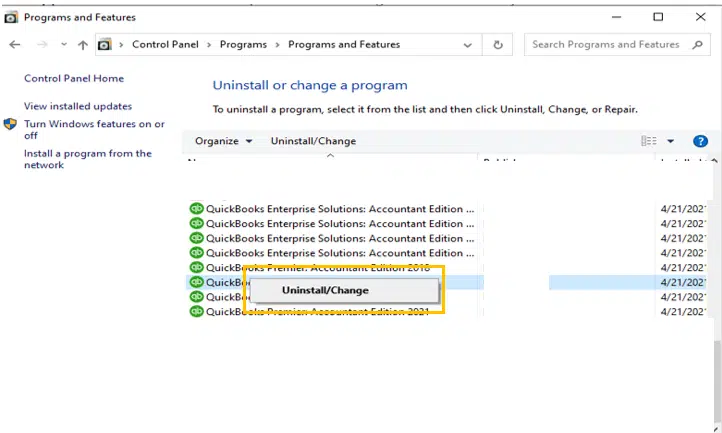
Start by uninstall QuickBooks desktop, and proceed by finding out control panel
Later, you need to proceed to Programs and features tab
You would further have to click on to the uninstall a program
Followed by, clicking on uninstall a program
Further, you would see a list of installed programs
There, you need to opt for QuickBooks program
After this, you would have to tap on uninstall
And the last step here is to wait for the uninstall process to end.
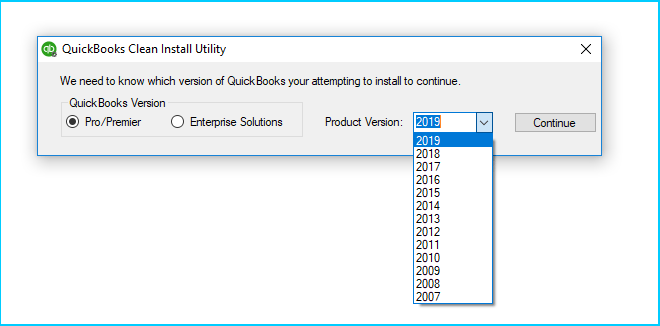
You can try running the clean install tool using the steps below:
Followed by, you need to let the tool to rename the installation folders
Proceed to the last step and try reinstalling the software with the correct license and product info and also make sure to activate QuickBooks desktop.
Conclusion!
The QuickBooks error 1749 isn’t something that should be taken lightly. Hopefully the solutions that we have scribbled above might turn out to be of great assistance. However, if there are certain queries that you feel should be answered immediately, then our QuickBooks technical support professionals will ensure that your issue is well taken care of. Give us a call at +1-888-510-9198, and our QuickBooks support team will try to help you with your issue right away.
Did you see a 1330 error when working on QuickBooks? Well, QuickBooks error 1330 is a point of sale error that can be associated with invalid data signature. You can further experience this issue when you try to reinstall QuickBooks POS version 7 on Windows XP. It is crucial to address this issue as soon as possible, as it might further trigger unrecoverable data loss. You will see this error along with a warning indicating stating “Error 1330 Invalid Digital Signature”. Getting rid of this error doesn’t involve any rocket science, it is easy and quick. All you need is to perform a bunch of measures. Let us understand, what actually causes this issue and what measures can help you fix this.
Toward the end of this segment, we believe that you will be able to get rid of QuickBooks error 1330 successfully. Just in case you fail to do so, you can simply connect with our technical support team at +1-888-510-9198, and your queries will be addressed immediately. We are surrounded by a team of certified professionals who work round the clock to provide the best possible support services.