Did you come across an issue related to damaged transactions in QuickBooks? Well, this can pose a threat to the company file data. As the company file stores all the necessary information about the company, it can easily get damaged due to damaged transactions. Thus, it becomes crucial to fix damaged transactions as soon as possible in QuickBooks. In QuickBooks, transactions may occasionally get damaged which needs to be fixed in order for the file to work properly. To help you in fixing damaged transactions in QuickBooks Desktop, we have curated this segment sharing the complete set of steps that can be implemented. However, if you have any queries or if you need any sort of technical guidance, then connecting with our technical support team at +1-888-510-9198 would surely help. Having said that, let us understand what causes damaged transactions in QuickBooks and what ways can help you fix them.
Also Read: How to Locate Missing Transactions in QuickBooks Desktop?
Reasons behind damaged transactions in QuickBooks
There are a bunch of factors that can drag you into such an error. These reasons include:
- At times, sudden power surges can force the hard drives to overwrite the data, ultimately affecting the company data.
- Another reason can be quitting QuickBooks without exiting the company file
- You can further experience a similar issue when QuickBooks software is being used over a network
- Moreover, in case of oversized company files, such an error can be seen.
- Virus infection or malware attack can also end up in corrupted transactions in QuickBooks
- Over-sized company files can be a reason behind the occurrence of such an error
- If you use journal entries instead of preferred data entry methods for accounts receivable or accounts payable, then it might damage the transactions
- Another probable reason can be using QuickBooks when the system is running low on resources.
Steps to fix damaged transactions in QuickBooks Desktop
You can end up in such an error due to the bunch of reasons listed above. Now that you know what causes damaged transactions, it is time to implement the right set of steps to get rid of the issue immediately. Let us explore the steps involved in fixing damaged transactions in QB desktop.
Step 1: Launch Rebuild and Verify Data Utility
You need to verify and rebuild quickbooks data file to fix the issue using the steps below:
- You need to first run rebuild and verify data utilities
- Once done with that, repair the company file using the rebuild data tool
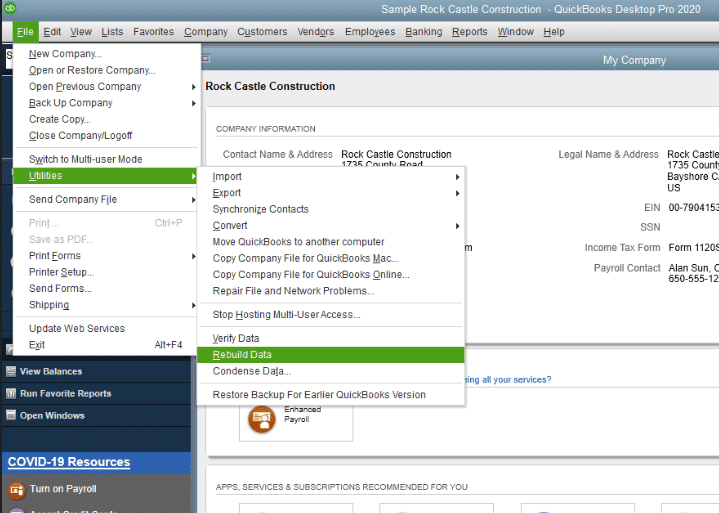
- Another step is to head to the file menu and then navigate to the utilities tab
- After that, select the rebuild data option.
- Choose ok tab on the information window and then perform the onscreen prompts to save the backup
- Now, let the tool repair the file.
- This might take some time, as QuickBooks might seem stuck, but if you are able to move your mouse, then it indicates that the tool is still working.
- The next step is to click on the ok tab after the process ends.
- Navigate to the file menu
- After that, hover over the utilities tab.
- Toward the end, you need to choose the verify data tab.
- You need to let the tool check the file for any data issues.
It is also possible to opt for the manual process to run the rebuild and verify data utilities. The steps involved here are:
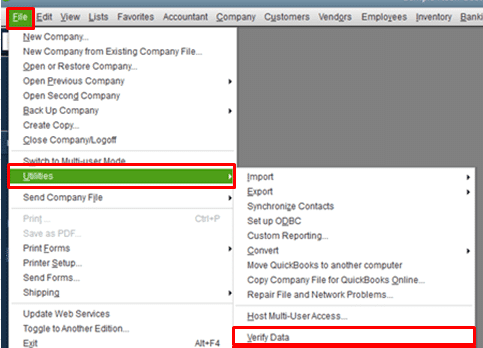
- The very first step is to head to the file menu and hover over the utilities tab
- After that, choose verify data
- And further, let the tool start checking the file for data issues
- Now, after the check is over, from the verify results screen, select expand all option to see the issues
- Select the see online article to fix the error.
Also Read: How to fix Error code: – subsui-error-10004?
Step 2: Identify damaged transactions based on the QBWin.log
Step 3: Apply the appropriate fix on the transactions
Damaged link or date
- Firstly, open the damaged transactions
- Once done with that, change the date to 20 years after
- The next step is to select save and close tabs
- Followed by reopening the damaged transaction
- Now, change the date back to the original date
- By the end of the process, you need to click on save and close tab
Transaction out of balance
- Open damaged transactions
- Now, add any item
- The next step is to choose save and close after adding any item
- Reopen damaged transaction
- Also, remove the item that you added in the last step
- The last step is to choose save and close tabs
Damaged item history
- You need to move the damaged item history and open the damaged transaction
- Head to the first blank item line
- Then, type in three periods in the description column
- Lastly, you need to choose the save and close tab.
You might find this helpful: How to Resolve QuickBooks Desktop Doesn’t Start or Won’t Open Error?
Conclusion!
Getting rid of damaged transactions in QuickBooks becomes crucial, in order to avoid any sort of technical discrepancy further. Hopefully, the above-enumerated steps might be of some assistance in getting rid of the damaged transactions in QuickBooks desktop successfully. However, if you land on the same issue again and again, then in that case contacting our technical support team at +1-888-510-9198, is suggested. Our technically sound QuickBooks ProAdvisors will ensure to cater to all your needs immediately.
Other Related Articles:
Connect Bank and Credit Card Accounts to QuickBooks Online
Deposit Payments into Undeposited Funds Account in QuickBooks

