Want to close your books in QuickBooks desktop? Well, this is now possible, as we have curated this segment sharing the complete steps that you can implement to close your books in QuickBooks successfully. You can close your accounting periods to ascertain that old invoices from invoice don’t accidentally update the old accounting periods in QuickBooks. It is possible to close your books at the end of every fiscal year. Also, QuickBooks creates automatic adjustments in preparing for the coming year. To find out the entire procedure to close books in QuickBooks successfully, make sure to read this segment. Or you can further get in touch with our technical support team at +1-866-453-7060.
Year-end adjustments QuickBooks desktop makes automatically
QuickBooks Desktop carries out year-end adjustments based on the fiscal year start month. Let us understand that:
- QuickBooks adjusts the income and expense accounts at the end of the year to nullify them and let the user start the new fiscal year with zero net income
- QuickBooks further makes an adjustment entry to net income. Like, if the profit for the year was $12000, the equity section of the balance sheet shows a line for a net income of $12000 on the last day of the fiscal year
- On the first day of the fiscal year, the QuickBooks increases the retained earning equity account by the previous year’s net income and decreases the net income by the same amount. This will start new fiscal year with a net income of zero.
Important Points to close books in QuickBooks Desktop
Before you close the books, keep a check on the following points:
Advantages to closing the books
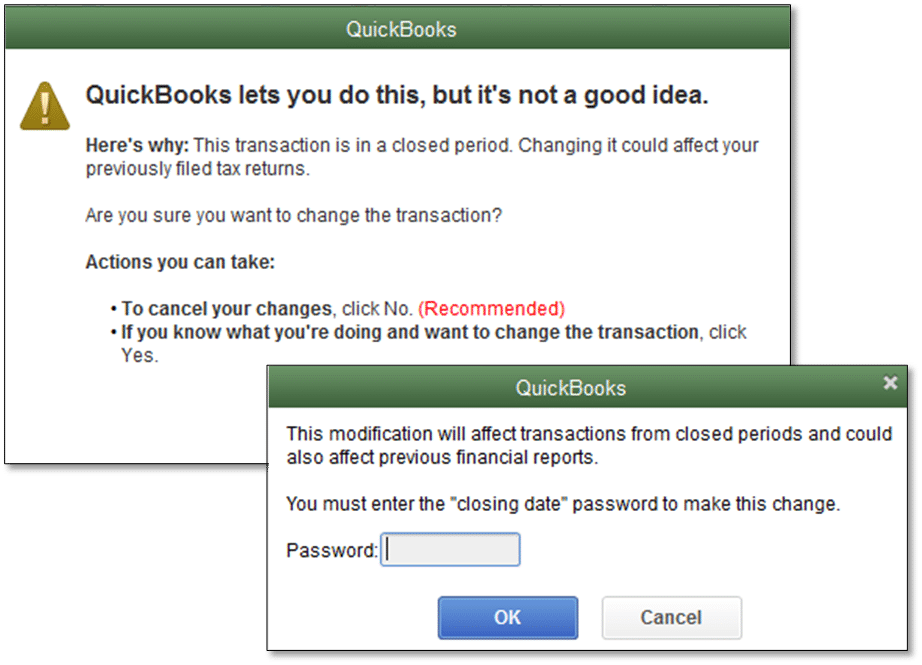
Restricted access: The user can create a closing date password in order to restrict access to data from the prior accounting period, that includes the details of every transaction. The user needs to find out the closing date password and have the right permissions to modify or delete transaction in a closed period.
Reporting: Note that the changes made after the closing date to the transactions dated on or before the closing date show in the closing date exception report.
- To run the report and move to the report’s menu
- Furthermore, select the accountant and taxes and further select the closing data exception report
- The closing date history shows the current and past closing dates and the user who set the closing date.
Also Read: Find QuickBooks License Number – Quick Steps
More about closing books in QuickBooks Desktop
- Note that the closing entries are made after recording all the adjusting entries. And when the books are closed, the user isn’t supposed to enter any entry for the fiscal year.
- There are certain programs that restrict the user from making any entry even if that entry corrects or makes the books accurate
- QuickBooks lets the user to enter transaction that affect the balance of the closed fiscal year. But it either tells the user that it isn’t something we recommend or it will ask for the closing date password if you set up one.
- QuickBooks doesn’t have an actual transaction for closing entries that it creates. After you run a report, the program computes the adjustments. However, the user can’t QuickZoom on these transactions. The adjustments are termed as closing entry.

- Note that closing entries are the entries made at the end of the fiscal year to transfer the balance from the income and expense account to retained earnings. The user aims at zero out the income and expense accounts, and then add the fiscal year’s net income to retained earnings.

Steps to close the books in QuickBooks Desktop
You can try performing the below steps to close books in QuickBooks easily:
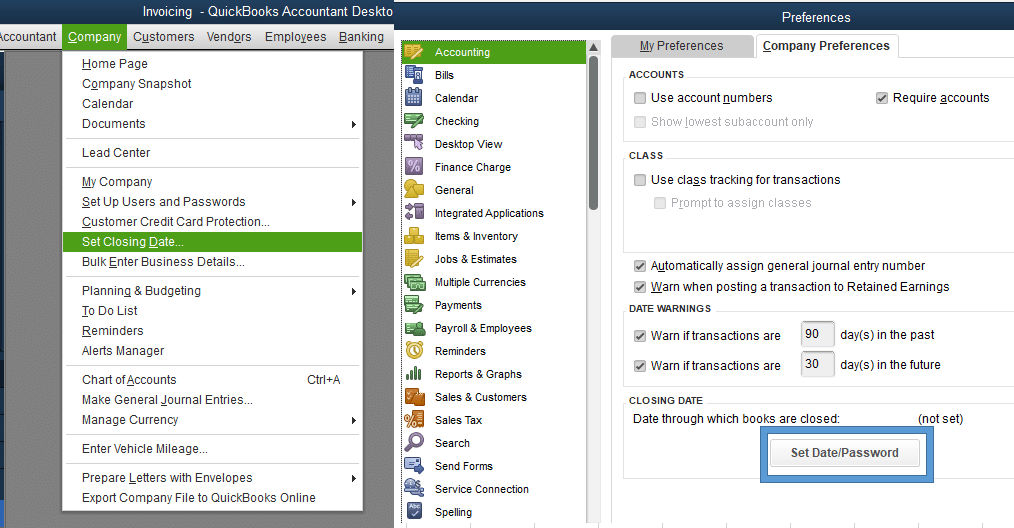
- Initiate the process by heading to QuickBooks and further click on edit and preferences tab
- Choose accounting tab and select the company preferences tab
- The user will then have to click on the set date/password tab.

- You need to enter the date you wish the books to be closed and set the password and click on ok tab
- After that, the closing date will be set
- No invoices edited prior to the particular date will sync into QuickBooks
- If an invoice from the closing date or earlier syncs, you will get a notice to let you know that the period is closed
- Lastly, the sync process is successful, though the invoice did not get updated in QuickBooks
You might find this helpful: Sign In to QuickBooks Online Account
Conclusion!
Now that you know what is the process to close books in QuickBooks desktop, it is time to implement the steps right away. However, if you fail to do so for some reason, then contacting our QuickBooks support professionals might help. You can dial our tech-support number i.e., +1-866-453-7060, and our certified QuickBooks ProAdvisors will help you with your queries.
Other Related Articles:
Fix Damaged Transactions in QuickBooks Desktop
Connect Bank and Credit Card Accounts to QuickBooks Online
Deposit Payments into Undeposited Funds Account in QuickBooks


