
Learn The Process to Create and Modify QuickBooks Memorized Transactions
If you find yourself entering the same invoice, bill, or check in QuickBooks every single month same vendor, same amount, same account, you’re doing it the hard way. QuickBooks Memorized Transactions are built exactly for this situation. They work as reusable templates for any transaction that repeats on a regular schedule, and they give you two options: either have QuickBooks remind you when it’s due, or have it enter the transaction automatically without any action needed from you at all.
The time savings add up fast once you have recurring transactions memorized. More importantly, automating these entries reduces the chance of forgetting a payment, missing a billing cycle, or making a data entry error from retyping the same information repeatedly.
This guide covers everything you need how to create a memorized transaction, how to organize them into groups, how to update them when details change, and how to delete them when you no longer need them. If you need a hand with any of this, our certified 24*7 QuickBooks payroll support are available at +1-888-510-9198.
You might find this helpful: QuickBooks Desktop 2024 Download, Pricing, and Features
What are memorized transactions in QuickBooks?
Memorized transactions in QuickBooks is a feature that provides you reminders for transactions that are recurring or can be rapidly entered using a template. As a business, you can simply enter the transaction since they function as templates. You can see your memorized transactions at any point in time. All you need is to head to the lists menu and choose the memorized transaction list. Let us explore further about memorized transactions in detail!
Significant features of Memorized transactions in QuickBooks
- Time-saving
- Enhanced accuracy
- Accurate bookkeeping
- Keeps better tabs on the cash in the bank
Things that can be memorized in certain transactions:
- Recurring Purchase Orders
Purchase Orders which repeat with several same products. When you make transactions like these, you can opt manually from the list of memorized transactions and remove the lines to exclude items not required for the next purchase.
- Recurring Sales
Recurring sales for the supply of products or services based on a regular or monthly basis.
- Cash Flows
- Recurring checks in your QuickBooks or other personal services payable on a regular basis.
- Electronic withdrawals of checks every month like installment payments of business
- Insurance or payments made through internet access.
- Monthly installments are due from customers
- Health insurance premiums for the month
- Recurring invoices/bills in QuickBooks
- Payments for lease or loan
- Tuition invoices
- Rent Collection
- Rent Payable
- Journal Entries
- Journal entries for Monthly Depreciation
- Overhead is allocated to other departments
- Recurring Estimates
If you choose the same items frequently while making a quote
Read Also: How to Fix QuickBooks Error Code 6150?
Procedure for creating QuickBooks Memorized transactions
Want to create QuickBooks memorized transactions? If yes, then go through the steps below, and make sure that you follow the same order. So, without further ado, let us have a look:
- To begin with, the very first step is to ‘Enter the transaction‘ in the same way as you want it to be memorized.
Note: The point to be noted here is that the user can leave those fields blank that contain the information that might change.
- The next step is to visit the ‘Edit menu‘ and then select the ‘Memorize option’ that is seen there.
- Now, in order to ‘Memorize the transaction‘, the user is required to press the ‘Ctrl and M‘ keys simultaneously and then click on the ‘Memorize‘ icon.
- Once done with that, the user is required to enter the name of the transaction that is being memorized. The name you enter should be the one with which you wish to handle the transaction in QuickBooks.
Add to My reminder list: Now comes the process of adding the same to the reminder list. For this, three simple steps can be followed, which include the following:
- The first step is to ‘Add the memorized transaction‘ of your reminder list.
- After that, the user is required to enter ‘How often the user wants the reminder to occur‘.
- Now, the last step is to ‘Enter the transaction next date‘ when the transaction will be due.
Don’t remind me: Another case can be when the user doesn’t want the software to remind for the same. In such case, the user is required to select the ‘Do not remind me‘ option available, and the transaction will not be used to get memorized.
Robotic Transaction entry: Well, in this case, the transaction will be automatically entered at the times when it will get due. This actually means that the QuickBooks software will automatically enter the details, and the users need not be concerned for the same.
- The first step is to enter how often the user wants the software to enter the transaction.
- The next step is to enter the next date when the transaction will be due.
This means that the user will be required to fill in how often and next date fields.
Points to be noted:
- The very first thing is to ensure that the ‘Next Date select‘ is set to a day in the future due to its automatic schedule.
- While filling in the number remained field, the user is required to make sure that it includes the ‘Next Date transaction‘.
- Also, another point that the user should be concerned about is, in case the user wants to enter the other important information in the Transaction, he/she is required to enter the same and then tap on ‘OK‘.
- The last and most important thing to consider is to click ‘Save & Close‘ or ‘Save & Next‘, to enter the ‘memorized transaction‘. Select the ‘Clear button‘ and close the window, in case the user is only entering the transaction information for the future purpose.
You might also like: How to Fix QuickBooks Error Code 6189?
Simple Process to update QuickBooks Memorized transaction
- To begin with the procedure, the user is required to visit the ‘list menu’ and then choose the ‘Memorized transaction list‘.
- After that, the user is required to double-click the ‘Preferable memorized transaction‘.
- Moving ahead, if you want to make any kind of changes in the transaction, then you can also make changes.
- Now, simply click on the ‘Close and Save‘ option.
- And the last step is to select the ‘next‘ option, in order to ‘Enter the memorized transaction‘.
Insight into creating memorized transaction group
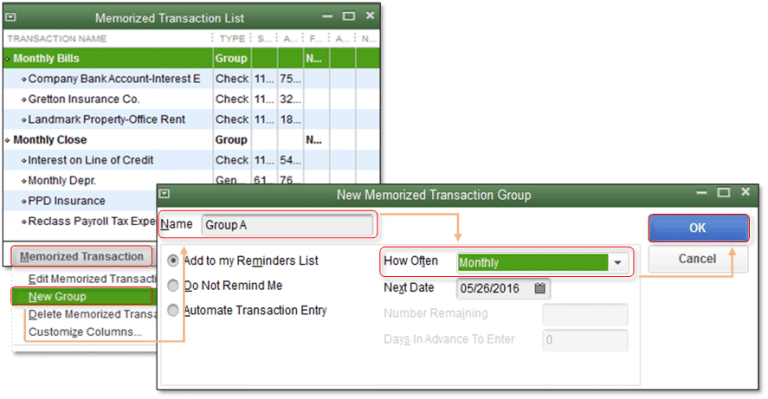
- To begin with, the user is required to visit the ‘file menu‘ and then select the ‘Memorized transactions list‘.
- Once done with that, from the pop-up menu, the user is required to select the ‘New Group‘ option.
- Now, fill the important information like the group name and then select the ‘action‘ and the ‘date‘ options.
- To end the procedure, the user is required to click on ‘OK‘ button.
Read Also: How to Resolve QuickBooks Error 61686?
Add a transaction to a memorized transaction group by following simple steps:
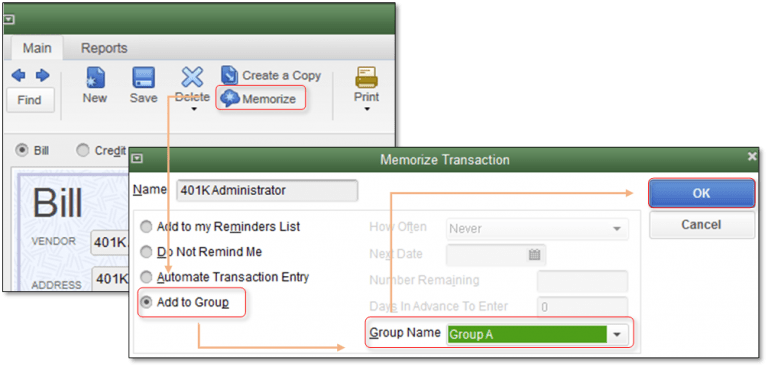
- The first step in this procedure is to open the transaction that the user wants to memorize.
- After that, choose the ‘Memorize‘ option.
- And then, opt for the ‘Add to Group‘ options and enter the group name.
- The last step is to click on the ‘OK‘ option, in order to ‘Save‘ it.
See Also: How to Fix QuickBooks Error Code 31600?
Procedure to edit or delete the Memorized transactions in QuickBooks
The process to delete memorized transactions manually is different for windows and mac. When deleting a transaction, it is suggested to select the correct transaction to delete. And further, it is recommended to choose the right set of steps to delete the transactions.
Method 1: Delete Memorized Transactions on Windows
- The very first step here is to launch QuickBooks desktop.
- Furthermore, choose the lists menu.
- Also, click on the memorized transaction list.
- The next step is to select the transaction you wish to delete
- Also, right-click the memorized transactions.
- And then, click on delete memorized transaction.
- And hit ok tab.
Method 2: Deleting Transactions on Mac
- Under this process, the first step is to run QuickBooks desktop on mac
- Find and click the lists menu
- Once done with that, press memorized transactions
- Further, hover to the edit menu and also click on the same
- The last step is to click on delete memorized transactions and you are done
Rectifying issues encountered while memorizing reports
- In case the QuickBooks user encounters any error message while attempting to memorize the report, then QuickBooks will not retain the report. This basically might be done on the grounds that the report’s definition is excessively vast. In such case, the user is required to take a stab at lessening the number of channels or the particular quantities of things that picked in each of the channels to curl up the report’s size.
- If the user select the ‘Process Multiplier Reports‘ from the ‘Reports‘ menu, and the same doesn’t appear, then it might be brought about by a harmed report or a report that is imported from another form of the software. In such cases, the user is required to discover, erase, as well as re-make the report causing such issue.
Exporting Memorized Transactions from QuickBooks
You can simply export your lists of memorized transactions from QuickBooks to use the lists however you like using the steps below:
- The very first step is to log in to the QuickBooks account
- Furthermore, head to the dashboard and choose reports
- Once done with that, go for the lists and click on memorized transactions listing
- Followed by using the excel option to generate a new spreadsheet
- And lastly, export the memorized transaction
- After the sheet gets prepared, simply export it to any software. The last steps might take some time.
Edit a memorized transaction
- The first step is to head to the lists menu, and choose memorized transaction list.
- Once done with that, double-click the memorized transaction you wish to modify.
- Further, make the necessary changes.
- The next step is to choose memorize at the top.
- Also, choose replace to update the transaction or add to create a new one.
- The last step is to choose save and close.
- And also hit save and next tabs.
You may also like: How to Fix QuickBooks Error Code 80040408?
CONCLUSION
Once your recurring transactions are memorized and organized, take a moment to review your Memorized Transaction List (Lists > Memorized Transaction List) to make sure every entry has the correct frequency, next date, and handling option whether that’s a reminder, automatic entry, or no reminder. It’s also worth setting a calendar reminder to review this list quarterly, since business circumstances change and a memorized transaction that made sense six months ago might need to be updated or removed.
If you run into any issues while setting up memorized transactions, or if an automatic entry went in incorrectly and you need help correcting it, our certified QuickBooks support are available 24/7 at +1-888-510-9198. We’re happy to help you get your recurring transaction setup running smoothly.
Frequently Asked Questions (FAQs)
The major focus is to assist companies and individuals get reminders of their recurring business transactions. This feature works as a template and makes it simple to create quick entries of transactions.
One can simply disable the QuickBooks memorized transactions using the steps:
1. At first, run QuickBooks and choose lists
2. After that, right click memorized transactions
3. And choose edit memorized transactions
4. Also, click on do not remind
5. The next step is to hit ok and you are done
Use the steps below to generate a memorized invoice under QuickBooks.
1. The first step is to create an invoice
2. And then click on memorize above transaction
3. Enter a name and select the way QuickBooks will handle it
4. Assign other info and also click ok tab
5. Select save and next or save and close to end the process
In order to clear an un-entered memorized QuickBooks Transaction you need to first launch QuickBooks, and then choose edit tab and also go for preferences menu. The next step is to click on reminders and also click on company preferences. Now, choose don’t remind me and hit ok tab.
“Add to Reminder List” means QuickBooks will notify you when the transaction is due, but you have to manually choose to enter it giving you control to review and adjust details before it goes in. “Automatic” means QuickBooks enters the transaction on your behalf on the scheduled date without any action from you. Automatic is ideal for truly fixed recurring entries; Reminder is better for transactions where amounts or details might need reviewing each time.
Yes, and this is actually the recommended approach for recurring transactions where the amount changes. Before memorizing, simply leave the Amount field blank. When the transaction comes due and QuickBooks generates a reminder (or prompts you before automatic entry), you’ll be asked to fill in the current amount. This gives you the convenience of a memorized template without locking in an incorrect amount.
QuickBooks Desktop supports up to 14,500 memorized transactions, which is more than enough for most businesses. If you’re managing a large volume of recurring entries, organizing them into memorized transaction groups keeps the list manageable and makes batch processing at month-end significantly easier.
Some other useful links:
How to Fix QuickBooks abort error?