Ever came across an error when installing the ABS PDF driver? Well, this error might freeze your process when installing QuickBooks desktop. Or it might stop responding when installing QuickBooks desktop. This error can be experienced if there is any system issue or a slow internet connection. The QuickBooks accounting software uses the ABS PDF to print transactions, which makes it important for the component to be installed. Though the error isn’t a common one, can be fixed using some basic set of steps. To understand how to install ABS PDF driver in QuickBooks, make sure to read this segment carefully. Or you also have the option to consult our technically sound QuickBooks professionals who might help you with the fixation of the error permanently. Get on a call with our team at +1-888-510-9198, and we will help you with the process further.
What causes QuickBooks installation stuck on installing ABS PDF drive?
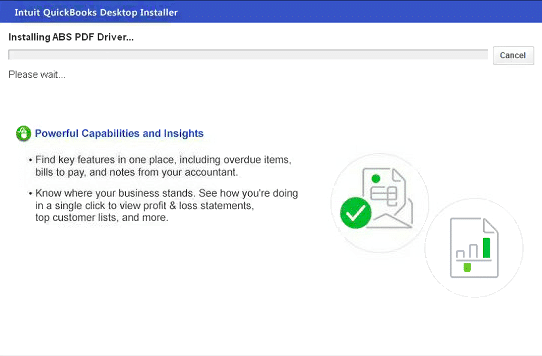
Well, there are certain factors triggering the QuickBooks freezing while Installing ABS PDF driver message or the installer being frozen. Let us have a look: One of the basic factors can be a slow internet connection. Another trigger can be if there is any problem with the device itself.
Steps to fix Error: Stuck on “Installing ABS PDF driver issue…” while installing QuickBooks Desktop
As the error isn’t a common one, there are only a few defined steps that can be followed to install ABS PDF Driver in QuickBooks. In case of any queries, it is suggested to consult a QuickBooks professional. Let us check out the steps involved one by one:
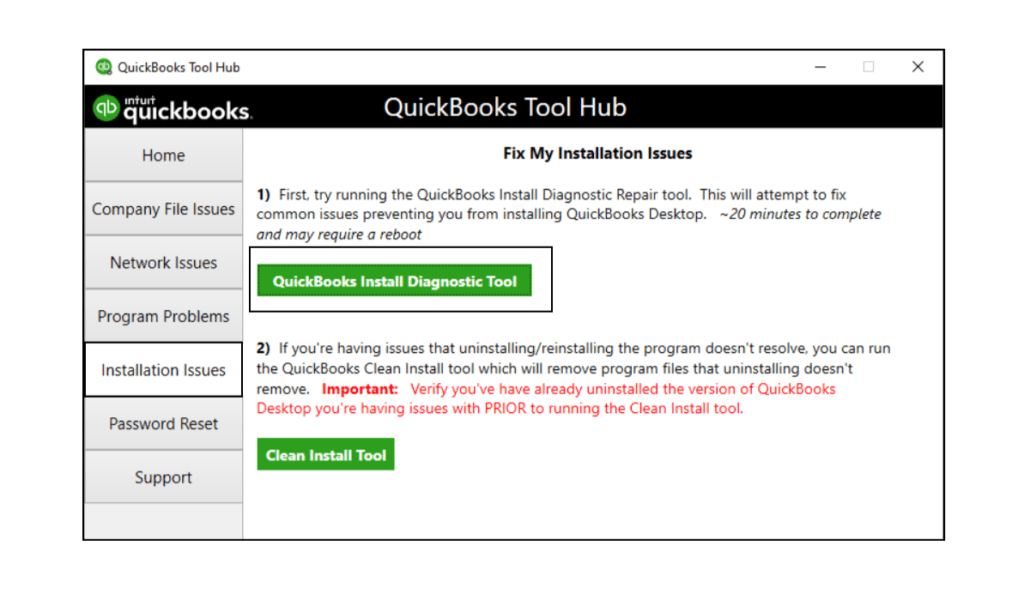
Step 1: Download and install the QuickBooks tool hub
Tool hub can fix some of the major issues in QuickBooks and can be used in this case as well. You are recommended to perform the steps below to download and install QuickBooks tool hub. Let us check it out:
The very first step is to close QuickBooks.
Once done with that, you need to download the QuickBooks tool hub latest version.
Now, save the file where you can spot it easily.
After that, open the file that was downloaded earlier.
The file should look like QuickBooksToolHub.exe
Now, perform the onscreen steps to install the tool hub.
Also, make sure to agree to the terms and conditions.
Once the install process ends, double click the Icon on the windows desktop for opening the QuickBooks tool hub.
Note that, in you are unable to spot the icon, then make sure to search for the same in windows for QuickBooks tool hub and go for the Program.
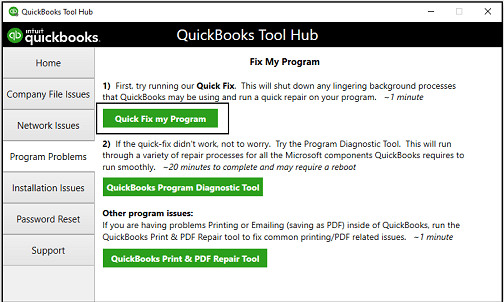
Step 2: Run Quick fix my program from the QuickBooks tool hub
The very first step here is to go for the Program problems in tool hub downloaded earlier.
And then, pick the Quick fix my program.
Now, open the Run command.
And then press Windows + R keys.
The user will now have to enter %TEMP% and hit Enter key.
Select the TEMP Folder
Search for the Prx_usXXrX or Enterprise_usXXrX folder Note: that the X’s on this folder indicates the version, year, and release of the QuickBooks.
Moving ahead, open the Third-party folder and also go for ABS.
The user is now required to double-click ABSPDF412Setup for running the file.
Once you are done with the install process, make sure to open and register QuickBooks.
If the ABS PDF installer continues to freeze or stops responding, then make sure to connect with an IT expert and let the professionals check for the issue in your system.
Now that you know what steps can be performed in fixing the stuck ABS PDF driver error when installing QuickBooks, it is the right time to perform those steps and get rid of the issue permanently. On the contrary, if you are unable to deal with the issue even after performing the set of steps discussed above, then connecting with a bunch of professionals is the only key to success. You can simply get in touch with QuickBooks support professionals at +1-888-510-9198 and ask them to perform the necessary steps for you in eliminating the issue. We are a team of certified QuickBooks professionals who work round the clock in providing instant QuickBooks Support Services.
Some FAQs on How to Install ABS PDF Driver issue in QuickBooks
What is ABS PDF Driver and how to install it?
ABS PDF Driver is a software component that helps in creating and managing PDF files. It is important because it enables users to convert any document or image into a portable document format (PDF), which is widely used for its universal compatibility and security features.
What are some common ABS PDF Driver issues and how can I resolve them?
Some common ABS PDF Driver issues include compatibility problems with newer operating systems, outdated software, and conflicts with other PDF software. To resolve these issues, you can try updating the ABS PDF Driver software to the latest version or uninstalling and reinstalling it.
What if I still face ABS PDF Driver issues even after trying to resolve them?
If you are still confused about how to install ABS PDF Driver issues even after trying to resolve them, you can contact our toll-free support number +1-888-510-9198 for assistance. Our expert technicians will be happy to help you resolve the issue.
How do I update ABS PDF Driver to the latest version?
To update ABS PDF Driver to the latest version, you can go to the software’s official website and download the latest version. Alternatively, you can also contact our toll-free support number +1-888-510-9198 for assistance in updating the software.
Can ABS PDF Driver issues affect the performance of my computer or the security of my data?
ABS PDF Driver issues can sometimes affect the performance of your computer, but they generally do not pose a threat to the security of your data. However, it’s always a good idea to keep your software updated to ensure optimal performance and security. If you have any concerns about the security of your data, you can contact our toll-free support number +1-888-510-9198 for assistance.
It is a common question amongst people whether they can install QuickBooks on multiple computers or not, and the answer to this is yes. It is possible to synchronize QuickBooks on two or more computers with the help of multi-user mode features. Using this feature more than one person can work on a single company file at the same time. This saves a lot of time and makes a business highly productive. One can install QuickBooks on multiple computers by performing a certain set of steps. This particular feature of QuickBooks is helpful when the company has a large number of employees and every employee requires access to QuickBooks.
It should be noted that there are three versions of QuickBooks desktop which allow the different number of users to work on the same file at the same time. These versions include QuickBooks desktop, QuickBooks desktop pro, QuickBooks desktop enterprise. Each of them offers 3, 5, and 30 respectively. Before performing the steps to set up multiple QuickBooks, it is essential to ensure to have l a separate licensed copy of QuickBooks installed in all the systems in which you want to run QuickBooks simultaneously on multiple computers. To know more make sure to read the article carefully till the end. Or in case you aren’t well-versed in the technical aspects of QuickBooks, feel free to reach out to our technical professionals at +1-888-510-9198, and they will provide you with the right guidance possible. Now that you know how you can reach out to our technical professionals, let us explore further the installation process of QuickBooks on multiple computers.
Steps to setup and install multi user network or QuickBooks desktop on multiple computers.
The below steps can be performed to successfully set up and install multiple user network in QuickBooks.
Step 1: Install QuickBooks on multiple computers
On a multi-user network, one system hosts your company files. This is your server system. All other systems connected to your network that don’t host your company files are known as workstations.
The very first step is to download QuickBooks on your server system.
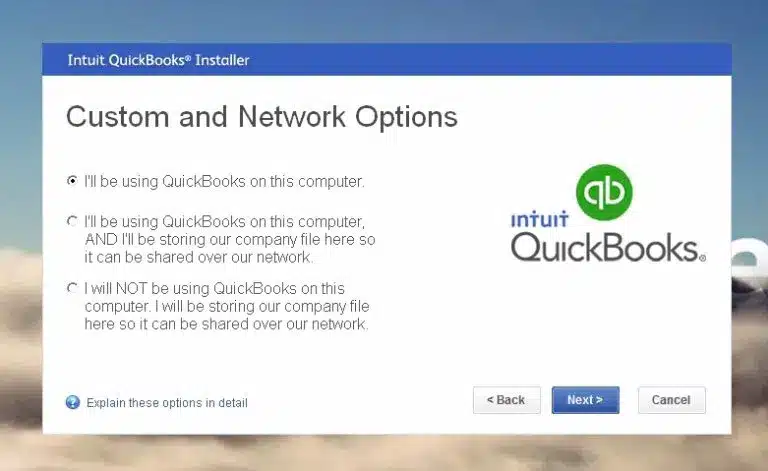
After that click on custom and network install for the install time type
And then click on I’II be using QuickBooks Desktop on this computer option, And I’ll be storing…if you have the required full version of QuickBooks Desktop on your server system. Either you just want your server system to host your files, then click on I Will Not Be Using QuickBooks Desktop on This Computer.
Perform on screen steps to install
Map network Drive-in window
Steps to follow to put your files on a mapped network drive:
For Windows 8/10:
The very first step is to search for this pc in the windows search bar and choose the same
The user needs to perform the steps to set up folder permissions on the server system. And also ensure that the folder having the company file is on the network
Important points to remember
Be particular while performing the steps
Ensure that the installation directory have the right permission
In case you are running Microsoft Windows Home Edition, then the security tab will not be available in normal mode in it. Thus, you need to restart your system in Safe Mode to complete the process.
This can be done by performing the following steps:
The very first step is to restart the system, and then press F8 to open Advanced Boot Window.
Now choose Safe Mode on the Advanced Boot window, and press Enter.
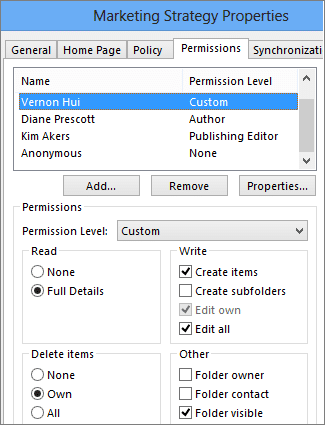
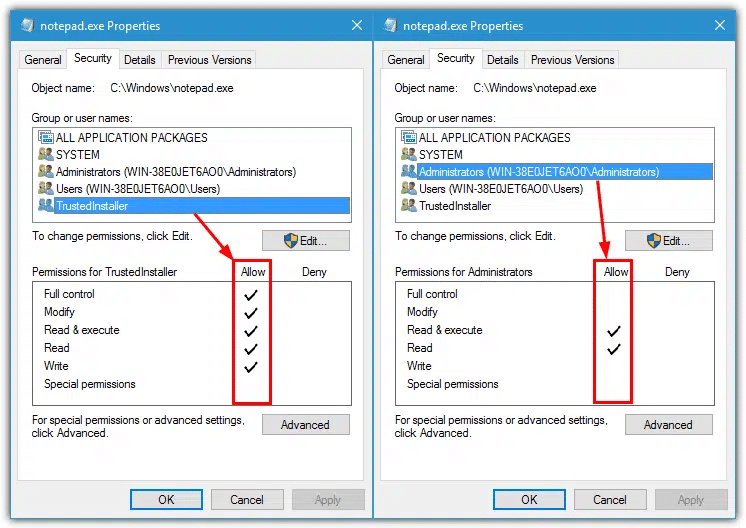
Set up folder and Windows access permission to share company file:
Ensure that the permissions are given correctly
And then right click the company folder to choose properties
After that click on Advance, on Security tab
Now, choose QBDataServiceUserXX and click on the Edit option
The user needs to ensure that the settings are set to Allowed
Traverse Folder/ Execute File
List Folder/Read Data
Read Attributes
Read Extended Attributes
Create files/Write Data
Create Folders/Append Data
Write Attributes
Write extended Attributes
Read Permissions
In case the permissions are not set properly then follow these steps:
The user needs to first right-click the company file folder and hit on Properties tab
Now, click on Security and choose Edit
Go for QBDataServiceUserXX and click on Full Control, then Allow.
Hit Apply option, then OK.
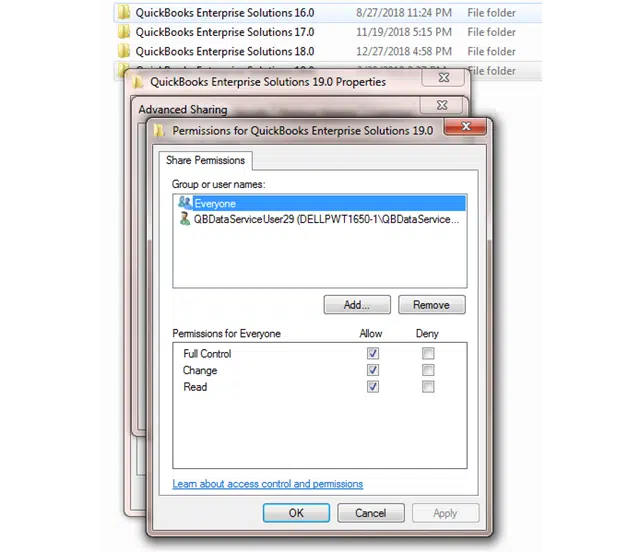
Change Folder Permission
The very first step is to open File Explorer (Window + E)
After that head to the parent folder, and choose the Properties option.
It should be noted that these steps are to be performed for every folder on the list but all folders may not apply to each installation as they apply to a particular version of QuickBooks Desktop
It should be noted that in case Everyone option is not listed in Group or User Name box, choose Add and type in Everyone, then go for OK.
The user needs to choose Full Control, then pick Apply and OK
After that choose Everyone on the Security tab
Note: If for any reason Everyone is not listed in Group and Username box, then need to select Add and type in Everyone, then choose Ok.
And tap on Full Control and click on Apply then Ok.
Set Windows access permissions to share company files
Ensure that QuickBooks has the right access permission that can help in getting rid of future issues while working with your company files across the network.
Windows 10, 8 and 7
The very first step is to press Windows + E to open File Explorer
After that right-click that folder contains your Company file.
Now choose Properties option,> then Sharing > Share Add.
The next step is to choose the QBDataServiceUserXX that corresponds to your version.
In order to access full control over the file set the permission level.
Windows 8.1
The user needs to initially take control of the file
Now, choose the folder for taking ownership of and choose Share.
Head to Advanced Security > Change > Advanced > Find Now.
The user needs to choose the folder and then the Share option.
After that head to Advanced Security option> Add > choose a principal.
Now hit Advanced option> then Find Now.
And go for the user and click OK
Opt for Full Control and OK.
Windows Server 2012
Before heading to the steps, ascertain that the File and Storage Services are installed.
The user needs to then press Ctrl + R to open Run Command
Now, enter Server Manager and click OK.
And also head to file and Storage Services > and then Shares.
Now, on the Task drop-down, select New Share. A list of File Share Profile shows.
The next step is to hit SMB Share – Quick.
Now, in share location selection, go for Type a custom path > Browse to locate the folder you wish to share.
And then choose the folder > then hit Next.
In order to find out more, head to the setting up a folder and windows access permission
Step 3: Install Database Server Manager (Verify an existing setup)
The user needs to make use of the QuickBooks Desktop Manager to verify an existing setup. And also, to scan the company file in the system where the file is located. The user should ascertain that the database server manager is installed in the system, as it will help the user to share the company files with other systems over the network.
Step 4: Set admin rights to install QuickBooks on Multiple Computers
When the user signs in with the user account, it is essential to ensure that the account has Windows admin rights and the Database Server Manager has admin rights.
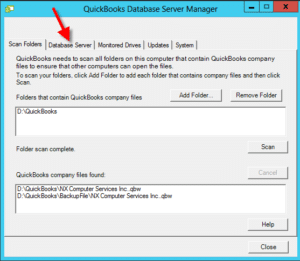
Step 5: Using Database Server Manager
When the installation process ends, the user is suggested to use Database Server Manager to scan the folder that holds your company files.
Once the process ends the file in the “QuickBooks company files found” will be seen. The user can access the company files in these folders through other systems via a network.
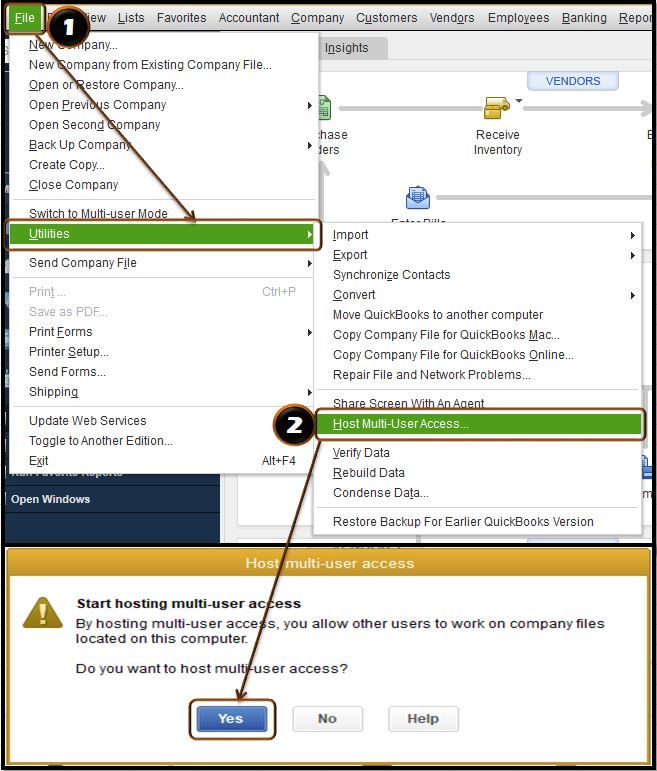
Step 6: Turn on hosting
All the steps are now performed to complete the set up outside QuickBooks, now the user needs to only turn on Multi-user Access on the server. However, ensure that the server system should be the only one in which this feature is turned on.
The user should head to the QuickBooks desktop
And then head to the file menu and navigate to utilities tab
Once done with that click on host multi user access and click on yes to confirm
The user can now easily host your company files through your network.
Whenever the user wishes to access the multi-user network, all that is needed is a sign-up as a user with admin rights in the server system and workstations.
In case they are connected, copy the backup file to your new one via flash drive or another external device or network.
And now restore all the backup data on your new PC.
You can perform these steps on all the workstations.
Conclusion!
This brings us to the end of the article, where we hope that the information shared above might be of some help in installing QuickBooks on multiple computers. However, if you are unable to perform the steps above or need our assistance at any point in time, then feel free to contact our team professionals at +1-888-510-9198, and they will help you in successfully installing QuickBooks on multiple computers.
Yes, it is possible to install QuickBooks on multiple computers. However, for this, it is a must to have a multi-user license. Note that the standard QuickBooks pro license allows you to install it on up to 3 computers and every edition has a different number of users allotted, depending upon the subscription.
Can I use the same QuickBooks license on two computers in different locations?
Yes, you can use the same license for two computers in different locations.
How many users can use QuickBooks Desktop?
QuickBooks Desktop Pro lets 3 users to work on the same company file. Whereas, QuickBooks Premier lets 5 users to work on the same company file.
How do I open QuickBooks on multiple computers?
To do that, you can install QuickBooks data server manager on your server and enable multi user access, and further the authorized users can access the same QuickBooks company file. Each multi-user has a valid license to use the QuickBooks program, according to Intuit.
A firewall is network security device or security software which is specially designed to obligate the unauthorized access based upon certain sets of the rule. Irrespective of the firewall location, whether it’s present on the server or computer, it can easily capable to block/stop the communication between the QuickBooks Point of Sale company data & computer. The Point of Sale utility is comprised of the ability to automatically detect & configures the firewall if it finds that the connections are blocked. Although, there are many time when the firewall required to configure manually by the users.
In this post, we are going to discuss about how a QB user can configure the firewall for QuickBooks Point of sale by their own. While going through manual configuration, the users should read the manual provided by the firewall program. So that they can perform the configuration accurately. You can further go through this piece of writing for further information. However, if you need any sort of technical guidance, then in that case, give us a call at +1-888-510-9198, and our technically sound QuickBooks professionals will ensure to provide you with the best possible solutions immediately.
Processes that is Interrupted by the Blocking of QuickBooks POS
Below are few programs that will be interrupted when the security program blocks the QuickBooks Point of Sale utility:
Electronic Funds Transfer: Processing of the Intuit’s Merchant Credit Card
Database Server Manager: Capability to connect & record transactions/changes to the company file
Intuit Entitlement Service: Product license & user validation
Most of the time Point of Sale automatically configure the firewall for you whenever the connectivity gets blocked. However, few-times you need to configure your firewall manually. If you are going to configure your firewall application manually, you should review the appropriate sections of the manual that has provided with the firewall program.
Steps to Configure Manually Windows firewall for QuickBooks Point of Sale?
Points to Remember:
Firstly, You should have the authority on ‘Windows Administrator‘ rights to perform.
Ensure to add the required ‘Firewall ports‘ & ‘Executable files‘ for the Point of Sale utility (In case, the firewall security is a third-party program).
It is recommended to contact the developer of the 3rd party program to know – How to add port & file exemptions.
Manual Steps to Configure the Windows Firewall
First of all, You need to Press ‘Windows+R‘ keys, the ‘Run‘ command will open.
After that, Type ‘Control‘ & hit the ‘OK‘.
The ‘Control Panel‘ will appear.
On the right upper corner of the display, set the “View by” to Small Icons.
Now Choose the ‘Windows Firewall‘.
After that Choose the ‘Advanced Settings‘.
Select the ‘Inbound‘ option there.
Now Click on the ‘New Rule‘.
Choose the ‘Port‘, and then Hit the ‘Next‘.
Type the numbers of the ports, and then hit the ‘Next‘.
Choose ‘Allow Connection‘, and then select the ‘Next‘ option.
Give a certain name to your firewall rule, and then finally press the ‘Finish‘ button.
Important Note: While manually configuring the firewall of the device for QuickBooks. You will see questions with several options like deny, grant, block, permit, or something similar option. You have to select all the positive options like permit, allow, or grant the permission. The action is performed for one question or for a specific file or folder wont be automatically applied to all the files or folder in the POS program.
Perhaps, it could be possible that the client still encounters the problem with configuring the firewall in QuickBooks point of sale or any other issue related to QB. Well, you don’t have to be worry…!! Host Docket is a firm and dedicated team of certified Intuit accounting experts to resolve all the issues, no matter if it is related to firewall configuration, QB errors, QB Installation, or anything.
Also you can directly contact us at +1-888-510-9198. In the meanwhile, If you have still questions then feel free to contact us at our QuickBooks support number anytime.
FAQs Related to Firewall Configuration for QuickBooks POS
How do I set up firewall in QuickBooks Desktop?
You can set up firewall port exception using the steps below: 1. At first, open Windows start menu. 2. Now, enter windows firewall into the search bar and also open windows firewall. 3. Once done with that choose advanced settings. 4. The next step is to right click the inbound rules and later on create outbound rules. 5. Choose port and hit next. 6. After that ensure that TCP is selected.
How do I fix firewall issues in QuickBooks?
To fix firewall issues in QuickBooks, you need to perform the steps below: 1. At first, open QuickBooks database server manager and there choose start scan, in case the company file gets displayed. 2. If not, then browse to the location of company file, and choose start scan. 3. The QuickBooks database server manager will repair the firewall and security permissions on its own.
What is the firewall standard configuration?
Configuring firewall involves configuring domain names and internet protocol addresses and completing various other actions to keep firewall secure. Note that the firewall configurations are based on network types that can be set up with security rules.
How do I stop windows firewall from blocking QuickBooks?
You can simply add an exception for QuickBooks in firewall ports using the steps below: 1. At first, click on the windows tab. 2. Further, in the search bar, enter firewall 3. You now have to click on enter tab. 4. Click on windows firewall option. 5. And then, click on the advanced settings tab. 6. Once done with that, right click on the inbound rules field. 7. Select new rule 8. Also, click on port. “
A Complete Guide to Setting up the QuickBooks Email Service in QuickBooks desktop
QuickBooks allows users to set up email service on QuickBooks Desktop. If you have already set up its email service, you can use it to send invoice to your clients, send and receive reports, and perform other transaction as well from your QB Desktop through your outlook or webmail id. This added feature makes QuickBooks accounting software even more useful for small and mid-sized business owners.
If you are yet to use this QuickBooks feature or you are facing any issue in setting up QuickBooks email service, this article is for you. We have created this article to inform you how to set up email service and fix some common email service errors. Reading this article will help you out in setting up QuickBooks email service in QuickBooks desktop. Moreover, you can also call us at our toll-free number i.e. +1-888-510-9198, and our QuickBooks customer support team will be there to assist you or will set up email service.
Benefits of setting up QuickBooks email services
QuickBooks is loaded with features and these features make it efficient for businesses to perform their daily activities. And the email service feature can be of a lot of benefits to the users. It can help the users in the following ways:
One can easily email invoices whenever the customer requires it directly from the software.
Another plus point of this feature is that it allows the user to send payment reminders to customers by emailing them invoices.
It further helps in importing data from spreadsheets.
This feature serves both as a storage and tracking device for clients’ and vendors’ contact details.
Using this feature, one can make a list of the products and send them to the vendors in a more efficient manner.
Overall, this feature adds to the efficiency and smooth working of the business.
What do you need to set up email in QuickBooks?
In case you are planning to setup Outlook 2007 or Outlook 2003, then you might require the following information:
Username
Password
Outgoing email server address
Incoming email server address
Incoming email server type
Available Email options in QuickBooks
QuickBooks allows the use of limited email services. There can be situations where you might be unable to spot the options for a particular email at QuickBooks desktop setup, due to some or the other reason. One of the reasons can be a different version other than the ones listed below. The common three options available are as follows:
Outlook: In case you have Microsoft Outlook installed already, then simply avail outlook support. Also, note that outlook is a preferred email client and offers more effective hold with much ease.
QuickBooks Email: The second option is the QuickBooks email option. This is not so common option among QuickBooks users.
Webmail: Another option available is the webmail feature, which was launched in 2011 to bridge with Gmail, Yahoo, or any other email platforms.
Steps to Set-up QuickBooks Email Service on QuickBooks Desktop
Before proceeding, you need to prepare and setup your Microsoft Outlook profile.
You can use your existing Outlook profile or create a new one to set up your QuickBooks email service. You will also require Outlook username, password, incoming mail server address, outgoing mail server address and incoming email server type. In case you don’t have these details, you can contact your ISP (Internet Service Provider).
Procedure to set up QuickBooks email invoices in Outlook and web mail
To continue this process you need to create an outlook profile first.
Your webmail password will not be accepted on QuickBooks Desktop
If you are logged in to your QB desktop and trying to send email, you may receive a message that your password is incorrect and you would have to set up your password for your webmail account.
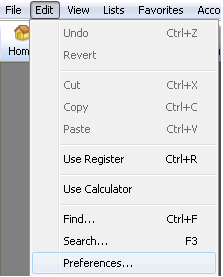
Quick tip: If QuickBooks Desktop doesn’t have outlook:
Go to ‘QuickBooks Edit‘ menu
Click on ‘Preferences‘
Select ‘Forms‘
Choose Outlook and click ‘OK‘
QB 2018: Provides for Gmail and Hotmail/ Lives user in the UK, USA, and Canada.
QuickBooks 2017 R5 and newer versions: Provides for Gmail users for the USA only.
QuickBooks 2017, older and R4 version: No Secure Webmail available.
Important Note: If you wish to add Secure Webmail to your QB company file, you should set up a strong password for your file.
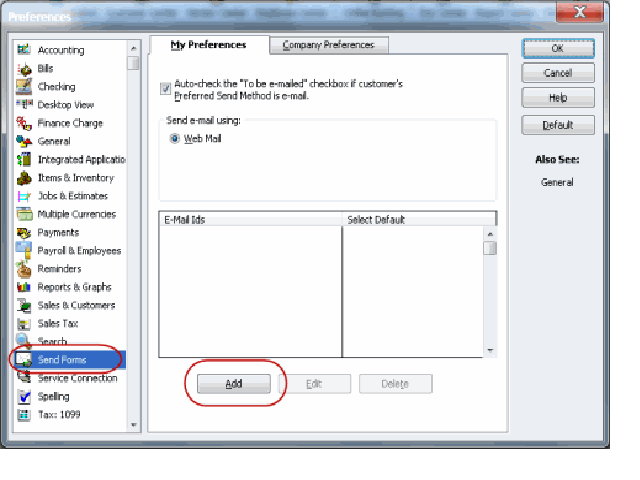
Go to QuickBooks Edit menu and select Preferences and then Send Forms.
Choose WebMail and Click Add.
Type in your email address.
Click “enhance the security” check box.
Click OK.
Sign in after the Login Page appears.
Allow Intuit access.
Important: In hosted environments like right network, you may have to sign into your webmail account to send emails through QuickBooks software.
Your internet service provider determines the Webmail servers and port settings. QB can automatically furnish details for Gmail, Yahoo and other common providers.
You can choose your email service provider in different emails if you use a different email. However, make sure you verify this with your ISP prior to setting up webmail in QB Desktop.
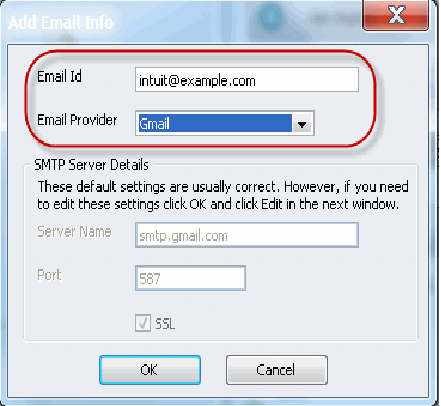
Go to ‘QuickBooks Edit menu‘ and select ‘Preferences‘ and Send Forms.
Select ‘Webmail‘ and click ‘Add‘.
Provide Login credentials.
QuickBooks email service set up- screenshot 3
Click ‘OK‘ to save the changes.
Important: QuickBooks Desktop, unlike the Secure Webmail, prompts you to provide your password the first time you use regular webmail to send an email.
In case QB Desktop still doesn’t take your password, please know that web mail providers (Gmail, Yahoo, etc.) practice two-step verification and want users to check the account setting for the same.
If you are a Cox user: Cox’s standard SMTP setting is not to use SSL or login credentials when sending emails. QB Desktop prefers SSL connections and wants you to provide login information. Thus, using port 25 and no SSL connection with SMTP doesn’t function with QuickBooks Desktop. A different trick is to use SSL with port 587 or 465.
If you are a CableOne users: Please use the following information since CableOne uses Google servers.
Email Address: Your Email ID
Email Provider: Gmail
Port: 587 or 465
SSL: Yes
Set up Email service in QuickBooks
This process requires you to choose the QuickBooks email settings.
Followed by opting for the QuickBooks email option.
Later on, enter the needed information like the email address, password, username, etc.
You are also required to enter in any other information asked to and this would successfully link the email service to your QuickBooks.
Set up regular webmail
Before setting up the regular webmail, make sure to perform the steps related to verifying the server and port information with ISP. The steps involved in setting up web mail are as follows:
Note that, the webmail servers and the port settings are governed by ISP.
Enter the information for some of the most common providers like the Gmail, Yahoo, and Hotmail.
Search for the server and port information.
Perform the steps that appear on the screen until it shows set up successful.
Internet Service Provider (ISP) and Port Information
Below we have shared a table in which we have mentioned various internet service provider and port information. The users can check out the below table to find out the exact codes and information.
SP (Internet Service Provider)
SMTP Server
SMTP Port
1AND1.com
smtp.1and1.com
587 (SSL enabled, with password)
ADELPHIA
mail.adelphia.net
110
AOL
smtp.aol.com
465 or 587 (see Note) (SSL enabled for incoming and outgoing mail server)
We hope that you find this blog post helpful and at the end of this post you might be able to Set up Email Service In QuickBooks Desktop. In case you have any further query we are available 24×7 at your service. However our QuickBooks online support team is always there to assist you in your problems.
You can call us at our toll-free number i.e. +1-888-510-9198, and our certified professionals will be happy to help you!
Here Is what benefits of using QuickBooks desktop pro
Majority of QuickBooks users and other entrepreneurs believe that QuickBooks can only be used for Bookkeeping. They are unaware of the capabilities of QuickBooks and the various tasks it can perform with perfection. Contradiction to the misconception, QuickBooks is a multitasking software that has helped millions of small- and mid-sized business owners to meet their business goals. The maker of QuickBooks – Intuit keeps on introducing new features and versions of the software, in order to offer better user experience. And it can be used to perform a lot more tasks than just bookkeeping such as customer support and inventory creation. The users should accept the fact that QuickBooks can perform a lot more tasks than just bookkeeping.
Businesses that are incorporated and have employees typically need more advanced accounting packages then QuickBooks is the solution to all. QuickBooks is a good compromise between trying to do your own accounting using spreadsheets and hiring a professional accountant and bookkeeper to perform all of your small business’s accounting.
This article is created with an aim to discuss QuickBooks Pro’s usefulness. But since including all the utilities in one post isn’t feasible, we are going to discuss a few major uses of the software. However, if you are still doubtful regarding QuickBooks and its features, then feel free to get in touch with our QuickBooks premier support team via our toll-free number i.e. +1-888-510-9198. Our team will provide you with all the latest facts associated with QuickBooks.
QuickBooks Pro is a financial accounting software application that is made by Intuit. This software is developed for usage by local business, the software flaunts a variety of features aimed at helping users to handle each of their accounting features, consisting of accounts payable, credit card management and financial reporting. Using QuickBooks Pro to maintain your company records allows the users to prevent those possible problems.
There are countless perks using QuickBooks Pro in general, however the user has 2 options in terms of which package to purchase: Pro or Premier. The primary benefits to using QuickBooks Pro falls into a series of common categories. If you have still not utilized QB Pro, then it’s time to pull up your socks and avail the numerous benefits it offers. This software can provide your business the adhering to five advantages:
10 Crucial Usage of QuickBooks Pro Excluding Bookkeeping
In order to broaden the ideas, there are some basic advantages that QuickBooks pro accounting software offers. Mostly all the users taking care of the QuickBooks Pro ought to experience the benefits of it. Here Is What QuickBooks Pro can do beyond Bookkeeping:
1. Customer Service
The first advantage that made to the list is customer service. Catering to customers queries isn’t something any service provider can do. Though, it’s a fact that QuickBooks desktop Pro can’t listen to a user’s issues but certainly does a lot to help its users manage them. The users can write and keep significant notes handy, monitor overdue invoices, and keep all contact information accessible all the time.
Not only this, but also the Customer Snapshot offers users with all their client’s crucial data on one screen. These QuickBooks Pro features enable users to handle a customer without any delay in accessing for vital data. The software is also equipped with advanced email capabilities. Its ability to establish excellent and uninterrupted communication between a user and client make it a valuable software. Thus, QuickBooks Pro can be really beneficial in customer service.
2. Inventory Control
Inventory is an integral part of bookkeeping and this QuickBooks Pro feature comes handy if you are a merchant and sell products or you need to keep some stock stacked for your company. QuickBooks Pro incorporates inventory control with bookkeeping through a few significant features. The accounting software enables users to create orders as well as schedule reorder points. The users need to be watchful for the inventory levels so that they know the exact time when they have to organize a fresh shipment. Thus, if you are not aware that QuickBooks offers inventory control feature, then try it now and make the best use of it.
Not be known to many, QuickBooks Pro is capable of handling more tasks than the most accounting and bookkeeping software and it helps users in managing the details of communication. This accounting software offers something beyond basic email notices. Multiple attachments including information about a particular client or job can be included and previous messages about the same transaction can be checked. Furthermore, users can also thoroughly customize their email templates.
These features of QB Pro make communication with customers, vendors, and affiliates immensely simple, clear, and more professional. As per the requirements, the users can easily add a header, image(s), unique signatures, or all three. Good communication is a vital part of good bookkeeping as well as business management. The tools equipped in this advanced accounting software respond to immediate issues for an uninterrupted workflow.
4. Shipping
Pausing crucial tasks to handle shipping of the deliverable can be frustrating and annoying. The postal services are improvising themselves and working continuously to make the process faster and simpler, but it still going to take some time to provide business with the sort of service that is expected. Leave the postal services, even print, and ship online service also at times may be complicated. It requires separate registration and payment methods. Indeed, you will have to stop whatever you are doing to take care of shipping.
This is where QuickBooks accounting software comes into play. QuickBooks seems to have some great features for the users to save both time and efforts. With QuickBooks Pro the users can now auto setup the shipping process rather than dedicating a significant amount of time for the task and also avoid any kind of hassle or error in performing the task. QB Pro incorporates UPS, USPS, and FedEx, allows users to be able to ship essentially anything with least effort.
One of the most essential benefits of using QuickBooks desktop pro is business improvement. All organizations and individuals make investments to enhance their business values. Though, not all services or software purchased and paid for offering the desired outcome work well. Luckily, QuickBooks Pro does that. Feature to generate advanced reports, ready-to-use templates and multiple other QB Pro features keep users ready to deliver in the least possible time and makes QuickBooks desktop Pro one of the highly preferred accounting software. On top of that, the software can be used to customize the report, build it from scratch, use the existing templates, and to access a wide range of templates used in the industry by other QuickBooks users.
These reports consist of customer rankings, profits, expenses, and other useful details. QuickBooks Pro reports keep users updated with every change. In simple words QuickBooks helps the businesses to generate reports with more accuracy in less time.
6. Data Accuracy
Either you have a large or small business you have to keep accurate records of your finances. You cannot avoid the fact that humans don’t make mistakes, with the help of accounting software the chances of calculation error is minimum. You never know how or when a calculation mistake can lead to a disaster. Light yourself from the burden of calculator and paper ledger by letting QuickBooks accounting software automate tasks and minimize the errors. You can easily verify digital documents and fix errors before printing.
If you opt for QuickBooks, the next generation accounting and bookkeeping software then there is no doubt that you can access your business accounts from anywhere. QuickBooks offers you many options, on how you want to manage your accounts either it be on cell-phone or desktop. This will allow you following the independence of following tasks:
You can view client, expense or invoice information.
You can send the invoice directly from your cell-phone.
With the help of a built-in timer track, you can track billable time.
With your contact on the phone, you can directly import a new client.
You can record expenses immediately and attach bills.
It is compatible with any sort of devices.
One more money and time-saving advantage of QuickBooks Pro accounting software is the ability to allow your accountant directly access to your accounts through the online application, rather than manually transfer paper or electronic files whenever they have to access to your accounts.
8. Security
Just think of it that your company file is in wrong hands by accident, it can jeopardize all your business efforts. The abundance of confidential data, such as financial balance, account numbers, social security and employer identification numbers will be at huge risks. Business owners must consider such accounting software which can describe security features in detail such as malware technology, anti-spyware and firewall protection.
One of the most important aspects of using QuickBooks accounting software is that data loss can never happen. It automatically saves a backup of your company file in the main server, in case the software crashes.
The developers of QuickBooks accounting and bookkeeping software developed it in such a way that even a person with minimum knowledge can manage this software. This software is extremely user-friendly and uncomplicated. Although, sometimes an error may pop in your software but don’t worry, with the help of 24×7 QuickBooks customer support you can troubleshoot errors. Not only this, when you opt QuickBooks accounting software it will set up a new user function which will offer you with a visual orientation practice.
With a single mouse click, you can experience this software’s capabilities. As an accounting software, it is its purpose to fulfill the needs of its users in either way.
10. Sales Invoicing
QuickBooks accounting software offers its clients the time-saving feature of keeping track of sales and generating receipts and invoices at the single click of a mouse. Then, via email, you can directly deliver invoices to your customers. This software furthermore enables customers to be charged separately or in large batches. Users that sign up for Intuit QuickBooks Merchant Services get the additional benefit of being in a position to accept credit as well as debit card fees via QuickBooks Pro.
Users who sign up for Intuit Check solution for QuickBooks will get the feature to scan and deposit checks into the software, getting rid of the requirement to manually key in the data.
QuickBooks Pro is useful accounting software of business of all sort and sizes, and is highly recommended for small businesses. The advanced software saves both time and money for business owners. It can multitask with accuracy. It’s an amazing investment that does a lot more than just bookkeeping. In a nutshell, it can be said that QuickBooks accounting software is not confined to bookkeeping, rather it performs manifold tasks that too in the smoothest possible way. We expect that after reading this article carefully, the user will successfully make the best us of this amazing benefits of using QuickBooks desktop pro.
However, if you still have certain doubts regarding this software, or you are seeking for someone who can help you into your problems, then you can directly talk with one of our Intuit certified ProAdvisors by dialing toll free +1-888-510-9198. Do not hesitate, and get in touch with our QuickBooks support team today. Our Certified Accountant and bookkeepers are always ready there to help you!
FAQs Related to QuickBooks Pro
What are 3 benefits of using QuickBooks?
The Benefits of using QuickBooks desktop pro are as follows: 1. QuickBooks allows users to create and track invoices easily. 2. It keeps track of expenses and bills on its own. 3. QuickBooks is intuitive. 4. QuickBooks has an automated backup service. 5. QuickBooks is customer-oriented.
Why is QuickBooks better than other accounting software?
QuickBooks stands out as a leading accounting software, known for its user-friendly interface, comprehensive features, and vast third-party programs.
Why do accountants like QuickBooks?
QuickBooks helps in tracking the business finances all in one place, which makes it easily accessible to you and your accounting team.
Why should I switch to QuickBooks?
Switching to QuickBooks Online offers the ultimate in accounting flexibility, which is one of the best benefits of using QuickBooks desktop pro. You have access to your business data anywhere, on any device when you work in the cloud. With all your data in one place, you can collaborate with your bookkeeper or your accountant in real time.