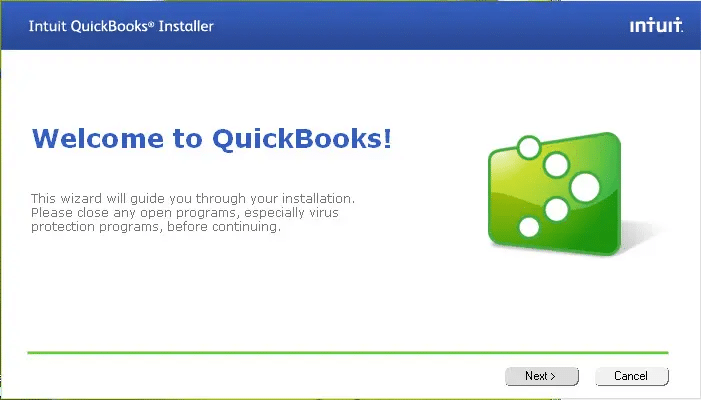
Searching for the procedure to change registered email address in QuickBooks? Well, while accessing or logging in QuickBooks, at times a thought of changing the registered email address might strike to the user’s mind, due to various reasons. Now, Intuit Inc. made it easy for the users to do it. Later, you can update the desired email address with the help of the old email address. Updating the email address is essential, as it is one of the basic or primary means of sending crucial and sensitive notifications and communications. Also, email address is one way of retrieving the User ID or password. All these factors make it necessary for the users to keep updating the email address after a certain time period.
If you also feel the need to alter the email address, but do not know what to do, then this article is a savior for you. In this post, we will briefly introduce you the process to do so…! If you no longer have access to your old registered email, check out the Email change request. Or you can even directly reach the QuickBooks online support team via our toll-free number i.e. +1-888-510-9198 Our team will perform the procedure for you without any hassle.
Do you want to change the registered email address? Now updating the QuickBooks associated email address is simple & effortless. There can be two possible situations listed below, let us check them out:
If the old registered email is accessible, then in that case log into QuickBooks Online & pursue a few straightforward steps to update the registered email address.
Or if the old registered email is no longer accessible, go to the “Email change request” option.
Notifications you will receive
Notifications are one of the important aspects, as they can mean many things. There can be many forms of notification that the user might receive via email, a few of the examples are as follows:
Procedure to change the email address associated with your business
Choose the “Gear” icon on the Toolbar.
In “Your Company” section, choose the “Account and Settings” tab (or Company Settings).
In the menu section, select the “Company” tab.
From the “Contact Info” section, choose the “Pencil” icon.
In the “Company email” field, type in the new email address. (Note: Check the box for the same as company email, if it’s the same email address that you use for your sales forms).
Select the “Save” icon, and then click on the “Done” tab.
How to change the email associated with a location (for location tracking)?
Select the “Gear” icon on the Toolbar.
In the “Lists” tab, select the “All Lists” tab.
Choose the “Locations” tab.
Select the desired location you want to edit, and then in the drop-down lists on the action column, select the “Edit” tab.
Check the box for this location has a different email address for communicating with customers.
Type-in the email address, and then choose the “Save” tab.
Update email address for notifications
First of all, sign in to “My Account”.
In the next step, on the “Manage your QuickBooks page”, the user is required to select the product that is to be managed.
After that, the user should check if he/she has logged in to the correct company, by looking at the top right corner. If not, the user should select the correct company from the drop-down list.
Moving ahead, the user should scroll down to the “Authorized users list”.
And then, select the “Edit” option, beside the name.
The next step in the process is to enter the “new email address” and hit “Save”. Also, select the “X” button to get back to the home page.
Lastly, the user will receive notifications regarding the change in the email address.
Change email address in QuickBooks desktop
One can choose any of the below options to change email address in QuickBooks:
Option 1: Change an Email Address in QuickBooks Desktop for Signing in
One can try to modify the current email address and try to login into QuickBooks with another ID. The user is recommended to pick a product or service from the manage tab of your QuickBooks page. After that find the company name option and choose the drop-down menu which is next to it. One can further view edit login with the drop down. And further the email address can be changed using this feature. Let us have a look at the steps to be performed to change the email address:
The first step is to sign in to QuickBooks desktop and then head to manage your QuickBooks.
The next step is to choose a service or product that you need to manage.
Now, press the dropdown option which is next to the company name.
After that, click on the edit login tab
And also hit the enter tab for profile
Go for the edit option which is available near the email address
The user is then required to enter in a new id in the email address
And press confirm email address
Enter the password that you are using to login and press save tab
On the new email id, wait for the verification
And then, open the verification in inbox and click on the verify my email
Make sure to click on continue after seeing the verified email
Option 2: Change an Email Address in QuickBooks Desktop for the Notifications
It should be noted that only after signing into your account can the process be performed. You can use the existing email address. The steps involved here are as follows:
The very first step is to sign in by entering my account
After that on manage your QuickBooks, choose a product or service
The next step is to ensure that the correct component is logged in. You can also select the appropriate business by selecting the menu tab.
Note, the search list for authorized users right now.
After that click edit by the name
And also mention the modified or new email address.
The user needs to choose the save from the menu.
And also press the X button.
After the steps have been performed, a notice will be delivered to the new email.
This will confirm the email
How to Change Your Email Address in QuickBooks Online?
When you want to update or add new email to QuickBooks online, you can simply go for settings and choose a new ID to sign in to tour account by using settings. Note that the steps for QuickBooks online accountant change. Let us have a look at the steps to be performed to change email address in QuickBooks online.
Option 1: Changing QuickBooks Online Email Address for the Company
For changing an email address for your company, you can first open settings. For accountant and settings, look for your company. Select the company option and this will show up the contact information. Make sure you choose the correct id. And continue with the steps below.
At first, the user needs to press the icon stating the settings tab.
Now, look for the complete tab.
The next step is to head to the account and settings tab.
Once done with that, the user needs to choose the company from the available options.
Followed by, click on the contact info.
Now, enter the company’s updated or new email address.
The next step is to choose the customer facing email.
After that, hit save tab after entering the new email id
The user is then required to click on new and also click on invoice that is below the customers.
Once done with that, make a sample mail and click on save.
Now, check that the new email id has is present in the field and click on send and close.
Once you receive the email, ensure that it mentions the new email address
Option 2: Change an Email Address in QuickBooks Online for Signing in
If you use QuickBooks online, then you need an email to access the account. You might not want to use the registered or preferred email ID for various reasons. You can simply change it by performing some set of steps. Head to the settings option to modify/update your email address. The steps below will help in changing the email address.
The very first step is to open it by clicking on QuickBooks Online.
Head to the Settings option of the software.
Click on the options that are available.
Furthermore, click on one of the following:
Intuit Account
Your Account
Head to the section of Email Address.
Click on the Edit option.
End the process by signing in and entering the new email ID and then save it later on.
Option 3: In QuickBooks Online Accountant Change a Registered Email Address
This can be done by clicking the Gear icon and selecting the Company from the menu. Also click the Account tab. The steps below will help in completing the process.
The first step is to click on the Gear button in QuickBooks Online Accountant.
Navigate to the Your Company option.
You have to click on the tab titled Your Accountant.
Go for the icon that looks like a Personal Profile.
Furthermore, click on the symbol of Edit Personal Information.
Head to the section that says Your Sign-in Information and then you have to visit the tab for Change Sign-in Info.
Now, press the option of Continue.
Also, mention your username and password on the sign-in page.
Go for the Sign in option.
Head to the profile and look for the section of the Email Address. Enter this section.
Now, hit the Edit tab and enter your new email ID.
For this ID you have to enter the password and then click on the Save option.
Wait for the confirmation message that will confirm that the email address has been changed in QuickBooks Online Accountant.
Once you save the modifications, the email address will be updated on the associated servers. Hopefully, this article will turn out to be helpful for you to know how to change your email address in QuickBooks ..! If you are still unable to change your registered email address even after following the above steps are prescribed, then you can contact our QuickBooks toll-free helpline number .i.e. +1-888-510-9198 without waiting much time and effort.
FAQs Related to change email address in QuickBooks
How to change primary admin email address in QuickBooks?
You can sign in with Intuit Account info. And this should be different from what you use to sign in to the company file. Further scroll down to the primary contact section and further choose change. And also go for the new primary contact from the list of contacts on the account.
How do I set up email in QuickBooks desktop?
You can set up a secure webmail using the steps below: 1. You need to head to the QuickBooks edit menu and further choose preferences. 2. Further, choose send forms. 3. Also, go for web mail and select add. 4. The next step is to choose provider from the drop down and enter the email address. 5. Once done with that, choose the use enhanced security checkbox and hit ok tab. 6. When asked, sign in to the Intuit account.
How do I add multiple email addresses to QuickBooks desktop?
You can add multiple email addresses to a report using the steps below: 1. Head to the reports tab. 2. Once done with that choose the report you want to send, and choose the email icon. 3. Now opt for email and in the to field, enter the email addresses separated by a comma and space. 4. You now have to enter the email addresses in the CC field. 5. Choose send and you are done.
Did you know that QuickBooks database server manager is a must-have to access QuickBooks in multi-user mode? Well, QuickBooks database server manager, also known as Intuit personal database manager tool makes it quick and easy to create network data files for each and every company file on the host system. QBDBSM is the only way to access multi-user mode in QuickBooks.
In today’s article, we are going to discuss the various aspects related to QuickBooks server manager. Thus, make sure to read this post till the end. However, if you are looking for expert assistance, then in that case you can get in touch with our QuickBooks desktop support team via our toll-free number i.e. +1-888-510-9198. Our experts will help you with all your queries immediately.
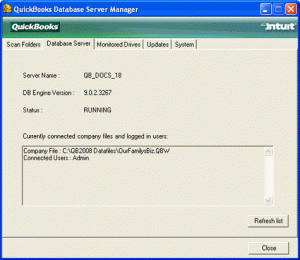
QuickBooks database server manager is tool in QuickBooks that lets you configure QuickBooks server for the multi-user access. This tool develops network data file (.ND) for the company file on the host computer. It is also famous as Inuit’s personal database manager tool. This amazing tool makes it easy for the users to create network data files for the company file present on the host system or on the host workstation.
In case the user wants to use multiple desktop version of QuickBooks, then the user will have to install this effective tool. Note that without this tool, it is not possible for the user to access multi-user mode. Each version of QuickBooks database server manager installed on the system adds to a new user to the desktop version. Later in this article, we will discuss how to install, update and setup the QuickBooks Database Server Manager.
Following are the activities it can perform:
Scan the QuickBooks company file as it is important for the multi-user access
Check the local storage device so as to detect new company file automatically
Important Note: The QuickBooks Desktop needs the optimum file performance on the network and so you can install and set up the tool on your system in the location of the company files.
Easy and Quick Tips to follow
The QuickBooks Database Server Manager 2023 develops Network data files and stores the company file in the host computer. In case, you want to use the multiple version of QuickBooks Desktop it is important to install each version of the Database server manager.
If you are planning to install multiple versions of Database Server Manager then it will provide you with only multiple versions of processes. However, it cannot provide multiple versions of the software.
Install the Database server Manager in a chronological order, which is from the oldest to the newest version, when you want to use multiple versions of QuickBooks Desktop.
Be informed that the year’s database services are running in the background when the server works for each year. Ensure that the services of the windows interface that can be accessed through the Windows and the Control Panel than this service is mentioned in the QuickBooks DBXX where the xx shows the number of versions.
Each of the QuickBooks versions add one user when the QuickBooks Database Manager is installed. (ex. QBDataServiceUser28 for 2018 and QBDataServiceUsers27 for 2017).
Steps to Download QuickBooks Database Server Manager
The database server manager can be downloaded without any issue. It is usually a part of QuickBooks. If you are not having database server manager already, then you can download it from the official Intuit website. The steps involved in the procedure to download quickbooks database server manager are:
Start with downloading QuickBooks tool hub from Intuit’s website, and further navigate to the downloads by pressing Ctrl + J.
Now, click on QuickBooksToolshub.exe file.
You now have to click on yes tab to allow the app to make changes.
Once done with that, click on next tab to install it and also click on the yes tab to accept the license agreement.
Furthermore, click on next tab and install options.
The process might take some time.
Once the installation ends, click on finish tab.
And also open QuickBooks tool hub icon.
Now, under the network issues tab, choose QuickBooks database server manager.
When the process ends, give all the users permission to access the company folders. However, QBDBSM will create a unique user for each installation by default. This will download QuickBooks database manager successfully.
Steps to Install QuickBooks Database Server Manager
Here is how to install quickbooks database server manager. Let us have a look:
In order to install QuickBooks desktop database server manager, the initial step is to double-click on the installer and the “Start” with the installation of the “Wizard“.
If your computer has internet then to download an update click on “Next“. In case the computer is not connected with the internet then tap on “No” and then on “Next“.
Now, the user will have to close “All programs” that are open and click on “Next“.
The user is also required to carefully read the “Terms of the software license agreement” and if you agree with the “Terms and conditions” then select “I accept the terms and license agreement” and click on “Next“.
Once done with that the user needs to opt for “Custom or Network options“
After this click on the installation type
Select “I’ll be using QuickBooks on this computer And I’ll be storing“….and when you want to run the program in your system.
Opt for the “I will not be using QuickBooks on this computer…” when only QuickBooks data will be stored on this computer.
The next step in the process is to click on “Yes“, Allow “Access“.
Steps to Update QuickBooks Database Server Manager
It is necessary to update QuickBooks Database Server Manager. It is important because when a critical update is released or when the new version of QuickBooks Desktop is installed in the computers. Let us explore the steps for downloading quickbooks database server manager update.
After the completion of the installation, you have to reboot the server and it is very important to do so.
Once the server is updated on each of the workstations you will get the message: The Company File needs to be updated to work with this “version of QuickBooks Desktop.”
After that, the updates can modify the database structure and in such instances, you will get the message to “Create a backup“.
This will allow the users to open the file when you follow the prompts once you complete the backup.
Steps to Set up and Use the QuickBooks Database Server Manager
The Database Server Manager tool can do the following:
The folders and QuickBooks company files that needs to be configured for multi-user access are scanned
The local hard drives are used so as to automatically configure new company files
“Hope this infographic will be informative for you to understand about set up of QuickBooks Database Server Manager”
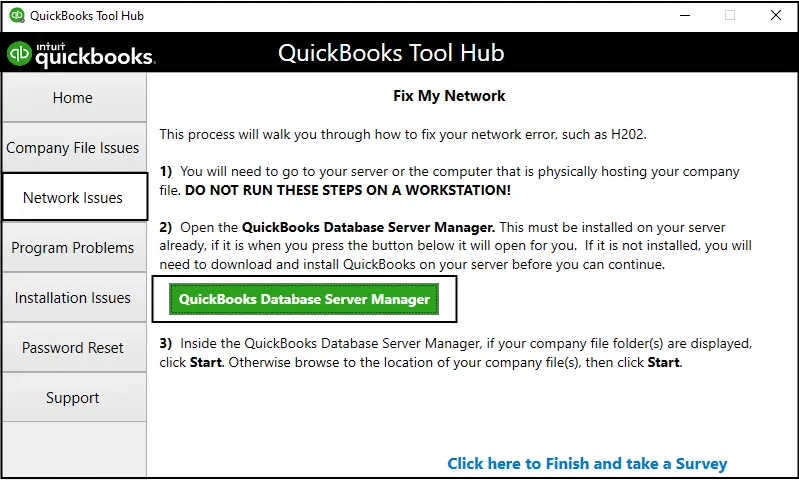
Step 1: Open QuickBooks Database server manager
Get to know how you should open the QuickBooks Database Server Manager:
The initial step in the process is to Go to “Start” button then click on “Programs”, then click on QuickBooks, and then click on “QuickBooks Database Server Manager“.
The company files that you store on the server should be scanned to ensure that they are configured to permit other users to access these company files easily.
Go to the “Start” button and then click on “Programs“. After this click on QuickBooks. Then on QuickBooks Server Manager.
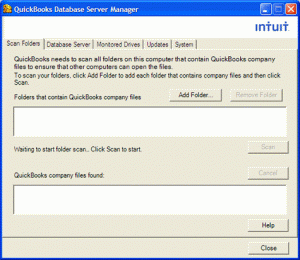
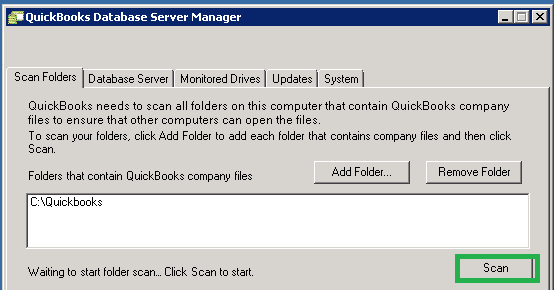
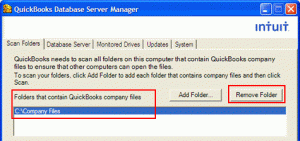
And then click on “Scan Folders“
After this look for the folders that contain “QuickBooks company files“. In case you don’t know which files then scan the entire the whole disk.
Lastly click on the “Scan” button.
All the company files that are configured in the scanned folders for multi-user access when they are completely scanned.
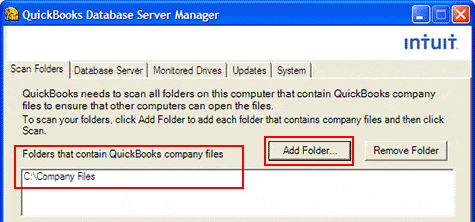
Step 3: Steps to Add Folder
Click on “Add folders” button and then select the “folder” you wish to include there.
The location of the folder under the folders which contain the “QuickBooks company file“.
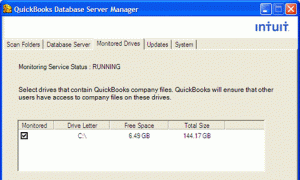
When you add new company file to the server, you can use the “Monitored Drive features” which keeps your QuickBooks Database Server Manager 2016 updated
First of all, go to the “Start” button and then click on “Programs“, then on QuickBooks and then click on QuickBooks Database Manager.
And then, click on “Monitored Drive tab“
“Remove and rename” and then click on “Select“, in case you want all the “local drives” that you want to monitor for company files.
Permit QuickBooks database server manager to run on the server computer
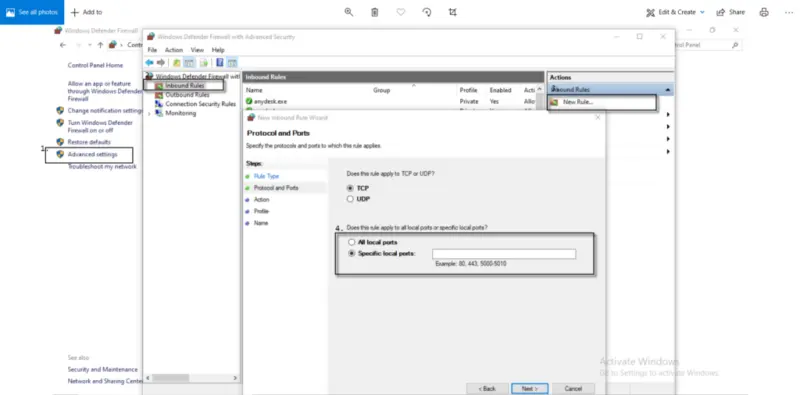
You can try performing the below steps to allow QuickBooks database server manager to run on the server system.
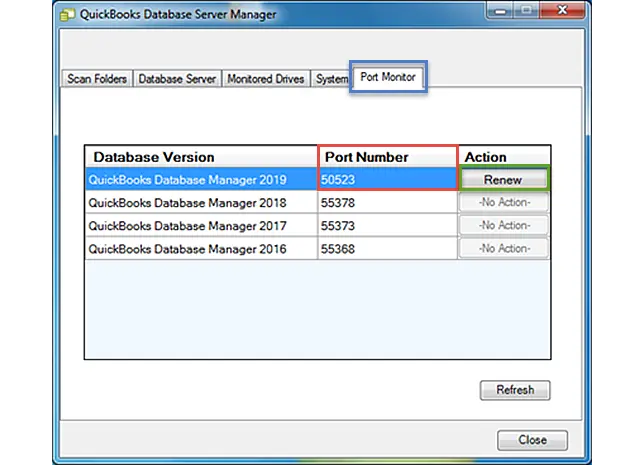
Once done with that, open QB database server manager and click on Port monitor tab.
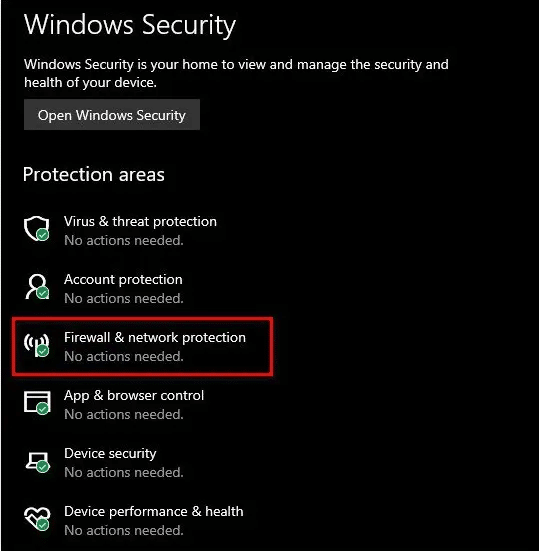
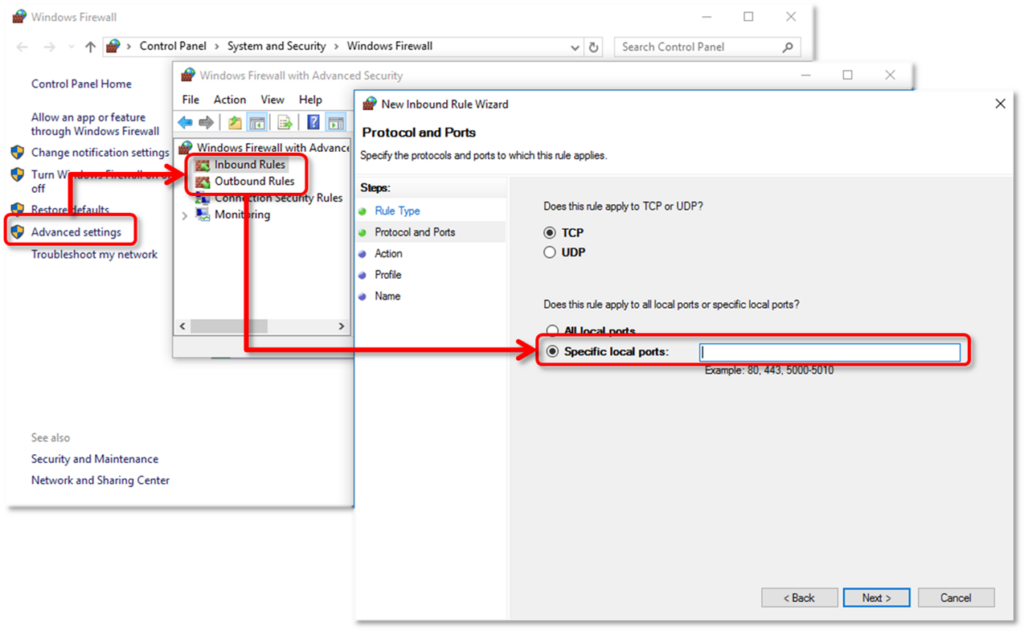
You now need to click on start menu and further look for windows firewall and open it.
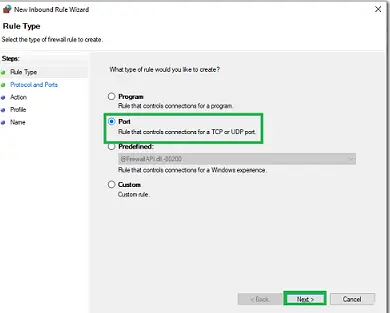
Once done with that, right click the inbound rules from the advanced settinsga and further choose rule.
Now, choose port and hit next tab.
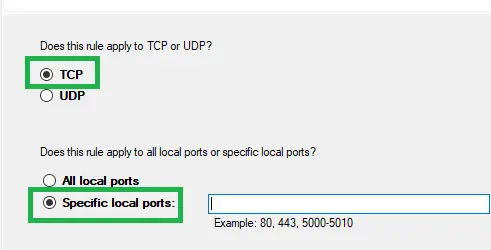
Choose TCP
Enter in specific ports in specific local ports option.
The port format is as per the QuickBooks currently in use:
QuickBooks Desktop 2020: 8019, XXXXX
QB Desktop 2019: 8019, XXXXX
QuickBooks Desktop 2018: 8019, 56728, 55378-55382
QuickBooks Desktop 2017: 8019, 56727, 55373-55377
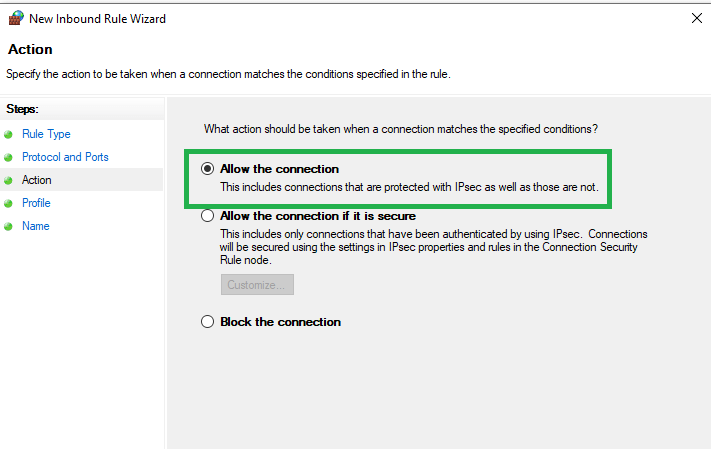
You now have to click on next tab and also allow the connection.
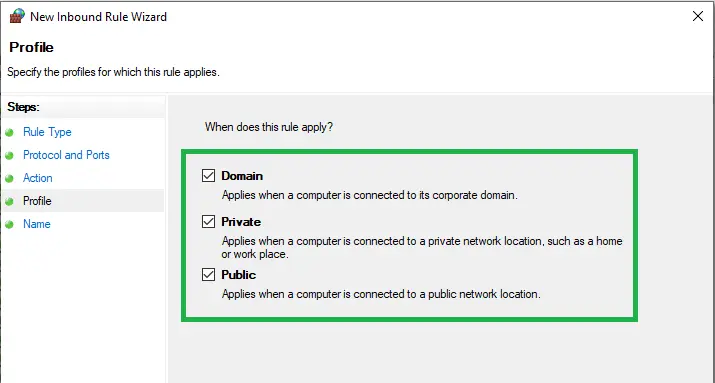
Click on next tab when needed and further mark all the profiles.
Once done with that click on next again.
Create a rule and also assign a name to it.
The last step is to click on finish option and also repeat the steps for outbound rules.
What are the features of QuickBooks database server manager?
Following are the features of QB database server manager.
Database Server Features
To determine open your QBDSM:
The list of users who are log into each company file and the company files that connect to the server.
The status which displays the services of the QuickBooks Database Server. All the services should be running when the server is hosting the company files.
In case, you want a change in the status of the services then use the Services Administrative Tool to configure the services QBDBXX.
We hope that this article has helped you with QuickBooks database server manager download, Install, Update and Set up. In any case, you have any query regarding Database Server Manager then seek assistance from QuickBooks enterprise technical support team.
Host Docket is a team of Intuit Certified ProAdvisors and available for 24/7 to help you. Our experienced technicians are available to provide you with any kind of guidance or solve any error faced by QuickBooks Database Server Manager. Dial our toll-free support number i.e. +1-888-510-9198
Frequently Asked Questions!
Where is QuickBooks database server manager stored?
You can perform the steps below to spot the database server manager. Note that quickbooks database server manager free download is available to QuickBooks users. 1. The very first step is to head to the host or server system. 2. After that, click on the Windows tab. 3. Now, in the search menu type database. 4. Also, click on the enter tab to open QBDMS. 5. The last step is to click on properties. And find the location of QBDMS.
Do I have to update QuickBooks database server manager?
Well, it is important to update the QuickBooks database manager because it is critical to update when the new version is updated.
How to delete old QuickBooks database server manager?
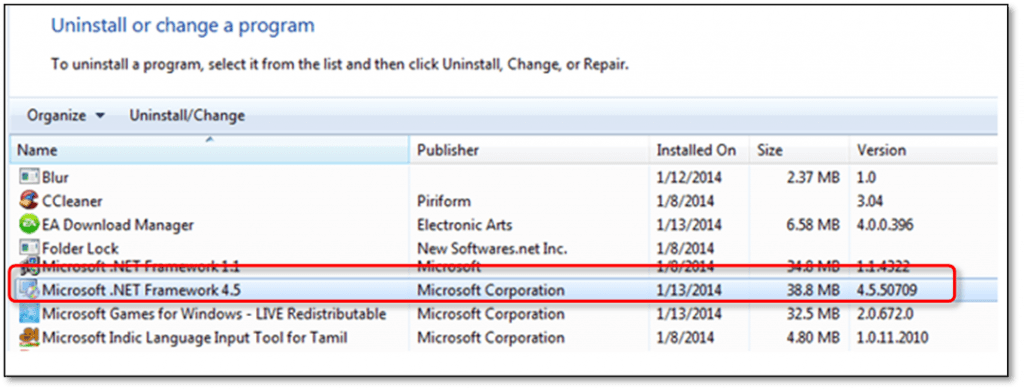
The user can try performing the below-stated steps to uninstall the QuickBooks database manager. 1. The first step is to press windows + R 2. After that, run dialog box will open on the screen 3. Now, type appwiz.cpl and press the enter tab 4. The next step is to navigate to the programs and features and choose QBDSM 5. Right-click the drop-down menu and also choose uninstall tab 6. Perform onscreen steps and this would end the uninstall process
Checkout the supported versions of QuickBooks desktop in Windows 10:
Are you planning to upgrade QuickBooks? Have you checked whether your Windows 10 is supported with the software version you are planning to use? Well, every software has certain system requirements that are to be met, in order to avoid any sort of compatibility issues. Thus, to help you avoid any sort of compatibility issue with your Windows 10 version and QuickBooks version, here we are with the list of QuickBooks versions that are compatible with Windows 10 along with some of the momentous information related to Windows 10.
For more details, make sure to go through the article till the end. Or you can also get in touch with our QuickBooks support team for expert assistance. You can simply make a call at our toll-free number i.e. +1-888-510-9198, and let our experts and certified QuickBooks professionals fix the error for you.
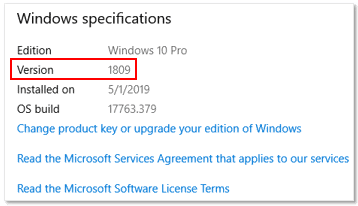
Windows 10 is not used by everyone on the same version. Thus, in order to check the version, along with other specifications, the below-listed steps can be carried out.
The very first step in the process is to click on the Start menu, and then type About your PC
After that the user is supposed to click on About your PC, followed by scrolling down to look for the version number
New updates included in Windows 10
The start menu in the latest version is the same as in Windows 7
Windows 10 comprises of a virtual desktop, called the task switcher
Microsoft Windows 10 boasts the latest version of .Net framework (4.6)
Windows 10 comes with a new browser named EDGE
The new versions bring more control over the optional updates
The cloud download for reinstalling Windows
You can rename the desktop
Disk type and GPU temperature in the task manager
The web browser Internet Explorer 11 is available in the latest version of Windows
It also includes a new browser named the Microsoft Edge Renaming Virtual Desktops
Disk type and GPU temperature in the task manager
WSL 2 with a Linux Kernel Bandwidth limits for Windows update
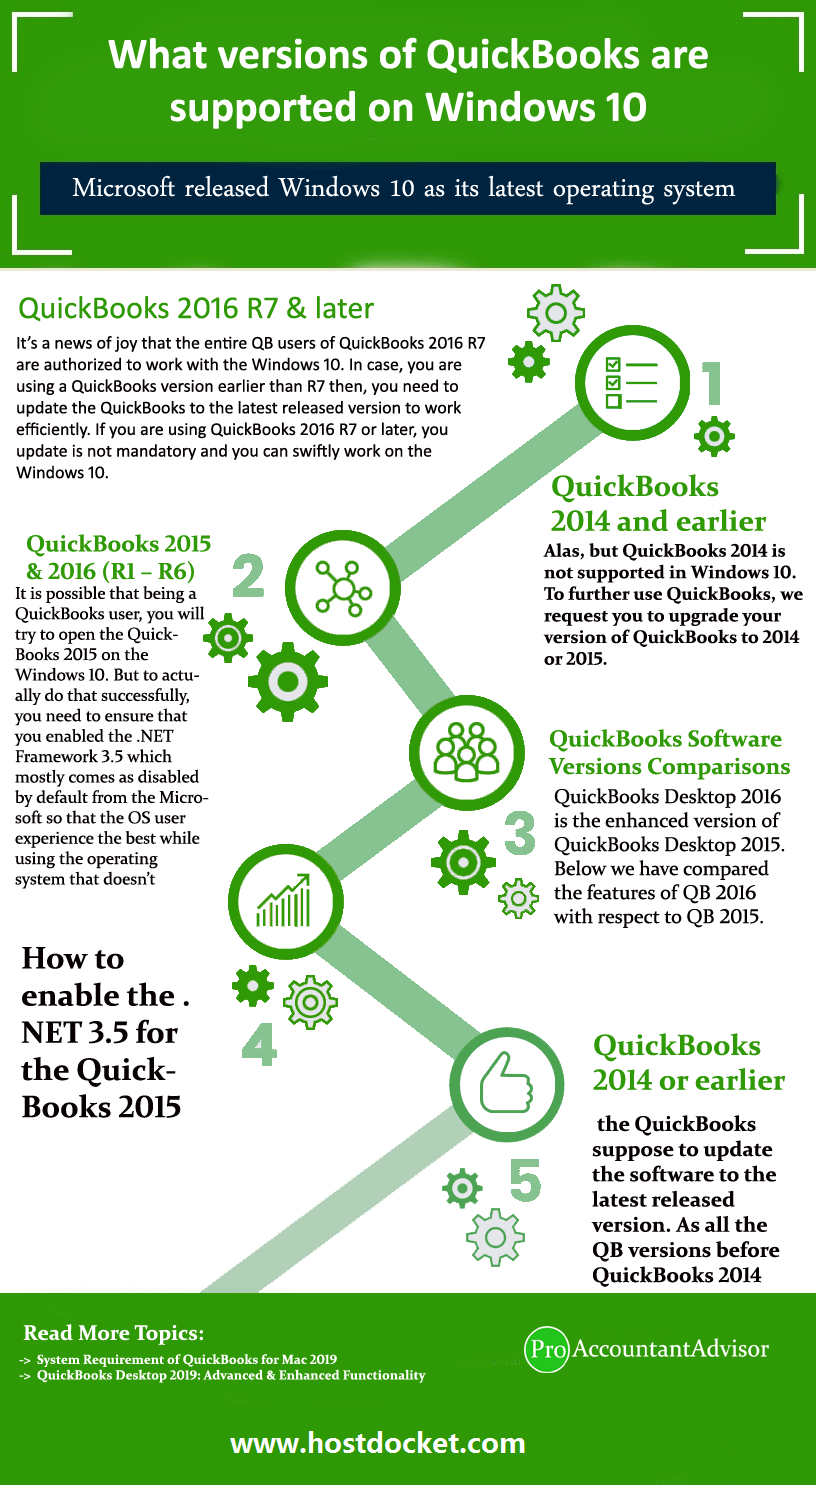
Supported Versions of QuickBooks desktop in Windows 10
After obtaining the version number, the user needs to look for the version that is certified to work with QuickBooks. Below we have mentioned the versions supported by QuickBooks Desktop.
Windows 10 version 1809:
QuickBooks Desktop 2020 is certified to work in a proper manner on version 1803 of Windows 10. However, QuickBooks Desktop 2017-2019 is not completely certified.
Windows 10 version 1803:
Coming to this version of Windows, QuickBooks Desktop 2017-2020 is entirely certified to work in the best possible way on this version of the Windows operating system.
Windows 10 version 1709:
Similar to the earlier one, on this version of Windows also QuickBooks Desktop 2017-2020 is certified to work without any hassle.
Windows 10 version 1507, 1511, 1607, and 1703:
For those who are using the Home or Pro versions of the mentioned Windows editions, then it is recommended to update them to the latest release of Windows 10. The reason is that Microsoft has already discontinued support for the mentioned versions.
Supported Version of QuickBooks Desktop supported with Windows 10
QuickBooks 2016 R7 & later
It’s a news of joy that the entire QB users of QuickBooks 2016 R7 are authorized to work with Windows 10. If the user is using a QuickBooks version earlier than R7, then in that case the user needs to update the QuickBooks to the latest released version, in order to work in efficient manner. However, for QuickBooks 2016 R7 or later users, updating is not mandatory and can swiftly work on Windows 10.
QuickBooks 2014 and earlier
It should be noted that QuickBooks 2014 is not supported in Windows 10 and using this version might create compatibility issues or can end up in a complete mess. Thus, to further use QuickBooks, we request the user to upgrade the version of QuickBooks to 2014 or 2015.
QuickBooks 2015 & QuickBooks 2016 (R1 – R6)
It is possible that being a QuickBooks user, you will try to open the QuickBooks 2015 on Windows 10. But to actually do that successfully, you need to ensure that you enabled the .NET Framework 3.5 which mostly comes as disabled by default from Microsoft so that the OS user experiences the best while using the operating system that doesn’t support the QuickBooks.
Windows 10 also supports QuickBooks 2015. Although you need to ensure that .NET 3.5 is enabled for QuickBooks 2015, for that you could use the steps mentioned below-
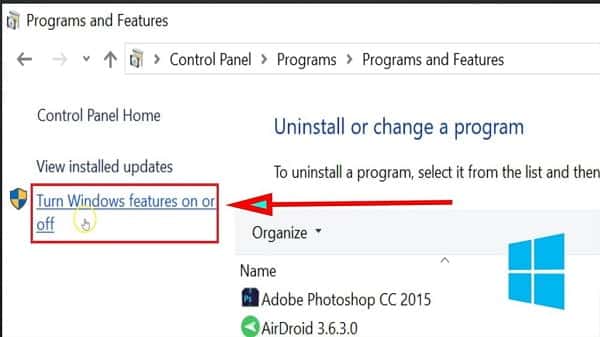
The very first step is to click on the “Start” button
And then, press “Windows + R” keys, in order to open “Run” Window
Once done with that, the user will have to type in “Control Panel” and hit “OK” button
After that select the “Turn Windows features ON or OFF” option, after clicking on the “Uninstall a Program” option
After clicking on the above one, the user will witness a dialogue box will appear saying “.NET Framework 3.5“, along with .NET Framework 4.5.
The user needs to ensure that the option is activated. If this option is off then enabled
And to end the process, the user is recommended to “Reboot” the system
QuickBooks Desktop 2016 is the enhanced version of QuickBooks Desktop 2015. Below we have compared the features of QB 2016 with respect to QB 2015.
QuickBooks 2015
QuickBooks 2016
Bill Tracker is not supported in Pro, Premium and Enterprise version.
This version supports bill tracker.
It does not support bulk clear send forms, to remove multiple transactions.
This version includes bulk clear send forms, in reason to eliminate multiple transactions.
It does not help in advanced reporting features.
It comes with Advanced Reporting features.
Although it provides facility to update company file for new version option.
This version too provides facility to update company file for new version option.
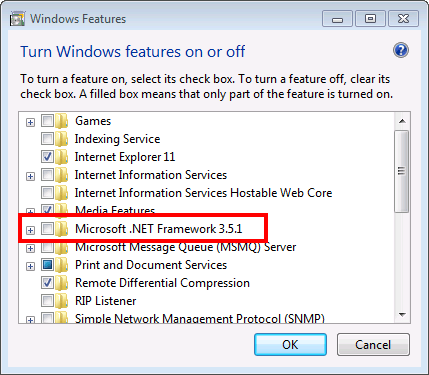
How to Enable the Microsoft .NET 3.5 for the QuickBooks 2015?
Windows 10 version sometimes may not have .NET Framework 3.5 enabled by default and the framework is essential for QuickBooks Desktop to functions properly with the latest series of operating system. You must enable (if not enabled already) the .NET Framework 3.5 for the smoothest experience possible on Windows 10. Here is how you can install it:
To begin with, the user is required to hit the “Start” or “Windows” button
After that, look for the option “Turn Windows features On or Off”
Once you find out the above option, press right-clicks on it
Moving ahead, the user will see a dialog box where you can see the option as “.NET Framework 3.5”
Also, make sure that the option is enabled. If you found it still disabled then, click the checkbox & enable it
Once this process is completed, reboot the computer
If you are encountering any issue with it, you can contact the consulting team to get the instant help.
QuickBooks 2014 or earlier
For all the QuickBooks versions before QuickBooks 2014, the QuickBooks suppose to update the software to the latest released version. As all the QB versions before QuickBooks 2014 requires an update as it does not support the Windows 10.
That’s all from our behalf..! However, if you need more information about supported versions of QuickBooks desktop in Windows 10 or have any questions related to your QuickBooks, you can contact our technical support team anytime.
It might be possible that you still face some hassles with the QuickBooks software and it could be related to anything such as QuickBooks installation, QuickBooks error codes, QuickBooks Updates, or QuickBooks data recovery. For any such problem, you can contact us by dialing our toll-free +1-888-510-9198. We are Intuit Certified ProAdvisors and capable to resolve all types of critical and major issues that is faced by users.
FAQs Related to Supported versions of QuickBooks desktop by Windows 10
Is the start menu in Windows 10 and Windows 7 the same?
Well, few features of windows 10 and windows 7 are same, and various features make them similar to each other
Are QuickBooks 2016 Release 7 and later QuickBooks Desktop 2015 and 2016 compatible with Windows 10?
Yes, both QuickBooks 2016 release 7 and later, and QuickBooks Desktop 2015 and 2016 are compatible with windows 10.
Does QuickBooks 2009 work with Windows 10?
Windows 10 isn’t compatible with QuickBooks 2009. It isn’t compatible with QuickBooks 2014 or prior versions. You simply have to upgrade QuickBooks to the QuickBooks 2022 version, if you want to explore the new features and want to enjoy QuickBooks.
What version of QuickBooks is compatible with Windows 10?
The answer to this common query is that not all versions are compatible with QuickBooks, especially versions prior to 2014.
QuickBooks Connection Diagnostic Tool is helps fixing a wide variety of errors in QuickBooks Pro, Payroll, and Premier with data file, data recovery, download, update, upgrade, and more. It helps in fixing multiple errors, especially 6000 series errors. In this article, we will discuss in detail the features, benefits, installation process and ways to use QuickBooks Connection Diagnostic Tool. You can simply ring up at our toll-free number i.e. +1-888-510-9198. Our QuickBooks support team will ensure to answer all your queries in the least possible time.
This tool can troubleshoot the multi-user & networking errors while accessing the company file. The QuickBooks Connection Diagnostic Tool is a specially designed tool to fix the H series Errors & 6000 series errors such as 6000 304, 6000 77, 6000 80, 6000 83. With this feature, the users are able to develop an appropriate & sufficient connection with the other application such as QuickBooks database manager (QBDM) and QuickBooks company records. The devices with the Microsoft Windows 7, Windows XP, or Windows Vista are only compatible with the Connection Diagnostic Tool. Moreover, it supports only QuickBooks 2008 and newer or QuickBooks Enterprise Solutions 8.0 or newer.
The users can download, install and run the QuickBooks connection diagnostic tool to resolve the warning messages or error messages that might appear in front of you while installing the QuickBooks Desktop software. Also, this tool or feature is also widely known as QBNetDiagTool.exe, QBServerUtilityMgr.exe etc. However, The version 4.0 software is the most famous tool as it has an inbuilt antivirus tool to keep it free from the viruses.
List of issues that are encountered
Unable to connect QuickBooks to the database
QuickBooks Database connecting issues
Firewall post issues
Perks of using QuickBooks connection diagnostic tool
The benefits of using connection diagnostic tool are many. Here is a quick list.
The tool assists in resolving countless errors faced by the users.
You can fix issues where employees make certain entries that do not get updated on QuickBooks.
Using the tool saves a lot of time and effort and simplifies the process of resolving errors.
You can identify and resolve errors that appear when installing the software
It further assists in rectifying unexpected errors and multi-user errors in QuickBooks desktop.
Important points to consider
Before heading forward, note that in case you are using QuickBooks desktop 2016, then it is probable that you might receive reminders and prompts to use QuickBooks File Doctor. In that case follow what this article says and choose the version mentioned here.
File Doctor tool works for QuickBooks Desktop for Windows, but QuickBooks Connection Diagnostic Tool works for QuickBooks for Mac as well.
This tool offers proper connections between QuickBooks database server manager and the Company File for both H series errors (H202 and H505) and 6000 errors (6000 83, 6000 77, 6000 80, 6000 304) making the fixation process easier
It is suggested to use QuickBooks 2008 or a later version on MS Windows 7, Vista or XP for the connection diagnostic tool to avoid any mess
Also, note that the tool can be downloaded from Intuit’s official website to fix error texts that show up while installing QB Desktop. However, 4.0 is the most commonly used version.
What issues QuickBooks connection diagnostic tool fix?
There are certain issues that can be fixed using a connection diagnostic tool. These errors include:
QuickBooks database access denied
Another error can be inappropriate configured windows firewall
Blank vendor and customer list in the accounting software can also be eliminated using the connection diagnostic tool.
Corrupted or damaged company can also be fixed using this tool.
Missing company files
When to run QuickBooks connection diagnostic tool?
The following situations might call for using this tool.
In case of unexpected errors in QuickBooks like those in the 6000 series.
If there is any virus affecting the QuickBooks functions.
Or issues related to the QuickBooks database
Errors associated with Windows firewall.
Damaged or corrupted QuickBooks files.
To fix multi-user errors, which usually fall in the category of H series errors in QuickBooks.
Steps to download QuickBooks connection diagnostic tool
The steps below can be performed to download the connection diagnostic tool successfully.
Start the process by clicking on the Official download link of the QuickBooks connection diagnostic tool.
The next step is to Save the file in the system.
The user should then open the installer name as QBInstall_tool_vs.exe.
And also shut down the running programs in the background.
After that restart the program
Avoid any kind of further issues and ascertain to have a good Internet connection.
The user should then clear all the applications in the background.
End the process by performing the steps related to installation.
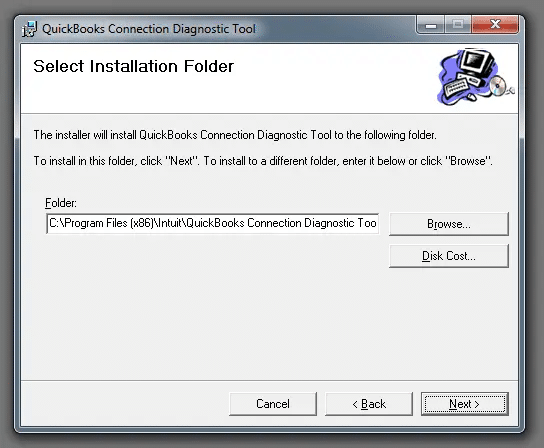
Steps to Install the QuickBooks Connection Diagnostic Tool
After the download process, the below steps can be performed for installation.
The user is first required to check the system to ensure there isn’t a version of the QuickBooks Connection Diagnostic Tool already installed.
After that download the tool from the OEM website and click on the icon twice after it appears on your desktop.
Perform the prompts that show up on your computer screen for installation:
Also, hit the Next tab when screen displays: “Welcome to the QuickBooks connection diagnostic tool setup wizard“.
Now click on Next to choose Installation folder.
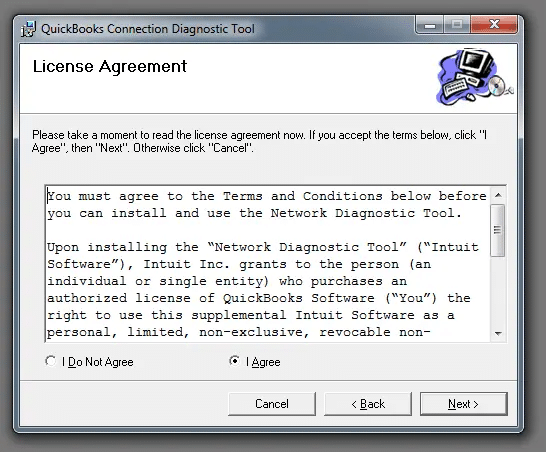
Tap on the I agree circle to accept the license agreement of the software.
The .NET framework must be configured properly, especially for Windows 10.
Wait for the application to open
Click on the icon
Head to the directory that contains the company file which is to be diagnosed.
Do not use the Network connectivity option, if you are using Single user mode.
Type in the Admin and password, after the message box appears on the screen.
Click on ok tab
Select whether you are using the host system or a Workstation PC.
The process might take some time, wait for it to complete
Steps to Employ QuickBooks connection diagnostic tool
After the installation comes employing process. The steps below can help the user in employing the tool.
At first, click on the QuickBooks icon.
Avoid opening the corrupted file.
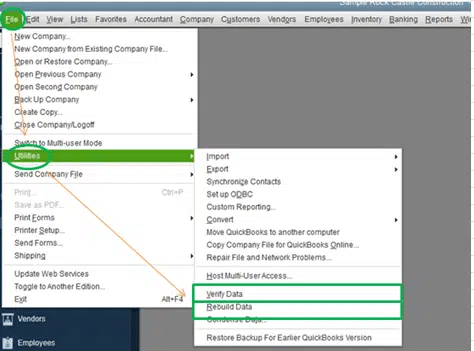
Also, tap on the Utilities tab and then Repair the file option.
Hit the Network problems tab.
Click on Yes to collect the personal information related to QuickBooks and it’s data.
Head to the folder that has the company files and search and open the one that is corrupted
Click on the Show advanced settings
After that a list of items in a drop-down will appear on the screen.
Go for the issue that relates with the current issue.
First of all, Download, install and run the QuickBooks connection diagnostic tool as instructed in the download device tab. After that just Perform double-click on the connection diagnostic tool to run on the device. Once this procedure completed, follow the troubleshooting steps mentioned below:
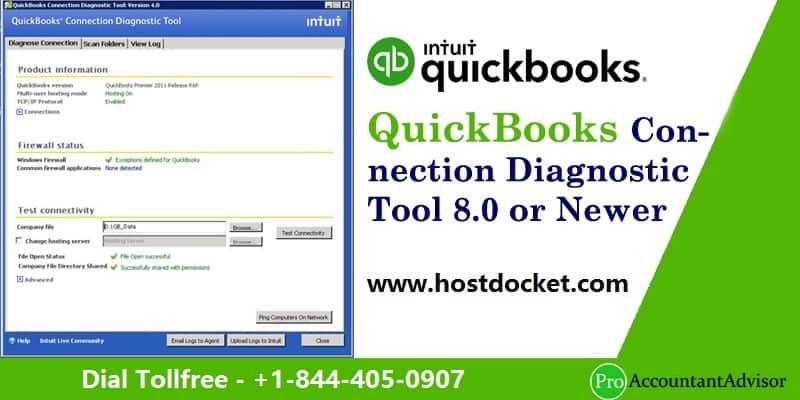
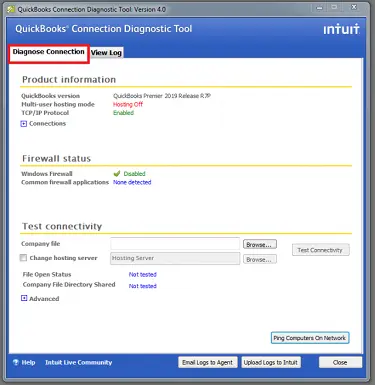
1. Diagnose Connection tab
The Diagnose Connection tab enables the users to make sure that you are able to access the company data file from the computer, no matter if its single-user or multi-user. The error code appears again & again if the permissions are not set accurately, or if it has blocked ports or firewall.
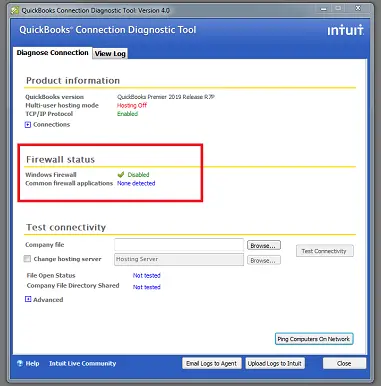
2. Firewall Status
The Firewall Status feature shows the basic instruction about the firewall on the display.
3. Test Connectivity
This feature will enable you to check the workstation or computer connectivity.
Procedure to test the computer’s connectivity
In the initial step of the process, the user will see a tab to locate the company file, next to the Company File field.
Select the “Change Hosting Server” If the network is set up in the Linux systems & it is in the Alternate mode.
Note: All statuses suppose to appear as “Not Applicable” in blue before the users run the connectivity test.
Once you run the connectivity test, either you will see all the statuses in Green or Red in color. The Green color signifies that there is no problem and the Red color signifies that some problem has been detected.
After that the user will have to select the “Test Connectivity” tab
There can be a situation, when the connectivity test might fail if the File Open Status appears as Red. In this case, the user will witness the “Advanced” section where all the checked areas are mentioned. Click on “What do these mean?”
The user is then required to resolve the relevant status to run the tool again. And then, check if there any problem still exists or not.
In case the problem exists now and you open the “File Open Status”. You will see the Successful message pop-up on your display.
Important Note: The 4.0 variation software is the most suggested version which is available on some site. Couple of year later on Intuit launched QuickBooks File Doctor tool which have a more powerful tool as well as advanced attributes.
How you can test your workstation’s connectivity?
You can test the workstation’s connectivity using the set of steps listed below:
The very first step is to click on the tab near the company file field to search the company file.
Also, ensure that you are using Linux system when the network setup is available in alternate mode.
One can choose to pick the change hosting server checkbox.
Every status must appear on not applicable in blue before you instigate the connectivity test.
After the test is run, status should appear in green which denotes that no threats are found or red denoting threats found.
Press the test connectivity
In case the file open status appeared in red, then the test has failed and you would see the advanced section showing section that was checked
Click on what do these mean?
After the relevant status is fixed, rerun the diagnostic tool to find out if there are any more issues.
Once you receive a message denoting the success of the process, repeat the steps mentioned above on all systems that have QuickBooks.
Wait for the tool to run and the error might be fixed. This process largely depends upon the company file size and network speed.
I hope the above given information related to QuickBooks connection diagnostic tool are helpful to you. In case you have any queries related to this tool then you can get in touch with our experts. We, Host Docket have a specialized team of efficient and certified professionals who can resolve all the issues related to your accounting software.
We provide support for all the QuickBooks versions – QuickBooks Pro, QuickBooks Premier, & QuickBooks Enterprise. In the meanwhile, if you are encountering any discrepancy with the QB software, it could be any QuickBooks Error, Installation issue, QuickBooks Data loss, or other. In such scenario, all you recommended to do is to make a call on their toll-free helpline number with no hesitation i.e. +1-888-510-9198.
Frequently Asked Questions!
What errors QuickBooks connection diagnostic tool can fix?
The QuickBooks connection diagnostic tool can fix the errors such as H202, H505, or 6000 series errors. It can fix the issues with firewall settings, network configuration, and other network-related errors.
Where can I get Program Diagnostic Tool option in QuickBooks?
You can simply download the connection diagnostic tool from the official Intuit website or from the tool hub program.
How do I fix a connection error in QuickBooks?
You can fix a connection error in QuickBooks using the steps below: 1. The very first step is to run connection diagnostic tool to identify and fix network related issues 2. Verify that your network setup is correct and also that all computers are connected to the same network. 3. Check the firewall and antivirus settings to ensure that they are not blocking QuickBooks. 4. Make sure that QuickBooks is updated 5. Also, ensure to contact QuickBooks technical support professionals
Here is how you can Install update for Intuit Data Protect to backup QuickBooks Files:
It is necessary for business owners to keep backups of their data. QuickBooks is a modern accounting software that significantly does that for its users. Using this state-of-the-art software – QuickBooks users can not only backup their data but also increase their productivity. Unquestionably, there are a plethora of advantages of this accounting software, but at times it receives some errors that may cause QB users a wide range of issues. The errors that the users may face may be caused by many different factors and may appear at any occasion. Users may also experience errors while backing up data using Intuit Data Protect.
Please note that an error may occur when backing up data through Intuit Data Protect. Also, Data Protect errors mostly occur when QuickBooks is not updated to the latest version. This blog post is created to give you detailed information of the update process that you can use to avoid and fix common Intuit Data errors. To learn further, make sure to stick around till the end. Or you can also get on a call with our certified QuickBooks Professionals at +1-888-510-9198, for any further technical assistance. Having said that, let us continue reading this piece of writing.
Before you proceed with the steps to set up and update Intuit data protect, let us first understand what it is all about. Intuit data protect is basically a backup service. One can easily backup the entire computer or just the QuickBooks files and folders, depending upon the requirements. After you set up Intuit Data Protect, it will back up your data every day. Note that: QuickBooks desktop pro plus, premier plus, and QuickBooks enterprise subscriptions include free access to Intuit Data Protect. It is further compatible with QuickBooks 2011 and later versions of QuickBooks.
Why is it necessary to Update Intuit Data Protect?
It’s necessary to update web applications, including Intuit Data Protect. The practice of regularly updating your applications can keep you from a wide range of online threats. The process ensures improved security, better and faster performance and security of your information.
Below are the advantages of keeping Intuit Data Protect up to date.
Advanced Security to safeguard your critical information and prevent data theft.
Improved performance of the web application and tools.
Enhanced stability on other operating systems.
Complete data safety and protection from data loss.
What are the system configurations required for Installing Intuit Data Protect?
Below are the basic system requirements for installing the Intuit data protect on your system:
Operating Systems (OS)
Windows 7, Windows 8.1, Windows 10, Windows Server 2008 R2 SP1, Windows Server 2011, Windows Server 2012 R2, Windows Server 2016, Standard and Essentials.
Browser
Internet Explorer 11, Google chrome, Mozilla firefox, Safari browser
System Hardware
4 GB RAM, 4 GHz Processor, minimum 5 GB of free disk space, 4X DVD-ROM drive (in case installing from a CD), 1280 x 1024 screen resolution.
Steps to set up intuit data protect to backup QuickBooks files
You can try performing the set of steps listed below to set up intuit data protect:
Start with opening QuickBooks on the system or server where the company file is stored.
To find out, Press F2 key in QuickBooks.
After that, head to the File menu and select the Backup Company and then Set up online backup.
Now, sign in with the Email Address used to register.
After the setup is complete, select Continue.
Choose the QuickBooks company file, and select Continue.
If you possess the system plan, then select the folder where you want to backup and then click on Continue.
Checkmark the box accompanying Back up local selected documents and click on Continue.
After that, select the files and folders you want to back up and hit continue.
Schedule the daily backup and click on the continue tab.
Conclusively, you can ascertain that you set up the notification settings and click on continue again.
Note that the first backup might take several hours. It depends on the number of company files and the file size. Backups after the first one would hardly take a couple of minutes.
It is suggested to update Intuit data protect. In case you have automatic updates enabled, the software will automatically download the update.
Download the latest update for intuit data protect, by selecting the update QuickBooks option from the help menu.
After that, select the update now option.
And ensure that you select data protect from the list, and select get updates option.
Now, click on Install update and choose the up arrow on the desktop toolbar.
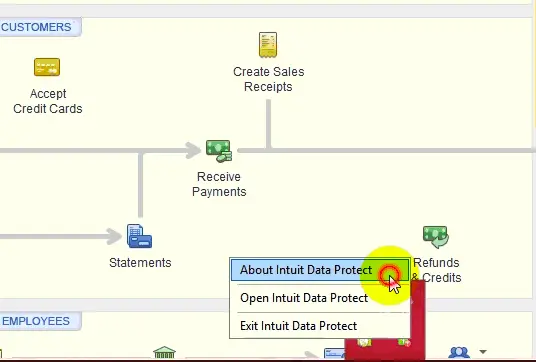
Right click the Intuit Data Protect icon and select About Intuit Data Protect.
Select Update tab.
And click on ok when done.
Conclusion!
We hope this article enables you to update Intuit data protect to backup QuickBooks files. Please note that it’s not rare for users to receive errors during this process. In case that happens, you can call our 24*7 customer support at +1-888-510-9198 and we will be glad to assist you.
Intuit Data Protect is basically a cloud-based backup and recovery service that can help in the protection of the accounting data in QuickBooks and other crucial files related to QuickBooks. It ensures that the files are secured from data loss or corruption.
How to set up Intuit Data Protect?
To set up intuit data protect, you can sign up for the service and then download and install the tool on the system. After installing the tool, pick the files and folders to back up and proceed with the procedure ahead.
Can I use Intuit Data Protect with other software besides QuickBooks?
Yes, Intuit Data Protect can be employed to back up crucial accounting files other than QuickBooks data.


![How to Install & Setup Update for Intuit Data Protect to Backup QuickBooks Files? [Quick Guide]](https://www.hostdocket.com/wp-content/uploads/2018/04/How-to-Data-Backup-or-Restore-Files-in-QuickBooks-Software-1.jpg)