An easy guide to change QuickBooks services or Inventory item types
It’s important for every business owner to create inventories of their purchases, sales, products, services, and anything else that needs to be tracked. And since QuickBooks is extremely user-friendly accounting software, it makes it as simple. QuickBooks services or Inventory Item or QB inventories is not a tough task, here are some simple and effective methods to add them to QuickBooks. To learn further about changing service or inventory item types in QuickBooks, make sure to read this segment till the end. Or you can also consult our technical support team at +1-888-510-9198, and we will provide you with instant support and guidance.
You might also like: Fix QuickBooks Runtime library errors & MS Visual C++ problems
Understand QuickBooks services or QuickBooks Inventory items
Before jumping onto any conclusion, it is important to understand the basic difference in between QuickBooks Services and QuickBooks Inventory Items:
An Inventory Item can be defined as anything that the company offers, resells or acquire within the course of company, just like the product, delivery fees as well as handling fees, discounts and excise responsibility (tax) (if applicable). It seems as a line on an invoice or various other sales forms. Setting up things integrate inventory part and also sub-assemblies right into a single product.
QuickBooks Services or Inventory Item
A Service is something that you offer to your clients to help them with their business and individual needs. You charge them to complete a task or by the hour. Service items can be created in QuickBooks Pro inside the list of items for the services that you provide. This helps the users to get rid of manually writing the similar item details into sales forms of the services that they offer.
QuickBooks Inventory Items:
A QuickBooks inventory item, on the other hand, is anything that your business sells, resells, or purchases within the course of business such as the product, charges for shipping, charges to handle the product, and applicable excise duty or tax. On invoice and other sales forms, it would appear as a line. Assemble items put together the inventory part and sub-assemblies.
The user can simply create service products in QuickBooks pro inside the Item list, for the services that are offered by the user. This assists in escaping repeatedly writing a comparable item information into sales forms for services offered.
Read Also: How to Fix QuickBooks Error 404?
Steps to create your service items in QuickBooks Pro
- Go to the “Item List” window.
- Click “Item” on the lower left.
- Once the drop down box opens, click the “New” command.
- After “New Item” window pops up, choose “Service” from Type drop-down menu.
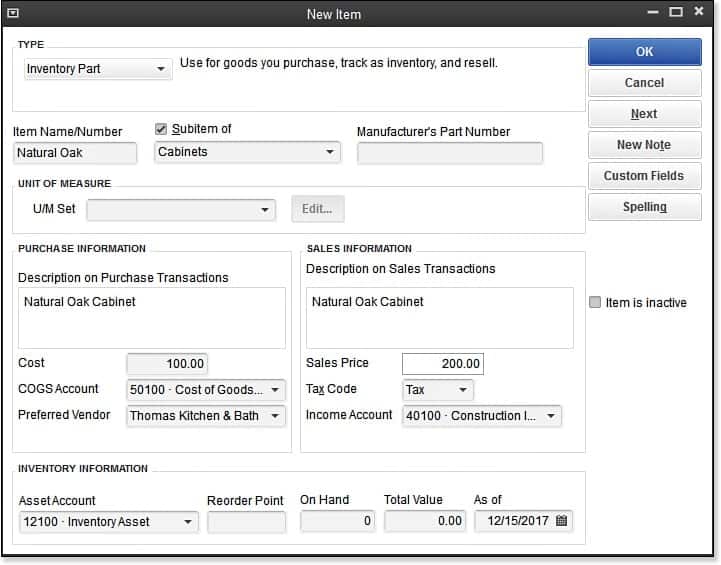
In the “New Item” window, the fields will appear and look like ones like creating “Inventory Part” items.
In case you face any trouble or require assistance you can contact Pro Accountant Advisor team that is certified from Intuit. Our team of certified QuickBooks enterprise support experts has cutting-edge tools and technology to fix all sort of QuickBooks related issues.
See Also: How to Fix QuickBooks Error 6000, 301?
Create and add services or inventory items in QuickBooks Pro
Here is how you can create and add services/inventory items in QuickBooks Pro:
- Tap on “List” on the Menu bar.
- After that tap on the Item list, followed by opening the Item List window.
- Click on the Item tab in the lower left-hand corner of the list window to create service in QB pro.
- After a drop-down menu shows up, select “New” to open item window.
- In the next, opt for Service from the Type drop-down.
- Now, the user needs to manually put in an item name in “Item Name/Number“.
- In case you wish to make this service as a sub-item of another service, select the Checkbox in front of the Sub–item.
- After that select the “Main service item” in a category where the user wishes to add a current item from the adjacent drop-down.
- Write about the service you offer in the description box so that it’s displayed in “Sales receipts” and “Invoices“.
- Enter the rate at which you provide your service and choose the appropriate “Tax code” for the service.
- Choose an “Income account” for the sales of your service through the Account drop-down.
- Click the following check-box to change the available fields. This is to mention the services your customers purchase in their “Invoices“.
- Enter the “Purchase details” for the service in the “Purchase Information box“.
- Furnish sales descriptions for the service in Sales Information and that would create Service item.
- The last and final step is to hit “OK” button, in order to save it into the Item list.
Different types of Products and Services and ways to change them
With an exception for bundle and inventory items, it should be noted that the products and services can be easily changed for one type of item to another. The items mentioned generally have a different way of tracking. It should also be noted that there are 4 item types in the Products and Services list on QuickBooks accounting software.
Different product/services types
Inventory items: Inventory items can be purchased and sold and their quantities can be tracked. You will be required to choose the Tracking Quantity on Hand option for this item type.
Non-inventory items: To define Non-inventory items, it can be said that they are those items that can be purchased and sold but it is not possible to track their quantities, such as nuts and bolts used in an installation.
Services: You provide services such as support, landscaping, and training to your customers.
Bundle: They are like a collection of products and/or services you sell jointly, for example, a beach kit that includes sunscreen, towel, flip flops, and other items. It’s the decision of the user whether to hide or display bundle components, when sending/printing transactions.
In order to add or edit bundle items, the user needs to visit the products/services option via bundle section and set as he/she wishes to put on show your bundle items.
Important: It should be noted that the feature for tracking inventory is available just in QuickBooks Online Plus. Also, bundle items can only be used or created in the browser version of QuickBooks Online. Android or iOS mobile apps are yet to support them.
Ways to change the types of products/services
Below we have discussed few points to change the product/service type:
Change Service Item(s) to Non-inventory items:
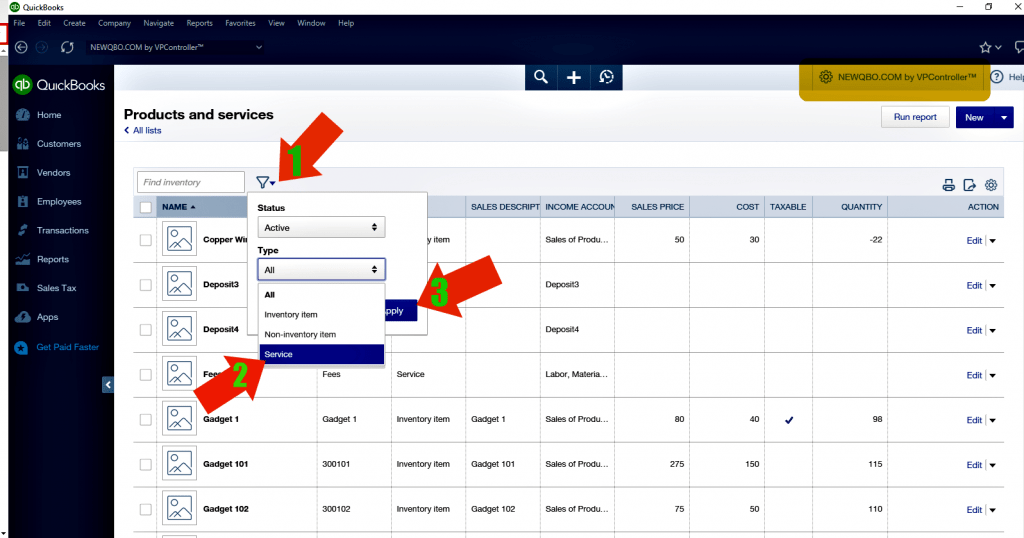
- Click on the “Gear icon” on the top and select “Products and Services“.
- Hit a click the checkbox in front of the service item you have to change.
- And then the user needs to click on the “Batch actions” drop-down box, followed by selecting the “Make non-inventory” option.
Change Non-inventory item(s) to Service Items:
- In this, firstly tap on the “Gear icon” on the top, and then select “Products and Services“.
- Click the “Checkbox” in front of the non-inventory item(s) you have to change.
- Now give a single Click on the “Batch actions” drop-down box and choose “Make service“.
Service or Non-inventory items to Inventory Items:
- First of all, the user needs to tap the “Gear icon” on the top, along with that select “Products and Services“.
- Now, search and spot the “Item you want to update” and then visit the “Action column” and click on “Edit” button.
- Once done with that, the user needs to select the “Change type link” and select “Inventory” button.
- Here are the additional details you’ve to enter:
- Initial quantity on hand.
- As of date or an effective date (It should be noted that the date mentioned must be a date prior to any transactions where this item was used).
- Inventory Asset, Income, and Expense accounts.
- Sales Price, Cost, and Sales/Purchasing information
- The last and final step is to select “Save and Close“.
Steps to change service types in QuickBooks online
The steps below can be performed to change the service types in QuickBooks online. Let us have a look:
- The very first step is to sign into the QuickBooks online
- After that head to the settings tab.
- Select the products and services option from the settings tab.
- Once done with that, select the edit option from the action column.
- Now, choose the change type tab.
- And then, select the appropriate type.
- The user will then have to select the save and close tabs to save all the changes.
- Note that, you can use the batch action from the product and services list, in case you want to change multiple items to any type.
Important: Please note that inventory items can’t be converted to any other types. If you want to change the type of Inventory items, you will have to create a new item.
Steps to change the inventory items in QuickBooks online
The user can try performing the below set of steps to change the inventory items in QuickBooks online. Let us check it out.
Step 1: The user needs to adjust the Quantity of inventory item
- The first step is to choose the products and services option from the settings tab.
- After that, from the products and services list, look for the inventory item.
- Now, choose the edit option from the action column.
- And then head to the quantity on hand section.
- After that select the edit option from the action column
- Now, head to the quantity on hand section
- And also choose adjust tab
- Later on select quantity tab
- In the inventory quantity adjustment window, enter the 0 value, in the new window.
- Save the changes and close by clicking on save and close.
Step 2: Find the Total Value of Adjusted Inventory
- Head to the settings tab
- After that choose charts of accounts.
- From the Chart of Accounts section, find out the Inventory Shrinkage Account.
- Now, choose Run Report option.
- Search for the inventory item that you have adjusted.
- And keep the amount of the adjusted note in another place.
Step 3: Create a Journal Entry to Account
- Start with clicking on the new tab and choose the journal entry
- Head to the Account drop-down menu.
- Now, choose the Opening Balance Equity option.
- Debit Column – Enter the adjustment amount in this field. From the second line, go to the Account drop-down menu, and choose the Inventory Shrinkage option.
- Credit Column- Enter the same adjustment amount in this field
- Click on save to end process
Read Also: Steps to fix QuickBooks license error after cloning
Conclusion
We hope that you are able to add as any services or items as you wish and run your business with ease. In case you have any query or require assistance, you can contact our experienced QuickBooks technical support team at +1-888-510-9198.
We are available round-the-clock and offer nothing but the best solutions and services for all QuickBooks related issues.
FAQs
Well, of course, one can change an item’s type, if the item is a non-inventory part, other charge item, or an inventory part. For this, you simply need to head to the lists menu and choose the item list for windows or items for Mac. And then, double click the item you want to change. After that, from the type drop-down, choose the new item type.
For the non-inventory items:
1. The first step is to head to the sales menu.
2. After that choose products and services.
3. Once done with that click on new and then select non-inventory.
4. The user needs to then add the name of the item.
5. Followed by selecting the category that best describes the service item from the category dropdown.
6. The user will then have to enter the rest of the fields and information.
7. The last step is to click on save and close tabs.
This can be done by performing the steps below:
1. At first, login and navigate to settings tab.
2. After that, in the top right corner, choose the gear icon.
3. The user needs to then head to the firm settings.
4. Now, under the integrations, choose QuickBooks.
5. Once done with that, choose the default QuickBooks service.
6. And save the changes.
7. Enter the information and you are done
To edit the inventory items, the below steps would work:
• In the inventory items, select lists and then choose the item list option for windows
• If you are a Mac user select items.
• Now, double click the item you want to change.
• Also, edit the info for the item.
• The last step is to click on ok tab.
You’ll also like these topics:
QuickBooks 2014 Services discontinued – what’s next?
How to Fix QuickBooks Install Error Code 1722?
Advanced & Enhanced Functionality in QuickBooks Desktop 2019

