

Advanced Inventory is one of QuickBooks Enterprise’s most powerful and most underused features. It takes your inventory management from basic stock tracking to a sophisticated, multi-location system that handles barcode scanning, serial and lot number tracking, bin location management, FIFO costing, and real-time inventory picking all directly within QuickBooks without needing any third-party software.
But before you can use any of it, the feature needs to be turned on and your license data needs to sync correctly. This article walks through exactly how to turn on Advanced Inventory in QuickBooks Enterprise, including what to do if the Advanced Inventory Settings option appears grayed out after purchase. For expert help, our QuickBooks Enterprise Support team is available at +1-888-510-9198.
Read Also: How to Fix QuickBooks Error Code 15270?
What is Advanced Inventory in QuickBooks?
QuickBooks Advanced Inventory feature helps the user to maintain as well as track the stock and virtually moving the products from one facility to another including its physical movement. Many QuickBooks users are unaware of this amazing tool. Thus, today we are going to discuss this advanced inventory management system and process to turn on this feature. This advanced inventory management feature enable the users to handle the business swiftly right in QuickBooks.
No other inventory management system, software, or data integration can replace the QB Advanced Inventory. It can manage the wide array & size of inventories simply.
You may also read: How to upgrade QuickBooks enterprise to latest version?
Features of Advanced Inventory
Here’s a quick look at what the feature actually enables:
- Enables user to track each and every item from a specific location in the warehouse.
- Barcode scan facility to grab the data, information, or detail of the specific item quickly & easily.
- Manage the specific item or consignment by serial number or lot number.
- A feature to transport or transfer the specific items or consignments to/between the inventories.
Significance of the QuickBooks Advanced Inventory
QuickBooks Enterprise Advanced Inventory feature plays a vital role as integration with the same user interface. While using the Advanced Inventory feature, you don’t require any other inventory management system or separate software to perform all these tasks. You can buy or take a subscription of it for your enterprise version of QuickBooks.
Checkout the features below that can save plenty of time of the QB user.
- Extract the item/items data via Barcode scanning
- There is a flexibility to Track and trace the Lot Number or Serial Number
- Track the inventory placed at multiple locations
- You can Track & trace the inventory data
- Track & trace the Bin Location
- Serial or lot numbers
- Multiple location inventory
- Fifo costing
- Work right inside QuickBooks enterprise
- Transfer inventory from one location to another location
- Real time inventory picking
- Customizable inventory reports
- Mobile inventory barcode scanning
See Also: How to Fix QuickBooks Error Code 15227?
How to turn on advanced inventory in QuickBooks enterprise?
Follow the steps in ascending order to turn on the advanced inventory in QB Enterprise:
- First of all, Go to the “Edit” menu
- Choose the “Preferences”
- From the left side, select the “Items & Inventory”
- Navigate to the “Company Preference”
- See the “Inventory and Purchase Orders” are an Active pop-up
- Choose the “Advanced Inventory Setting” option. If the advanced inventory option appears as gray, it means that the user has purchased the feature & need to sync the user license data so that it enables the QuickBooks to reorganize it.
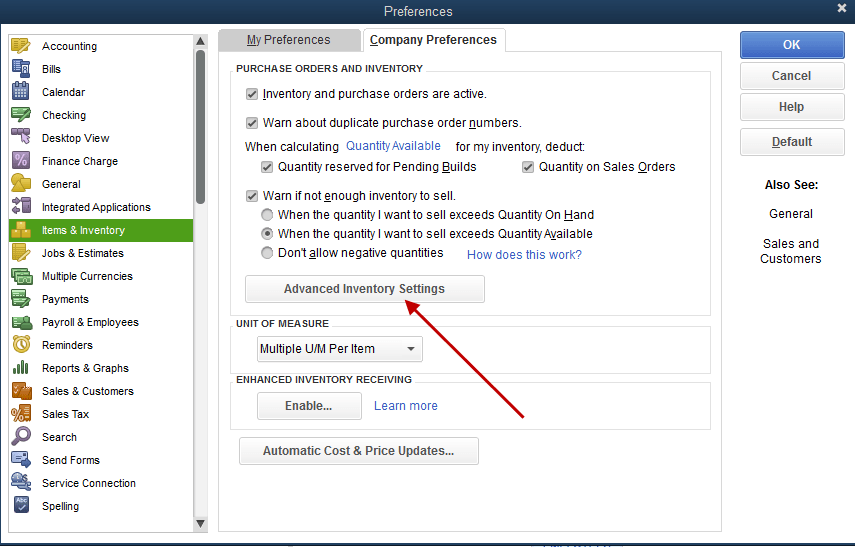
- In QuickBooks, go to “Help => Manage my License => Sync License Data Online“
- Verify that the “Advanced Inventory Settings” is not gray anymore
- Shut-Down & Re-Start the QuickBooks program
Important Note: If the syncing fails, the QB user has to follow the below troubleshooting steps. Only for the users who are using the Windows Operating System are recommended to apply the steps, it is not for users with Intuit products. However, If an error occurs while repairing or uninstalling the .Net Framework, the steps might become more complex.
If you find any difficulty in performing the steps, the QB user can contact the QuickBooks Enterprise support team. Our certified QuickBooks experts will resolve the issue instantly. At first, just follow the below steps to resolve it by your own self.
You may also like: How to Fix QuickBooks Payroll Update Error 15243?
Still need help & suggestions
If you’ve followed all 9 steps and Advanced Inventory is still showing as grayed out after syncing, or if the license sync process itself is failing, our QuickBooks Enterprise Support team at +1-888-510-9198 can verify your license status and get the feature properly enabled. We’re available 24/7 and can also help with any related Enterprise issues i.e. Enterprise error codes, Installation issues, or update errors.
FAQs Related to Advanced Inventory in QuickBooks Enterprise
Note that only QuickBooks enterprise platinum and diamond allow for advanced inventory management.
You can turn on advanced pricing in QuickBooks enterprise using the steps below:
1. Choose edit tab and go for preferences.
2. The next step is to choose sales and customers.
3. Once done with that select company preferences.
4. And then, in custom pricing, choose enable advanced pricing.
5. Tell QuickBooks how to handle price rounding.
6. Hit ok tab.
QuickBooks makes use of weighted average cost to determine the value of the inventory and the amount debited to COGS when you sell inventory. Moreover, the average cost is the addition of all the items in inventory divided by the number of items.
This is a very common experience and it almost always means that your QuickBooks license data hasn’t been synced after the purchase was made. QuickBooks needs to verify your subscription level with Intuit’s servers before it can unlock Advanced Inventory which is what Step 7 (Help > Manage My License > Sync License Data Online) does. After syncing, close and reopen QuickBooks and the option should no longer be grayed out. If it still is, running Reboot.bat or the Install Diagnostic Tool (as noted in the Important Note section) usually resolves it.
Turning it on is just the first step there’s additional setup required for each specific feature within Advanced Inventory. For example, to use Multiple Location Tracking, you’ll need to create your inventory sites. To use Barcode Scanning, you’ll need to assign barcodes to your items. To use FIFO Costing, you’ll need to enable it separately and understand that it applies going forward from the activation date. Each feature has its own configuration steps inside the Advanced Inventory Settings screen.
Turning on Advanced Inventory doesn’t delete or alter your existing inventory data it simply enables additional tracking capabilities on top of what’s already there. However, some features like FIFO Costing do affect how QuickBooks calculates inventory values going forward, so it’s worth understanding the implications of each feature before enabling it. If you’re unsure how a specific Advanced Inventory feature will interact with your existing data, our Enterprise Support team at +1-888-510-9198 can walk you through the implications before you make the change.
Other recommended articles
Link mobile device in QuickBooks enterprise advanced inventory
How To Use PayPal Integration with QuickBooks Online?
QuickBooks Enterprise Setup, Installation – Getting Started Guide