QuickBooks Online lets you process and authorize all major debit and credit card transactions directly. Not only that, the payment information is automatically updated, so there is no need to enter the data twice. Talking about QuickBooks Payments, it lets you add links to invoices so that the customers can pay online. A customer can pay with PayPal, Venmo, credit card, or ACH bank transfer. The only thing that is required is to follow the link in the email. It is further possible to process payments in person or over the phone. In this segment, we will let you know the process of QuickBooks credit card processing, along with that you will get to understand how to process payments in QuickBooks online with QuickBooks payments.
Thus, if you are interested in knowing more, make sure to stick around this segment carefully, or you can also connect with our technical support team for any kind of technical assistance. Give us a call at +1-888-510-9198, and get immediate assistance from certified professionals.
Also Read: Deposit Payments into Undeposited Funds Account in QuickBooks
How QuickBooks Credit Card Processing can help you?
Well, accepting credit cards can help you in the following ways:
- Grow your business – You can make it easy for customers to make payments by offering them convenient payment options.
- Get paid faster- The approved funds can be deposited into the account in as few as two to three business days.
- Get paid automatically – You can set up recurring sales receipts and collect payments automatically so that customers do not have to be reminded to pay you.
- Save money – When you accept credit cards, there are no extra hardware, software, or phone lines needed. You can save around $1,000 or more in comparison to buying or leasing a terminal.
- Save time – QuickBooks online payments service is the only merchant account service that is fully integrated with QuickBooks online. When you process a transaction, the information is automatically entered in the QuickBooks online company file. The need to manually enter data is eliminated.
It should be noted that QuickBooks online doesn’t currently integrate with a shopping cart.
Furthermore, QuickBooks payments are an optional fee-based service. And application approval is required. Terms, conditions, features, pricing, and services are subject to change without notice.
In order to apply for this service, you need to perform the following steps:
- Initially, you need to head to the settings tab and further go for account and settings
- The next step is to choose the payments tab
- And lastly, choose learn more!
After the QuickBooks credit card processing is activated, you can process credit cards using recurring sales receipts. Note that, the clearance time for funds may vary depending upon the demand deposit account.
You might find this helpful: Set up Landed Cost in QuickBooks Enterprise
Steps to take and process payments in QuickBooks Online with QuickBooks Payments
You can check the QuickBooks payments website for the latest plans. The steps to take and process payments in QuickBooks Online with QuickBooks payments are described below:
Step 1: Sign up or connect an existing QuickBooks payments account
In case you haven’t already signed up for QuickBooks payments, perform the steps below. Or if you have, then connect your existing account to QuickBooks online.
Step 2: Set up an account so customers can pay invoices online
Set your company preferences.
You need to first set up your account settings for invoice payments.
- At first, you need to head to the settings tab and further choose account and settings
- Once done with that, choose the sales tab
- Also, under invoice payments, go for edit and then go for the payment options you want.
- You can further enter payment instructions.
- This will show on all invoices irrespective of the template, when the payments are enabled.
- The next step is to choose save
- Also, go for the done option.
Set your payment options directly on the invoice
You can select how to receive payment on each invoice you send. In case you change them on one invoice, then this will only impact the invoice you change and not the company preferences.
Note that, your estimates or invoices will look different depending upon whether you have the old or new estimate and invoice experience.
You can change the invoice payment options with new invoicing:
- Head to sales and then choose invoices
- Now, find the invoice you want to update, and then go for the edit
- The next step is to choose manage and then select payment options
- You are now required to turn the switches on or off for the payment method you want to use
- The last step is to choose save or save and close tabs respectively.
Steps to change invoice payment options with old invoicing
In order to change the payment options on an existing invoice, you need to perform the following:
- For this, you simply need to head to sales and further go for invoices
- The next step is to find the invoice you are planning to update and then go for edit
- The user is then required to select edit in the online payments section
- Furthermore, choose the payment options you want.
- And hit the ok tab.
- The last step is to choose save and close.
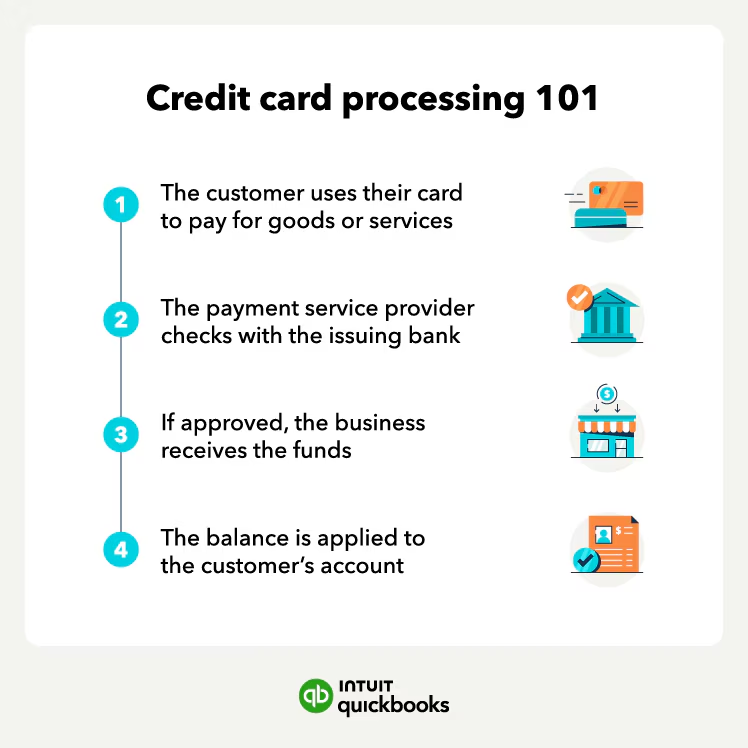
Step 3: Process payments in QuickBooks Online
After you are ready to get paid, you need to carry out the steps below on how you received the payment:
Process payments for sales receipts:
In case the customers come into your business, you do not have to send them an invoice. You can simply create a sales receipt. The steps involved here are:
- The very first step is to choose + New tab
- Then, choose sales receipt or make a sale, then enter the customer info.
- Also, add a product or service to sell.
- Now, from the payment method dropdown, choose credit card
- And furthermore, enter credit card details.
- The next step is to enter the credit card info or select swipe card
It is not mandatory, but to save this customer’s credit card, you can choose use this credit card in the future.
- You need to choose save or use this info.
- Furthermore, choose Got it and select Save and Close or Save and New.
In case you add the customer’s email address, then QuickBooks sends them a copy of the sales receipt.
Process payments for invoices
In case you sent a customer an invoice, but they wish to pay in person, then you simply have a few options. You can ask them to follow the link in the email and complete paying for the invoice online. Or process the payment for them and tally it with the existing invoice.
- The very first step is to choose +new
- The next step is to choose receive payment
- After that, enter the customer name and payment date
- Now, in the outstanding transactions section, choose an open invoice to apply the payment.
- And to take a partial payment, you can simply change what’s in the payment field.
- The next step is to select a credit card from the payment method dropdown
- Also, choose enter your credit card details
- Once done with that, enter the credit card info or select the swipe card
To save the customer’s credit card, you can select the option use this credit card in the future tab
- Choose save or use this info
- The next step is to go for Got it icon and choose save and close or save and new.
QuickBooks will send automated receipts to the registered email when an invoice is paid through QuickBooks online payments. You can also re-print a copy of the receipt from QuickBooks online payments. This can be done as follows:
- You need to first go to the invoice that was paid and then choose the payment
- The next step is to choose a transaction processed from the customer details; a copy will show up of the receipt that you can print.
Process payments for invoices in QuickBooks Solopreneur
- Here you simply have to choose get paid and then go for invoices
- The next step is to find the invoice that you wish to record as fully or partially paid
- Now, under the action column, you need to choose record payment
- And then, in the deposit to dropdown, select the account to record the payment to
- The user is then required to fill out the remaining fields, like the amount paid and the payment date.
- After you are done, choose save.
Step 4: Learn about deposit times for customer payments
After processing payments, QuickBooks puts money into the bank account. It simply makes use of the bank account that is opted for when signing up for QuickBooks payments. The time taken for deposit depends upon the product and the type of payment. You can get more info about deposit times for QuickBooks payments.
It should be noted, if you are new to payments, then your first payments might take a bit longer while QuickBooks set up the accounts. After the accounts are set up, customer payments will be processed faster.
Disclaimer: QuickBooks payments account is subject to eligibility criteria, credit, and application approval. Money movement services are provided by Intuit Payments Inc., licensed as a money transmitter by the New York State Department of Financial Services.
Also Read: How to merge accounts in QuickBooks?
Conclusion!
Toward the end of this segment, we believe that the reader might be able to understand how to take and process payments in QuickBooks Online with QuickBooks payments. Moreover, the above steps might help you in successfully understanding QuickBooks credit card processing in QuickBooks online. However, if you have any queries, or if you need any sort of technical guidance, then in that case, reach out to us at +1-888-510-9198, and our technically sound QuickBooks ProAdvisors will answer all your queries immediately.
Other Related Articles:
QuickBooks Downloads Desktop – Complete Guide
Undeposited Funds in QuickBooks

