Want to Sign in to QuickBooks Online Account? We can help you with that. You can use Identity First to sign in to QuickBooks Online. It is designed to make accessing QuickBooks account easily. It combines the sign in and account recovery process. If you are using a new device to sign in, such as a new laptop or even a different browser, and you can’t remember your user ID and password. Till the time you have the email address or phone number, you can use IDF to get the access to the account. To learn further about signing in to QuickBooks Online Account, stick to this segment. Or you can also connect with our technical support team at +1-888-510-9198.
When you sign in QuickBooks Online using a different user ID
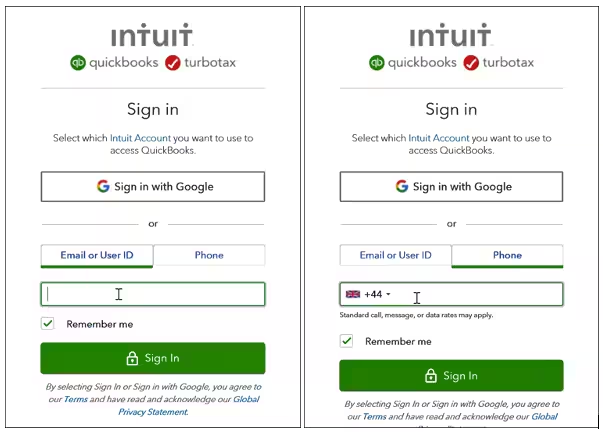
Sign in to QuickBooks Online
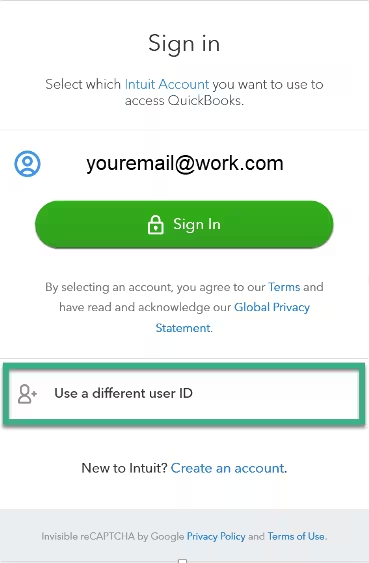
You need to choose use a different user ID
In case you have recently used other Intuit accounts to sign in, they will be present here
After that, enter the email address, user ID, and password or phone number
The next step is to save the sign in information, and choose remember me
Now, select sign in
You will get an email or text message from us containing a 6-digit verification code
Enter the code and choose continue to sign in
In case your phone number isn’t up to date – QuickBooks online sign in
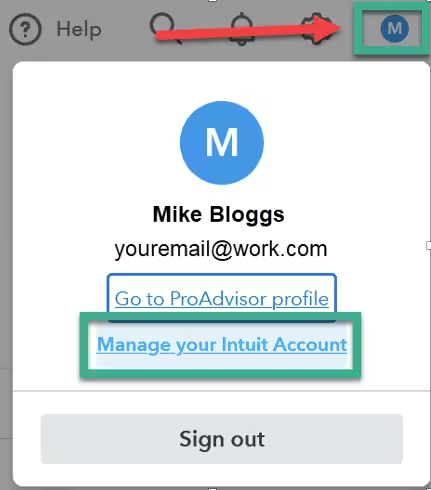
After you are logged in to QuickBooks Online, you can update the phone number, select the blue circle in the top right corner and then manage your Intuit Account.
In case you are unable to recover the account with the options available, you can connect with experts.
Now that you know the steps to sign in to QuickBooks online, make sure to implement these steps. However, if there are any queries or if you need any sort of technical guidance, then connect with our technical support team at +1-888-510-9198. Our technically sound QuickBooks ProAdvisors will provide you with immediate support and assistance.
Do you know the process to connect your bank and credit card accounts to QuickBooks Online? Well, it is possible to connect credit card to QuickBooks Online. Connecting your online bank in QuickBooks automatically downloads and categorizes the transactions. It further helps in saving time in updating the bank feeds. You simply have to review and approve them. To help you connect bank and credit card accounts to QuickBooks online smoothly, here we are with this segment, sharing the complete set of steps that can be performed to connect bank and credit card accounts. To know more, ascertain to read this segment carefully. You can also get in touch with our technical support team at +1-888-510-9198, and we will provide you with immediate support and assistance.
You need to connect your bank or credit card account, to avoid manually entering the transactions. It is further possible to connect multiple businesses and personal bank accounts, in order to keep the business information up to date in QuickBooks.
It should be noted, in case you have an American Express business account, then you can also connect it to your QuickBooks online account.
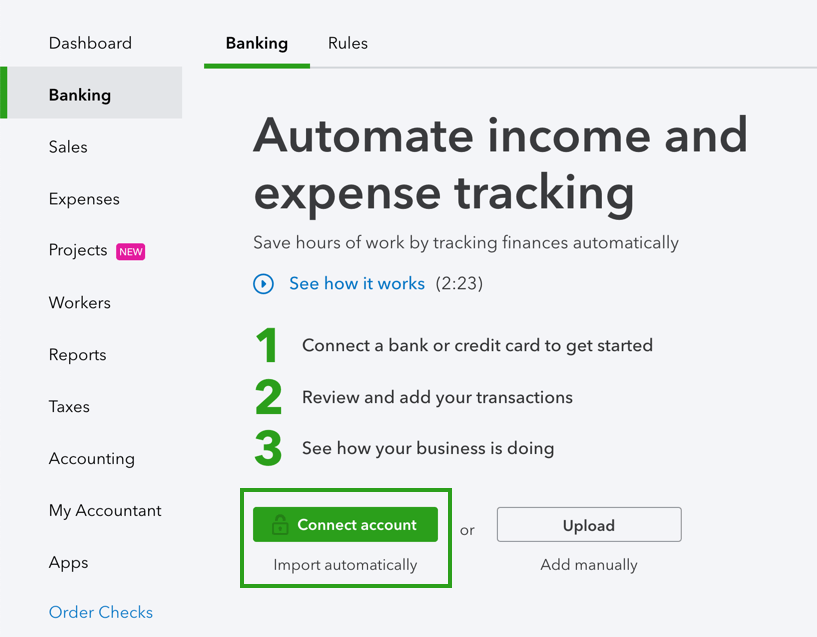
You need to first head to the transactions and then choose bank transactions
After that, select the link account
The next step is to enter the URL or name of the bank in the search field and then choose the bank.
It should be noted that if you can’t find the bank, you can manually upload transactions instead.
Furthermore, enter the sign info in the login and password fields and then click on the continue tab.
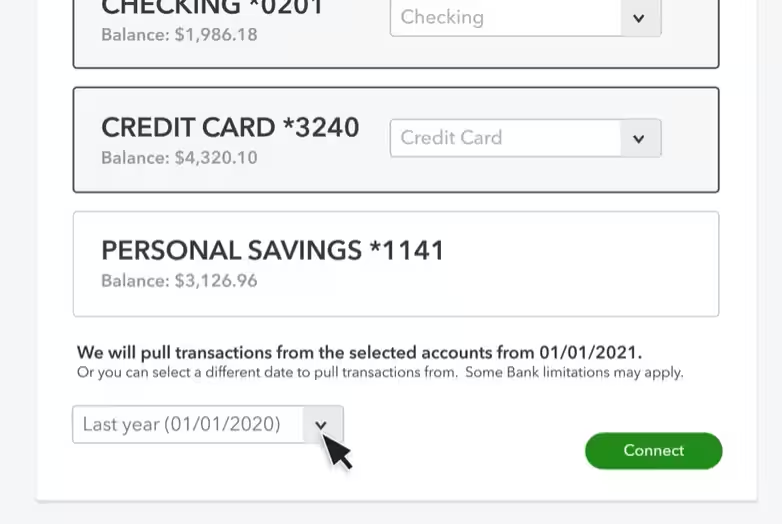
Choose the account you wish to connect and the date to pull transactions from the dropdown▼.
Now click on the next tab.
Further, note that some banks let you download the last 90 days of transactions. Whereas, Others can be downloaded for as long as 24 months.
Choose your account type on the account type dropdown▼ and further click on the next tab.
Also, note that you need to choose the account type that matches your chart of accounts in QuickBooks. In case you do not see the correct account type, and select +add new.
For New Bank Accounts:
In the account type dropdown▼, you need to choose the bank
After that, select savings or checking in the detail type
Now, give the account a name and then choose save and close.
For New Credit Card Accounts:
In the account type dropdown▼, you need to choose credit card
Furthermore, assign the account a name, hit save, and close tab
You now have to map the bank account in the existing accounts dropdown▼ and then hit next.
The next step is to choose Connect and select Done.
Also, you can edit the account name in the new account name field or change it later.
Connect your bank account from the chart of accounts
Under this process, you need to first head to the settings tab and then choose the chart of accounts
The user needs to choose the view register dropdown▼ in the action column. Choose connect bank
Enter the URL or name of the bank in the search field, and choose a bank.
Also, note if you can’t find your bank, you can manually upload transactions instead.
Enter the sign info in the login and password fields and choose the continue tab.
Choose the account that you want to connect and date to pull transactions from the dropdown▼ and hit the next tab.
Note that you need to choose the account type that matches your chart of accounts in QuickBooks. In case you do not see the correct account type, then choose + Add new.
For new bank accounts:
Choose the bank in the account type dropdown ▼
Now, in detail type, choose savings or checking
After that, give the account a name and then choose Save and close
For new credit card accounts:
In the account type dropdown▼, choose credit card
Once done with that, assign a name, click on save, and close
You now have to map the bank account in the existing accounts dropdown▼ and then choose next.
After that, choose Connect and select Done.
Note that, it is possible for you to edit the account name in the new account name field or change it later.
Head to the transactions tab and choose bank transaction
Now, select the update tab.
Step 3: Categorize downloaded transactions
You need to review and categorize the downloaded bank transactions to ensure that it is categorized correctly. This would help you organize the charts of accounts perfectly.
Now that you know what steps can be taken to connect bank and credit card accounts to QuickBooks online, it is time to implement those steps manually. You can also connect with our technical support team at +1-888-510-9198 and we will provide you with immediate support assistance. Our certified and technical upgraded QuickBooks ProAdvisors will answer all your queries immediately and make sure that you are successfully able to connect your bank and credit card accounts to QuickBooks Online.
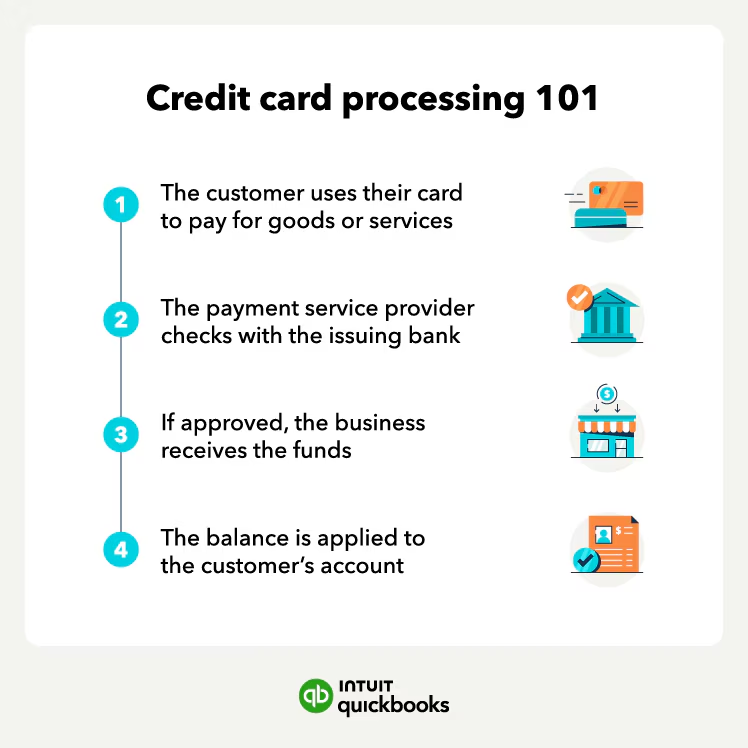
QuickBooks Online lets you process and authorize all major debit and credit card transactions directly. Not only that, the payment information is automatically updated, so there is no need to enter the data twice. Talking about QuickBooks Payments, it lets you add links to invoices so that the customers can pay online. A customer can pay with PayPal, Venmo, credit card, or ACH bank transfer. The only thing that is required is to follow the link in the email. It is further possible to process payments in person or over the phone. In this segment, we will let you know the process of QuickBooks credit card processing, along with that you will get to understand how to process payments in QuickBooks online with QuickBooks payments.
Thus, if you are interested in knowing more, make sure to stick around this segment carefully, or you can also connect with our technical support team for any kind of technical assistance. Give us a call at +1-888-510-9198, and get immediate assistance from certified professionals.
How QuickBooks Credit Card Processing can help you?
Well, accepting credit cards can help you in the following ways:
Grow your business – You can make it easy for customers to make payments by offering them convenient payment options.
Get paid faster- The approved funds can be deposited into the account in as few as two to three business days.
Get paid automatically – You can set up recurring sales receipts and collect payments automatically so that customers do not have to be reminded to pay you.
Save money – When you accept credit cards, there are no extra hardware, software, or phone lines needed. You can save around $1,000 or more in comparison to buying or leasing a terminal.
Save time – QuickBooks online payments service is the only merchant account service that is fully integrated with QuickBooks online. When you process a transaction, the information is automatically entered in the QuickBooks online company file. The need to manually enter data is eliminated.
It should be noted that QuickBooks online doesn’t currently integrate with a shopping cart.
Furthermore, QuickBooks payments are an optional fee-based service. And application approval is required. Terms, conditions, features, pricing, and services are subject to change without notice.
In order to apply for this service, you need to perform the following steps:
Initially, you need to head to the settings tab and further go for account and settings
The next step is to choose the payments tab
And lastly, choose learn more!
After the QuickBooks credit card processing is activated, you can process credit cards using recurring sales receipts. Note that, the clearance time for funds may vary depending upon the demand deposit account.
Steps to take and process payments in QuickBooks Online with QuickBooks Payments
You can check the QuickBooks payments website for the latest plans. The steps to take and process payments in QuickBooks Online with QuickBooks payments are described below:
Step 1: Sign up or connect an existing QuickBooks payments account
In case you haven’t already signed up for QuickBooks payments, perform the steps below. Or if you have, then connect your existing account to QuickBooks online.
Step 2: Set up an account so customers can pay invoices online
Set your company preferences.
You need to first set up your account settings for invoice payments.
At first, you need to head to the settings tab and further choose account and settings
Once done with that, choose the sales tab
Also, under invoice payments, go for edit and then go for the payment options you want.
You can further enter payment instructions.
This will show on all invoices irrespective of the template, when the payments are enabled.
The next step is to choose save
Also, go for the done option.
Set your payment options directly on the invoice
You can select how to receive payment on each invoice you send. In case you change them on one invoice, then this will only impact the invoice you change and not the company preferences.
Note that, your estimates or invoices will look different depending upon whether you have the old or new estimate and invoice experience.
You can change the invoice payment options with new invoicing:
Head to sales and then choose invoices
Now, find the invoice you want to update, and then go for the edit
The next step is to choose manage and then select payment options
You are now required to turn the switches on or off for the payment method you want to use
The last step is to choose save or save and close tabs respectively.
Steps to change invoice payment options with old invoicing
In order to change the payment options on an existing invoice, you need to perform the following:
For this, you simply need to head to sales and further go for invoices
The next step is to find the invoice you are planning to update and then go for edit
The user is then required to select edit in the online payments section
After you are ready to get paid, you need to carry out the steps below on how you received the payment:
Process payments for sales receipts:
In case the customers come into your business, you do not have to send them an invoice. You can simply create a sales receipt. The steps involved here are:
The very first step is to choose + New tab
Then, choose sales receipt or make a sale, then enter the customer info.
Also, add a product or service to sell.
Now, from the payment method dropdown, choose creditcard
And furthermore, enter credit card details.
The next step is to enter the credit card info or select swipe card
It is not mandatory, but to save this customer’s credit card, you can choose use this credit cardin the future.
You need to choose save or use this info.
Furthermore, choose Got it and select Save and Close or Save and New.
In case you add the customer’s email address, then QuickBooks sends them a copy of the sales receipt.
Process payments for invoices
In case you sent a customer an invoice, but they wish to pay in person, then you simply have a few options. You can ask them to follow the link in the email and complete paying for the invoice online. Or process the payment for them and tally it with the existing invoice.
The very first step is to choose +new
The next step is to choose receive payment
After that, enter the customer name and payment date
Now, in the outstanding transactions section, choose an open invoice to apply the payment.
And to take a partial payment, you can simply change what’s in the payment field.
The next step is to select a credit card from the payment method dropdown
Also, choose enter your credit card details
Once done with that, enter the credit card info or select the swipe card
To save the customer’s credit card, you can select the option use this credit card in the future tab
Choose save or use this info
The next step is to go for Got it icon and choose save and close or save and new.
QuickBooks will send automated receipts to the registered email when an invoice is paid through QuickBooks online payments. You can also re-print a copy of the receipt from QuickBooks online payments. This can be done as follows:
You need to first go to the invoice that was paid and then choose the payment
The next step is to choose a transaction processed from the customer details; a copy will show up of the receipt that you can print.
Process payments for invoices in QuickBooks Solopreneur
Here you simply have to choose get paid and then go for invoices
The next step is to find the invoice that you wish to record as fully or partially paid
Now, under the action column, you need to choose record payment
And then, in the deposit to dropdown, select the account to record the payment to
The user is then required to fill out the remaining fields, like the amount paid and the payment date.
After you are done, choose save.
Step 4: Learn about deposit times for customer payments
After processing payments, QuickBooks puts money into the bank account. It simply makes use of the bank account that is opted for when signing up for QuickBooks payments. The time taken for deposit depends upon the product and the type of payment. You can get more info about deposit times for QuickBooks payments.
It should be noted, if you are new to payments, then your first payments might take a bit longer while QuickBooks set up the accounts. After the accounts are set up, customer payments will be processed faster.
Disclaimer: QuickBooks payments account is subject to eligibility criteria, credit, and application approval. Money movement services are provided by Intuit Payments Inc., licensed as a money transmitter by the New York State Department of Financial Services.
Toward the end of this segment, we believe that the reader might be able to understand how to take and process payments in QuickBooks Online with QuickBooks payments. Moreover, the above steps might help you in successfully understanding QuickBooks credit card processing in QuickBooks online. However, if you have any queries, or if you need any sort of technical guidance, then in that case, reach out to us at +1-888-510-9198, and our technically sound QuickBooks ProAdvisors will answer all your queries immediately.
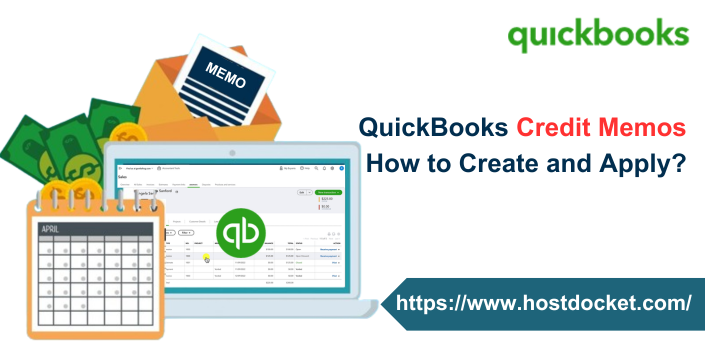
Do you know how and when to give a credit memo or delayed credit to customers? Well, we can help you with that. At times, instead of a refund, some customers prefer getting a credit that they can use to reduce the balance on their next invoice. It is possible to handle credit memos in QuickBooks using a bunch of ways. You have two different options, one is to create a credit memo to immediately reduce a customer’s current balance, and the other is to enter a delayed credit so that it can be used in the future. In this segment, we are going to discuss further about the differences and how they can be applied to the customer transactions.
It should be noted that if you are refunding money that a customer has paid already, then it is suggested to record a customer refund in QuickBooks by creating a refund receipt. Having said that, let us proceed with the segment and understand QuickBooks credit memos better. However, if you have any queries, or if you need any sort of professional guidance at any point in time, then we suggest you consult our technical team at +1-888-510-9198, and we will help you with your doubts immediately.
What is the difference between QuickBooks credit memos and delayed credits?
QuickBooks lets you give credit using a credit memo or delayed credit. However, there are a few key differences that we have jotted down. Let us evaluate:
Credit memoin QuickBooks
A credit memo can be used in case your customer wants to immediately reduce their current open balance.
It can also be used as payment for an invoice by the customer. Either they can use all of their credit memos or a portion of it.
A credit memo can be applied when recording payment for a customer’s invoice.
Note that, credit memos impact sales reports, even if you do not apply them to the invoices.
Delayed Credit in QuickBooks
In case you wish to track a customer’s credit for future use, and they do not want it to instantly affect their current open balance, then using a delayed credit might help.
The customer can use their delayed credit to reduce the balance of an invoice.
One can add delayed credits to future invoices as a line item.
Delayed credits do not impact sales reports until you apply them to invoices.
Steps to create and apply a QuickBooks credit memo
In order to create and apply a credit memo, you can try performing the steps enumerated below:
Step 1: Turn on or turn off automatically apply credits
Begin with heading to the Settings tab
Choose Account and settings
You now have to choose the advanced tab
Once done with that, choose the edit tab in the automation section
Also, turn on automatically apply credits, in case you wish to automatically apply credits to customer balances or open invoices.
After that, turn if off in case you wish to make a decision that open invoices you want to apply credit memos to.
The last step is to choose Save and click on Done.
Simply turn on auto-apply credits, to automatically apply credits to the oldest open invoices for the same customer. In case it is on, here is what happens:
In case you have older open invoices, QuickBooks will apply the credit to the oldest open invoice. If none, QuickBooks will apply the credit to the next invoice.
Just in case the credit matches the amount on the invoice, the credit memo and invoice will show Closed. In case the credit is less than the amount of the invoice, the credit memo will show as closed, and the invoice will depict partial.
Also, if the credit is more than the amount of the oldest open invoice, QuickBooks applies the remainder to the next oldest open invoice. In case there is no more open invoices, then the status of the credit memo will show unapplied
In case you create credit and the customer owes nothing, then they will have a negative balance.
Case 2: If the automatically apply credits setting is off
If you create a lot of invoices and credit memos for customers, then you need to turn off auto-apply credits. Just in case you apply specific credit memos to specific invoices, then here is what happens if it is off:
When you enter a credit, QuickBooks won’t apply it to any open invoices.
Moreover, when you receive a customer payment using receive payment, then it has a credits section. Choose when to apply credits and to which invoices.
In case you don’t link any credits, the customer balance detail report will show that both the invoice and the credit memo have open balances. They further show as open or customer and sales transaction pages.
Remove auto-applied credits from an invoice
Here you need to choose an invoice that has the credits applied
After that, choose the blue hyperlink of the credit applied, and then choose the date.
The payment transaction will open.
The next step is to choose more and then delete. Also, choose yes to confirm.
In case you want to transfer credit from one customer to another, create a journal entry, then apply the credit.
From the customer dropdown, you need to choose customer’s name
Also, enter the credit memo details, such as the date and the amount.
Note that, you can create a custom credit service item so that you can quickly add it to credit memos as a single line item.
After you are done, choose save and close.
Step 3: Apply the QuickBooks credit memos to an invoice
Just in case you turn on the auto-apply credits, QuickBooks will apply the credit for you. And in case you turn it off, you can manually apply a credit memo to an invoice.
Begin with, choose + New
After that, choose Receive payment
Select the customer from the customer dropdown.
You now have to choose the open invoice you wish to apply the credit memo to in the outstanding transactions section
In credits section, choose the credit memos you wish to apply
Also, note that, if you do not see the credits section, in case you haven’t created the credit memo.
Enter the credit you want to apply for the open invoice in the payment column.
Now, leave the payment method, reference no, deposit to, and the amount received fields blank.
Also, enter in the rest of the details including the payment date.
Ensure that the total is correct after applying the credit memo.
The last step is to choose save and close.
Steps to create and apply a delayed credit
For creating and applying a delayed credit, the steps enumerated below can be implemented.
Step 1: Create a delayed credit
To begin with, you need to choose + New
After that, choose delayed credit
Now, from the customer dropdown, choose the customer’s name
And then, enter the details, such as the date and the amount
Note that, you can create a custom credit service item, so you can quickly add it to the delayed credits as a single line item
Adding a delayed credit to an invoice from a prior accounting period will affect that period’s balances.
You need to choose + New
And then go for the invoice
After that, in the customer dropdown, choose the customer.
This opens a window with all open transactions for the customer and further includes invoices and delayed credits.
Also, note that, if you do not see this, choose the small arrow next to the invoice balance due.
Once done with that, find the delayed credit and choose add.
This adds the credit as a line item to the invoice
Now, fill in the rest of the details.
And choose save and close.
Credit memo customization
Any sort of customizations applied to the standard template will be applied by the credit memo. Thus, in order to customize a credit memo, you need to edit the standard template according to the requirements.
Towards the end of this segment, we believe that the information shared in above might be of some help in creating and applying credit memos or delayed credits in QuickBooks online. However, in case of any queries, you need to simply reach out to our technical support professionals at +1-888-510-9198, and they will help you with your doubts instantly.
Want to record and classify refunds easily in QuickBooks? If yes, then this segment is surely something you need to go through. Refunds usually happen when a client has to refund you for an overcharge, returns an item, or cancels a service. The QuickBooks accounting software helps in managing refunds in many ways. You need to record a refund depending on various scenarios. This ensures that your books are up-to-date. To help you out in recording customer refunds in QuickBooks, here we are with this segment sharing the complete set of steps that can be implemented. To learn more, stick around this segment carefully. Or you can also consult our technical support team for any sort of technical guidance and to find out how to record refund in QuickBooks. Dial +1-888-510-9198, for any sort of technical guidance.
Record and Categorize Refunds in QuickBooks Desktop
You can perform the below set of steps to record and categorize refunds in QuickBooks. Let us have a look:
Step 1: Launch QuickBooks
Initially, you need to launch QuickBooks software and then sign into the account.
Step 2: Make a new customer
Before you issue a refund, you must have a customer refund. If the customer is not present in your database, then you need to add them using the steps below:
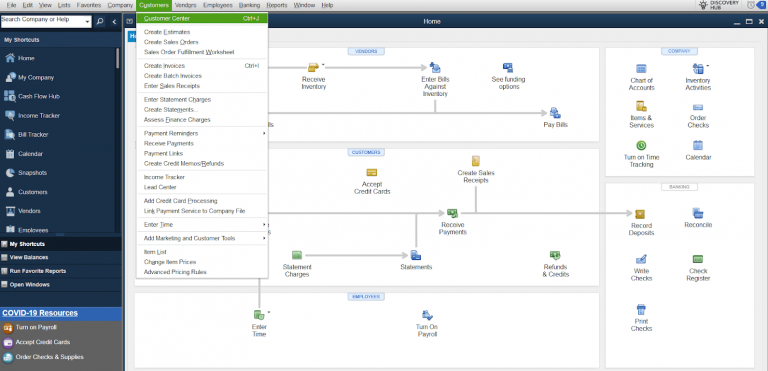
Head to the customer menu.
After that, choose Customer center
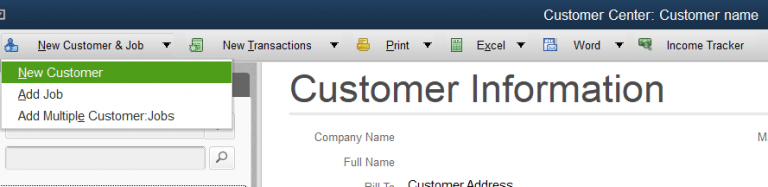
You need to then press new customer and job option.
Also, select a new customer.
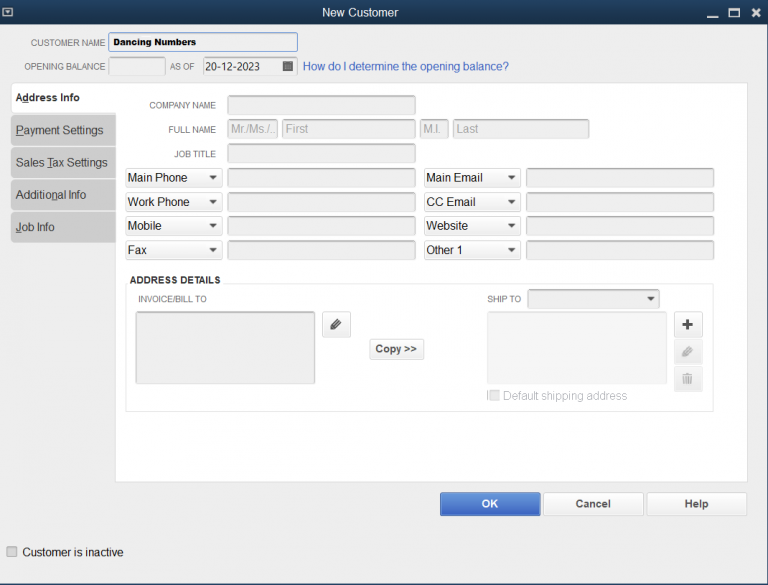
Complete all the customer details like the address, name, contact details, etc.
You need to now click on ok tab.
Step 3: Create a refund receipt
Here, you need to record the money that you are giving back to the customer. The steps involved in here are:
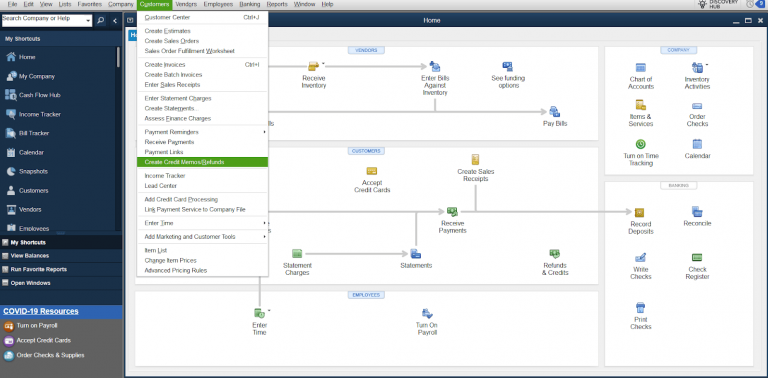
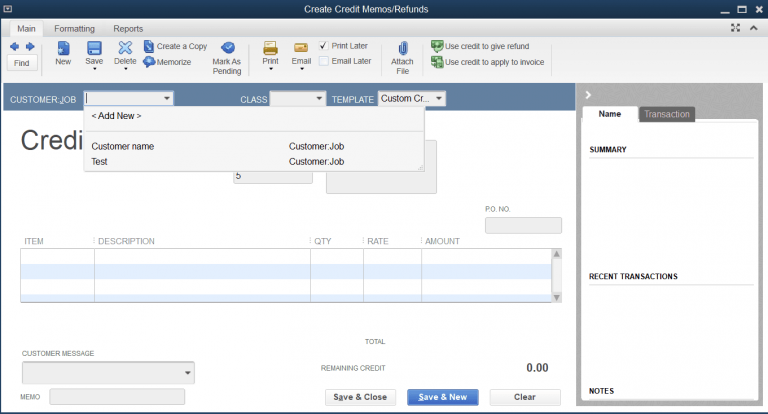
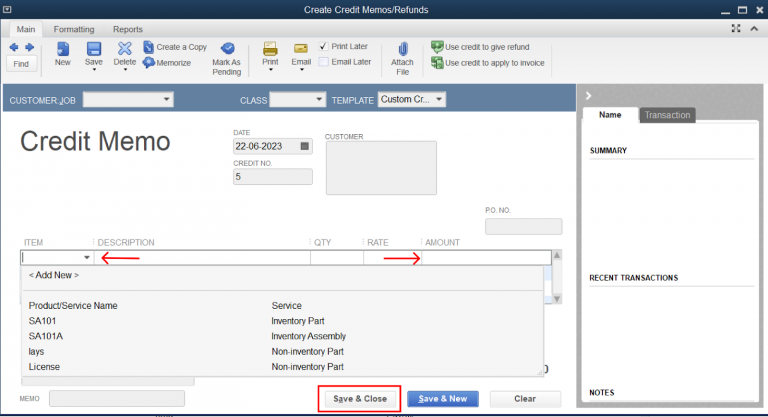
The very first step is to head to customers menu and select create credit memos/refunds.
You now need to select the customer you are refunding.
In the section for item, select the items that are refunded.
After that, type the amount of the refund in the particular account column.
Step 4: Issue a refund check or implement the refund to the customer’s balance
After preparing the credit memo, you can either apply it to the balance of the customer for future purchases or can refund the amount immediately with the help of the steps below:
After the credit memo is saved, a screen will ask you how you wish to handle the refund. Now, select apply to an invoice to use the refund for future purchases.
Now, select the option, and give a refund to refund the amount now.
Just in case you select the option give a refund, you will get notified to select the payment method for the particular refund along with the account the money will be taken from.
Now, click on ok tab.
Step 5: Review the Refund
The last step here is to review the refund to ensure that it has been categorized in the right way.
Head to the reports menu.
Select the customers and receivables and then opt for customer balance details.
You need to reimburse a client or vendor for an overpayment or returned items, which includes precise paperwork and prompt processing while issuing a refund in QuickBooks.
Partial Refunds
You can reimburse a partial of the initial payment using partial refunds in QuickBooks online. This gives you options when handling refund requests from customers or vendors. This includes determining the refund amount based on the percentages of the original payment being repaid. In order to ascertain transparency in financial transactions and properly represent the partial reimbursement, adjustment entries can be made in QuickBooks online.
Refunding to a Customer
When you receive a refund in QuickBooks, the overcharged amount must be returned or a return request must be processed. Proper documentation and on time compensation are guaranteed. The process involves customer filing a refund request which the authorized staff then examines and approves. Once you get the approval, the payment must be reconciled in QuickBooks to ensure that the amount reimbursed is the same as the initial transaction. After the reimbursement is processed on time, the consumer is informed in full via email. This maintains transparency and confidence. QuickBooks lets a smooth refund management process that lets businesses to maintain both financial accuracy and customer happiness.
Refunding a payment
When refunding a payment in QuickBooks, reversing the associated transaction, updating financial records, and guaranteeing an exact reconciliation of the refunded amount are essential. Initially, you need to find the original payment transactions in QuickBooks and select the suitable refund processing option. Accounting changes must be made when the refund is started, so that the financial records reflect the refund properly. You further need to check that the updated transaction information matches the financial statements. Businesses can guarantee accuracy in the financial records and transparency in their refunding processes by following the protocols.
In order to get the accuracy of the financial reporting and maintain clean financial records, one needs to accurately record and categorize refund in QuickBooks.
The above-discussed steps were related to recording a refund in QuickBooks Desktop. Let us now check out the steps that discuss how to refund a customer in quickbooks online.
Customer refund if invoice has been paid
Here is how to issue a refund in QuickBooks. Let us have a look:
Step 1: Enter a credit memo
Begin with by simply selecting +New tab and choose Credit memo
Once done with that, select the right customer in the customer field
You now have to enter the credit memo date, amount, tax, and product/service.
It should be noted that in case you choose an inventory item, then QuickBooks will put it back into inventory. In case the item is defective or if you do not wait it added back to inventory, then make an inventory adjustment.
The last step is to choose save and close tabs.
In case the customer has overpaid, then you d not need the credit memo as you will already have an unapplied credit that acts as your credit memo.
Step 2: Make a refund
Here you simply need to choose + New and then go for expense
After that, in the payee field, choose or enter the desired customer.
Furthermore, in the payment account field, choose the bank the money is being refunded from.
Also, in the category field, choose the debtors account.
And in the amount field, enter the amount of the refund.
The next step is to choose the appropriate tax in the tax field.
Choose save.
And also, head to + new and select receive payment.
After that add the customer and choose payment method and deposit to.
The balance should be 0 as they will cancel each other out.
You now need to choose save and close
In case you have online banking, head to transactions and then bank transactions.
Also, match the record you found.
Refund for goods or services that didn’t satisfy the customer
You can make use of refund receipts, in case a customer asks for a refund for an item or service. In case they used a credit card, then you can perform the steps related to refunding a credit card payment. It should be noted that, in order to avoid a double refund, ensure that you haven’t already entered a credit memo yet.
At first, choose new
And also, go for refund receipt or give refund.
The next step is to choose customer dropdown and then opt for customer you wish to refund.
Now, go for refund from drop-down and then choose the bank you deposited the payment for the invoice to.
After that, add all products or services the customer returned in the product/service column.
And then, ensure to fill the date, quantity, rate, amount, sales tax, and other fields.
Once done with that, choose save and close
Refund a customer’s overpayment or credit
One can record a refund to the customer using check or expense, in case:
They want to redeem their open credits
They made a prepayment for an older but canceled it before receiving the goods or services.
They wish to reimburse an accidental overpayment
Making use of a check or expense to record the refund reduces the bank’s balance and offsets the customer’s open credit, overpayment, or prepayment.
Step 1: Record the refund for your customer
You need to first choose +new
After that, opt for expense, add expense or check.
In case you are in a business view, follow the steps to switch to accountant view first.
Now, choose the customer you wish to refund from the payee dropdown
And then, from the payment account dropdown, select the bank account where you deposited the overpayment to.
On the first line of category column, select accounts receivable.
After which, you need to enter how much you want to refund in the amount field
The next step is to enter in other field as you see fit, and choose save and close.
Step 2: Link the refund to the customer’s credit or overpayment
The very first step is to choose +New tab
And then, select receive payment
Also, choose the same customer you used for the check or expense when recording the refund
Enter in the details
And in the outstanding transaction section, go for the checkbox for the expense or check you created when recording the refund.
It should be noted that in case you have automation to apply bill payments turned on, then this step is done for you.
Ensure that the payment is equal to the open balance, and choose save and close.
Recording a customer refund in QuickBooks isn’t a tough nut to crack. We hope that the information shared in above might be of some help in recording refund in QuickBooks successfully. However, in case of any queries, or if you are unable to record refund even after performing the steps above, then in that case, consult our technical support professionals right away by dialing our technical support number i.e., +1-888-510-9198. Our support professionals will provide you with instant guidance.