
Reconciling an account in QuickBooks is essential so that they match the bank and credit card statements. The way to balance your checkbook, you are supposed to review your accounts in QuickBooks and ascertain that they tally with your real-life bank and credit card statements. The entire process of reviewing is what it means when you say as reconcile an account in QuickBooks. When you get your bank statement, you will have to compare each of the transactions with the ones that you entered into QuickBooks. If everything tallies, then this means that your accounts are balanced and accurate. It is recommended to reconcile QuickBooks including checking, savings, and credit card accounts every month.
To help you with the process to reconcile an account in QuickBooks, here we are with this segment sharing the complete set of steps that can be performed. Note that, the procedure for QuickBooks online and QuickBooks desktop might vary. Thus, we have tried to cover both procedures in detail. For better understanding, read this segment carefully, or you can further get on a call with our QuickBooks technical support team, for any sort of professionals guidance. Dial our toll-free customer support number i.e., +1-888-510-9198, and all your queries will be answered immediately.
Also Read: How to Reconcile Payroll Liabilities in QuickBooks?
Steps to Reconcile an Account in QuickBooks Online
Here are the steps that can be performed by QuickBooks Online users to successfully reconcile an account in QBO.
Step 1: Review your Opening Balance
When you are reconciling an account for the very first time, it is crucial that you review the opening balance. It is important that it matches to the balance of your real-life bank account for the day you started tracking transactions in QuickBooks.
A quick tip- You can save your effort by connecting your bank and credit cards to online banking, as it automatically downloads transactions and further records the opening balance in QuickBooks for you. In case you forgot to enter an opening balance in QuickBooks previously, then need not to worry, you can perform the steps to enter an opening balance later on.
Also note that, entering a service charge and interest earned options are only available when the bank account is not connected to online banking.
Step 2: Start a Reconciliation
After you have your monthly bank or credit card statement, it is time to start with the QuickBooks reconciliation. Keep in mind that if you are reconciling multiple months, do them one statement at a time, starting with your oldest statement. The steps involved here are:
- Just in case your accounts are connected to online banking, ensure you match and categorize all the downloaded bank feed transactions.
- Now, head to the Settings tab ⚙ and further click on Reconcile. In case you are reconciling for the very first time, then click on Get Started.
- After that, from the Account ▼ drop-down, choose the account you wish to reconcile. Ensure it is the same one on your statement.
It should be noted that, if you witness a message regarding a previous reconciliation, then you need to opt for We can help you fix it. This needs to be fixed before you continue with the steps.
- Furthermore, review the Beginning Balance. Ensure that the beginning balance in QuickBooks matches the one on the statement.
- Now, enter the Ending balance and Ending date on the statement. Note that, certain banks might call the ending balance a new balance or a closing balance.
- In case you see it, review the last statement ending date.
- This is basically the end date of the last reconciliation. Your current bank statement should begin the day after.
- Once you are ready to begin, click on Start Reconciliation.
This might be helpful: How to Fix Reconcile Discrepancies in QuickBooks Desktop?
Step 3: Compare your Statement with QuickBooks
It is now time to simply compare the transactions on the statement with what’s in QuickBooks. Review them one by one. As this can be a tricky part, you need to ensure that you have the right dates and transactions in QuickBooks. Continue with the steps below for the type of account that you are reconciling.
Reconcile accounts connected to online banking
As all of the transaction info is obtained directly from the bank, reconciling becomes easy. In certain cases, the accounts are already balanced.
- You need to start with the first transaction on the statement.
- Now, look for the same transactions in the Reconciliation window in QuickBooks.
- After that, compare the two transactions. In case they tally, put a Checkmark next to the amount in QuickBooks. This usually marks it as reconciled.
- To speed up things a little bit, the transactions that you added or tallied from online banking are already selected.

- In case a transaction doesn’t show up on the statement, but it is present in QuickBooks, then do not put a checkmark.
- You need to compare each transaction on the statement with what’s in QuickBooks.
A quick tip: In case you are sure that you have found a match but something small isn’t right, like the payee, then you can choose the transaction in QuickBooks to expand the view. Further, click on edit and make the edits so the details tally.
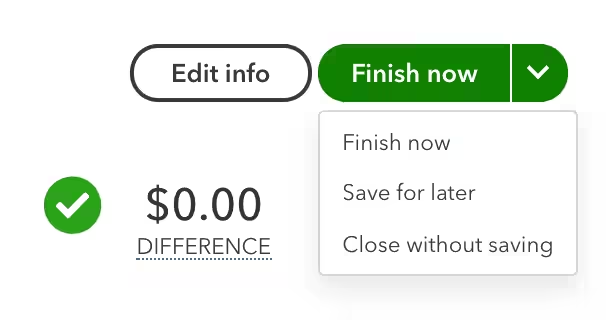
- After you reach the end, the difference between the statement and QuickBooks should be $0.00. If it is, then make sure to click on Finish Now.
Reconcile accounts that aren’t connected to online banking
If your accounts are not connected to online banking, then here is what you can do:
- Begin with the first transaction on the statement.
- Find the transaction in the Reconciliation window in QuickBooks.
- You now have to compare the two transactions. In case they tally, you need to put a checkmark next to the amount in QuickBooks. This will mark it as reconciled.
- In case a transaction doesn’t show up on the statement, but you see it in QuickBooks, skip putting a checkmark.
- Furthermore, compare each of the transactions on the statement with QuickBooks.
Quick Tip- In case you are sure that you found a match but there is some small issue, then you can simply Edit the transaction.
- Now, toward the end, you will see the difference between the statement and QuickBooks as $0.00. If that is the case, then click on Finish Now.
Steps to Review Past Reconciliations
You will have to run a QuickBooks reconciliation report to review your work. The steps involved in here are:
- Initially, head to Settings tab ⚙ and also click on Reconcile.
- Furthermore, choose History by Account.
- Now, make use of the dropdown menus to choose the account and date range.
- Or you can further print or export your reconciliation reports, in case you need to share them.
Steps to edit completed reconciliations
You can perform necessary changes to past reconciliations, but keep in mind that changes can unbalance the accounts and other reconciliations. It further affects the beginning balance of the next reconciliation. You need to start by reviewing a previous reconciliation report. In case you reconciled a transaction mistakenly, then you need to start over again or connect with an accountant. Note that, these changes can get a bit complicated for you to handle.
Also Read: Resolving QuickBooks Accountant Copy Failed Error
Steps to Reconcile an Account in QuickBooks Desktop
If you are a QuickBooks Desktop user, then here are the steps that you need to perform to reconcile accounts in QuickBooks Desktop.
Step 1: Review Your Opening Balance
Before you begin with reconciliation, ensure that you back up the company file. In case you are reconciling an account for the first time, then simply review the opening balance.
Step 2: Prepare for Reconciliation
Ensure that you enter all the transactions for the bank statement period you plan to reconcile. In case there are transactions that haven’t cleared the bank yet and aren’t on the statement, you need to wait to enter them.
Step 3: Start Reconciliation
After you get your bank statement, you can start reconciling. In case you are reconciling multiple months, start with your oldest bank statement. You can reconcile each month separately, one statement at a time. It should be noted that, in case you are reconciling a merchant or payments account and QuickBooks desktop sees that you aren’t signed in, then you will see a sign-in window. This further ensures that your account is successfully linked to a valid company ID.
- Head to the Banking menu and further choose Reconcile.
- Once done with that, in the Account field, choose the bank or credit card account you want to reconcile.
- The statement date is entered on its own. Usually, it is 30 or 31 days after the statement date of the previous reconciliation. You need to change it as needed, in order to match the bank statement.
- QuickBooks further enters the beginning balance. It uses the ending balance from the last reconciliation to get this number.
- Further, enter the ending balance based on the bank statement.
- You now have to enter the service charge and interest earned based on the bank statement.
- Do not enter charges that you have already entered in QuickBooks.
- Also, review the fields. In case the info is correct, choose the continue or ok tab.
In case you beginning balance doesn’t match your statement, then need not to worry. There are a few tools that can help you.
- Just in case the number doesn’t match, choose Locate Discrepancies. This gives you reports that can be used to find discrepancies and other reconciliation issues.
- In case you have issues, then try fixing the opening balance and beginning balance.
- To start over from scratch, select undo the last reconciliation.
It should be noted that, when you undo a previous reconciliation, your beginning balance reverts to the beginning balance of the previous reconciliation. Moreover, all cleared transactions on the reconciliation become uncleared.
Also Check This Out: How to Use Undeposited Funds Account to Receive Payments in QuickBooks Online?
Step 4: Compare Bank Statement and QuickBooks
In order to reconcile, simply compare the list of transactions on the bank statement with what’s in QuickBooks. Ensure that you have the right dates and transactions. After you are done reviewing the statement, you will know everything made it into QuickBooks.
Here are a few things that you can do to make reconciliation is little easier.
- In case you only want to see the transactions for the statement period you are working on, simply choose Hide transactions after the statement’s end date.
- Or if you are reconciling a credit card account, then the sections are Charges and Cash Advances and Payments and Credits. Focus on one section at a time.
- In case you are reconciling an account for online banking, then choose Matched.
- You now have to enter the Statement Ending Date from your bank statement. This automatically selects transactions QuickBooks downloaded and matched.
Note that, a matched transaction in the register has a lightning bolt next to ti. Once you reconcile it, a checkmark replaces the lightning bolt.
- In case you want to sort the list, choose the header or title of a column.
- Or if there are more transactions in QuickBooks than there are on your bank statement, resort the list.
Match Your Transactions
- Once you are ready, start with the first transaction on the statement.
- Now, find the same one in the reconciliation window in QuickBooks.
- You now have to compare the two transactions. In case the transactions match, choose and put a checkmark in the checkmark column.
- This reconciles the transaction.
- You need to compare each transaction on your statement with what’s in QuickBooks.
- As you clear or add transactions to the reconciliation, the Cleared Balance amount decreases.
- The amount increases, in case you clear or add deposits and other credit amounts.
- In case a transaction doesn’t appear on the statement, do not mark it as reconciled. Here are the ways to check if things tally or not:
- In case you wish to see the total number and amount of transactions you have added to the reconciliation, you need to look for the items you have marked in the cleared section. The majority of banks provide the same summary of transactions on bank statements. You need to compare the total number of transactions to see if anything is missing.
- Just in case you want to edit or get more info about a specific transaction, then select the transaction and then click on Go To or double click.
- If you want to take a step back and make a change to the info you entered in Step 3: Start your reconciliation, then choose Modify. The service charges, interest, and ending balance info are available in the section next to it.
- After you reach the end, the difference between the bank statement and QuickBooks should be $0.00. If that is the case, then choose Reconcile Now.
What to do if balances don’t match after you Reconcile QuickBooks?
In case the difference isn’t zero, then you can fix it using a bunch of steps. For bank accounts, QuickBooks opens the Reconcile Adjustment window. You have the following options:
- Return to Reconcile: Head to the reconciliation to review everything again.
- Leave Reconcile: You need to save the reconciliation so you can review or edit any existing transactions causing issues. You can come back and finish the reconciliation process later on.
- Enter Adjustment: In case you wish to complete the reconciliation, you can force QuickBooks to create an adjustment to balance everything. This should only be done if you know all of the correct transactions are in QuickBooks and what you entered is right. QuickBooks will automatically enter the adjustment as a journal entry.
The journal entry goes into a special expense account termed as reconciliation discrepancies.
Steps to review the reconciliation Adjustment
In order to find all your adjustments on your list, you can simply review a previous reconciliation report for the reconciliation you adjusted. This will show the cleared transactions and any changes that are made after the transaction that may not show in the discrepancies.
- Begin with the edit menu, and choose the find tab.
- Now, in the find window, choose the Advanced tab and then head to Memo.
- The next step in the memo field, type Balance Adjustment, and choose Find.
Also Read: How to Manage Your Account, Products, and Subscriptions in QuickBooks?
Review Cleared Transactions
You can try to review all the cleared transactions using the set of steps enumerated below. Let us have a look:
- At first, navigate to the Reports Menu and choose Reports Center.
- After that, search and open the Previous Reconciliation Report
- Now, choose the account you reconciled, then either detail, summary or both.
- Go for transactions cleared, plus any changes that are made to those transactions since the reconciliation.
- You now have to choose Display.
Note that, for other types of accounts, QuickBooks opens the Make Payment Window. This will let you write a check or enter a bill to pay to cover the outstanding balance. In case you do not want to record a payment, then choose the Cancel tab.
In case you run into issues or discrepancies, which simply means that the transactions in QuickBooks do not tally to the bank statement, then need not to worry. You can fix the mismatches by performing some simple steps.
Review Reconcile QuickBooks
Once you reconcile, you can choose the Display tab to view the Reconciliation report or Print to print it. In case you want to review a reconciliation report later on, then simply carry out the below steps:
- Head to the Report menu, and choose Reports Center.
- Now, search and open a previous reconciliation report.
- Choose the account you reconciled, then either Detail, Summary, or Both.
Conclusion!
Now that you know the correct ways to reconcile an account in QuickBooks desktop and QuickBooks online, it is time to implement these steps. Hopefully, this segment might be helpful in successfully reconciling in QuickBooks. However, if you have any queries, or if you need our support and assistance at any point in time, then give us a call at +1-888-510-9198, and all your queries will answered immediately.
Other Related Articles:
How to Setup QuickBooks Online Bank Reconciliation: Process & Overview? [Guide]
How to Fix Banking Error 9995 in QuickBooks Online?

