
If you’re seeing the error message “Cannot communicate with the company file due to a firewall” in QuickBooks, you’re not alone this is one of the most commonly reported multi-user errors in QuickBooks Desktop. It usually shows up when the network firewall is blocking the connection between your computer and the server where the company file is stored. And until that connection issue is resolved, QuickBooks simply won’t let you access the file. Moreover, you can come across similar issue when updating the operating system or the software. It shows up on the screen with the following error message:
| Error: | Cannot communicate with the company file due to a firewall |
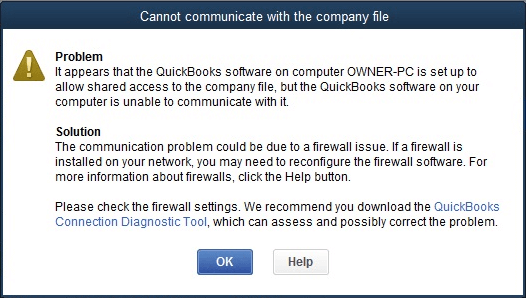
| Problem | It appears that the QuickBooks software on computer QWNER-PC is set up to allow shared access to the company file, but the QuickBooks software on your computer is unable to communicate with it. |
This error can also appear when you update your operating system or QuickBooks itself especially if the update changes certain firewall or network settings. The good news is that there are 6 proven solutions to fix it, and in most cases, you can resolve it without any technical background. In this guide, we’ve covered everything what causes the error, and exactly how to fix it step by step. And if you’d rather have a professional handle it for you, our QuickBooks Support team is available 24/7 at +1-888-510-9198, just give us a call and we’ll get your company file connection restored right away.
What causes QuickBooks unable to communicate with the company file due to firewall?
A bunch of factors can stop your company file to communicate with QuickBooks. The common reasons include:
- A firewall latest version is not present in any network.
- The server loses the connection.
- A QuickBooks database server manager stops running to any server.
- Incorrect DNS setting.
Read Also: How to Resolve QuickBooks Error 2000?
How to Solve “Error: QuickBooks Cannot Communicate with the Company File”?
Now that you know what’s causing the error, let’s get into the fixes. We’ve listed 6 solutions below start from Solution 1 and work your way down. Most users find the fix within the first 2 solutions, so don’t feel overwhelmed. Just go through them one by one:
Solution 1: Use the QuickBooks File Doctor tool
You can follow the steps to download the QuickBooks tool hub program and further QuickBooks file doctor tool. The tool will perform a mini repair of the server and the firewall. Once it is completed, you need to open the company file in QuickBooks desktop. The steps that can be performed over here are:
Step 1: Download and install QuickBooks tool hub
The QuickBooks tool hub usually helps in fixing a bunch of errors. You simply need to close QuickBooks to make use of the tool hub. Note that, use Tool Hub on Windows 10, 64-bit.
- Begin with closing QuickBooks.
- Once done with that, download the most recent version of QuickBooks Tool Hub.
- Save the file where you can easily find it.
- Also, note that if you have installed the tool hub earlier, then you can find what version you have.
- Choose the home tab and the version will be on the bottom.
- Open the file downloaded in the previous step.

- Perform the onscreen steps to install and agree to the terms and conditions.
- After the installation ends, double-click the icon to open the tool hub.
Step 2: Run QuickBooks file doctor
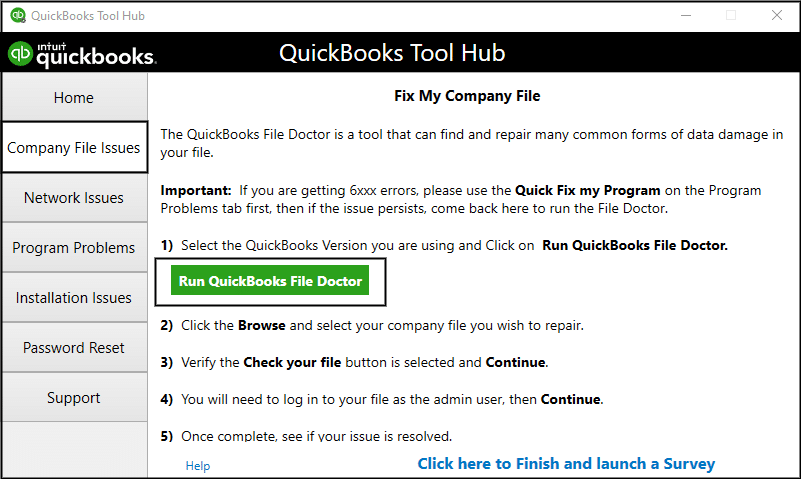
- You need to open the tool hub and select the company file issues tab.
- Once done with that, choose Run QuickBooks, file doctor.
- It can take up to one minute for the file doctor to open.
- It should be noted that if QuickBooks File Doctor doesn’t open, then you need to look for QuickBooks File Doctor and open it manually.
- In QuickBooks File Doctor, you need to choose the company file from the drop-down menu.
- In case you do not see your file, then choose browse and search to find the file.
- Now, choose Check your file and then hit the Continue tab.
- The next step is to enter the QuickBooks admin password and choose next.
Solution 2: Update QuickBooks to the Latest Release
QuickBooks automatically downloads updates whenever they are available. When the update is downloaded, you will see the update available on the status bar in the top right corner. The next step is to install the update. It will install on its own if you close the software and keep the system turned on. To manually install it, you need to perform the steps below.
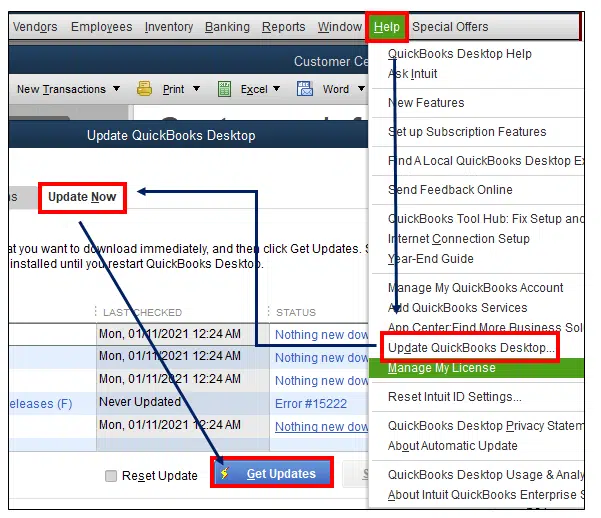
- Choose update available and go for install now to install the update.
- Now, wait for update to get installed. This might take some time.
- Open QuickBooks once the update is installed.
- In case you have a payroll subscription, you need to download the latest payroll tax table to process payroll in QuickBooks.
(Note: Click here to learn how to update QuickBooks to the latest version)
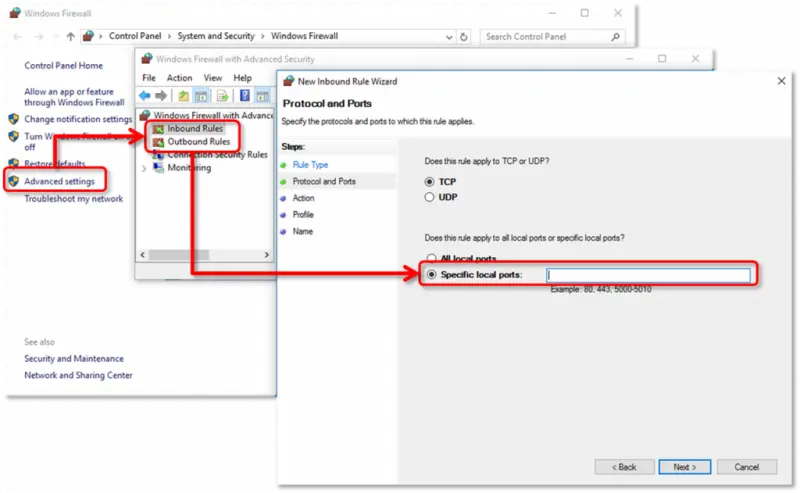
Solution 3: Configure Windows and third-party Firewall
Note: Intuit does not provide support for firewall or anti-virus programs. You may need to take help from the service provider for assistance with installing and setting up of your program. Here are the steps that can be performed to configure firewall for QuickBooks
Step 1: Click on QuickBooks Setup
- First ensure that you’ve installed QB software in your PC. It has the latest QuickBooks updation that has been applied and allow to open the company file.
- Then log in to your QuickBooks as an administrator with admin permissions.
- This will promote by QB users and gives the Axis permission to access the QuickBooks company files.
- If QuickBooks is running as Administrator or it has elevated mode (shield on the desktop icon) then please run Axis as Administrator too.
- Check that you meet the minimum systems requirements to use Zed Axis System Requirements. (Note: Click here to check the minimum system requirements of QuickBooks Desktop.)
Note: If you are using Microsoft Windows XP, Vista, 7, 8 or 8.1 then please ensure that you have User Account Control (UAC) set to ON or Always Notify. (If changing UAC, you will need to reboot Windows for the change to take affect).
However, if you are using a 64-bit version of Windows operating system & receives an unable to connect a message that you should make it as turn UAC as turned off and then try to reboot it in a normal mode and then try a connection to connect it freshly.
- Close any crashed instances of QuickBooks (qbw32.exe), by using the Windows task manager icon that is labeled as on the desktop.
- Ensure you have only one QuickBooks company file open.
- If a user connects directly to QuickBooks and are unable to remove or delete the old connection, then select it as:
- Click on Edit
- Choose Preferences list
- And then Integrated Application list
- Finally retry to establish a new connection.
If errors continue then follow the next step as explained below:
Step 2: Refresh your QuickBooks Interface files Rapidly
If you want to connect with QuickBooks and is unable to launch the connection. In case the files are not compatible with QuickBooks.
You need to refresh it by following the below steps as indicated here:
- Get to take back up as safely the Company Data File.
- Then find the file Reboot.bat (it was found in C:\Program files\Intuit\QB).
- Run in as administrator or give one right click.
- Reboot your PC & then try to connect your system to another.
Solution 4: Verify hosting
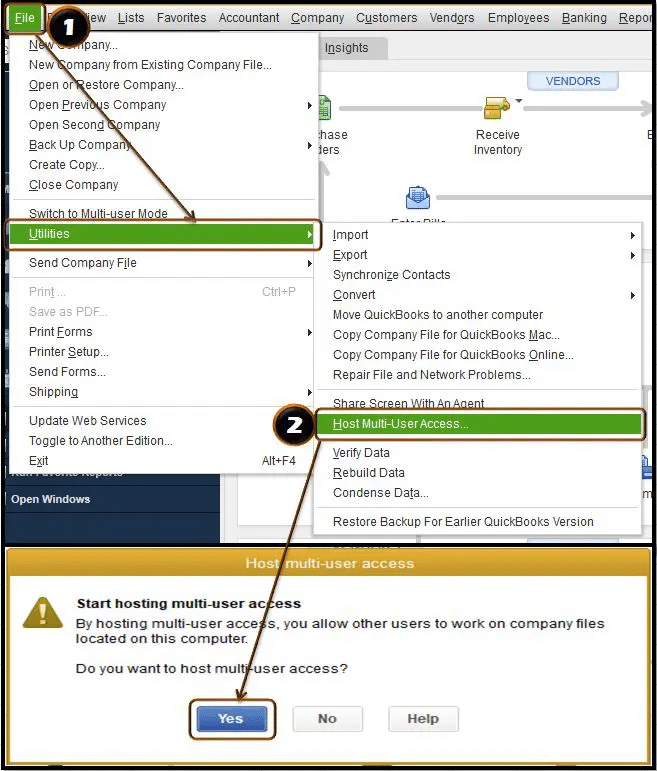
If you are using QuickBooks in a multi-user mode, only one computer should host the company file. Scanning the company file using the Database Server Manager turns hosting on.
Turn off hosting in all Workstations:
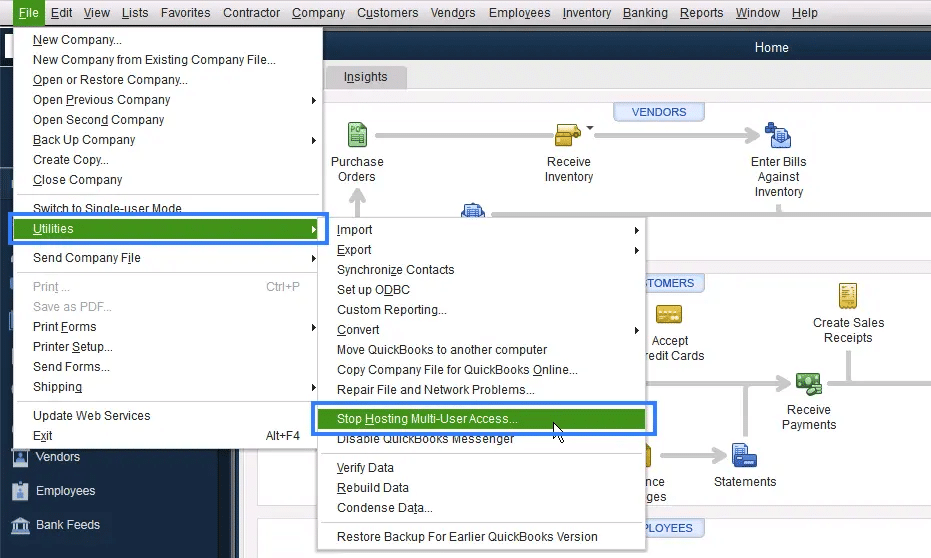
- Select Utilities from the QuickBooks File menu.
- Click Stop Hosting Multi-User Access.
- Click Yes on the confirmation message.
Ensure that Hosting on the server system is on:
- On your keyboard, Open the task manager by Pressing the Ctrl+ Alt+ Delete keys to open the task Manager.
- Now search the QBDBMgrN.exe in the Image Name column
- If you are not able to search the QBDBMgrN.exe file, ensure that QuickBooksXX service is running on your server.
- Important: You may need to log in as the system administrator to perform the following steps.
- Type Windows+R to open the Run window, on your keyboard.
- Now Type in services.msc and then click OK.
- Find the running file QuickBooksDBXX of your QuickBooks. (For example: QuickBooks 2017: QuickBooksDB27, QuickBooks 2016: QuickBooksDB26)
- Ensure that the startup type is Automatic.
- Verify that the entry in the User Name is correct, in the QBDBMgrN.exe row
- The user’s name depends on your QuickBooks version. (Example: QuickBooks Desktop 2017: QBDataServiceUser27, QuickBooks Desktop 2016: QBDataServiceUser26)
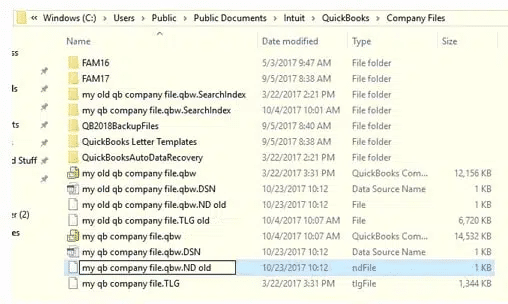
Solution 5: Create/build the Network Data (.ND) file(s)
For information, we would like to inform you that Network Data (.nd) file is a type of QuickBooks file that stores or keeps all the data/information of the host computer that contains QuickBooks company files. This particular file is a self-generated or automatically created when the user scans the QB folder or any open QuickBooks company files.
- On the keyboard, tap on the “Windows” or “Start” key once & enter the ‘QuickBooks Database Server Manager’ (QBDSM) in the search box. Choose the ‘QuickBooks Database Server Manager’ (QBDSM).
- NOTE: In the ‘Program List’, if you are unable to see the QuickBooks Database Server Manager (QBDSM) then it is suggested that you should uninstall & reinstall QuickBooks application. Ensure that you choose the second option, “I’ll be using QuickBooks on this computer, AND I’ll be storing our company file here so it can be shared over our network to guarantee the installation of QuickBooks Database Server Manager”.
- Go to the ‘QuickBooks Database Server Manager (QBDSM) display, click on the “Add Folder” tab, and search to locate the folder containing the QB company file(s).
- Once adding all folders, click on the “Scan” tab.
- Once you scan all the QB folders, go to the ‘QuickBooks Company Files’ section to see it.
- Go to the ‘QuickBooks Company File’ location and make sure to create .nd extension files for each QB data file.
Also Read: How to Troubleshoot QuickBooks Error 15271?
Solution 6: Turn off hosting on workstations
Ensure that the host multi-user access option is off on the workstations. These are basically the systems that are connected to the network that don’t host the company files. The server system should be the only one hosting.
- You need to first open QuickBooks on one of the workstations.
- Avoid opening the company file. Rather choose the file menu and then hover over utilities.
- The next step is to head to the next workstation, in case you see the host multi-user access option.
- In case stop hosting multi-user access is an option, then go for it.
After you have verified all the workstations, you need to head to the server system and reset the hosting settings.
- You need to open the QuickBooks on the server.
- Head to the file menu and hover to the utilities tab.
- In case the host multi-user access option is available, then this will reset the multi-user mode.
- The next step is to repeat the process one more time and choose host multi-user access.
Winding Up!
We hope one of the 6 solutions above helped you fix the “QuickBooks Cannot Communicate with the Company File” error and restored your access to the company file. In most cases, running the QuickBooks File Doctor or verifying the hosting settings takes care of the issue quickly, so always start there before trying the more advanced fixes. If you’ve gone through all the solutions and the error is still showing up, there may be a deeper network or firewall configuration issue that needs a professional to look at. Don’t keep troubleshooting on your own and risk disrupting your entire multi-user setup. Call our certified QuickBooks ProAdvisors at +1-888-510-9198 or visit our QuickBooks Support page, we’re available 24/7 and will diagnose the exact cause and get your QuickBooks back to full connectivity as quickly as possible.
See More Articles to Read:
How to Fix QuickBooks Error Code 80040408?
How to Fix QuickBooks Error Code C=343?
Methods to Resolve QuickBooks Error Code 1317
Some FAQs Related to QuickBooks cannot communicate with the company
What to do if QuickBooks is not communicating with my company file?
First, try restarting both your computer and QuickBooks. If that doesn’t work, try opening the company file in multi-user mode. If the problem persists, make sure that your QuickBooks software and Windows operating system are up to date. If none of these steps solve the issue, contact QuickBooks support at +1-888-510-9198 for further assistance.
How can I resolve the error message “QuickBooks is unable to communicate with the company file”?
Try opening the company file in multi-user mode. If that doesn’t work, make sure that your QuickBooks software, Windows operating system, and firewall settings are all up to date. If you continue to receive the error message, it may be a network issue. Contact QuickBooks support at +1-888-510-9198 for help resolving network issues.
What causes QuickBooks to not communicate with the company file?
There are a number of reasons why QuickBooks may not be able to communicate with the company file, including outdated software or operating systems, network issues, and firewall restrictions.
Is it possible to access my company file if QuickBooks is not communicating with it?
No, if QuickBooks is unable to communicate with the company file, you will not be able to access it until the issue exists.
Can a Windows update cause the “QuickBooks cannot communicate with company file” error?
Yes, absolutely. Windows updates can sometimes reset or change your firewall and security settings, which can block QuickBooks from communicating with the company file on your network. If this error started appearing right after a Windows update, Solution 3 in this guide configuring your Windows firewall is the most likely fix. Make sure QuickBooks is added as an exception in your firewall settings after any major Windows update.
Does this error only occur in multi-user mode, or can it happen in single-user mode too?
This error most commonly occurs in multi-user mode, since it involves a network connection between a workstation and the server hosting the company file. In single-user mode, QuickBooks accesses the file directly from the local machine, so firewall and network issues are less likely to interfere. However, if your company file is stored on a different drive or network location even in single-user mode, this error can still appear. In that case, Solution 5 rebuilding the .ND file usually fixes it.
How do I know if the QuickBooks Database Server Manager is running on my server?
The easiest way to check is to press Ctrl + Alt + Delete on the server computer to open the Task Manager, and look for QBDBMgrN.exe in the list of running processes. If you can’t find it, it means the QuickBooks Database Service has stopped. You can restart it by going to Windows Services (type services.msc in the Run window), finding the QuickBooksDBXX service for your version, and clicking Start. If you’re not comfortable doing this, our support team at +1-888-510-9198 can remotely check and restart the service for you.

