Creating invoices in a few clicks is one of the best features offered by QuickBooks. In case you plan to get paid in the future for products and services you sell, you can send your customers an invoice. Not just that, you can add the product or service you are selling to an invoice and email it to your customers. Creating and sending invoices in QuickBooks online is now easier with the set of steps scribbled in this piece of writing. We have tried to cover the steps to create an invoice in QuickBooks Online and also how to review unpaid invoices. Thus, scroll down to unleash the complete information.
You can also speak to our technical support team in case you need our assistance in creating invoices in QBO or for any sort of QuickBooks-related queries. Ring us at +1-888-510-9198, and we will surely answer all your queries immediately.
Also Read: Create invoice in QuickBooks Desktop
Steps to create an invoice in QuickBooks Online
Creating invoices involves a few simple steps. Your customers can pay their invoices online if you have QuickBooks payments. You can also handle the invoice and payment activities when you use an external payment processing platform. Note that your estimates or invoices will look different depending on whether you have the old or new estimate and invoice experience. Let us now explore the steps involved in creating an invoice in QuickBooks online.
Step 1: Create and send an invoice
Note that the steps for the new layout and the old layout differ. Let us explore the steps in both scenarios:
Condition 1: In case you are using the new layout
Well, there are multiple ways to create an invoice in QuickBooks. When you send an estimate to your customer, there are chances that the customer might approve it, in such case, you can convert your estimate to an invoice. Also, there is an option to create a new invoice from scratch.
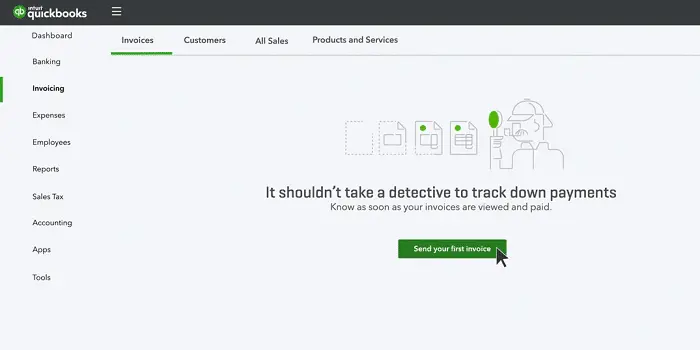
- The very first step is to choose + New
- Now, opt for an invoice
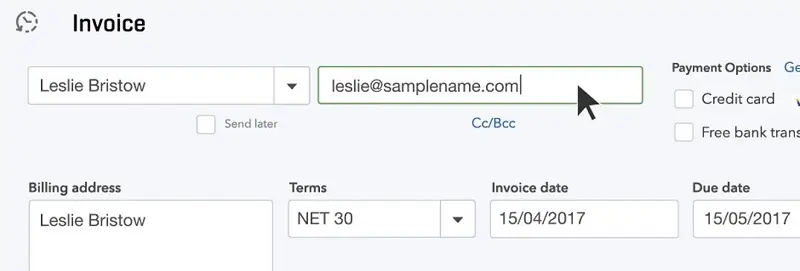
- The next step is to choose add customer and pick a customer from the ▼dropdown menu.
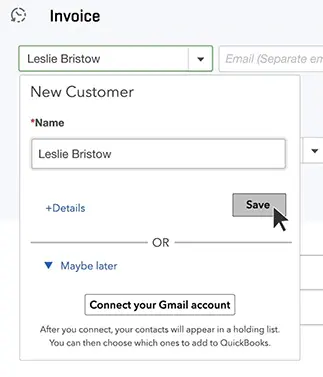
- Ensure that all of the info entered is correct, especially the email address.
- Now, review the invoice date, due date, and terms.
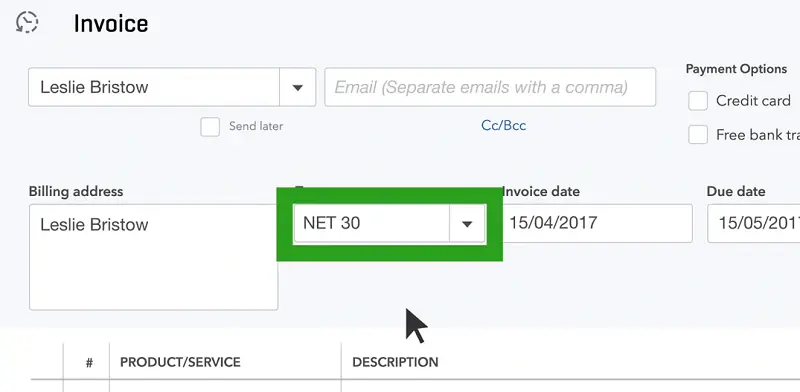
- Enter the new dates or terms, if you need to.
- The terms field contains the word net, which refers to the number of days until the payment is due.
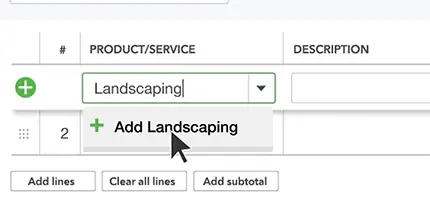
- You will then have to choose to add a product or service and go for a product or service from the ▼ dropdown.
- Once done with that, choose how you want to calculate the charge amount- flat rate, by hour, or by item.
- You will then be required to enter a quantity and rate if asked to.
- To customize the info or design of the invoices, choose ⚙ manage tab.
- Also, go for the options from the side panel.
- QuickBooks keeps a check on your choices and further applies them to all existing and future invoices.
- After you are done, there are various options for saving or sharing the invoice.
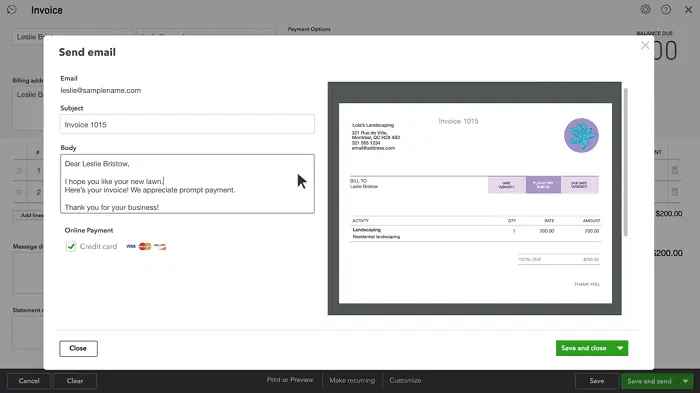
- In case you are ready to send the invoice, choose review and send, to email the invoice to your customer.
- Further, adjust the email if required.
- Once done with that, choose send invoice.
- To send the invoice later, choose save and close tabs.
- In order to print a paper invoice, choose print and download.
- Or if you have received a payment from the customer, then choose receive payment.
- Now, in order to send your customer a link to the invoice through text message, choose the share link.
- You can also customize the email and send it.
Related Article: How to Setup Intuit GoPayment? – [Uses and Benefits]
Condition 2: In case you are using the old layout
- Here, you need to first choose + new
- After that, opt for the invoice.
- The next step is to select a customer from the customer ▼ dropdown.
- Ensure all of the info is correct, especially the email address.
- Now, review the invoice date.
- In case you want to change the due date, then head to the terms ▼ dropdown.
- Note that net refers to the number of days until the payment is due.
- The default is 30 days, but you can change the due date in case require to.
- After that, from the product/service column, choose a product or service.
- Further enter a quantity, rate, and change amount in case needed.
- Also, choose the tax checkbox in case you need to charge sales tax.
- Once done, there are several options for saving or sharing the invoice:
- In case you are ready to send the invoice, opt for save and send, to email the invoice to the customer.
- You are also suggested to adjust the email in case needed and then choose send and close.
- In order to send the invoice later, choose save and close.
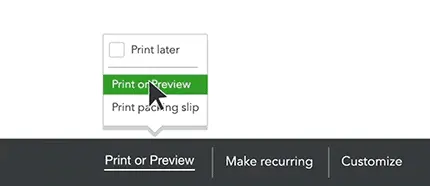
- Also, to print a paper invoice, choose save.
- Further, opt for print or preview.
- Now to send your customer a link to their invoice through text message, choose save and share link.
Also Check This Out: How to Turn off Sales Tax in QuickBooks Online?
Step 2: Review unpaid invoices
QuickBooks usually marks unpaid invoices in the accounts receivable account, which is visible on the balance sheet and other financial reports.
To review the invoices, you need to head to sales and choose invoices. Now, check the status column to see the status of the invoices in the sales process. There are a bunch of statuses that can show up. Let us evaluate each of the scenarios one by one:
- Due in [days]: This means that you haven’t emailed the invoice yet.
- Due in [days] sent: This indicates that you have emailed the invoice to the customer
- Due in [days] viewed: This message shows up when your customer opens the invoice.
- Deposited: It simply means that the customer has paid the invoice
- Overdue [days]: This status indicates that the invoice is past due and unpaid.
- Overdue [days] viewed: This appears when the customer has opened but didn’t pay the past due invoice.
- Delivery issue: In such a case the invoice would be undelivered. You will have to check the email address and resend.
- Voided: The invoice was voided in QuickBooks.
You can notify your customers about the upcoming invoice due dates. You can send them a reminder message.
Step 3: Receive payments for invoices
In case you use QuickBooks payments, then your customers can pay the invoices directly by credit card, PayPal, Venmo, or ACH transfer. Intuit processes and handles everything for the user. Once the payment is made, QuickBooks will put the transaction into the correct accounts.
However, just in case you make use of an external platform to process payments, then you can simply keep track of those payments in QuickBooks.
Also Read: How to Setup QuickBooks Invoicing For Gmail: Send Invoice to Your Customer Through Gmail?
Conclusion!
The set of steps enumerated above is enough to create an invoice in QuickBooks online successfully. However, if you have any queries at any point in time, or if you need our technical assistance in creating invoices in QBO, then feel free to ring us up at +1-888-510-9198,, and our technically sound certified QuickBooks ProAdvisors will ensure that all your queries are addressed immediately.
FAQs Related to Creating Invoices in QuickBooks Online
You need to perform a handful of steps:
1. Choose + New
2. Select the invoice and add customer
3. Review the invoice date, terms, etc.
4. Choose add product or service
5. Select the process to calculate the charge amount
6. Customer the info or design of your invoices.
7. Choose Manage.
8. Select the options from the side panel.
9. Save and share the invoice
Yes, using QuickBooks online you can minimize missed payments, and reduce administrative hassle by sending recurring invoices on a schedule. Even let your customers set up autopay.
In QuickBooks Online, users can simply create invoices when they sell products and services but expect customers to pay for them in the future. These forms key details about the sale and further lets you track the open and completed sales.
Yes, you can use the invoice generator for free in QuickBooks.
Well, you can make necessary changes to an invoice after you have created it. However, it might show some exceptions and errors when reconciling, especially if the invoice has been filed already.
No, only an accountant can batch change VAT codes on invoices.
Other Related Articles:

