Mistakenly turned-on sales tax, and now unable to turn it off in QuickBooks Online? Well, here is a quick guide for you. Automated sales tax is an amazing feature in QuickBooks. However, if you mistakenly turn on sales tax, but don’t want it to affect your overall invoices or do not charge sales tax, then you have an option to turn it off. In simple words, if you have the setting turned on in your QuickBooks online account, you will have to turn it off before using the new invoices experience. This will further help you in setting up your account for hassle-free use later on.

To help you out with the process to turn off sales tax in QuickBooks online, we have curated this piece of writing sharing how to turn off sales tax in QuickBooks online? For more details, stick around to this piece of writing till the end, or you can further get in touch with our technical support team at +1-844-499-6700, and let them help you out with your QuickBooks online sales tax queries and more.
You might need this: Convert from QuickBooks Online to Desktop
Find and Remove Sales Tax Transactions
Well, the ability to disable sales tax is available to all customers on both classic and automated sales tax from September 13, 2023. However, this is possible only if you haven’t created a transaction with sales tax in the past. In case you have any, you will have to delete these first. Removing the tick from the taxable box on the invoice will simply not work. You will have to manually remove sales tax transactions. And this can be done using a couple of steps enumerated below:
- You will first have to sign in to your QuickBooks online account.

- Heading forward, navigate to the reports tab.
- Once you reach there, look for and open the sales tax liability report.
- Now, set the report period to all dates. All agencies and tax items are displayed in the report.
- Followed by selecting the taxable amount, in order to open a report with all transactions having global sales tax on them.
- To continue, carry out the steps below:
- Note down the details of the transactions.
- Further, you need to delete the transactions. Note that the transactions deleted can be viewed in the Audit log.
- Once done with that, turn off the sales tax feature.
- And further refer to the sections for manual or automated sales tax.
- Towards the end, re-enter the deleted transactions.
Also Read: How to Sign up for QuickBooks Online Accountant & troubleshoot any probable error?
Turn off Sales Tax in QuickBooks Online (Automated Sales Tax experience)
Now that you have removed transactions having the sales tax, it is time to turn off the sales tax. The below steps are related to turning off sales tax in the automated sales tax experience. Let us have a look:
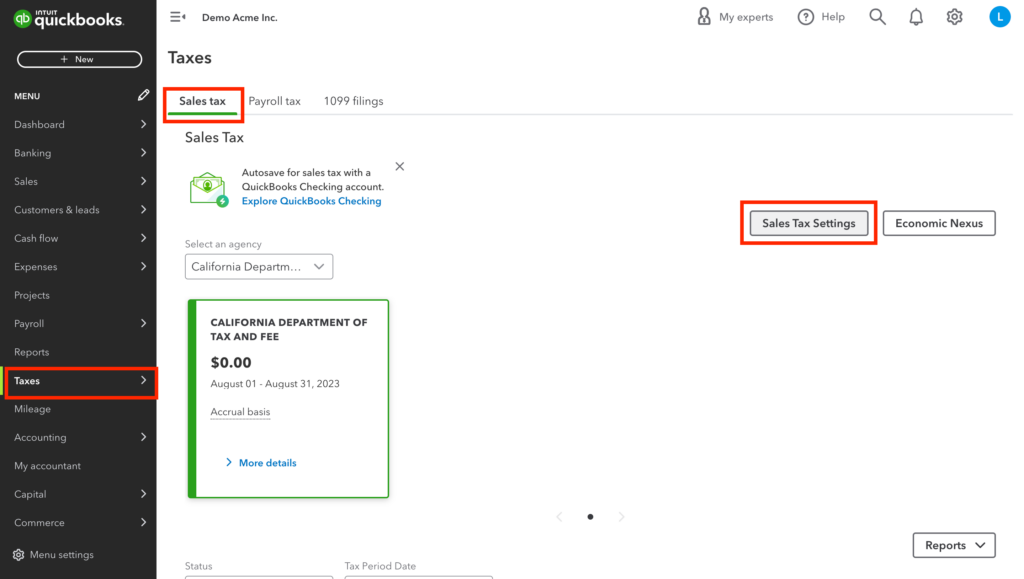
- Initially, head to the taxes tab and further choose sales tax.
- Once done with that, opt for sales tax settings
- Followed by selecting turn off sales tax.
- You now have to choose yes to confirm.
Turn off Sales Tax in Manual Sales Tax Experience
If you want to turn off sales tax in manual sales tax experience, then the steps might differ from the automated ones. The steps involved in this procedure are:
- Navigate to the taxes tab and further opt for sales tax.
- You now will see an option to go to the new sales tax experience, where you will have to choose do it later tab.
- Once done with that, choose edit sales tax settings under related taxes.
- After that, you will see a tab asking Do you charge sales tax? where you need to opt for No option, in case you don’t charge sales tax.
- Further click on save tab.
Also Check This Out: What is QuickBooks Online Sync Errors & How to Resolve it?
Delete Sales Tax Rates and Agencies in QuickBooks Online
Deleting sales tax rates or tax agencies in QuickBooks online isn’t possible. However, you can deactivate the tax rate or rename the tax agency, in case you no longer need or use them. It should be noted that, if you are unable to spot the settings below, it indicates that you are using Auto sales tax feature. Let us explore the steps to deactivate the tax rate.
Steps to Deactivate a tax rate in QuickBooks Online
Before you perform the steps below, note that you cannot reactivate a tax rate. Thus, if you deactivate this one, you will have to create a new one in future.
- For deactivating a tax rate, you will first have to navigate to taxes.
- Now, choose sales tax
- Followed by heading to the related tasks section in the sales tax center.
- Once done with that, choose add/edit tax rates and agencies.
- Here, you need to choose a tax rate name, and opt for deactivate option.
- The last step is to choose the continue tab on the dialog box.
Steps for renaming a tax agency
- This process requires you to first head to the taxes tab.
- Once done with that, choose sales tax.
- Followed by heading to the agency name table in the sales tax center.
- Also, choose rename for the agency name you want to edit
- The next step is to make changes you want and choose save.
Read This: How to Fix QuickBooks Payroll Tax Tables: Download, Install and Verify?
Alternate Solution (unable to turn off sales tax in QBO)
Another effective option is to manually edit the invoices and select a 0% tax rate to remove the automated taxes. In case this rate isn’t available, then create a custom rate and make use of it to calculate the sales tax when creating the invoices. Let us have a look at the steps below:
Steps To add the rate:
- You need to first move to the taxes menu and further choose sales tax settings
- Once done with that, click on add rate from the custom rates section.
- Further click on single or combined and enter the name of the custom rate.
- You will then have to choose the agency you file payments to and enter the rate.
- The next step is to press save.
Steps to use the rate on invoices:
- For this, you need to first open the invoices you want to edit one by one.
- After that, on the select tax rate section, click on the drop-down and select 0%.
- Enter in the required information.
- Followed by clicking on save and close.
Note that this function works perfectly when you create an invoice directly in QuickBooks online.
QB Online Related Article: How to Setup QuickBooks Online Bank Reconciliation: Process & Overview?
Conclusion!
Turning off sales tax in QuickBooks online can be a crucial feature for many businesses. It is believed that the above discussed steps might be of some help in successfully turning off the sales tax in QBO. However, if you are stuck at any point in time, or if you need any sort of technical assistance in carrying out the procedure, then in that scenario, we recommend you to connect with our technical support team at +1-844-499-6700, and let our certified QuickBooks professionals help you with all your queries.
Other Related Articles:
How to Fix QuickBooks Banking Error Code 105?
How to Fix QuickBooks Banking Error 103 or 310?
How to Fix QuickBooks Banking Error 9999?
How to Fix QuickBooks Banking Error 102?
FAQs Related to Turn off Sales Tax in QuickBooks
To turn off sales tax in QuickBooks online, you simply need to perform the steps below:
1. Head to taxes tab and choose sales tax
2. Once done with that, choose sales tax settings
3. Choose turn off sales tax
4. And now, choose yes to confirm
Note that, once you set up VAT in QuickBooks online, it can’t be turned off. However, you can set the default VAT to No VAT and stop VAT from showing in future transactions.
To delete GST adjustment, you need to perform the below steps:
1. Head to the settings tab first and then choose chart of accounts.
2. Once done with that find the income or expense account you used to add an adjustment.
3. You will now have to choose run report
4. Followed by selecting the adjustment you need to delete and further choose delete tab.
5. Click on confirm to end the procedure.


