Looking for the process to recover the lost data using the auto data recovery tool? If yes, then your hunt ends right here. Auto data recovery is basically a feature of QuickBooks that can be used in case of data loss or corruption. This also helps to recover all or nearly all of the data. Intuit Data Services can help with data recovery most of the time. However, the process can take some time and restrict the user from using QuickBooks for some time. However, using the QuickBooks Auto Data Recovery tool can be a faster way of recovering lost or corrupted data. We suggest to use this method only when other methods don’t work.
If you wish to know the answers of questions such as “How do I recover ADR files?” or “How do I recover a deleted file in QuickBooks?”, then your quest ends here. Read on to understand the working and various features of the QuickBooks Auto Data Recovery tool in order to help yourself recover your precious lost data. You can also get in touch with our QuickBooks support team at +1-866-453-7060, in case you need any sort of technical assistance in recovering your company file data. Having said that, let us understand the process further!
What is Auto Data Recovery Tool in QuickBooks?
Intuit, the developer of QuickBooks provides a bunch of tools to the its users to get rid of the issues that one might face when working on QuickBooks. And the auto data recovery tool is one such tool that can be a savior for QuickBooks users, in case they lose their crucial data when working on QuickBooks company file. The QuickBooks Auto data recovery tool can help the user to recover the lost file in QuickBooks by:
- It helps in restoring the lost transactions with the help of the current transaction log file and a copy of the company file.
- Also, it can help in restoring all but the last few hours of transactions with a copy of both your Company file and your Transaction Log file.
One can even recover lost QuickBooks data files from the hard drive by using the ADR feature. Let us further understand about the steps involved in making the most of auto data recovery tool in QuickBooks.
Important points to remember
- ADR is only available in QuickBooks Pro, Premier, and Enterprise Solutions for Windows.
- Also, the ADR feature is not available in Accountant Editions.
- The ADR file size limitation is 1.5 Gigabytes.
- In case the backup is larger than 1.5 Gigabytes, QuickBooks will not generate an ADR file.
- To maximize this feature, make sure that your QuickBooks Desktop always has the latest updates.
You might also need: How to Download and Install QuickBooks Tool Hub
Steps to make the most of QuickBooks Auto data recovery tool
The user can recover recent transactions using the original .TLG file with .QBW.adr file. And can also make use of the original Transaction Log file and ADR version of the company file to recover all recent transactions.
- The user should to create a new folder on the desktop named as QBTest
- And then open the folder where the company file is saved.
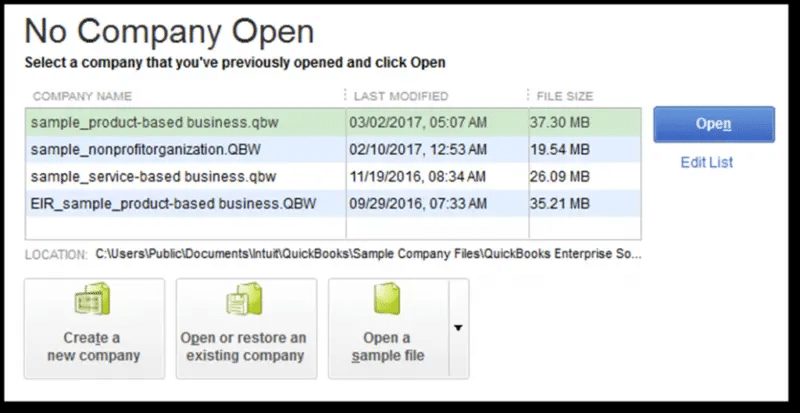
- After that, check the location of the company file on the Product Information screen (press F2 or Ctrl+1 on your keyboard) and No Company Open Window.

- The next step is to look for the .tlg file in your company file’s folder. It has the same name as your company file.
- The user should then show file extensions
- In case the user is unable to spot the tlg file, then performing the below steps to show the file extensions would help:
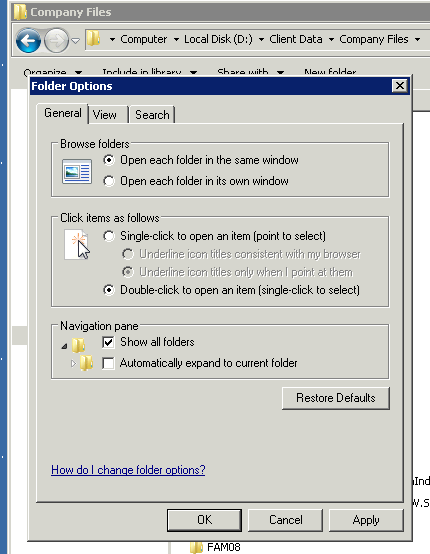
- At first, one has to open the file explorer by pressing Windows + E
- And then choose organize and select folder and search options
- For Windows 10, 8.1 & 8: Choose View, then select File name extension.
- And then choose Hide extensions for known file types.
- Now, go for Apply, then OK.
- The user should copy the corresponding .tlg file of your company file, and paste it to the QBTest folder on your Desktop.

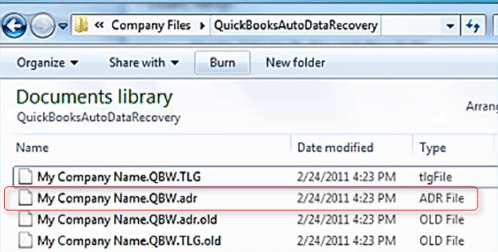
- Now, the user should open the QuickBooksAutoDataRecovery folder. It is in the same location as the company file.

- After that copy the .QBW.adr file and paste it to the QBTest folder.
- Now you will have the.QBW.adr and .tlg file on your QBTest folder.
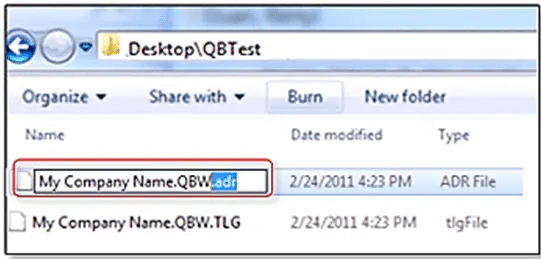
- In your QBTest folder, the user is required to right-click the .QBW.adr file and select Rename.
- And then, delete .adr at the end of the file name.
- After that open QuickBooks.
- The next step is to open the company file that is saved on your QBTest folder.
- We suggest that you use your account register to verify if all transactions are there.
- Now, choose File then Utilities and then Verify Data to check the data integrity of the recovered file.
- In case this copy of the company file is good, then you can move the damaged company file to a different location and transfer the copy from QBTest to the original location.

Recover recent transactions using .QBW.adr and .TLG.adr files
In this solution, we will be using the ADR version of both the qbw and .tlg files. This will recover all but past 12 hours of transactions.
- The user is should create a new folder on your Desktop named QBTest.
- And then open the folder where the company file is saved look for the QuickBooksAutoDataRecovery folder.
- Now, it is suggested to check the location of the company file on the Product Information screen (press F2 or Ctrl+1 on your keyboard) and No Company Open Window.
- After that check for the .TLG.adr and .QBW.adr files. These files have the same name as your company file.
- Perform the steps to show file extensions
- In case the user is unable to spot the the .TLG.adr and .QBW.adr files, steps below will help:
- In order to open the file explorer, the user needs to open file explorer and press windows + E
- After that choose to organize and select folder and search options
- For Windows 10, 8.1 & 8: Choose View, then select File name extension.
- After that go for Hide extensions for known file types.
- And choose Apply, then OK.
- The next step is to copy the .TLG.adr and .QBW.adr files and paste them to the QBTest folder.
- On your QBTest folder, remove the .adr from the end of the file name. That should give you a .qbw and .tlg files on your QBTest folder.
- The user should then open QuickBooks.
- And also, open the company file that is saved on your QBTest folder. Use your account register to verify all transactions are there.
- The next step is to check the data integrity of the recovered file: in the top left, select File then Utilities and then Verify Data.
- If this copy of the company file is good, you can move the damaged company file to a different location and transfer the copy from QBTest to the original location.

Conclusion
With this, we come to the end of the article, where we hope that the information shared in above might help in successfully retrieving the lost data using the QuickBooks auto data recovery tool. However, in case the user isn’t able to retrieve the data even after performing the steps above, then contact our QuickBooks tech support team. Feel free to reach out to us at +1-866-453-7060 and our tech personnel will help you in getting back your data successfully.
Recommended reading:
Fix QuickBooks Error Code 12002
How to transfer QuickBooks from Old Computer to a New Computer?
How to resolve QuickBooks error code 15215
FAQs Related to QuickBooks Auto Data Recovery
The Auto Data Recovery feature is available in every version of QuickBooks including Pro, premier, and Enterprise. However, the accountants edition can’t access this tool.
QuickBooks Auto Data Recovery tool lets the user to retrieve the lost or corrupted data, which might otherwise can be a impossible task. This tool helps in recovering the lost data majority of the times, when either user mistakenly deleted the data or the file gets corrupted.
When there are any changes made to the company file, the data is saved to two hard drives. Automatic backups if activated are performed every night.
For this, you can:
1. Move to the file menu.
2. Select open or restore company
3. Choose the backup copy and hit next.
4. Select local backup and hit next.
5. Browse the system for backup company file


