Looking for the process to recover the lost data using the auto data recovery tool? If yes, then your hunt ends right here. Auto data recovery is basically a feature of QuickBooks that can be used in case of data loss or corruption. This also helps to recover all or nearly all of the data. Intuit Data Services can help with data recovery most of the time. However, the process can take some time and restrict the user from using QuickBooks for some time. However, using the QuickBooks Auto Data Recovery tool can be a faster way of recovering lost or corrupted data. We suggest to use this method only when other methods don’t work.
If you wish to know the answers of questions such as “How do I recover ADR files?” or “How do I recover a deleted file in QuickBooks?”, then your quest ends here. Read on to understand the working and various features of the QuickBooks Auto Data Recovery tool in order to help yourself recover your precious lost data. You can also get in touch with our QuickBooks support team at +1-888-510-9198, in case you need any sort of technical assistance in recovering your company file data. Having said that, let us understand the process further!
What is Auto Data Recovery Tool in QuickBooks?
Intuit, the developer of QuickBooks provides a bunch of tools to the its users to get rid of the issues that one might face when working on QuickBooks. And the auto data recovery tool is one such tool that can be a savior for QuickBooks users, in case they lose their crucial data when working on QuickBooks company file. The QuickBooks Auto data recovery tool can help the user to recover the lost file in QuickBooks by:
It helps in restoring the lost transactions with the help of the current transaction log file and a copy of the company file.
Also, it can help in restoring all but the last few hours of transactions with a copy of both your Company file and your Transaction Log file.
Steps to make the most of QuickBooks Auto data recovery tool
The user can recover recent transactions using the original .TLG file with .QBW.adr file. And can also make use of the original Transaction Log file and ADR version of the company file to recover all recent transactions.
The user should to create a new folder on the desktop named as QBTest
And then open the folder where the company file is saved.
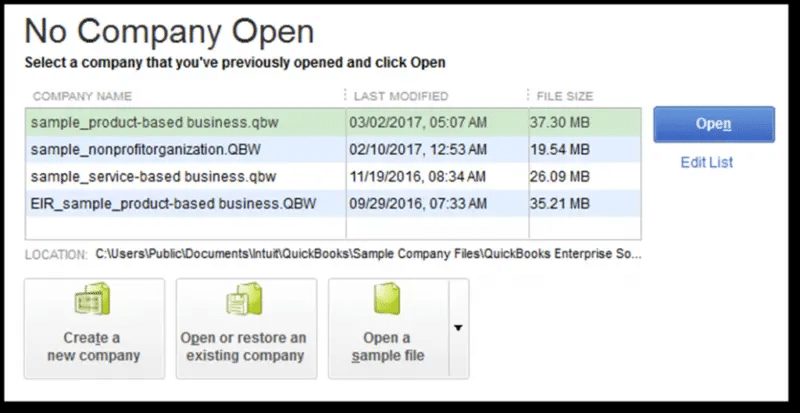
After that, check the location of the company file on the Product Information screen (press F2 or Ctrl+1 on your keyboard) and No Company Open Window.
The next step is to look for the .tlg file in your company file’s folder. It has the same name as your company file.
The user should then show file extensions
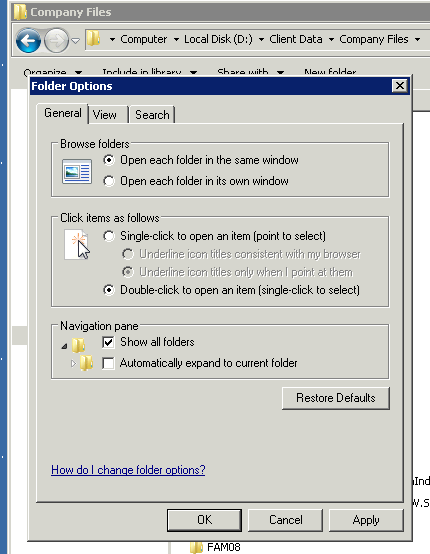
In case the user is unable to spot the tlg file, then performing the below steps to show the file extensions would help:
At first, one has to open the file explorer by pressing Windows + E
And then choose organize and select folder and search options
For Windows 10, 8.1 & 8: Choose View, then select File name extension.
And then choose Hide extensions for known file types.
Now, go for Apply, then OK.
The user should copy the corresponding .tlg file of your company file, and paste it to the QBTest folder on your Desktop.
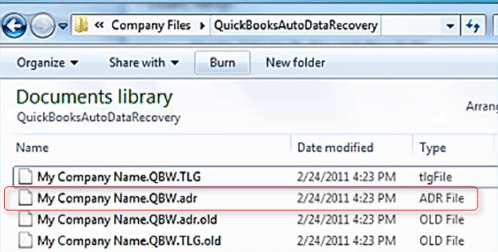
Now, the user should open the QuickBooksAutoDataRecovery folder. It is in the same location as the company file.
After that copy the .QBW.adr file and paste it to the QBTest folder.
Now you will have the.QBW.adr and .tlg file on your QBTest folder.
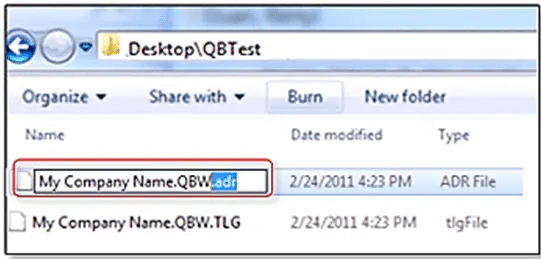
In your QBTest folder, the user is required to right-click the .QBW.adr file and select Rename.
And then, delete .adr at the end of the file name.
After that open QuickBooks.
The next step is to open the company file that is saved on your QBTest folder.
We suggest that you use your account register to verify if all transactions are there.
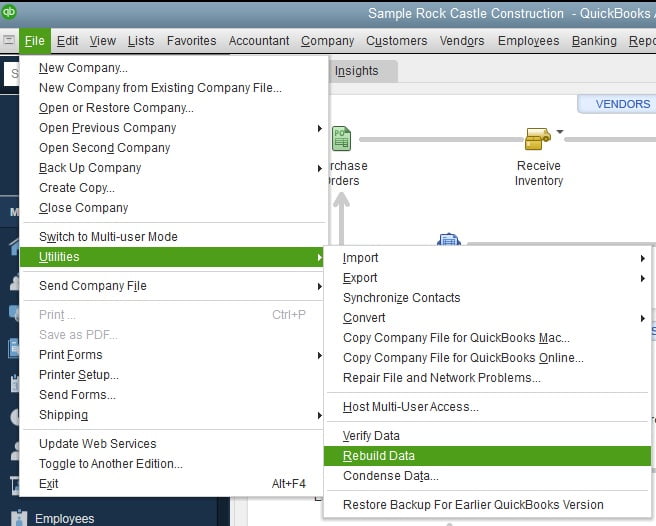
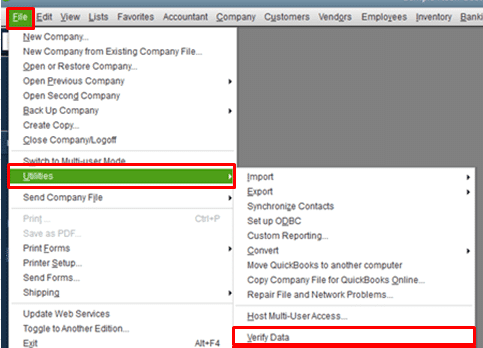
Now, choose File then Utilities and then Verify Data to check the data integrity of the recovered file.
In case this copy of the company file is good, then you can move the damaged company file to a different location and transfer the copy from QBTest to the original location.
Recover recent transactions using .QBW.adr and .TLG.adr files
In this solution, we will be using the ADR version of both the qbw and .tlg files. This will recover all but past 12 hours of transactions.
The user is should create a new folder on your Desktop named QBTest.
And then open the folder where the company file is saved look for the QuickBooksAutoDataRecovery folder.
Now, it is suggested to check the location of the company file on the Product Information screen (press F2 or Ctrl+1 on your keyboard) and No Company Open Window.
After that check for the .TLG.adr and .QBW.adr files. These files have the same name as your company file.
Perform the steps to show file extensions
In case the user is unable to spot the the .TLG.adr and .QBW.adr files, steps below will help:
In order to open the file explorer, the user needs to open file explorer and press windows + E
After that choose to organize and select folder and search options
For Windows 10, 8.1 & 8: Choose View, then select File name extension.
After that go for Hide extensions for known file types.
And choose Apply, then OK.
The next step is to copy the .TLG.adr and .QBW.adr files and paste them to the QBTest folder.
On your QBTest folder, remove the .adr from the end of the file name. That should give you a .qbw and .tlg files on your QBTest folder.
The user should then open QuickBooks.
And also, open the company file that is saved on your QBTest folder. Use your account register to verify all transactions are there.
The next step is to check the data integrity of the recovered file: in the top left, select File then Utilities and then Verify Data.
If this copy of the company file is good, you can move the damaged company file to a different location and transfer the copy from QBTest to the original location.
Conclusion
With this, we come to the end of the article, where we hope that the information shared in above might help in successfully retrieving the lost data using the QuickBooks auto data recovery tool. However, in case the user isn’t able to retrieve the data even after performing the steps above, then contact our QuickBooks tech support team. Feel free to reach out to us at +1-888-510-9198 and our tech personnel will help you in getting back your data successfully.
Which versions of QuickBooks have Auto Data Recovery Feature?
The Auto Data Recovery feature is available in every version of QuickBooks including Pro, premier, and Enterprise. However, the accountants edition can’t access this tool.
What is QuickBooks auto data recovery?
QuickBooks Auto Data Recovery tool lets the user to retrieve the lost or corrupted data, which might otherwise can be a impossible task. This tool helps in recovering the lost data majority of the times, when either user mistakenly deleted the data or the file gets corrupted.
Does QuickBooks do automatic backups?
When there are any changes made to the company file, the data is saved to two hard drives. Automatic backups if activated are performed every night.
How do I retrieve data from QuickBooks?
For this, you can: 1. Move to the file menu. 2. Select open or restore company 3. Choose the backup copy and hit next. 4. Select local backup and hit next. 5. Browse the system for backup company file
QuickBooks accounting software is packed with powerful features ensuring smooth functioning of the businesses and their accounting activities. One of the major highlights of this software is that you can transform the current record information. All business related information can easily be changed with the help of this seamless accounting software. As this application has some great features, it is considered as one of the most effective bookkeeping programs available in the market today. This article is based on in-depth details about the perks of using QuickBooks Data conversion service. So, without further ado, let us begin with our discussion. For any further information, you can also make call at our toll-free number i.e. +1-888-510-9198. Our QuickBooks data recovery support team will provide you with all the relevant information that you need.
Checkout the benefits of using the data conversion services in QuickBooks
Budgetary Moves:
For the past few years entrepreneurs are constantly chasing practical business arrangements and that’s how they start using QuickBooks especially on the web.
A lot of users: QuickBooks online is has an edge over QuickBooks Desktop, as it can signup around five users in comparison to only one user in the later. Moreover, different users can participate in the application many times, which is another compelling thing about it.
Free app system: QuickBooks Online customers get access to an environment of free application and this assists them in creating an answer that works great for their business without having to shell a lot of money.
Never Miss upgrade: When the entrepreneurs or various other users make use of the QuickBooks Data conversion system, they cannot miss out on any kind of upgrade.
Cloud Storage: Since the customers make use of the storage system where the data is kept secure they do not face any kind of hassle.
Capable Effectiveness
Sans Hands Information: QuickBooks users interface their ledgers to QuickBooks, and so on the web their exchanges will be naturally downloaded.
Less Printed material: With QuickBooks portable application it gives the users a golden opportunity to attach the images of their receipts to exchanges.
More Associations: When the users find that the application synchronizes their PayPal exchanges, they find it pretty impressive. You have to connect the business cards with the American Express and later on import the deal information from the Square.
Fulfill on Demand: Online access basically means that the user has the access to the system through QuickBooks. While QuickBooks is present on the Web, the customers can carry their office anywhere anytime.
Error-free in a state of harmony: When everyone is on the same page the accuracy is less demanding, which means that the user can enjoy error-free accounting. QuickBooks gives you and your customers only one arrangement of a book to continuously oversee.
Very Adaptable: The Cloud based application lets the companies take care of all the changes that are in demand by not putting the resources to use.
Greater portability: The uses of the portable systems are too efficient and effective. When the user makes use of any device like apple iPhone, iPad, Android is regarding what gadget the consumers favor. They’re never more than a breeze (or swipe!) far from finishing their next task.
Use it anyplace, anytime: Reports can be run freely with the help of the service tools and even solicitations can be sent, sort out costs from gadgets like tables, PC, Macbooks etc.
Keep current: This tool helps you in creating new assessment rates to new highlights. And it will also help you get to know about the recent updates.
Get receipts on your phone: This application helps in getting images of your receipts and then connect it with an exchange using the QuickBooks portable software.
Get information easily: QuickBooks Data Conversion services helps you with information whenever you are stuck.
Other Perks
Offer books with your Bookkeeper: In order to enable you your bookkeeper can get your books so that he/she can keep a track and prepare for imposing time.
Less informative passage: QuickBooks will download as well as sort out your band and Visa exchanges.
Accounting Data transfer: QuickBooks Data Conversion Services imports data from the system and even exports the QuickBooks easily.
Convert MS or CSV to QuickBooks: It helps in migrating the data or convert to MS Excel or CSV to QuickBooks.
There are many benefits of using QuickBooks data conversion services. For this service, you can easily get in touch with our QuickBooks data recovery experts, and we will be ever ready to help you. So, why wait? Call us to avail QuickBooks data conversion services and our team will not leave any stone unturned to provide you with the best possible support services.
Convert Your Data to QuickBooks from a Different Accounting System
One tool that we will like to mention here in this post is the QuickBooks conversion tool that you can add to your subscription to convert your accounting data to this robust software and run your business smoothly. However, there might be occasions when you may face issues with QuickBooks Data Conversion. You can speak to our industries best experts and accounting professionals who can help you with the conversion process.
QuickBooks Data Conversion team can help in the following cases:
We can guide you convert and migrate data. With our expert guidance, you can easily convert data and records from Microsoft Excel and CSV into QB. Furthermore, we can take care of all your inventories, accounting charts, services, tax items, vendors, employees, affiliates, customers, etc.
Our advisors can convert your accounting transactions data with ease into QuickBooks. We assist you with invoices, open accounts payable, open estimates, bills from vendors and service providers, open purchase and sales orders, monthly summary balance and more.
Your business data and files also require periodic cleaning. Please note that all accounting software takes care of business transactions in different manners. But despite that, our QB Data Conversion team can assist you to convert all your general ledger transactions, invoices, bill details, consolidate files and so on.
Here are the accounting systems (in alphabetical orders) from where we can help you import data
QuickBooks Data Conversion Service Provider in a host of industries
Businesses from a wide range of industries depend on QuickBooks for their accounting requirements. Our QuickBooks Data Conversion Team has worked with QuickBooks within the following industry:
Accounting
Advertising
Agriculture
Construction
Car Dealers
Distribution
E-commerce
Education
Electronics Manufacturing
Engineering
Financial Institutions
Food and Beverage
Government
General Contractors
Healthcare / Medical
Hospital and Nursing Homes
Information Technology
Insurance
Legal
Manufacturing
Management Consulting
Nonprofit
Professional Services
Real Estate
Retail/Hospitality
Telecommunications
Others
This blog post is created to give you an idea of the information related to QuickBooks data conversion services. We also wished to tell you where you can use a Certified Advisor or a team of accounting experts to run your business smoothly. However, if you are facing issues in data Conversion or your QuickBooks accounting software is not working properly, you can contact our QuickBooks support experts by dialing toll-free +1-888-510-9198. We are available 24×7 and we offer you nothing but the best services.
Our professionals bring with them years of experience working with a wide range of industries. Thus, you can rest assured that we understand your business serve you thoroughly with all your QuickBooks related issues
Frequently Asked Questions!
What is meant by Data Conversion?
Talking about data conversion, it is basically the process of taking all the data from one source and placing it in another destination. Note that the new location where you are going to store the data should be properly formatted QuickBooks instance. Also, converting from another software to QuickBooks might require data conversion.
What is a company file in QuickBooks?
A Company file in QuickBooks is the core file that carries all the necessary financial information of the company. The file holds sensitive data, which makes it essential to create a monthly backup of the company file.
How does the data conversion process is performed in QuickBooks?
The user can carry out the below steps for data conversion in QuickBooks: · The professionals will identify the suitable version of QuickBooks · New company file will be created · Reorganizing the accounting data into the new QB company files. · Condense the lengthy files to operate data smoothly. · The old system is rechecked to ensure there is no data available. · And lastly, verify the performance of QuickBooks to ensure smooth operations
Can I switch from other accounting software to QuickBooks?
Well, yes, it is possible to migrate to QuickBooks software from any accounting software with much ease. The user might require performing a certain set of steps and might have to get the QuickBooks license from the official Intuit website or purchase a QuickBooks subscription from a third party.
Suddenly encountered error code 6094 in QuickBooks and can’t find a way to culminate it? Well, without a doubt, QuickBooks is a well-built accounting software with advanced features that can assist businesses in performing their daily accounting and bookkeeping activities. However, it is an undeniable fact that it is prone to certain sorts of errors. These errors can be at times tiresome to deal with. One such error that we are going to highlight in this piece of writing is the QuickBooks Error 6094 (6010, 2). It is one among the hundreds of errors. This error usually occurs when QuickBooks fails in launching the web database. In addition to this, you can also face this error if there are some anti-virus programs running in your system, which may include AVG Anti-virus, SpyHunter Malware Blocking, PC Tools Internet Security, and others. Let us delve in deep to understand further about this issue. Moreover, if you feel the need for expert assistance at any point in time, then feel free to reach out to our technical support professionals at +1-888-510-9198, and our technically sound QuickBooks ProAdvisors will make sure that all your queries are addressed immediately. Having said that, let us further explore the information related to the QuickBooks error code 6094.
Talking about QuickBooks error code 6094, it is basically a 6000 series error that often occurs when QuickBooks fails to launch the web database. The same error can be seen due to the security program updates. It appears on the screen with a warning message that states:
Warning: “An error occurred when QuickBooks tried to start the database server that manages access to the QuickBooks company file. Error (-6094,0)”.
There can be a handful of factors instigating this error, which we will be elaborating later in this segment along with the fixes for the same. Let us explore together!
What triggers QuickBooks Error 6094?
The causes due to which QB Error 6094 (6010, 2) takes place are as follows:
Anti-virus programs such as AVG Anti-virus, SpyHunter Malware Blocking, PC Tools Internet Security are the main reasons behind this error.
When the user tries to launch the database server which manages access to the QuickBooks Company file, then this error can occur.
Now that you know the reasons why such an error occurs, it is time to implement the right set of steps to culminate the error permanently. However, you can save your time and effort by consulting with our QuickBooks data recovery team. Let us examine the methods one by one:
Solution 1: PC Tools Internet Security
Restore all the ‘infections’
First of all, open the settings menu and choose ‘Quarantine’
Now, restore all the necessary items
In the meantime, click ‘Yes’ and the click ‘Ok’
After this, you will have to create an exception to avoid QuickBooks directory.
Go to PC Tools Internet Security menu and Click on Settings
Now, choose Global Action List and add files which you want to eliminate from scanning
Now, click OK
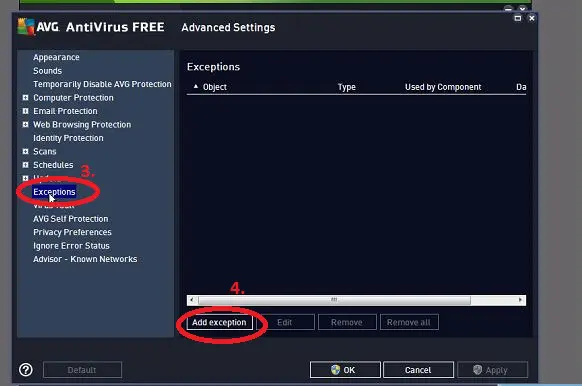
Solution 2: Configure the AVG Anti-virus
Here is the second solution that can help you resolve the QuickBooks Error Code 6094. This solution says that you would need to remove QuickBooks directory from being skimmed.
Close the QuickBooks Desktop and start AVG Anti-Virus User Interface.
Double-click on the Resident shield and click on Manage Exceptions
After this, click and add the path C:\Program Files\Intuit ( Note: The path will be added only when the QuickBooks is installed in a different folder)
After all the above steps, save the changes and click OK ( Note: Make sure that you restore all the QuickBooks files that AVG Anti-Virus quarantined)
Now check if any of the QuickBooks files are quarantined or not.
Click on History in the AVG Anti-Virus User Interface
Select Virus Vault and select any quarantined QuickBooks File.
For example, qb.exe, qbw32.exe, qbdbmgr.exe
Restore all the important files
Now, restart your QuickBooks Desktop.
Verify all the renamed files in the installation Directory
Close QuickBooks Desktop
Go to install directory and click on C:\Program files \Intuit\QuickBooks folder to check the files to be renamed
QuickBooks might recognize antivirus as a threat and further transfer crucial QuickBooks executable files into the QuickBooks folder. The steps listed below can give you an idea about how you can restore QuickBooks from quarantine.
First of all, close all the unnecessary programmed that are running in the background.
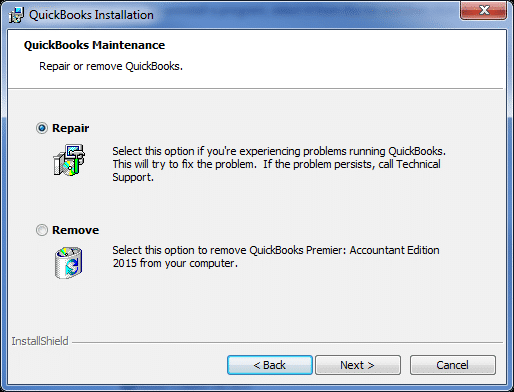
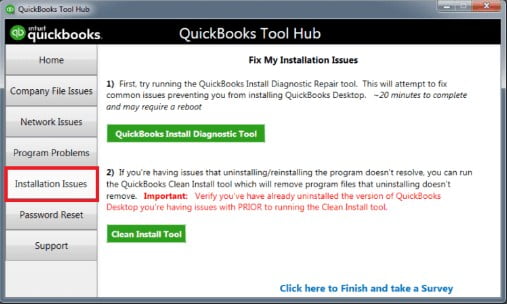
At times, a mere reinstall can fix the issue up to a certain extent, and clean installation is an advanced form that tends to eliminate different errors from their root causes. The steps that can be performed to clean install QuickBooks desktop.
You can run it from the desktop icon, and further navigate to the section under program installation issues.
In order to completely reinstall the program, try to choose QuickBooks clean Install tool and stick to the on-screen directions.
Try rebooting QuickBooks and check if the issue gets fixed.
We recommend you contact support professionals in case you are unable to fix the issue.
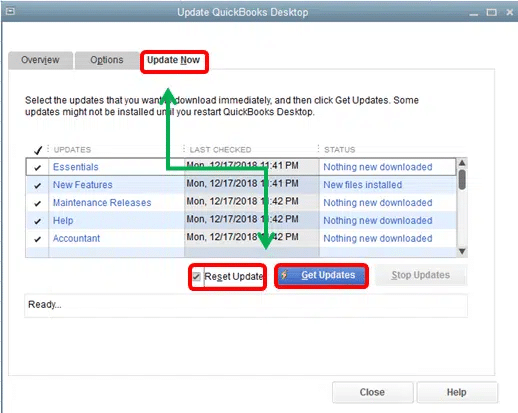
Solution 5: Update QuickBooks to latest release
Often outdated QuickBooks can trigger certain errors in QuickBooks. Thus, it is essential to ensure that the software is updated to the latest release. The steps involved in the procedure to Update QuickBooks to Latest Release are as follows:
Begin the process by launching the QuickBooks desktop software.
You now have to head to the help tab.
Later on, move to the QuickBooks desktop update option.
You can also click on the update now tab.
And choose the get updates tab.
The update process usually takes time.
Eventually, close and re-open QuickBooks to check if the issue is rectified or not.
Solution 6: Remove QuickBooks files from the list of blocked files
You can try removing the blocked files from the list of blocked files, in order to fix the error code 6094 successfully
The very first step is to launch the SpyHunter Software.
Furthermore, you need to click on the System Guard.
Heading forward, choose User Added tab and further look for the QuickBooks files.
You now have to set the QuickBooks files status as Allowed.
In case you are unable to find the QuickBooks files, then simply head back to the added tab.
Moving forward, verify PUP.
And if you find any QuickBooks file in the list, then set its status to allowed.
Moreover, set the status as allowed if you found QuickBooks blocked under PUP.
With the above three solutions, you will be able to get rid of QuickBooks Error 6094. But in case you still face problems, then you can contact us immediately on our QuickBooks enterprise support phone number .i.e. +1-888-510-9198. This number is toll-free and our executives are available 24*7 to assist you.
FAQs
How do I fix error 6094 in QuickBooks?
Try to implement the general steps to fix such an error: 1. Update QuickBooks to the latest release. 2. Try updating the Antivirus software. 3. Access the Antivirus Vault. 4. Access the quarantine folder. 5. Also, restore qbdbmgr.exe and qbdbmgrn.exe files
What is QuickBooks error 6094?
QuickBooks error code 6094 is associated with the database service and would further prevent the service from starting.
How to disable antivirus to fix error 6094 in QuickBooks?
In order to disable the antivirus, you need to simply right-click the antivirus icon on the taskbar, and further click on the option to temporarily disable the program. Later on, try to restart the database service.
What is error code 6010 in QuickBooks?
QuickBooks error code 6010 is a common error that one might come across if access to the network is denied. Moreover, if the antivirus blocks QuickBooks from connecting to the network, then experiencing this issue is probable.
At times, when you try working on the QuickBooks software, you end up in some unexpected errors like this one i.e., QuickBooks error C=1304. This is a commonly faced situation by the QuickBooks users and mostly occurs when the users update QuickBooks or install any program. The update and install errors might seem to be easy to handle, but at times are the most challenging ones, as they make your software stuck at a point from where there is no come back. As the error occurs, a pop-up appears on the screen which says, “error writing to file (file name)”. At this moment, the user needs to ensure that you have the access to the directory.
The user can also contact our QuickBooks data recovery support team at our helpline number i.e. +1-888-510-9198, but we would first recommend to make an attempt to resolve the error manually. This article can be helpful for you to rectify the error C=1304, by carrying out a few steps manually, but before that let us check out the causes of the error.
There are three major reasons for this error to occur, namely:
Any kind of problem with the CD Drive can be one of the most common reasons behind the occurrence of this type of error.
Another factor that might lead to error C=1304 can be, if the CD gets damaged or the CD driver is not functioning in the proper manner.
If there is any kind of damage to the Microsoft .Net components, then in that case the user might stumble upon QuickBooks error code C=1304.
Error Code C=1304 Analysis
Now that we know the causes of the issue, let us get a brief about QuickBooks error code C=1304. This kind of error can occur simply due to any issue with the CD or the CD drive. The problem can be fixed by copying the installation folders from CD to hard drive. Now, install QuickBooks from files copied from CD to hard drive. This would aid in resolving the error.
There are 3 troubleshooting steps for QuickBooks Error c=1304. You can follow these steps in sequence as they are given below.
Method 1: Use the Installation CD to Replace Installation Files
In order to rectify the issue, the user can make use of the installation CD for replacing the installation files. This can be done by following a few simple steps enumerated below:
To begin with, the user needs to replace the installation files from CD to hard drive
For this, the user is supposed to insert QuickBooks CD into CD drive. As soon as the installation process gets started, the user needs to click on ‘QUIT‘ option.
Now, go to C: drive, create a new folder and paste the files there:
Select the desktop on the left pane of window, in Windows Vista, Click Organize and click on New Folder.
Once the New folder appears, rename it to QuickBooks.
After that, in left pane, right click the QuickBooks CD and also click on Explore.
Followed by finding QuickBooks, other third party folders, and setup.exe file in right pane.
The next step is to press and hold the Ctrl key, followed by selecting the folders and file.
Now, On the highlighted folder, right click and opt for Copy.
After that the user needs to come back to QuickBooks folder, right click on it and tap on Paste option.
Now, from the folders that were copied earlier, the user needs to install QuickBooks.
After that the user should open the QuickBooks folder where the files were copied.
On the setup.exe file, double click to start Installation process.
The last and final step is to follow the onscreen instructions and complete installation.
Method 2: Advanced Computer User Solution (To restore it manually)
In case the above method doesn’t work, then the user can opt for another solution namely Advanced computer user solution (To restore it manually). The steps involved in this process are as follows:
The very first step in the process is to login as the system administrator.
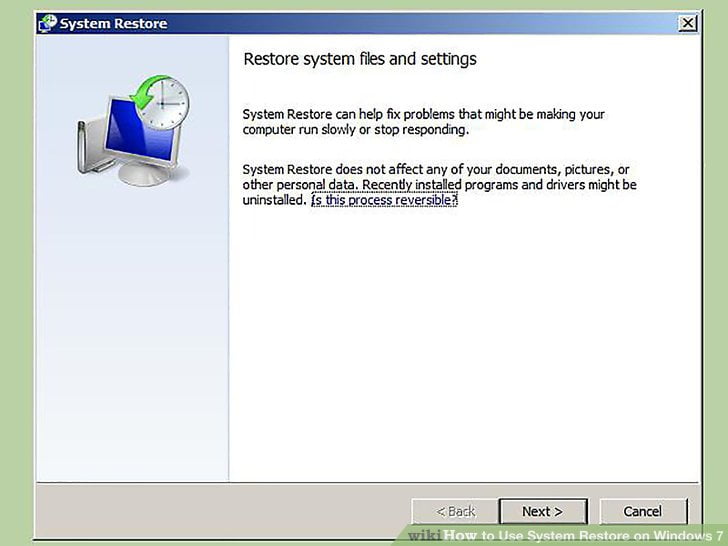
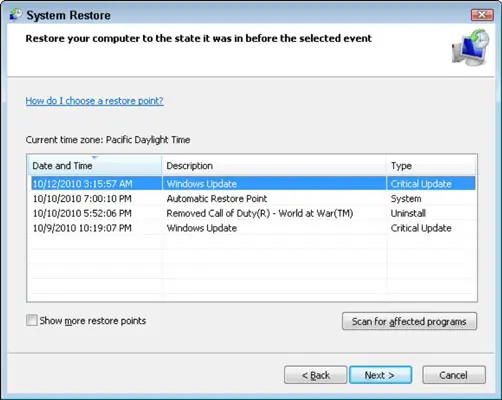
And then, click on the start button. Now, the user needs to select All Programs >System tools >Accessories, and then click System Restore settings.
Moving ahead, the user needs to select “Restore my computer to an earlier mature” button, in the growth window.
Reorganize Reduction from “On the list, click a modernize reduction list” and then, click Next.
The final step is to restart the system, as soon as the restoration is complete.
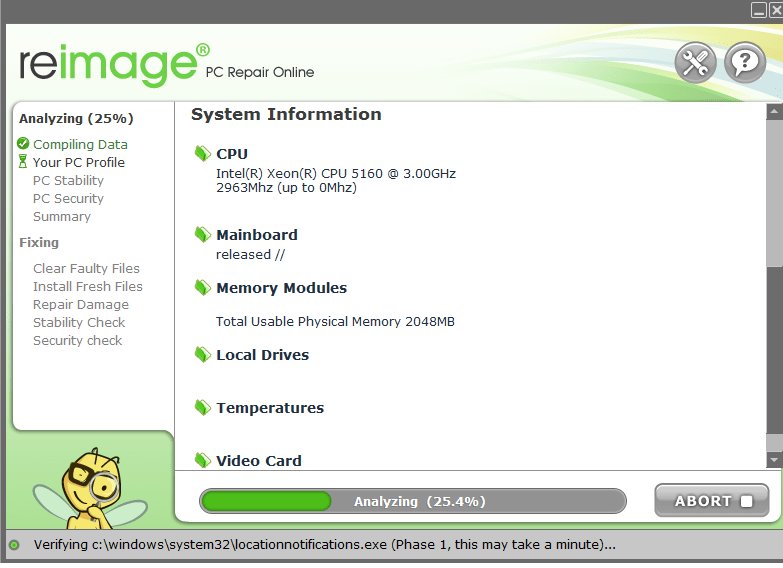
Method 3: Scanning the system with Reimage Repair Tool
The user can use re-image repair tool to scan, repair and detect the system errors such as 1304 error of QuickBooks:
Now, the user needs to navigate the file location and then double click on it. With this the Installation process will get started, after which the User Account Control (UAC) will prompt ‘if you non-existence to control the program, click Yes to continue.
After that the user will see a welcome screen, then the user needs to ensure that checkbox remain un-tick in order to allow the repair tool to scan. After this, click Install to start the installation process.
Now, the Reimage will install itself. Make sure that the internet connection is not broken.
And then the preliminary scan will also begin.
Once the scan is complete, the user will know the damaged areas of PC and would be able to repair. Click ‘Start Repair’ button in the bottom right corner.
The last and final step is to restart the system, when the repair process is complete.
Method 4: On a New Device Share CD-ROM
The very first step is to place QuickBooks installation Disc into a networked system.
Exit the window by clicking Quit when the download starts
After that head to Windows File Manager, and right-click the “CD-ROM”
The next step is to select Sharing and Security from the menu.
Now ensure that the “Share this folder” checkbox is tick mark.
The next step is to click on Apply and ok tabs respectively
Right-click on the My Computer symbol and go for Properties.
Once done with that go for the Computer Name
Click the Windows + R keys on the device you wish to download QuickBooks on
Enter the name of the computer having the QuickBooks CD.
Now, double-click the alphabet of the CD drive after pressing the Enter key.
The last step is to click on the setup file to start the download.
Method 5: Copy the Downloaded Application to Device’s Hard-Driver
The user needs to first enter the CD into the CD drive
In case the download procedure starts immediately, then click on quit tab
Now, right-click on the Windows Start button
And choose explore tab
Create a new folder in the appropriate position before transferring the data
Enter QuickBooks to make it the folder’s name.
Right-click on the CD and go for explore option
Now, locate QuickBooks and the setup.exe file on the right side of the window.
And also opt for both the file and the folder, press and hold the Ctrl key.
The next step is to right-click any folder and click on copy from the menu.
After that click on the QuickBooks folder, you established previously and choose Properties.
Now click on paste
Method 6: Repair the .NET Framework
The user needs to first install the QBDT.
This tool will resolve the issue that is related to the MS .NEt Framework.
Once done with that ascertain that you sign in your PC as admin.
Search for the QBDT & open it by clicking on them.
Download the file & save it on your PC.
Close all the running app in the background.
QBInstall_Tool_v2.exe will be seen.
The user should open the file.
Click on run to let the scanning process start
The last step is to let the repair process end
Method 7: Restore your computer system
The steps below can help in restoring the system successfully. Let us have a look:
The very first step is to sign in as admin
Now, click on start tab and choose all programs
After that, select system tools and accessories
The user needs to then click on the system restore settings
And also, choose the option to restore my computer to an earlier point
Click on the list of modernize reduction and click on next
The last step is to restart the system after the process ends
Implementing any of the above stated methods can help the user in fixing the QuickBooks error C=1304. In case, the user continues to face any error, then reaching out to our 24×7 QuickBooks error support team at +1-888-510-9198 can work in your favor. Our team of experts and certified professionals is available round the clock to resolve your errors and ensure that your work is streamlined. Thus, feel free to contact our Experts for any further details.
Frequently Asked Questions– QuickBooks Error C 1304
How do I fix error code C 1304 in QuickBooks?
The user can try eliminating the Error code C 1304 using any of the below methods: 1. The user needs to scan the system with the reimage repair tool 2. The user can also use the installation CD to replace installation files 3. Restore the system to fix the error 4. Repair Microsoft Components
What is error code 1304 in QuickBooks?
Error 1304 is an installation error in QuickBooks that appears when the system cannot read the installation files. Any kind of problem with the CD Drive can be one of the most common reasons behind the occurrence of this type of error
How do I fix a reconciliation error in QuickBooks?
Run a Reconciliation Discrepancy report 1. Go to the Reports menu. Hover over Banking and select Reconciliation Discrepancy. 2. Select the account you’re reconciling and then select OK. 3. Review the report. Look for any discrepancies. 4. Talk with the person who made the change. There may be a reason they made the change.
Sometimes, QuickBooks software encounters unknown malefic error messages such as:- R# (M=1153, L=133, C=88, V=28 (FFFFFFF4). The ‘C’ errors or data error usually appear in the QBWin.log as shown in the above format. This error code is more likely to be seen in the older version as compared to the newer version. The QuickBooks Error Code C=88 (Problem Reading One or More of the Data Trees in the File) generally occur in the following circumstances:-
While working on the QuickBooks software
During using the authentic data within the company file
When some data issue occurs
Under such situations, the QuickBooks Error Code C=88 appears repeatedly.
Intuit Inc. developed the QuickBooks software in the year 1983 to reduce time consumption & stress of accounting for businesses. Since then, it captured around 73% market of the United States in the sphere of accounting & bookkeeping solution.
M=1153: It stands for a module within the QuickBooks related with the error. This module endows technical support and programmer personnel with a frame of reference about the operation in progress at the time of the error.
L=133: The “L=133” stands for the line number on which the error encounters. This line number endows the details as to execute point in program execution. This is the point where error resulted in shut-down.
C=88: “C=88” stands for a specific error code. The fatal error messages containing “C=88” is a result of the data damage. This value usually appears when the QuickBooks doesn’t have any idea what to do with the damaged transaction.
V=28: when the error message contains “V=28”, it indicates that the technical support & programmer personnel may find useful in error resolution.
Error C=88 can occur when you check the data within the company file and find any data related problem. Standard QuickBooks data repair methods are enough to repair your data.
Fix QuickBooks Error Code C=88 (Problem Reading One or More of the Data trees in the File)
Below we have provided some quick tips and tricks to solve QuickBooks error code C=88. You need to follow each steps carefully to get rid of from the problem.
The above-mentioned troubleshooting steps should fix QuickBooks error code C=88 in most cases. You can also restart your system and server and see if the issue is fixed. That however may be a temporary fix and you may face the same error again. The following steps might help you prevent data damage caused by low resources on your system or network in the future.
Increase or add more “RAM” (memory) on your systems and server. The amount of memory your systems require is parallel with the QuickBooks version you use and is run on your system.
Make changes to the “processor clock speed”. Increase that on your workstation.
Set all of your Network Interfaces to “Auto Detect” or “Auto Select”. If you are not comfortable performing this step, take help for a professional.
If you use a hub, replace it with a switch with “1 gigabit port” for the server and “100 megabit ports” for the systems.
Situation 3: Clean Install QuickBooks
Clean installing QuickBooks simply means uninstalling and then installing the software again in order to fix installation issues. These issues can be causing QuickBooks Error Code C=88. Here are the steps involved in this process.
The very first step is to open the file explorer.
After that, head to the programs and features tab.
The user needs to locate the .exe file.
Once done with that, right-click on it and click on uninstall tab.
The user is then required to head to the official website of Intuit.
And download QuickBooks again.
Perform the onscreen steps and then open the QuickBooks and log in using the license and product key.
Situation 4: Restore Companyy File Backup
In case your currently opened company file has data damage, then you can restore the backup. The steps to do that are as follows:
The user needs to first open the QuickBooks software and then head to the file menu.
After that, click on open or restore company.
The user needs to click on restore a backup copy.
And click on next tab.
Also, click on local backup option.
The next step is to click on next tab.
Locate the backup on the system. And the company file backup will be stored with the .qbb extension.
The user needs to now choose the folder where the restored company file will be stored.
Also, click on open.
After you have performed all the above steps, hit save.
In case an overwriting prompt appears, go for whichever option best suits you.
Ensure not to overwrite unless necessary.
Situation 5: Run QuickBooks File Doctor
The file doctor tool identifies and resolves damages to any QuickBooks components without hassle or much effort. The steps to run this tool are as follows:
The user needs to first shut down QuickBooks, in case it is open.
After that, download and install the QuickBooks tool hub from the official Intuit website.
The user is then required to right-click and open the tool.
Also, head to the company file issues tab.
And click on Run QuickBooks file doctor. Press okay if it prompts you to ask for backing up.
Once the backup of the company file is created, the tool will start scanning on its own.
The process might be time-consuming.
The damages will be resolved once the tool completes scanning
It might be possible that you find the above-shown steps a little time taking…! If you require a professional service to solve this error – we suggest you to contact our QuickBooks Data Recovery Customer Service team.
Our Intuit Certified ProAdvisors provides a premium QuickBooks desktop support team that provides instant support with the help of advanced edge-cutting tools and technology. So, get in touch with us today through our toll-free number i.e. +1-888-510-9198. We are available round the clock with 24 hour of customer service.
FAQs
How to fix rebuild errors in QuickBooks?
The user can fix the rebuild errors using the steps below: 1. Open QuickBooks. 2. Go to the file menu. 3. Select utilities. 4. Tap on rebuild data utility. 5. This tool will resolve the rebuild error.
How to fix QuickBooks Desktop installation errors?
Installation errors are often experienced when installing QuickBooks. They can be fixed using the steps below: 1. Install diagnostic tool. 2. Download and run the QuickBooks tool hub. 3. Run QB file doctor. 4. Clean and install QuickBooks in select startup mode.
What is QuickBooks file doctor tool?
QuickBooks offers various tools to deal with the errors that can be experienced when working on the software. One such tool is the QuickBooks file doctor tool. This tool comes in handy in case there are any sort of company file or QuickBooks-related file-associated issues. This tool can be easily accessed from Intuit website or via the QuickBooks tool hub.