Did you see QuickBooks Error Code C=43? Well, the QuickBooks error indicates that the software has encountered an issue when trying to access the company file. One might come across such an error in QuickBooks due to a loss of power or network connection. There can be a handful of reasons triggering such an error in QuickBooks, which we will try to elaborate on later in this segment.
Thus, to understand QuickBooks error code C=43 in a better way, stick to the article till the end, or can get in touch with our QuickBooks error support team for more details by dialing our toll-free number i.e. +1-888-510-9198.
QuickBooks error C=43 shows up on the screen with the following warning messages:
Error
Description
Error Code
QuickBooks error code C=43
Error Message
Error reading a transaction or memorized transaction
Software
QuickBooks
Applies to:
Windows XP, Vista, 7, 8, 10, 11
You can come across QuickBooks error C=43 in case there is any data damage or when QuickBooks tries to navigate a report or report-like data. In case restarting QuickBooks doesn’t fix the error, it indicates that this particular error might show up due to damaged data.
Why does QuickBooks error C=43 occur?
In this article, we are going to mention the description, causes, and solution of Error C=43. Possibly, the QuickBooks error C=43 appears due to one or more reasons given below.
Steps to fix QuickBooks error C=43 (Unable to read transaction)
Follow the procedure to resolve the QuickBooks Error Code C=43 (Unable to read transaction) & to remove the corruption in the QuickBooks (QBW) file.
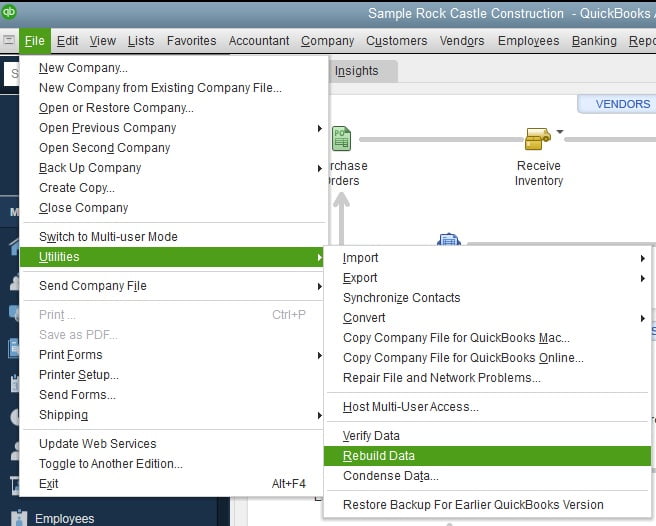
Solution 1: Use the QuickBooks feature “Rebuild Data”
The Intuit Inc. product QuickBooks has an In-build feature to resolve the QuickBooks error code C=43 from the QB software. The “Rebuild Data” feature is generally used when the error code appears due to the damaged QuickBooks data file/files. Rebuilding a company file is an ideal step in these situations. Perform these quick steps to Rebuild your company file.
Steps to run the Rebuild utility by following these steps:
Go to Utilities.
Click on the Rebuild data menu option
Follow the actions given below to backup your data files:
Leave the restoring procedure nonstop until it gets successfully complete.
Once you have started the Rebuild Data utility, QuickBooks will prompt you to create a backup of your company file before proceeding to the steps.
Follow these actions to backup your information:
First of all Click OK button to backup your data
After that select the online type or local type and options
Now select the location for your back-up files
Leave your computer system nonstop while QuickBooks rebuilds your company file
Once the QuickBooks has finished restoring your company file just click on OK button
QuickBooks includes a utility to verify a company file.
Perform these steps to check for damage.
To verify your company file go to the File and then click Utilities
Now click on Verify Data menu selection.
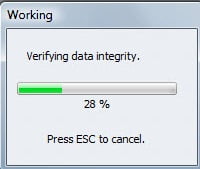
File verification will proceed by its own. You need to press the ESC key on your keyboard, if you require to cancel the verification process.
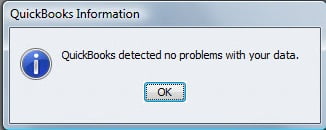
Simply click OK button to go back to the other tasks. (Under the regular situations, the verification procedure will complete as well as not find any type of problems.)
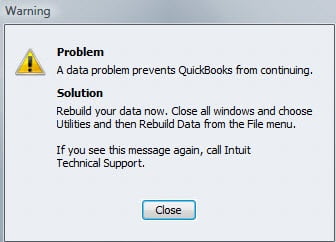
In case the verification process troubles with a problem, you’ll see the warning screen revealed listed below.
You need to click on Close button and proceed to use the Rebuild Information feature to fix this issue.
If the QB error C=43 appear when the 1099 & W2 form is printed, you suppose to eliminate/remove the entire OCR-A fonts and reinstall QuickBooks software to fix this error.
Solution 4: Result-Oriented Professional Tool
Many QuickBooks users admire using the third-party professional utility to fix this error immediately. This method is assumed as the fastest and smooth way to troubleshoot the QuickBooks error C=43.
We often see many tools and service providers who claim to provide the best solution for the QuickBooks error C=43. Whether it’s related to installation, updates, integration, or data recovery. But we always need professional and certified experts to help us out as they can understand our issues because they have extensive experience in their sphere.
We at, Host Docket, team of authentic and authorized QuickBooks professionals, work with an aim to fix and resolve all the issues related to QuickBooks. To get in touch with our team of experts and certified professionals, make call at our QuickBooks error support phone number i.e. +1-888-510-9198. Our team will provide you with a feasible solution for your accounting issues in no time.
FAQs – QuickBooks error c=43
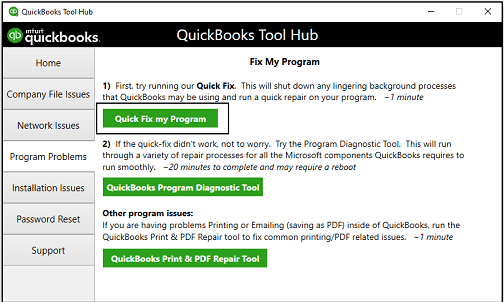
How to fix QuickBooks error
If you get an error when you use, install, or update QuickBooks, our tool hub can help. Just run Quick Fix my program to fix common errors right away. The steps involved here are: 1. In the QuickBooks Tool Hub, select Program Problems. 2. Select Quick Fix my Program. 3. Start QuickBooks Desktop and open your data file.
How to fix QuickBooks error code H303?
The QuickBooks error code H303 can result in one or more of your workstations is set to be the server for QuickBooks. Your server (the computer that hosts your company files) should be the only computer set to host multi-user mode. The Host Multi-User Access option should be turned off on your workstations.
What is QuickBooks error code C=44?
Error Code c=44 can occur when QuickBooks attempts to access a damaged record, such as a transaction. To recover from this error, do the following: Verify your data (on the File->Utilities->Verify Data menu) If necessary, rebuild your data (on the File->Utilities->Rebuild Data menu)
Prepare QuickBooks data files backups to Survive a Computer Crash
A computer crash occurs when a software or operating system or any other computer program stops working and exits. It’s better to be prepared for such crashes as there isn’t any complete and foolproof mechanism to prevent them. A system crash or hard drive fail is an intimidating issue for QuickBooks users too. Knowing that you lost all your data can be an irreparable loss. One computer crash and you may lose your essential documents, emails, contacts, user profile, password, bookmarks and more.
This blog post is aimed to prepare you well to cope up with such unpleasant and unwanted moments. Learn the steps to prepare QuickBooks data files backups by going through this piece of writing. With the right preparations, you can overcome even the worst conditions. Here is how you can stay ready for a computer crash. However, if you need any sort of technical assistance at any point in time, then do not hesitate in connecting our tech support professionals at +1-888-510-9198, and we will provide you with immediate assistance.
Here is your step by step guide to prepare QuickBooks data files backups:
Keep Backups of Your Data Files
You must always create copies of all your essential files and store them in one or more locations to not lose them. This is the thumb rule to safeguard your backups. Virus and other malicious software affect computer data, and thus most people save data flash drive or CD. You should be aware of such unwanted items that may harm your computer or data by regularly making the backups of your company file. This step would ensure the security of your essential data.
Create Backups Periodically
You should consider creating the backups of your data and files periodically. Now if you ask how often, then there is no particular answer to it. This depends on the sort of work you perform on your computer. For instance, a writer should consider creating backups of his work once or twice in a month. It professionals can create the backup of their work every week. Business owners or curators can perform daily or weekly backups depending on the quantity of the data to be secured.
Hire IT Professional
You can hire IT professional to safeguard your vital data. They make sure that the networks your computer and other devices are connected to are safe. By making sure that your anti-virus and other safety feature are updated and working appropriately they leave almost no scope for malicious software to harm your data. Also, they make sure that your systems receive a permanent supply of power so that you don’t lose your system data if the power goes off.
Many of us keep wondering that how often we should create backups for our system data and where to store them. Now, creating backups is also no easy task, and many of us may find taxing. There is one very simple answer to all such questions and doubts – create backups as often as possible. You can create keep on creating daily, weekly or monthly backups depending on the requirement of your work and dependency on your computer data. But make sure that you don’t keep postponing it.
Flash drives, CDs, and external hard drives are among the best tools to store the backups. You can also save your data on NAS or cloud store. External may have large space to accommodate your data, but they are not very portable. Thus you should always handle such tools with care.
NAS (Network Attached System) is like a system with similar costs and requirements. It needs to be configured to not be accessible directly from a system as a system drive. This is an excellent choice, but it may be very expensive.
Save time by moving your data on cloud
Keeping our essential data in the cloud is presently the most popular and affordable solution to keep your data from being lost. Storing your data real time in the cloud is very simple.
However, if you are making a backup with a cloud, you should ensure that no one else has access to it and its safe. Cloud backups are located on your network, and thus you should use it carefully.
This is also convenient for QuickBooks users as moving QuickBooks data to cloud is also very easy. In case you don’t have IT support and some file crashes, you can easily move the data to a cloud.
Cloud Save your Data – is a major feature of cloud hosting providers and it monitors and safeguards data of the users using standard security. Moving data to cloud is simple and saves you a significant amount of time.
We discuss here many ways to secure data and recover from a computer crash.
We hope that you find this article helpful. If you still have any doubt or you need assistance in protecting your essential data you can write to us or reach us at +1-888-510-9198. Our QuickBooks data recovery team will provide you the right tips & solutions to save your important data files from being damaged or lost.
FAQs Related to Lost QuickBooks data files due to computer crash
How do I recover a lost QuickBooks file?
You can restore a backup company file to recover a lost QuickBooks file. The steps involved are: 1. Head to the file menu, and further choose open or restore company. 2. You now have to choose restore a backup copy and hit next. 3. Once done with that, choose a local backup and hit next. 4. Browse your system for a backup company file. 5. Choose a folder to decide where to save your restored company file.
How do I reinstall QuickBooks after computer crash?
You can remove and then install QuickBooks by performing the steps in the control panel. This will help you start working on QuickBooks afresh.
How do you resolve data damage on your QuickBooks company file?
You can try repairing the company file using the rebuild data tool. The steps involved are: 1. Head to the file menu and hover over the utilities tab and choose rebuild data. 2. After that, choose ok tab. 3. You now have to let the tool repair your file. 4. When the tool finishes, hit ok tab. 5. Move to the file menu and let the tool check your file for data issues.
How do I find my QuickBooks data file?
The default location of a QuickBooks desktop company file is C:\Users\Public\Public Documents\Intuit\QuickBooks\Company Files.
Fix Error Code 80004003, 80004005 – QuickBooks Damaged/Corrupted File Repair and Data Recovery
Troubled by QuickBooks condense data errors and can’t find an ideal way dump them? Well to save you from such a situation, we are here with this piece of writing. You might shockingly bump into condense data errors, when using QuickBooks accounting software and especially when trying to archive the data file. The condense data errors like 80004005, 80004003 in QuickBooks can hinder the smooth working procedure midway and might not let the file be condensed. The condensation process basically indicates the process to reduce the company file size. This feature further helps in reducing the size of the company file to a considerable degree restoring QuickBooks performance. You can land this this issue depicting a bunch of warning messages on screen, which include:
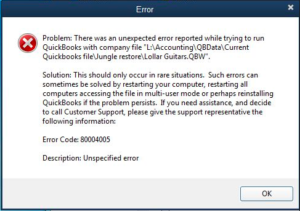
Warning 1- QuickBooks encountered a system error when trying to archive your data file. QuickBooks will not condense your data file. The error is – an unspecified error. Please try the operation again.
Warning 2- QuickBooks encountered an error and was unable to successfully complete the condense process. Your company file has been restored to its original state.
Warning 3- Unable to run QuickBooks Clean up data utility
Warning 4- Not enough storage is available to complete this operation Illegal operation error
You can come across these errors due to damaged company file at the time of attempting to condense the QuickBooks company file. Also, the issue QuickBooks Error 80004005 can be fixed by Intuit data services tools as it can scan and repair company files. The process will eradicate all the damaged files. To help you culminate these errors successfully, we have drafted this piece of writing with the complete details regarding these errors. You can call our QuickBooks Data Repair Support teamon +1-888-510-9198 to obtain these QuickBooks errors solve shortly. Having said that, let us delve in deep and unleash further about condense data errors!
QuickBooks Condense Data Error shows up a different error code, for example, QuickBooks error code 80004005, 80004003. These codes indicate that company file repair in detail is required and keeps users from facing company data loss in condensing utility process or later. The troubleshooting for these errors may also not be the same. If you are performing the troubleshooting steps for QuickBooks error code 80004005, please ensure that you keep a portable backup of your company file.
How to Resolve Error 80004005 and 80004003 – QuickBooks Condense Data Errors?
What makes QuickBooks an ideal software even after being prone to certain errors is the fact that the users can implement some set of steps to rectify the errors successfully. And the same theory applies in case of condense data errors. Let us explore each of the methods that can be implemented to culminate the condense data error in QuickBooks.
Technique 1: Use Rebuild Data Tool
First of all, ‘Reboot database server‘ or your computer system.
In case the step mentioned step doesn’t work, check if ‘QuickBooks is configured appropriately‘ and if the PC that hosts the data file is working properly
Verify and Rebuild to fix QuickBooks Condense Data Error 80004005
Tips to verify and rebuild to repair QuickBooks Condense Data Error 80004005
Firstly, Login to your QuickBooks and run it as a ‘System Administrator‘
Go to your ‘Company file‘
Choose ‘Utilities‘
Select the prompt that will allow you to back up your file.
Select ‘Verify‘ to check if the company file is hosted right.
At times, a mere reinstallation of QuickBooks can rectify the issue to a certain extent, and clean installation is a more advanced version of the same. You can try performing the below procedure to clean install QuickBooks.
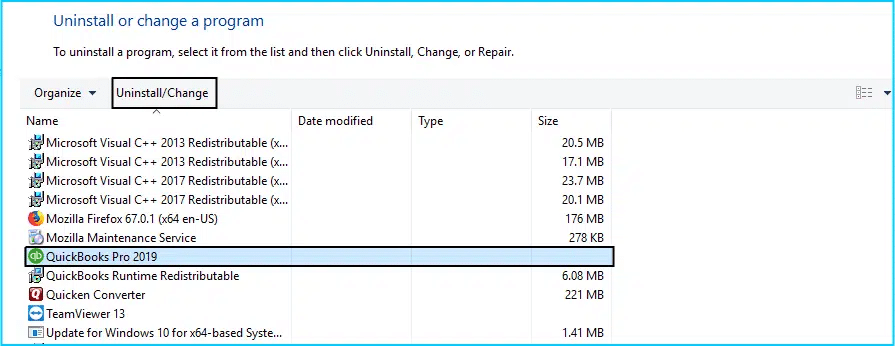
Step 1: Remove QuickBooks
You can try opening the windows start menu at first.
Eventually, search for the control panel.
Choose the programs and features tab or uninstall a program.
You would then have to select the version of QuickBooks desktop you want to remove.
Go for the option to uninstall/change, remove.
Furthermore, select the next tab.
In case you are able to spot this option, try to sign out and sign in back to windows as admin.
Step 2: Install QuickBooks Desktop Again
Once you are done, install QuickBooks desktop, and when you install again, QuickBooks will automatically install new folders and rename the old ones.
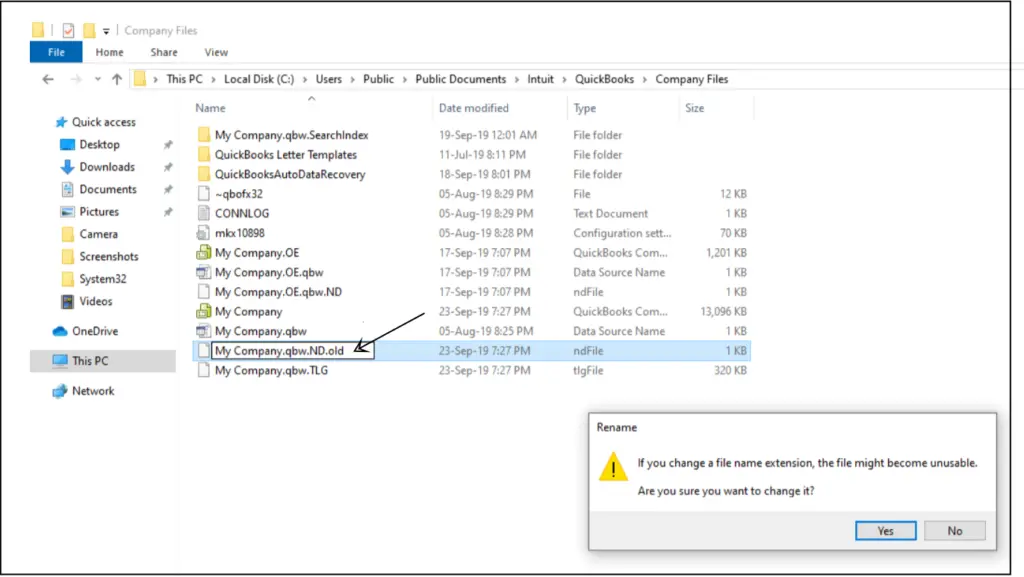
Technique 3: Change the name of QBWIN.LOG file
In case you are facing an issue when condensing the file, try to rename the file. You simply need to add old in the file extension and then condense the company file.
Start off by opening the QuickBooks folder in the Drive C.
Furthermore, you need to right click the QBWIN.LOG file.
Heading forward, choose Rename tab.
And then, add .old at the end of the file name.
After renaming the file, try to launch QuickBooks program and try condensing the company files.
Other than the above discussed procedures, you can try performing the below shared methods to eliminate the condense data errors in QuickBooks.
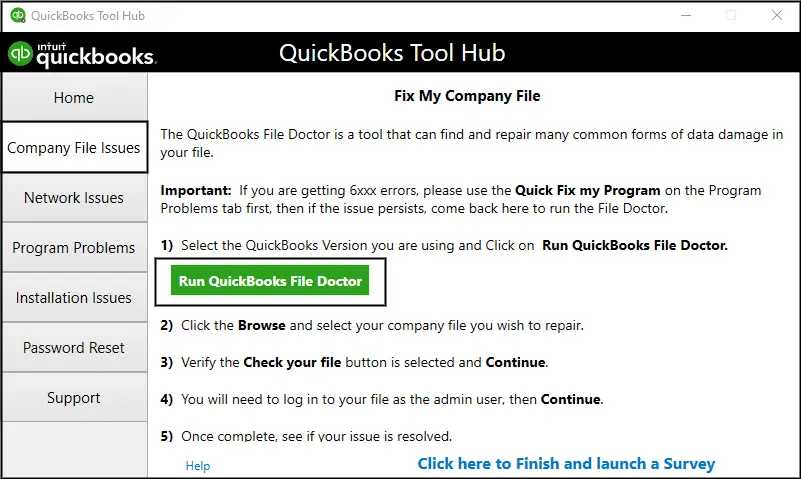
Method 1: Run QuickBooks File Doctor Tool
As the name suggests, QuickBooks file doctor tool is designed to eliminate all sorts of file related issues in QuickBooks. You can try performing the below set of steps to run the file doctor tool.
Method 2: Fix Negative Entries in QuickBooks Company file
To start off with, explore QuickBooks Installation, and further open the qbwin.log file.
You will then have to scroll down to the bottom of the file and search for the error and type the error in the text.
Heading forward, the text in the file will show the transaction and entries that are having a negative value or any other type of issue.
You will then have to note the invoice number and look for the same in the company file.
Perform the necessary changes to the value of the transaction or the entry and save the file.
Towards the end, you need to try condensing the company file again and check if the issue is rectified or not.
Method 3: Start Windows in Safe Mode
Entering safe mode helps in eliminating various errors hindering the smooth working process. In order to enable the safe mode on windows, perform the following instructions:
Simply begin by pressing shift key and then restarting the system.
You will find the Advanced Boot options there on the startup screen.
Make sure to choose the troubleshoot option.
And further click on the advanced options. This will provide you with some advanced options, one of which is the startup settings.
There you need to click on the Restart tab.
When Windows starts, you will see the active boot options list.
You need to press F4 key to enable safe mode.
After you enter the safe mode, the system will itself prevent the third-party application from performing, ultimately preventing the errors.
If the Error 80004005, 80004003 persists or any new error code shows up you can contact our round the clock QuickBooks error support number at +1-888-510-9198. We are a team of highly trained and experienced QuickBooks experts and can help you fix any QuickBooks related issue in the least possible time.
FAQs
What happens when you condense data in QuickBooks?
When you condense the data file in QuickBooks, it reduces the size of the company file. It further converts individual point data for each calendar month into a single summarized entry. Condensing data conserves disk space. Not just that, it removes data points from the Single Test Point Data Entry dialog box and adds them to the Single Test Summary Data Entry dialog box.
How do I delete a transaction from QuickBooks condense data?
For this, you simply need to: 1. Click on the File menu. 2. After that, choose Utilities. 3. Now, select Condense Data. 4. Go for, Remove the transactions you select from your company file and click on Next. 5. Choose what transactions do you want to remove and click on Next. 6. Opt for how transactions should be summarized.
Can I undo the QuickBooks Condense data process if I encounter errors?
No, the condense data process cannot be undone. Thus, it is suggested to keep a backup of the company file before condensing the file.
QuickBooks Condense Data Utility often assists in streamlining the company data file and enhancing performance. Intuit, lets the QuickBooks users to make use of the condense data utility feature and reduce the size of the company file to make it more compatible and easy to use. To use this utility, you simply need to use the QuickBooks condense data tool. This tool comes in handy, when the file size is way too large and causing issues. This particular tool was introduced in the year 2019. The tool keeps the data intact and ensures that your overall file size is usable.
To help you understand QuickBooks condense data utility better, we have drafted this segment right here. Thus, stick around this article and find out the quick ways that can help you condense your data using the tool. However, if you need any technical guidance, you can contact our team at +1-888-510-9198, and let our certified professionals help you fix the issue.
Condense Your Data using QuickBooks Condese Data Utility
Now that you have an idea about what QuickBooks Condense Data Utility is, it is time to understand the right steps that can be performed to condense your data. Let us have a look:
Condense QuickBooks Data While Keeping All Transactions
Here you simply have to opt for File and then go for Utilities
Now, choose Condense Data
After that, go for Keep all transactions, but remove audit trail info to date
The next step is to click on Next
Once done with that, choose Close.
Condense QuickBooks Data by Removing Selected Transactions
Under this procedure, you will have to opt for File tab.
Later on, choose Utilities
Once done with that, go for Keep all transactions, but remove audit trail info to date.
The next step is to choose Next.
Lastly, let the process complete, and choose Close.
Condense Data by Removing Selected Transactions
The very first step is to choose File and then go for Utilities
After that, choose Condense Data
You now have to choose Remove the transactions you select from your company file.
Now, select Next tab
The next step is to choose the transactions you would like to remove and then hit Next.
Choose how transactions would be summarized, and then click on Next
Select how inventory should be condensed, and click on the Next tab
After that, choose the recommended transactions you would like to remove and then hit the Next tab
You now have to go for the list entries you would like to remove and click on the next tab
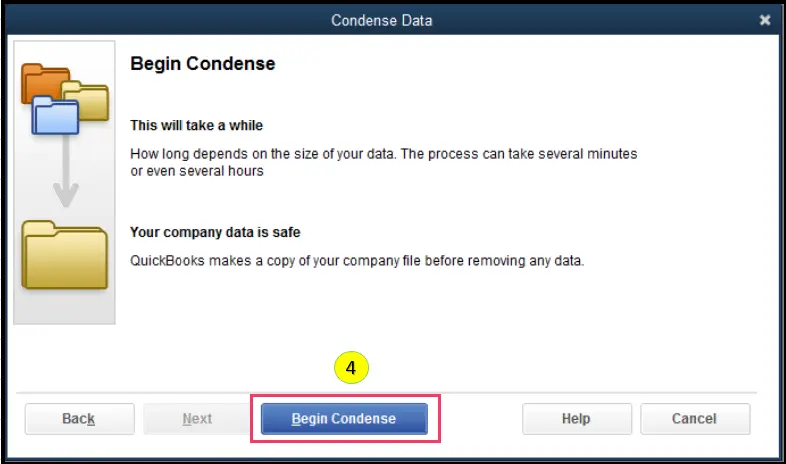
The last step is to choose begin condense and wait for the process to complete.
Understand QuickBooks Condense Data Utility Better!
There are a few factors that you can know to understand the QuickBooks Condense Data Utility in a better way. Let us Explore:
QB Condense Data Repair isn’t Reversible
After you condense your company file, note that it can’t be undone. You can try other solutions first, before you perform the steps related to condensing the data. Here are some quick reasons to do so:
Having a large data file
You have close to a list limit
In case you have upgraded your hardware
Your Accountant and technical support have discussed other options and are willing to proceed with condensing
Condense Data Utility in QuickBooks may or may not affect the size of the company file
It might reduce the size as it’ll remove transaction details and list entries.
Furthermore, open transactions won’t get condensed and the file size won’t be affected
The condense won’t be available, in case there is no significant change to the file size.
Condense Data Repair might not fix Data file damage
There can be scenarios, when QuickBooks condense data repair might fail in fixing damaged files, in such scenarios, you need to try the following:
Fix data damage on the QuickBooks desktop company file
QuickBooks Condense Data Repair doesn’t remove certain transactions
Transactions
Description/Reason
Payroll Transactions
In case the condense date is before 12/31/2018 or if an employee’s W2 isn’t reviewed.
Invoices, payments, credit memos, and refund checks
In case they are not linked to each other in a proper manner.
Payments recorded to Undeposited Funds
If they haven’t been deposited to a bank account.
Bills, bill credits, and bill payment checks
In case they are not linked to each other in a proper manner.
Estimates linked to invoices
Estimates are non-posting entries and can’t be condensed into journal entries, which are posting transactions.
Sales tax not paid in Pay Sales Tax
Paying sales tax with checks leaves invoices open which are non-condensable.
Transactions linked to a non-condensable transaction
Example: You entered an invoice on 12/15/2015 and the corresponding payment on 1/15/2016, then ran the Condense Data utility through 12/31/2015. Both won’t be condensed. This is because the invoice is linked to a payment made outside the period.
The account-based reports will be accurate due to entries on accounts aren’t affected:
Profit and Loss (accrual)
Balance Sheet (accrual)
Statement of Cash Flows (accrual)
Trial Balance (accrual)
The item-based reports will be blank due to all of the item data is gone.
Sales and Purchase reports
Job Costing reports
Accounts Receivable and Accounts Payable Aging report
Cash Basis Reports
Cash basis reports for the condensed period will not be accurate. There aren’t any links from cash into income or from cash out to expenses.
Reports filtered by Class
Note that, any transactions summarized by the utility won’t have classes assigned. When you run a profit or loss by class report will show amounts in the unclassified column.
Sales Tax Liability Reports
It is important to note that the invoices with sales tax no longer exist. A condensed journal entry basically has an amount credited to income accounts. QuickBooks will not be able to identify what part of the income is taxable and which part is nontaxable. Moreover, the tax collected comes from the invoices, which no longer exist, so it will show zero.
The reports draw their data from items on invoices and bills. As there are no more invoices and bills, there will be no more items and the reports will be empty.
A/R Collections Reports
The A/R collection report will usually show the condensed journal entries under No Name. The entries will contain the entries to A/R that aren’t linked to closing transactions and are considered as open. The total is zero as all of the invoices in the file are paid.
A/R reports won’t show the condensed journal entries as they have a default filter of Names All Customer: Jobs. You need to remove this filter and the A/R aging reports that will show the condensed journal entries.
Audit Trail Reports
Only edited, voided, and deleted transactions are removed from the audit trail report when condensing.
Moreover, the condense data doesn’t remove the audit trail report.
The audit trail report info option will be available in case a company file has a significant amount of edited, voided, or deleted transactions.
Reconciliation
Note that the opening balance for your next reconciliation will be correct as the condensed journal entries are cleared transactions
The checks and deposits no longer exist, so the reconciliation reports might be incorrect or gone.
The statement date gets incorrect as the last reconciliation ismissing.
Note: Before you condense, and reconcile all accounts, print all reconciliation and discrepancy reports, or save these reports in PDF format. Also, backup the company file.
Toward the end of this segment, we believe that the reader might be able to successfully condense QuickBooks data file using the condense data utility. However, in case of any queries, or if the user needs our technical assistance at any point in time, then in that case contact us at +1-888-510-9198, and our certified ProAdvisors will help you with your queries immediately.
QuickBooks is a premium accounting software that has assisted thousands of business owners and accountants to meet their business goals. All the users of this software are required to create an accountant and log in. But at times users may come across following errors during their attempt to log in QuickBooks company file:
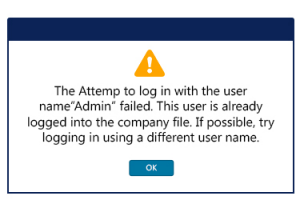
“The attempt to log in with the user name (name of the user) failed. This user is already logged into the company file. Try a different user name.”
Or
“User ID Admin is already logged into the company file.”
This error can be a bit tricky to handle. Thus, to help you in dealing with this issue, we have curated this piece of writing sharing the complete details about this annoying error. To learn further, make sure to stick around till the end. Or you can further get on a call with our certified QuickBooks professionals, in case you need our assistance at any point in time. Ring us up at +1-888-510-9198, and we will answer all your queries immediately.
Download and install the QuickBooks Tool Hub and Run Quick Fix my Program
Close your QuickBooks.
Download the most recent version (1.5.0.0) of the QuickBooks Tool Hub. Save the file somewhere you can easily find it (like your Downloads folder or your Windows desktop). Note: If you’ve installed Tool Hub before, you can find out which version you have. Select the Home tab. The version will be at the bottom.
Open the file you downloaded (QuickBooksToolHub.exe).
Follow the on-screen steps to install and agree to the terms and conditions.
When the installation finishes, double-click the icon on your Windows desktop to open the tool hub.
In the QuickBooks Tool Hub, select Program Problems.
Select Quick Fix my Program.
Open QuickBooks Desktop and log in to the company file.
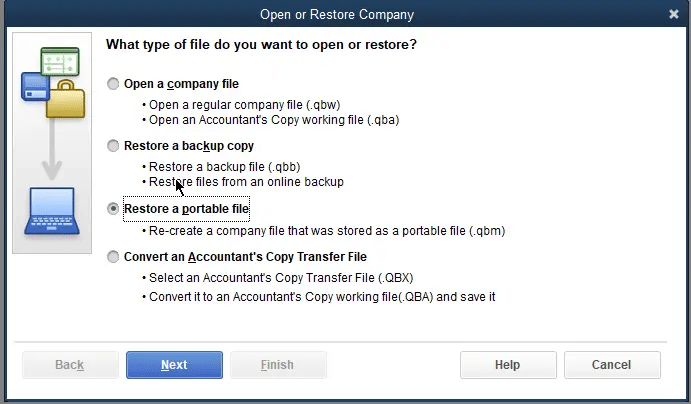
Restore the recent backup of company file
Restoring backup helps in restoring the company file. You can perform the below steps including:
You need to first open QuickBooks desktop and move to the file menu.
Once done with that, from the file menu select open or restore company option.
Click on restore a backup copy.
And further click on the next tab.
You now have to browse your computer to find your backup company file.
This should appear like your company file name.qbb
Choose the local backup option and hit next.
You can further browse and select the location of the company file backup having the .qbb extension.
Hopefully, the above-mentioned troubleshooting steps should be able to fix log in error for you. However, if you are still not able to QuickBooks data file, you can call our round the clock QuickBooks Data recovery number i.e. +1-888-510-9198. Our experts have the right tools and technology to resolve all your QuickBooks related issues in the least possible time.
FAQs related to the attempt to log in with the user name Admin failed error
What is the attempt to log in with the user name in QuickBooks?
This error can be seen if the accountant or user logging into the company file is using Remote Access, and didn’t log out from a previous session. The user is already logged into the company file from a different workstation. Any sort of network issue can further trigger this error.
Why is QuickBooks making me login as administrator?
This error occurs when your windows user needs to grant permission for QBPOS services to run. Moreover, the windows UAC prevents the QBPOS services to run, or the user is having damaged windows user.
How to change admin to another user in QuickBooks?
You can change admin to another user with the help of below steps: 1. Move to the company menu first. 2. After that, pick the users and passwords field. 3. You now have to choose the particular user and go for the edit menu. 4. Once done with that, the user must be aware of the kind of access to set up the admin. 5. Add an ID as the new admin 6. Now, click on save tab and close the program
How do I run QB as administrator?
You can run QuickBooks as admin using the steps below: 1. At first, close QuickBooks desktop. 2. After that, open the windows start menu. 3. You now have to open the control panel and choose user accounts. 4. Once done with that find the QBDataServiceUserXX for your version of QuickBooks. 5. Choose change the account type and then admin 6. Click on apply to save changes.