Your QuickBooks company file holds every invoice, transaction, payroll record, and financial detail your business has ever generated. Losing it even partially isn’t just inconvenient, it can set your accounting back months. Hard drive failures, accidental deletions, corrupted files, ransomware attacks any of these can wipe out data that took years to build, often without any warning.
This is exactly why backing up your QuickBooks company file isn’t optional it’s one of the most important habits you can build as a QuickBooks user. The good news is that QuickBooks Desktop gives you several flexible backup options: automatic backups, scheduled backups, reminder-based backups, and manual backups. Each one serves a slightly different purpose, and knowing how to set them up correctly means you’ll always have a clean, recent copy of your data to fall back on.
This blog walks through all six steps to set up and manage your QuickBooks company file backup properly. If you’d prefer a professional to handle it, our certified QuickBooks experts are available 24/7 at +1-888-510-9198.
Don’t miss this out: How to fix QuickBooks error 6190 816?
Steps to Create a Backup of your QuickBooks Company File
Note: Just in case you don’t need a complete QuickBooks backup and are just looking forward to moving certain accounting data only, then try performing the steps to create a portable company file. Not just that, if the backup copy is in a compressed file format, it is suggested to use the restore wizard to bring the data back into QuickBooks. And avoid using the copy command from windows. Let us explore the steps involved in creating a backup of the company file successfully:
Step 1: Set up Automatic QuickBooks Backup
The process to create a company file backup becomes much easier with the help of the option to set up automatic QuickBooks Back up. The steps you can carry out in this process are as follows:
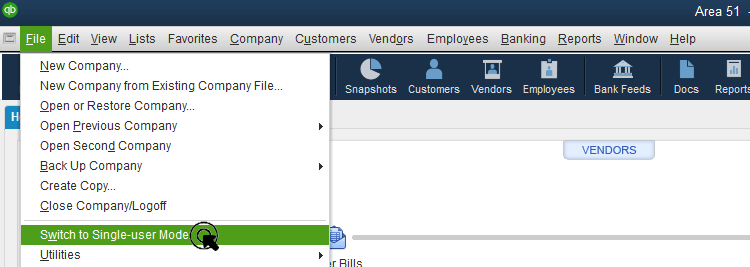
- At first, open the file menu and switch to single user mode.
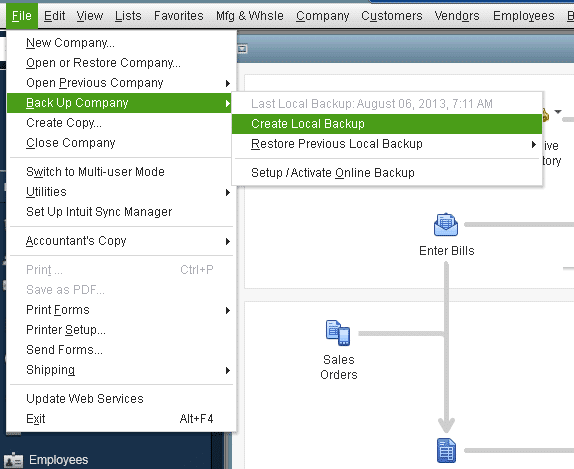
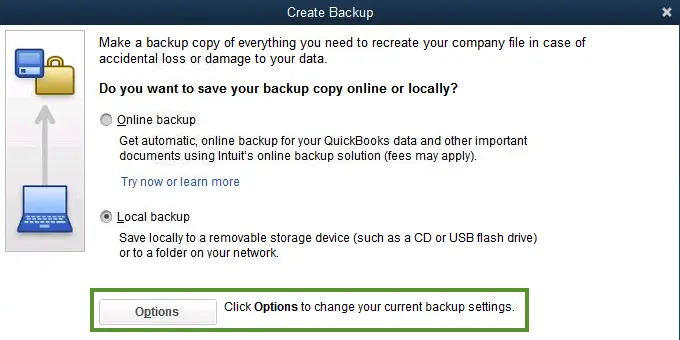
- Go for the save copy or backup company and further create a local backup.
- Once you have selected the backup copy, click on the next tab.
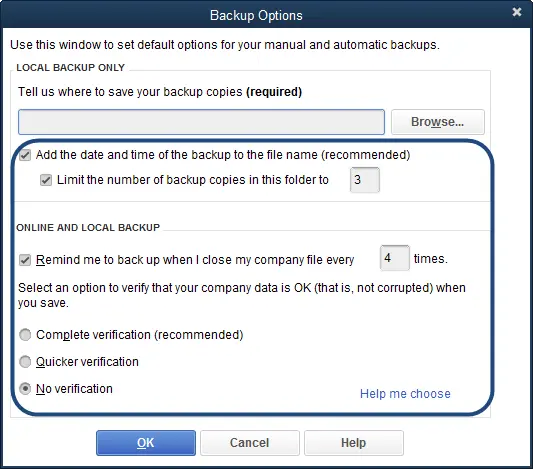
- And further, choose options to set up the backup defaults and click on the next tab.
- Look for and note the date and time of the file backups to determine the files.
- Also use the checkbox to limit the number of backup copies and put a number to cap the number of backups created for every company.
- Once done with that, click on the checkbox to remind me to backup when I close my company file every time so as to receive reminders for creating backups and set a frequency.
- Click on options for verifying the data before saving the changes.
- Skip the steps to ensure that the process ends faster, but we recommend you to enable it to ensure that you get the alerts whenever damage is spotted.
- After the backup options window appears on the screen, make sure to click on browse and go for the location to store the copy.
- You are then supposed to choose the option to change location tab or use this location, and click on next tab.
- Click on the option save it now and schedule backups for future and click on next.
- Select the option stating save backup copy automatically when I close my company file every time.
- Enter a number and click on finish in the field.
Step 2: Set up Scheduled QuickBooks Backup
Often setting up scheduled backups helps in timely backing up the company file and eliminates the risk of losing the crucial data. The steps involved in this particular process are as follows:
- The process requires you to open the file and further click on save copy or backup.
- You will then see a backup wizard on your screen.
- Once done with that, go for the backup copy option and click on the next tab.
- Now, head for the options tab so as to set backup defaults and click on the next tab.
- You are then supposed to click on the only schedule future backups and click on next tab.

- The step ahead requires you to move to the backup on a schedule section and click on the same.
- Moving forward, enter a description for the schedule backup that you are creating.
- And further look for folders where you want to save your backup copies.
- Click on the number of backup copies to keep the checkbox and also enter a number.
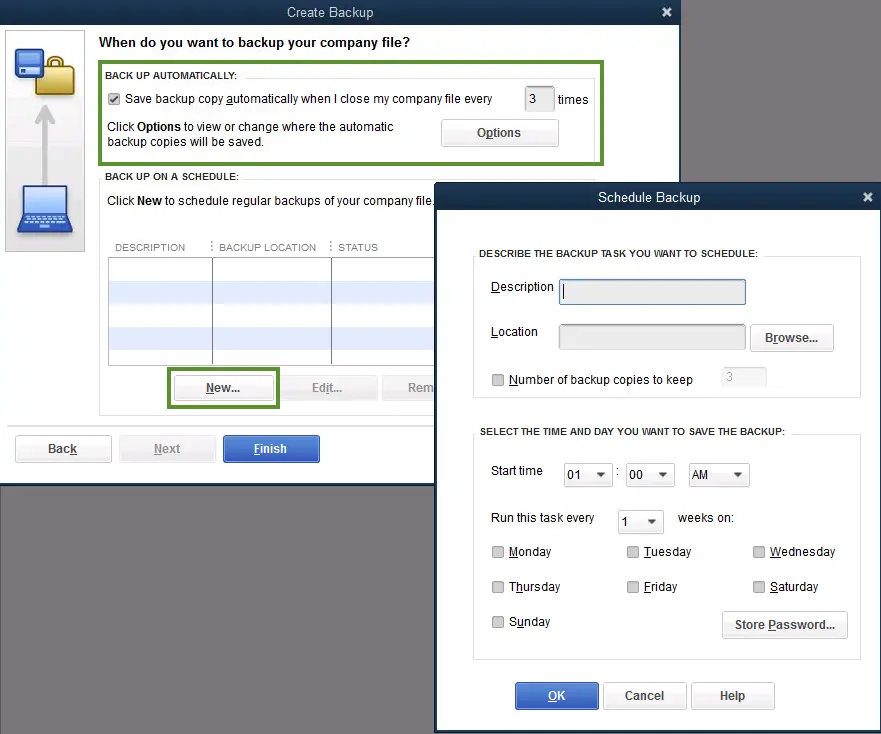
- Now, click on store password and also go for the store windows passwords.
- Enter the required login details.
- And further select the date, weekly frequency for the backup.
- Click on the same and you are good to go.
Have you checked this out: How to Set Up a New Company File in QuickBooks?
Step 3: Set up QuickBooks backup reminders
Often you might skip the part of backing up the data, due to the occupied schedule. However, setting up backup reminders can definitely help in saving you from such situations. Try performing the steps below, to set up QuickBooks backup reminders. Let us explore:
- Begin the process by heading to the file menu.
- Select save copy or backup.
- Click on the next option.
- And then, you need to click on the options tab.
- Once done with that, you will see a pop up asking for the location to save the files, make sure to choose the right location and save the file successfully.
- Select the remind me to backup option when closing data every time and further provide a number in the field as you might require.
- Select add time and date of the backup to the file name box and click on ok tab.
Step 4: Backup the company file manually
If you are comfortable in backing up the company file manually, then try performing the steps enumerated below:
- Initiate the process by heading to the file menu and further go for switch to single user mode.
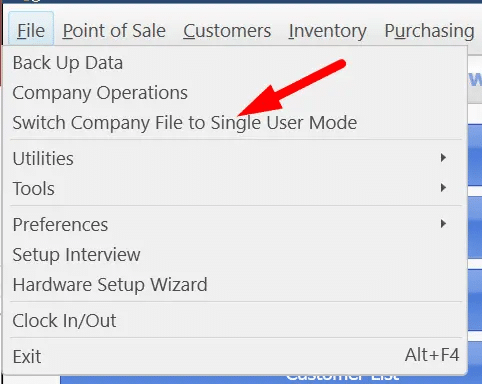
- Navigate to the file menu again and further hover over the backup company.
- Once done with that, select the create local backup option.
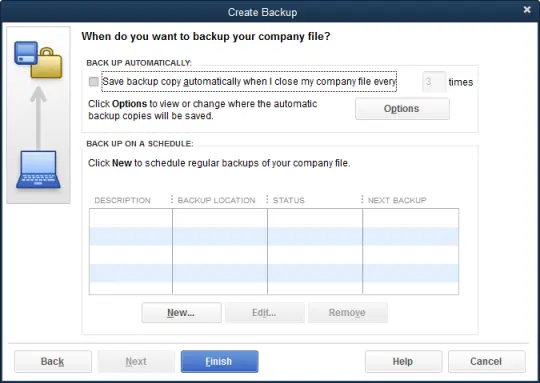
- Also, go for the local backup option and click on the next tab.

- In the local backup only section, choose the browse option and select the location for saving the backup.
- Set the number of backups that you wish to keep.
- Furthermore, make a note that this step is not a compulsion.
- We recommend you to set backup reminders using the options in the online and local backup section.
- Not just that, run a test to ensure that the backup file is in good shape.
- Hit the ok tab.
- And ensure that you click on the save it now option and also click on next.
You might find this useful: Resolve Error: QuickBooks already has A Company File Open.
Step 5: Adjust the backup settings
To see when you last backed up the company file, make sure to navigate to the file menu and hover over the backup company. This will show up the time and date option, where you can see the details. To make any changes to the backup preferences, continue with the steps below:

- Simply start off by selecting the file and head to the backup company.
- You now have to click on the create local backup option.
- Once done with that, choose the options tab.
- Make necessary changes and click on ok tab.
- Have a backup company file that you can use to restore the QuickBooks company file.
- This file has a .qbb extension at the end of the file name.
If you keep the backup company files on an external device or hosting service like box, then you might need to remove them to the local hard drive first and then perform the steps to restore. It should be noted that in case QuickBooks finds the company file with the same name in folder, then QuickBooks will ask whether to replace the existing file or not. In such a scenario, it is recommended to avoid replacing it, as the existing file might get erased.
Step 6: Make use of express start method
You can try using the express start method with the help of the steps enumerated below:
- Start off by creating a company file and further click on the express start.

- You now have to enter the required information in QuickBooks setup.
- Once done with that, select the option to help me choose to see a description for every business type.
- Preset chart of accounts that will be created as per industry.
- You now have to click on create company.
- Furthermore, create a chart of accounts, customers, and services, once you create the company file.
- This step can also be done later by selecting the start working option.
Restore the backup settings in QuickBooks
You can try restoring QuickBooks company file, after taking the backup of the company file. Note that the file will have a .qbb extension at the end of the name. In case you back up the company files on an external device or a hosting service like box, then you will be required to move them to the local hard drive first before restoring.
This Article might Help you: How to Fix data damage on your QuickBooks desktop company file?
The Crux!
With your backup schedule configured and your first backup created, the most important next step is to actually test the restore process at least once. Many businesses set up backups faithfully for months and then discover during an actual crisis that the backup file is corrupted, stored in the wrong format, or saved to a location that’s no longer accessible. A quick test restore using a backup file on a secondary machine or in a test environment confirms that your backup is working as expected and that your data can actually be recovered when you need it most.
If you’re ever in a situation where your company file is damaged or a backup restore isn’t going as planned, don’t troubleshoot it alone. Our certified QuickBooks professionals are available 24/7 at +1-888-510-9198 data recovery and company file restoration are among the most common issues we handle, and we can usually turn things around in a single support session.
FAQs Related to Creating Backup of QuickBooks Company File
For this:
1. Move to Settings ⚙.
2. Choose Back up company.
You would have to sign in with Intuit account, then choose Authorize to proceed.
3. After that choose the User menu.
4. Pick where you want to save your back up.
5. Perform the steps to allow QuickBooks to create backups.
It should be noted that the default location for a QuickBooks Desktop company files is: C:\Users\Public\Public Documents\Intuit\QuickBooks\Company Files.
In order to manually backup QuickBooks, you can perform the steps below:
1. Head to the File menu
2. Choose Back Up Data.
3. Specify the backup location: Go for Default Location to backup to the default folder on your local drive.
4. Further, choose Specify Alternate Location to backup to a network or removable drive.
5. Pick Backup then Finish.
QuickBooks at times can fail to back up the company file, if the backup path is unavailable. You can further check the backup location drive or directory before starting the backup task.
A backup file (.QBB) is a full, compressed copy of your entire company file including all data and transactions it’s what you want for disaster recovery purposes. A portable company file (.QBM) is a smaller, compressed version designed for easy transfer, but it doesn’t include all the supporting data that a full backup contains. Use .QBB for backups and .QBM only when you need to move data to a different computer.
Ideally, back up your company file every day you use QuickBooks. If that isn’t practical, at a bare minimum back up after every significant batch of transactions payroll runs, invoice cycles, or month-end entries. The more frequently you use QuickBooks, the more you stand to lose from any gap in your backup schedule.
Yes, and in fact, storing backups on external drives or cloud services like Box, Google Drive, or Dropbox is highly recommended. Keeping your backup on the same computer as the original file means a single hardware failure or ransomware attack could take out both copies simultaneously. An external or offsite backup protects against exactly that scenario.
Related Articles:
How to Fix QuickBooks Payroll Error Code 12031?
How to Fix QuickBooks Runtime Library Errors & Microsoft Visual C++ Problems?
How to Troubleshoot Error: Cannot Open QuickBooks Company File?

