
QuickBooks is financial software that is installed into the system and customizes all the accounts in a systematic schedule. However, a few QB users have reported certain technical glitches at the time of updating the payroll. Today’s article is going to be all about QuickBooks Payroll Error: ‘Failed to send usage data’ at the time of updating QuickBooks desktop. We will be discussing the causes and troubleshooting steps to the error.
This error occurs due to the incorrect time zone of desktop or you have created Accountant’s copy. Here we are going to share some easy and quick methods to fix this error. Once you follow these steps you can easily fix this typical error code by your own.
Read Also: How to fix QuickBooks abort error?
Why Error: Failed to Send Usage Data Error Occurs in QuickBooks?
This problem may occur due to the following reasons:
- When your time zone is incorrect into a computer or a laptop.
- Also, in case the user creates a copy of an Accountant.
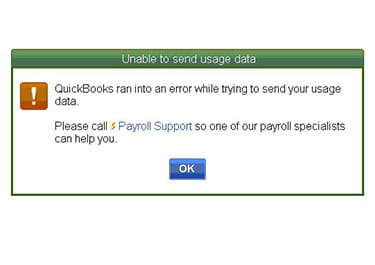
You may see the following error message on your desktop screen:
You may also like: How to Fix QuickBooks Error 6129, 0?
Steps to Fix Error ‘Failed to send usage data’ while update
Follow the below methods to resolve error: failed to send usage data in QuickBooks. However, if you are looking for instant help then contact our QuickBooks payroll customer service team that will look forward to your concern and provide you a feasible solution. Our U.S based technical advisors are available 24/7 to provided you perfect solution for your problems.
Solution 1: Edit Your Payroll Service Key
First Method that Resolves this issue as promptly:
- Go to the employees section and then select My Payroll service option. After that, select manage your Service Key.
- Now click to the edit option, then go to next step and check your dialog box on as Open Payroll Setup and hit the finish tab. This will send your service key button and make it as to activate.
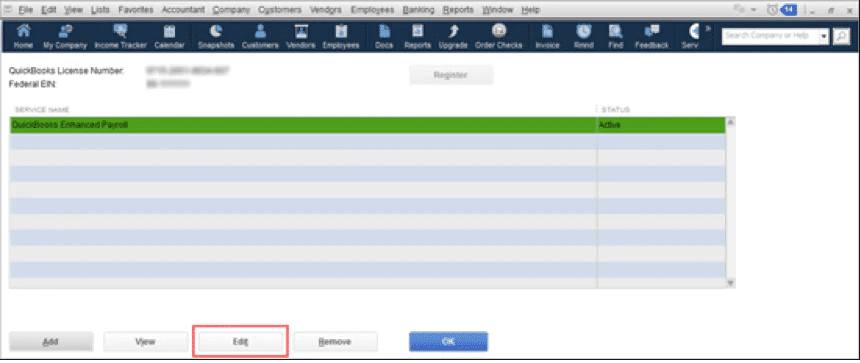
- After that go back to main setting page.
- To do so this, select to go employees and then click on My payroll service option. Then click on send usage data tab. If above method fail to fix this pitfall, then try second method & ready to perform it in as professionally.
Read this also: How to Fix QuickBooks Error 17337?
Solution 2: Check the date & time of the file location in your System
In Windows 7:
If you are a Windows 7 user, you need follow the below points as described here:
- First of all, open your computer system and double-click on the date and time icon and change the date and time. (Note: You can see the date and time option on the bottom of the screen)
- If you are unable to change the date and time from your system, then go to Start option and click on control panel.
- Here you need to select the clock, language or region option to change the date and time. (Note: Here you can see two more option date and time settings and region and language)
- Now click on the option to change date and time settings.
- After that on the Date and Time button, the user is required to click on the Change date and time button.
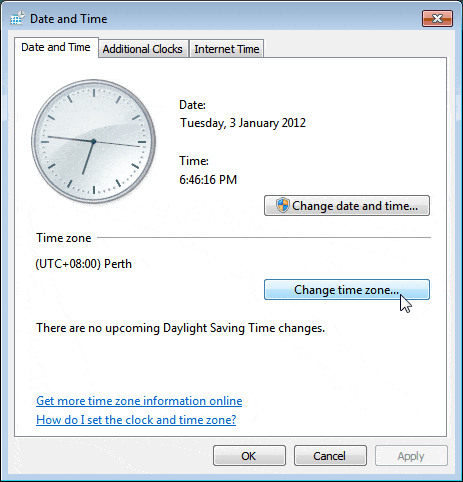
- Followed by selecting the current date and time, and hit OK key button.
- If you want to change the order of a time zone then you can easily click on the change time zone button as shown on the screen.
- Give a click on the time zone as scroll down in the drop-down arrow keys by using the system keyboard.
- Then the user is supposed to choose it as the correct time zone.
- If the user is present in a daylight-saving time zone, then hit the Automatically modify clock for Daylight Saving Time tick-box.
- After this, you need to click on the OK key button and then click to the OK option as it again.
- After that, verify the time and date are correct in the system or not. If not, ask expert advice by connecting to our techies that have great skills in deploying extreme services.
In Windows 8:
If you are a Windows 8 user, you need follow the below points as described here:
- First of all, open the Control panel option.
- And then hit Clock, language, Region heading.
- The next step is to click on the set date & time, that is present under the heading date & time settings tab.
- Moving ahead, the user is required to click on to change the date & time button, in a new date or time tab.
- After that, the user is supposed to correct date as well as time and hit OK.
- The last and final step is to verify the correctness of date and time.
Solution 3: Ensure if there exists an Accountant’s copy
In case the Date and time are absolutely correct, then it is recommended to toggle the time zone (correct, wrong, correct) by following the simple steps listed below:
- Coming to the third solution, in case an Accountant’s copy exists, the user is supposed to remove the restrictions manually, or he/she can wait until the accountant’s copy is returned. But still do not forget that when the user is removing accountant’s copy, he/she needs to verify with the accountant.
- After that, the user is required to send the data to Intuit.
- The next step is to delete all the online transactions, if the error continues to grow.
- Now the user is supposed to click on Edit option from top menu bar
- And then the user should press CTRL+F key
- Moving ahead, click on the Advanced tab.
- And then in the Filter box, the user is required to carry out the following steps:
- Visit the drop-down menu, and select the filter Detail Level and then select the Summary only.
- After that the user is supposed to move to the drop-down menu and then choose the filter Online Status also choose Online to send.
- The next step is to move to the drop-down menu and then select the filter Posting Status also select Filter option.
- And then in the Filter box, the user is required to carry out the following steps:
- Coming to the end, the user is required to hit Find button from Find screen.
- Followed by, reviewing the results:
- If the user detects any non-payroll transaction, then he/she needs to complete the processing.
- And if the user finds the paychecks, then removing them the very next moment and then making an attempt to send to Intuit again is the only option that the user should follow. If it is done successfully, then the user needs to recreate the paychecks.
Solution 4: Download Payroll Updates in Safe Mode
- The very first step is to shut down your computer.
- And then, start the system in the Safe mode.
- Press F8 key repeatedly. This will show the Advanced Boot Options.
- After that download the QuickBooks Desktop Payroll updates.
- Now, reboot your computer in Normal mode.
- Download updates now
Solution 5: Reset the settings of the Internet Explorer Browser
- The user needs to first open the Internet Explorer browser.
- Go for Tools menu that is 3 dots on the right side of the window.
- The next step is to click on the Internet Options.
- Hit the Advanced tab.
- Pick the Restore Defaults or Reset option.
- Click on the Apply button to apply all changes.
- Hit ok and close tabs respectively
Solution 6: Repair QuickBooks Desktop Software
- The first step is to open the Control Panel.
- Click on the Programs or Programs and Features option.
- A list of programs will appear on the screen
- Go for QuickBooks.
- And then, right-click on it to choose Uninstall/Change option.
- Click on repair tab
- Open the QuickBooks software and check if the issue is resolved or not
Solution 7: Install Digital Signature Certificate
- Start with opening C: Drive and move to Program Files/Intuit in Windows Explorer.
- Go for QuickBooks from the list of options.
- Choose Properties by right-clicking the QBW32.exe file.
- Select the Digital Signature tab from the menu
- Check to see if intuit is selected in the list of signatures.
- Now, select the Details option.
- Go for the View Certificate option.
- Under the certificate box, select the Install Certificate option.
- Click on next tab again and again till the final page shows up on your window desktop.
- Now, go for the finish tab.
- Reboot the system and open QuickBooks and also update the payroll software
Conclusive Lines!!
With this we conclude our article, and also hope that the above stated information will help the users to fix Error – QuickBooks Payroll “Failed to send usage data” while update.
However, if the problem still persists then the user can seek for technical guidance and help from accounting experts. You can dial our toll-free i.e. +1-888-510-9198. Feel free to connect with our QuickBooks support technicians that are available 24/7.
More helpful articles to read:
Fix Login Problems of QuickBooks online on chrome

