
If you use QuickBooks for your accounting needs, you may need to update or manage your Intuit account from time to time. Fortunately, Intuit offers a user-friendly portal called the Customer Account Management Portal (CAMPs) that makes it easy to manage your account. With Intuit CAMPs, you can manage your accounts, products, contacts, billing, and user ID Access. Not just that, you can review charges, update payment methods, change credit cards, as well as update billing information and email addresses. It further provides an easy way to download the products, find license number or cancel your subscription.
In this blog post, we will walk you through the steps of using CAMPs to change, manage or update your Intuit CAMPs account. Intuit CAMPs is also an easy way to get in touch with QuickBooks Customer Support or if you face any trouble at any point in time you can directly seek help from the QuickBooks Support team by dialing our toll-free number +1-888-510-9198.
Advantages of using Customer Account Management Portal (Intuit CAMPS)
- User-friendly interface: CAMPs have a user-friendly interface that makes it easy to manage your Intuit CAMPs account. The dashboard is easy to navigate, and you can quickly find the information you need.
- Centralized management: With CAMPs, you can manage all aspects of your Intuit account in one place. You can update your payment information, manage your subscriptions, and add or remove authorized users all from the same dashboard.
- Customizable access: CAMPs allow you to grant access to other users, such as an accountant or bookkeeper, and you can choose to grant them full access or limited access to your account. This makes it easy to collaborate with others while maintaining control over your financial data
- Automatic notification: CAMPs will send you automatic notifications when your subscription is about to expire, when a payment fails, or when there are any other billing issues. This helps you stay on top of your account and avoid any interruptions in service.
You may also see: How to use the built-in QuickBooks File Doctor?
Uses of Customer Account Management Portal (CAMPs) for QuickBooks Desktop
You can try performing the following activities using Intuit CAMPs account:
- You can simply edit or change the email.
- Moreover, it allows you to locate the license number.
- Furthermore, you will be able to easily download products that you have purchased.
- Product orders, transactions and chargers can easily be checked.
- The primary contact can also be changed
- You will also be able to add, edit and further remove other users.
- Not just that, you can even change business phone number and address can also be easily done in CAMPs
Features of Customer Account Management Portal (Intuit CAMPS)
In addition to the advantages of using CAMPs, there are several features that make this portal a valuable tool for managing your Intuit account. Let’s take a closer look at some of these features:
1. Manage subscriptions and billing:
With CAMPs, you can manage your subscriptions and billing information in one place. You can view your invoices, update your payment information, and manage your subscription plan all from the “Billing & Subscriptions” tab.
2. Add and remove authorized users
CAMPs allow you to add and remove authorized users from your Intuit account. You can grant full access or limited access to your account, depending on the user’s needs. This makes it easy to collaborate with others while maintaining control over your financial data.
3. Access notifications and alerts
CAMPs send automatic notifications and alerts to keep you informed about your account. You will receive notifications when your subscription is about to expire, when a payment fails, or when there are any other billing issues. This helps you stay on top of your account and avoid any interruptions in service.
4. Track your account history
CAMPs allow you to track your account history, including changes to your subscription plan, billing history, and authorized users. You can view this information from the “Account History” tab, which provides a complete record of all account activity.
5. Manage your profile
CAMPs also allow you to manage your profile information, including your name, email address, and contact information. You can update this information from the “Profile” tab, ensuring that your account information is always up-to-date.
Read Also: How to Fix QuickBooks desktop doesn’t start problem?
How to use the Customer Account Management Portal (Intuit CAMPs) in QuickBooks?
Now that you know various advantages and features of CAMPs to manage your Intuit CAMPs account, let’s take a look at how to use this portal:
Step 1: Access CAMPs
To access CAMPs, go to the QuickBooks Online login page and click on the “Sign in” button. Enter your login credentials, and you will be taken to your QuickBooks Online dashboard. Click on the “Settings” icon, and then select “Account and Settings.” This will take you to the “Billing & Subscription” tab, where you will see a link to “Manage your QuickBooks Account.” Click on this link to access CAMPs.
Step 2: Navigate CAMPs
Once you have accessed CAMPs, you will see a dashboard with several tabs, including “Billing & Subscriptions,” “Authorized Users,” and “Notifications.” You can use these tabs to manage different aspects of your Intuit account.
Step 3: Update your account information
To update your account information, click on the “Billing & Subscriptions” tab. Here, you can update your payment information, view your invoices, and manage your subscription. To update your payment information, click on the “Edit payment info” button and follow the prompts.
Step 4: Manage your subscriptions
If you need to change your subscription plan or cancel your subscription, you can do so in the “Billing & Subscriptions” tab. Click on the “Change plan” or “Cancel subscription” button, and follow the prompts to make the necessary changes.
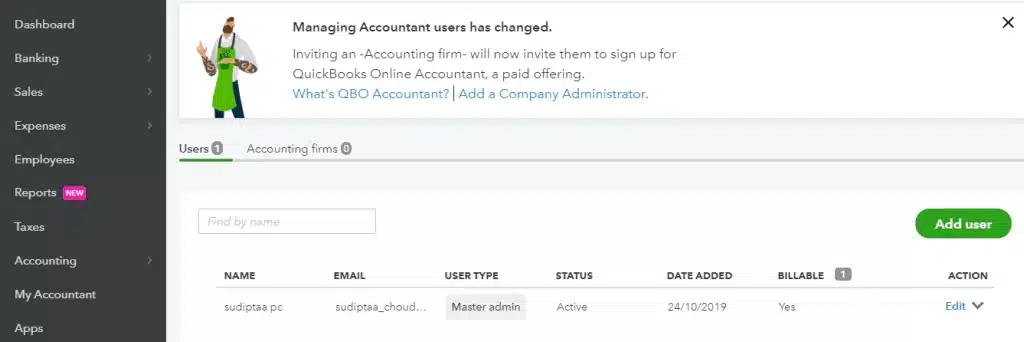
Step 5: Add authorized users
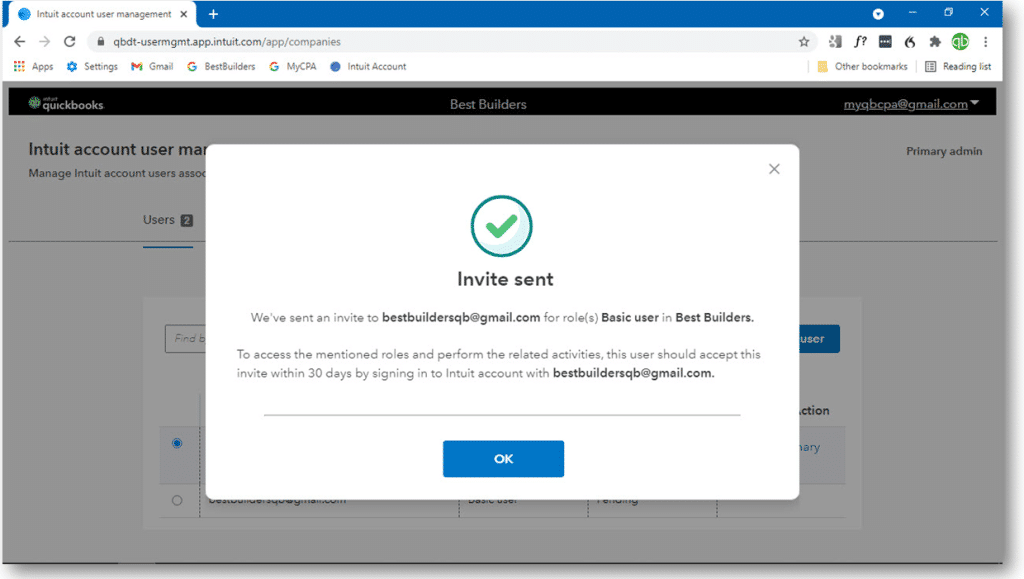
If you need to grant access to other users, such as an accountant or bookkeeper, you can do so in the “Authorized Users” tab. Click on the “Add user” button, and enter the user’s email address. You can choose to grant the user full access or limited access to your account.
Step 6: Remove authorized users
To remove an authorized user from your account, go to the “Authorized Users” tab and click on the “Delete” button next to the user’s name. Confirm that you want to delete the user, and they will no longer have access to your account.
Add, Remove, or Edit Authorized Users in My Account (QuickBooks CAMPs)
One of the key features of CAMPs is the ability to add and manage authorized users for your Intuit account. Authorized users are individuals who have access to your account and can perform certain tasks, such as managing your financial data or running reports. Here’s how to add, edit, and remove authorized users in CAMPs:
Add an authorized user
To add an authorized user, go to the “Authorized Users” tab in CAMPs and click on the “Add user” button. Enter the user’s email address and select the access level you want to grant them. You can choose to grant full access or limited access to your account. Once you have entered the user’s information, click “Save” to add them to your account.

Edit an authorized user
To edit an authorized user, go to the “Authorized Users” tab in Intuit CAMPs and find the user you want to edit. Click on the “Edit” button next to their name, and make the necessary changes. You can change the user’s name, email address, or access level. Once you have made your changes, click “Save” to update the user’s information.
Remove an authorized user
To remove an authorized user, go to the “Authorized Users” tab in CAMPs and find the user you want to remove. Click on the “Delete” button next to their name, and confirm that you want to remove them from your account. Once you have confirmed, the user will no longer have access to your account.
You may also like: How to Fix QuickBooks Install Error Code 1722?
Points To Remember When using Intuit CAMPs
the Customer Account Management Portal (CAMPs) is a valuable tool for managing your Intuit account. With CAMPs, you can update your account information, manage your subscriptions, and add or remove authorized users all from one central location. The user-friendly interface, customizable access, and automatic notifications make CAMPs a great choice for small businesses and individuals who want to stay on top of their finances. So, if you use QuickBooks for your accounting needs, be sure to take advantage of this powerful tool to manage your Intuit account with ease and efficiency. Here are a few tips to keep in mind when using Intuit CAMPs to manage your Intuit account:
- Set up notifications and alerts
- Make sure to set up notifications and alerts in CAMPs to stay on top of your account activity. This will help you avoid any interruptions in service and stay informed about any billing issues.
- Review your authorized users regularly
- It’s a good idea to review your authorized users regularly to ensure that only those who need access to your account are granted it. This will help keep your financial data secure and reduce the risk of any unauthorized access.
- Keep your profile information up-to-date
- Make sure to keep your profile information up-to-date in CAMPs. This includes your name, email address, and contact information. This will ensure that Intuit can reach you if there are any issues with your account.
- Take advantage of the support resources available
- Intuit offers a variety of support resources for CAMPs users, including help articles, community forums, and customer support. If you have any questions or issues with your account, don’t hesitate to reach out for help.
What if unable to see all the products?
At times, you might not be able to all the products due to certain factors, in such scenario, you can perform the below steps:
- At times, the user might have registered different products with different emails, in such a scenario, it is suggested to sign out of CAMPs and again visit camps.intuit.com.
- Furthermore, you can try claiming an account, instead of signing in.
- This generally helps in connecting the accounts with different emails.
- You will now be able to see all the other products successfully.
Steps to locate license number using CAMPs
You can perform the below shared steps to locate the license number using CAMPs. Let us have a look:
- You need to first login to the intuit.com CAMPs page.
- Once done with that, locate your subscription in the list of Products and services.
- Heading forward, you need to select the details tab and choose download option.
- You will now have to install the QuickBooks desktop program
Final Words!
In conclusion, Intuit CAMPs is an essential tool for managing your Intuit account. By taking advantage of the features and functionality it offers, you can streamline your account management process and ensure that your financial data is secure and up-to-date. With Intuit CAMPs, you can manage your subscriptions, update your billing information, and add or remove authorized users with ease. So, if you haven’t already, be sure to check out Intuit CAMPs. Even if after reading this article you have any confusions or queries, then our support team of highly professional QuickBooks Tech Support team is available to help you round-the-clock just by dialing our toll-free number i.e. +1-888-510-9198.
See more helpful articles to read:

