
Get to know all about the Enhanced Inventory Receiving on Transactions
QuickBooks enterprise application has brought a revolutionary change in accounting and bookkeeping industry. Not only does it save a lot of time but also effectively maintains the finances of the company. In this article we will discuss QuickBooks Enhanced Inventory Receiving and various other aspects associated with the same. To learn further about enhanced inventory receiving on transactions in QuickBooks enterprise, make sure to read this post till the end, or you can also connect with us at +1-888-510-9198, for further technical guidance.
You may also read: How to restore deleted transactions in QuickBooks desktop?
What is QuickBooks Enhanced Inventory Receiving (EIR)?
EIR is considered to be one of the best features in the QuickBooks Desktop Enterprise solutions and it is known to manage the complete new procedures of paying and receiving items. QuickBooks Enhanced Inventory Receiving (EIR) is the finest feature accessible by QuickBooks Desktop Enterprise V12.0. It changes past transactions when started. This feature manages the complete new process for receiving and paying the items.
However, one needs to answer the below given questions in order to understand that this feature is valuable or not. If your given answer is ‘Yes‘ to any of these, it might just work for your business.
These Questions are as:
- Have you ever received a bill that covers multiple item receipts?
- Did you pay for the items before to receiving them and do not want to increase your inventory quantities?
- Do you grab multiple bills for one item receipt?
- Do you require 2 different receipts from accounts payable?
- Want to different items receipts from accounts payable?
Important Points to Remember:
- Create a backup of your company file before go to the following steps in this article (Recommended).
- Don’t forget it that Enhanced Inventory Receiving (EIR) is only the feature, that you can’t switch off once it gets turn on.
- Compress your company file if it is too large or heavy.
- We recommend you to conduct a test using a copy of your company file and analyse if it works with your business.
Read Also: How to Fix QuickBooks Error PS077 or PS032?
What happens after turn on EIR (Enhanced Inventory Receiving)?
- When the user turns on the EIR feature, the Bills do not increase the inventory items, and also the bills that are generated from the items receipts are no longer exchange items receipts.
- Also, the Account Payable doesn’t get affected by the Item receipts anymore, only if you receive a bill for an open item receipt.
- If the user gets a bill with different costs equated to the connected item receipt, then the program spontaneously changes the item cost on the available item receipt.
- When a new item is entered, the QuickBooks Desktop calculates the inventory average cost. Each day the item receipts makes changes in the order of the inventory transactions that ends up in the average cost.
- Once the user turns on the EIR, the process generates receipts for each bill in the company file that carries items and thereby there is a growth in the number of the transactions.
- Also, it should be noted that the third party applications that affects the inventory may not be able work along with the EIR.
Limitations when using EIR:
- The very first negative point is that the user can not add any negative item to Item Receipts or Bills.
- Also, the user is restricted to add expenses to the receipts of items.
- In case the user has generated any purchase order for non-inventory items, then the user has to receive them with an item receipt so as to close that purchase order.
- In EIR the user will not be able to assign the items as ‘billable on the item receipts.
See Also: How to correct the cache amount for QuickBooks Enterprise?
Accounting behind the EIR:
Once EIR is turned on by the user, and the user tries to get a separate receipt of an item from the bill for which the user is supposed to find the account for the value of the item received. The EIR QuickBooks Desktop developed an Inventory Offset Account that works as an opening account in between the item receipts and bills. As the user enters the bill for an item receipt, the transaction amount that has been cleared from the Inventory Offset Account and credit to the payable account.
At the time the user entered an item receipt QuickBooks desktop generates the below journal entry:
| Item Receipt Item Receipt | ||
| Debit | Inventory Asset Account | |
| Credit | Inventory Asset Account |
At the time when the user enters an item Bill QuickBooks desktop generates the following journal entry.
| Bill Bill | ||
| Debit | Inventory Offset Account | |
| Credit | Accounts Payable |
After Enhanced Inventory Receiving is turned on, the QuickBooks Desktop produces these transactions unlike the common reports in QuickBooks used to look like.
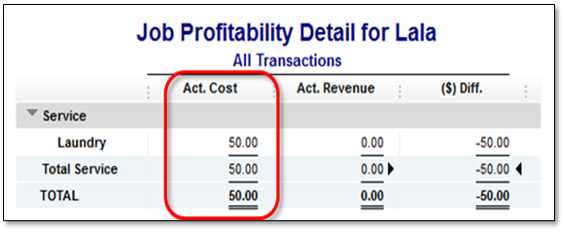
For example: After turning on the Enhanced Inventory Receiving (EIR), Act. Cost shows 0.00 in job profitability detail report in a company file.
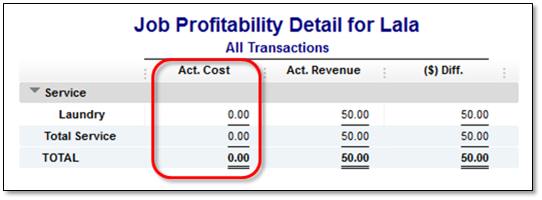
As EIR is turned on, the item used in generating bill is often related to the Inventory Offset Account rather than the account that was used at the initial setup of the item.
The default filter of job profitability detail report is Account: All income/expense and Name.
Therefore, add or change the filter in “Account” to Inventory Offset Account gives you the actual amount of Act. Cost column.
See Also: How to Fix QuickBooks Error Code 3003?
Ways to Activate the Enhanced Inventory Receiving (EIR) Feature
Following are the instructions that the users are supposed to activate the EIR Feature:
- The very first thing to do is to select the Edit Menu, followed by clicking on the select Item & Inventory.
- After this, on the Company Preference tab, the user is required to click on Enable below Enhanced Inventory Receiving section
- Moving ahead, the user will get a warning message and he/she has to click on Continue.

- The user will witness a pop-up message that would ask for back up your company file.
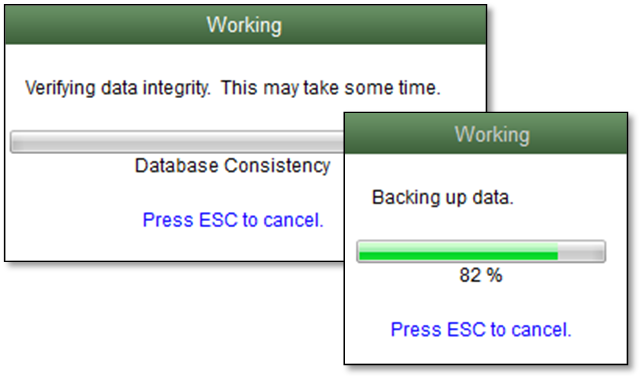
- The process might be a but time consuming affair due to the size of the company file.

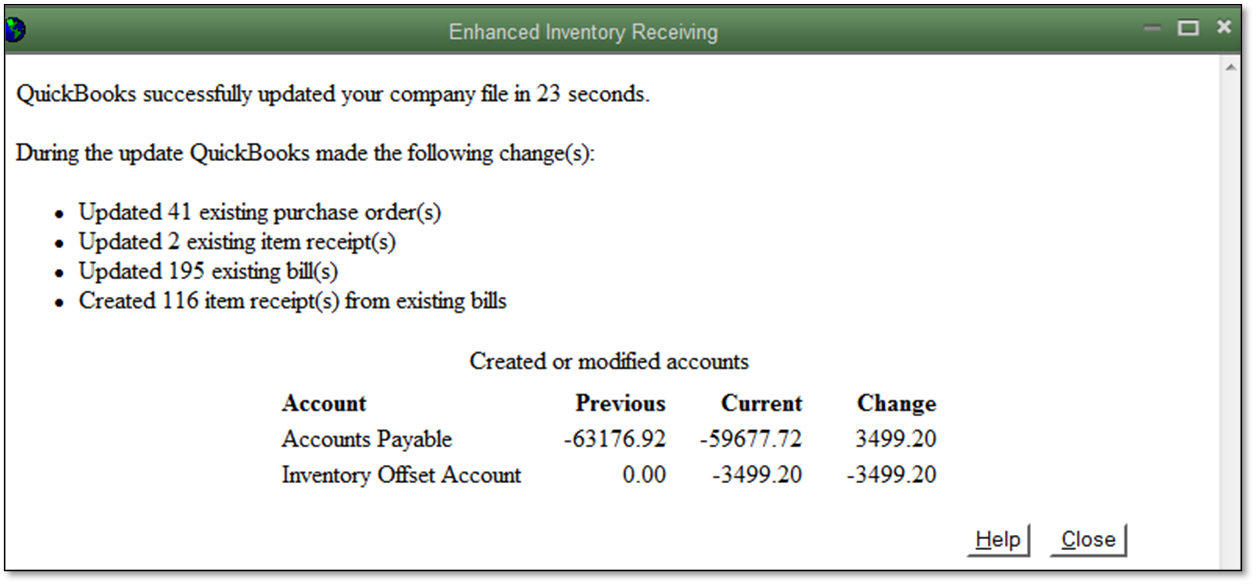
- Once done with that, QuickBooks Desktop will generate the review of all the modification that happened during the process.
Read Also: What is Paytrust and what is the use of it?
Latest process for receiving and paying for items:
To pay and receive inventory, the user will have to follow two processes:
When EIR is turned off:
- Single transaction: Enter the bill that makes the inventory at hand larger
- Multi-transaction: In order to enlarge your inventory adds an item receipt and list a bill that is opposed to the item receipt.
After EIR is turned on
Two transactions must be recorded, the user can list them in order either:-
- An item receipt to make the inventory close by larger.
- Or A Bill to pay the items. In order to check the exact value of your payable account you have to enter a bill opposed to an open item receipt. You must enter a bill as opposed to an open item receipt in order to see the exact value of your payable account.
Important: This procedure claims only to bills. Using Checks and Credit Card, you can still enlarge your inventory Amounts and pay for the items in one step.
Reference Site: https://quickbooks.intuit.com/learn-support/en-us/item-receipts/turn-on-enhanced-inventory-receiving-eir/00/185570
After discussing various aspects of EIR, we conclude that after reading the above information, the user can make the best use of EIR. In case the user has any query regarding QuickBooks Enhanced Inventory Receiving (EIR), or in case of doubt, you can speak to our experts executives.
Our team will be happy to help you anytime of the day. Feel free to dial our QuickBooks Enterprise helpline number i.e. +1-888-510-9198 and get instant help with the best support services.
FAQs Related to advanced inventory in QuickBooks Enterprise?
You can turn on advanced inventory in QuickBooks using the steps below:
1. At first, go to the edit menu and further click on preferences.
2. You now need to choose items and inventory and select the company preferences tab.
3. After that, find the inventory and purchase orders are active box and check it.
4. Once done with that, click on advanced inventory settings.
QuickBooks Advanced Inventory is an add on Enterprise feature that allows a business to maintain, track, and virtually move inventory. Using QuickBooks Advanced Inventory, a business can: Manage your inventory process from a single dashboard. Track bin, lot or by serial number. Use mobile or standard bar code scanning.
QuickBooks® Enterprise includes a number of features that support this kind of robust inventory management. Amongst those features, the software’s tools enable you to easily: Track products by bin location, serial numbers, or lot numbers. Manage your end-to-end workflow from a single dashboard.
You’ll also like these topics:
Steps to resolve QuickBooks error 6007

