
Trying out random fixes for certain errors don’t usually work in QuickBooks. In this segment, we are going to help you spot the correct fixations to the QuickBooks error Error QBWC1039. You might come across Error Unique OwnerID/FileID Required. Well, such errors can often be encountered when you try to connect an app to your QuickBooks software using the web connector. QuickBooks error QBWC1039 can also be encountered when QuickBooks users try to add the same configuration file twice within the software.
A bunch of other factors are also responsible for the occurrence of such an error, which we will try to elaborate on later in this segment. To understand this error further, stick around this segment carefully. Or you can further get on a call with our QuickBooks support professionals. Give us a call at +1-888-510-9198, and discuss your queries with certified QuickBooks ProAdvisors. Having said that, let us understand the QuickBooks error QBWC1039 in detail!
Here is: How to Fix QuickBooks Web Connector Error QBWC1085?
What is QuickBooks error QBWC1039?
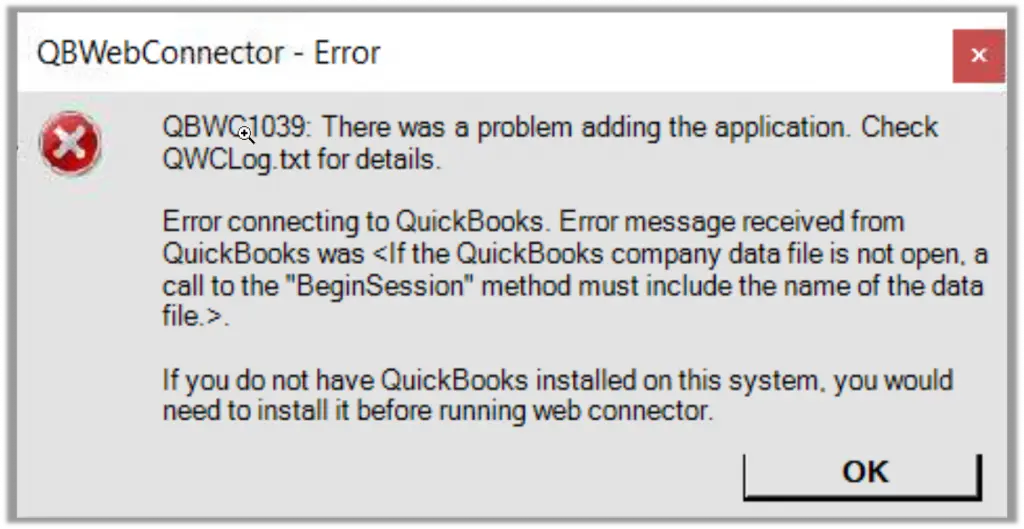
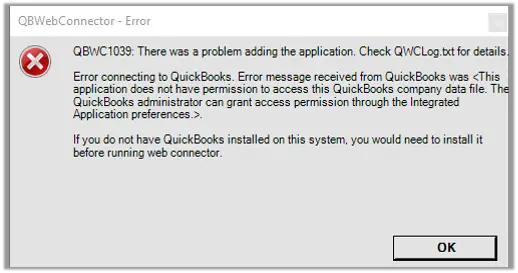
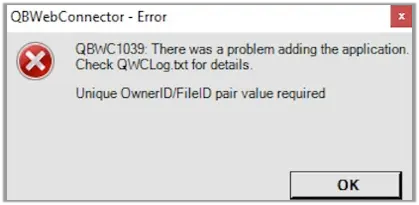
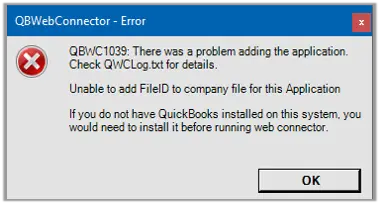
Well, before we jump onto the steps to rectify the error, it is better to first understand what QuickBooks error QBWC1039 is all about. There isn’t a set error message that shows up. A bunch of messages might appear, which include:
Message 1: “QBWC1039: If the QuickBooks company data file is not open…”
Message 2: “QBWC1039: This application does not have permission to access the QuickBooks company data file…”
Message 3: “QBWC1039: Unique OwnerID/FileID pair value required”
Message 4: “QBWC1039: Unable to add FileID to company file for this Application”
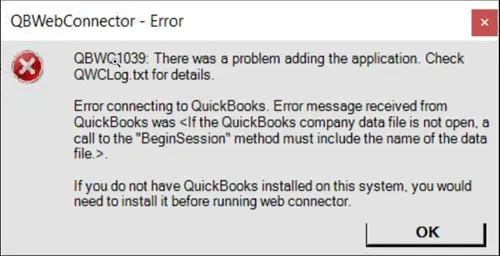
Message 5: “QBWC1039: There was a problem adding the application. Check QBWCLog.txt for details”
Any of these error messages might appear on the screen disturbing your smooth working process, especially when you are trying to connect an application to your software with the help of a web connector.
Factors causing QuickBooks error QBWC1039
There are a few factors that can trigger QuickBooks error QBWC1039 or Error Unique OwnerID/FileID Required. Let us understand each of the factors one by one:
- One of the basic reasons can be when a QuickBooks company file is located on a remote computer.
- Moreover, if the user has already made attempts to integrate the application, this error can be experienced.
- Another possible reason can be if the name of the company file is changed.
- You can further come across such an error if there are any sort of compatibility issues between the company file with the application.
- Also, if the QuickBooks admin is restricting the integration of third-party software.
- Be prepared to experience such an error if the third-party software removes any important file.
Effective Measures to fix QuickBooks error code QBWC1039
Now that you know what reasons can trigger QuickBooks error QBWC1039, it is time to perform the necessary methods to fix such an error. Let us explore the following methods:
Method 1: Update QuickBooks to the latest release to Fix QBWC1039
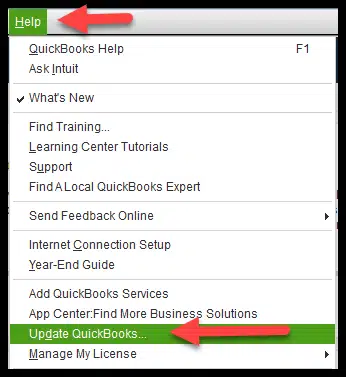
Using an old version of QuickBooks can instigate a bunch of errors. Thus, it is essential that you keep your software updated to the latest release i.e., QuickBooks Desktop 2024. Here are the steps that can be performed to update QuickBooks:
- Begin with, downloading QuickBooks latest update from the Intuit website.
- Furthermore, save the file where you can access it easily
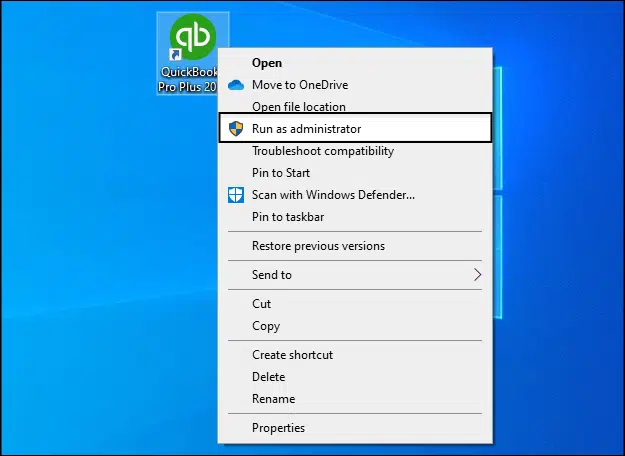
- After that, perform the installation procedure by right-clicking the file and selecting run as admin.
- You now have to click on the finish tab and reboot the system.
- This will update QuickBooks to the latest release, and you can begin using it.
Method 2: Configure web connector to run when QuickBooks is closed
Ensuring that your web connector is configured properly is essential. Thus, these steps can be performed when QuickBooks is closed.
- The very first step is to sign in to QuickBooks as an admin user.
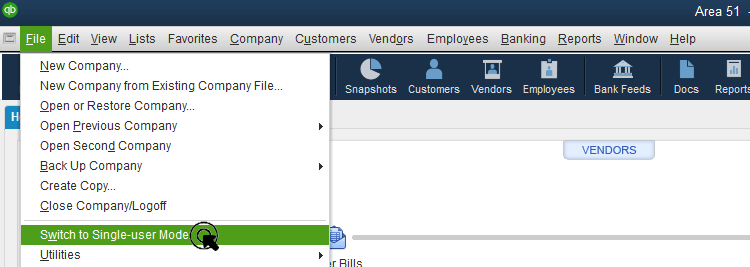
- In case QuickBooks is on multi-user mode, then head to the file menu and also choose switch to single-user mode.
- The next step is to select preferences from the edit menu.
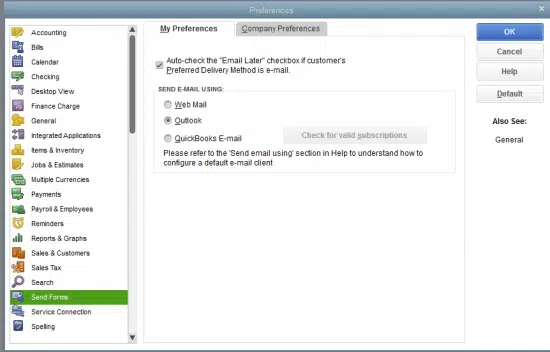
- You now have to select the integrated application and then select the company preferences tab.
- Also, go for the third-party app and select properties.
- Now, allow this application to log in automatically.
- In the authorization window, select yes.
- Furthermore, you need to choose the user to log in and then click on the ok tab.
Must Read: What are the Best Ways to Fix QuickBooks Error QBW32.exe?
Method 3: Fix Permission issues in accessing the company file
Having insufficient permissions to access the company file can trigger Error Unique OwnerID/FileID Required in QuickBooks. Thus, you can simply fix the permission issues in accessing the company file using the below steps.
- Start by simply signing in to the QuickBooks as admin.
- Furthermore, you need to navigate to the file menu and switch to single-user mode, in case QuickBooks is in multi-user mode.
- Now, from the edit menu, choose preferences.
- Select the integrated application and go for the company preferences tab.
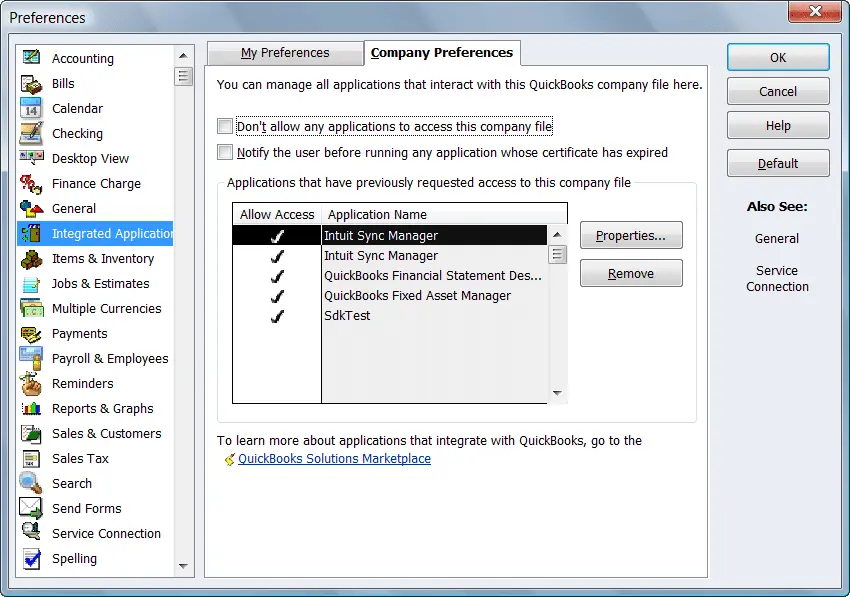
- Later on, uncheck the box for don’t allow any application to access this company file.
- And in the SDK app authorization, select the yes tab.
- Check for the third-party application in order to allow access.

- End the process by simply clicking on the ok tab.
Method 4: Unique OwnerID/FileID pair value required
- Under this process, you can simply open QucikBooks and download the CP3 tool.
- Once done with that, open the CP3 tool and click on the file option.
- Later on, look for the QWC file and enter the QBC file location.
- Open the file and click on Remove stamp.
- This would now show up a warning message, where you need to click on yes.
- Select the continue tab and also hit the ok tab in the access confirmation window.
- Perform the onscreen prompts and click on oktab.
- After the confirmation message shows up, you need to click on the ok tab.
- The last step is to close the CP3 tool and add a third-party app.
Method 5: Change the name of the company file
If you are still facing the same issue, try renaming the company file using the below steps:
- Begin the procedure by opening QuickBooks and pressing the F2 key or Ctrl + 1 keys. This would open the information window.
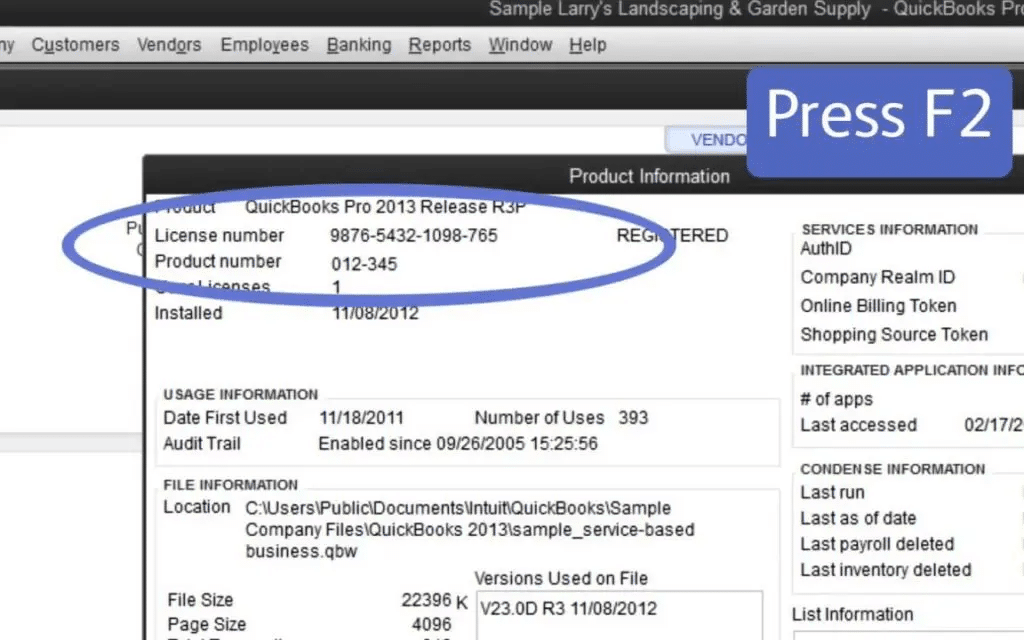
- Note the location from the file information field.
- After that click on the start tab.
- Furthermore, click on File Explorer only for Windows 8 and Windows Explorer for the rest.
- Once done with that, right-click the file and choose rename tab.
- Click on the enter tab.
- In order to confirm the actions, click on the yes tab.
- And further set up QuickBooks use a new file name and click on the file menu.
- Toward the end, you need to open the company file and click on the next tab to open the renamed file.
Method 6: Restore the backup file to the previous location
Just in case you have saved the file in any external location like USB or somewhere else, then simply move it to the local hard drive and perform the steps to restore backup files in QuickBooks from the previous location. The steps you can carry out are:
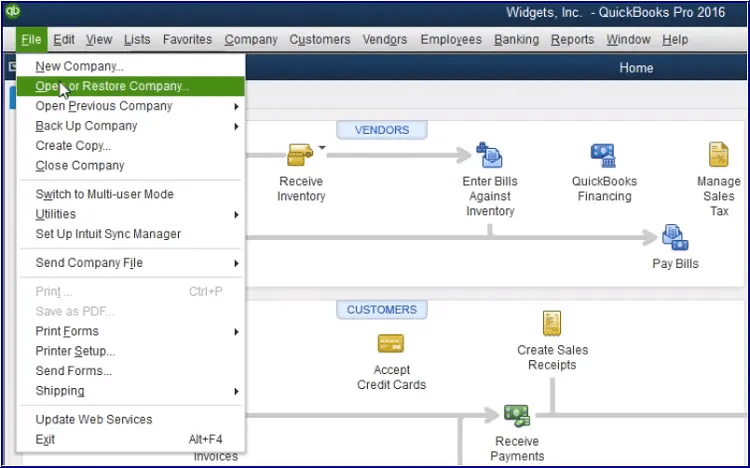
- Start the process by clicking on the file menu and launching QuickBooks.
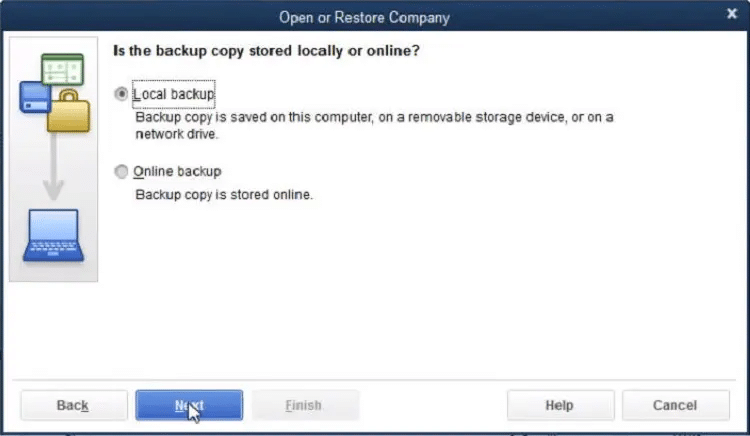
- Furthermore, click on open or restore company and choose to restore a backup copy.
- The next step is to click on the next tab and go for the local backup tab.
- Also, select the next tab and browser backup company file.
- You now have to choose a folder to save the restored file.
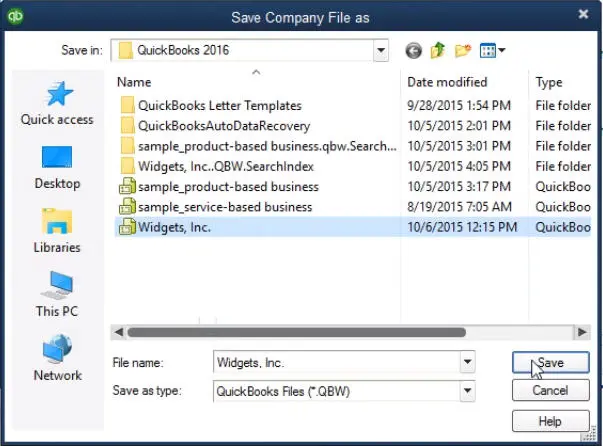
- Later on, you can save the file with a unique name and try not to overwrite the new company file.
- The last step is to open and save the restored company file.
Method 7: Create a backup company file
If none of the above methods helped you eliminate QuickBooks error QBWC1039, then simply try to create a backup company file. This can be done by performing the steps enumerated below:
- This process requires you to open QuickBooks and the file.
- Now, switch to single-user mode.
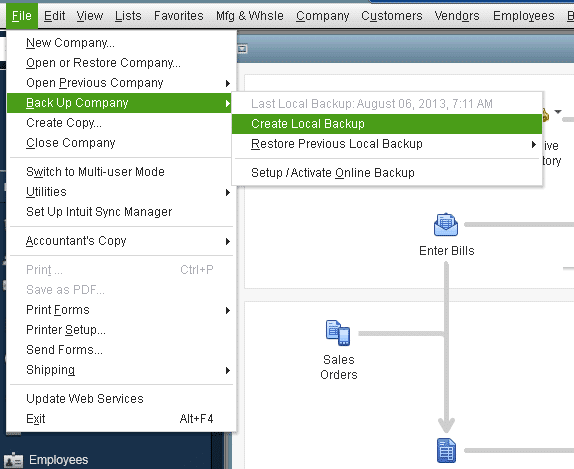
- Click on the file menu and then the backup company option.
- After that, choose the Create local backup option and select the local backup.
- Now, click on the options tab to open the backup window and click on the browse tab.
- You now have to select the local hard drive location of the company backup file copy.
- Toward the end, you need to hit the ok tab and save it.
You might find this helpful: How to Set Up a New Company File in QuickBooks?
Conclusion!
Getting rid of QuickBooks error QBWC1039 becomes easy once you implement the following set of steps and procedures. However, if you are unable to rectify the issue or if you need our technical guidance at any point in time, then in that case connecting with our technical support professionals at +1-888-510-9198is recommended. Our team will help you with all your queries immediately

