
Effective ways to troubleshoot PDF and Print problems with QuickBooks Desktop
QuickBooks is a feature-packed software, preferred by entrepreneurs all across the globe. One of its features is QuickBooks Print and PDF. While using this feature, like at the time of printing PDFs, invoices, and checks, QuickBooks users might encounter certain issues. Sometimes, fixing the PDF and Print problems might be tricky for the users.
Considering this, we have come up with this article, where we will be discussing some of the helpful for QuickBooks pdf and print problems.
A more natural way to resolve this problem can be to consult our QuickBooks error support team by dialing our toll-free number i.e. +1-888-510-9198, and they will rescue you from this article in no time.
See Also: Fix QuickBooks TLS 1.2 Error For Windows 10,8/8.1,7,XP/Vista
What is QuickBooks PDF and Print Repair Tool?
QuickBooks PDF and Repair Tool is a tool designed to discover and repair errors that occur while using the PDF and Print feature of QuickBooks. This tool has been specially introduced and designed in a way to fix the issues in Microsoft components, ultimately resolving the main issues. This tool can work wonders to resolve all sorts of printing and PDF errors.
What are some of the common QuickBooks pdf and print problems Tool?
QuickBooks accounting tool can fix many of the common errors and glitches with QuickBooks. Sometimes the errors appear due to incorrect settings of QuickBooks Desktop or due to failure of any Microsoft component. A few other errors that can be resolved by using this tool are listed below:
- Issue associated with currently selected printer, Microsoft XPS Document writer on XPS port.
- In case when the QuickBooks is not responding.
- When the QuickBooks user is unable to print invoices, reports, or checks
- If by any chance, the printer stops responding
- In case the PDF Convertor shows offline
- When the error occurs stating, QuickBooks can’t complete the current action due to a missing component
- When the device is not ready
- In case the user is unable to print directly to the QuickBooks PDF Converter
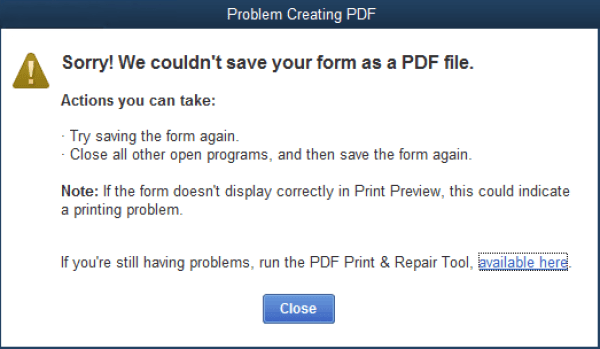
- If the user is unable to save as .pdf file
- In case of an unrecoverable error
- Error 1722 or 1801 is encountered while installing PDF Converter
- Problems printing transactions or reports.
See Also: How to Fix QuickBooks Error 6000?
Causes behind QuickBooks PDF and Printing Errors
There can be a plenty of factors that might cause QuickBooks PDF and Print issues, a few of which are mentioned below:
- PDF record part is missing
- Or in case the PDF converter is disconnected
- Another factor causing the issue can be, if the framework is unable to communicate with the printer
- Similar issue can be faced, when an arranged network is unavailable
- The user can also encounter PDF and print issues, if the printer programming isn’t introduced adequately
- If a non-working print driver host is present, the issue is probable to occur
- Another reason can be outdated QuickBooks software
Points to remember
Before opting for the major solutions, it is essential to have a look at some pointers that are required to be considered. Let us check out those points:
- The very first thing is that the user will have to check whether the printer is turned on properly or not.
- After that, the user can check whether the printer is able to print from some other program or not. In case it does it work properly, then the problem might not be with QuickBooks.
- The user should also try restarting the system, as it can resolve the issue.
- The user might also see Windows Error dialog or QuickBooks error dialog, along with printer error dialog.
- At times, the user might encounter a scenario, where the user can print reports, but will not be able to print transactions. In order to fix this, the user can try changing the template of the form. It should be noted that the corrupted templates can’t get repaired, which makes it important to try other templates.
Read Also: How to resolve QuickBooks error 6190?
Procedures to Fix QuickBooks PDF and Print Problems with QuickBooks Desktop
There can be numerous procedures to tackle the QuickBooks PDF and Print error. Therefore, we will be exploring each of the methods one by one. Let us begin:
Method 1: Run the QuickBooks PDF & Print Problems Tool from the QuickBooks Tool Hub
Step 1: Download and install the QuickBooks Tool Hub
- The first step is to download the QuickBooks Tools Hub. Now, save the file somewhere that you can easily find it, just like the Windows Desktop or downloads folder
- Moving ahead, agree to the terms of service
- Once the download is complete, open the file
- To install the same, follow the onscreen instructions
Step 2: Use QuickBooks PDF & Print Problems tool, from the Tool Hub
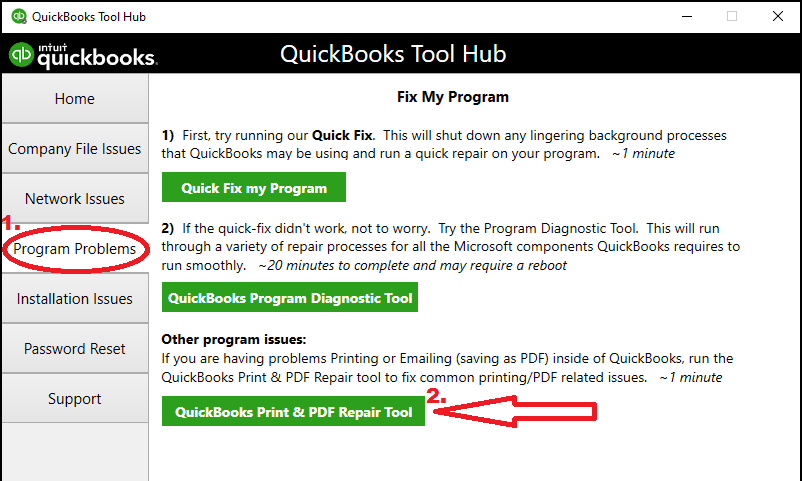
- To begin with, the user is required to tap on to the ‘Program Problems‘ option that will be shown in the ‘QuickBooks Tools Hub’.
- Moving ahead, choose the ‘QuickBooks PDF & Print Problems Tool‘, which might take a minute or two to run.
- Once done with the steps above, the user should make an attempt to send an email, print or save the file as a PDF.
Hopefully, this might work in your favor. However, if the glitch persists, the user should move on to the other solutions that we have listed below.
Method 2: Another method is to reset your temp folder permissions
This solution majorly consists of two steps and a few sub-steps. The steps include:
Step 1: The first step is to reset the temp folder permissions
In case the error persists, the user is required to reboot the computer and once again try for the same. However, if the user faces a failure again, then he/she can try resetting the temp folder permissions.
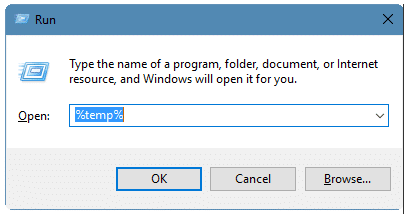
- To start with, the user is required to tap on the ‘Windows key + R‘ keys simultaneously, in order to open the ‘RUN‘ command.
- The next step is to write and enter ‘%TEMP%‘, followed by hitting ‘Enter‘ key.
- Now, right-click the empty area of the temp folder, and then select the option of ‘Properties‘.
- Click on the ‘Security‘ tab.
- Make sure that all the usernames and groups displayed on the Security tab have the Full Control.

- When the permissions have been set to ‘Full Control‘, then try to ‘Save as PDF‘.
Step 2: Give your confirmation that you can print to your XPS
In this step, the user is required to confirm if they can print to their ‘XPS Document Writer‘. The steps to do the same are as follows:
- First of all, the user is required to ‘Open the Notepad‘.
- Moving forward, write anything for testing purpose.
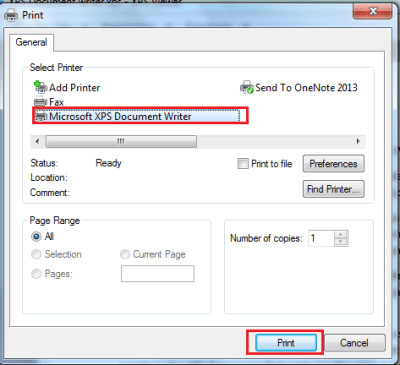
- Now, visit the ‘file‘ and then click on the ‘Print‘ option.
- The user needs to then choose the ‘XPS Document Writer‘ option, and choose the ‘Print‘.
- Now, pick the option of Desktop, from the save as dialog box.
- Lastly, navigate to the desktop and find out whether you are able to view the XPS document that you have printed from your notepad or not.
Method 3: Find out whether the reconcile window is off of the screen or not
In case the QuickBooks desktop software appears to lockup after picking reconcile from the Banking menu, however, if the PDF functions are operational, then the reconcile window might display off of the screen.
- In such case, select the ‘Window menu‘ and check if the reconcile window is listed or not.
- Pick the option, Close All and start with the reconciliation process once again.
See it Also: How to Integrate PayPal with QuickBooks Online?
Method 4: Test, reinstall, and alter permissions for XPS Document Writer
Note:
There are certain points that the user is required to consider before beginning with this procedure. You might be thinking what those points are, to make it easy for you, we have listed those points below:
- Intuit doesn’t support the Microsoft applications and is also not responsible for running all of these tools.
- If the user is uncomfortable in performing these tasks, then it is suggested that they should look for an IT professional to perform the same task for them, in order to avoid any mess.
Now comes the procedure:
Step 1: The first step is to test the XPS document writer, by simply printing outside QuickBooks
- To begin with, the user is required to select the ‘Print‘ option from the ‘file menu‘.
- After that, choose the ‘Microsoft XPS Document Writer‘ from the list of printers in the print window.
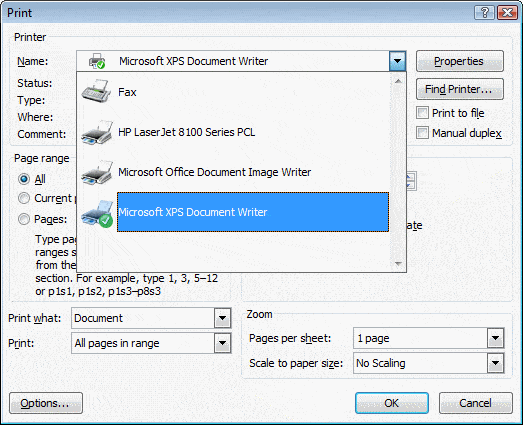
- Now, save the ‘.xps file‘.
- Lastly, visit the desktop and find out the .xps file:
- There can be certain situations encountered, one of which is that if the file is not there and the user didn’t encounter an error while saving the same. A security setting might be stopping the user from printing to the XPS Document Writer.
- In case the .xps file is present, the user is required to open it. In case he/she encounters any sort of error in opening the file, or also if the file doesn’t show up in a proper manner, then the user is required to reinstall the XPS Document Writer.
- Lastly, if QuickBooks desktop bumps into a problem while the user tries to print, then also there is a need to reinstall the same.
Now comes the step 2, which has two parts, namely A and B.
Step 2: Reinstalling the Microsoft XPS Document Writer
Part A: In the first part, the user is required to ‘Verify‘ whether the XPS Services are enabled or not.
Part B: In the second part, the user should reinstall the XPS Document Writer.
Let us explore, each of the steps one by one.
Part A: By following simple steps, the user can Verify whether the XPS Services Are Enabled or not
- Tap on the ‘Windows key‘ along with pressing ‘E key‘, in order to open the window explorer.
- In the upper left, pick the ‘Computer tab‘.
- Choose the uninstall option or change a program under the System group.
- Now, the user has to opt for the ‘Turn Windows Features‘ on or off over on the left.
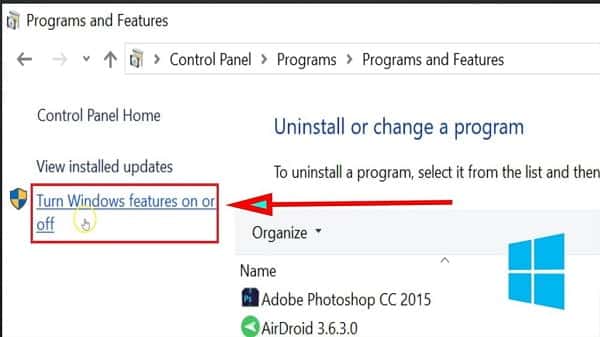
- Lastly, scroll down and make sure that both the XPS Services and XPS Viewer are enabled.
Part B: Reinstalling the XPS Document Writer in Windows 8 and Windows 7/Windows Vista
For Windows 7/Windows Vista:
- To start with, the user is required to select the ‘Devices and Printer’ options from the ‘Windows Start‘ menu.
- Now, choose the ‘Microsoft XPS Document Writer icon‘, followed by selecting the ‘Remove device‘.
- To continue and confirm, choose ‘Yes‘.
- Choose ‘Add a printer‘ and select ‘Add a local printer‘ option respectively from the toolbar.
- After that, choose the option ‘Use an existing port‘.
- Also, choose ‘XPSPort: (Local Port)‘, and then hit ‘Next‘.
- Now, the user is required to select ‘Microsoftt‘ and then ‘Microsoft XPS Document Writer v4‘, from the manufacturer list.
- After that tap on to ‘Next‘.
- The final step is to pick the ‘Replace the current driver‘ option and tap onto the ‘Next‘ option.
For Windows 8:
- To begin with, the user is required to hover the mouse in the lower or upper right-hand corner, in order to display the ‘Start Screen‘.
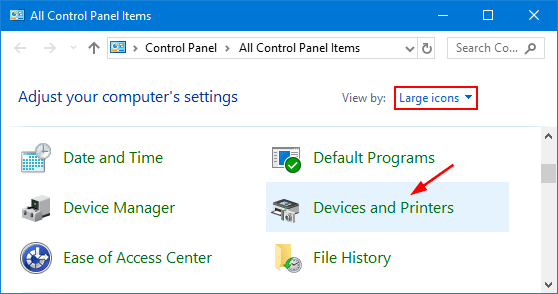
- Now the user has to choose the ‘settings > Control Panel > Devices and Printers‘.
- Moving ahead, the ‘Microsoft XPS Document Writer‘ icon is to be selected, followed by choosing the ‘Remove device‘.
- The user is now required to select the option ‘YES‘ to give the confirmation.
- From the toolbar, select the option of ‘Add a printer‘, followed by picking the ‘Add a local printer or network print‘ with manual settings option.
- The next step is to select the ‘PORTPROMPT‘ i.e. local port, in the use an existing port option.
- Tap on to the ‘Next‘ option to move ahead.
- The user is required to hit the ‘Microsoft‘ option, and then ‘Microsoft XPS Document Writer v4‘ from the manufacturer list.
- Again tap on to the ‘Next‘ option.
- Now, select the ‘Replace the current driver‘ option and then tap on to ‘Next‘.
- Take out the v4 in the Printer Name field, thus, the name is ‘Microsoft XPS Document Writer‘.
- The final step is to hit the ‘finish‘ tab and you are good to go.
Read Also: How to Fix QuickBooks Error 404?
Step 3: In this step, the user is required to adjust Windows user permissions for the XPS Document Writer
If by any chance, the Windows user is not having the permission to print to the XPS document writer, then in that case the QuickBooks software will not be able to create the .xps file. Also, the user is required to be logged in with Admin Rights to change these permissions.
- The very first step is to open the ‘Printers Control Panel in Windows‘
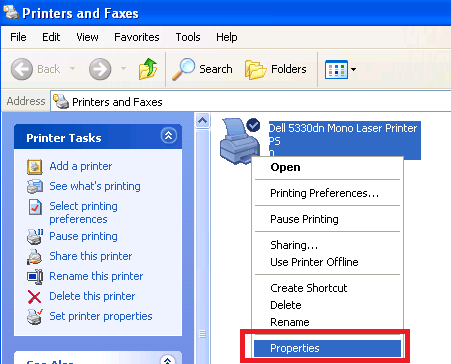
- And then, Right-click the ‘Microsoft XPS Document Writer‘, followed by selecting the ‘Printer properties (Windows 7 & 8) or Properties (Windows Vista)‘
- Now, tap on the ‘Security‘ option.
- Choose the ‘Everyone user group‘.
- This step is optional. In case the Everyone group is not seen in the list, the user can take necessary actions, which include:
- a) Hitting the ‘Add button’.
- b) Entering the ‘term Everyone’ in the field and lastly
- c) Tap on to ‘Check Names’ and hit ‘OK‘.
- Moving ahead, the user is required to select ‘Print‘ and hit ‘OK‘ tab, in the Allow column.
- Now, the user is required to navigate to ‘C:\Windows\System32\spool in Windows Explorer.‘
- In this step, the user is required to choose the ‘Printers‘ option and select ‘Properties‘.
- After that hit the ‘Security‘ tab.
- Now click on the ‘Edit‘ option.
- Moving ahead, tap on the ‘Add‘ option.
- Type ‘Local Service‘ and select ‘Enter‘.
- Make sure Local Service has ‘Full Control’, then select ‘OK‘.
- Open QuickBooks and try to ‘create a .pdf file‘.
Step 4: In this step, the user is required to edit the security software settings
At times the creation of .xps files can also be blocked by the settings of the security software such as, Norton Antivirus or McAfee firewall. Thus, the user is required to check those setting on their security software and ensure that the .xps files aren’t blocked.
Step 5: Installing or Repairing MSXML 6.0
Basically, MSXML 6.0 is a Microsoft Windows component and is also a part of the system requirements for the XPS Doc Writer. The steps for Windows 8 and Windows 7 might differ. Let us have a look at the steps one by one:
For Windows 8:
In Windows 8, system file checker is in-built, which is a utility provided by Microsoft to repair the Windows system files. Thus, the user is required to run this system file checker.
- First of all, hover the mouse in the upper or lower right-hand corner and then click on the ‘magnifying glass‘.
- Moving to the next step, the user is required to type ‘Command‘ and then select the ‘Command prompt‘.
- Now, choose the option on the bottom bar which says ‘Run as Administrator‘.
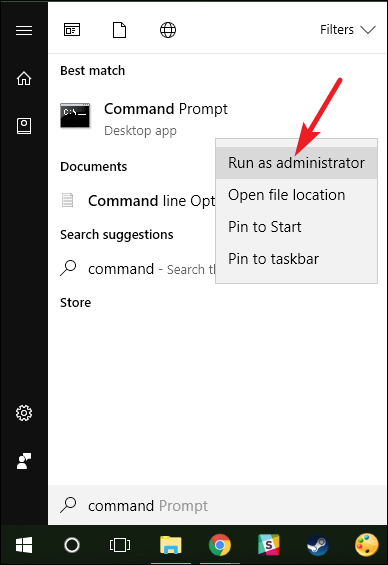
- If in case, the user is prompted for admin password, then simply enter the password or hit the allow option.
- Lastly, type in ‘sfc/scannow‘.

For Windows 7 and Windows Vista:
In case of Windows 7 also, the user is required to run the in-built System file checker, in order to repair the MSXML 6.0.
- To start with, the user is required to select the ‘Windows Start‘ button.
- After that, select ‘All Programs‘ option, followed by selecting ‘Accessories‘.
- Now select the ‘Command Prompt‘ and also select ‘Run as Administrator‘.
- In this case also, if the user is prompted to enter the ‘Admin password‘, then simply enter the password or click ‘Allow‘.
- The last step is to type in ‘sfc/scannow‘.
See Also: How to Fix QuickBooks Error 6000, 301?
Step 6: Moving ahead, the user is required to create a new template for the form
In case the template for the user’s form is damaged, they might encounter this issue. Thus, in such cases, the user is required to create a new template for their form.
- The first step is to create a new template for the form.
- After that change the template on the transaction.
- And lastly, create the .pdf file.
Step 7: The last step, is to bypass the print spooler
Once the user has completed the preceding steps, it is time to set the XPS document Writer to bypass the print spooler.
- To begin with, the user is required to open the ‘Printer Control Panel’ in Windows.
- After that, right-click on the ‘Microsoft XPS Document Writer’, followed by selecting the ‘Printer Properties or Properties‘, as the case may be depending upon the Windows of the user.
- Now, select the ‘Advanced tab‘ option and later select ‘Print Directly to Printer‘.
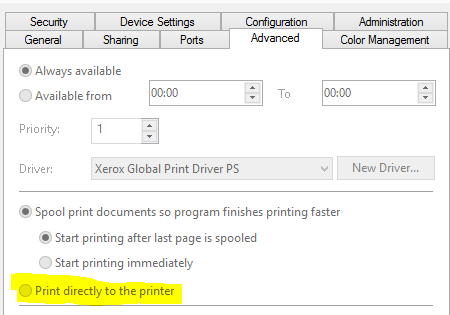
- The last step is to tap on ‘OK‘, in order to save the changes and close the ‘Printer Properties‘.
Method 5: Renaming or Removing the Printer file
In case the above methods failed to fix the issue, then in that case the user can delete the damaged file and create new ones. The steps involved in this process are as follows:
- The user is first required to search and spot the files.
- After that, instead of deleting them, try renaming the files to something such as ‘qbprint.old’ & ‘wpr.old‘.
- The next step in the process is to run QuickBooks and open the company file.
- Once done with that, the user needs to select file and then click on printer setup.
- And then, the user needs to pick any transaction in the Form Name and then hit OK.
- Carrying out the above step will make the user reset the printer settings in the software.
See Also: Settle QuickBooks error 17337 like a Pro
Winding Up!
So, with this, we come to the end of this article. We believe that after reading this article, it would be much easier for the QuickBooks users to tackle QuickBooks pdf and print problems in QuickBooks Desktop. However, if you find this procedure lengthy, time consuming, or if even after following the steps, you are unable to deal with such error, then it would be a better option to get in touch with QuickBooks enterprise support team by dialing our toll-free number i.e. +1-888-510-9198.
QuickBooks users might find dealing with these errors a difficult task, but our professionals have much deeper knowledge, which makes it easy for them to handle such issues. Thus, without thinking much, you can simply get in touch with our team of experts and they will clear all your clouds of confusion.
You might also like:
How to fix QuickBooks error code 80040408?
How to Setup Microsoft Outlook Email Integration with QuickBooks?

