Do you know that activating QuickBooks desktop requires few information like the license number or the product information? Well, in certain cases there might be some issue with the information that show up on the screen indicating QuickBooks Activation Errors or QuickBooks desktop activation issue. While these errors might seem to be easy, they might give you a long time trouble, all you need is to keep a look for the solutions right away and in certain cases you can even dodge these issues by keeping a few things in mind. Here, in this blog I am going to talk about these QuickBooks desktop activation issue and what should you do when you encounter them. However, If you have any query regarding this, you can reach out to our QuickBooks error support team to resolve all QB errors in no time.
If you are a QB user then you also may get the following error message after entering your validation code or license and product number for QuickBooks activation.
The validation code is incorrect. Please verify the number and enter it again.
This service is temporarily unavailable. Please try again later.
You have entered incorrect license/product numbers. Please check the numbers carefully.
If you’re dealing with any of these errors, don’t stress you’re not alone. These are some of the most common QuickBooks activation issues users face, and the good news is that all of them can be fixed without much hassle. Just follow the solutions below one by one, and you should be good to go. And if things still don’t work out, our team at +1-888-510-9198 is just a call away.
Important Points to Remember before Performing any of the Suggested Solutions
- Check if QuickBooks is already active
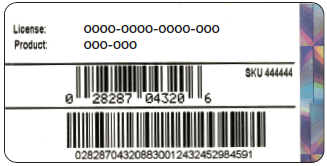
- Verify the license and product code of the QuickBooks software you are using (Note: License number and product version match the one on the sticker on the QuickBooks product package)
- For any downloaded product check the confirmation mail from Intuit at the time of purchase.
- In case you have QuickBooks on a CD then check the sticker on the CD Package.
- In case of ProAdvisors, visit member support for installation code.
Read also: How to Fix QuickBooks Error Code 31?
How to Fix QuickBooks Desktop Activation Issue?

If you get the error “The validation code is incorrect” or “This service is temporarily unavailable” then check recommended solutions and then execute the appropriate way to fix the problem during QuickBooks desktop activation
Solution 1: Verify the system date & time settings are correct.
- First, close QuickBooks Desktop.
- Then right click on the “Windows Taskbar” icon and then select to “Change the time and date“.
- Click on the “Date and Time” icon and set them.
- Then, click on the “Apply“ tab and after that on “OK” icon.
- After this, open the QuickBooks desktop and the click on the “Help” tab then Activate QuickBooks followed by the “Activation“ tab.
- Finally, enter the ‘Validation Code‘ and then click on the “Next” icon.
Solution 2: Reactivate MSXML quickbooks desktop activation issue
We recommend you to perform this action with the help of your IT professionals or a windows experts.
64-bit operating system, activate MSXML with the following commands:
- At first, open the “Start“ Menu, type-in the ‘cmd‘ and then right click and ‘Run as Administrator‘.
- At the prompt, enter the “cd\ windows\syswow64“
- Enter the “regsvr32 MSXML4.dll“ and press the “Enter” button.
- Enter the ‘regsvr32 MSXML6.dll‘ and press the “Enter“ button.
32-bit operating system: Register MSXML with the following command:
- First of all on your keyboard, press the “Windows + R” keys to open the ‘Run‘ window.
- Enter the ‘CMD‘ and press the “Enter“ key
- Enter the “regsvr32 MSXML4.dll“ and press the “Enter“ button.
- Also, Enter the “regsvr32 MSXML6.dll” and press the “Enter“ button.
Read also: How to Fix QuickBooks Update Error 15215?
Solution 3: Resetting of the .ecml file
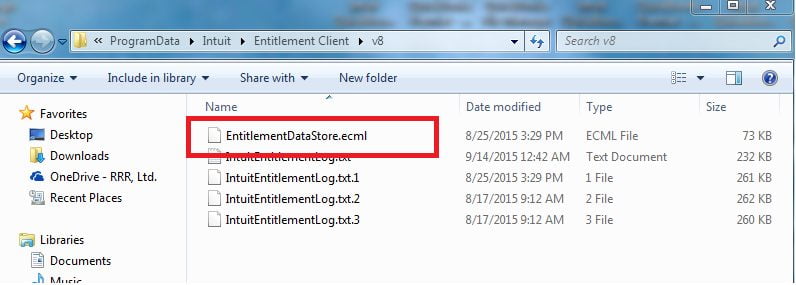
When QuickBooks Desktop is installed you have to provide the license number as well as product code to complete the process of installation and validate your copy of QuickBooks. At times an encrypted file with all those information may be damaged and it is then QuickBooks will not open and may display the error message. In such situations, removing or deleting the entitlement file and then re-entering the license and produce data will help solve the issue.
Delete EntitlementDataStore.ecml file
- At first, close the QuickBooks Desktop.
- Make sure that all QuickBooks processes are no longer running.
- From the keyboard, press the “Ctrl + Shift + Esc” keys and after this the “Task Manager“ tab opens.
- Go to the ‘Windows 10: Click “More Details” to show task manager.
- After this, click on the “Process“ tab.
- Then sort the processes alphabetically by clicking on the processor name header.
- For all examples of ‘QBW32.EXE‘, click the “Search“ option and then “End Job” icon.
- Open the ‘Entitlement Data folder‘ for your operating system and version of QuickBooks.
- On the keyboard, press the “Windows + R” keys so as to open the “Run“ window.
- Enter the “C: \ ProgramData \ Intuit \ Entitlement Client \ v8 (or v6)” and then tap “Enter” (Folder location is similar for all variants QuickBooks desktops and QuickBooks Desktop Enterprise .)
- Right-click the “EntitlementDataStore.ecml file” and choose “Delete” option.
- Click the ‘Yes‘ icon to confirm that you want to delete the file.
- Lastly, open the company file and then follow the instructions to register the application.
Solution 4: Run QBInstall Tool
In case you are not able to install or open QuickBooks Desktop, then QuickBooks Installation Diagnostics tool (OBInstall) can help. This tool is designed in such a way that automatically identifies and fixes the problems with .NET Framework, C ++, and MSXML.
There is no need or doing any manual steps as the most of the work will be done by the tool saving a lot of your time that would otherwise been used to solve the issue.
Read Also: Fix PS033 error: QuickBooks can’t read your payroll setup files
Solution 5: Restore the QuickBooks Desktop
At times when QuickBooks function gets damaged or any problem cannot be fixed then uninstall the QuickBooks Desktop. After this rename the installation files back and again reinstall the QuickBooks Desktop to your system. This whole process is called clean install.
Solution 6: Create a new Windows Administrator
For Windows 10
- Sometimes, it is important to try new windows users to eliminate user account damage.
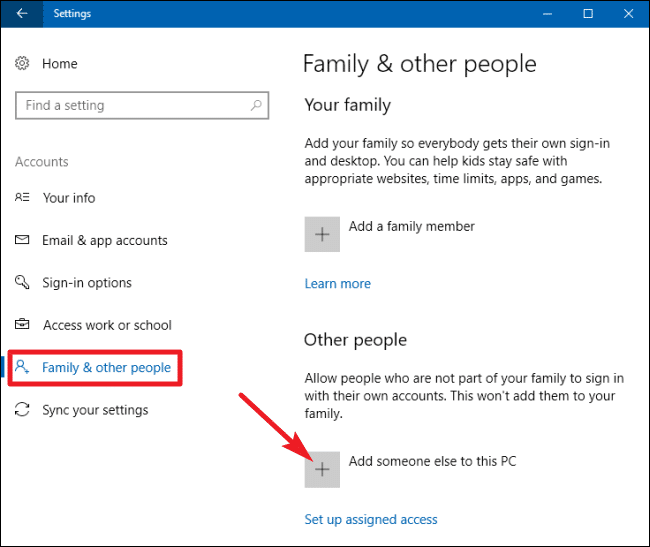
- At first, select the “Start“ icon and click on the “Settings” tab.
- Now, Select the ‘accounts‘ section & also click the “Family & other users” option.
- Under ‘Other User‘ icon, just click “Add“ an additional person to this computer system.
- Below of the web page, click ‘I do not have the sign-in information for this person‘.
- At the end of the next page, click the “Add users“ icon without a Microsoft account.
- Enter the name of the new account.
- Now, click the “Finish By default“ icon, the new account is established as the standard user.
- After than click on the recently created account as well as click on the “account type“.
- Click the drop-down menu as well as choose the “Admin” tab
- Now click on the “OK” tab.
- Second last after creating new users, logout from Windows and also sign-in back as a new user.
- After that Open the “QuickBooks desktop” and also choose the “Help” icon > “Activate QuickBooks” icon > “Start Activation” icon.
Note: (For the Canadian version of QuickBooks, click on the “Help” tab > “Register QuickBooks” tab > “Register” tab).
If these troubleshooting steps fixes your error then make a decision whether to keep or get rid of the new administrative user as well as continue to use the existing one.
For Windows 8
- Open the system window, tap on the “Windows + E” key on the keyboard simultaneously.
- At the top of the screen, choose the “Computer” tab and select the “Open Control Panel” tab.
- Choose the “User Accounts” tab => “Manage another account” tab.
- Once the ‘Manage Account’ screen appears, choose the “Add a new user in PC settings” option.
- Type-in the username & domain name, and then choose the “Next” icon.
- Choose the ‘Administrator access’ for this new user, then choose the “Finish” tab.
- Once you create a new user, sign-out & sign back in as a new user.
- Open the QuickBooks & attempt to register by selecting the “Help” tab => “Activate QuickBooks” tab => “Begin Activation” tab. (In QuickBooks Canadian version, you should go to “Help” tab => “Register QuickBooks” tab => “Start Registration” tab.)
For Windows 7
- Choose the “Windows” or “Start” tab, and then select the “Control Panel” tab.
- Select the “User Accounts” tab, and then “Manage Use Accounts” tab.
- Once the “User Accounts” screen opens, select the “Add” tab.
- Type-in the new user name & domain name, and then choose the “Next” tab.
- Choose the ‘Administrator access’ for this new user, then choose the “Finish” icon.
- Once you created a new user, sign-out & sign-in the windows as a new user.
- Open the QuickBooks & make an attempt to register it by selecting the “Help” tab => “Activate QuickBooks” tab => “Start Activation” tab. (For the QuickBooks Canadian version, go to the “Help” tab => “Activate QuickBooks” tab => “Begin Registration” tab.)
Also read: How to Fix QuickBooks Error Code 6150?
Solution 7: Close all versions of QuickBooks
- First of all you need to Press “Ctrl+Alt+Delete“ keys, on your keyboard.
- Select the “Processes” tab.
- After that choose the “Image Name“ to sort the processes alphabetically.
- Next, End any of the processes that show in the following list:
- QBW32.EXE
- qbupdate.exe
- QBWebconnector.exe
- QuickBooksMessaging.exe
- QBDBMGR.exe
- Any remaining process that starts with QB
- Now Close the “Task Manager“.
- Finally Install QuickBooks.
Final Note!
We know that dealing with activation errors can be frustrating especially when you just want to get back to running your business. If you’ve tried all the solutions above and the issue still isn’t resolved, it’s best not to waste more time troubleshooting alone. Our certified QuickBooks ProAdvisors are just a call away. Reach out to our certified QuickBooks support Proadvisor team at +1-888-510-9198 and we’ll help you fix the activation issue quickly so you can get back on track. We provide instant, US-based support no waiting, no runaround.
Other helpful blogs
Steps to Fix QuickBooks Desktop Update Errors
Solution to QuickBooks Error Code 15102
What are QuickBooks Data Conversion Services?
Some FAQs Related to QuickBooks Desktop Activation Issue
QuickBooks Desktop activation is a process that verifies the authenticity of your software and allows you to use all its features. It is necessary because without activation, you will not be able to use QuickBooks Desktop for accounting and financial management.
To activate QuickBooks Desktop using the product key, you need to open the software and go to the Help menu. From there, select “Activate QuickBooks Desktop” and follow the instructions on the screen. If you face any issues during activation, you can call our toll-free number +1-888-510-9198 for assistance.
If QuickBooks Desktop activation fails, you should check if you have entered the correct product key and other details. If the issue persists, you can try restarting your computer and then activating the software again. If you still face issues, you can contact QuickBooks Desktop support for assistance.
No, you cannot activate QuickBooks Desktop on multiple computers with one product key. Each installation of QuickBooks Desktop requires a unique product key, and you need to purchase separate licenses for each computer.
QuickBooks Desktop activation usually takes only a few minutes, depending on your internet speed and the performance of your computer. If the activation process takes longer than expected, you can contact QuickBooks Desktop support for assistance.
Don’t hesitate to call our toll-free number +1-888-510-9198 if you face any activation issues or have any other queries related to QuickBooks Desktop.
This usually happens when the EntitlementDataStore.ecml file gets corrupted or deleted. QuickBooks uses this file to remember that your copy has already been activated. Deleting and recreating this file (Solution 3 above) typically fixes this issue.
No, reinstalling QuickBooks Desktop does not delete your company data files. Your data is stored separately from the software installation. However, it’s always a good idea to back up your company file before performing a clean install, just to be safe.
Yes, in some cases firewall or antivirus software can interfere with the QuickBooks activation process. Temporarily disabling your antivirus or adding QuickBooks as an exception in your firewall settings can help. If you’re unsure how to do this, our support team at +1-888-510-9198 can guide you through it.

