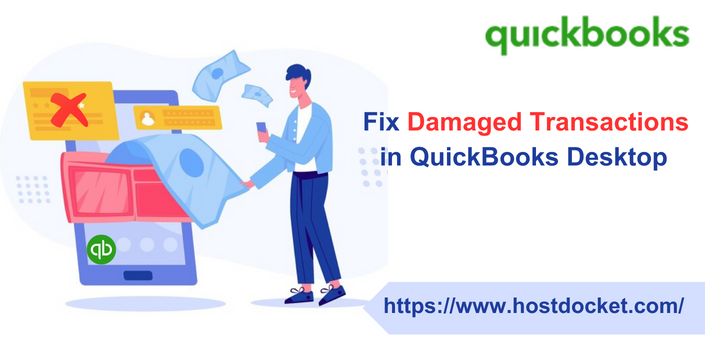
Did you come across an issue related to damaged transactions in QuickBooks? Well, this can pose a threat to the company file data. As the company file stores all the necessary information about the company, it can easily get damaged due to damaged transactions. Thus, it becomes crucial to fix damaged transactions as soon as possible in QuickBooks. In QuickBooks, transactions may occasionally get damaged which needs to be fixed in order for the file to work properly. To help you in fixing damaged transactions in QuickBooks Desktop, we have curated this segment sharing the complete set of steps that can be implemented. However, if you have any queries or if you need any sort of technical guidance, then connecting with our technical support team at +1-888-510-9198 would surely help. Having said that, let us understand what causes damaged transactions in QuickBooks and what ways can help you fix them.
Over-sized company files can be a reason behind the occurrence of such an error
If you use journal entries instead of preferred data entry methods for accounts receivable or accounts payable, then it might damage the transactions
Another probable reason can be using QuickBooks when the system is running low on resources.
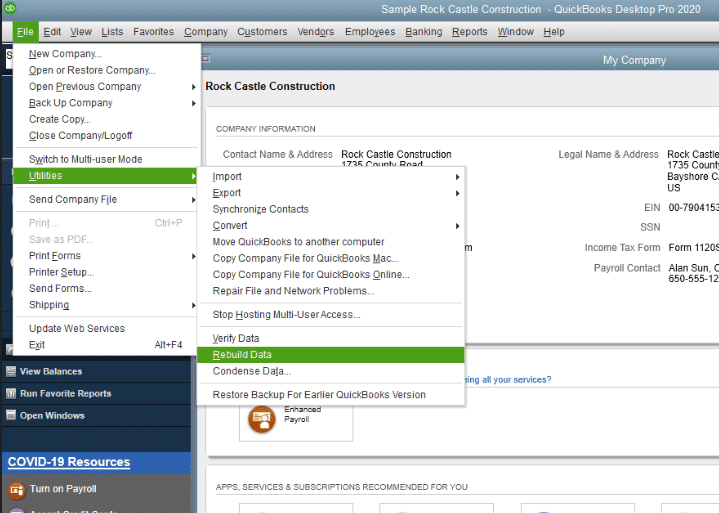
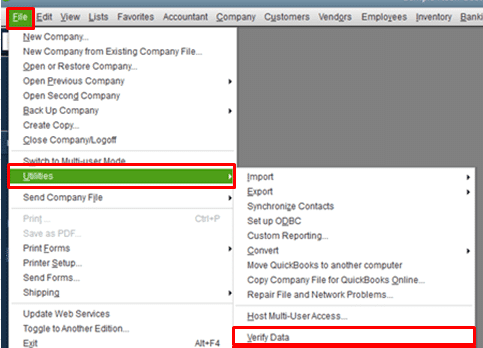
Steps to fix damaged transactions in QuickBooks Desktop
You can end up in such an error due to the bunch of reasons listed above. Now that you know what causes damaged transactions, it is time to implement the right set of steps to get rid of the issue immediately. Let us explore the steps involved in fixing damaged transactions in QB desktop.
Getting rid of damaged transactions in QuickBooks becomes crucial, in order to avoid any sort of technical discrepancy further. Hopefully, the above-enumerated steps might be of some assistance in getting rid of the damaged transactions in QuickBooks desktop successfully. However, if you land on the same issue again and again, then in that case contacting our technical support team at +1-888-510-9198, is suggested. Our technically sound QuickBooks ProAdvisors will ensure to cater to all your needs immediately.
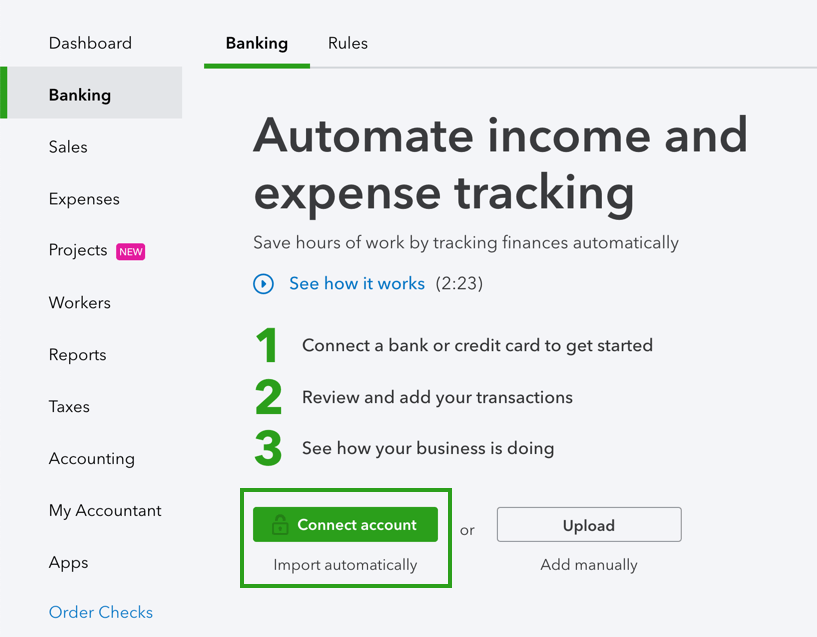
Do you know the process to connect your bank and credit card accounts to QuickBooks Online? Well, it is possible to connect credit card to QuickBooks Online. Connecting your online bank in QuickBooks automatically downloads and categorizes the transactions. It further helps in saving time in updating the bank feeds. You simply have to review and approve them. To help you connect bank and credit card accounts to QuickBooks online smoothly, here we are with this segment, sharing the complete set of steps that can be performed to connect bank and credit card accounts. To know more, ascertain to read this segment carefully. You can also get in touch with our technical support team at +1-888-510-9198, and we will provide you with immediate support and assistance.
You need to connect your bank or credit card account, to avoid manually entering the transactions. It is further possible to connect multiple businesses and personal bank accounts, in order to keep the business information up to date in QuickBooks.
It should be noted, in case you have an American Express business account, then you can also connect it to your QuickBooks online account.
You need to first head to the transactions and then choose bank transactions
After that, select the link account
The next step is to enter the URL or name of the bank in the search field and then choose the bank.
It should be noted that if you can’t find the bank, you can manually upload transactions instead.
Furthermore, enter the sign info in the login and password fields and then click on the continue tab.
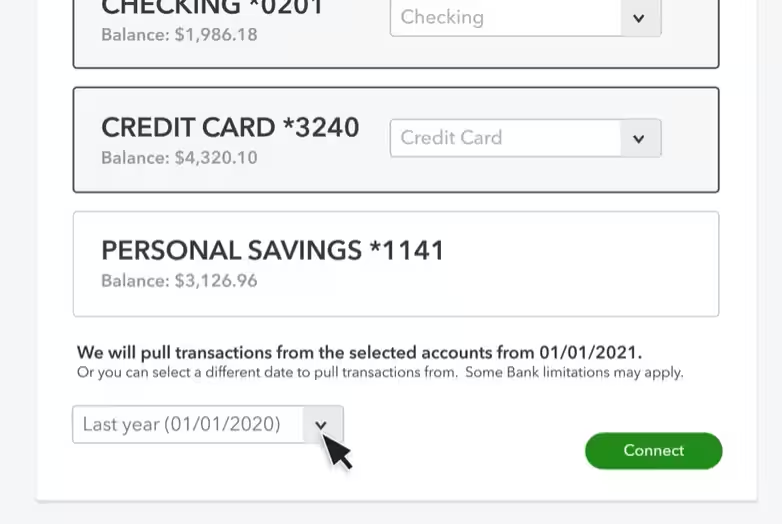
Choose the account you wish to connect and the date to pull transactions from the dropdown▼.
Now click on the next tab.
Further, note that some banks let you download the last 90 days of transactions. Whereas, Others can be downloaded for as long as 24 months.
Choose your account type on the account type dropdown▼ and further click on the next tab.
Also, note that you need to choose the account type that matches your chart of accounts in QuickBooks. In case you do not see the correct account type, and select +add new.
For New Bank Accounts:
In the account type dropdown▼, you need to choose the bank
After that, select savings or checking in the detail type
Now, give the account a name and then choose save and close.
For New Credit Card Accounts:
In the account type dropdown▼, you need to choose credit card
Furthermore, assign the account a name, hit save, and close tab
You now have to map the bank account in the existing accounts dropdown▼ and then hit next.
The next step is to choose Connect and select Done.
Also, you can edit the account name in the new account name field or change it later.
Connect your bank account from the chart of accounts
Under this process, you need to first head to the settings tab and then choose the chart of accounts
The user needs to choose the view register dropdown▼ in the action column. Choose connect bank
Enter the URL or name of the bank in the search field, and choose a bank.
Also, note if you can’t find your bank, you can manually upload transactions instead.
Enter the sign info in the login and password fields and choose the continue tab.
Choose the account that you want to connect and date to pull transactions from the dropdown▼ and hit the next tab.
Note that you need to choose the account type that matches your chart of accounts in QuickBooks. In case you do not see the correct account type, then choose + Add new.
For new bank accounts:
Choose the bank in the account type dropdown ▼
Now, in detail type, choose savings or checking
After that, give the account a name and then choose Save and close
For new credit card accounts:
In the account type dropdown▼, choose credit card
Once done with that, assign a name, click on save, and close
You now have to map the bank account in the existing accounts dropdown▼ and then choose next.
After that, choose Connect and select Done.
Note that, it is possible for you to edit the account name in the new account name field or change it later.
Head to the transactions tab and choose bank transaction
Now, select the update tab.
Step 3: Categorize downloaded transactions
You need to review and categorize the downloaded bank transactions to ensure that it is categorized correctly. This would help you organize the charts of accounts perfectly.
Now that you know what steps can be taken to connect bank and credit card accounts to QuickBooks online, it is time to implement those steps manually. You can also connect with our technical support team at +1-888-510-9198 and we will provide you with immediate support assistance. Our certified and technical upgraded QuickBooks ProAdvisors will answer all your queries immediately and make sure that you are successfully able to connect your bank and credit card accounts to QuickBooks Online.
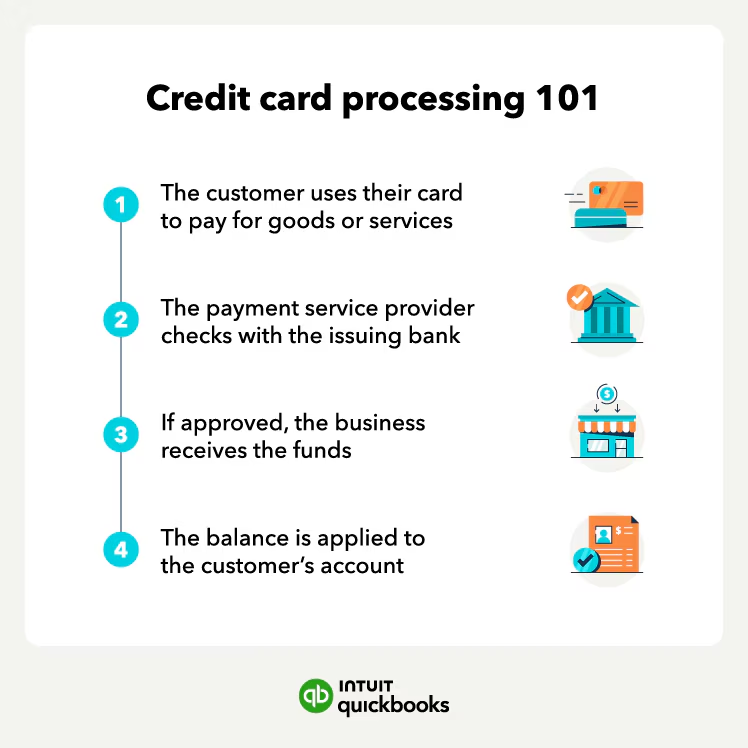
QuickBooks Online lets you process and authorize all major debit and credit card transactions directly. Not only that, the payment information is automatically updated, so there is no need to enter the data twice. Talking about QuickBooks Payments, it lets you add links to invoices so that the customers can pay online. A customer can pay with PayPal, Venmo, credit card, or ACH bank transfer. The only thing that is required is to follow the link in the email. It is further possible to process payments in person or over the phone. In this segment, we will let you know the process of QuickBooks credit card processing, along with that you will get to understand how to process payments in QuickBooks online with QuickBooks payments.
Thus, if you are interested in knowing more, make sure to stick around this segment carefully, or you can also connect with our technical support team for any kind of technical assistance. Give us a call at +1-888-510-9198, and get immediate assistance from certified professionals.
How QuickBooks Credit Card Processing can help you?
Well, accepting credit cards can help you in the following ways:
Grow your business – You can make it easy for customers to make payments by offering them convenient payment options.
Get paid faster- The approved funds can be deposited into the account in as few as two to three business days.
Get paid automatically – You can set up recurring sales receipts and collect payments automatically so that customers do not have to be reminded to pay you.
Save money – When you accept credit cards, there are no extra hardware, software, or phone lines needed. You can save around $1,000 or more in comparison to buying or leasing a terminal.
Save time – QuickBooks online payments service is the only merchant account service that is fully integrated with QuickBooks online. When you process a transaction, the information is automatically entered in the QuickBooks online company file. The need to manually enter data is eliminated.
It should be noted that QuickBooks online doesn’t currently integrate with a shopping cart.
Furthermore, QuickBooks payments are an optional fee-based service. And application approval is required. Terms, conditions, features, pricing, and services are subject to change without notice.
In order to apply for this service, you need to perform the following steps:
Initially, you need to head to the settings tab and further go for account and settings
The next step is to choose the payments tab
And lastly, choose learn more!
After the QuickBooks credit card processing is activated, you can process credit cards using recurring sales receipts. Note that, the clearance time for funds may vary depending upon the demand deposit account.
Steps to take and process payments in QuickBooks Online with QuickBooks Payments
You can check the QuickBooks payments website for the latest plans. The steps to take and process payments in QuickBooks Online with QuickBooks payments are described below:
Step 1: Sign up or connect an existing QuickBooks payments account
In case you haven’t already signed up for QuickBooks payments, perform the steps below. Or if you have, then connect your existing account to QuickBooks online.
Step 2: Set up an account so customers can pay invoices online
Set your company preferences.
You need to first set up your account settings for invoice payments.
At first, you need to head to the settings tab and further choose account and settings
Once done with that, choose the sales tab
Also, under invoice payments, go for edit and then go for the payment options you want.
You can further enter payment instructions.
This will show on all invoices irrespective of the template, when the payments are enabled.
The next step is to choose save
Also, go for the done option.
Set your payment options directly on the invoice
You can select how to receive payment on each invoice you send. In case you change them on one invoice, then this will only impact the invoice you change and not the company preferences.
Note that, your estimates or invoices will look different depending upon whether you have the old or new estimate and invoice experience.
You can change the invoice payment options with new invoicing:
Head to sales and then choose invoices
Now, find the invoice you want to update, and then go for the edit
The next step is to choose manage and then select payment options
You are now required to turn the switches on or off for the payment method you want to use
The last step is to choose save or save and close tabs respectively.
Steps to change invoice payment options with old invoicing
In order to change the payment options on an existing invoice, you need to perform the following:
For this, you simply need to head to sales and further go for invoices
The next step is to find the invoice you are planning to update and then go for edit
The user is then required to select edit in the online payments section
After you are ready to get paid, you need to carry out the steps below on how you received the payment:
Process payments for sales receipts:
In case the customers come into your business, you do not have to send them an invoice. You can simply create a sales receipt. The steps involved here are:
The very first step is to choose + New tab
Then, choose sales receipt or make a sale, then enter the customer info.
Also, add a product or service to sell.
Now, from the payment method dropdown, choose creditcard
And furthermore, enter credit card details.
The next step is to enter the credit card info or select swipe card
It is not mandatory, but to save this customer’s credit card, you can choose use this credit cardin the future.
You need to choose save or use this info.
Furthermore, choose Got it and select Save and Close or Save and New.
In case you add the customer’s email address, then QuickBooks sends them a copy of the sales receipt.
Process payments for invoices
In case you sent a customer an invoice, but they wish to pay in person, then you simply have a few options. You can ask them to follow the link in the email and complete paying for the invoice online. Or process the payment for them and tally it with the existing invoice.
The very first step is to choose +new
The next step is to choose receive payment
After that, enter the customer name and payment date
Now, in the outstanding transactions section, choose an open invoice to apply the payment.
And to take a partial payment, you can simply change what’s in the payment field.
The next step is to select a credit card from the payment method dropdown
Also, choose enter your credit card details
Once done with that, enter the credit card info or select the swipe card
To save the customer’s credit card, you can select the option use this credit card in the future tab
Choose save or use this info
The next step is to go for Got it icon and choose save and close or save and new.
QuickBooks will send automated receipts to the registered email when an invoice is paid through QuickBooks online payments. You can also re-print a copy of the receipt from QuickBooks online payments. This can be done as follows:
You need to first go to the invoice that was paid and then choose the payment
The next step is to choose a transaction processed from the customer details; a copy will show up of the receipt that you can print.
Process payments for invoices in QuickBooks Solopreneur
Here you simply have to choose get paid and then go for invoices
The next step is to find the invoice that you wish to record as fully or partially paid
Now, under the action column, you need to choose record payment
And then, in the deposit to dropdown, select the account to record the payment to
The user is then required to fill out the remaining fields, like the amount paid and the payment date.
After you are done, choose save.
Step 4: Learn about deposit times for customer payments
After processing payments, QuickBooks puts money into the bank account. It simply makes use of the bank account that is opted for when signing up for QuickBooks payments. The time taken for deposit depends upon the product and the type of payment. You can get more info about deposit times for QuickBooks payments.
It should be noted, if you are new to payments, then your first payments might take a bit longer while QuickBooks set up the accounts. After the accounts are set up, customer payments will be processed faster.
Disclaimer: QuickBooks payments account is subject to eligibility criteria, credit, and application approval. Money movement services are provided by Intuit Payments Inc., licensed as a money transmitter by the New York State Department of Financial Services.
Toward the end of this segment, we believe that the reader might be able to understand how to take and process payments in QuickBooks Online with QuickBooks payments. Moreover, the above steps might help you in successfully understanding QuickBooks credit card processing in QuickBooks online. However, if you have any queries, or if you need any sort of technical guidance, then in that case, reach out to us at +1-888-510-9198, and our technically sound QuickBooks ProAdvisors will answer all your queries immediately.
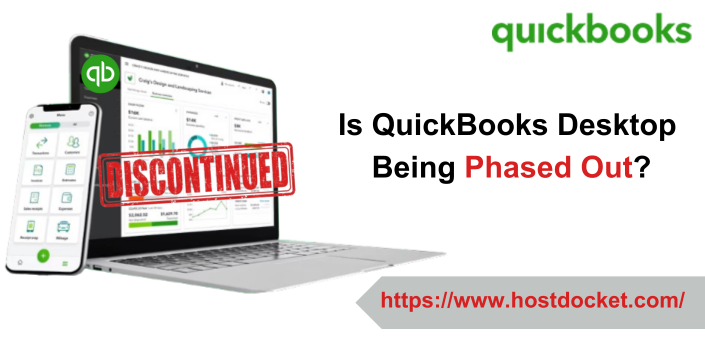
Is QuickBooks desktop being phased out? Is QuickBooks discontinuing desktop versions? Will there be a QuickBooks desktop in 2025? What is replacing QuickBooks Desktop Pro? Well, a lot of such queries are troubling QuickBooks users these days. QuickBooks is planning to stop selling several products to U.S. new subscribers after July 31, 2024. The existing customers have certain queries regarding this change. In this segment, we are going to answer these queries of yours. Let us find out what this mystery of QuickBooks being discontinued is all about. However, if you need expert assurance at any point in time, then in that scenario, feel free to connect with our technical support team at +1-888-510-9198, and we will answer all your queries immediately.
Note that, the existing subscribers are not impacted by this change. The existing QuickBooks Desktop Plus and Desktop Payroll subscribers can continue to renew their subscriptions after July 31, 2024. According to Intuit, they will continue to provide security updates, product updates, and support for existing subscribers. Moreover, QuickBooks desktop enterprise products are also not impacted by this change and the customers can continue to purchase enterprise subscriptions post July 31st, 2024.
Are current subscriptions for Quickbooks Desktop Pro Plus, Premier Plus, Mac Plus, and Desktop enhanced payroll going to be discontinued?
QuickBooks Desktop Pro Plus, Premier Plus, Mac Plus, and Desktop Enhanced Payroll won’t be discontinued at this time. This stop-sell is only for new purchases, and not a complete discontinuation of this QuickBooks desktop product line.
The existing subscribers of these products can continue to renew their subscriptions after July 31, 2024. The stop-sell will further most probably impact new subscription purchases. The security updates, product updates, and support for existing subscribers will continue.
Can a new customer buy QuickBooks Desktop Plus or Enhanced payroll products before July 31, 2024, and continue to renew?
Any customer who has purchased a QuickBooks Desktop Plus product or enhanced payroll subscription prior to July 31, 2024, will be able to continue to renew after July 31, 2024.
How to purchase QuickBooks Desktop Plus (Pro, Premier, or Mac) or Desktop Enhanced Payroll before the cut off date?
In order to purchase QuickBooks Desktop Pro, plus, Premier Plus, Mac Plus, or desktop enhanced payroll prior to July 31, 2024, you can connect with the sales team or reach out to us right away.
Is it possible to renew a suspended QuickBooks Desktop Plus Subscription?
Yes, it is possible to renew your suspended QuickBooks Desktop Plus subscription. For any billing or payment issues, you will also be notified via email and Intuit will provide a grace period of 30 days to renew after the final notice is sent out.
Well, QuickBooks Enterprise isn’t affected by this stop sell of QuickBooks for new customers after 31, 2024. The new enterprise customers can further continue to purchase QuickBooks enterprise subscriptions from phone sales agents and online after 31st July 2024. The current Enterprise customers are also not affected by this discontinuation of QuickBooks Desktop to new customers and can continue to renew their subscriptions upon the renewal dates.
What are the best Intuit account software options to purchase after the stop sell date of July 31, 2024?
It is suggested to consider QuickBooks Online, as Intuit has continued to innovate and improve it. QuickBooks Enterprise will be another great solution as a desktop accounting solution.
What payroll options can be purchased after the stop-sell date of July 31st, 2024?
Talking about QuickBooks enterprise, you get multiple software packages with payroll included. Customers who prefer payroll services beyond issuing paychecks can further go for QuickBooks online payroll. It includes benefits like automated tax management, time tracking, HR support, health insurance, 401(k) plans, and more. Certain fees might apply.
How to migrate QuickBooks desktop file to QuickBooks Online?
It is possible to migrate from QuickBooks desktop to QuickBooks online with much ease. You can check out our detailed QuickBooks Migration Tool article or another detailed article i.e., Move QuickBooks desktop to QuickBooks online, to understand the process in detail.
What if you are currently using an unsupported version of QuickBooks desktop?
It is essential that you use an active and supported version of QuickBooks, else you won’t be able to access live technical support, in case you run into issues or have access to any of the other Intuit add-on services that can be integrated with QuickBooks desktop. This further includes QuickBooks desktop payroll, QuickBooks desktop payments, and online bank feeds. The unsupported versions also don’t receive the latest critical security patches and updates.
Moreover, Intuit recommends that customers on standalone QuickBooks desktop pro, premier, or Mac versions 2021 and older try moving to QuickBooks online. There you will get more efficient workflows and flexibility to work from anywhere. Whereas, the users looking for a desktop version can purchase a QuickBooks desktop plus subscription prior to July 31st, 2024.
Towards the end of this segment, we hope that the information discussed above might be helpful enough to make the right decision. Just in case you have any queries, then do not hesitate in connecting with our technical support team at +1-888-510-9198, and they will provide you with instant support and guidance.
When you deposit multiple payments in a bank, it combines different payments into one. Thus, until you know what payments are combined and what payments you need to record, an undeposited funds account comes in handy. The undeposited funds account in QuickBooks keeps a record of payments in QuickBooks till you physically deposit the same payments at the bank. Until you have your deposit slip and know what payments your bank has combined, you can deposit payments into undeposited funds in quickbooks. After you have the complete info, you can combine them as needed. After you get the slip, you can combine payments from undeposited funds into a single record. This ensures that your QuickBooks matches your bank records.
This process is different for QuickBooks online and desktop, so here we are with this segment containing information on depositing payments into the undeposited funds account in QuickBooks online and desktop. To learn further, you simply need to read this segment carefully. You can also connect with our technical support team at +1-888-510-9198, and our experts will help you with your queries.
Deposit Payments into Undeposited Funds in QuickBooks Desktop
For QuickBooks Desktop, you need to consider the following steps to put payments into the undeposited funds account before you combine them.
Step 1: Put payments into the undeposited funds account
Payments processed with QuickBooks payments:
In case you process invoice payments using QuickBooks payments for desktop, then QuickBooks will take care of everything. You will not have to combine payments or move them to an account.
Invoice payments you process outside of QuickBooks:
However, if you follow the workflow to receive payment for an invoice, then QuickBooks will put them into undeposited funds. Head to the next step and deposit the payments in such a scenario.
Sales receipts for payments you process outside of QuickBooks
By default, QuickBooks will put sales receipt payments into the undeposited funds account. You will only have to create a sales receipt and QuickBooks will take care of the rest.
If you would rather opt for an account you put payments into:
Head to the edit menu and choose preferences.
Now, opt for payments from the list. Move to the company preferences tab.
Go for and uncheck the use undeposited funds as a default deposit to account checkbox.
The last step is to go for the ok tab.
Select an undeposited fund or another account each time you create a sales receipt.
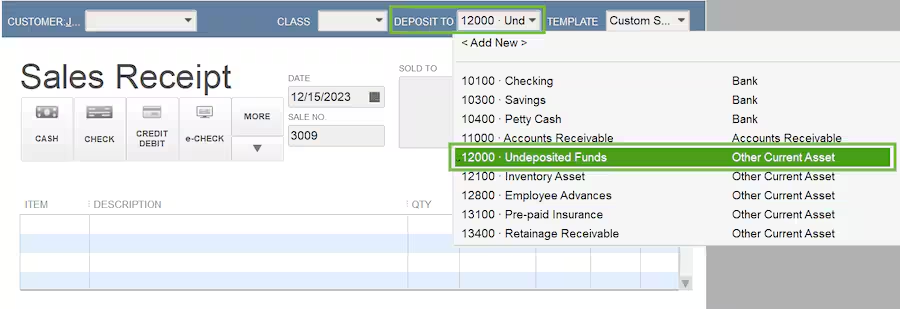
On the homepage, choose Create Sales Receipt
After that, choose a customer from the customer dropdown menu
The next step is to select undeposited funds from the deposit to drop down.
Then, enter the rest of the information and fill out the form.
Choose save and close or save and new.
It is recommended to always review the deposit to field, so you know where your payments are going.
In case your bank records a single payment as its own, then the need to combine it with others is eliminated. You can further put the payment directly into an account and skip undeposited funds.
When you have your deposit slip in your hand, you can record a bank deposit and combine payments successfully in QuickBooks. All the payments in the undeposited account will show up in the bank deposit window.
Other Steps: Review your undeposited funds account
It is good to check the undeposited funds account and further clear out any payments waiting to be moved.
Here, you need to choose a chart of accounts from the lists menu
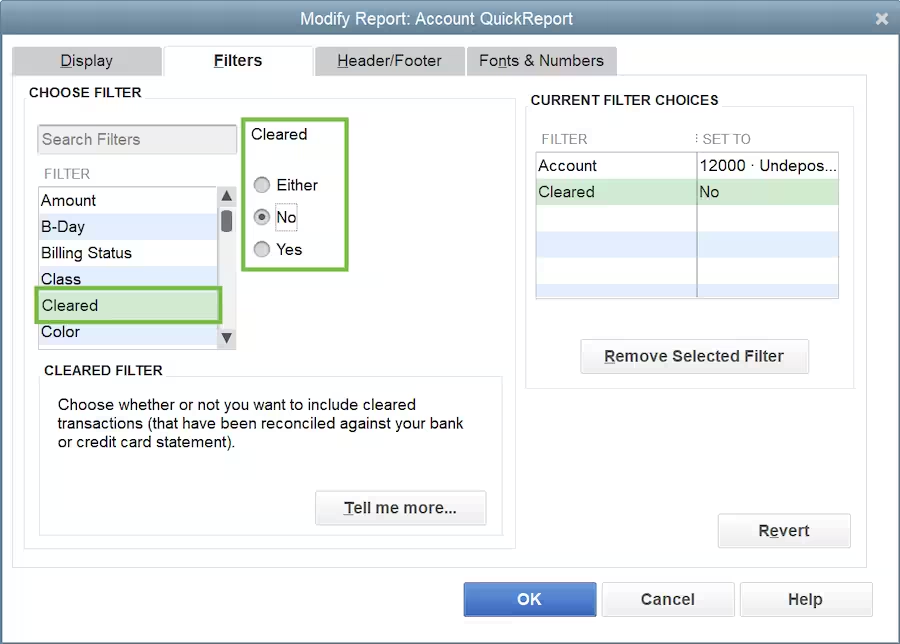
Now, right-click the undeposited fund and choose Quickreport: undeposited funds
The next step is to select all from the date dropdown menu
After that, choose Customize report
Go for the filters tab and then scroll down the filter list and choose cleared.
In the cleared section, choose no. Also, choose the ok tab.
The report lists any transactions that are remaining in the undeposited funds account. In order to add these payments to the deposit, you can make a bank deposit.
Steps to Deposit Payments into Undeposited Funds in QuickBooks Online
If you are a QuickBooks Online user, here is what you need to do, in order to put payments into undeposited funds account in QuickBooks Online:
Step 1: Put payments into the undeposited funds account
You simply have one undeposited fund account. This can be used to hold all payments you need to combine and group together. You will be able to decide which account in QuickBooks to put the deposit into when you combine.
You can carry out the below guidelines to process payments and enter transactions in QuickBooks:
Transactions you download from your banks and credit cards
In case you connect your bank and credit card accounts, then QuickBooks will download all the transactions. You simply have to combine downloaded transactions or use undeposited funds since QuickBooks already has the info from the bank. Simply categorize your downloaded transactions.
Transactions processed with QuickBooks payments
QuickBooks manages the invoice payments processed with QuickBooks payments for you. You don’t have to put these in undeposited funds. In case you need to combine payments processed outside of QuickBooks payments, then perform the steps in the next sections.
You need to opt for + New tab
Furthermore, choose receive payment
And then, choose a customer from the customer dropdown
After that, go for the checkbox for the invoice you are receiving payments for
Now, from the deposit to dropdown, choose undeposited funds
The next step is to enter the rest of the form.
The last step is to choose save and send, save and new, or save and close
Sales receipts for payments you process outside of QuickBooks
Go for + New
Then, choose the sales receipt
After that, go for the customer from the customer dropdown
The next step is to choose undeposited funds from the deposit to drop down
Now, enter the rest of the sales receipt
The last step is to choose save and send, save and new, or save and close
Note that, you should always review the deposit to field so that you know where your payments are going. In case your bank keeps a record of a single payment as its own, then you need not combine it.
With a deposit slip in hand, you need to simply record a bank deposit and combine payments in QuickBooks. All the payments in the undeposited funds’ account will appear in the bank deposit window automatically.
Other steps: Review the undeposited funds account
We recommend checking your undeposited funds account to clear out any payments waiting to be deposited. This can be done as follows:
Head to the settings tab and choose Chart of accounts
The next step is to find an undeposited funds account on the list
Now that we have reached the end of this segment, we believe that the information shared above might be of some help in depositing funds in an undeposited account in QuickBooks online and on desktop. However, if there is any query remaining, then in that case, you can try reaching out our technical support team at +1-888-510-9198, and they will answer all your queries immediately.