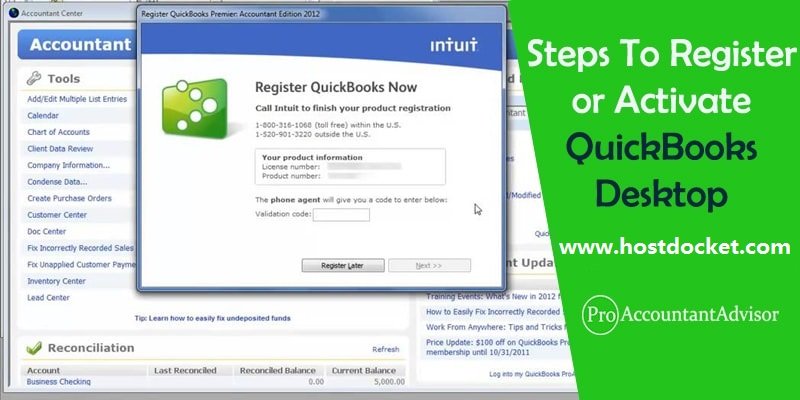
Installing QuickBooks isn’t the last step, there is a further process that you need to follow. You will be asked to activate your QuickBooks software. In case, you have one or more than one copies of QuickBooks Desktop application then it is necessary that being a QB user, you activate or register each copy manually. To help you in registering or activating QuickBooks, we have come up with this segment right here sharing the complete steps to register or activate QuickBooks desktop successfully.
Important: Make sure that the Internet Explorer 11 with TLS 1.2 has been enabled in the Windows & Mac Operating Systems. You can notice that after May 31, 2018, to access the Intuit services all the connections in the QuickBooks must have these minimum system requirements.
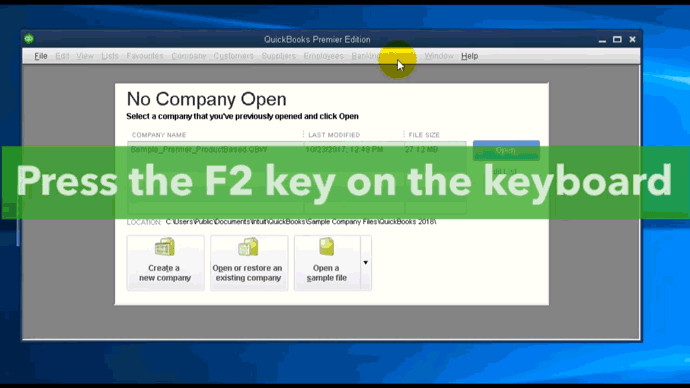
Always confirm that the QuickBooks is ACTIVATED or NOT by pressing key “F2” OR “CTRL+1”.
In case you see that QuickBooks is ACTIVATED then you are set. If not then jump to the activation.
If you get the error “The validation code is wrong” then confirm that:
Make sure that License and the Product number is correct. If in case the product number doesn’t match the license number then change the product number first before moving forward with the activation.
The validation code is right.
How to Register or Activate QuickBooks Desktop?
QuickBooks Desktop for 2016 and Later Versions
QuickBooks Desktop For Windows Computers:
Once you successfully installed the QuickBooks software, you need to activate it before getting started. A screen will appear to activate the software. You can also activate it manually with the below-given steps:
First of all, Open the QuickBooks and press the “F2” key on the keyboard.
After the ‘Product Information’ window opens where the user has to check for the registration status at the right-hand side of the ‘License number’.
You are good to go if QuickBooks reads ACTIVATED.
In case, QuickBooks is NOT ACTIVATED then follow the given steps below:
Select the “Ok” tab and it will close the ‘Product Information’ window.
Now, go to the “Help” menu and click on the “Activate QuickBooks” option (select Register QuickBooks for 2016).
Continue to follow the on-screen prompts and verify your details, and finish the activation process.
QuickBooks Desktop For Mac Computers:
Open the QuickBooks and go to the “menu” tab.
Select the “Register QuickBooks” option.
Type-in the “License Number” and “Product Number” in the information dialogue box, and then select the “Next” tab.
Choose the “Register Online” option.
Follow the on-screen prompts and complete the registration (in case the register option doesn’t appear, it means the software is already registered).
For QuickBooks Desktop 2016 and Earlier Versions
Intuit has discontinued the older versions before to the 2016 version. However, discontinued products can’t be registered for the first time.
The re-registering of discontinued items is possible if they were registered previously and their re-installation is going through. If you need a validation code, you can also contact us to receive it (Note: Charges applicable).
Note: The discontinued products are no longer provided any support.
Steps to Activate QuickBooks Desktop your Intuit Account
Well, the activation screen in QuickBooks usually offers an option to users to either activate using an existing Intuit account or further create a new one. In case you do not have an Intuit account, then make sure to fill in the necessary information to create user ID section and complete the activation process. Note that on the registration form that follows, the phone number and ZIP code are pre-filled depending upon the company file you had opened up.
If you go for creating an account, then continue to discover the message when opening QuickBooks. If you have an existing Intuit account, then enter the user ID and password to initiate the activation process. Perform the below steps to retrieve them:
Move to https://www.quickbooks.com/account
After that, click on I forgot my user ID and password link.
You now have to enter the registered email, phone number, or User ID.
Once done with that, provide the code received. And, now you will see the user ID and can reset the password.
The last step is to end the process and log in again.
Issues that occur with registering or activating QuickBooks Desktop
In case of the entered information is not being accepted, then you should check and ensure that the information entered is the same you provided at the time of purchase.
If you face a blank screen or error message or any other technical issue, you can try disabling (temporarily) your antivirus.
I hope you found this article helpful to activate your QuickBooks desktop. However, if you face any difficulties while installing and registering this software then you can consult with our Intuit certified ProAdvisors team that can help you in your troubles. Still have any queries? Don’t worry our QuickBooks support team is available 24*7 and can be reached at +1-888-510-9198. The professionals are highly experienced and capable to resolve all accounting issues in no time.
FAQs Related to Register or Activate QuickBooks
How do I register or activate QuickBooks Desktop?
In order to activate QuickBooks, you can perform the steps below: 1. At first, open QuickBooks 2. From help, you need to choose activate QuickBooks desktop. 3. Perform the onscreen steps to verify your info.
Do I need to register QuickBooks Desktop?
After installing QuickBooks successfully, you can activate the license by performing the steps. In case your license is not activated, then QuickBooks will prompt you to do so after installing the application on desktop.
Why do I have to register QuickBooks?
Registering Intuit QuickBooks accounting software will give you access to technical support and further keeps you updated by notifying you when new QuickBooks versions are available.
What is a QuickBooks license?
You can buy licenses in case you need more users to access a QuickBooks desktop company file at the same time. QuickBooks Desktop Premier lets 5 users to work in the same company file.
Making QuickBooks Issues Simpler by Appointing QuickBooks Support
The versatile software, QuickBooks by Intuit have gained popularity all across the globe. From big multinational companies to medium sized firms to entrepreneurs to small businesses, everybody has found this to be one of the best accounting software available in the market. With the coming of QuickBooks accounting and bookkeeping has become easier. This software comes with many features other than helping users with accounting. In fact, many companies have integrated it with their daily workflow management and this have benefited them a lot.
Even though QuickBooks is the best accounting software, it does have technical issues. Users often face errors that affect their business operations. Some issues can be solved but for few users needs expert advice. That is when they require QuickBooks Support & help Services.
The best thing about availing QuickBooks support services is that they are available 24/7 and in addition to that you can get instant solution to the problem which can solve your issue in few minutes. You will get the support services either through phone or through remote access. Give us a call at +1-888-510-9198, and we will provide you with immediate support and assistance. Our technically sound team will ensure to cater you with the best possible support and assistance.
With the advent of QuickBooks Support services, now even the most critical error can be solved in a short span of time. Reach us at +1-888-510-9198 for any type of errors or query regarding QuickBooks and our expert technicians will be ever ready to guide you with solutions and suggestions.
FAQs Related to Appointing QuickBooks Support and Issues
How do I get support from QuickBooks?
In case you need any sort of technical assistance for QuickBooks, then you can simply reach out to our technical support team at +1-888-510-9198, and we will provide you with immediate support and assistance for all sorts of QuickBooks related queries.
How do I fix QuickBooks problems?
You can run QuickBooks install diagnostic tool to fix common install issues. The further steps involved here are: 1. At first, open QuickBooks tool hub, and further choose installation issues. 2. Once done with that, go for QuickBooks install diagnostic tool. 3. You now have to restart your system and start QuickBooks desktop when the tool finishes and further open your data file.
What is QuickBooks script error?
QuickBooks script error is associated with the settings of the internet explorer. QuickBooks uses internet explorer and when you try to access a web page from QuickBooks, the same might refuse to load up or not be of your use.
What is QuickBooks error 517?
QuickBooks error code 517: Invalid Company File Path- 2. Furthermore, this error indicates that the company file path is invalid and you would have to provide a valid company file path and click on Set up QuickBooks connection button.
Prepare QuickBooks data files backups to Survive a Computer Crash
A computer crash occurs when a software or operating system or any other computer program stops working and exits. It’s better to be prepared for such crashes as there isn’t any complete and foolproof mechanism to prevent them. A system crash or hard drive fail is an intimidating issue for QuickBooks users too. Knowing that you lost all your data can be an irreparable loss. One computer crash and you may lose your essential documents, emails, contacts, user profile, password, bookmarks and more.
This blog post is aimed to prepare you well to cope up with such unpleasant and unwanted moments. Learn the steps to prepare QuickBooks data files backups by going through this piece of writing. With the right preparations, you can overcome even the worst conditions. Here is how you can stay ready for a computer crash. However, if you need any sort of technical assistance at any point in time, then do not hesitate in connecting our tech support professionals at +1-888-510-9198, and we will provide you with immediate assistance.
Here is your step by step guide to prepare QuickBooks data files backups:
Keep Backups of Your Data Files
You must always create copies of all your essential files and store them in one or more locations to not lose them. This is the thumb rule to safeguard your backups. Virus and other malicious software affect computer data, and thus most people save data flash drive or CD. You should be aware of such unwanted items that may harm your computer or data by regularly making the backups of your company file. This step would ensure the security of your essential data.
Create Backups Periodically
You should consider creating the backups of your data and files periodically. Now if you ask how often, then there is no particular answer to it. This depends on the sort of work you perform on your computer. For instance, a writer should consider creating backups of his work once or twice in a month. It professionals can create the backup of their work every week. Business owners or curators can perform daily or weekly backups depending on the quantity of the data to be secured.
Hire IT Professional
You can hire IT professional to safeguard your vital data. They make sure that the networks your computer and other devices are connected to are safe. By making sure that your anti-virus and other safety feature are updated and working appropriately they leave almost no scope for malicious software to harm your data. Also, they make sure that your systems receive a permanent supply of power so that you don’t lose your system data if the power goes off.
Many of us keep wondering that how often we should create backups for our system data and where to store them. Now, creating backups is also no easy task, and many of us may find taxing. There is one very simple answer to all such questions and doubts – create backups as often as possible. You can create keep on creating daily, weekly or monthly backups depending on the requirement of your work and dependency on your computer data. But make sure that you don’t keep postponing it.
Flash drives, CDs, and external hard drives are among the best tools to store the backups. You can also save your data on NAS or cloud store. External may have large space to accommodate your data, but they are not very portable. Thus you should always handle such tools with care.
NAS (Network Attached System) is like a system with similar costs and requirements. It needs to be configured to not be accessible directly from a system as a system drive. This is an excellent choice, but it may be very expensive.
Save time by moving your data on cloud
Keeping our essential data in the cloud is presently the most popular and affordable solution to keep your data from being lost. Storing your data real time in the cloud is very simple.
However, if you are making a backup with a cloud, you should ensure that no one else has access to it and its safe. Cloud backups are located on your network, and thus you should use it carefully.
This is also convenient for QuickBooks users as moving QuickBooks data to cloud is also very easy. In case you don’t have IT support and some file crashes, you can easily move the data to a cloud.
Cloud Save your Data – is a major feature of cloud hosting providers and it monitors and safeguards data of the users using standard security. Moving data to cloud is simple and saves you a significant amount of time.
We discuss here many ways to secure data and recover from a computer crash.
We hope that you find this article helpful. If you still have any doubt or you need assistance in protecting your essential data you can write to us or reach us at +1-888-510-9198. Our QuickBooks data recovery team will provide you the right tips & solutions to save your important data files from being damaged or lost.
FAQs Related to Lost QuickBooks data files due to computer crash
How do I recover a lost QuickBooks file?
You can restore a backup company file to recover a lost QuickBooks file. The steps involved are: 1. Head to the file menu, and further choose open or restore company. 2. You now have to choose restore a backup copy and hit next. 3. Once done with that, choose a local backup and hit next. 4. Browse your system for a backup company file. 5. Choose a folder to decide where to save your restored company file.
How do I reinstall QuickBooks after computer crash?
You can remove and then install QuickBooks by performing the steps in the control panel. This will help you start working on QuickBooks afresh.
How do you resolve data damage on your QuickBooks company file?
You can try repairing the company file using the rebuild data tool. The steps involved are: 1. Head to the file menu and hover over the utilities tab and choose rebuild data. 2. After that, choose ok tab. 3. You now have to let the tool repair your file. 4. When the tool finishes, hit ok tab. 5. Move to the file menu and let the tool check your file for data issues.
How do I find my QuickBooks data file?
The default location of a QuickBooks desktop company file is C:\Users\Public\Public Documents\Intuit\QuickBooks\Company Files.
Each year QuickBooks comes up with some amazing features and functionalities in its new version, and the QuickBooks Desktop Premier 2022 is no exception. The software rolls in with some amazing features and functionalities and fixes a lot of technical issues that you might face otherwise. This segment shares the complete information about QuickBooks Premier 2022 and will definitely help you get the latest update of QuickBooks.
This article describes how QuickBooks Premier Work and what benefits do this version provides? The QuickBooks Premier can install for up to five industry-specific desktop editions by using one user license. When connected to a network up to five users can work for company data altogether on a same time and this reduces their work stress.
QuickBooks 2022: The Advantages
As below-mentioned, we have described some of a few benefits of this QuickBooks Premier version that concurrent work for at least five users. Benefits of QuickBooks Premier as:
It’s easy to make a setup, plugged, and play feature and easy to learn.
Can create SO (Sales Order) and can also track back orders for payment follow ups.
Additionally, see all your performance and growth of your business where it stands by giving one click and check the status in your QB software.
Work done by significantly faster across multiple five monitors.
Easy to access the data file from different location.
Instantly locate items with complete inventory tasks at one place by using Inventory Centre in QuickBooks.
Further, track your bills record timely & material, we work best for our unique business to grow at high-level.
Creating GST professional invoices instantly.
No need to gain accounts knowledge.
Match your income through this version by automatically.
Keep control on further cash flow.
Accelerate growth of an organization.
Helps to managed all bills and account payables. The main responsibility is to keep the clients happier and gladder.
Memorized transaction helps to bring a speed up your data entry. If troubling somewhere then takes technical assistance provided by our certified experts.
Online Banking procedure will set and keep your QuickBooks account up-to-date.
Printing checks is a finest option where end users can increase their work efficiency. It eliminates the unnecessary data or files which an accountant has entered in this software version. If facing problems in using this version, then contact at QuickBooks Premier Customer Support Number.
Financial Reporting is basically made for small or a medium sized business.
Without running or analyzing all financial reports that performs bookkeeping to a full capability.
Understand the enhanced features of QuickBooks desktop premier 2022:
Get Automated Financial Reports
A user can see the status of their accounting bookkeeping reports. Through this a user can see automated system where they can send or receive automated data. Emails can schedule in timely.
Search by the Chart of Accounts
Search anything through the chart of accounts, whatever as like stored names, their account numbers including address and transaction amount that is more than quicker by this autocomplete feature in QB premier.
Bill Tracker
Instantly track your bill and status of your created bills consisting purchase order. This is easy to keep all record of bank transactions.
Report Filters
In this way, you can apply data filters to reports so that an accountant can simply scroll & find your basic requirement in an easiest manner.
The QB premier version is now run on smartphones where a user can access their valuable data in a quick way. It can work from anywhere or at any time.
Improved computing power (64-bit)
QuickBooks Desktop Premier Plus includes improved utilization of the 64-bit processors found in most computers to maximize performance and stability, making it up to 38% faster*. You’ll be able to maintain seamless third-party integrations by using the developer-preferred infrastructure and get the peace of mind that comes with knowing QuickBooks meets modern operating system standards.
Schedule and pay bills faster in QuickBooks
Save time by scheduling and paying bills in QuickBooks. Use the funding source you choose and a digital or physical form your vendors prefer. QuickBooks automatically marks the bill paid and notifies you once the money is sent. Gain financial flexibility by paying vendors from a card or bank transfer, then having the money sent via physical check or bank transfer.
Upload bills with the Desktop mobile app
Save time by automating bill entries using the QuickBooks Desktop mobile app. Just photograph, import, and review. Have your vendors send email invoices directly to QuickBooks, which will automatically draft bill transactions for your review. Stay organized by attaching files to bill transactions for simplified audit trails.
Attach documents to transactions
Attach documents to transactions faster by directly uploading them via the QuickBooks Desktop mobile app. You can even attach multiple documents at once. Eliminate the need to store physical documents and stay organized.
Customize bill payment stubs
Maintain professional and consistent communications by emailing customizable bill payment stubs to your vendors. Save time by immediately emailing bill payment stubs to one or multiple vendors at once. Easily edit your logo, formatting, balance-paid-to date, and other required billing information, all from within QuickBooks.
Above article describe what are the benefits & its usage for QuickBooks Desktop Premier 2022 Version. Also mentioning its new excellent features. If you have any questions or want to know more about this marvelous software, please contact us at +1-888-510-9198 and speak with one of our Intuit Certified ProAdvisor who can assist you in a better way. If you are looking for technical support for QuickBooks Premier then contact us by email, chat or remote on-site facility.
What new features are available in QuickBooks Desktop Premier 2022?
QuickBooks Desktop Premier 2022 comes with a variety of new and enhanced features, including automated bank feeds for smoother transactions, improved inventory management with centralized purchasing, and a customizable payment receipt format. Additionally, you’ll find advanced reporting capabilities and a streamlined setup process to get your business up and running quickly.
How can I get support for QuickBooks Desktop Premier 2022 if I encounter issues?
If you run into any problems or need assistance with QuickBooks Desktop Premier 2022, you can contact the QuickBooks support team. Give them a call at our toll-free number +1-888-510-9198. They’ll be happy to help you with any questions or concerns you may have.
Can I upgrade from a previous version of QuickBooks to Desktop Premier 2022?
Yes, you can easily upgrade from a previous version of QuickBooks to the Desktop Premier 2022 edition. The process is designed to be seamless, and all your existing data will be safely transferred to the new version. Just follow the step-by-step instructions provided by the software, and you’ll be up and running with the latest features in no time.
Is QuickBooks Desktop Premier 2022 compatible with third-party applications and integrations?
Absolutely! QuickBooks Desktop Premier 2022 is designed to work seamlessly with numerous third-party applications and integrations to enhance your accounting and business management experience. You can find a wide range of add-ons in the QuickBooks App Store, including inventory management, CRM, payroll, and more, tailored to fit your business needs.
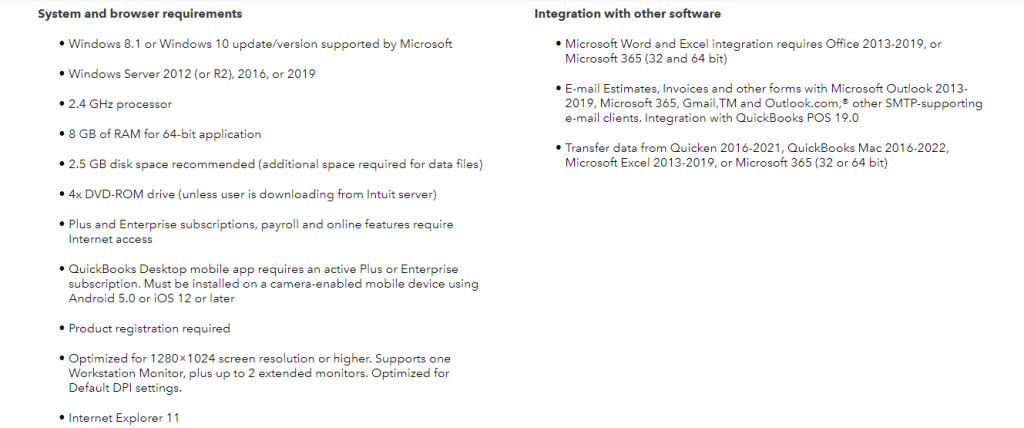
What are the system requirements for QuickBooks Desktop Premier 2022?
To ensure optimal performance and compatibility, QuickBooks Desktop Premier 2022 requires a Windows operating system (Windows 8.1 or newer), a 2.4 GHz processor, 4 GB of RAM (8 GB recommended), 2.5 GB of disk space, and a stable internet connection for updates and data sync. If you’re unsure whether your system meets these requirements, don’t hesitate to contact our support team at +1-888-510-9198 for guidance.
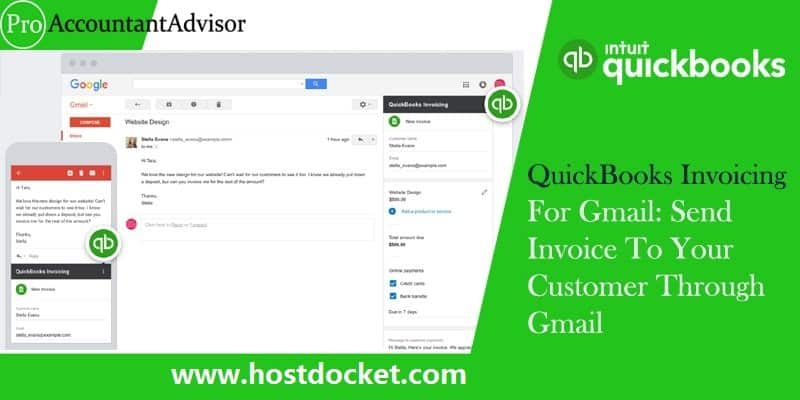
Send Invoices From QuickBooks To Gmail – An A To Z Guide
After QuickBooks Online teamed up with Google, it has been as simple as possible for you to invoice your clients from within your Gmail inbox. An add-on, QB invoicing for Gmail is entrenched within the inbox of your Gmail account and is simple to us. With this feature, you can now create invoices for your customers from the data available in your email. After an invoice is created in Gmail, it will be synced to QuickBooks Online. Intuit has also launched an app called “QuickBooks invoicing for Gmail” to make the work of the business owners simpler. The app is highly recommended for small businesses.
To learn further about the process to setup QuickBooks invoicing for gmail, you need to read this article carefully till the end. Or you can also get in touch with our technical support team in case of any queries. Give us a call at +1-888-510-9198, and we will provide you with our technical support assistance.
You can install “QuickBooks invoicing for Gmail” and create the invoicing.
There are multiple QuickBooks apps, thus you should be careful while establishing this app in choosing the appropriate app.
Then return to your “Gmail dashboard” and open “Email inbox” and find the “QuickBooks icon” on the right.
Click the “QB” icon and then the “Authorize Access link“.
Allow the app to access your account.
Find the option that would allow you to connect existing account or to “Sign up” for a “New account“.
When we use more than one accounts or any other client account, click the “Add app” to firm link.
Connect QuickBooks invoicing for Gmail app to your firm for testing.
Click the “Confirm tab” and get connected and ready to create the invoice from Gmail.
Now, you can open an email message to create an invoice, and while creating and viewing an invoice, click the “QB” icon and new invoice window would open on the right.
You can easily add your logo to an invoice using both “Gmail and QuickBooks invoicing”.
Look at the top of the screen, and you will find your “Company logo” added there. It will automatically show on invoices. This can also be added in the app settings.
When you “Send an invoice” to a customer and that customer’s name already exists in your QuickBooks online support list, the invoice will be added to the account.
In case the name of the customer is not in the existing list then a new customer need to be added to the QB Online list so that you can search it later with the client name.
If the customer “Email address” is occupied from Gmail message, you can click the link to “Add a product” or “Services” or add a “New item” here.
This act will also set the due date for the invoice.
You can also “Create a message” for the invoice instead of the default one available for you to use.
Adding the Product services
If you type a name of a product or service line, a matching list will appear. This list automatically shows up from QuickBooks Online product and service list. If you find other names from matching list, you can easily add those product or services to your list.
Fees for QuickBooks Invoicing Subscription
This feature has no monthly subscription fee. However, a transaction fee will apply if your customers pay invoices online.
Bank & Credit Cards Fees: For Bank Transfers the cost will be $1.50/transaction and for Credit Cards, the cost is “2.9%+ 25 cents/transaction“.
In the rate field, you can find the options of Flat rate, By Hour, or By Quantity.
Buy Hour: If you select “by hour” option, you will be asked for the hours or quantity.
You can change or edit the Description and Price sections.
Taxable Switch: Taxable Switch determines when sales tax is to get applied to this product. In case the product is marked as a taxable item, it would show as being taxable here.
When you click Add button to include this to the invoice and return to the invoice, you can easily point out that the item and a sales tax line has been added.
If sales tax is default to your existing QuickBooks Online account settings, you can easily edit this setting.
The term field will have the following options:
Due today
In 7 days
15 days
30 days Custom due date
In case you choose Custom due date, you can put in a specific date.
There might be some questions that may be arising in your mind after completing the invoicing for Gmail. Here we have included some of the most probable queries for you:
✔ Question: Is it possible to send a copy of the invoice email to self?
Answer: No. You can send an invoice to just one recipient.
✔ Question: How can I add or edit my bank account?
Answer: Go on “Gmail add-on > the menu > Settings > Manage“. This section will allow you to add or edit your bank information in the new tab.
✔ Question: What are the different methods through which I can accept payments from my customers with my account?
Answer: There are two ways to accept payments:
Email an invoice to your customer stating that they can pay online.
Take a credit card detail in QuickBooks Invoicing through a Receive Payment.
✔ Question: Will there be any fee to process a refund?
Answer: No
✔ Question: How can I change the information on my account?
Answer: Click the “Gear icon” at the top and go to Accountant Settings/company setting
We hope that this blog post furnishes you with all the information you require in regards to QuickBooks Invoicing for Gmail. If you have any more questions or queries related to this topic, you can call us at +1-888-510-9198. Our QuickBooks technical support department will be more happy to help you out in this.
FAQs Related to setting up invoicing for Gmail
How do I allow QuickBooks to email through Gmail?
You need to perform the steps listed below: 1. From any open transaction or report in QuickBooks, choose email. 2. After that, choose send and you will be have to log in with the Intuit credentials. 3. Once done with that, choose continue in the webmail authorization window that opens. 4. Hit allow tab.
How do I add an email address to an invoice in QuickBooks online?
For this, you can: 1. Open QuickBooks online 2. After that, find the customer and further click on edit their information 3. The next step is to add the email addresses you would like the invoices to go to under email. 4. Now save and move back to the backend.
How do di Send an email invoice in QuickBooks desktop?
You can simply perform the steps below to send an email invoice in QuickBooks: 1. The very first step is to select the main tab at the top of the invoice form. 2. Now, choose the email dropdown, and choose invoice. 3. Once done with that, review the invoice message. 4. When you are ready, choose send option.
How to change the email address invoices are sent from in QuickBooks?
You can your customer-facing email address. 1. Choose settings ⚙ and then go for company settings. 2. You now have to select the company tab as default., 3. Further, click on edit tab to the right of the contact info section. 4. Followed by entering your company’s email address in the company email field. 5. The last step is to choose save then done to save your changes.