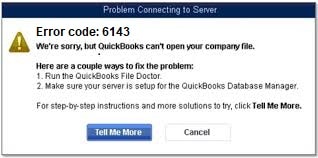
QuickBooks error code 6143 generally occurs if there is malfunction in the company files. The user can also end up in such an error when system files are corrupt. You might see a warning message on the screen when such an error occurs and as a result of this issue the window might crash, or the software might crash. Any sort of damage to the registry files can trigger this error in QuickBooks.
Also, if the Windows registry files got deleted mistakenly, then the occurrence of this error is probable. To learn more about this particular error, all you need to go through the piece of writing carefully and find out what measures can be taken to eliminate this issue in QuickBooks error code 6143. However, if you are stuck at any point in time or if you need our assistance, feel free to connect with our tech team at +1-888-510-9198 and they will provide you with instant support and assistance.
IMPORTANT:Before you implement the steps discussed below, it is essential to ascertain that Update QuickBooks Desktop to the latest version. Also, ensure to turn off the hosting on every system in the network leaving the server system hosting the company file.
There are certain factors due to which one might end up in such an error. Here is a list of the most common factors. Let us have a look:
One of the major reasons can be corrupted entries in the Windows system file
The user can also end up in such an error in the QuickBooks desktop installation is either incomplete or not performed properly
Another reason why such an error occurs on the screen is if the bank reconnects when there is a new credit card.
Damaged window system files can also lead to such an error in QuickBooks
Methods for TroubleshootingQuickBooks Error Code 6143
The QuickBooks error code 6143 can be resolved easily, by carrying out the methods enumerated in this article. Let us navigate across each of the methods one by one:
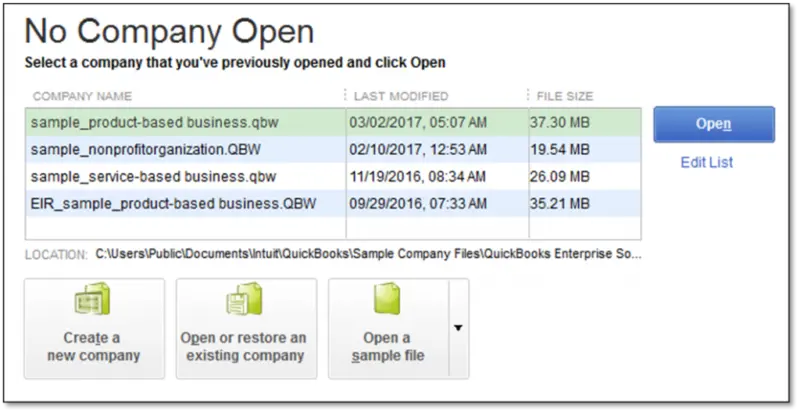
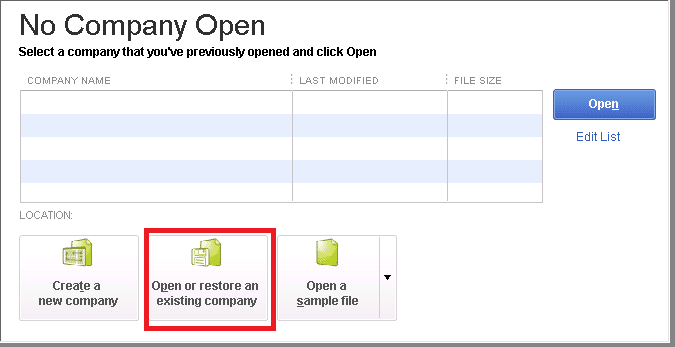
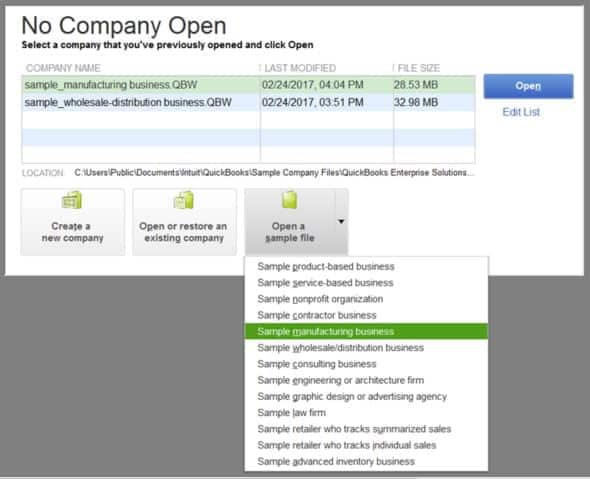
Method 1: Open a sample company file
The very first process can be to open a sample company file and check if there is any issue with the company file. The steps involved in this process are as follows:
The very first step is to open a sample file in the no company open window.
Once done with that select a file from the list of sample company files
Now, head to the next step and open the file locally.
This will open a sample company file and if the file opens, then it indicates that there is any issue with the company file. However, if the sample company file doesn’t open up, then it indicates issues with the software or any other issue
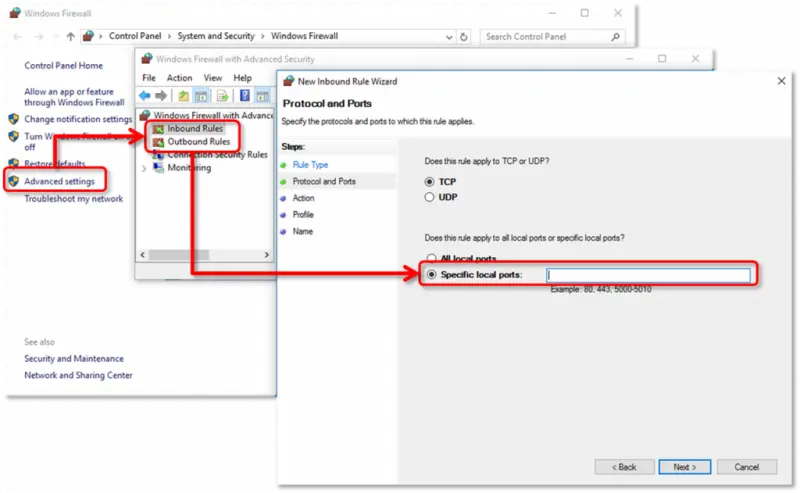
Method 2: Configure the antivirus software and firewall ports
Often antivirus or firewall ports might block the smooth working of the software. Thus, the user needs to configure the antivirus settings using the steps below.
Moreover, the user can also set up an exception for QuickBooks to the antivirus and try to eliminate this error
Method 3: Close all the QuickBooks processes.
At times the processes running in the background might trigger errors in QuickBooks. Thus, the user is recommended to perform the steps to close all the background processes.
The very first step is to log in to your system as admin.
Then press Ctrl + shift + ESC and the task manager will appear
After that head to the user tab and this will show the process running in the background
Once done with that close all tabs related to QuickBooks,
Click on the End Task tab
The last step is to close all the QuickBooks processes
Method 4: Open the company file locally to fix QuickBooks error code 6143
Often the company file itself might be triggering errors in QuickBooks. Thus, in such a situation, it is suggested to open the company file locally. This can be done using the steps below:
The very first step is to open the folder with the company file.
And then check out the QB extension and right-click on the file
Once done with that select the copy option
And then paste the file on the Desktop.
After that press the ctrl key and try to open the QuickBooks and reach no company open window.
At last open or restore the existing company and close all the QuickBooks processes and this will resolve the issue up to the certain extent
Method 5: Clear space within the file name of the company file
This measure involves the deletion of the clear spaces included within the file name of the company file.
The very first step is to right-click on the desktop icon and select the properties tab.
After the user is in properties, click on the open file location.
This move will directly take users to the QuickBooks folder.
Look for the company files folder within this folder and open the same.
The subsequent step requires right-clicking on the company file and clicking on the rename tab.
Ensure that the exist no spaces in the file name of the company file.
Click on the screen to reflect the changes made to the file name.
Open QuickBooks and double-check if the technical issue still occurs.
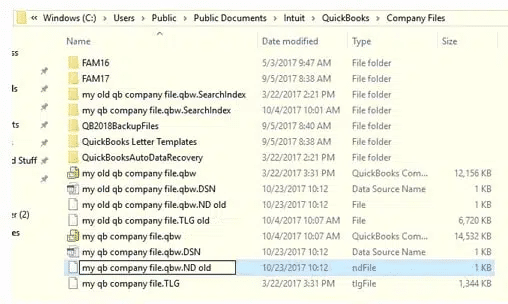
Method 6: Rename the .ND and .TLG files
Sometimes, renaming damaged files can also fix the error. By renaming the files, one might prevent QuickBooks from accessing the files. The steps to rename the file are as follows:
Access the directory containing the company files
Choose the file with the .nd and .tlg extension
Now, right-click on them and choose the rename tab
Add .old at the end of the files and click on the enter tab.
Reboot the system and check if the error continues
Now that you know what steps are involved in eliminating these sorts of issues in QuickBooks, it is time to perform these steps and try to get rid of the QuickBooks error code 6143. However, if there is any query or if the user needs our assistance at any point in time, then getting in touch with our tech team at +1-888-510-9198 is recommended. We are a team of technically sound QuickBooks professionals who work round the clock to provide instant customer support for QuickBoooks and assistance.
This error is shows up due to damage or corrupt company files, network connectivity issues, etc. The error code 6144, 304 often occur with a warning message that states: QuickBooks has encountered a problem and needs to close. We are sorry for the inconvenience.
What is QuickBooks error code 6138?
Error code 6138,-1005 signifies maybe your company file is still open in another location. It is a very general problem in QuickBooks. This problem has two resolving phases. Update QuickBooks to the latest version before performing any phase.
What is error code 6176 in QuickBooks?
QuickBooks error 6176 is an error that usually occurs due to incorrect folder permission, internet settings or firewall configuration. This error may also mean that QuickBooks is unable to fix the path to the company file.
What is error code 6143 in QuickBooks?
QuickBooks Error 6143 is a general error code that usually indicates a problem with the company file. A variety of different issues can cause this issue, such as any damage occurs to the file, or is missing. It can also show up due to incorrect folder permissions or incorrect network setup.
How do I fix a QuickBooks company file that won’t open?
Solution 1: Update QuickBooks and check your file type Solution 2: Don’t save the desktop when you close QuickBooks. Solution 3: Turn off hosting on your workstations. Solution 4: Open a sample company file. Solution 5: Move your company file.
How to move your QuickBooks Company data file from QuickBooks online to QuickBooks Desktop:
Opting for QuickBooks desktop or QuickBooks online depends upon the requirements of a business. At times, in order to meet those requirements, it becomes essential for a business to migrate from QuickBooks Desktop to QuickBooks Online. And this migration process requires you individually move QuickBooks Company file to QuickBooks online as well. To help you out with this, we have come up with this segment right here sharing the complete details about transferring QuickBooks company files data to QuickBooks online successfully. Thus, to explore further, make sure you stick around till the end, or if you are someone from a non-technical background or if you are skeptical about performing the steps manually, then feel free to reach out to our tech support professionals at+1-888-510-9198 and ask them to perform the required steps to migrate the file successfully.
Are you Sure about Migrating to QuickBooks Online?
Before you proceed with the migration, it is essential that you are sure whether this migration will turn out to be compatible for your business and its current requirements. There are certain situations that will help you in deciding whether this migration is ideal for you or not. The complexity of the company file plays a vital role in the success of the migration process. The company file stores the complete details about the company from inventory to accounting records. And when the company files are large, they are usually companies with extension histories, large inventories, and large sizes on the whole. And if such a company is using QuickBooks enterprise for the time being, then converting to QuickBooks online isn’t an ideal decision.
That simply doesn’t mean that QuickBooks enterprise users cannot migrate to QuickBooks online, but you might require some additional setup. In case you are a small or medium-sized company using QuickBooks desktop pro, premier, or premier accountant, then you can easily opt for migration.
Essential tips before moving ahead with the conversion
The process of converting the company file from QuickBooks online to the desktop can be a little tricky. However, there are certain pointers that need extra attention to avoid any kind of further mess. Here is a list of essential points that you need to focus on before implementing the steps for migration or conversion.
Often users miss out to keep a check on their internet explorer version, which can create certain issues later, especially compatibility issues. Thus, it is suggested to perform the necessary steps and check the version of the internet explorer being used. Note that the internet explorer should be windows version 10 or higher to perform the conversion smoothly. If not, then the user might need to perform the steps to upgrade to the latest version.
Another point that you can’t afford to miss out on is that the desktop software must be the 2004 edition or the latter one in the case of windows. The reason behind this can be that conversion is only possible with 2004 and later versions.
Note that the QuickBooks desktop software should be compatible with internet explorer. And internet explorer should be 32-bit. This is because the 64-bit version tends to show up an error and hinders the process.
In case you are making use of Mac version of QuickBooks, then direct conversion is not possible. And also, the process for this conversion might be different from the normal one.
Also, the user should have access to at least an invited accountant account if you are already a master or a company administrator, to avoid any kind of mess later.
The user might need an ActiveX to carry out the conversion. Thus, before performing the steps, make sure to get ActiveX.
Steps involved in transferring, migrating, or moving company file from QuickBooks Online to QuickBooks desktop
Now that the user is ready with to migrate the company file, he/she is required to perform the below steps to successfully move the company file from QuickBooks Online to QuickBooks desktop. Thus, make sure to implement the below-listed steps wisely:
Step 1: Setting up security settings in Internet explorer
The process starts with setting up the security settings in internet explorer or Microsoft Edge. The steps below are to be performed to carry out this process. Let us have a look:
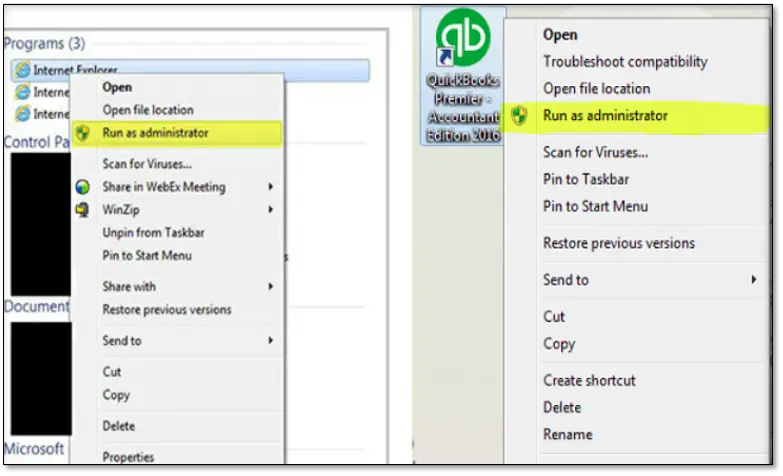
The process starts with right-clicking the Internet Explorer icon on the Run as admin option.
Once done with that, the user is supposed to click.
The user is then required to go for the Tools icon
Followed by selecting the Internet options.
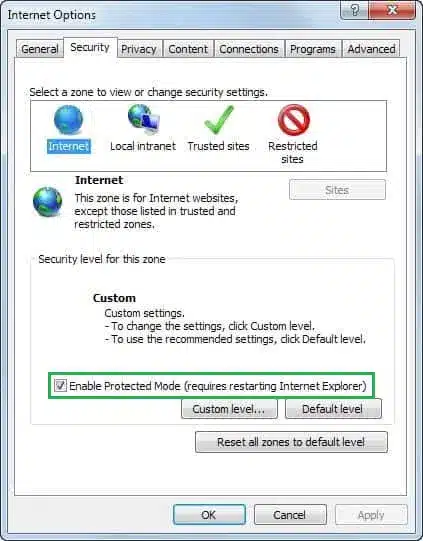
Once done with that, the user needs to go for the Security and trusted sites option.
Here, one must click on the Sites tab.
After that, in Add this website to the zone field, the user is supposed to enter: *.intuit.com and *.qbo.intuit.com
The next step is to uncheck the “Require server verification for all sites in this zone “.
And also, close the trusted sites window.
Later, go for the Apply option
After that uncheck Enable protected mode.
After that click on the Okay tab
And close and re-open Internet explorer to Disable the protected mode.
To end the process, one must leave internet explorer open.
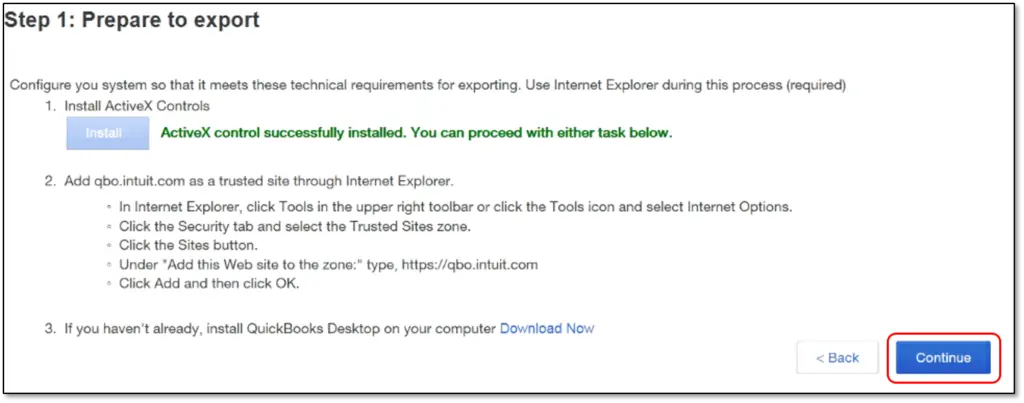
Step 2: Setting up QuickBooks desktop for Export
The second step is to set up the QuickBooks desktop for export. This process involved the below sub-steps:
At first, the user is supposed to right-click the QuickBooks desktop icon
Once done with that go for the Run as admin tab
In case the user hasn’t downloaded the QuickBooks desktop already, then it is suggested to download the trial version.
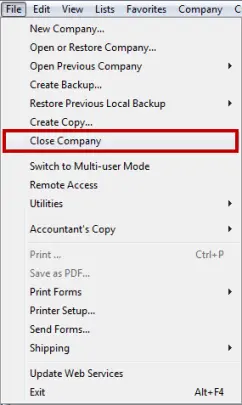
Once done with that, the user is supposed to move to the File and then go for the Close company option.
After that leave the QuickBooks desktop open at the time of completing the rest of the steps.
Step 3: Getting ready to export QuickBooks online data
After the above steps, the user will have to prepare for the export. This involves the steps below:
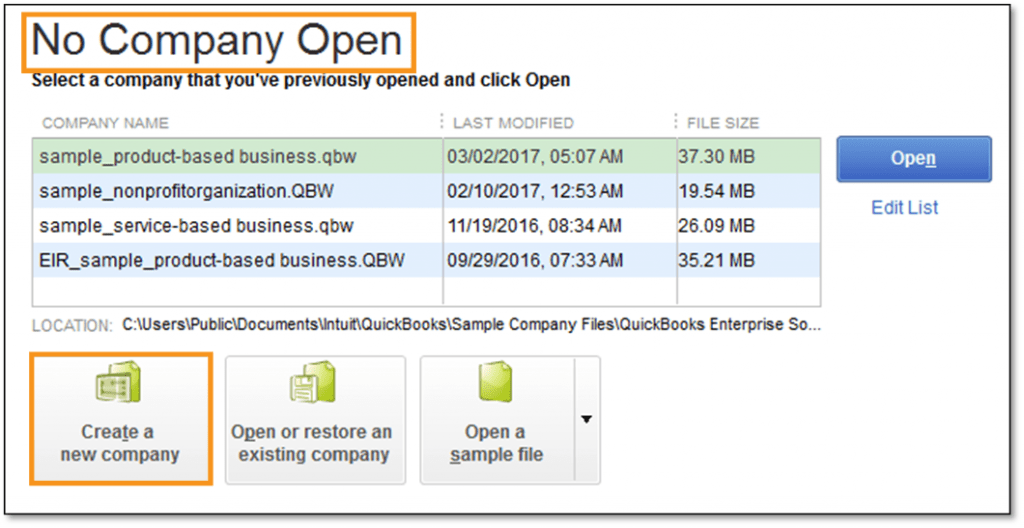
The very first step here is to open the version of QuickBooks that the company file will be converted to.
Note that the experts recommend to avoid opening the company file and also don’t go for no company open window.
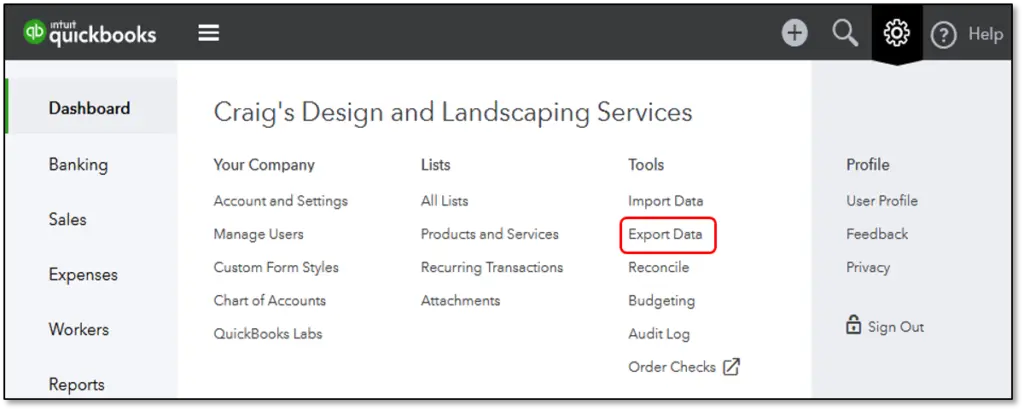
Once done with that, the user is supposed to log in to the QuickBooks Online account.
After that, opt for the Gear icon
Now, under the Tools tab go for Export data.
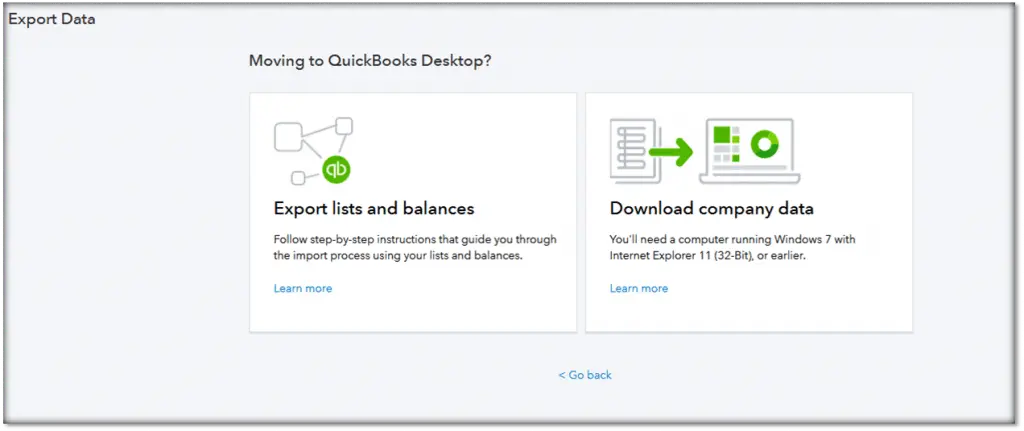
And opt for the reason from the pop-up window
Also, click on continue tab
And then, select Learn more under the download company data.
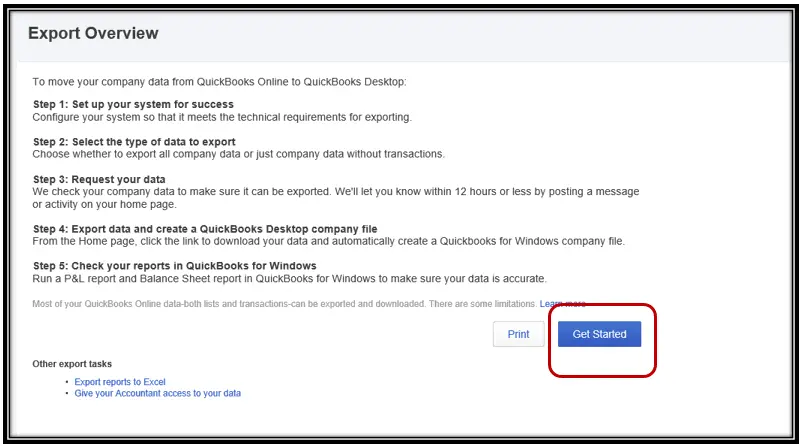
The next step is to review the Export overview.
And choose the get started tab
After that go for Install for ActiveX control
Pick to Install ActiveX Control Now to confirm the installation.
And also select to Continue after the installation comes to an end.
Now, pick the Data to export
Hit the Continue tab
Review the limitations of the data to export.
And click on the Continue tab respectively
The last step is to enter all the contact information and then choose the Continue option.
It should be noted here that the user might receive an email with steps to end the export conversion within a few minutes to hours. This depends upon the amount of data prepared.
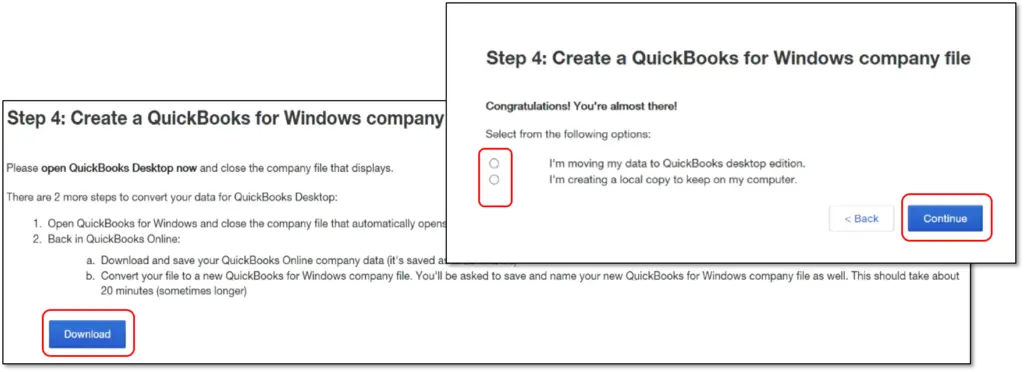
Step 4: End exporting the data
This is the last set of steps to be performed to complete the process.
At first, get back to the export page
And then, head to the setting tab
The user is then required to select the Export data in QuickBooks Online.
Once done with that, the user should perform the same steps and prepare to export the QuickBooks online data.
After that go for the Continue tab to download on the exporting from QBO page.
And switch to QuickBooks desktop.
The user needs to ascertain that No company open screen appears and also check if the company file is open
We suggest the user to visit the file and choose the Close company option.
Also, go for the preferred option
The next step is to choose the Continue option.
And click on the Download option.
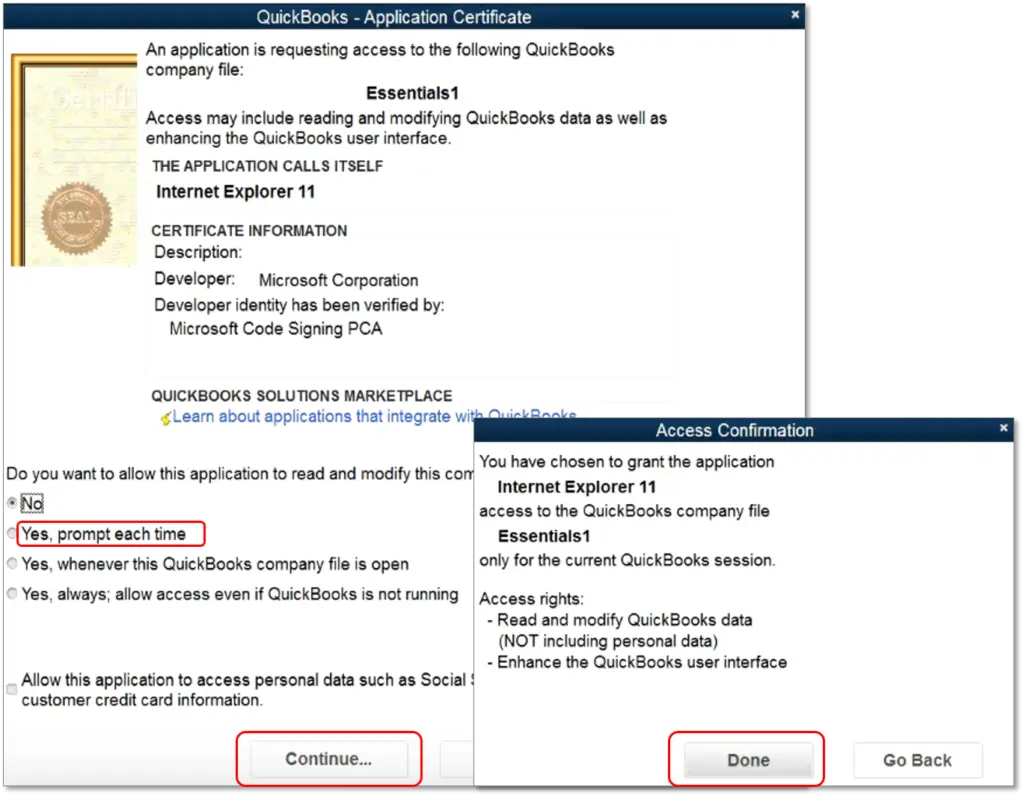
Once done with that the save the company file window will appear on the screen
And the user will be required to pick a location to save the file.
After that a pop-up window will appear asking where to save the file
After which the user will have to go for the Convert now option.
And hit the yes tab each time in the application certificate.
Now, choose Continue and then select Done.
Go for the Finished tab and then Run reports to end the process right here
This brings us to the end of the article, and we expect the reader to successfully move the company file from QuickBooks online to desktop making the best use of the steps listed above. On the contrary, if the user ends up in some or the other error or if the user gets stuck at any point in time, then contacting our tech personnel at +1-888-510-9198 is suggested. We are a team of certified QuickBooks professionals who work round the clock in providing the best support for QuickBooks-related issues. Thus, feel free to share your queries with our team and let them help you with the issue.
As a QuickBooks user, there is a high probability of experiencing certain abnormalities in the accounting software. These abnormalities are often termed as errors and are assigned certain error code by Intuit for easy identification and rectification. One such error that we are going to highlight in this segment is QuickBooks Error -6000, -82 or -6000, -106. For a QuickBooks user, bumping into errors is quite common. Out of these errors, a few are associated with the company file, whereas the others are either a result of human intervention or due to improper permissions, etc. Coming to the error code 6000 82 or 6000 106, it usually occurs when you try to open or access a company file in QuickBooks Desktop. Be prepared to receive these errors even when opening or creating a company file in QuickBooks Desktop.
As this particular is associated with the company file, subsiding them immediately is the only option to avoid any sort of hindrances in future. Thus, to help you in the fixation process, we have curated this piece of writing, sharing the in-depth analysis of the error, the factors driving this glitch in QuickBooks, and of course the measures and strategies you can implement to shun off the error permanently. Note: If you are trying to resolve these errors, ensure that QuickBooks is updated to the latest released version.
In addition to this, also download, install and run QuickBooks File Doctor Tool on your system. You can continue reading this writing for a better insight into this article, or if you don’t have a sound knowledge to implement these solutions, you can ask our QuickBooks ProAdvisors for further technical assistance by getting on a call at +1-888-510-9198. Or look for QuickBooks Error Support for any type of problem resolution. Having said that, let us together
What is QuickBooks error code 6000 82 or 6000 106?
If you are using QuickBooks for a while now, you might have surely heard about the QuickBooks 6000 error series at least once. These error codes are often associated with the company file and might prevent you from accessing the company file on any other system. The QuickBooks error code 6000 82 or 6000 106 belongs to the 6000-error series and is often experienced when you try to open the company file or when you try to access the company file data stats that the application can’t reach. This particular error appears on the screen with a warning message that states:
An error occurred when QuickBooks tried to access the company file. Please try again. If the problem persists, contact Quicken Technical Support and provide them with the following error codes: (-6000, -82).
When you bump into this issue, it might not let you access the company file on any other system. Often when you use a multi-user mode, it is probable to experience this issue. There are a couple of factors triggering such error in QuickBooks, let us explore together.
What may cause QuickBooks Error 6000, 82 or 6000, 106?
There are different 6000 series errors and error code -6000, -82 and -6000, -106 are among the rarest. But don’t worry, these are fixable and this article will explain all the possible solutions to get rid of these two codes. First, let’s learn about the most possible causes that may lead to this error.
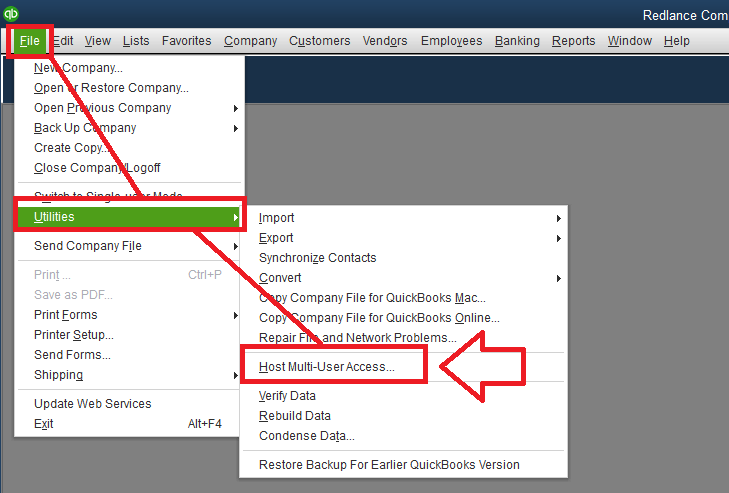
STEP 2: Turn off hosting with all the computers with QuickBooks installed:
For Single User: Turning off hosting mode disables multi-user access
Click on Utilities in the File menu and click on Stop Hosting Multi-User Access.
As you do this, a message will pop up on the screen. Click on Yes.
A Message appears on the screen when the company file has to be closed. Click ‘Yes’.
Multi-User:
Note: If this error occurs, this means that more than one computer has been set up incorrectly to host multi-user access.
You will be able to see this error on each and every computer with incorrect hosting settings
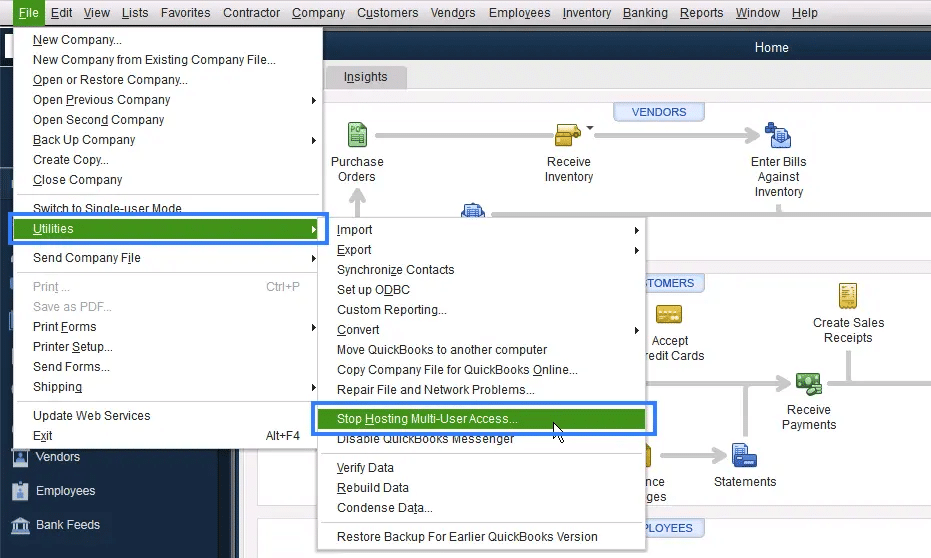
In the No Company Open Window, Select File and then click on Utilities.
Confirm that the menu option of host multi-user access is visible. Here, note that more than one client computer can display menu options and prevent hosting multi-user access.
After this, choose the option of Stop Hosting Multi-user access on any client computer; display the Stop Hosting Multi-user access.
Follow the steps to stop hosting
Open the problem file and ensure that the log-in window appears.
If the problem still persists, follow Step 3.
STEP 3: Move to Hosting Local and Remote File Mode:
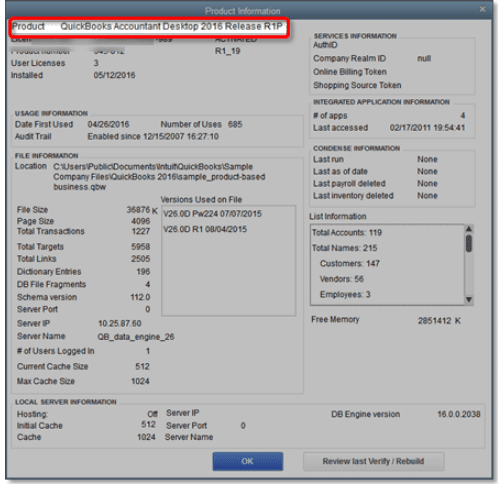
To open the detail of the window, click F2 key in QuickBooks
Set the hosting to local files only. (Check this at the bottom of the window under the section of local server information.)
Select File Menu and change it to multi-user mode.
Open the Company files. If you are seeking more details, then you can look for QuickBooks in-product Help. You can also set up multi-user mode for QuickBooks Desktop resource page.
To check the product detail tab, open the company file and press F2 key.
Now again confirm that the hosting is set to local files only.
If the problem persists, follow Step 4.
Point to Note: If you are trying to provide consistent access to company file to the users, then you shall leave the computer that is hosting multi-user access, and the users who set up the QuickBooks should be logged in. However, you are not required to open the QuickBooks.
After restarting the computer, you will observe that all the system settings will be brought from scratch and all the current settings and state of the software will be eliminated.
STEP 5: Use the standard data troubleshooting solution to resolve this error
While troubleshooting, there are chances that there may be damages to your company file data. In that case, you can follow the steps given on our website to resolve all the data damage issues.
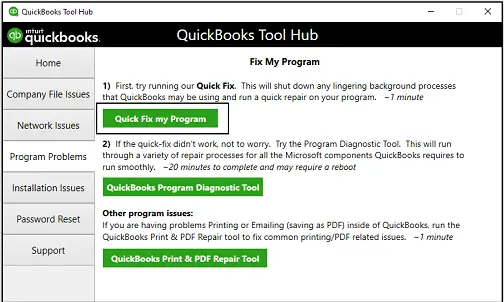
STEP 6: Run Quick Fix My Program feature on the client computer
If the above steps didn’t help, try running quick fix my program feature on the client system using the steps listed below:
Pick the Quick Fix My Program option from the list.
Choose QuickBooks desktop and further open the data file.
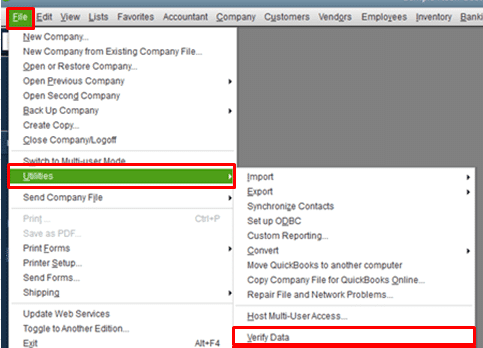
STEP 7: Use Verify and Rebuild Tool
At times damaged data can also trigger such errors in QuickBooks. Try fixing the damaged company file data that requires in-depth knowledge of the software. Run the rebuild utility and then verify utility to fix the data damage. Follow the steps listed below:
Start off by clicking on the Utilities tab from the file menu.
Further, click on the Verify Data.
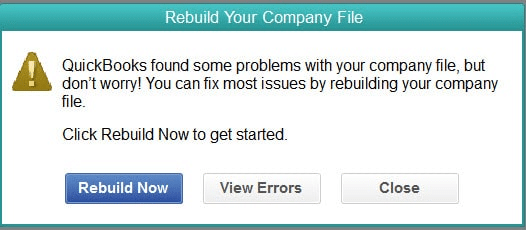
After the error message appears on the screen stating “QuickBooks detected no problem with the data”, click on the ok tab.
Continue using the company file.
If the verify tool finds an issue with the data, you should rebuild now or view errors.
Click on Close.
Or perform the steps below:
Spot the QBWin.log or QuickBooks.log files.
From the tech help window, if you are working with a support agent, click on the Send log files to intuit support.
This will send the file to the repository, which will enable the support agent to view the log files.
If you are working with a support agent, then you will have to locate the most recent file for Begin Verify.
In case you are a Mac user, you need to scroll all the way to the bottom for the most recent verified information.
Look for the line that contains the LVL_ERROR;
Search for it on QuickBooks learn and support.
You might also see the data damage Top LVL errors library.
Errors can be extremely devastating for QuickBooks users, and errors that are related to the company file need to be tackled as soon as possible. We believe that the steps illustrated above might be of some assistance for you in tackling this particular error code 6000 82 in QuickBooks. On the contrary, if you feel the need for a team of professionals, who can guide you through the right procedure to eliminate the error from its root cause, then do not hesitate in connecting with our QuickBooks Support team on our helpline number i.e. +1-888-510-9198 toll-free.
What is QuickBooks Error 6000 82 or 6000 106, and why does it occur?
QuickBooks Error 6000 82 or 6000 106 is an error code that appears when users try to open, restore, or backup a QuickBooks company file. It usually indicates a problem with the company file itself, such as a damaged file or an incorrect file extension. QuickBooks Error 6000 82 can also occur due to network issues or when the user is not logged in as an administrator.
How can I fix QuickBooks Error 6000 82 or 6000 106?
The solutions for QuickBooks Error 6000 82 or 6000 106 can vary depending on the underlying cause of the error. Some common troubleshooting steps include running the QuickBooks File Doctor tool, verifying file permissions and network connectivity, restoring a backup of the company file, checking for special characters or spaces in the file name, and ensuring that the user is logged in as an administrator. Additionally, some causes of the error may require advanced technical knowledge or assistance from a QuickBooks expert.
Can QuickBooks Error 6000 82 or 6000 106 be prevented in the future?
While there is no guaranteed way to prevent QuickBooks Error 6000 82 or 6000 106 from occurring, there are some best practices that can minimize the risk of encountering the error. These include regularly backing up QuickBooks company files, avoiding special characters or spaces in file names, ensuring that all network connections are stable and secure, and keeping QuickBooks and antivirus software up to date. Additionally, it’s important to maintain good communication with your IT team or QuickBooks support provider to promptly address any issues that may arise.
Certain errors in QuickBooks desktop company files can be caused due to QBWIN.log or QuickBooks.log files. QuickBooks Desktop logs program messages and errors, including information created by Verify, Rebuild, and Condense Data utilities, in a specific file. In Windows, the file is called QBWin.log while for Mac, it is called QuickBooks.log. Qbwin.Log: Lvl_error Error: Verify Online Account Information: Invalid Customer ID Number generally appears when you use or try to use an invalid Customer ID while setting up the account with online services such as Bank Feeds. The error is mostly triggered by the QuickBooks log file. There are a few do-it-yourself methods to troubleshooting methods to fix it. The users who already have faced this issue, however, recommend that contacting an experienced and reliable technical QuickBooks support team member is the best option.
Note: Errors like “IsQBInUseLockFilePresentAndLocked…LCK can’t be found. Error = 2” in QBWin.log is not a sign of data damage and should not be considered as one when fixing data damage. For more information, you can connect with our technical support professionals at +1-888-510-9198. And our technical support professionals will ensure to answer all your queries immediately.
What are Qbwin.log errors in QuickBooks?
You can come across a handful of QBwin.log errors in QuickBooks. Out of which, we have tried to list some common ones:
QBwin.log file: LVL_ERROR-QuickBooks has experienced a problem and must be shut down, ErrorCode:1256530728
How to find QBWin.log or QuickBooks log files?
You can find the files that can help you determine the cause of specific issues found in the QuickBooks company file. The QuickBooks desktop logs program messages and errors, along with the information generated through the verify, rebuild, and condense data utilities.
Find QBWin.log files in QuickBooks for windows
If you are only running one edition of QuickBooks desktop installed, perform the steps in option A.
In case you are unable to find the folder within the suggested guideline, then perform the steps for showing hidden guidelines.
How to Access QBwin.log on the local computer?
Option 1: Access QBWin.log on the local computer from the product information screen
From the home page, press F2 key or Ctrl + 1 keys to launch the information window for the product.
Press Ctrl + 2 or F3 key to start your tech help window, and then select to open the open file tab
Select QBWin.log and also click on open file
Press Ctrl + F and type start verify to locate the final entry of begin verify within the QuickBooks log file.
Option B: Access QBWin.log within windows
Find location of QBWin.log using file explorer
Location: C:\Users\YOUR USER NAME\ AppData\ Local \Intuit\QuickBooks\ log \XX.X\QBWin.log
Here XX.X represents your version of QuickBooks Desktop. For example: 18.0 is Enterprise 18.0 and 28.0 is QuickBooks 2018
A quick tip: You can do this a bit faster by typing %localappdata%\Intuit\QuickBooks\log\XX.X\QBWin.log to the address bar.
Log in to QBWin.log to Rights Networks or other hosted environment
For QuickBooks desktop pro/premier users:
On the start menu in the terminal or hosted environment, select computer
Now, on the search menu, enter QBWin.log.
Avoid hitting enter to click on the magnifying glass symbol
The list of QBWin.logs will appear
Check for QBWin.log with the most recent date and time
For QuickBooks enterprise solution users:
The user needs to first press ctrl + 1 keys or F2 key for the product information window
And then press F3 or ctrl + 2 to open tech window
Now, select open file tab
And also, choose QBWin.log and open the file
Find QBWin.log files on QuickBooks for Mac
The very first step is to select file and close company options
After that, choose option and select help and product information
The user is then required to click on collect logs.
This will create a zip archive on the desktop along with the QuickBooks log files
Double click to extract the files and within the folder, you will find those QuickBooks.log files
Method 2: Verify the online bank information in QuickBooks and try to connect to your bank again
Method 2 can be followed if the desired results are not received from the Option 1. To start with Method 2, verify your online bank details in the QuickBooks account. Connect with your bank to which this information is associated.
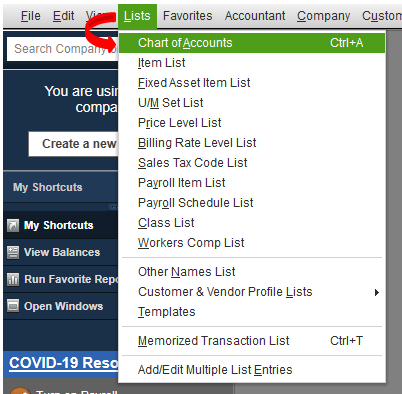
First of all, Go to ‘List menu‘ and choose ‘Chart of Accounts’.
As you encounter an error, right click on the ‘account‘ that is connected with your online QuickBooks services such as Banking.
After that Go to ‘Edit‘ option.
Move to Bank Feed settings. Ensure that the information of your setup ‘Customer ID‘ matches with the ‘Customer ID‘.
If this is also not matched with the Customer ID, then rectify the information by pressing ‘Save & Close‘ option.
Important Points for QuickBooks log file error
One of the suspected causes of this error can be the extra space, special character, dash in the Customer ID field. If anything is there, we would suggest you to remove that quickly.
Every Customer ID or PIN Fields may have alphanumeric characters as per the policy of the bank or financial institution. So, when you match your ID with the Customer ID field, then ensure to consider them. This is a sensitive case and thus should be kept in notice.
Maybe your account has been locked if you have exceeded the number of login attempts unsuccessfully. If it has been locked out, then please connect with your bank to resolve this issue.
After this, jump to Bank Feed center in your QuickBooks account, and re-establish the connection under Sent items.
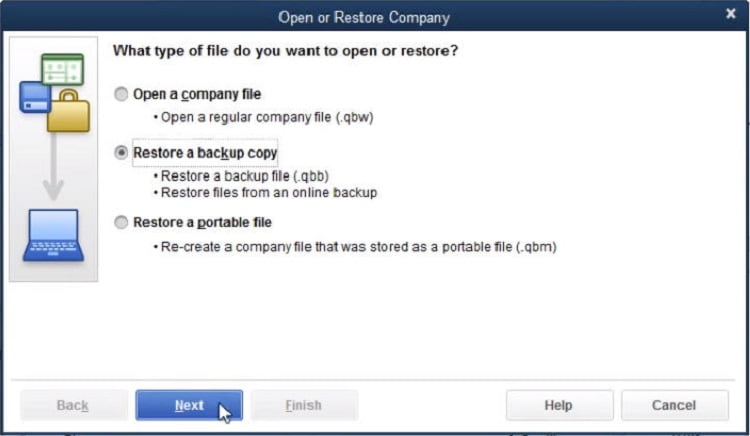
Method 3: Restore a backup
We always recommend you to keep a backup of your QuickBooks company file. A backup created recently may really come handy to restore your accounts. Open QuickBooks and then go to company file. If you have created a backup of your QB company file, proceed to use that to restore your accounts.
Open QuickBooks and then go to your Company File. If QBWin.log error or QuickBooks log file error persists, move to the next troubleshooting method.
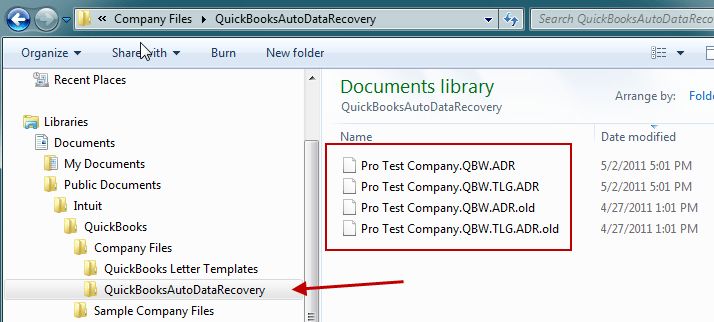
You may require assistance to fix your company file with Auto Data Recovery. Please note that this tool is only available for QB Pro, Premier, and Enterprise for Windows. You can’t use this tool with Accountant Editions. You can learn more about our data recovery services here.
Method 5: Update QuickBooks software
The user can try updating the QuickBooks software to the latest release using the steps below. This can fix the Qbwin.Log: Lvl_error Error: Verify Online Account Information error up to a certain extent.
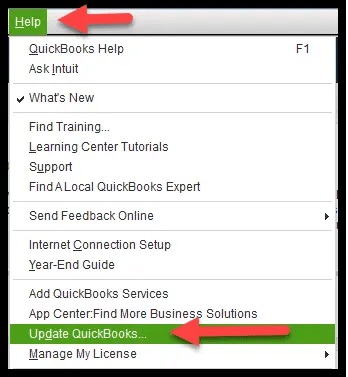
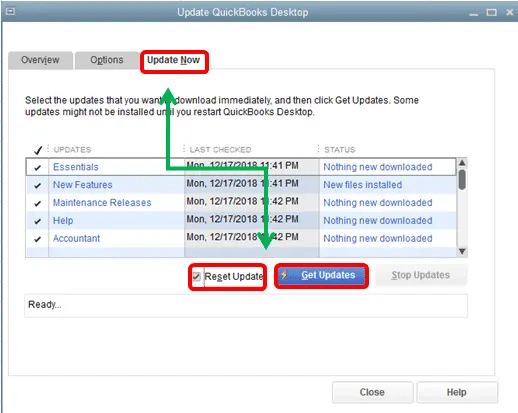
The very first step is to head to the help menu and then choose the update QuickBooks desktop option.
After that head to the update now tab
And choose the reset update checkbox to clear all previous updates
Later on, select get updates to begin with the download
Restart the QuickBooks, when the download completes
The last step is to accept the option to install the new release. And further, opt for Qb log in.
After performing the above-mentioned steps, you should get the desired result. However, if the Qbwin.Log: Lvl_error Error: Verify Online Account Information error still persists or your QuickBooks is not working properly, then you can contact our QuickBooks technical support team who will help you find out the exact reason for the error and will resolve the issue in the least possible time.
Our experts are available round the clock and are highly experienced. Just connect with us today at +1-888-510-9198.
FAQs Related to QBwin.log errors in QuickBooks
Does QuickBooks have an error log?
QuickBooks desktop logs program messages and errors, including information created by verify, rebuild, and condense data utilities, in a specific file. This file is termed as qbwin in Windows.
Where is the Qbwin log in QuickBooks?
You can spot this by: 1. Pressing F2 key. 2. Further, press F3 key. 3. Choose open file tab and scroll down to QBWIN.log.
Can I delete the QBWin.log file?
Yes, it is possible to delete the QBWin.log file, in case you no longer need it or you wish to clear the log history. QuickBooks will create a new QBWin.log file when it runs again.
What are common errors found in QBWin.log file?
The QBWin.log file might contain various types of errors including: 1. Data damage errors 2. Network connectivity errors 3. Installation errors 4. QuickBooks application errors 5. Errors related to third-party applications or services integrated with QuickBooks
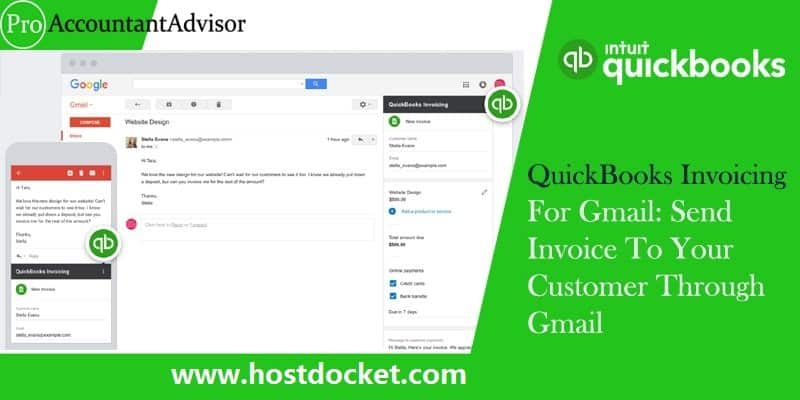
Send Invoices From QuickBooks To Gmail – An A To Z Guide
After QuickBooks Online teamed up with Google, it has been as simple as possible for you to invoice your clients from within your Gmail inbox. An add-on, QB invoicing for Gmail is entrenched within the inbox of your Gmail account and is simple to us. With this feature, you can now create invoices for your customers from the data available in your email. After an invoice is created in Gmail, it will be synced to QuickBooks Online. Intuit has also launched an app called “QuickBooks invoicing for Gmail” to make the work of the business owners simpler. The app is highly recommended for small businesses.
To learn further about the process to setup QuickBooks invoicing for gmail, you need to read this article carefully till the end. Or you can also get in touch with our technical support team in case of any queries. Give us a call at +1-888-510-9198, and we will provide you with our technical support assistance.
You can install “QuickBooks invoicing for Gmail” and create the invoicing.
There are multiple QuickBooks apps, thus you should be careful while establishing this app in choosing the appropriate app.
Then return to your “Gmail dashboard” and open “Email inbox” and find the “QuickBooks icon” on the right.
Click the “QB” icon and then the “Authorize Access link“.
Allow the app to access your account.
Find the option that would allow you to connect existing account or to “Sign up” for a “New account“.
When we use more than one accounts or any other client account, click the “Add app” to firm link.
Connect QuickBooks invoicing for Gmail app to your firm for testing.
Click the “Confirm tab” and get connected and ready to create the invoice from Gmail.
Now, you can open an email message to create an invoice, and while creating and viewing an invoice, click the “QB” icon and new invoice window would open on the right.
You can easily add your logo to an invoice using both “Gmail and QuickBooks invoicing”.
Look at the top of the screen, and you will find your “Company logo” added there. It will automatically show on invoices. This can also be added in the app settings.
When you “Send an invoice” to a customer and that customer’s name already exists in your QuickBooks online support list, the invoice will be added to the account.
In case the name of the customer is not in the existing list then a new customer need to be added to the QB Online list so that you can search it later with the client name.
If the customer “Email address” is occupied from Gmail message, you can click the link to “Add a product” or “Services” or add a “New item” here.
This act will also set the due date for the invoice.
You can also “Create a message” for the invoice instead of the default one available for you to use.
Adding the Product services
If you type a name of a product or service line, a matching list will appear. This list automatically shows up from QuickBooks Online product and service list. If you find other names from matching list, you can easily add those product or services to your list.
Fees for QuickBooks Invoicing Subscription
This feature has no monthly subscription fee. However, a transaction fee will apply if your customers pay invoices online.
Bank & Credit Cards Fees: For Bank Transfers the cost will be $1.50/transaction and for Credit Cards, the cost is “2.9%+ 25 cents/transaction“.
In the rate field, you can find the options of Flat rate, By Hour, or By Quantity.
Buy Hour: If you select “by hour” option, you will be asked for the hours or quantity.
You can change or edit the Description and Price sections.
Taxable Switch: Taxable Switch determines when sales tax is to get applied to this product. In case the product is marked as a taxable item, it would show as being taxable here.
When you click Add button to include this to the invoice and return to the invoice, you can easily point out that the item and a sales tax line has been added.
If sales tax is default to your existing QuickBooks Online account settings, you can easily edit this setting.
The term field will have the following options:
Due today
In 7 days
15 days
30 days Custom due date
In case you choose Custom due date, you can put in a specific date.
There might be some questions that may be arising in your mind after completing the invoicing for Gmail. Here we have included some of the most probable queries for you:
✔ Question: Is it possible to send a copy of the invoice email to self?
Answer: No. You can send an invoice to just one recipient.
✔ Question: How can I add or edit my bank account?
Answer: Go on “Gmail add-on > the menu > Settings > Manage“. This section will allow you to add or edit your bank information in the new tab.
✔ Question: What are the different methods through which I can accept payments from my customers with my account?
Answer: There are two ways to accept payments:
Email an invoice to your customer stating that they can pay online.
Take a credit card detail in QuickBooks Invoicing through a Receive Payment.
✔ Question: Will there be any fee to process a refund?
Answer: No
✔ Question: How can I change the information on my account?
Answer: Click the “Gear icon” at the top and go to Accountant Settings/company setting
We hope that this blog post furnishes you with all the information you require in regards to QuickBooks Invoicing for Gmail. If you have any more questions or queries related to this topic, you can call us at +1-888-510-9198. Our QuickBooks technical support department will be more happy to help you out in this.
FAQs Related to setting up invoicing for Gmail
How do I allow QuickBooks to email through Gmail?
You need to perform the steps listed below: 1. From any open transaction or report in QuickBooks, choose email. 2. After that, choose send and you will be have to log in with the Intuit credentials. 3. Once done with that, choose continue in the webmail authorization window that opens. 4. Hit allow tab.
How do I add an email address to an invoice in QuickBooks online?
For this, you can: 1. Open QuickBooks online 2. After that, find the customer and further click on edit their information 3. The next step is to add the email addresses you would like the invoices to go to under email. 4. Now save and move back to the backend.
How do di Send an email invoice in QuickBooks desktop?
You can simply perform the steps below to send an email invoice in QuickBooks: 1. The very first step is to select the main tab at the top of the invoice form. 2. Now, choose the email dropdown, and choose invoice. 3. Once done with that, review the invoice message. 4. When you are ready, choose send option.
How to change the email address invoices are sent from in QuickBooks?
You can your customer-facing email address. 1. Choose settings ⚙ and then go for company settings. 2. You now have to select the company tab as default., 3. Further, click on edit tab to the right of the contact info section. 4. Followed by entering your company’s email address in the company email field. 5. The last step is to choose save then done to save your changes.