QuickBooks Error 31 : SE_ERR_NOASSOC is a unique error experienced by QuickBooks users. This error can be a bit confusing for QuickBooks users, as it is a bit tricky to handle. There is no definite reason why such an error shows up. However, you might experience this issue at any time such as, while installation, updating or upgrading it. However, it mostly appears while opening payroll reports in Excel. It may slow down your work and impact your productivity. But the good thing is, QuickBooks Error code 31 is fixable.
To help you tackle the QuickBooks error 31, here we are with this article, sharing the quick solutions for the same. Make sure to read this article till the end, or you can further connect with our technical team at +1-888-510-9198, and let them help you with the issues further.
This error mostly appears while opening payroll reports in Excel. Other occasions when this issue may crop up are when you install the software, update it, launch it, sync it, try to open it, delete or remove a file, export a file, print something, or import or add accounts on Microsoft Windows 7, 8, 8.1 or 10. A malicious software, corruption in software, or hardware malfunctioning may trigger this error.
Another major reason behind the occurrence of this error may be the lack of affiliation in QuickBooks report layouts and Excel. A damaged Microsoft Office establishment may also cause Intuit QuickBooks Error Code 31.
Steps to Troubleshoot Intuit QuickBooks Error Code 31
This article is aimed to assist you fix QuickBooks Error Code 31. Here are the steps you can follow (in the given order) to resolve this issue.
The very first step is to find out the reason of this error and that may be with computer equipment, windows, internet connection, security software, or with any third-party software.
To start with, you can check if the Windows operating system is working properly. If your Windows OS is not updated, it may create issues.
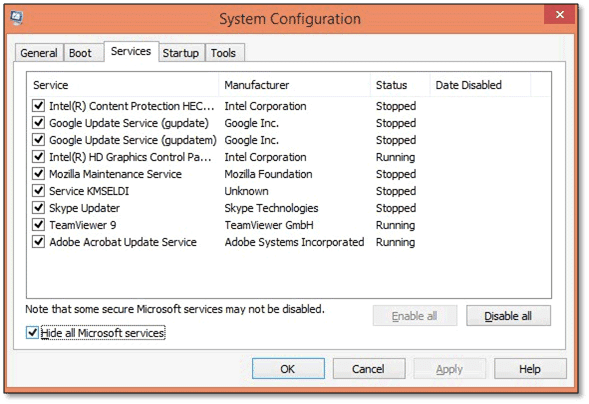
Remove all security software that you may have installed recently.
Turn off the Firewall.
Ensure that you haven’t opened any other application while you are trying to fix Intuit QuickBooks Error 31.
In case the application was working fine lately with your security software, check if the security software is updated.
Remove or uninstall and application or software that you have installed of late.
Make use of Windows Explorer to explore the file where error message is found.
Now, double-click the file where error message is found, and you will receive a prompt requesting you to choose a program to connect the file.
Select Excel and click Ok to connect the format with Excel and you should be able to successfully open the payroll report.
Toward the end of this segment, we hope that the information discussed in above might be of some help in getting rid of the QuickBooks error 31. In case the issue still persists, you can contact QuickBooks error support team. You can contact our experts at +1-888-510-9198 for quick and precise solutions. We are available round the clock and offer you the best services that your business deserves.
FAQs Related to QuickBooks error 31:SE_ERR_NOASSOC
How Do I fix a QuickBooks error?
You can run QuickBooks install diagnostic tool to fix common install issues using the steps below: Open QuickBooks tool hub and further choose installation issues. 2. You then have to choose QuickBooks install diagnostic tool 3. After the tool finishes, reboot the system and start QuickBooks and further open the data file.
How do I fix a bank connection in QuickBooks?
You need to first move to bookkeeping and choose transactions. After that go for bank transactions. Also, choose update now link from the Let’s fix this bank connection banner. And perform the onscreen prompts to update the connection.
How do I fix a locked file error in QuickBooks Desktop?
You can check for multiple host computers and stop hosting on all workstations. 1. The first step is to open QuickBooks. 2. And then, from the file menu, choose utilities tab. 3. Also, close QuickBooks. 4. Repeat the steps above on all workstations that do not host the company file. 5. The last step is to open QuickBooks try doing the task that caused the issue.
How do I repair a QuickBooks backup file?
The first step is to move to the file menu and further hover over the utilities tab. You can also choose the rebuild data option. And perform the necessary fixes for the same.
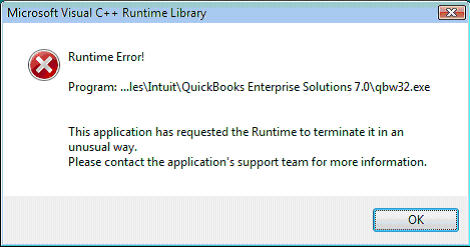
Coming across errors in QuickBooks is quite common and especially when it comes to runtime library errors in QuickBooks. Often when opening QuickBooks, one might end up in QuickBooks Runtime library errors and Microsoft Visual C++ problems. This error may be frustrating as it’s not very simple to fix it. You might come across the following warning message on the screen when such an error appears: This application has requested the Runtime to terminate it in an unusual way. Please contact the application’s support team for more information.
Fixing this particular error might seem to be a tough nut to crack. Thus, here are some troubleshooting steps that you may perform to do away with this error.
Go ahead and launch QuickBooks like you normally would after renaming the QBW file. Hopefully, the new file extension will resolve the Runtime error, allowing you to once again access and use your QuickBooks software.
We hope that this article will help you fix QuickBooks Runtime Errors. If the error still exists or you face any other QuickBooks-related issue, you can call our QuickBooks Error Support team by dialling +1-888-510-9198.
What is a QuickBooks runtime error and what causes it?
A QuickBooks runtime error occurs when the program encounters an unexpected problem that prevents it from functioning properly. This can be caused by a variety of factors, such as damaged or missing program files, issues with system compatibility, or problems with the Windows registry.
I keep getting a runtime error when using QuickBooks. How can I fix this?
If you’re experiencing runtime errors in QuickBooks, there are a few things you can try to fix the problem. First, make sure your software is up-to-date and all necessary updates have been installed. You can also try repairing or reinstalling QuickBooks, or contacting our technical support team at +1-888-510-9198 for further assistance.
How do I prevent QuickBooks runtime errors from happening in the future?
To prevent runtime errors in QuickBooks, it’s important to keep your software updated and to regularly perform maintenance tasks such as cleaning up your system registry and removing temporary files. Additionally, make sure your computer meets the minimum system requirements for QuickBooks and that all necessary software updates are installed.
Can third-party apps or add-ons cause QuickBooks runtime errors?
Yes, third-party apps and add-ons can sometimes cause runtime errors in QuickBooks if they are not properly installed or are not compatible with your system. To avoid this, make sure to only install trusted and reputable third-party apps and add-ons, and check their compatibility with QuickBooks before installing.
How can I get more help with QuickBooks runtime errors?
If you’re experiencing QuickBooks runtime errors and need additional help, you can contact our technical support team at +1-888-510-9198 for expert assistance. Our team can help diagnose and troubleshoot the problem, as well as provide recommendations for preventing runtime errors from happening in the future.
Learn how to resolve “QuickBooks Error 1920: Service QuickBooks Database Manager (QBCFMonitorService) failed to start” when trying to install or update QuickBooks Desktop:
QuickBooks is one of the most trusted accounting software in the world. Right from big companies to small businesses, today almost everyone is using this cutting edge software. Not only does it help in accounting and bookkeeping but also with the overall financial management of the company. Each year new version of this application is launched with new and improved features. Even though it is one of the best accounting software, yet users at times do face technical errors. These technical errors can be managed but at times for the more complicated ones you have seek assistance from the QuickBooks Support service providers.
In this article we will discuss the issue of QuickBooks installation error 1920. In most cases this error occurs when you are trying to install QuickBooks Desktop or a program update. This generally happens when QuickBooks Database Manager Scans installed hard drives for the company to create a connection with those files. As this services tries to access the drive on the desktop and is not able to so the installation is affected.
This error can be experienced due to a bunch of factors, which we will be listing later in this segment. To find the factors triggering this issue and also the quick fixes for the same, make sure to read this piece of writing carefully. One can also consult our tech support professionals for any sort of further support and assistance.
What Causes QuickBooks Error Code 1920?
The below set of factors can trigger such an error in QuickBooks.
Damaged installation of QuickBooks desktop
There is Invalid entries in the registry of your windows
Virus or malware attack on data files
System power failure
Deletion of important system files or registry entry
After this open your QuickBooks Desktop and then open the company file.
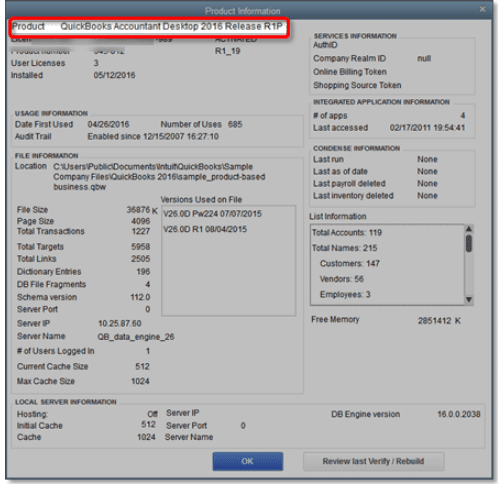
Now on your keyboard press on F2 or Ctrl+1 keys so as to open the Product Information
After this track the location of the company file listed in the File Information.
Important Note: In case the file name is quite long, it will be displayed with and ellipsis.
Once done close QuickBooks Desktop
After this navigate to the company file location
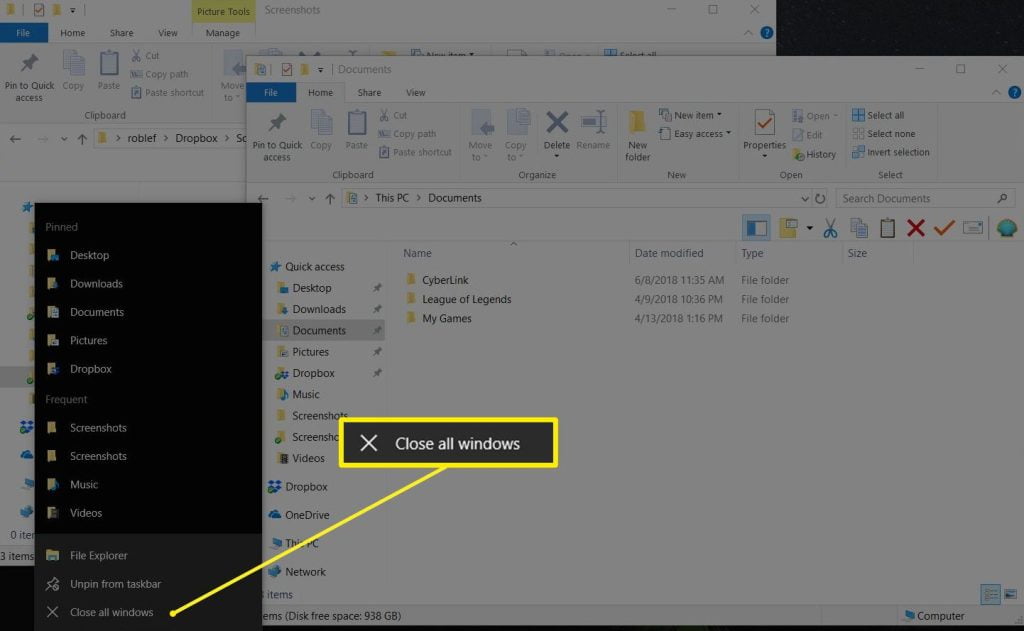
For Windows 10, 8.1 and 8: Right-click on the Windows Start button and then choose File Explorer
For Windows 7 and Vista: Right-click on the Windows Start Button and then select the Open Windows Explorer.
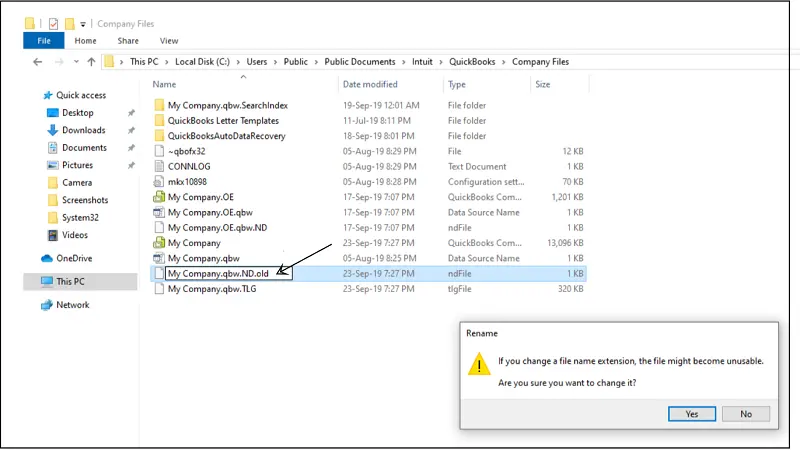
Once done you have to right-click on the file and choose the Rename option
After this type the new name of the company files and click on Enter. In case, Windows asks you confirm you to give confirmation for the action then click on Yes.
Step 4: Set up QuickBooks desktop to use the new company file name
The very first step is to open QuickBooks
After that, the user needs to head to the Qb file menu and click on open or restore an existing company
The user is then required to open a company file and click on next tab
Also, select a new name for the company file
Once done with that click on open tab
Step 5: Installing QuickBooks desktop
The user will first have to prepare for installation of the software
After that, install QuickBooks
Here, the user needs to open the downloaded file
And perform the onscreen steps and accept the license agreement
Now, select the next tab
And enter the product and license numbers
Hit next tab
And also, decide which install type is right for you
Choose express install or custom and network install option
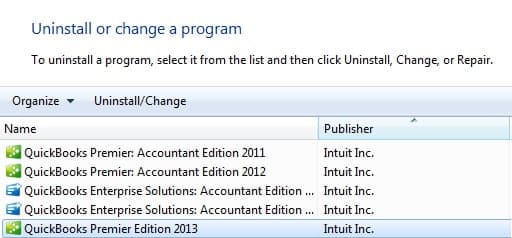
If you have other Intuit apps installed on your computer system, you need to only uninstall or rename the QuickBooks versions folder located in the Intuit folder: C: \ Program Data \ Intuit.
Go to the installation folders. Refer to the chart below.
Windows 10/8/7
Windows Vista
C:\Program Data\Intuit
C:\Program Data\Intuit
C:\Program Data\Common Files\Intuit
C:\Program Data\Common Files\Intuit
C:\Users\[Username]\AppData\Local\Intuit
C:\Users\AppData\Local\Intuit
C:\Program Files\Intuit
C:\Program Files\Common Files\Intuit
C:\Program Files\Common Files\Intuit
C:\Program Files\Common Files\Intuit
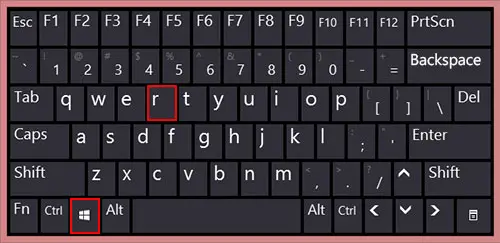
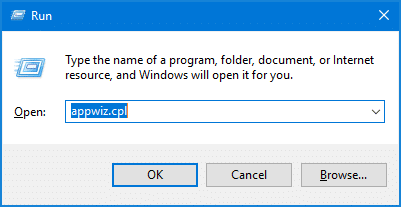
Press Windows + R keys together to open the Run command
Enter (or copy and paste) the location of the folder, and then hit on Enter key
Right-click on the folder, then choose Rename
Rename the folder to .OLD
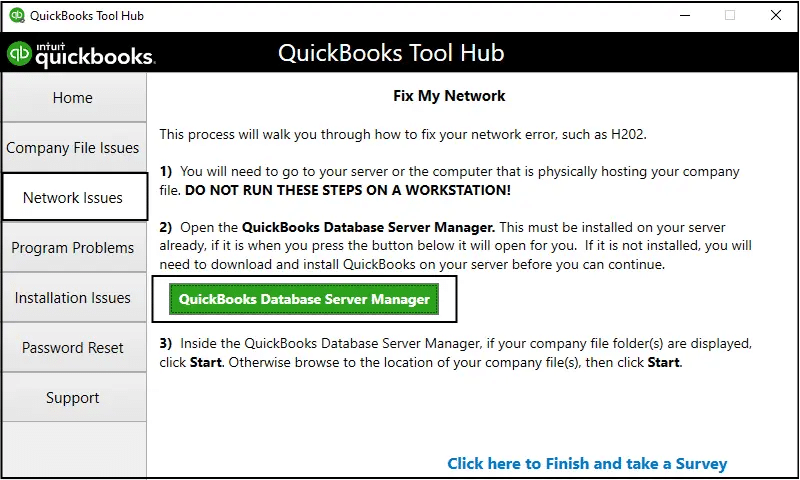
Step 3: Reinstall QuickBooks Database Server Manager
Database Manager is a part of QuickBooks Database File and allows you to share your company files with other systems connected to the same server. Uninstalling and installing the Database Server Manager can help you fix QuickBooks Error 1920. Following are the steps to follow:
Uninstall QuickBooks Database Service Manager
Download QuickBooks Database Manager
Install QuickBooks Database Manager
Close all open applications and programs on your server computer, including QuickBooks
Open the file (Setup_QuickBooks.exe) you downloaded
Follow the on-screen prompts
Select either Custom or Network Options when QuickBooks asks you to pick an install option
Next, choose Next
Select the best option for your setup (except Express) and press Next
Both the options install the Database Server Manager
Choose “I’ll be using QuickBooks Desktop on this computer, AND I’ll be storing” if you want both Database Server Manager and QuickBooks Desktop on your server computer
Select “I will NOT be using QuickBooks Desktop” if you only want Database Server Manager on your server computer
Follow the on-screen instructions and select Install
Tackling errors in QuickBooks becomes easy, once you know the right steps that are to be performed. However, if you still face the problem “QuickBooks database installation error 1920″ even after following the above steps then you can seek assistance from QuickBooks error support team. Our accounting expert technicians are available 24/7 to provide you solution to your problems as well simple tips to avoid in the near future. Contact us at +1-888-510-9198 today.
FAQs – QuickBooks error 1920
What is QuickBooks installation error code 1920?
QuickBooks error code 1920 is often seen when the QuickBooks database server manager service is unable to launch during the QuickBooks installation. This error is often associated with a warning message that states “Error 1920: Service QuickBooks database service failed to start”. If you are experiencing the same issue, then make sure to perform the right set of steps to eliminate it.
How do I manually start QuickBooks database manager service?
In order to manually start the database manager service, make sure to perform the steps below: 1. The very first step is to press windows + R to open the run dialog box 2. After that, enter services.msc and also click on enter tab 3. The user is then required to look for the QuickBooks database manager service in the services window 4. Now, right click the QuickBooks database manager services 5. And also, click on properties ab 6. The user is now supposed to change the startup type to automatic 7. Once done with that, press start tab to manually start the service 8. And lastly, click on ok tab
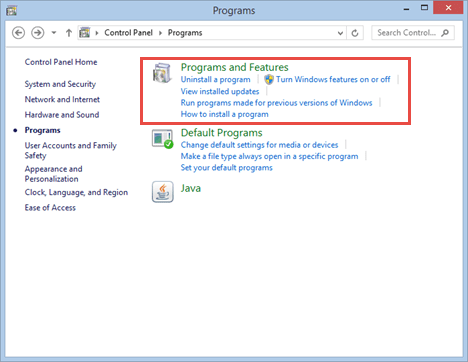
How do I fix QuickBooks installation errors?
The user can try to fix the issues related to QuickBooks installation, using the steps below: 1. Start with downloading and installing QuickBooks tool hub on the system 2. After that, download he QuickBooks hub file 3. Also, save it where it can be easily accessed 4. Furthermore, update windows 5. Install QuickBooks desktop using selective startup
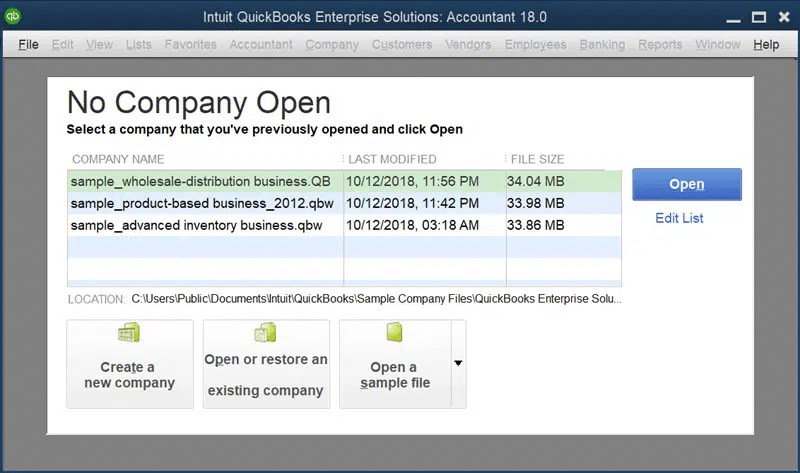
Intuit has launched QuickBooks File Doctor tool (QBFD) in 2012. QuickBooks File Doctor is a tool that has been designed to recover the damaged company files and also helps in solving the network issues with QuickBooks. There are test results as well each of the result has a section in it where all the result is described in detail along with the resources that can help fix the problem. To learn more about fixing network issues with QuickBooks file doctor test results, make sure to stick around to this piece of writing till the end. Or you can further give us a call at +1-888-510-9198, and get answers to all your queries immediately. Our technically up-to-date professionals will ensure to make fixing network issues in QuickBooks much easier for you.
Here are the results of file doctor test that would help you eliminate network issues with QuickBooks. To access your QuickBooks files, turn on the Hosting.
Note: You can ignore this warning if you are working on a workstation computer.
Now turn on the hosting!
When you are hosting QuickBooks Company Data Files in multi-user mode:
QuickBooks Company Data File Hosting means that you allow other computers or workstations to access the file. This file is easily accessible to the host (main computer) as only this host contains the company data file.
The following services are used by QuickBooks Desktop to manage company file access:
You can also find this service in the Windows Control Panel. Now, you are required to look for the service that corresponds to the version of QuickBooks Desktop you are using.
The following diagrams illustrate QuickBooks hosting modes.
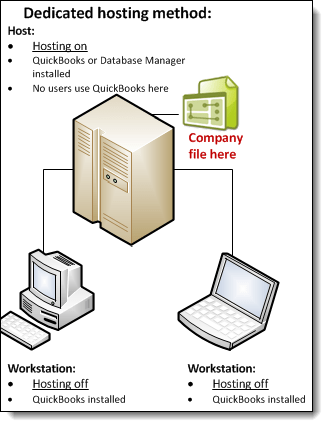
Dedicated hosting diagram
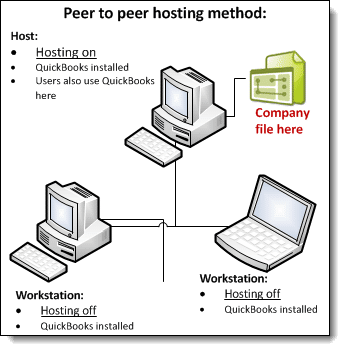
Peer to peer hosting diagram
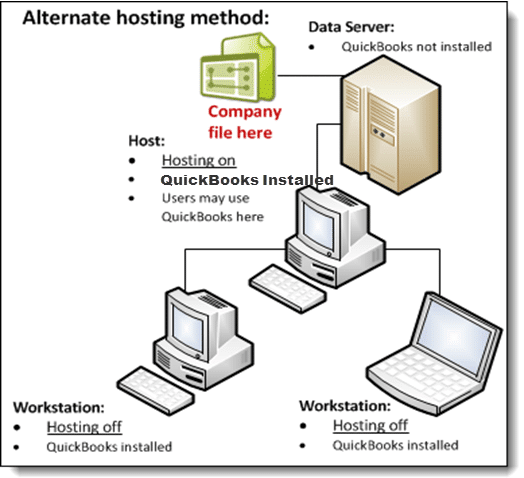
Alternate hosting diagram
Ways to Access the Company Files
In order to access the company file, make sure that your system meets following conditions:
Database Server Mode: The company file can be easily and successfully opened by the database server.
QuickBooks User Login: Make sure that each user has a user login and password.
Windows File Permissions: Ensure that if a user is log in, then he must have the permissions to Full Control. These permissions also include permission to modify the files and to look at the file.
You need to know that the hosting mode is set for the versions of QuickBooks Desktop as well as for other computers. But this hosting mode is not set for the company file. The hosting mode settings go independent when multiple versions of QuickBooks 2016 or later are used simultaneously. Usually, there are a total of three hosting modes:
Multi-user mode is not supported by the Not Hosting Mode. To communicate with QuickBooks, shared memory is used by this hosting mode. Moreover, database server to access a file can be used only by the QuickBooks user who is running QuickBooks on the local computer.
Hosting Local Files only
A Windows service namely QuickBooks DBXX is run by QuickBooks Database Server (Here XX is a number from 17 to 32 that indicates the version of QuickBooks). And also as the Windows user QBDataServiceUserXX (where XX is a 2-digit number from 17 to 32).
The service QuickBooksDBXX runs until the computer is on.
To communicate with the QuickBooks software, multi-user mode is supported using TCP/IP. Note that QuickBooks users who are on remote computers can access the company file using a database server which runs in Hosting Local Files only mode.
A computer that runs on this mode can host the files that are located on that computer.
Hosting Local & Remote Files mode
QuickBooks Database Manager runs as a normal process just like the currently Windows user. This process starts when the user logs into the Windows and the process stops as soon as the user logs out.
If a computer is running in this mode, then it can support multi-user mode in order to communicate with QuickBooks. However, do this using TCP/IP. QuickBooks users who work on remote computers can access company files using the database server.
In addition to this, a local computer that is running in this mode can also host the files that are stored on it and located on remote computers. These files can also be opened on the local computer.
How QuickBooks determines which database server to communicate with?
The ways in which QuickBooks Desktop determines the database server to communicate with, are as follows:
QuickBooks looks for .nd file and this file is a small text file which has the same name as the company file but has an .nd file extension. Moreover, this text file is located in the same directory where the company file is located. The company file has the extension- .qbw. The details like IP Address and port, to contact the server are also available in the directory.
QuickBooks Desktop also determines whether the .qbw file is in use or not.
When QuickBooks Desktop find this text file, i.e. .nd file, then it also detects the company file that is in user. After this, the QuickBooks software tries to communicate with the server in the following manner:
If communication is successful, the company file will open by QuickBooks.
If communication is not successful, then an error message comes which describes the ways to resolve this issue. You can take a look at the Multiple computer receive error H101, H202, H303 and Error H505.
When the folder that contains file is not writable and is not shared
Make sure that the folder that contains the company file is available to the other users.
Important: If you are on a workstation then you should ignore this warning.
When there is no network connectivity:
Even when there is no network, one TCP/IP adapter that is working and that the hostname of the local machine is resolvable.
Run IPConfig:
The IPConfig tool is very useful in verifying the TCP/IP configuration of the computer you are using. This tool helps to troubleshoot the problems by using QuickBooks on the network.
Some of the most common IPConfig commands are as follows:
Command
Description
Ipconfig
Basic TCP/IP information
Ipconfig/ all
Detailed TCP/IP information
Ipconfig/ renew
Renew the IPv4 address for all network adapters
Ipconfig / release
Renew the IPv4 address for all network adapters
Steps to run the ipconfig:
To verify the TCP/Ip configurations of your computer, you may find the IPConfig tool. This tool helps you to resolve & troubleshoot problems while using QuickBooks on a network.
Here’s how
Select the Windows Start button.
Enter CMD in the search field.
From the list of results, choose Command Prompt.
At the Command prompt, enter ipconfig and then, press Enter.
If you need any more information regarding this, then you can enter ipconfig/? At the command prompt or visit support.microsoft.com.
When there is network problem: IP reverse lookup is failed:
Check whether the Windows can produce an IP address from a hostname and reverse the process.
If QBCFMonitorService/ QBDBMgrN is not running or if Firewall is blocking the QuickBooks
These are the common errors that you will encounter when firewall block Internet access that you require for a specific QuickBooks program. You can resolve this issue by updating your firewall to the latest release or you can configure exceptions and ports required for the firewall software.
When QBCFMonitor Service is not running
To open 8019 port for the tool and QuickBooks applications on the client and server, configure your firewall.
Make sure that the hosting of the server is on.
Now, ping the server and that should succeed from both the server and the client.
QBDBMgrN is Not Running:
In order to open all the QuickBooks applications and Dynamic database port for the QuickBooks File Doctor, you should configure your firewall. Configure the firewall on all the client computers and your server as well.
Make sure that the hosting is on the server.
Ensure that you are able to ping the server both with the IP and hostname on the server.
We hope that this article might helped you to fix network issues with QuickBooks . If you have any questions or queries or you need any type of help related to your QuickBooks software, feel free to contact our QuickBooks Help Number at +1-888-510-9198. We provide you a feasible solution for all your concerns.
FAQs Related to fixing Network Issues with QuickBooks File Doctor test Results
How do I fix network connection failure in QuickBooks?
You can fix connection failure by removing the network error message using the steps below: 1. Choose the reload tab. 2. Press F5 or press command + R for Mac to download the entire page. 3. In case the problem continues, reboot the browser and log in to QuickBooks online.
How do you resolve potential data issues in QuickBooks?
You can do this by performing the steps below: 1. Under QuickBooks file menu, also choose utilities tab. 2. You now have to pick the verify data option. 3. Now, click on ok tab. 4. Furthermore, continue using the file. 5. However, if the verify rebuild utility finds any issue with the data, you will get an error message.
Why is my QuickBooks file Doctor not working?
This can happen if you try to use damage files. The error might show up on the screen stating that you have lost your files. And file doctor is further unable to open them.
How do I know if my QuickBooks file is corrupted?
You can try running the QuickBooks verify data utility. This will confirm the corruption in QuickBooks and will further suggest you to rebuild data.
Accidently bumped into QuickBooks error code 6154, and don’t know what can be done to eliminate it? Well, this is a pretty common company file error in QuickBooks. When this error happens then the message is displayed on the screen as: “QuickBooks Error 6154 occurred when QuickBooks company file not open or QuickBooks unable to open specified folder or file.’’
There can be a couple of factors causing QuickBooks error code 6154. To learn further, make sure to stick around this piece of writing or connect with us at +1-888-510-9198 and let our experts and certified QuickBooks professionals.
What is QuickBooks Error Code 6154?
QuickBooks error code 6154 is a company file error that can be seen when the users are not able to open any of the company files as the computer will have problems in getting connected with the company file. This leads to QuickBooks software being unable to access any particular file or folder. As a result of this issue, you will not be able to open any of the company files/data. This is because the system you are working on has a problem establishing a connection with the company file.
If none of the methods above helped in fixing the issue, then try using QuickBooks tool hub. The steps involved here are:
Head to the Intuit website.
And start by downloading QuickBooks tool hub from the available link
After that, save the particular file that gets downloaded in a smooth useable location.
Now, after the download is complete, you must install and then set it up for access.
Moreover, navigate to the downloaded file folder.
And double click the QuickBooksToolHub.exe file to start the installation process.
You now have to perform the onscreen steps and press yes tab.
Open QuickBooks tool hub to use the tools to fix the issue.
Moreover, navigate to the program problems section of QuickBooks tool hub
This will further show quick fix my program to show and identify the issues with the system.
You will see different tools in different segments.
Solution 5: Update QuickBooks and authenticate the file type
You can experience an error when QuickBooks is outdated. The user is suggested to update the software using the steps below:
In QuickBooks desktop, head to the help menu.
After that, select update QuickBooks.
Also choose update now and click on get the latest update.
Perform the onscreen steps.
Ensure that the error is fixed or not.
Also verify the file is not encrypted or compressed.
Right click the company file and also click on the option for properties.
Now, select the option for advanced.
Once done with that clear the particular checkboxes for encrypt or compress
And hit ok tab.
Final Note…!
In case, you still face the QuickBooks error code 6154 issue, then you should seek assistance from QuickBooks Enterprise Support by dialing the toll-free +1-888-510-9198. Our Intuit Certified ProAdvisors will provide you a quick and easy solution to QB related technical problems.
Error 6154 is a common issue faced by QuickBooks users, which occurs when the software is unable to open or access a specific company file or folder. The primary causes of this error include: 1. Corrupted or damaged QuickBooks installation files. 2. Improper or incomplete installation of QuickBooks software. 3. Malware or virus infection affecting the system files or also QuickBooks-related program files. 4. Deletion of QuickBooks-related files by another program, either mistakenly or maliciously.
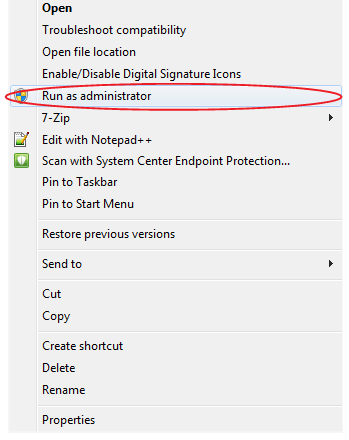
How can I resolve QuickBooks Error 6154?
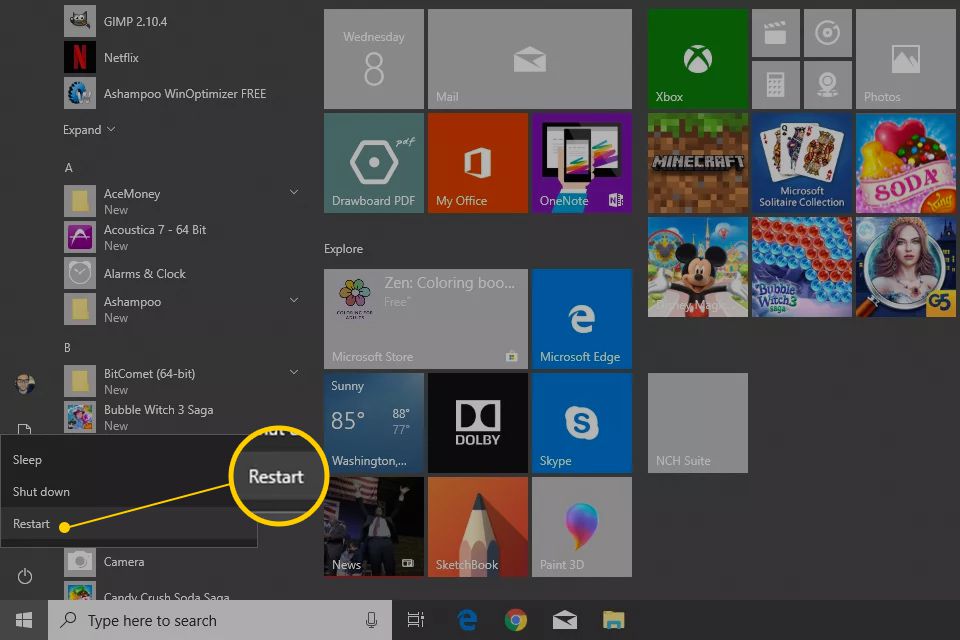
1. Restart your computer: Sometimes, simply restarting your system can resolve the issue, as it clears out any temporary glitches or conflicts. 2. Run QuickBooks as an administrator: Right-click on the QuickBooks icon and select ‘Run as administrator’ to ensure it has the required permissions to access the files. 3. Repair QuickBooks: Use the built-in repair tool within QuickBooks to fix any damaged or corrupted installation files. 4. Further, update QuickBooks: Ensure your QuickBooks software is up to date, as newer versions often fix known issues. 5. Also, scan your system for malware or viruses: Use a trusted antivirus program to scan and clean your system. 6. Reinstall QuickBooks: If all else fails, uninstall and reinstall QuickBooks to ensure a fresh, error-free installation.
How can I prevent QuickBooks Error 6154 in the future?
1. Regularly update your QuickBooks software: Keep your QuickBooks up to date with the latest patches and updates, as they often contain fixes for known issues and improved features. 2. Perform routine system maintenance: Regularly clean up temporary files, caches, and also other junk data on your system to reduce the chances of software conflicts and performance issues. 3. Backup your data: Regularly backup your QuickBooks company files and folders to prevent data loss in case of corruption or accidental deletion. 4. Use strong security software: Protect your system with reputable antivirus and also anti-malware software to prevent infections that could damage your QuickBooks installation or files. 5. Avoid installing unnecessary software: Limit the number of applications installed on your computer, especially on the same drive as QuickBooks, to reduce the risk of software conflicts and performance issues. 5. Regularly check for folder permissions: Ensure that the folder containing your QuickBooks company files has the appropriate permissions, allowing the software to access, read, and write data as needed.


![Fix QuickBooks Error Code 6154 [Company File not Open]](https://www.hostdocket.com/wp-content/uploads/2018/07/How-to-Resolve-QuickBooks-Error-Code-6154.jpg)