Are you in search of the procedure to resolve QuickBooks Error in Reload.SQL in Windows? Well, if this is true, then you have come up to the right place.
This is the kind of error that usually appears while opening a portable company file or accountant’s copy transfer file (QBX) in QuickBooks. So, for this, at first you need to recreate the Document or file and then send the generated file one more time to the Accountant.
QuickBooks Desktop’s latest version has labeled the QuickBooks Error in Reload.sql At Line issue.
To get this error fixed you need to update this QuickBooks Desktop to the latest version as a replacement for the present version. Even after getting the update done, if the error still exists then examine the folder which has stored Portable and Accountant’s copy, as there are chances that the folder might damage. Hence, in such circumstances transfer the company or accountant file to another folder and then try to restore or recover the same file from the new location. There are different kinds of reload.sql error messages that might appear while opening the file.
Therefore, in this editorial blog we have described the Reload.SQL error and its different forms as well as various quick fixes for them. Kindly read it carefully till the end and follow the blog if you can relate to it.
About QuickBooks Error in Reload.SQL At Line (Brief Description)
This table contains brief description about this QuickBooks Error in Reload.SQL At line along with its possible causes, symptoms and solutions to resolve it.
Error name
Reload.sql At Line
Software Developer
Intuit.Inc
Software Name
QuickBooks
Applies to
Windows XP, Vista7 & Vista8
Error Description
This error comes out when the user tries to open an accountant copy transfer file (.QBX). In order to escape this error, recreate the generated file and then resend the same file to the accountant.
Possible Causes
When the copy of the Portable or Accountant’s is collected over the network, Damaged installation of QuickBooks.
Symptoms
QuickBooks Desktop won’t respond or stopped working, Windows operating system got frozen.
Resolution
Assign QBX which is Accountant’s Copy Export file type and QBM, which is the Portable file type.
Probable Reasons behind this QuickBooks Error in Reload.SQL At Line
There are various reasons that are responsible for this QB Error in Reload.SQL At Line error given below:
One of the main reasons behind the occurrence of this error is, if the size of the file is bigger than 3MB or if the file of a Portable or Accountant’s copy restoration is done from a remote location.
Another probable reason could be if the copy of the Portable or accountants is being restored over the computer network.
It could also be possible if the copy of Accountant or Portable is restored with the damaged file folder.
It also occurs as a result of unprofessional installation of QuickBooks Software.
Different kinds of QuickBooks Error in reload.SQL At line for Windows
Here is the list of different forms of the QuickBooks Errors in reload.SQL At line that can occur in Windows is given below:
Error Message
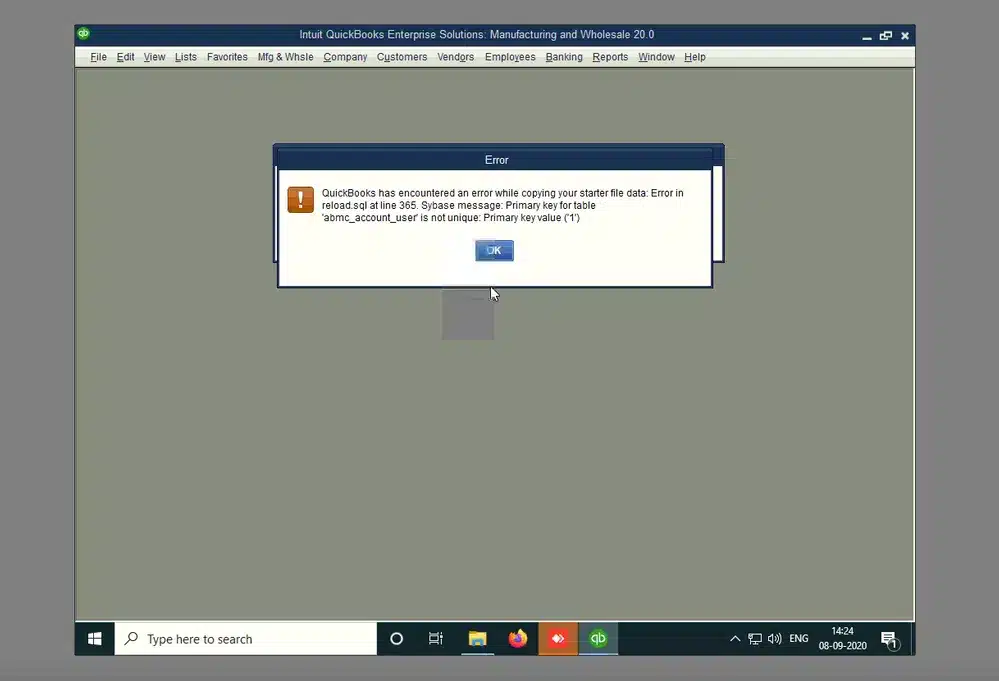
QuickBooks generally meets with the error while copying the starter file data. Error in reload.sql at line 365. Sybase message: Primary key for table ‘abmc_account_user’ is not unique: Primary key value (“1”)
Error Message
Error in reload.sql at line 29886. Sybase message: can’t transform hex string to varbinary
Error Message
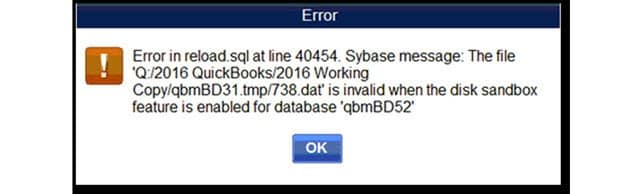
Error in reload.sql at line 40454. Sybase message: The file ‘Q:/2016 QuickBooks/2016 Working Copy/qbmB31.tmp/738.dat is invalid when the disk sandbox feature is enabled for database ‘qbmBD52’
Error Message
Error in reload.sql at line 25514. Sybase message: Right truncation of string data
Troubleshooting methods to fix QuickBooks error in Reload SQL
This error mostly occurs during the process of Accountant’s Transfer file. It is then transferred and can be typically resolved to reform the transfer file. It is then sent through File Transfer Service.
Method I
At first open the Accountants file copy which is generated while transferring data.
Mark theFile for Removing the Restrictions from Accountants Copy.
Now markon the Box that displays the message: Yes, the user wants to erase the Accountant’s Copy Restrictions
Createa latest Accountants Copy
Perform all the above steps also this error could be fixed in the latest version of QuickBooks Desktop. If you still face the same error, it shows that Accountant’s copy or Portable file might be damaged. At this time the user can transfer their company data file to another location through a restoration process.
Method II
Make sure that the file is restored locally and not over the network
Navigate to the folder of the file where Accountant or Portable’s copy file is saved
Mark on the file and select the copy
Now Open the C: drive and create the latest folder and rename it as QBTest
Then Paste the Accountant or Portable’s copy file on the new folder
You need to restore the file from the location of the QBTest file folder.
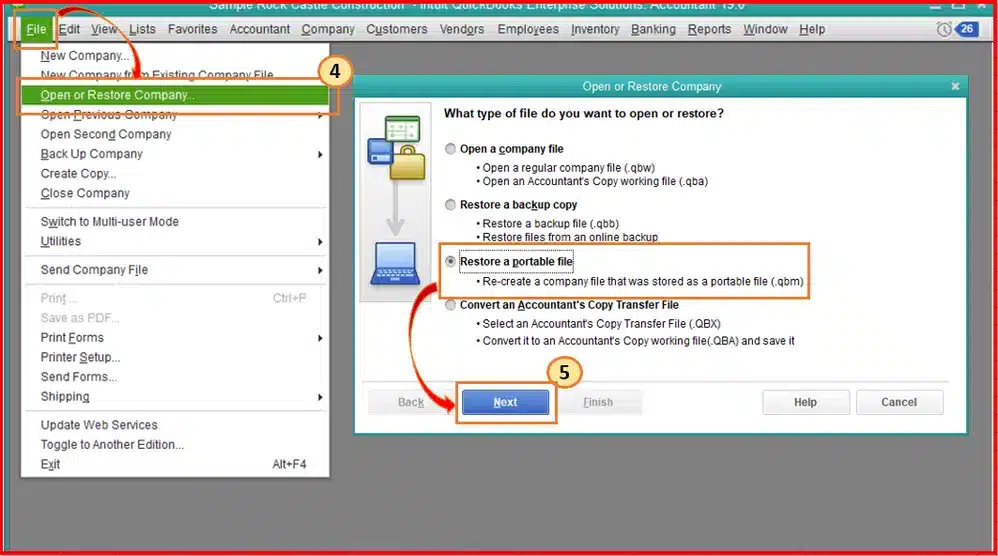
Now while holding down the Ctrl button, open the QuickBooks software as they are focused on the No Company Open window
Select open or restore an existing company file.
Go to the QBTest file folder. Look for the company folder file which was opened and copied.
To fix QuickBooks Error in Reload.SQL At Line in 25514 and 29886 for Windows
You can face this error while trying to open it when it is stored on a different system or through a network.
Basic Steps to resolve these are given below:
Access your QuickBooks Company File from which the accountant’s copy transfer file was generated.
After that remove the accountant’s copy restriction.
Then create new accountant’s copy and send this to your accountant.
To Fix QuickBooks Error in reload.sql At Line 40454 for Windows
Another QuickBooks error related to Reload.SQL that appears in the form of the following message:
“Reload.sql at line 40454. Sybase message: File is invalid when disk sandbox is enabled for database”
Basic steps to fix this error message are given as below:
Initially, by moving your file to the local system where you are making use of QuickBooks Desktop.
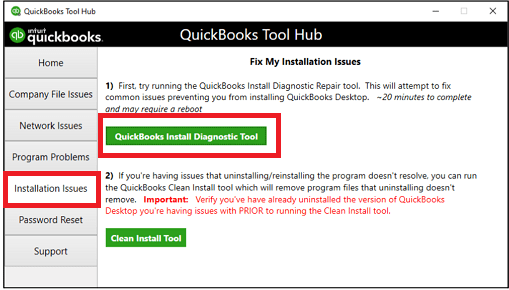
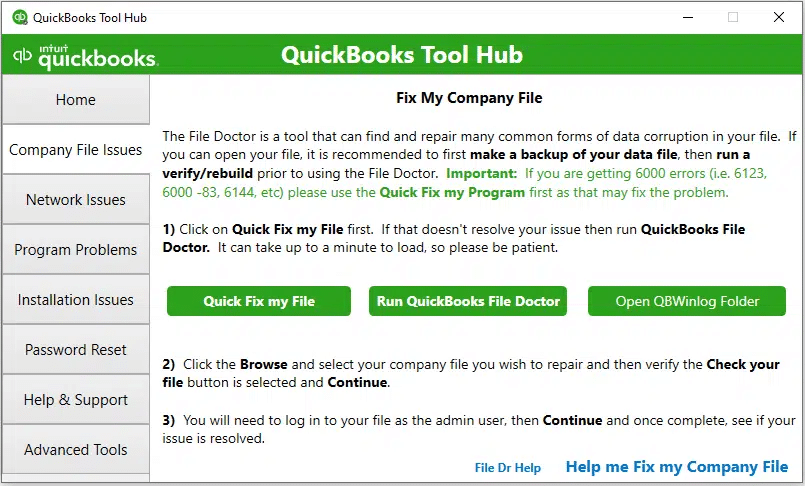
Start the procedure by downloading QuickBooks Tools Hub available on the website of Intuit.
After that, double click on the set-up file to install the QuickBooks tools hub.
Now you are then required to open the tool hub and then select the Installation Issues tab.
Open the QuickBooks Install Diagnostic Tool and go ahead with the scan process.
Grant the permission to QB Diagnostic Tool to identify or spot and then repair it if any Installation error is there in QuickBooks.
Once done with that, start the QuickBooks once more and also check if this tool could help you in resolving the Error in reload.sql.
If in case the error does not get resolved, then, go ahead and try for the next solution.
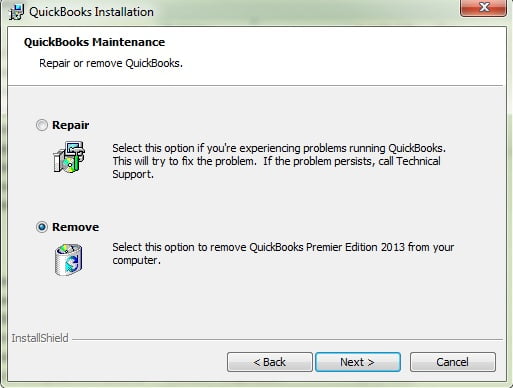
PROCEDURE 3: Mending of QuickBooks Desktop
This is the suitable method to resolve Error in reload.sql in QuickBooks for Windows which is done by mending QuickBooks Desktop. Follow the below mentioned steps as it:
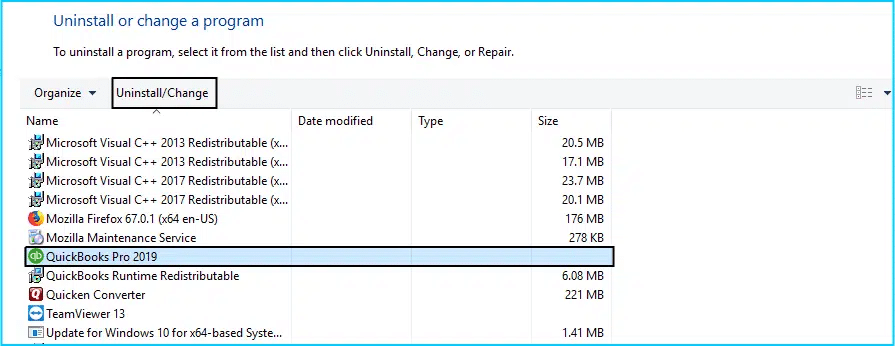
Press the start button and then open the Control Panel.
After that, opt for Programs and Features and click it.
Select QuickBooks and then choose to click Change/Uninstall.
Now, ahead to the Repair option and then follow all the onscreen direction in order to update the accounting program.
After the completion of repairing, switch on the QuickBooks and again make an effort to restore the accountants copy.
Also if the file isn’t restored, then proceed to the next method of cleaning install QuickBooks Desktop.
PROCEDURE 4: Reinstall QuickBooks Desktop using clean install
So finally, we have reached at the end of this post and let’s finish up today’s discussion with this last and the most effective procedure to resolve this Error in reload.sql in QuickBooks desktop is by reinstalling QuickBooks Desktop using clean install.
This procedure helps in complete removal of QuickBooks by following reinstallation of the program and clean installing QuickBooks. It is done with the help of the Clean Install Tool presented by Intuit, or you can manually uninstall the QuickBooks from the Control Panel.
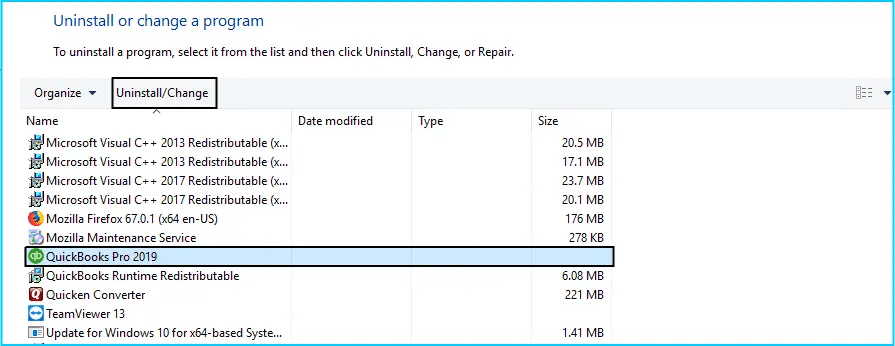
Start the procedure by pressing the Start button and then move ahead to the Control Panel.
Navigate to the Programs and Features.
Once done with that, go down in the list and Select QuickBooks software.
After that, opt for Uninstall/change and then press the Uninstall option.
Once the entire process is complete, start your system again and then reinstall the QuickBooks.
As for the registration and activation of the product you will need the original license and product keys.
And so, with this, Error in reload.sql in QuickBooks will get resolved.
Hopefully, we have reached at the conclusion of this blog where we have provided you with all the possible solutions to resolve the error in Reload.SQL At Line in QuickBooks for windows. Although, this problem can still persist in varied forms. So, for any kind of queries regarding this error, you can directly contact our QuickBooks error support experts by dialing our toll-free QuickBooks support number +1-888-510-9198 as mentioned here. Our team of experts is ready to give you immediate support for your issues.
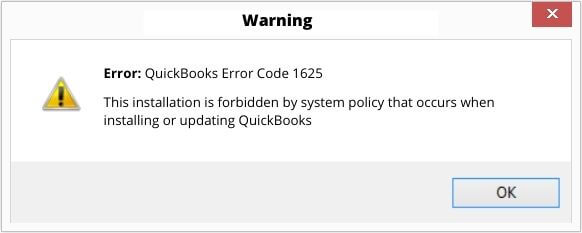
Relax; these things happen while installing updates on QuickBooks; QuickBooks Error 1625 is a bug that occurs if your windows installer file is missing or corrupted.
Majority of the trading and e-commerce business go for QuickBooks as an accounting solution due to its convenient and timely updates. The process of its installation and setup are also pretty easy. But while installing or updating the application you may encounter an unprecedented error known as QuickBooks Update error code 1625.
QuickBooks Update Error Code 1625 is another kind of error that you may face when some Microsoft Co-operation- related program like Windows installer is running in the background that on the other hand creates many technical issues. Moreover, it also occurs even more while establishing the framework or when starting and shutting down your system.
And the error message that pops up on your screen of this Update Error Code that:
”the installation is forbidden by the system’s policy when installing or updating QuickBooks”.
However, to fix such issues, all you need to do is disable the Prohibition on Non-administrators, configure your UAC Settings, make modifications in the software restriction policy, and try refreshing the Obsolete Drivers.
In this module, let us explore this QuickBooks Update Error code 1625 in detail, its causes and also the quick remedies to fix it. So, to know more about this make sure to read this article attentively till the end.
In case you have queries related to the QuickBooks error 1625 you can instantly ring our toll-free number +1-888-510-9198. Here, we have a team of QuickBooks professionals that are expertise in dealing with QB errors. They will guide and assist you immediately with the best solutions to fix this error.
Do you have any idea what triggers QuickBooks Error Code 1625?
Well, yes there are some of the prominent reasons that trigger QuickBooks errors 1625. They are listed below:
First reason could be damage or incomplete download of Windows installer programming.
Another reason could be if the user has not signed in as an administrator mode.
When the Windows Installer Framework arrangement blocks the user from programming refreshes.
If any of the Mandatory files or program of Windows Installer got deleted.
When the Windows registry error occurs due to changes done in Windows installer programming.
And also, sometimes any malware or virus has damaged Windows Framework records and installer related program.
Well-known Areas where this QB Update Error Code 1625 message is visible:
When updating the software or while establishing the program.
Immediate shutting down or starting of your Desktop.
While installing or updating Windows on the system.
Prominent resolutions to fix the QuickBooks Update Error Code 1625
There are numerous resolutions available that can be implemented for treating this Error Code 1625. Let us understand some of these methods in detail one by one:
Method I: Try to turn off the Non-admin Restriction
Some of the computer systems are set up in such a way that asks for admin privileges while carrying out an installation on them. So, in order to avoid this QuickBooks Error Code 1625 and go on with the installation process, follow the steps as mentioned below:
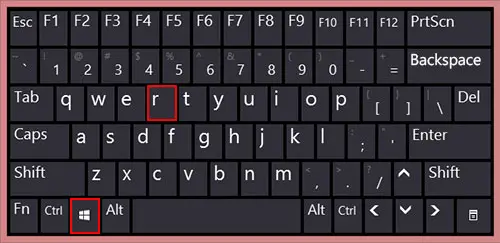
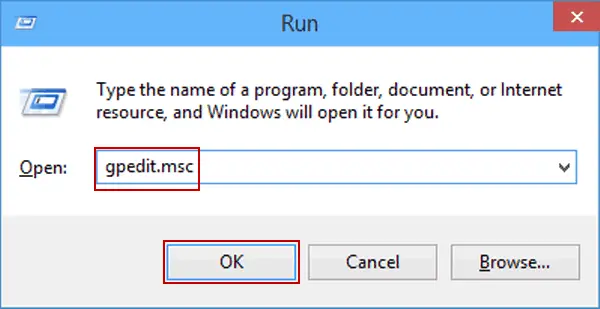
Start this by pressing the Windows Key + R to open the Run window.
Now type gpedit.msc in the search bar and tap the Enter bar.
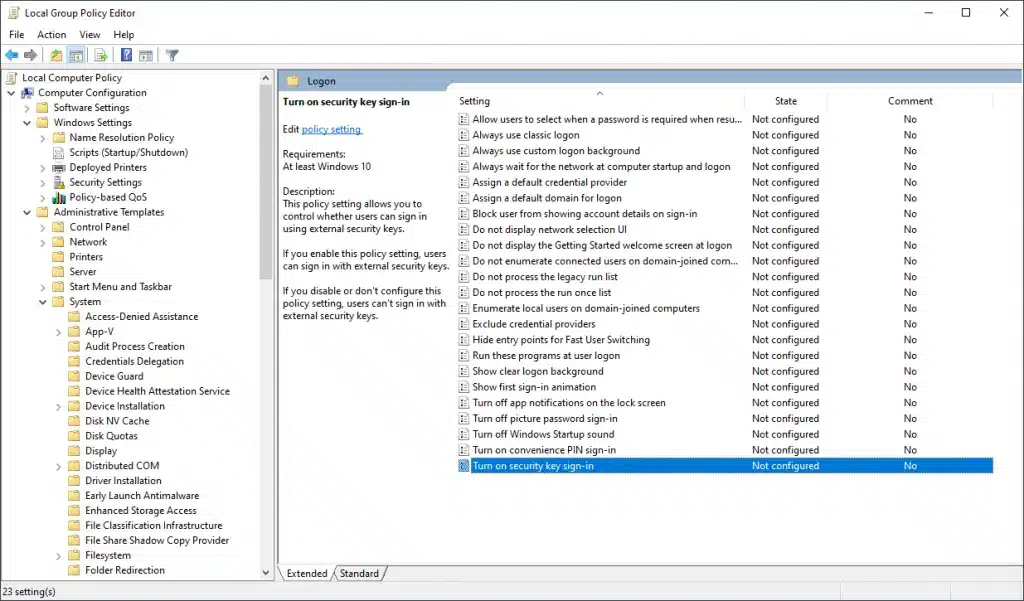
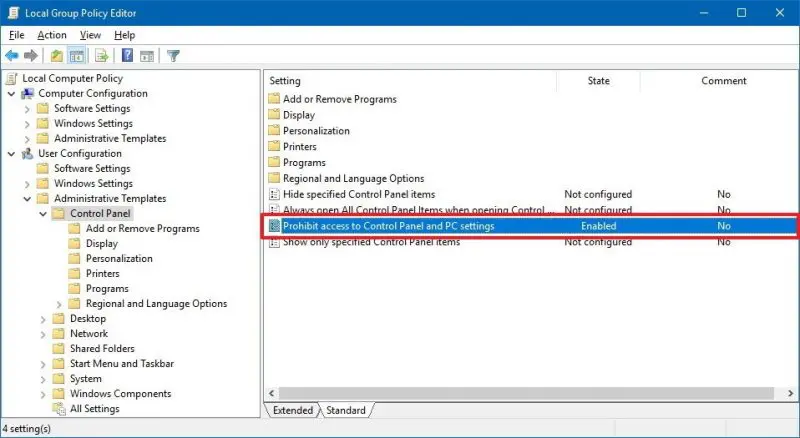
Navigate to the Local Group Policy Editor window and choose Local Computer Policy.
After then go to the Computer Configuration tab and Select the Windows Settings.
Once done with that Select the Administrative Templates option and then double-click on Windows Components.
In that, hit on the Windows Installer and go to the Applying vendor-signed updates.
At this step Search for Prohibit non-administrator option and then double-click on it.
Lastly, turn the slider to the Disabled option and Tap on the OK button.
Reboot your system and also try to install or update the QuickBooks again.
Kindly Note down: Abovesteps are for the Windows Vista 7, 8 or 10.
Method II:Alteration of UAC Settings
Another method is to dismantle the prompts of this QuickBooks Error code 1625 is altering or modifying of UAC settings by following the steps mentioned below:
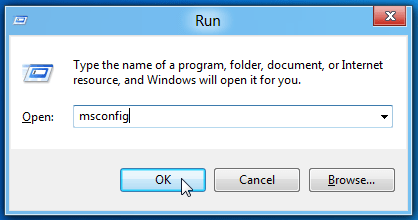
In order to open the Start menu, press the Windows Key from the keyboard.
Type in MSCONFIG and hit enter tab
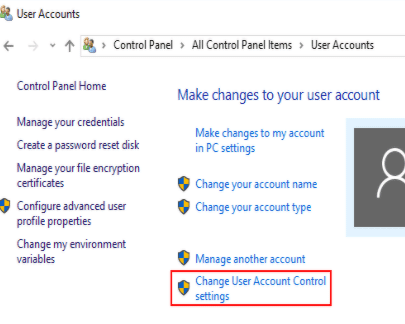
Or navigate to the Control Panel for going to the User Accounts.
After that Select the User Accounts again and then click on the Change User Account Control Settings.
If the UAC window prompt asks for confirmation, please select the Continue option.
Now, turn the slider down to the Never Notify option and hit the OK button.
Once you are done with all the above foregoing steps, Restart the system and check if the error still appears. Also try to install the updates again.
Method III: Alteration of Computer’s Software Restriction Policy
In order to get rid of this QuickBooks Update Error Code 1625 in an easy way you can also go for alteration of the software restriction policy.
The software restriction policy is responsible for identifying programs and running them on a domain. This same policy can also be the reason behind the QuickBooks Error Code 1625, and so the user should alter or modify it to allow QuickBooks to install the updates by adhering to the steps mentioned below.
Start the process by going to the Start tab and locate the Control Panel
From this Control Panel menu, click on System and Security tab.
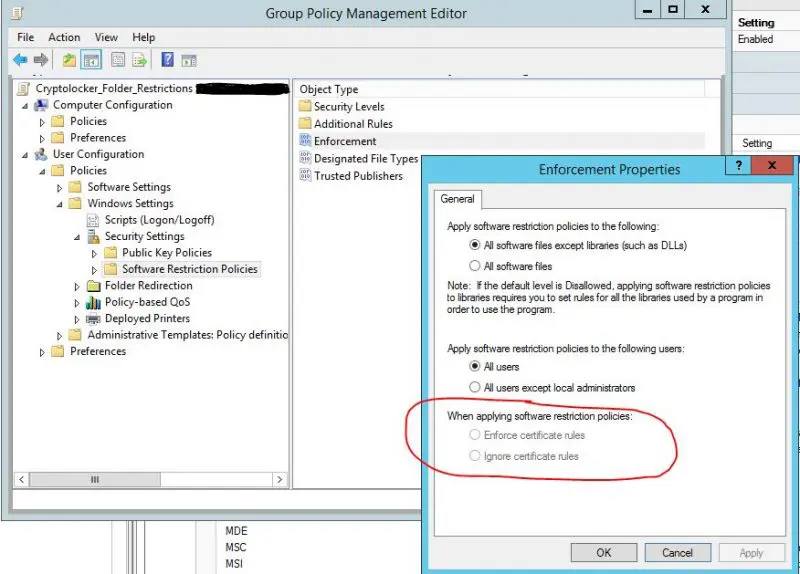
Now Go to Administrative Tools and Select the Local Security Settings option.
Opt for Software Restriction Policies, and if there are no restrictions, look for the Software Restriction Policy Node and then right-click on it.
Hit on the New Software Restriction Policy and then you need to double-click on the Enforcement.
After that, under this Enforcement Properties window, click on All users except local administrator option.
Hit on the OK tab and lastly restart your system.
You can also verify to see if the QuickBooks update error 1625 is still present.
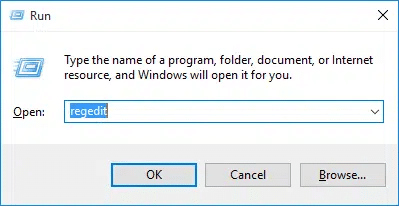
Method IV:Launching of regedit
After trying the above method, you can also go for other effective method in order to fix this Error code 1625 instantly. And the steps to launch this regedit are given below which are to be followed as it is:
Navigating to the Start button is the initial step.
Then on the Start menu, enter the command in the search bar without tapping on the Enter button.
Click the enter tab while holding the Ctrl + Shift keys simultaneously on the keyboard.
After that the permission dialogue box appears on your screen, where you need to click yes option.
Once done with this, a blinking cursor and a black box will be on your screen.
Now Input regedit and press the Enter key.
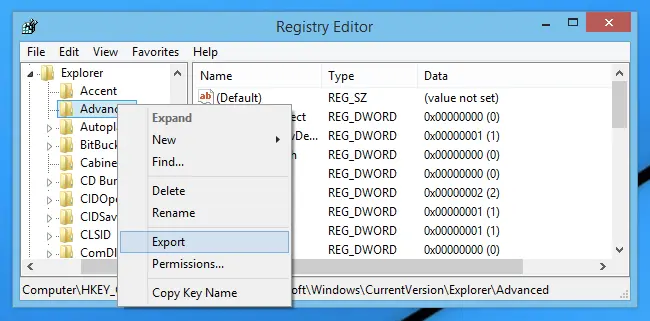
Choose the export option in the file menu.
In the file name box, write the name of the backup company file.
Then choose the Selected Branch and then click the Export Range field.
After that, hit the OK button.
Go to export and choose a location to save the file using .reg file extension.
At the end of the process, backup of the Windows installer will be available to you.
Method V:Update the Window drivers andverify the obsolete Gadget drivers
These Windows drivers can work fine one day, but after updating your windows and not the drivers they might go obsolete. So, it becomes important for you to verify them for fixing error code 1625. And for this, you need to refresh the drivers. Also check them whether they are used correctly. If somehow, they are not used properly, it will give rise to this QB Update error 1625.Therefore it is advised to use the Driver Doc (Driver Refresh Instrument) in order to refresh the gadget drivers’ major part. It also helps to improve the overall functioning of the drivers and enhance the working by fixing the errors.
Winding up here!
Here we have reached to the end part of this module and we are very hopeful that all the above given information and troubleshooting methods are relevant to treat this QuickBooks Update Error Code 1625 successfully. Also make sure that you log in as an administration mode so that you can easily modify all the necessary settings. However, if you still get any sort of difficulty regarding this error or any other component related to this, then it is advisable to get immediate technical assistance with our QB technical support team of expertise by dialing our toll-free number +1-888-510-9198. They will ensure you to provide you help within a short span of time and to whom you can address all your queries.
Want to learn how to print W2 Forms in QuickBooks Desktop? Well, then you have entered to the right place. In this piece of article, we will guide you in every way that you need to know about W2 Forms and how to print W2 Forms in QuickBooks Desktop and that too in very basic steps. Here we go:
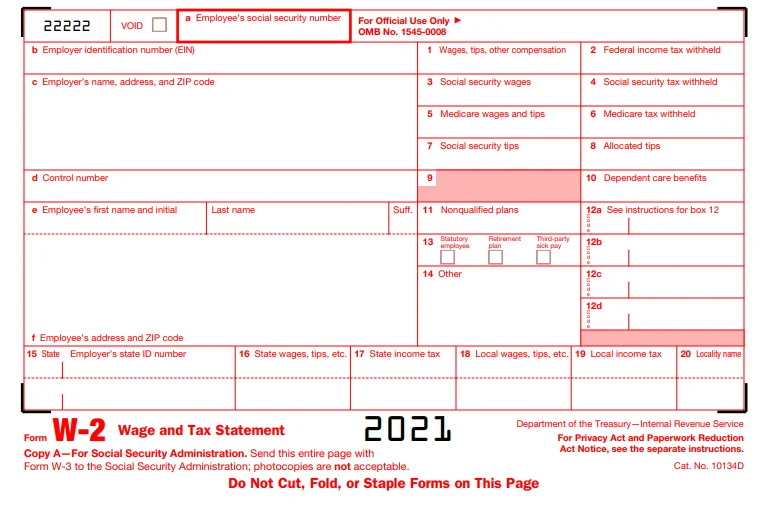
Basically, W-2 Forms are nothing but the statements that contain the information related to salaries or the wages paid by an employer to his employee. In addition to this, it also reveals all the information about the tax deduction from employee’s paychecks which is important for the employee while preparing for its tax returns.
However, Printing W-2 forms is quite critical task for any trading firm as it requires everything about employee’s statement of taxes, social security, report of wages paid along with Medicare taxes etc.
Therefore, before proceeding through the printing process of W2 Forms in QuickBooks Desktop, it is important for you to know some more about W2 Forms, its importance and its printing requirements.
As we are well versed with the fact that in every nation the citizen who is earning well income has to pay income tax every year. And all this tax amount (beneficial) Collected by the Government from its citizens is then used for the developments of its state and the country. So, in every firm employer deducted certain amount from its employee’s salary and files taxes every month for them without even letting them know. Although this entire withdrawal amount is then paid to the IRS (Internal Revenue Service) by the end of each month. Therefore, an employer has to give a detailed account of the amount being deducted as a tax from the salary of the employee. This is only the source from where the W2 form comes in.
W2 Form is a document that gives you detailed information about the amount deducted from an employee’s account on an annual basis. It is also known as the Wage and Tax Statement Form that assists you to calculate the exact amount when you are calculating the return at the end of the year. And W2 employee is the employee is that individual whose taxes are deducted from its salary/wages by his employer to file taxes and submits additional information to the Government.
This W2 Form is sent on or before 31st January every year so that one gets enough time for filing the income taxes before the deadline mostly within the first week of the month of April. This tax is filed by the employer is for the previous year, e.g., you will get the W2 form in January 2021 for the income earned in 2021.
3 Things you should always keep in mind before and after printing W 2 Formsin QuickBooks
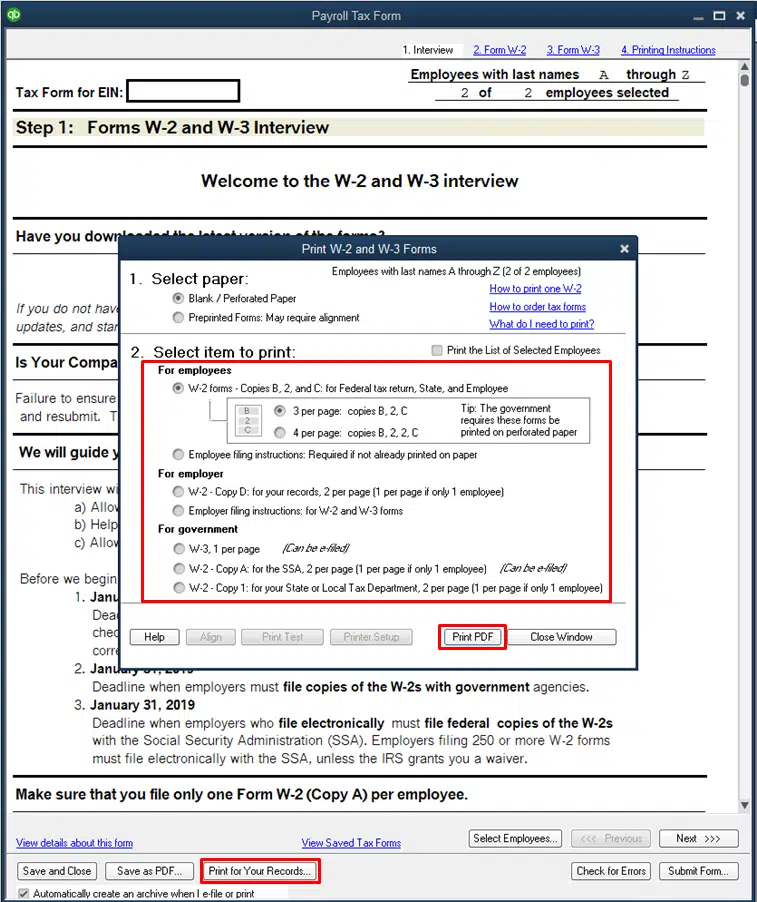
Save the draft for the W-2 form
For saving the draft click on the Save as PDF option in the Payroll Tax Form window. This Save As button is shown on the bottom left side of the screen. Once done with this select the location to save your W2 forms as a draft which is then done by clicking the Save button.
While e-filing or printing in QuickBooks Desktop it automatically archives W-2 forms in QuickBooks
In the window of Payroll Tax Form, it automatically creates an archive when e-file or print box is selected. This option is located on the bottom left side of the Payroll Tax form window. It saves the W2 form automatically in the default location and in the PDF format.
Process to access the archived forms when there is no active subscription of payroll tax form window
You can also access your archived W-2 forms in case your active subscription plan has expired or you have not purchased it yet.
For this, search the archived W-2 forms in the system for the folder having archived data without opening the QuickBooks program.
The location of the files is C:UsersPublicDocumentsIntuitQuickBooksSample Company FileQuickBooks XXXX(Write Company name) Tax Form History.
Now you have to select the folder in the location that has your archived form which is required. It is the same folder whose name includes 941, W2 with its name.
Pre-Requisites to print W 2 Forms in QuickBooks Desktop
A few of the basic necessities that you must arrange in advance for printing the employees W2 form in QuickBooks Desktop are stated below. They are:
Kindly have the updated or supported version of QuickBooks Desktop installed in your system. Also ensure that this version of QB is compatible with your Windows OS of your system.
Next thing required to print W2 form is the Black ink to print it on the paper.
Active QuickBooks Payroll standard service is also required.
Make sure that you have latest tax table of payroll on your system.
It is also suggested to have W2 paper for your printer and the payroll service.
We also recommend to make use of perforated paper/blank papers or pre-printed laser printed forms either.
Lastly, it is advised that for the ink jet printers you can also use pre-printed forms.
Now you can go ahead for the process of printing W2 forms in QuickBooks Desktop.
3 Basic steps to print W2 Forms in QuickBooksDesktop
Once you are done with all printing requirements, let’s start the process of printing the form with these basic steps. They are as follows:
STEP I: Opening the W-2 form from QuickBooks Desktop
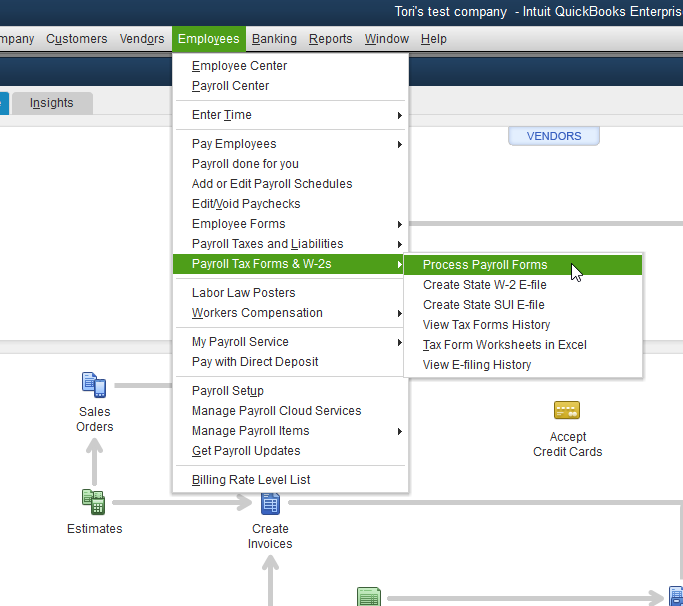
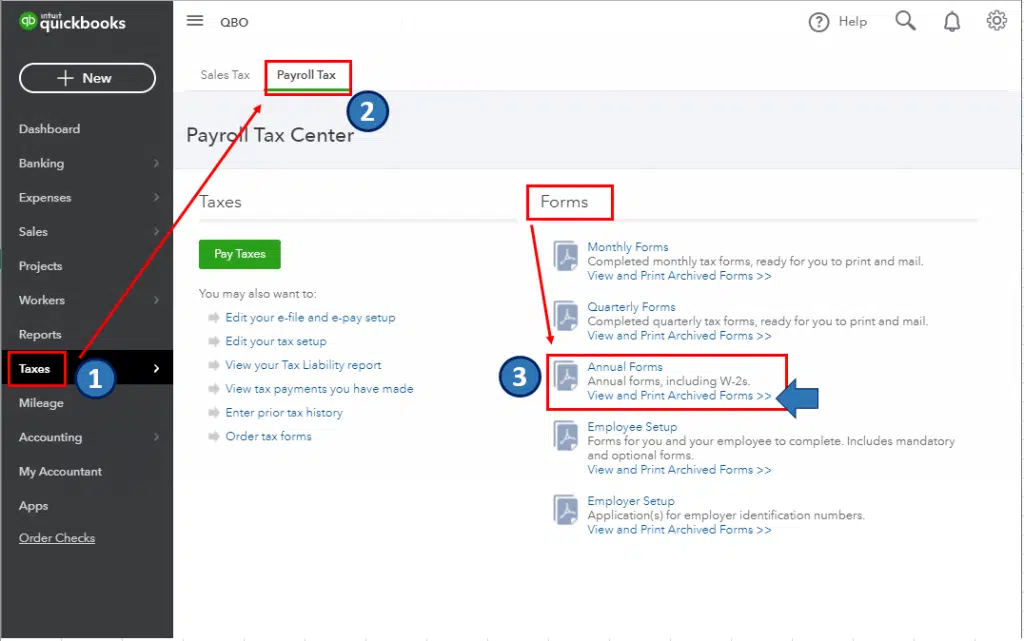
In the beginning, go to the Employees menu and then choose payroll taxforms and W2s
Further click on the payroll forms process
Now choose the tax statement transmittal and annual Form W2/W3 wage
Then hit the “Create form” button for creating it.
Suppose you need to file the forms of all your employees then for this select All Employees option.
Along with that, click on the last name of the employee
Now you have to add/Introduce the year of the form you are printing and then hit the OK button. Only one version of your tax form is saved for QuickBooks Desktop.
For instance: If the QuickBooks 2017 version of your form is already available, but you need to print W2 forms for 2016, you will require a newer version of the form to use it.
Next you have to select the employees for printing the form. For this, click on review/edit if you haven’t reviewed all your W2 forms.
For continuing the printing process, you are advised to click on the submission form. Also, to print the type, select the workers. Again, if your W2 forms have not been reviewed, click on review/edit option.
We are hoping that you find this article helpful for printing W2 forms in QuickBooks Desktop. Additionally, you got the opportunity to learn every detail about W2 forms through this article. But if you are not very good at following instructions and then you could be stuck between.
Therefore, if you encounter any kind of trouble related to this W 2 forms printing process, we would recommend you to take technical assistance from our QuickBooks technical support team by just dialing our toll-free helpline number +1-888-510-9198 Our team of QB experts is available round the clock to provide you immediate support.
As the name suggests, the fixed asset manager is used to manage the fixed assets in QuickBooks. It is basically a feature available in QuickBooks that manages the deprecation of fixed assets according to the standards published by the IRS. Note that the term depreciation methods here are predefined reports you can use to manage the asset information. Moreover, the fixed asset manager is only accessible in QuickBooks desktop premier accountant, enterprise, and enterprise accountant versions.
In today’s segment, we are going to learn the process to use fixed asset manager in QuickBooks and other related details. Thus, make sure to read this segment carefully. If you are new to QuickBooks or do not have proper knowledge about the software and require professional assistance, then feel free to connect with the QuickBooks support professionals at +1-888-510-9198, and we will provide you with instant support and assistance.
Before you learn the steps to use the fixed asset manager in QuickBooks, it is important to understand a little about fixed assets and the fixed asset manager. Well, fixed assets are basically property that cannot be converted into cash easily and conventionally cannot be sold to the end users directly. And talking about the fixed asset manager, it basically lets the users to handle the fixed asset and depreciation account efficiently. Once the user sets up the fixed asset manager, he/she can use it to manage the accounts. It helps in calculating the reduction in the value of the asset abiding by the standards that are published by the IRS. There are certain terms involved in this tool, which we will be elaborating on below. Let us have a look.
Important Terms related to FAM
Capitalization Limit
This means the dollar limit for fixed asset purchases to be considered as an asset instead of expense. This depends upon the company size.
Fixed Asset
They are basically the tangible items (i.e. machinery, furniture, computers, and equipment) that are owned by a company and have a useful life of greater than one year and whose value is greater than the company’s capitalization limit.
Depreciation
This is basically the amount by which the value of the asset reduces after use or due to deterioration, obsolescence, and impending retirement. It applies particularly to physical assets like equipment and structures. It is important to track the depreciation for tax purposes.
Disposal of Asset
It is basically removing an asset from the company either by theft, selling, or throwing it away.
Fixed Assets
Types of Depreciation Methods
Straight-Line Method (SL)
It is an easy method that assigns an equal amount of depreciation each time.
Declining-Balance Method
This assigns more depreciation expense to the early years of an asset’s life when it is new. The reason is that there should be less downtime and fewer repairs in the early years, and the company should get more use out of the asset at the beginning of its life.
MACRS (Income Tax Method)
This method uses a double-declining balance process. However, the user only takes one-half year’s depreciation in the first year. And then, the user switches to the straight-line method in the middle of the asset’s life.
Predefined Reports
ACE Adjustment Calculation
This is done to determine the total ACE adjustment needed to compute a tax return for a corporation. Here, the assets are grouped by category and sorted by asset number within each group.
Amortization Schedule by General Ledger (G/L) Account Number
This is to see a summary of the activity of the amortized assets. Here the assets are grouped by general ledger account number and sorted by asset number within each group.
Amortization Schedule by User Defined (1 to 5)
This report is to see a summary of the activity of the amortized assets, grouped by one user-defined classification. Assets are grouped by the user-defined field and sorted by asset number within each group. Note: There is a report for each user-defined field that you use.
AMT Adjustment Calculation
This report is used to print the necessary information for AMT depreciation adjustment reporting (Federal depreciation – AMT depreciation = AMT adjustment). Assets are grouped by category and sorted by asset number within each group.
Asset Disposition by Asset Sales Description
This one is to see a summary of disposition information according to the sale description assigned to each asset. Moreover, Assets are grouped by asset sale description and sorted by asset number within each group.
Asset, Basis and Disposal Detail Report
This particular report is to print the asset details for each asset in the Asset and Disposal tabs that you see on-screen.
Assets Acquired in the Current Year
And this one is to see a summary of each asset purchased in the current year. Moreover, the assets are grouped by general ledger account number and sorted by acquisition date within each group.
Depreciation Schedule by G/L Account Number
This particular report is to see an activity summary for each asset, grouped by general ledger account number. Assets are sorted by acquisition date within each group.
Depreciation Schedule by User Defined (1 to 5)
This report is to see an activity summary for each asset, grouped by one user-defined category. Assets are sorted by asset number within each group. Note: There is a report for each user-defined field that you use.
Lead Schedule by Category
To see an activity summary for each asset, grouped by category, in a traditional lead schedule format. Furthermore, Assets are sorted by asset number within each group.
Lead Schedule by G/L Asset Account
To see an activity summary for each asset, grouped by general ledger account number, in a traditional lead schedule format. Furthermore, assets are sorted by asset number within each group.
Lead Schedule by Location
To see an activity summary for each asset, grouped by location, in a traditional lead schedule format. Assets are sorted by asset number within each group.
Lead Schedule by Tax Form and Property Description
To see an activity summary for each asset, grouped by tax form and property description, in a traditional lead schedule format. Assets are sorted by asset number within each group.
Monthly G/L Accumulated Account Summary
To see the total monthly cost additions and deletions and their beginning and ending balances. This report is grouped by general ledger asset account. Assets without assigned account numbers are grouped by “No Account Number.”
Monthly G/L Asset Account Summary
This one is to see the total monthly accumulated depreciation/amortization additions and deletions, and their beginning and ending balances. This report is grouped by General Ledger Accumulated Depreciation and Amortization account. Assets without assigned account numbers are grouped by “No Account Number.”
Monthly G/L Expense Account Summary
This report is required to see the total monthly depreciation/amortization expense additions and deletions and beginning and ending accumulated depreciation and amortization balances. This report is grouped by General Ledger Depreciation and Amortization Expense account. Furthermore, assets without assigned account numbers are grouped by “No Account Number.” It should be noted that this report will appear from the list after expense data are entered.
Personal Property Schedule by Year of Acquisition
These reports work to see a summary of depreciation amounts for assets that you marked as personal property. Assets are grouped by the year each asset was placed in service and sorted by acquisition date within each group.
Projection by Category
This one is to see a five-year projection for each asset. Assets are grouped by category, and sorted by asset number within each group.
Remaining Basis Over Remaining Life Report
This particular report can be used to identify assets that were not fully depreciated. Assets within this report are grouped and subtotaled by category.
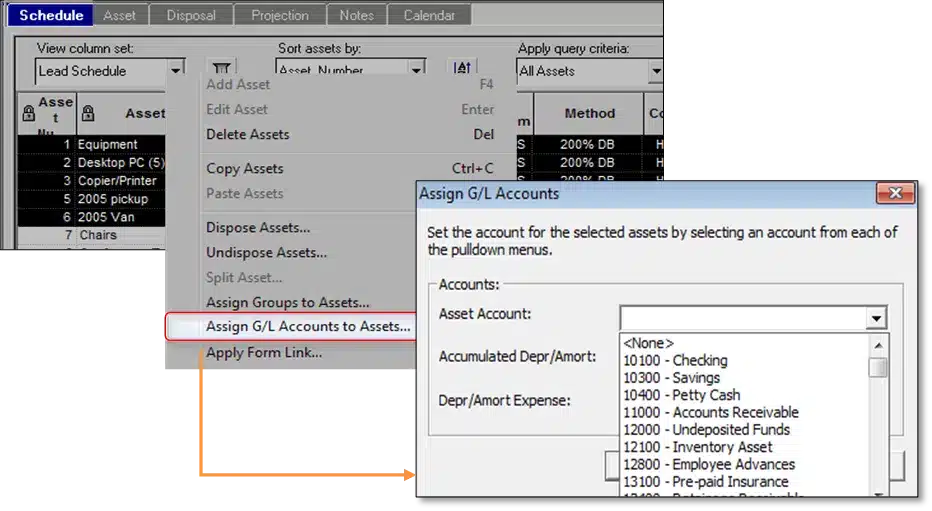
Steps for assigning an account to multiple assets
When you convert the asset data from one version of QuickBooks to another or when you import the assets into FAM, it might leave some general ledger accounts. Moreover, the fixed asset manager manually assigns these accounts. This requires you to perform the following steps:
The very first step is to open the fixed asset manager.
Highlight all the assets that you need to assign to a specific account in the schedule tab.
Right-click the assets selected and then choose to assign G/L accounts to assets.
The next step is to select the account and click on the ok tab.
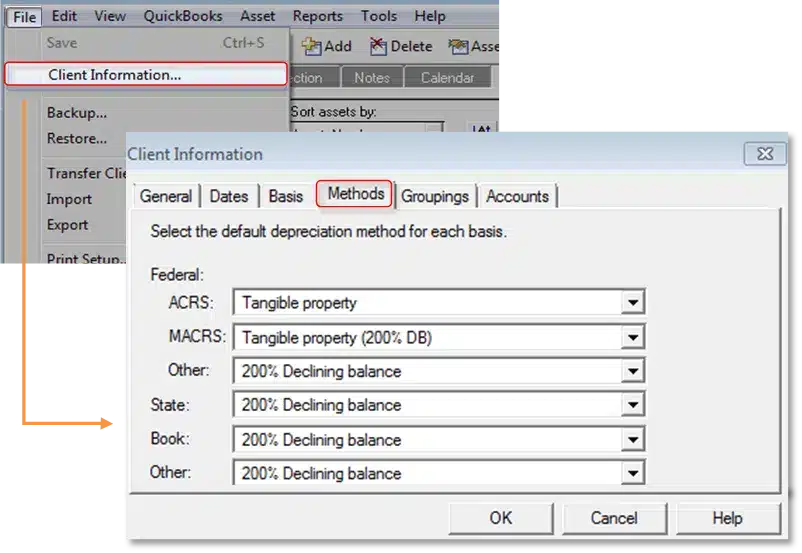
The user might need to change or add the depreciation method for a fixed asset to let the fixed asset manager calculate the current and prior depreciation correctly. Thus, perform the steps below:
The user needs to open the fixed asset manager.
After that from the file menu, choose the client information tab.
Furthermore, go for the appropriate depreciation method from the methods tab.
Once done with that click on ok to save the changes made.
Depreciating an old asset in QuickBooks
The business might have some old assets recorded in the books. Thus, it is important to depreciate those assets by performing the below set of steps.
In QuickBooks desktop
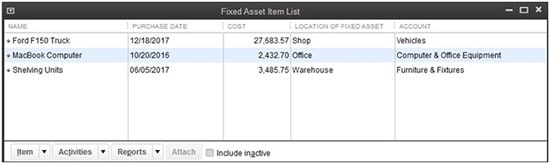
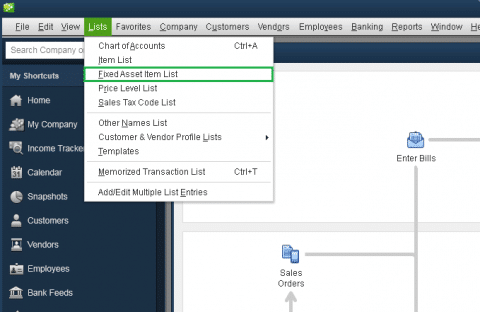
The user needs to choose the fixed asset item list from the menu.
And then select the item and click on new.
Enter the necessary information and also click on ok to close the new item window.
In fixed Asset manager
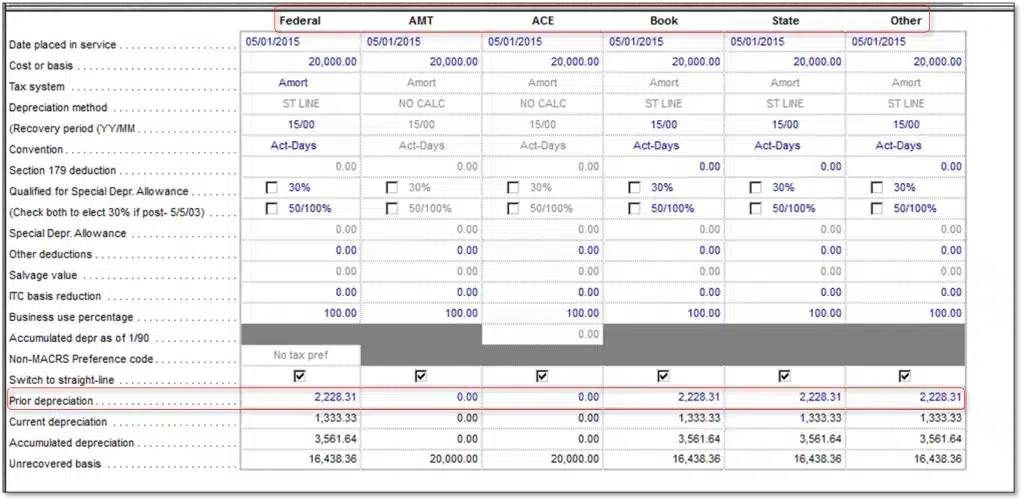
It should be noted that if the current date is entered in the date placed in the service field, then the previous depreciation will gray out. Moreover, it is important to learn the amount of depreciation booked in previous years before performing the steps. This information can be provided to you by your accountant. You can continue with the steps to depreciate the asset in the fixed asset manager.
The very first step is to click on the ok tab when the asset sync log window opens up.
After that, double-click the asset in the schedule tab.
Once done with that head to the previous depreciation row and then go for the amount displayed.
In addition to that make proper changes, and adjust the AMT, ACE, Book, State, and other columns.
To end the process, you need to choose the save tab.
Export QuickBooks fixed asset items to Pro Series form 4562
Note that the QuickBooks fixed asset manager can only export the data to the same year of the Pro Series. The reason is that QuickBooks is based on the calendar year, where the fixed asset manager and pro series are based on the tax year. This simply means that the QuickBooks desktop 2019 comes with FAM 2018 which can export to pro series 2018. The steps to be performed in creating the file with the form that is the same as the form in QuickBooks desktop in pro series.
In QuickBooks desktop:
The user needs to create FAM asset by selecting a fixed asset item list, from the lists menu.
And then, select the item and click on new.
Once done with that, enter the fixed asset information and click on ok tab.
The user will then have to import QuickBooks FAM information into the fixed asset modules.
Followed by selecting the manage fixed asset from the accountant menu.
Moreover, select create a new fixed asset manager client and click on ok tab twice.
Enter the date in particular and choose next.
Also, click on next.
Moreover, choose the default depreciation method for each basis and hit next.
The user further needs to choose a method of how he/she wants the fixed asset items brought in the fixed assets module from QuickBooks desktop and hit next.
Choose the type of assets to save to the fixed asset item list in QuickBooks and then click on next.
Furthermore, choose the finish tab.
The last step here is to click on ok in the asset synchronization log window.
In the fixed asset manager
Here, the user needs to choose export and Pro Series tax from the file menu and then hit the export tab.
Once done with that, go for the file from the export Pro Series tax client file list.
Furthermore, choose the client file and hit export.
Lastly, choose the ok tab, where the message states the export has been completed successfully.
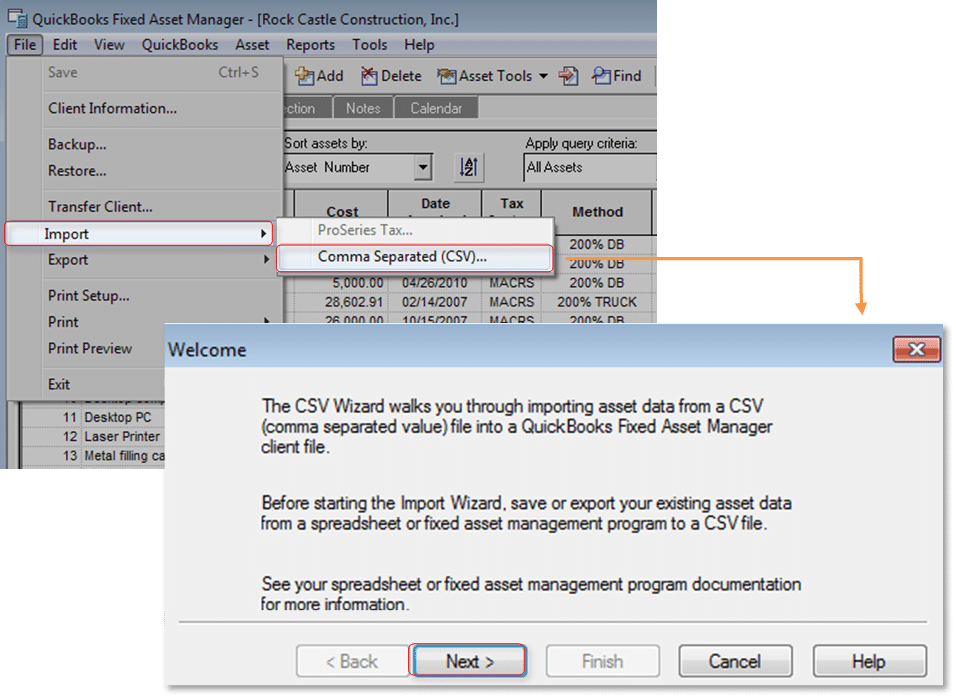
Import Fixed Assets from Excel into the Fixed Asset Manager
One can transfer information from the third-party application to Fixed Asset Manager as long as you can export data as CSV file.
The first step is to open fixed asset manager
After that, from the file menu, choose import
Once done with that, choose CSV to start the import wizard
Moreover, perform the onscreen prompts to complete the import
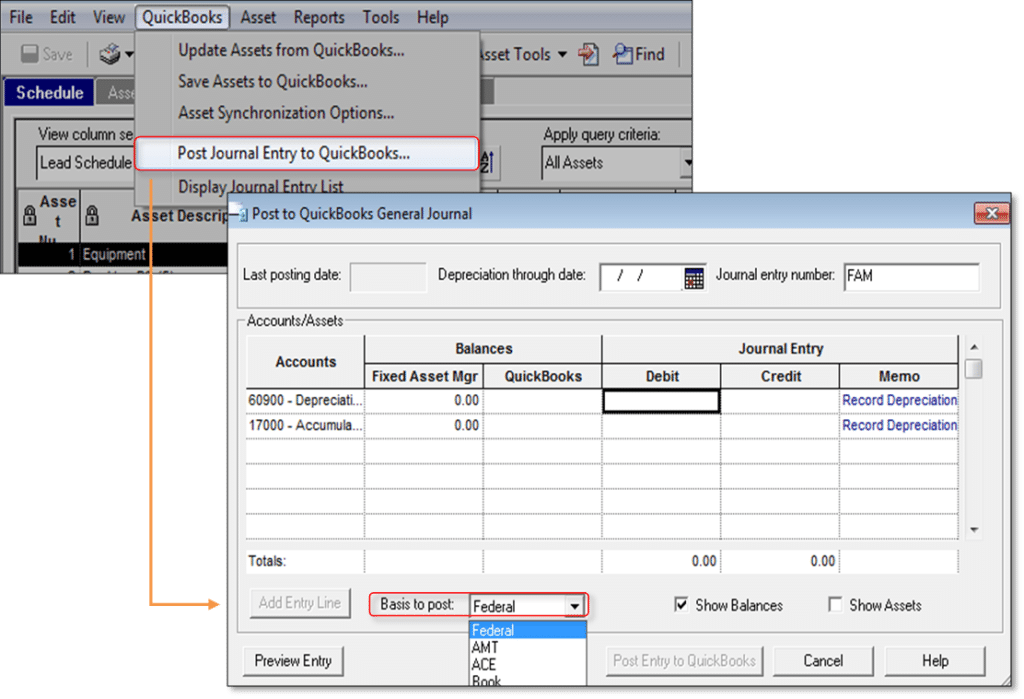
Choose the basis on which to post a journal entry
In fixed asset manager, change the basis of posting the journal entries.
At first, one needs to open fixed asset manager
After that, choose post journal entry to QuickBooks from the QuickBooks menu
Furthermore, at the bottom of the window, choose the desired posting basis from the basis to post drop-down menu
Lastly, the user needs to post the journal entry as usual
Towards the end of this post, we hope that the information shared in above might be of some help in making the most use of QuickBooks fixed asset manager. However, if you are having any queries or if you require our assistance at some point in time, then in that scenario, consult our QuickBooks tech support professionals at +1-888-510-9198, and we will provide you with instant support and assistance. We are a team of certified QuickBooks professionals who work round the clock in providing immediate support and assistance.
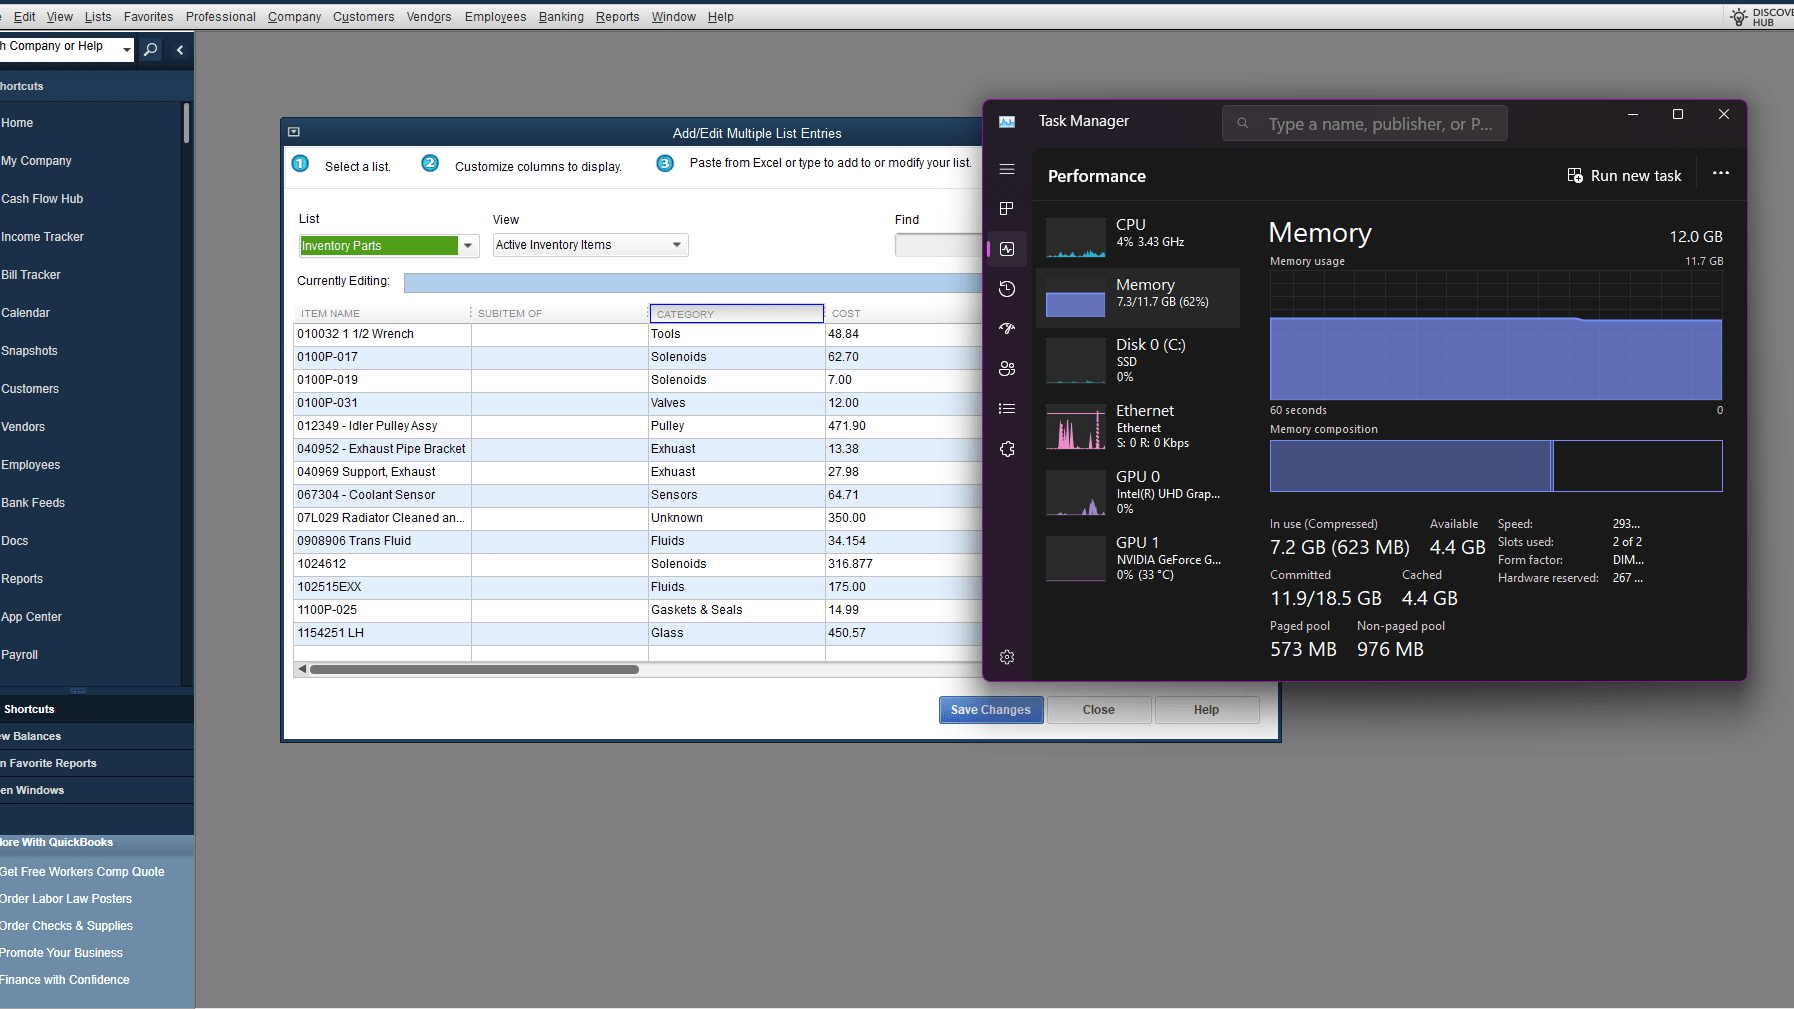
Recurring glitches and technical snags are quite common in QuickBooks, which might further lead to frequent freezing or even crashing of the software. In this segment, we are going to discuss the QuickBooks Freezing Problem. This simply means that the software hangs and doesn’t take any commands for some time. It rather creates a new off-screen window running in the background, and when the user tries to close the software, the window doesn’t shut down, ultimately leading to the freeze issue.
Freezing errors in QuickBooks can be quite annoying, as they might interrupt the smooth working of the software and would further end up in losing the unsaved data. To learn more about this error, you can simply scroll through this segment carefully. Or can also consult our QuickBooks tech support professionals at +1-888-510-9198, and let them help you with the issue ahead.
What is QuickBooks Freezing up Error?
QuickBooks freezing issue usually stops the overall functionality of the software, as it might start showing random glitches and pauses. When the QuickBooks is showing a freezing issue, then it isn’t possible to work on it. QuickBooks freezing up error is usually seen when the company file exceeds the limit of storage and cannot work properly due to storage issues. In case the system is outdated or corrupted, or if the user is having damaged company files, then experience such an error is most probable.
What instigates the QuickBooks freezing error?
Coming across this issue is possible when the installer freezes while installing the QuickBooks software. Usually, it might get stuck on the installing ABS PDF driver window. Other than that, there can be a bunch of other factors triggering this issue. Let us have a look:
One of the basic factors causing this issue can be if the windows OS is out of date.
Furthermore, in case the company name is too long, then you might end up in such an error.
The user can also experience this issue if the PDF and preference files get damaged.
Moreover, if the file doesn’t permit the user to operate the window, then such an error can be seen.
Another possible reason can be, a damaged Windows operating system or a missing QBWUSER.INI file
You can also face similar issues if there are applications running in the background.
Possible Symptoms Indicating the QuickBooks Freezing Problem
Identifying the error becomes easy with the following signs and symptoms. Let us have a look:
In case the system slows down or freezes for a few seconds.
Or if processing operations in QuickBooks becomes much more difficult.
Also, in case the QuickBooks slows down and doesn’t respond to the inputs.
Effective Fixes for QuickBooks Freezing Problem
There are a bunch of solutions that you can perform to get rid of the QuickBooks freeze error. Let us check out each of the solutions one by one:
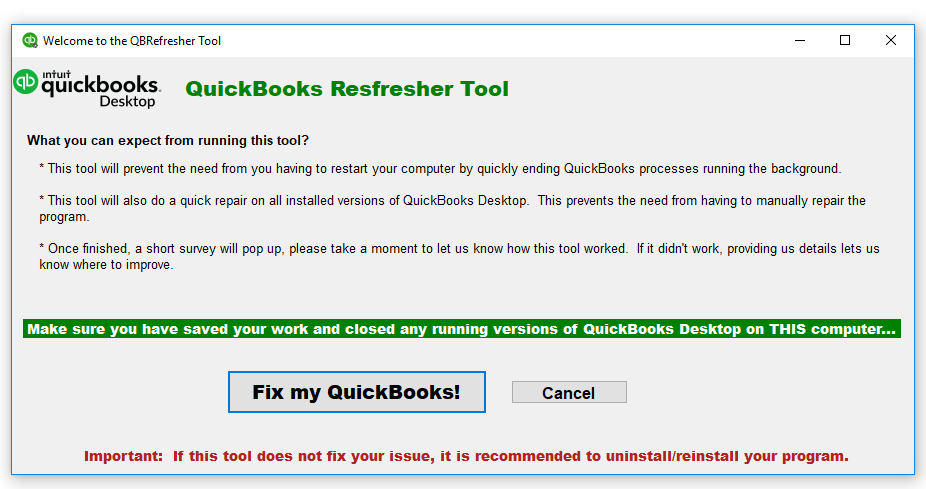
Method 1: Use the QuickBooks refresher tool
Under this process, you are required to close the QuickBooks desktop.
After that, download QuickBooks refresher tool.
Now, save the file on the desktop.
Post that, run the QBRefresher tool.
Re-open the QuickBooks desktop.
And this would fix the issue up to a certain extent.
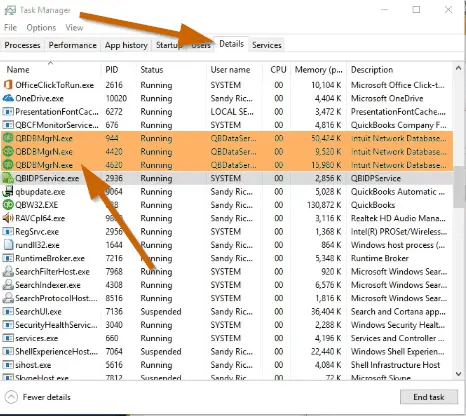
Method 2: Use the Task Manager to close QB-related programs
This process requires you to sail to the task manager and then click on ctrl + Alt + delete.
After that, select any open QuickBooks program that initiates with the letter QuickBooks or intuit.
Now, click on end task to end the process.
And lastly, shut down the task manager and reboot the software to see if the error gets fixed or not.
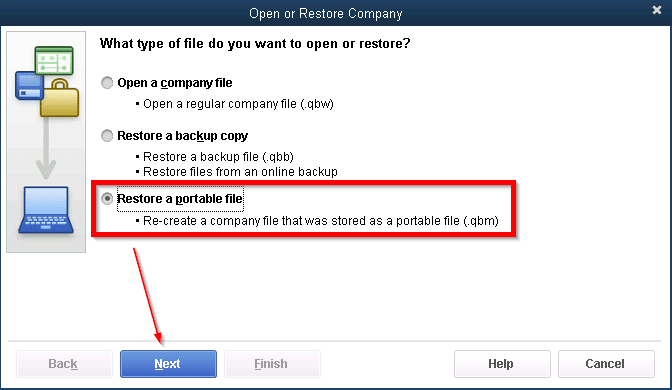
Method 3: Restore the Portable Company File
In case you are experiencing any data issues, then the software allows you to create a portable file in QuickBooks that can be used to address the issue. This can be done using the steps below:
The very first step is to access/open the QuickBooks file and opt for File.
Now, select the Create Copy option.
Also, click on the Portable Company File and then click on Next.
You are now required to select the location to save the portable file and then click on save and hit ok tab.
To restore the portable file, you can move to the file menu and select open or restore company option.
Now, click on next and select restore a portable file option.
The next step is to look for a portable file and select it.
Also, click on open and next respectively.
The last step is to click on save after changing the location of the company file.
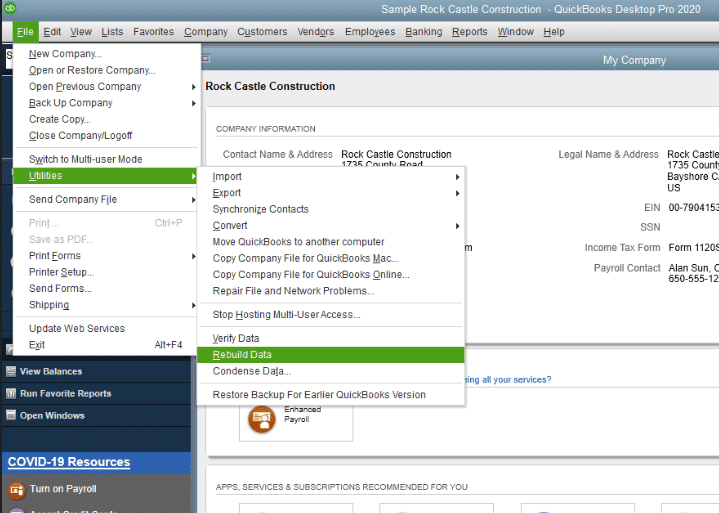
Method 4: Use the Rebuild Data tool
Here, you simply need to open the file menu and head to the utilities tab.
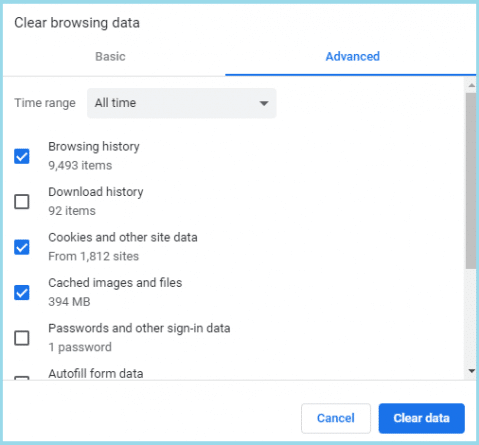
Method 6: Clear the browser cache and temporary files
Often the cache files might create issues in QuickBooks, especially slow and QuickBooks Freezing Problem. Thus, the user should try to clear browser cache and remove the access data which slow down the system.
After that perform the onscreen steps and let the tool fix the issue.
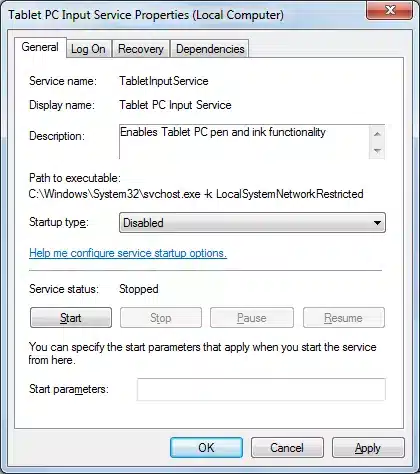
Method 8: Disable the input services
Under this process, press Windows + R and enter in MSC.
After that, click on ok tab.
Now, double-click the system input service.
And then, click on the stop the service option.
Now, double-click the input services and select the properties tab.
Disable the start-up type and hit on the OK button.
Lastly, shut down the services menu and then reopen QuickBooks.
Method 9: Edit the DAT and DDF files
Here, firstly close the company files
After that, search for the company directory and rename ‘DAT’ to ‘OldUserPRef.DAT.’
Now, delete each file with the DDF extension.
Open the company and click on confirm to save the payments from the same directory.
After that click on print to print successfully
To Conclude!
We end this segment right here, with the hope that the information discussed above might be of some help in dealing with the QuickBooks Freezing Problem. On the contrary, if you are facing some issue in getting rid of the error or if you are getting the same error again and again even after performing the steps discussed above, then in that scenario, we recommend you connect with our QuickBooks Desktop tech support professionals. Give us a call at +1-888-510-9198 and we will provide you with instant support services.
FAQs- QuickBooks Freezing Problem
What to do when QuickBooks Freezes?
When your QuickBooks software freezes try to check the internet connection. If there is any issue with the internet, then you can try restarting and fixing the issue. You can also disable other programs to fix the issue, if it is caused due to hindrance of any other program.
Why does QuickBooks keep freezing?
There are a couple of reasons due to which you can experience this issue:
QuickBooks trying to open too many files together.
You have a lot of applications open at the same time.
The system might not have enough memory to handle all the information.
Compatibility issue with other programs on the system can also cause such an error.
How do you unfreeze QuickBooks?
You can unfreeze QuickBooks using the steps below:
Head to utilities from file menu
Click on rebuild data and click on ok tab.
Move to file menu and head to utilities and select verify data
In the next step, you will be asked to rebuild now or view errors.
Click on ok tab and QuickBooks freezing issue will not show up anymore.
![How to Resolve QuickBooks Error in Reload.SQL at Line? [Fixed]](https://www.hostdocket.com/wp-content/uploads/2023/06/How-to-Fix-Error-in-reload.sql-in-QuickBooks-for-Windows-1080x630.png)