Every year Intuit, the developer of QuickBooks, releases the latest version of this accounting software which rolls in with new and upgraded functionalities and some fixes for the bugs that are present already. These updates are also known as maintenance releases for “patches.” The updates optimize the performance of QuickBooks and fix many known issues automatically. All these updates come at no extra cost for product releases. You can download these updates to enhance the company’s productivity. Moreover, upgrading the software regularly ensures that you are up-to-date and also prevents any sort of issue that might hinder the smooth working of the software.
In this article, we are going to talk about the process to upgrade to QuickBooks 2022 in detail. If you are interested in knowing more about this or if you are planning to upgrade to QuickBooks desktop 2022, then reading this article carefully is all that we recommend. Moreover, if you are seeking expert assistance, then feel free to talk to our experts at +1-888-510-9198, and they will help you with answers to all your queries.
Following are the perks that you can enjoy after upgrading to QuickBooks desktop 2022:
One of the major benefits can be that the user might be able to update guarantees better security of the data
Moreover, upgrading ensures error free user knowledge
It will fix difficulties to some common security loops and bugs
Real time invoice status tracking, improved data file, etc. are some characteristics that are seen while updating QuickBooks
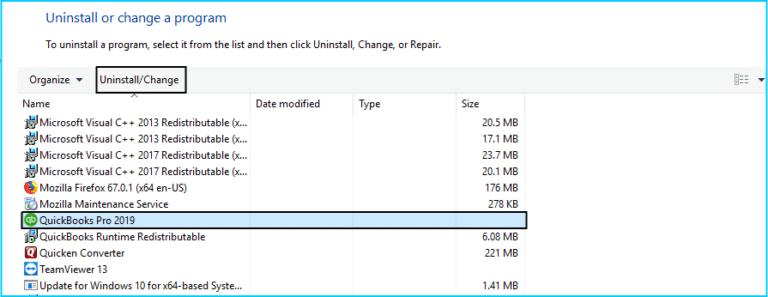
Steps to check whether QuickBooks desktop is up-to-date or not
It is very much essential to check whether your software is updated to the latest version or not. This can be done by performing the set of steps below:
At first, open the QuickBooks desktop.
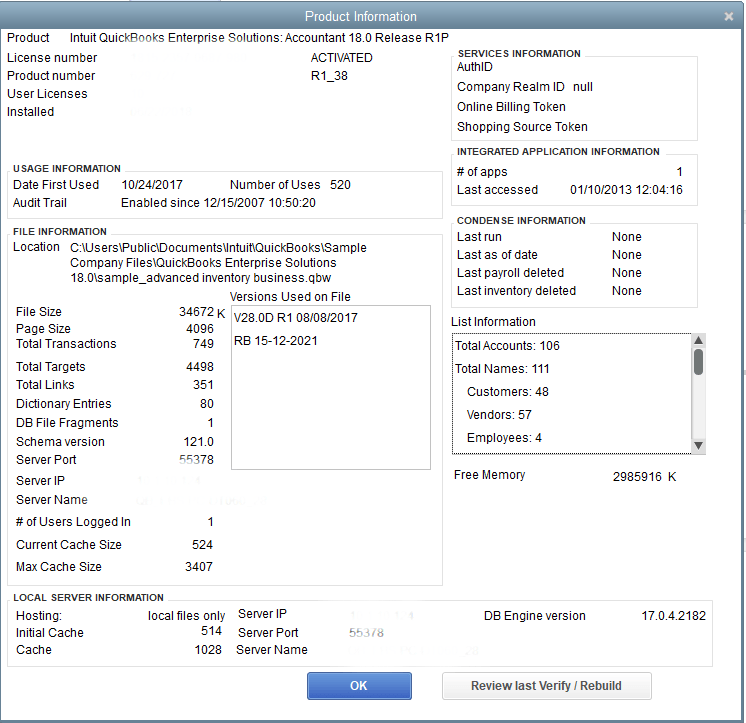
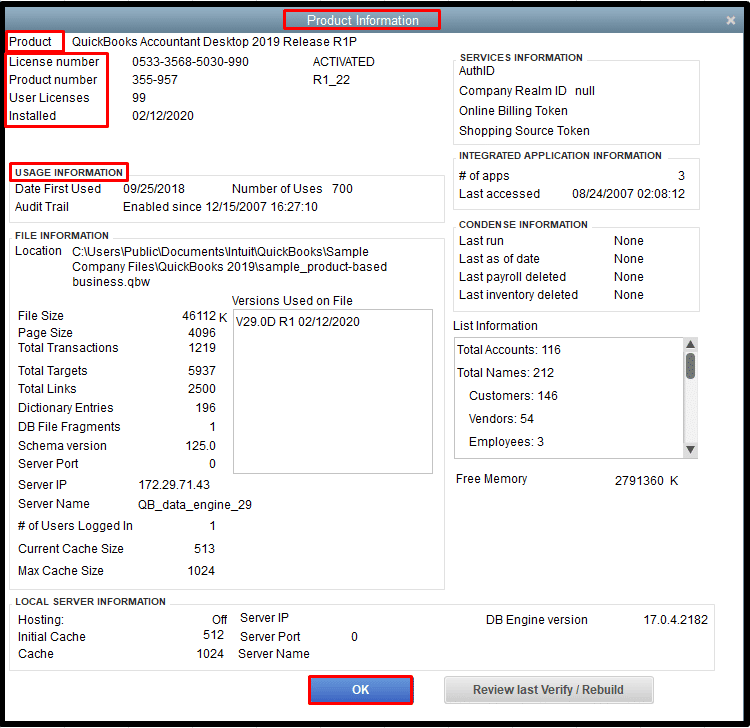
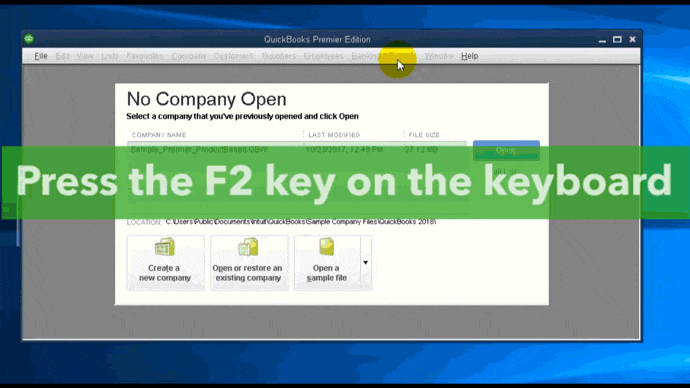
Press and hold F2 or Ctrl+1 key for opening the product information window.
Now, check the current version and release.
After that verify the available QuickBooks release.
Intuit rolls out new QuickBooks versions every year. This year the new version has something very from the previous releases. The new QuickBooks Desktop 2022 is now subscription-based software which means the users will have to pay each year for the upgrade. The new subscription-based software has a lot of features except that it needs to be renewed each year. Now you must be wondering about the cost of this new software, well for the QuickBooks Desktop 2022 pricing you can go ahead to our “QuickBooks 2022 Pricing” section of this blog. If you have questions regarding QuickBooks 2022 without subscription, get in touch with our QuickBooks 2022 support team via chat or phone.
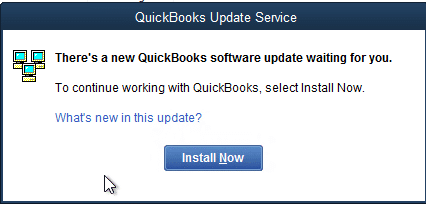
After the user has downloaded the updates, it should be noted that all the essential company files will be installed to the correct location on the system automatically. Moreover, all the updates, post downloading the updates would automatically be prompted. The user might get a notification to install the update the next time whenever he/she starts the accounting software.
This particular method checks intuit services for new updates. The available updates are only downloaded when you are not using your QuickBooks and the internet. And it will download the available updates when you are not using the internet. To check if the software is running or not, this method will itself download updates from the Intuit server. The user has the choice to disable the automatic update option in case he/she didn’t wish to update the software.
Download and Install Automatic update to QuickBooks Desktop 2022
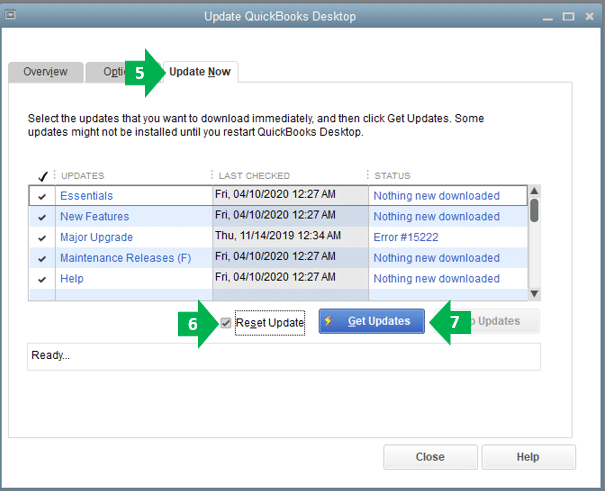
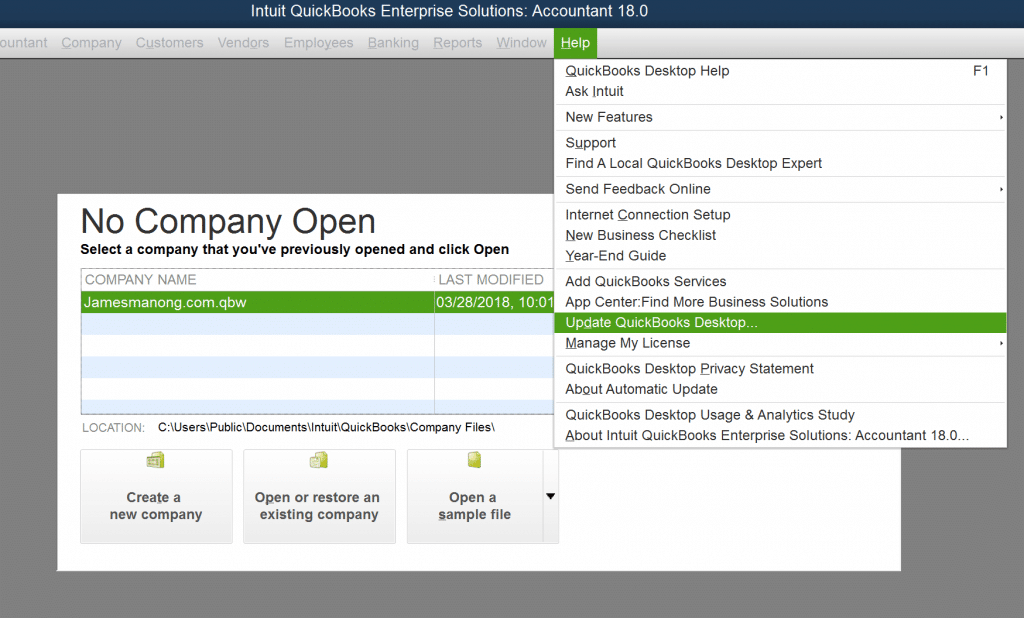
The very first step is to open QuickBooks software and then move to the help menu.
Now, select the Update QuickBooks tab.
Click on the Update Now tab, in the update QuickBooks screen.
The user is then required to eliminate all previously downloaded updates and then tick mark the reset update box.
After that select Get updates icon.
End the process to restart the QuickBooks application.
Steps to enable or disable the automatic updates option for future:
Under this method, the user should head to the help menu and click on update QuickBooks.
After that click on the options tab in the Update QuickBooks window.
Choose the option of your choice
Go for Yes to enable and no to disable the option for QuickBooks.
Also, opt for the update you wish to receive and take out the unnecessary updates from the update section if for enabling automatic update option.
If the user clicks on disable option, then user will stop receiving all notifications even if there are notifications available on the Intuit server.
This feature is just to remind the user to check updates and doesn’t always mean that an update is available.
Once done with that hit a click on Save and then Close.
The above-mentioned steps are for enabling and disabling the QuickBooks update option, the user can move on to the next step to update your QuickBooks desktop to the latest release.
Step 2: Immediate Update Method to Upgrade to QuickBooks Desktop 2022
This particular process allows the user to download the updates directly from the Intuit server. It does not need QuickBooks to be running in your system and can be used at any time. The user can go for this method to download updates even if he/she has enabled Automatic Update. It’s advisable to check for updates at least once a month.
How to check for updates and install them?
You need to first open your QuickBooks and go to the Help menu.
Now, click on Update QuickBooks and then Update Now.
After that go for update you want to download and tap on Get Updates.
The user can also learn what is included in the update from the Update column.
Hit the Maintenance Release link. A new page will show up with changes/improvements in the update.
After that shut down the QuickBooks.
Next time when the user uses QuickBooks, he/she will receive a prompt to install the update.
The user can go to download it now or later options respectively. After that restart your computer after the installation is complete.
Consider re-installing the updates in the sequence they appear in. Not following the provided sequence may lead to issues in opening the company file.
In case the user is facing issues with the update feature or wants to install updates using the update feature, then downloading and installing available updates is recommended. It is suggested to use the update feature to install QuickBooks updates. The user should ensure to update all copies in case he/she uses multiple copies of QuickBooks.
QuickBooks Pro and Premier: The user can download updates for multi-user mode.
In case the user is using QuickBooks pro or premier in multi-user mode, then it is suggested to install updates on every system. Connect the computers to the internet and download and install the updates. The user also downloads the update on one computer on the network and later shares it.
Steps to share the updates
First, the user should open the shared company files.
And then, move to Help menu and click on Update QuickBooks.
Head to the Options tab.
Choose Yes for the Share Download option.
Now, go for the Save button.
Once the user applies to all the mentioned steps, the updates that he/she has downloaded will be shared to all computers. The updates get downloaded at the location in QuickBooks where, after turning on the share option, your company files will be located.
Now, the user should install new release updates for the QuickBooks company file.
As we have already explained about the subscription-based model of QuickBooks in the previous sections of this post, now it’s time to get to know the QuickBooks 2022 pricing. The cost for QuickBooks Desktop 2022 starts from $399.95/User/Year which for the most basic version i.e. QuickBooks Desktop Pro 2022. To get to know about the other versions i.e. QuickBooks Desktop Premier 2022 and QuickBooks Enterprise 2022 get in touch with our dedicated support team of QuickBooks experts. Also, for questions such as ‘Is QuickBooks Desktop 2021 available?‘ or ‘How to get QuickBooks 2022 without subscription?’ You can contact our support team and avail different non-subscription versions.
Conclusion!
Coming to the end of the article, we believe that the reader might be able to successfully deal with the upgrade process of QuickBooks desktop 2022. Just in case the user gets stuck at any point of time or need our assistance for any QuickBooks related issue like QuickBooks 2022 pricing, or QuickBooks 2022 without payroll, or to know the answer to the query ‘Is QuickBooks desktop 2021 available?’, then contacting our tech personnel at +1-888-510-9198 is recommended. We are a team of technically sound QuickBooks professionals who work round the clock to provide immediate support services.
FAQs Related to Upgrade QuickBooks Desktop 2022
How do I upgrade QuickBooks desktop to 2022?
You can use the discovery hub to upgrade. The steps involved here are: 1. Open the discovery hub and choose upgrade to QuickBooks 2022 2. Select proceed to upgrade and then upgrade now 3. In case you want both versions, choose keep old version on my computer and leave blank otherwise 4. Select open QuickBooks.
How do I upgrade QuickBooks desktop 2022 to 2023?
You can upgrade QuickBooks desktop 2022 to 2023, perform the steps below: 1. Open the discovery hub 2. Choose upgrade to QuickBooks 2023 3. Click on proceed to upgrade and click on upgrade now 4. In case you want both versions, click on keep old version on my computer. 5. Click on open QuickBooks
Is QuickBooks 2022 available in desktop?
QuickBooks Desktop 2022 requires a 64-bit Windows operating system and won’t run on 32-bit. 2.5GB of disk space (additional required for data files). Additional software: 60MB for Microsoft .
Why upgrade to QuickBooks 2022?
The current QuickBooks Desktop version 2022 is subscription-based accounting software. It provides improved collaboration between clients and accountants. Not to mention, it will also ensure that current security patches along with 3rd party operating system support.
QuickBooks accounting software is a robust solution that has marked its presence in the past couple of years. However, the only pitfall of this software is the errors that the users come across when working on it. In today’s article, we are going to discuss one such error i.e. QuickBooks error code 7300. The user can come across such an error when the program is set up or during Windows startup or shutdown or even during the installation of the Windows operating system. Or such an error can also be experienced when opening the company files.
There can be multiple factors leading to such an error, which we will be discussing later in this article. If you are interested in finding the solutions to such an error, all you need to do is to go through this article till the end. The user can also get in touch with our QuickBooks support team for any sort of further tech assistance. Give us a call at +1-888-510-9198, and we will provide you with immediate support services.
Procedure 2: Back up the QuickBooks related registry entry
If the first method didn’t help much in eliminating the issue, then try backing up QuickBooks related registry entry. The steps involved in this procedure are as follows:
The user needs to first click on the Start tab.
Once done with that, in the search bar the user should enter in command and avoid hitting enter tab
The next step is to press Ctrl + Shift keys and then click on Enter tab.
The user will see a permission dialog box, where he/she will have to select Yes.
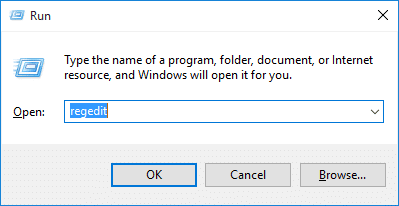
Now, a black box appears with a blinking cursor will appear, where the user should enter regedit and press Enter key.
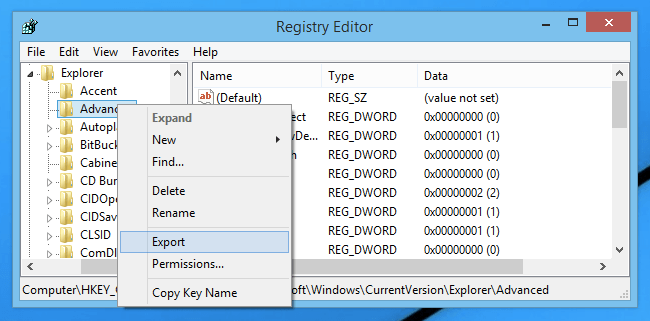
The next step is to click on the QuickBooks error 7300 related key you want to backup.
And from the File menu choose Export.
After that choose the folder to save in the list
Now, in the Export Range box, make sure that the selected branch is selected.
Once done with that, the user should choose to Save with a .reg file extension.
And the final step is to back up the QuickBooks-related registry entry.
Towards the end of the article, it is believed that the reader might be able to understand what all solutions can be implemented, so as to deal with such an error. However, if there are any queries remaining, then contacting our technical Support for QuickBooks Enterprise at +1-888-510-9198 is recommended. We are a team of technically sound professionals who work round the clock to provide the finest possible assistance.
FAQs related to QuickBooks Error 7300
What is error code 7300 in QuickBooks?
The error 7300 in QuickBooks is often seen when the Intuit sync manager stops working. You can expect to face similar issues when trying to open the company files in QuickBooks.
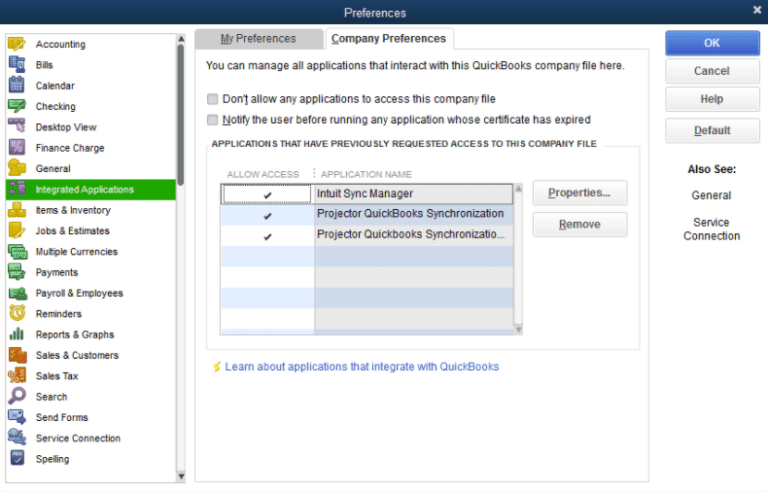
What is Intuit Sync Manager?
Intuit sync manager basically syncs QuickBooks company file data with Intuit online services and third-party developed applications that the user might subscribe to.
How do I turn off Intuit Sync Manager?
You can try to turn off the Intuit sync manager using the steps below: 1. Right click the Intuit sync manager from the system tray. 2. Further, select the company 3. Click on sync enabled menu. 4. After that select disable from the drop-down menu.
Experiencing QuickBooks POS error 140014 can be extremely devastating. It is a Point-of-Sale error that is not pretty much commonly encountered. The error series 14XXXX indicates that the issue is related to the connection between the QuickBooks desktop and QuickBooks POS. You can bump into such an error when you try to run the reports in QuickBooks point of sale. There can be a bunch of factors instigating this particular error in QuickBooks, which we will be elaborating later in this segment. You can find a warning message highlighting on your screen stating:
QuickBooks POS cannot access your QuickBooks Financial Software company File.
You can face this issue if UAC settings are misconfigured, or the version of QuickBooks being used is outdated. There are a few factors causing this issue in QuickBooks, which we will be discussing later. Thus, to learn further about QuickBooks POS error 140014, stick around this piece of writing. On the other hand, if you need any sort of professional assistance, then feel free to connect with our QuickBooks support professionals at +1-888-510-9198, and get answers to all your queries immediately. Having said that, let us further unleash the causes and fixes of QuickBooks POS error 140014.
Towards the end of this article, we expect that the information stated above might help in dealing with the QuickBooks POS error code 140014. However, if for some reason the error persists or the user needs any sort of technical assistance, then we suggest you to get in touch with our QuickBooks support team. Give us a call at +1-888-510-9198 and we will provide immediate technical assistance.
FAQs related to POS error 140014
How do I fix invalid product number in QuickBooks POS?
To fix the invalid product number in QuickBooks POS, use the steps below: 1. Delete the contents of the entitlement client folder 2. Rename the WSActivity file 3. Clean reinstall QuickBooks Desktop point of sale
Is QuickBooks POS no longer supported?
Note that QuickBooks point of sale payments will no longer work with QuickBooks point of sale software after October 3rd, 2023.
What is QuickBooks error 140014?
You might come across QuickBooks point of sale error 140014, when running the financial reports in QuickBooks POS.
How do I fix POS error 140014 in QuickBooks?
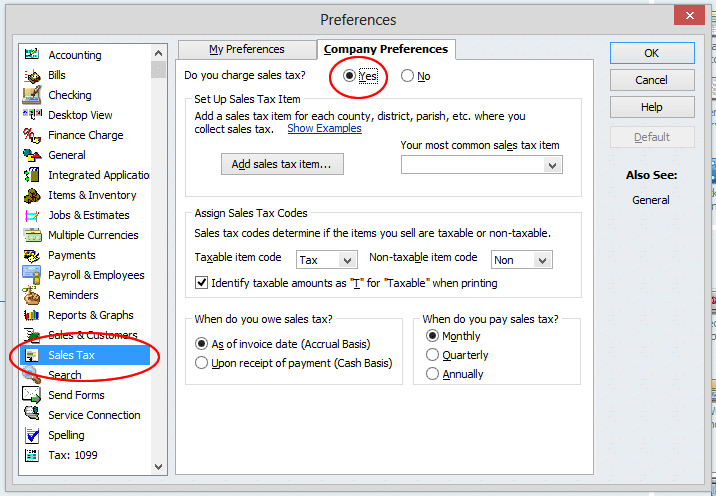
The steps to fix the issue are as follows: 1. Update QuickBooks 2. Disable UAC preferences 3. Enable sales tax 4. Create of New windows user 5. Ensure QuickBooks POS is enabled in QuickBooks desktop
QuickBooks error code 179 is an error that can be seen when the user tries to log in to the bank’s website on the system. Error 179 in QuickBooks means that your bank’s website has rejected a login attempt as you might already be signed in somewhere else. This error restricts the user from logging in and forbids the user from accessing the data. The banking errors are often critical and should be taken care of immediately. The same error can also be experienced after incorporating the Accountant’s copy into the company file. You can come across this issue if you have forgotten to close the bank’s app correctly or you logged out, but the bank hasn’t acknowledged the request. At times, it can take around 15 minutes or more for bank servers to recognize a logout request.
There can be a couple of factors causing such an error, which we will be discussing later in this article along with the effective solutions for the same. To learn more about such an error, make sure to read the article carefully till the end. However, the user can also contact our QuickBooks Error support team for any sort of further assistance. Give us a call at +1-888-510-9198, and we will ensure to provide immediate support services.
Experiencing QuickBooks error code 179 is possible due to the following reasons:
The user can face such an error if there are some issues in the reports
Or if the user forgets to log out of the last session
Another reason can be that there are some issues with the company file
Or the balance sheet reports are not showing all accounts
The user can also face a similar issue if the transactions are missing in QuickBooks
Also, if the QuickBooks company file is facing issues
Incorrect login credentials can also cause a similar issue
Signs of QuickBooks error 179
The user can experience such an error with the following signs:
One of the basic signs can be if the company file is damage or missing
Or if QuickBooks is not responding to the commands or is freezing automatically
The software is missing some important information
Or when the software starts inputting null values whenever you are in operation
Quick Steps to fix QuickBooks error 179
In order to fix the bank error 179, you can perform these quick steps. A quick tip is that, if an account is being connected for the very first time and then shows error 179, then you need to wait for 15-30 minutes before trying to update again. Also, note that there are times when the account will update overnight with a fresh banking aggregation.
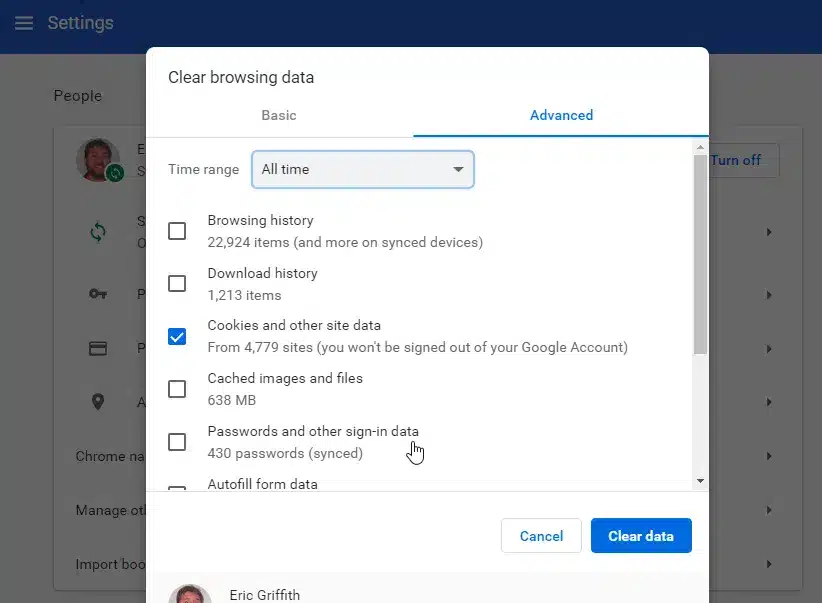
You need to ensure that you have logged out of the bank website or app for more than 15 minutes.
Furthermore, clear your browser’s cache and cookies, or try other browser troubleshooting options.
Also, ascertain that the bank app on the phone is completely closed. Simply minimizing the app doesn’t send a sign-out request to the bank.
In case you are using a joint account, then ascertain that no one else is connected to the bank account’s website or app.
The last step is to confirm if you have only connected the bank account to one QuickBooks online account.
Note that if you still get error 179 after connecting the bank, try to change the bank password. This will sign you out of any other sessions. Moreover, you can change your password once you have connected.
Once the above-stated steps are performed, the user will be able to successfully get rid of the issue from its root cause. However, if in case the user isn’t able to, then contacting our QuickBooks support team at +1-888-510-9198 is recommended. We are a team of technically experienced QuickBooks Enterprise Support professionals, who work round the clock to resolve all sorts of QuickBooks issues.
FAQs
What is QuickBooks XML error and how do you fix it?
You can fix the XML error using the steps below: 1. The very first step is to unhide the hidden files and folders 2. After that update QuickBooks point of sale 3. And then, repair QuickBooks point of sale application 4. Now, change the name of entitlement client folder 5. Change the name of session data file 6. Delete the files from the entitlement folder
What is QuickBooks error 6177 0?
Error Code -6177, 0: “QuickBooks is attempting to open this Company file” indicates that QuickBooks accounting software is unable to use the path to the company file. This kind of error generally occurs while a user uses QuickBooks in multi-user mode.
How do I fix a QuickBooks error?
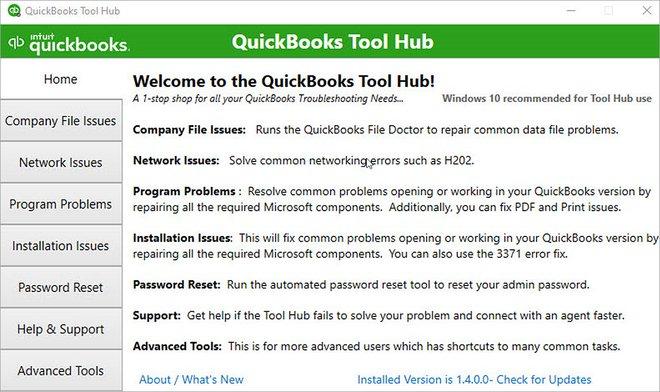
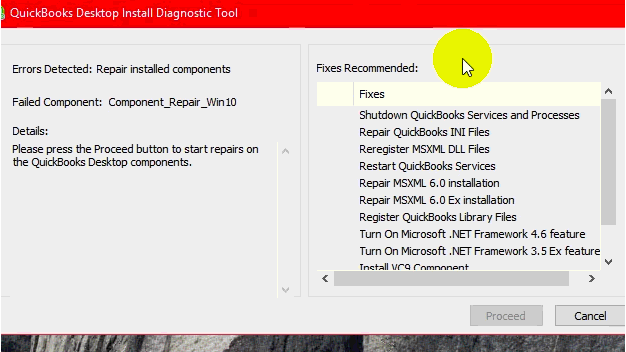
The user can try to fix the QuickBooks errors by running the QuickBooks Install Diagnostic Tool. This would resolve common install issues. For this, one needs to open the QuickBooks Tool Hub, then select Installation Issues. Select QuickBooks Install Diagnostic Tool.
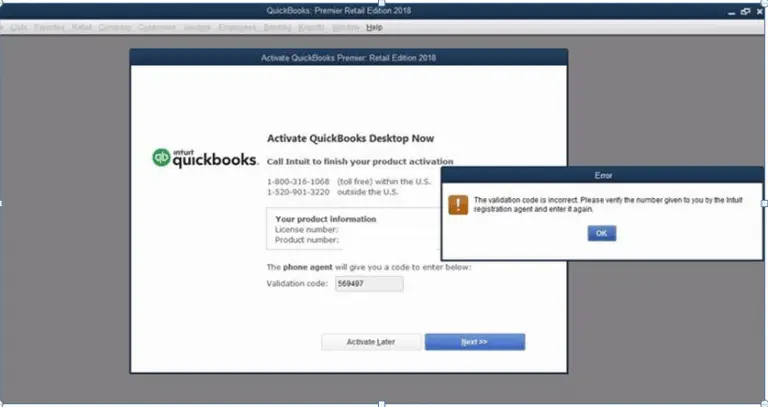
Experiencing license, validation, and registration errors in QuickBooks desktop and can’t find an ideal option? This article will guide you to fix license, validation, and registration errors in QuickBooks Desktop with the right set of steps. In case you see an error message after registering, subscribing, or syncing the data in QuickBooks, then don’t worry, we will get you the way through it. The error messages include:
Error: The validation code is incorrect or the service is temporarily unavailable when activating
Message: You cannot use online banking because QuickBooks is not registered
You must subscribe to the accountant’s copy file transfer service
The sync license data online option is grayed out
These errors could be seen due to an install file. In this article, you will learn the ways to safely delete the file, so that you can refresh the registration. If you are interested in learning more about such an error, make sure to read the post till the end. Or contact us at +1-888-510-9198. We are a team of technical professionals working to provide best assistance.
Causes Behind the fix license validation and registration errors in QuickBooks
Checkout the below given troubleshooting methods in order to fix license, validation, and registration errors in QuickBooks Desktop:
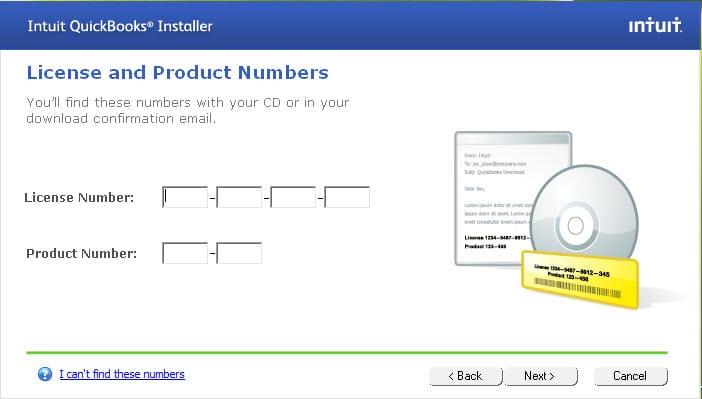
Case 1: Error- You have entered incorrect license/product numbers
Make sure that the license and the product number tally.
In case the user bought QuickBooks desktop from Intuit website: then it is suggested to search in the purchase confirmation email you received
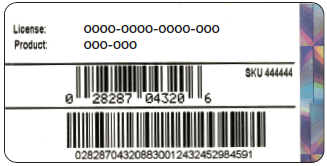
If the user bought QuickBooks from a retail store: Then, look for a sticker on the original CD envelope
Case 2: Error- The validation code is incorrect or This service is temporarily unavailable
In case the user gets an error message that shows: “You have entered incorrect license/product numbers“, one needs to perform a couple of steps to rectify it. However, before performing the steps, it is essential to carry out the below activities.
You need to ensure QuickBooks is working properly.
Further check if QuickBooks is activated and also verify the license number and product code.
You now have to check the purchase confirmation email for the products that have been downloaded.
Ans also check the bright-colored stricker on the original CD envelope, in case QuickBooks was bought on CD.
Make sure to further verify the license number and product code provided on the QuickBooks product page.
Fixes to fix license validation and registration errors in QuickBooks Desktop
You can try performing the below discussed steps and procedures to successfully eliminate the issue in QuickBooks Desktop.
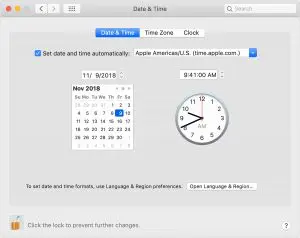
Solution 1: Check the date and time settings
At first, the user needs to close the QuickBooks desktop
After that right click the time display on the windows taskbar and then choose the adjust date/time
The user is then required to check if the date and time settings are correct
In case they are not having any issue, then move to another solution, or else continue with the steps
The next step is to, choose the date and time tab and set the date for the current year
The user should then click on apply and ok tab respectively
Now, open the QuickBooks desktop and hit help
Once done with that select activate QuickBooks and also click on begin activation
And enter the validation code and then hit next
Solution 2: Close the running QuickBooks tasks
The running background processes might be creating trouble for the user. In that case, the user needs to use the QBRefresher tool for closing and refreshing all QuickBooks’ background tasks. After using the tool, open the QuickBooks software and try to activate it.
Any sort of disturbance at the time of installation can lead to such an error. In such case, run the QBInstall tool to fix common install issues. This tool will enable the user to activate QuickBooks without any error.
Solution 4: Reactivate MSXML
Go for this method only if you have an IT professional beside you, or if you are working with an expert from Microsoft support. Follow the steps below for the version of the system.
In case of 64-bit system
Head to the start menu and then type cmd
After that, right click cmd and choose run as admin tab
Now enter cd/windows/syswor64 at the C: prompt and then press Enter
Enter regsvr32 MSXML4.dll and then hit enter
After that enter regsvr32 MSXML6.dll and then hit enter again
In case of a 32-bit computer
Open the run window and then press windows + R key
After that enter cmd and press enter
Type in the regsvr32 MSXML4.dll and then click on enter tab
The last step is to, enter regsvr32 MSXML6.dll and hit enter
In case the user is able to activate or open QuickBooks, then the process is complete. Else can continue with the troubleshooting.
Solution 5: Reset the .ecml file
Creating damaged entitlementdatastore.ecml file once again can work in fixing the activation issues. After which, the user can easily try and activate the QuickBooks again.
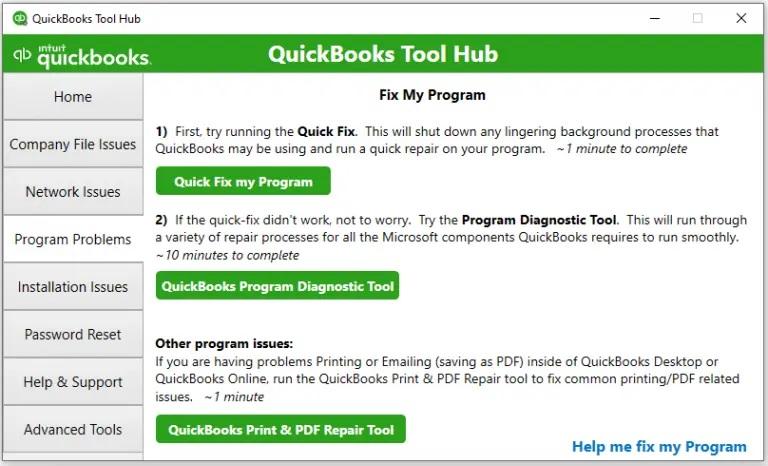
The user needs to follow the onscreen prompts to install and agree the terms and conditions
The last step is to double click the icon on the windows desktop to open the tool hub
After that Run Quick fix my program
The user needs to select installation issues in the QuickBooks tools hub
The user should then choose quick fix my program and also hit ok
Now, start QuickBooks and open the data file
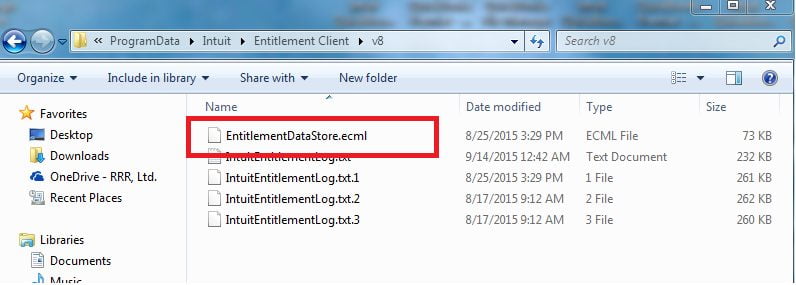
Solution 2: Manually eliminate the entitlement file to fix license validation and registration errors
The entitlement file tells QuickBooks that the product is valid and registered. The user can find and delete the file, in order to re-enter the license info and resolve the issue.
At first, the user needs to open the windows start menu
Now, type run into the search and open run
The next step is to type C:\ProgramData\Intuit\Entitlement Client\v8 and then hit enter. Or enter C:\ProgramData\Intuit\Entitlement Client\v8 instead.
Look for the entitlementdatastore.ecml and then right click the file and then choose delete. Also, select the yes option to confirm
We end the article here with hope that the information we have shared in above might be of some help in fix license, validation, and registration errors in QuickBooks Desktop. But if in case the user faces any difficulty in tackling this issue or in case of any query, feel free to contact our QuickBooks enterprise support team at our support number i.e. +1-888-510-9198.
FAQs Related to QuickBooks license validation and registration errors
How do I fix a QuickBooks license error?
1. You need to first open tool hub 2. Select Installation issues tab. 3. Click on QuickBooks license issues. 4. Perform onscreen instructions to fix the issue.
What is the license error in QuickBooks desktop?
License error usually occurs in QuickBooks when you enter incorrect license and product numbers. You need to ensure that your license number and product code tallies with the one present on the CD.
How do I register my QuickBooks license?
To register your QuickBooks, you need to: 1. Open QuickBooks 2. From QuickBooks menu, choose register QuickBooks. 3. Enter the license and product number and hit next. 4. Go for either register online or contact us. 5. Choose register online perform the onscreen steps to complete the activation.
How do I find my QuickBooks desktop license?
You can find your license by: 1 Firstly, open QuickBooks. 2. Press F2 key 3. Look for product name, product number, and license number in the product information window.