QuickBooks payroll error 15243 is usually seen when you try to update QuickBooks premier in preparation for export to QB online. As a result of this issue, one might not be able to navigate through the suggested options to correct. It is a common payroll error that can be seen when you operate QuickBooks. You can face this issue when trying to update the software and this error is often associated with the file copy service.
To help you deal with this issue easily, we have drafted this segment right here, sharing the complete set of steps to fix the error permanently. To learn further about Quickbooks error 15243, stick around this segment. Or you can also contact our technical team at +1-888-510-9198, and we will provide you with immediate support and guidance.
Payroll update error 15243 usually occurs when the QuickBooks user downloads the latest released updates. This error code produces the discrepancy in the workflow of the business process leading to the unwanted Payroll update error 15243. The QuickBooks Payroll update error appears while the payroll updates to the latest release & some other programs are running in the background simultaneously. This arrangement might hinder the working of QuickBooks software.
Check out the list of possible causes due to which QuickBooks Payroll Update Error 15243 appears. Here below are some of the reasons that lead to the unsuccessful completion of QuickBooks payroll updates.
When the QuickBooks File Copy Service (FCS) is not working properly
While the QuickBooks File Copy Service (FCS) is distorted or damaged
When the update completed improperly
Symptoms of QuickBooks Error 15243
Check out the symptoms of QuickBooks update error 15243:
The QuickBooks payroll error 15243 appears on the display
Frequent active window crashes
Windows perform sluggishly
Keyboard inputs & mouse perform slowly
Computer freezes frequently after a few intervals of time
How to Troubleshoot QuickBooks Payroll Error 15243?
Check out the methods to resolve the QuickBooks Payroll Update Error Code 15243. However, you can take help from QuickBooks error support team to get instant help from the experts.
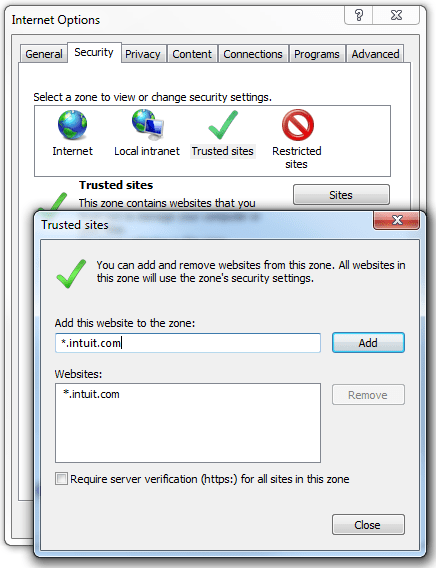
Method 1: Edit the Internet Explorer Options
At first, turn on the computer
Open the “Internet Explorer“ browser
Hit the icon looks like a “Gear“
Select “Internet“ option
Click on the “Security“ tab
Choose the “trusted webpage” options available
Hit on the “Address bar” on the top of the web-page enter website URL in the provided space
For the US, enter the “*.inituite.com &*.quickbooks.com“
For Canada, enter the “*.quickbooks.ca &*.intuit.ca“
Click on the “Close“ option
Select the “Apply” & then, click “OK“
Method 2: Repair QuickBooks Desktop
Firstly, Open the “Task Manager“ and end all of the QuickBooks programs running on the system.
Furthermore, choose “All applications” that started with the “.qb, QuickBooks or Intuit name.“
Hit on the “End Task“ option to close them.
Follow the steps mentioned below to repair them.
Press the letter “E” + “Windows” button to open the computer windows.
If Windows 8 user, hit the “Computer tab“.
Moreover, choose the “Uninstall” or change program option.
Also, open the “QB installation window” & hit the “Next” tab
Method 5: Repair QuickBooks File Copy Service (FCS)
Open “Run” by pressing “Windows” and “R” keys simultaneously on your keyboard.
Also, type “services.msc” in the open box and click “OK” button.
In addition to that, a list of services will open up on your screen, find “Intuit QuickBooks FCS”.
Now, on the “Intuit QuickBooks FCS Properties” window, choose “Manual” option for the Startup type. Hit the “OK” button and open “QuickBooks payroll”.
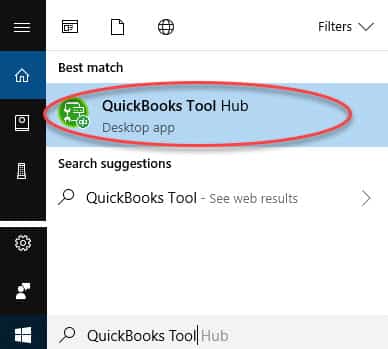
Method 6: Use QuickBooks Tool Hub
“QuickBooks Tools Hub” can spot and fix a wide variety of errors. For the best outcome, download the most recent “QuickBooks Tool Hub version(1.4.0.0)”. Save the file on an easy-to-remember location like Windows Desktop or the Downloads folder. If you already have QuickBooks Tool Hub installed in your computer, check the version. Click on Home tab and you would see the version details on the bottom right. Click on Home tab and find out the version details (on the bottom right). You can also find QuickBooks Tools Hub detail in “About” section.
Here is how you download, install and use it:
Click open the downloaded “QuickBooksToolHub.exe” file.
Furthermore, follow the on-screen instructions to install the tool.
Also, agree to the “terms and conditions” to continue.
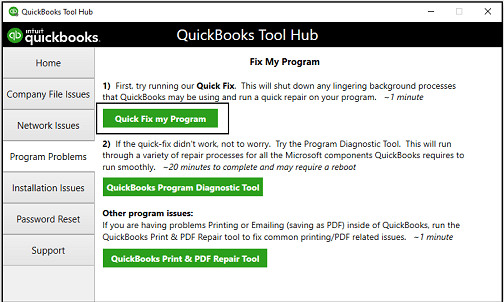
After the installation is accomplished, double-click the “tool hub icon”.
Once the tool hub opens, go to “Program Problems”.
Apply the above-prescribed steps to fix the QuickBooks Payroll Update Error 15243. However, in some cases it happens that few users still unable to resolve this error by following these steps. In such cases, they require instant support to fix this issue for you.
Users can contact our QuickBooks payroll support number i.e. +1-888-510-9198. We are a renowned and famous firm with having professional experts & technicians to provide 24×7 support to global users.
Some FAQs Related to QuickBooks payroll error 15243
What is QuickBooks Payroll Error 15243, and how does it affect my system?
QuickBooks Payroll Error 15243 is a common error that occurs when the QuickBooks File Copy Service (FCS) is not functioning properly. This error can disrupt your payroll update process and affect your ability to perform essential tasks, such as downloading the latest tax table updates. The error is typically accompanied by an error message indicating that the update was unsuccessful.
What are the common causes of QuickBooks Payroll Error 15243?
The primary causes of QuickBooks Payroll Error 15243 include incomplete or damaged QuickBooks software installation, corrupt or damaged Windows registry, interference from antivirus software, and issues with the QuickBooks File Copy Service. Identifying and resolving the underlying cause is essential for troubleshooting the error effectively.
I’ve tried the above solutions, but I still can’t resolve QuickBooks Payroll Error 15243. What should I do next?
If you’ve attempted the solutions mentioned above and still face issues with QuickBooks Payroll Error 15243, don’t hesitate to contact our expert team for assistance. You can reach us at our toll-free number +1-888-510-9198. Our dedicated professionals will help you diagnose and fix the problem to ensure your QuickBooks payroll runs smoothly.
Get the east steps to Upgrade/Convert your QuickBooks for Mac company files to a newer version
Upgrading or converting your QuickBooks for Mac company files to some new version occasionally is highly essential. Despite the unique benefits and features, an upgrade QuickBooks for mac company files can make sure a flawless and uncomplicated procedure for your organization. Upgrading your QuickBooks company file is a simple task, and this article is created to inform you of some basic things before you start upgrading your QuickBooks.
In this article today we are going to explain you that how to Upgrade/Convert QuickBooks for Mac company files to a new version. However, you can take expert advice from the QuickBooks Support team. You can further give us a call at ++1-888-510-9198, and we will provide you with instant support and assistance.
Things to know before you start upgrading QuickBooks company file
Make sure that you have your new version of QuickBooks Mac Desktop software installed before you begin upgrading your company file to enable it to work with the latest version.
In case you are the solitary user in your company file, then you are automatically an administrator. Else, you are required to sign in and continue with the upgrade.
Important: Please note that in case you are not an administrator and trying to update your QB company file, you will find the message, “The Company file needs to be updated. You can ask your QuickBooks administrator to update file”. Thus you are required to switch to Admin the user and then retry.
Save QuickBooks Mac Desktop company file locally on the system you are accessing it from.
It is not suggested to upgrade the file while saved on the network or a mapped drive as this can cause the conversion to be unstable and may risk the file of getting damaged.
Once you are done with the conversion of the file to the newer version, the older version of the QuickBooks will not be opened.
Nevertheless, the QuickBooks Mac Desktop automatically creates backup of your data file before upgrading it. If in case you are required to use the older version of this you can restore the backup with the old version of QuickBooks Mac Desktop.
If the conversion procedure gets interrupted, you can easily restore the backup with the new version of QuickBooks Mac desktop start upgrade again.
First of all ensure that you are logged out of your company file.
Launch a newer version of QuickBooks Mac Desktop.
Select ‘File‘ and then ‘Open or restore company‘.
You need to login as a company admin.
Now browse your data file, choose your company file and then tap to ‘open‘ that.
Now read the information on upgrade dialog. Select ‘upgrade to continue‘.
Log into the company file as an ‘Administrator‘.
Choose ‘OK‘ on following dialog that states the file has been upgraded.
Once the file gets upgrade:
Make sure to store the backup in a safe location until you are certain that will not need it again.
In case you copied the data file from any other system to upgrade it, copy it again.
In case you are unable to find your data file in its original location and if it is not in the particular folder, search your hard drive for .QBW and you will be able to find all the QuickBooks company files.
We hope you shall be able to upgrade/convert your QB accounting software for Mac Company file to a newer version after reading this blog post. However, in case you face any issue or need assistance with your QuickBooks, you can reach us at ++1-888-510-9198. Our QuickBooks for Mac technical support team is readily available 24/7 to help you out in best possible manner.
FAQs Related to Upgrading QuickBooks Desktop for Mac
How do I update QuickBooks on my Mac desktop?
You need to perform the below set of steps update and install the QuickBooks desktop for Mac: 1. You need to choose check for QuickBooks updates from QuickBooks dropdown menu 2. After that, go for install update, if the newer version is available. 3. The next step is to click on install and relaunch options when asked to.
How much is QuickBooks for Mac upgrade?
You can purchase a desktop version with an annual licensing fee of $349.99 per year or get the online cloud version for $15 per month for the first three months, then
Is there a QuickBooks desktop 2023 for Mac?
QuickBooks Mac Plus 2023 is available on an annual subscription that costs $549 for one user. There are other plans as well for more users, and all the plans include unlimited customer support.
Steps that will help you connect your QuickBooks with PayPal Integration
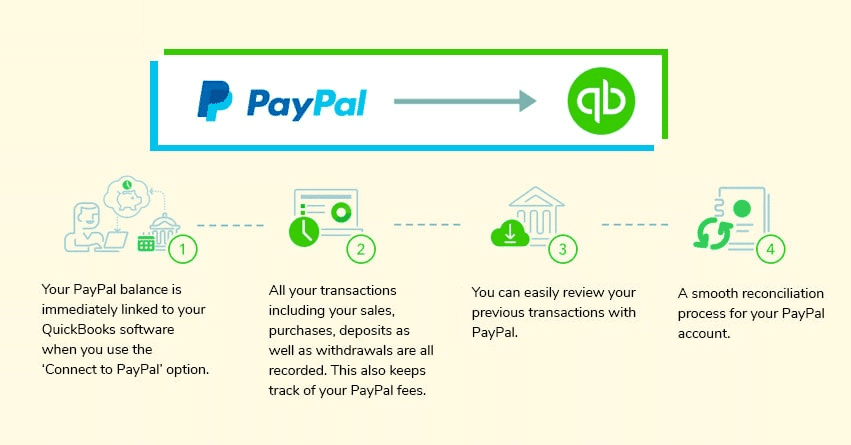
QuickBooks, a leading accounting and bookkeeping software, with PayPal payment tool is doing wonders for business owners. PayPal is a popular payment tool which is turning into a demanding platform as dealers, as well as customers, get comfortable with digital bills. The payment tool is demonstrated as a charge processor or invoicing tools or internet checking pockets. Moreover, the versatility approaches are frequently complex as well as confusing to handle in QuickBooks Online. Within QuickBooks, clients are to PayPal as a bank account. Our integrations which include connecting with PayPal are created that way. Considering PayPal as a financial institution can frequently reconcile the stability in the QuickBooks together with PayPal. It also applies when you take out money in cash from PayPal into your bank account or pay your clients with PayPal with the use of the credit or debit card. Thus this situation must deal with the transfers among the two accounts in the QuickBooks while checking your PayPal or your bank account.
PayPal can easily sync up your data such as transaction of users from QuickBooks from PayPal. This is one of the simplest information in just one manner. When the activation is completed after the integration, your PayPal account will be continuously screened for income, bank transfers, and expenses. You can get this app without any difficulty from a tab of apps of your QB online account. For more details, make sure to read this article till the end. Or you can also get in touch with our technical support team, in case you have any queries related to connecting QuickBooks with PayPal. Give us a call at ++1-888-510-9198, and we will provide you with immediate support and assistance.
Benefits of connecting QuickBooks Online to PayPal App
When Connecting to PayPal, you can access all your transactions before you place them into QuickBooks accounting software.
Sales receipts will obtain information relevant to the items discounts, shipping, sales, tax and more.
When loading a transaction from PayPal. We will record automatically the PayPal fees for you to a price account of your choice so you don’t have to enter manually.
How PayPal App work with QuickBooks Online?
Connecting to the PayPal app with the QuickBooks Online is an logical method to create your transactions of PayPal to QuickBooks along the swift connection with the PayPal, we will recover the total amount that is troubling the transactions to consequence that you have in PayPal. Now you may edit, rename and test the transactions to secured whether it is error free.
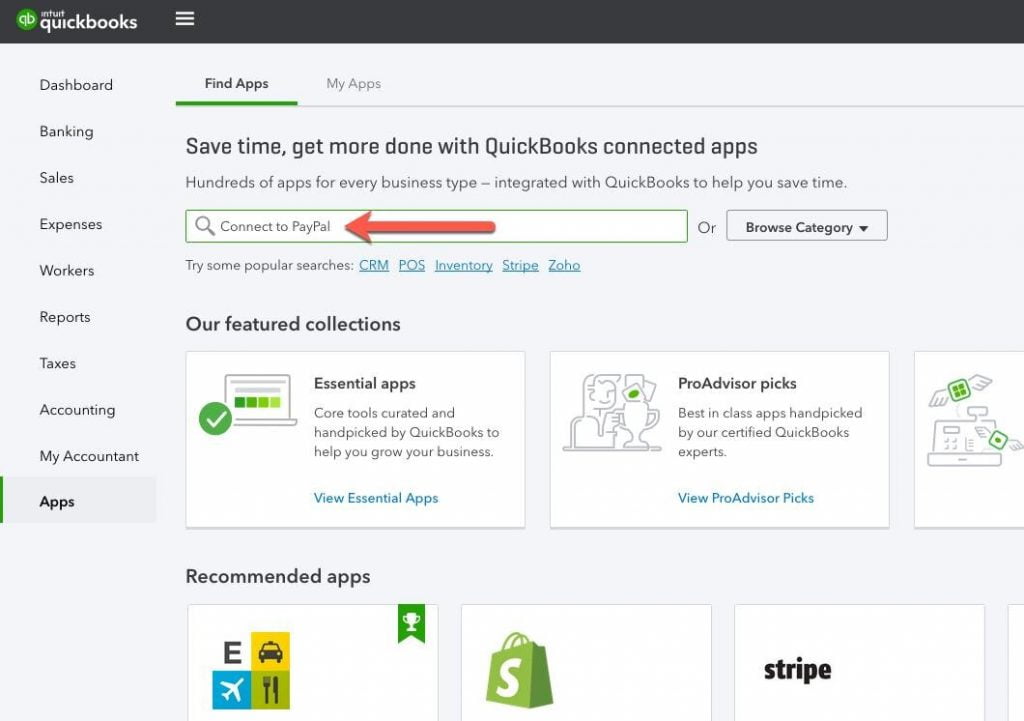
Steps to Sync QuickBooks Online account with PayPal
Firstly, Log in to your QuickBooks Online account.
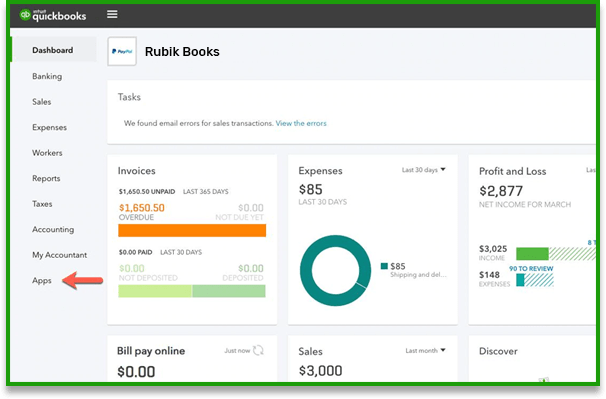
Go to the ‘Menu‘ on the left and choose ‘Apps‘
Now tap on the ‘Search button‘ and search ‘PayPal‘
Next, select ‘Sync with PayPal‘
Choose to ‘Get the app now‘ from the upper right side.
Once you will get this done, get the correct answer for the question and then tap ‘Next‘
Select to ‘Connect with PayPal‘ and after this select let done with it.
Make sure that all remaining steps are followed to get connected and set up the settings of your app as per your choice.
PayPal Transactions
After you select the authorization, your transactions of PayPal will automatically be synchronized securely from the PayPal to QuickBooks Online.
Settings and Mappings
With the settings of the app, you will be allowed to view or edit the loan from the PayPal such that it gets mapped with an accurate account of online QuickBooks. This smart mapping technology is picked by default for the categories for they can select how to make PayPal account mapping with use of Online QuickBooks. The advanced users of QuickBooks can change these setting without any kind of difficulty in this complete setup.
The Last Transaction Section
With all the previous transactions done, this software allows users to create a preview transaction to import on the QuickBooks Online. Transactions up to 18 days can get transferred easily at the time of the setup from the present day. But if at the time of setup, if the user transfers more than the limited transaction they can utilize Sync with PayPal. The whole overview of the guide import is an appropriate way to complete the manual import.
Sync with PayPal integration with QuickBooks online
Ensure that you get logged into QuickBooks account.
Now click on the ‘Application‘ tabs.
From the ‘Search‘ option search ‘PayPal app‘.
Choose ‘PayPal app‘.
Now tap on button ‘get the app now‘.
Now logout to online QuickBooks.
Once all the given steps are followed and set up, the accounting software can get synchronize with the PayPal in every fifteen minutes, and new transaction gets updated from PayPal to QB Online.
Important Note: You will get the description of summary on a daily basis which is another of advantage syncing PayPal with QuickBooks.
Import PayPal Debit Card Transactions with QuickBooks
Login to your ‘QuickBooks account online‘
Go to an ‘Application of tabs‘
Get ‘Sync with the PayPal app‘ where card located is there.
After that tap on ‘Sync with PayPal‘ in the settings. You will get opened with a tap.
Now in the app setting now tap on ‘Editing‘ option.
Make sure that you have clicked the checkbox which includes my PayPal debit card transaction while importing.
Enhance cash flow with Integration of QuickBooks and PayPal
This helps users to pay faster. You can send affiliate invoices from your accounting software and get paid with seamless PayPal payments.
This feature helps you to manage your payment. With QuickBooks app, you can manage the invoices efficiently and get pay with an organize payments.
It also helps to manage customer easily.
The QuickBooks helps in updating the invoices and additionally deposits the costs. Also, this software helps in maintaining the balanced books.
You are not required to go to the bank regularly while utilizing QuickBooks which ensure that your bank, master cards, and the PayPal card will get credited.
We hope that this article assists you to understand how to connect your QuickBooks with PayPal Integration. However, if you need personalized assistance, you can always reach us at ++1-888-510-9198. Our QuickBooks Online Support executives are available round the clock and offer quick and precise QuickBooks Help.
FAQs Related to connect QuickBooks online to PayPal app
How do I connect my QuickBooks Online app?
You can download an app using the steps below: 1. Choose the app you wish to download 2. After that, choose the get app now. 3. In case an app is in beta testing, then the tab will display opt-in now. 4. You now have to authorize the app to connect to your QuickBooks online. 5. Perform the remaining steps to connect and set up the app settings of your choice.
How much does PayPal charge for QuickBooks Online?
Well, you can benefit from accepting online payments with no upfront costs or subscription fees. PayPal fees for QuickBooks invoices start from just 1.7% + $0.20 per transaction for credit and debit cards.
Can QuickBooks Online accept PayPal?
Yes, in addition to providing an option to accept online payments. Accept payments with PayPal will import sales and expenses. When a payment is received by PayPal, it syncs with QuickBooks online, with detailed information including which item is sold, quantity, discount, taxes, etc.
How do I receive a PayPal payment in QuickBooks?
You can perform the steps below to do so. 1. Sign in to QuickBooks online and add accept card payments with PayPal app. 2. You now have to connect your PayPal account to your QuickBooks account. 3. Further, grant permissions to connect your QuickBooks account. 4. Confirm via the confirmation mail. 5. And later on create and send an invoice.
QuickBooks software is the most tremendous accounting & bookkeeping software that help businesses worldwide. It prevails numerous advanced and modern functionalities in the business sector to boost their business within less time & stress. But a minimum system requirement is necessary to run this software. System requirements vary according to the version of QuickBooks being used. It is crucial to understand the system requirements, before getting the software, to avoid any sort of further technical issues and compatibility issues with the software. In this article, we are going to pour light on the System requirements for QuickBooks 2019 and Enterprise Solutions 19.0. Thus, stick around to this piece of writing till the end, or you can further connect with our technical support team at +1-888-510-9198, and we will provide you with instant support and assistance.
System Requirements for QuickBooks Enterprise Solutions 19.0
Operating Systems (OS)
MS Windows 10, all editions including 64-bit
Windows 8.1 (Update 1) all editions including 64-bit
MS Windows 7 SP1 all editions including 64-bit
Windows Server 2016
MS Windows Server 2012 R2
Windows Small Business Server 2011
Microsoft Windows Server 2008 R2 SP1
Database Servers
Windows: Windows Server 2016, Windows Server 2011, Windows 10, Windows 7 SP1, Windows Server 2012 R2, Windows Server 2008 R2 SP1, Windows 8.1 (update 1).
Hardware & Operating System Requirements for QuickBooks Desktop Enterprise Solutions 19.0
Processor: 2.4 GHz minimum
RAM: 8GB Recommended, 4GB minimum
✔ 1-5 Users: 8GB RAM
✔ 10 Users: 12GB RAM
✔ 15 Users: 16GB RAM
✔ 20 Users: 20+GB RAM
Disk Space: 2.5GB of disk space
Windows: Use US version Windows for the US QuickBooks. Use Canadian version of Windows for the Canadian QuickBooks.
Optical Drive: 4X DVD-ROM drive
Screen Resolution: 1280 x 1024 screen resolution or higher
Software Compatibility for QuickBooks Desktop Enterprise Solutions 19.0
QuickBooks is compatible to integrate with numerous third-party software applications. The list of that software is mentioned below:
Microsoft Office:
Office 2016 on both 32 and 64-bit (including Outlook 2016)
Office 201o, Office 2013, and Office 365 on both 32 and 64-bit (including Outlook 2010 and Outlook 2013)
Email Estimates, Invoices & other forms with Microsoft Outlook 2010-2016, Microsoft Outlook with Office 365, Gmail, Yahoo! Mail and Outlook.com, other SMTP-supporting e-mail clients
Microsoft Outlook Synchronization requires Outlook 2010
QuickBooks POS V18.0 & V12.0 (the US only)
Quicken 2016, 2017, and 2018
QuickBooks Mac 2016 (the US only)
Firewall & antivirus application compatibility
Below is the list of firewall and antivirus with which QuickBooks Pro/Premier 2019 & Enterprise 19.0 have been tested.
For the purpose of download, CD/DVD drive or internet connection is mandatory.
Printer: In case, you are planning to print lists, checks, lists, reports, graphs, mailing labels, deposit slips, or purchase orders, you need 100% Macintosh-compatible printer.
Checks: if you want to print the checks, you must use Intuit Checks.
Product registration is mandatory.
Note: Canadian Image Ready Cheques are not supported.
Final Words..
I hope this information will be helpful to you. In case you if have any doubt anywhere or have questions related to enterprise solutions 19.0 you can contact us at our QuickBooks Enterprise helpline number any time to troubleshoot the issues related to QuickBooks. We are a strong & renowned team of Intuit certified professional that strives 24×7 to solve the QB software problems. You can get in touch with us straightaway on our toll-free helpline number .i.e. +1-888-510-9198.
FAQs related to System requirements for QuickBooks desktop enterprise 2019
What are the system requirements for QuickBooks desktop?
Hardware and operating system requirements
QuickBooks Desktop 2023 requires a 64-bit Windows operating system and won’t run on 32-bit. Find out how to check if you have 64-bit. 2.5GB of disk space (additional required for data files). Additional software: 60MB for Microsoft.
How much RAM do you need to run QuickBooks desktop?
For QuickBooks Desktop 2022, the minimum requirements are: Windows 10 (64-bit) 2.4 GHz processor. 8GB of RAM (16 GB recommended)
In what capacity do you use QuickBooks Desktop Enterprise?
QuickBooks Desktop Enterprise is an end-to-end accounting solution designed to grow alongside small businesses. The software provides tools for managing inventory, tracking sales, generating reports, and running payroll. It is ideal for medium to large scale businesses.
What is the difference between QuickBooks and QuickBooks Enterprise?
QuickBooks enterprise has the same functionality as QuickBooks, but has more complex processes and features including advanced pricing, payroll, and inventory tracking. It further includes more data capacity, more sophisticated inventory management, and multiple entities.
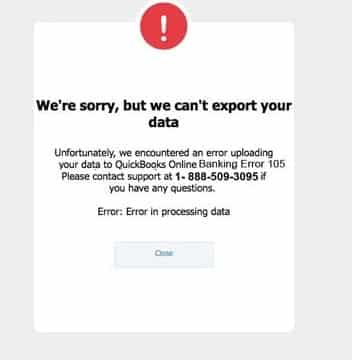
Error 105 in QuickBooks is a banking-related issue that occurs when the software is unable to establish a connection with your bank’s website. This typically happens due to temporary server outages, ongoing maintenance, or technical glitches on the bank’s end. When this error appears, QuickBooks fails to fetch new transactions, update account balances, or sync banking data, leading to discrepancies in financial records.
Many users encounter this issue when attempting to refresh their bank feeds or add a new account to QuickBooks Online. Since the error is often linked to the bank’s website, resolving it may require checking for service updates or manually refreshing the connection. However, in some cases, outdated login credentials, browser-related issues, or incorrect account settings can also contribute to the problem. If you’re experiencing this issue, don’t worry! In this guide, we’ll go over the possible causes and provide step-by-step solutions to help you restore your banking connection and get back to business smoothly.
QuickBooks Banking Error 105 usually appears when the banking site encounters some sort of specialized issue. It could be the server issue due to which the information cannot be exchanged between the banking website & QuickBooks Online. You might see the following error message on your computer screen:
What are the causes behind the error 105?
Check out the list of causes by which QuickBooks Banking Error 105 occurs:
It possibly appears due to the poor Internet connection
It could also appear due to the bank & financial issues such as altering information
When the downloaded or imported file/files are deleted
When the QuickBooks user is using an old or incompatible computer for the QuickBooks
Use the update button to update the account under QB software & run the 3 manual updates
Make sure that all the latest & advanced third-party programs and tools are used to go through the latest version system setup
Log in to your bank website with an appropriate online banking URL
Verify the messages and notification with a successful login to the bank website
Ensure that there is no hindrance in verifying the account details, transactions, history, and summary
If the issue persists, re-verify it after a day so that a bank got enough time
In case, the issue exists more than 24 hours – we recommend you to contact the online customer support & ask for the assistance with the bank details such as name, bank name, website URL, and account type
At the upper right corner, choose the ‘Update‘ icon
In case, you want to update only some of the accounts. You just choose to clear the unwanted accounts
Hit the ‘Update Now‘ icon
Type the ‘Multi-Factor Authentication (MFA) credentials‘ and hit the ‘Continue Update’ icon
Solution 4: Check with your bank or credit card provider
You should also check with your bank and credit card provider if everything on their end is fine. You can check that online. Sign in with your bank/credit card credentials. If you are unable to sign in, contact your bank or credit card company for help. Look for any error messages, notifications, or alerts and find out the reason behind the bank error. If you are able to login to your account, review the history and transactions in your account. If you are unable to see these, there may be an issue with connection with your bank’s server.
If your bank account or credit card is new, it may be unavailable for you to connect to online banking right away. Check with your bank to learn how long you may have to wait.
Nowadays, it has been frequently reported that users are facing discrepancy in using it. Hence, to resolve the issues such as QuickBooks Banking errors, payment failure, tax table error, and other – you can take help from our QuickBooks online support team by dialing +1-888-510-9198 (toll free). Our accounting experts will look forward to your concern and provide you a feasible solution for your accounting errors.
FAQs
How do I fix bank error in QuickBooks?
The user can try fixing the bank error using the steps below: 1. The user needs to go to the bookkeeping and choose transactions 2. Choose bank transactions 3. Choose the title for the bank account 4. The user needs to choose edit icon 5. And also choose sign in info 6. Update your info as needed
Why is QuickBooks not downloading bank transactions?
The user can see the QuickBooks not downloading bank transactions, due to bunch of factors. Check your account for messages, notifications, or alerts. Look for any display issues as you navigate the website. These can block QuickBooks from downloading new transactions. Check your bank’s website for any announcements about new security requirements.
How do I download my bank transactions into QuickBooks?
To download the bank transactions in QuickBooks, the user can go to Bookkeeping then Transactions then select Bank transactions. Select the blue tile for the account you want to upload the transactions into. Select the Link account dropdown and then Upload from file. Select Drag and drop or select files and select the file you downloaded from your bank.