QuickBooks Payroll is an eminent tool to manage and maintain the financial transactions. In the past few years, QB Payroll productivity has immensely increased due to its great demand in the market. This software enables you to create your employees’ payroll, salary, and insurance while deducting the holidays & leaves accurately. In this post we will demonstrate how to fix payroll service server error.
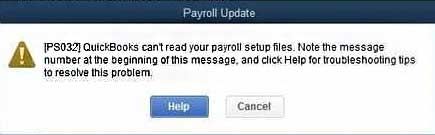
But it has been reported that QuickBooks Payroll users encounter a problem while sending data or direct deposit paychecks. These errors usually appear with an error message:
Payroll service server error. Please try again later. If this problem persists, please contact Intuit Technical Support.
Payroll Connection Error
Error: QuickBooks Desktop has encountered a problem sending your usage data.
In this article today we are going to explain you about these payroll server error/connection error also we have provided quick fixation methods for these payroll service error.
What Causes QuickBooks Payroll Server Error?
This payroll server error can be caused due to one or more reasons that are given below:
Invalid security certificate.
While sending data in multi-user aptitude.
Common Internet Connection issues.
When the system date & time properties are incorrect.
When the Internet security & firewall setting configuration is not correct.
Quick Fixation Steps to Resolve Payroll Service Server Error
Important Note: If the Be Safe application is installed into your computer, it will make you unable to send the information. This application will block the entire financial details/info that is sent or received by the computer.
Reboot the computer & retry.
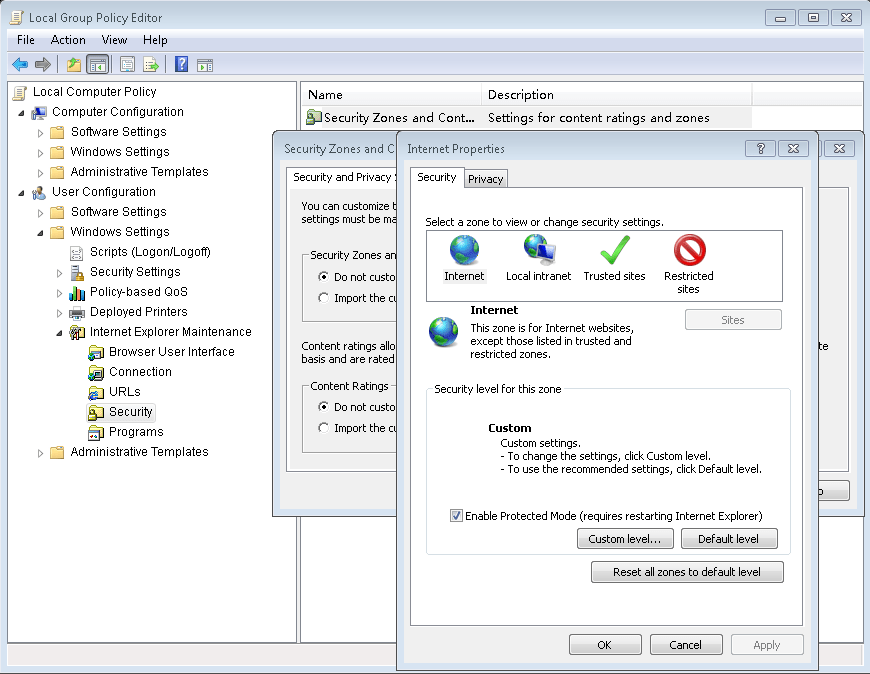
In the Internet options window of the Internet Explorer, ensure that the Use TLS 1.0 is checked where the Use TLS 1.1 & Use TLS 1.2 are unchecked. Finally, restore the Internet Explorer Advanced Settings.
Ensure the single-user mode while transmitting the payroll data.
Ensure that nobody else except you logged into the QuickBooks Desktop.
If anyone else logged in to it, you need to ask them to sign out.
In the QuickBooks File menu, hit the Switch to Single-user Mode.
Follow the command prompt to continue to switch & log in again.
Try an attempt to resend the payroll. If in any case, it doesn’t work then proceed with the steps given below.
Update the payroll.
First of all, Select the Employees > Get Payroll Updates.
After that, Hit the Update
Once the update is completed, restart the QuickBooks Desktop.
Again, try an attempt to resend the payroll information. If it’s still unsuccessful, follow the next step given below.
Verify the system date & time properties.
In the Microsoft Windows taskbar, double-click the time display.
Make sure that the date, time, year, and time zone in the Date and Time properties are correct. If it’s not, then correct them and press OK.
Now, restart the computer.
Finally, resend the payroll information. If it doesn’t, proceed with the following steps.
Ensure that the Internet Explorer is set as the default browser.
Once you set the Internet Explorer as a default web browser, try to resend the payroll information again. If it doesn’t, then proceed with the following steps.
Ensure that you can access the secure web pages or websites .i.e. your personal banking institution’s website. Again, resend the payroll details/info and if it sent unsuccessfully – proceed with the next step given below.
Make sure that you have downloaded the latest QuickBooks & tax table released updates. Later, resend the payroll information. If it doesn’t send, follow the steps mentioned below.
Hit the Options Select the Yes or No for Shared Download.
Later, try to resend the payroll information.
Re-validate the payroll subscription.
Verify the QuickBooks Internet Connection.
Firstly, go to the Help menu, select the Internet Connection Setup.
Now Choose the Use my computer’s Internet connection settings to establish a connection when this application accesses the Internet.
Now Select the Next
Select the “Advanced Connection Settings”.
Choose the LAN Settings. Ensure that the Automatically Detect Settings box is chosen but not the Proxy Server checkbox.
Select the OK tab twice. Hit the Done
Again, try to resend the payroll information.
Ensure that the personal firewall & internet security software is configured correctly.
Winding Up
If you are facing any trouble related to QuickBooks Payroll Server or Error associated with it, you can immediately contact the QuickBooks Payroll Customer Service team.
We are one of a well-renowned and top globe QuickBooks software, services and technical help provider from last 7 years. Also, we have an efficient and certified expert team of QB accounting experts to solve the entire QuickBooks issues such as QuickBooks Installation, QuickBooks Updates, QuickBooks Integration, and QuickBooks Error Codes. In case you need an urgent support, you can call on our toll-free support number i.e. +1-888-510-9198 with no hesitation.
Frequently Asked Questions!
What is QuickBooks payroll service?
Talking about QuickBooks Payroll Service, it is basically a subscription that you can activate to enable the payroll features in your QuickBooks Desktop Software. Depending on the features you need, you can choose from Basic, Enhanced, or Assisted Payroll. However, it should be noted that the QuickBooks Payroll service does not work with QuickBooks Mac
How do I fix QuickBooks payroll errors?
QuickBooks payroll errors can be experienced due to a bunch of factors such as insufficient permissions or file corruption. One can try to rectify these issues by simply accessing the software using admin access or can edit the windows permissions.
How to update QuickBooks desktop?
Intuit the developer of QuickBooks releases the latest version of QuickBooks software from time to time. QuickBooks users are always recommended to update their QuickBooks software to the latest release, in order to access the new features and functionalities. One can easily update the QuickBooks software by heading to the help menu and checking for available updates.
How to deal with firewall issues in QuickBooks?
At times, QuickBooks users might face firewall configuration issues, or the firewall might be blocking the communication of the software with the server, in that case, one can take the assistance of the QuickBooks file doctor tool. Other than the file doctor tool, firewall issues can be eliminated by creating firewall port exceptions.
QuickBooks has gained immense popularity for the past decade. And due to its growing demand Intuit started launching new version of the software every year. Today this cutting edge software helps small and medium businesses in their accounting, bookkeeping, inventory management, sales and more. But since it is just a software, at times users do face errors. Even though the errors can be solved easily at times they can be pretty serious affecting the whole business operation. So, in this article we will discuss about the troubleshooting basics with QuickBooks desktop for Mac. However, you can connect with QuickBooks experts to get the best advices and instant support. Give us a call at +1-888-510-9198, and our technical support team will ensure to provide you with immediate support and guidance.
Steps to Troubleshoot Basic with QuickBooks for Mac
Below we have cover up few troubleshooting basic with QuickBooks for Mac.
1. Check your version of QuickBooks for Mac and your Mac’s operating system
Did you recently upgraded your MAC OS? Often that kind of change can lead to issues in the older version of QuickBooks. When you update your operating system it is also important to upgrade your QuickBooks. And even after updating the technical errors remain, then there should be compatibility issues between the QuickBooks and the operating system. In that case try to open a sample company file installed in QuickBooks. In case there are any problem then there can be issues with data damage.
2. If there are issues with the sample company file, then check your disk permissions
If you see the problem in occurring on the sample company file, then try checking to your disk permission. Few times fixing the disk permissions can make things right.
First open the Disk Utility (Applications > Utilities > Disk Utilities)
Now choose your Mac’s hard drive and then click on the Repair Disk Permissions button
3. Delete the QuickBooks User-level preference file
Step 1: The first thing to do is go to the user account on the Mac and then open Preference folder inside the Library Folder and now look for the QuickBooks for Mac plist file and then trash it.
Note: You may need to reset some preferences the next time you launch QuickBooks.
Step 2: In case fixing the permissions and deleting the plist file doesn’t work then the main problem would a corrupted user account in the Mac. So, you have to make a new user account and then open QuickBooks when you are already logged into the new account.
Step 3: Now open the company file and then start using it. In case the regular behavioral issue with the file is resolved then it means that that the Mac user account is corrupted and this issue can only be fixed by Mac expert.
Step 4: If the sample company file works smoothly then you should try fixing the repairing permissions and remove the preference file. And in case your company file still doesn’t work properly for example there is an issue with lists and reports then you have to resolve the list damages.
Important Note: It may have list damage. See the short article checklist damage in QuickBooks for Mac: Symptoms and Cures for actions to fix that issue. However, if all your efforts, your file collisions, record errors or display screens incorrect details, it might have data damage on your company file.
4. Download and Install the Latest Updates
If you are upgrading to Mac 2020 or later versions, there may be file compatibility issues with your earlier QuickBooks Desktop versions. The incompatibility situation may cause the program to crash or prevent from loading.
You should download and install the latest QuickBooks updates to use Mac 2020 or macOS Catalina. The following is how you can install QuickBooks updates:
QuickBooks Mac will automatically open after the update is complete
If you aren’t able to handle the issues then you can always seek help from the QuickBooks Mac Support team. We are available 24/7 and you will be guided by experienced experts who will solve the errors as well as give you tips to avoid it.
We hope that you are now able to understand how to backup company file in QuickBooks for Mac 2015 also how to open your QB for Windows file in QB for Mac and convert a QuickBooks file from windows to mac. However, if you need further information or need technical help dial our QuickBooks Enterprise support number i.e. +1-888-510-9198.
FAQs Related to QuickBooks for MAC
Why is the QuickBooks app not working on my Mac?
QuickBooks online Mac desktop app is no longer supported as of April 20th of 2021. However, you can continue logging in through the web browser.
Can you use QuickBooks with a Mac?
Yes, QuickBooks is available for Mac users as well. Moreover, QuickBooks online works with your MAC without any issues.
Is QuickBooks different on a Mac?
QuickBooks Mac Plus isn’t as robust as Windows. It has less functionality as compared with QuickBooks for windows. There is no accountant’s copy, which means that sharing files with your accountant is a little bit more complicated.
How do I activate QuickBooks on my Mac?
From QuickBooks Menu, go for register QuickBooks. Further enter the license and product numbers, and hit next. Once done with that choose either to register online or contact us. Now, select register online and follow the steps on the screen to complete the activation process.
Advanced inventory is one of the finest features in QuickBooks that saves a lot of time. It can easily compete with other inventory management software. It further helps in maintaining the tracking the stock. Using this feature into day to day activities can save the time. Just in case you are interested in using and creating picklists in QuickBooks enterprise advanced inventory, then going through this write up will work.
This article will provide you with the new automated process of sales order in QuickBooks Enterprise advanced inventory. In this case, creating a pick list is considered very essential for inventory management. In this article, you will find steps that you can follow to create a pick list.
To learn further about this feature and its uses, make sure to go through this piece of writing or you can also connect with our tech support professionals right away at +1-888-510-9198, and we will provide you with immediate support services right away.
An Introduction
Earlier, the QuickBooks Enterprise Advanced Inventory was manual in the sales order section but now, it has been automated. The manual process was daunting to make the sales order via this version of QuickBooks as the software could not fulfill the order requirement.
There is also an Upgraded Deals Request Satisfaction Worksheet for the QuickBooks Endeavor Propelled Stock clients. This is done to make it less demanding and also makes it faster to organize deals order for satisfaction and discover the same from time to time.
This ensures that the data is available and accessible to you. This pick list can help you create sales order easily in the minimal time period.
The upgraded deals request satisfaction worksheet brings request of every person in a single place. It also includes the data such as worldwide stock accessibility, and shipping date.
The status of access stock in plain dialect is displayed in the overhauled fulfill able section. You also have an option to discover the site that can satisfy every deal arranges with just one click, if you are using the multi-area.
In order to make the upgraded deals to request satisfaction worksheet and work processes, you have the business request screen in the QuickBooks. This screen fuses announcements with informing that gives a user the present status of the business orders.
Benefits offered by the advanced inventory in QuickBooks enterprise
Using the advanced inventory permits the user to track stocks in different locations
Track the inventory items to specific bins within warehouses becomes easy
The barcode scanning is another perk of advanced inventory
Track the entire inventory data in a single place
The configuration flexibility of different types of locations or warehouses
Steps to follow for activating the advanced inventory settings
One can try to activate the inventory settings by performing the steps below:
One needs to align the license that you got after purchasing the QuickBooks before the advanced inventory settings can work.
Choose the help on the extreme right-hand side of the QuickBooks enterprise version
Click on the manage my license and select the sync license data online.
You may see the messages ‘Sent for Picking’ underneath the Business Request and other messages may include ‘Pick in Advance’ and ‘Picked’ or ‘Somewhat picked’.
New sections are there in the business request- picked status of everything , and the amount picked. Deals arrange data increments were earlier intended for the new ‘Versatile Deals Request Satisfaction‘ work process which makes utilization of a Standardized identification Scanner.
At present, another work process alternative joins manual picking with virtual pick refreshes.
In order to utilize the upgrade method ‘Manual’, you shall turn on the new Improved Deals Request Satisfaction Worksheet from the new Site Operation tab. This can be found inside cutting edge stock settings.
Later this, as you will check the sales order from the worksheet, the advanced version will be replaced by the standard one. For example, select an order and you will be recommended to create sales order and then put ‘Yes’ within the consummated column in PC Window.
Now, click on Next to begin the pick list preparation process.
Select the items to pick for special sales order. This can be easily chosen from the window of the PC.
Select ‘items‘ and create the ‘Pick list‘.
As soon as you select the items the pick list creation window will appear on the screen. You can change the pick list name and create by QuickBooks very easily and smoothly.
From the Picker’s name from the drop list, take picker option. Here you can also add notes to picker field.
To create and print, press the drop-down button that will take you forward.
Print the pick list. In this, you can also look at the total system. Also, the pick list you have created will appear on the window.
Take the pick list tab and you will find a new list and the status for picking will be ‘send’.
Press the blue updates sales order and edit the ‘pick list quantity‘.
After this, the sales order will be updated as per the new pick quantity.
This availability will be very useful for advance sales order. Additionally, it is also helpful for the fulfillment of worksheet that aids in deciding the ability of the external sales order as soon as possible.
Working System And Its Uses
Being very effective with the QuickBooks, Working Systems allow a salesman to make different and numerous orders in the minimal time.
If in any case, you have a stock client who does not seem to be utilizing the standardized portable tag scanner for the deals request satisfaction. You can turn on this component and create your pick lists design. Just kill the component by unchecking the inclination on the site operation tab.
We hope that this article assists you in getting rid of all your doubts. Still, If you encounter any problem related to the QuickBooks software, we recommend you to contact our QuickBooks Enterprise help & support team immediately. We have an efficient and professional team of QuickBooks experts to resolve the entire QB issues such as QuickBooks Installation, QuickBooks Errors, QuickBooks Updates, and more. For urgent assistance, you can dial our toll-free support number +1-888-510-9198. Help is available 24*7 for you.
Frequently Asked Queries!
How do I create a picklist in QuickBooks?
For this, you need to head to the Sales Order section, then choose Orders. Go for the Sales Order that you would like to generate a pick list for, then select Finalize to change the state of the Sales Order from Active to Finalized. To generate your pick list, select the dropdown menu next to the Order
How do I use advanced inventory in QuickBooks Enterprise?
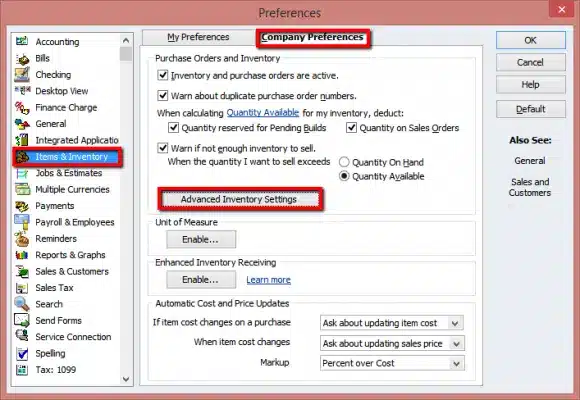
The user can use advanced inventory in QuickBooks enterprise using the steps below: From the Edit menu, select Preferences. On the left pane, choose Items & Inventory then go to the Company Preferences tab. Check the Inventory and Purchase Orders are Active box. Select the Advanced Inventory Settings button.
What is QB advanced inventory?
QuickBooks Advanced Inventory is a QuickBooks Enterprise Desktop add-on that offers functions to manage inventory. The Intuit website provides instructions to install this feature if needed to record transactions at additional locations.
Certain errors in QuickBooks desktop company files can be caused due to QBWIN.log or QuickBooks.log files. QuickBooks Desktop logs program messages and errors, including information created by Verify, Rebuild, and Condense Data utilities, in a specific file. In Windows, the file is called QBWin.log while for Mac, it is called QuickBooks.log. Qbwin.Log: Lvl_error Error: Verify Online Account Information: Invalid Customer ID Number generally appears when you use or try to use an invalid Customer ID while setting up the account with online services such as Bank Feeds. The error is mostly triggered by the QuickBooks log file. There are a few do-it-yourself methods to troubleshooting methods to fix it. The users who already have faced this issue, however, recommend that contacting an experienced and reliable technical QuickBooks support team member is the best option.
Note: Errors like “IsQBInUseLockFilePresentAndLocked…LCK can’t be found. Error = 2” in QBWin.log is not a sign of data damage and should not be considered as one when fixing data damage. For more information, you can connect with our technical support professionals at +1-888-510-9198. And our technical support professionals will ensure to answer all your queries immediately.
What are Qbwin.log errors in QuickBooks?
You can come across a handful of QBwin.log errors in QuickBooks. Out of which, we have tried to list some common ones:
QBwin.log file: LVL_ERROR-QuickBooks has experienced a problem and must be shut down, ErrorCode:1256530728
How to find QBWin.log or QuickBooks log files?
You can find the files that can help you determine the cause of specific issues found in the QuickBooks company file. The QuickBooks desktop logs program messages and errors, along with the information generated through the verify, rebuild, and condense data utilities.
Find QBWin.log files in QuickBooks for windows
If you are only running one edition of QuickBooks desktop installed, perform the steps in option A.
In case you are unable to find the folder within the suggested guideline, then perform the steps for showing hidden guidelines.
How to Access QBwin.log on the local computer?
Option 1: Access QBWin.log on the local computer from the product information screen
From the home page, press F2 key or Ctrl + 1 keys to launch the information window for the product.
Press Ctrl + 2 or F3 key to start your tech help window, and then select to open the open file tab
Select QBWin.log and also click on open file
Press Ctrl + F and type start verify to locate the final entry of begin verify within the QuickBooks log file.
Option B: Access QBWin.log within windows
Find location of QBWin.log using file explorer
Location: C:\Users\YOUR USER NAME\ AppData\ Local \Intuit\QuickBooks\ log \XX.X\QBWin.log
Here XX.X represents your version of QuickBooks Desktop. For example: 18.0 is Enterprise 18.0 and 28.0 is QuickBooks 2018
A quick tip: You can do this a bit faster by typing %localappdata%\Intuit\QuickBooks\log\XX.X\QBWin.log to the address bar.
Log in to QBWin.log to Rights Networks or other hosted environment
For QuickBooks desktop pro/premier users:
On the start menu in the terminal or hosted environment, select computer
Now, on the search menu, enter QBWin.log.
Avoid hitting enter to click on the magnifying glass symbol
The list of QBWin.logs will appear
Check for QBWin.log with the most recent date and time
For QuickBooks enterprise solution users:
The user needs to first press ctrl + 1 keys or F2 key for the product information window
And then press F3 or ctrl + 2 to open tech window
Now, select open file tab
And also, choose QBWin.log and open the file
Find QBWin.log files on QuickBooks for Mac
The very first step is to select file and close company options
After that, choose option and select help and product information
The user is then required to click on collect logs.
This will create a zip archive on the desktop along with the QuickBooks log files
Double click to extract the files and within the folder, you will find those QuickBooks.log files
Method 2: Verify the online bank information in QuickBooks and try to connect to your bank again
Method 2 can be followed if the desired results are not received from the Option 1. To start with Method 2, verify your online bank details in the QuickBooks account. Connect with your bank to which this information is associated.
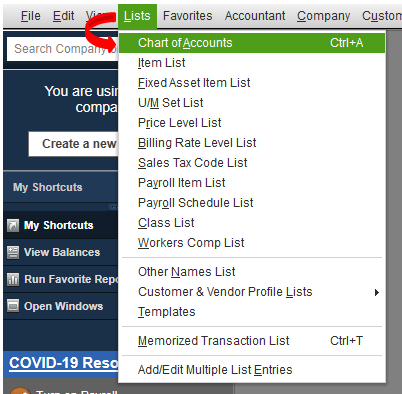
First of all, Go to ‘List menu‘ and choose ‘Chart of Accounts’.
As you encounter an error, right click on the ‘account‘ that is connected with your online QuickBooks services such as Banking.
After that Go to ‘Edit‘ option.
Move to Bank Feed settings. Ensure that the information of your setup ‘Customer ID‘ matches with the ‘Customer ID‘.
If this is also not matched with the Customer ID, then rectify the information by pressing ‘Save & Close‘ option.
Important Points for QuickBooks log file error
One of the suspected causes of this error can be the extra space, special character, dash in the Customer ID field. If anything is there, we would suggest you to remove that quickly.
Every Customer ID or PIN Fields may have alphanumeric characters as per the policy of the bank or financial institution. So, when you match your ID with the Customer ID field, then ensure to consider them. This is a sensitive case and thus should be kept in notice.
Maybe your account has been locked if you have exceeded the number of login attempts unsuccessfully. If it has been locked out, then please connect with your bank to resolve this issue.
After this, jump to Bank Feed center in your QuickBooks account, and re-establish the connection under Sent items.
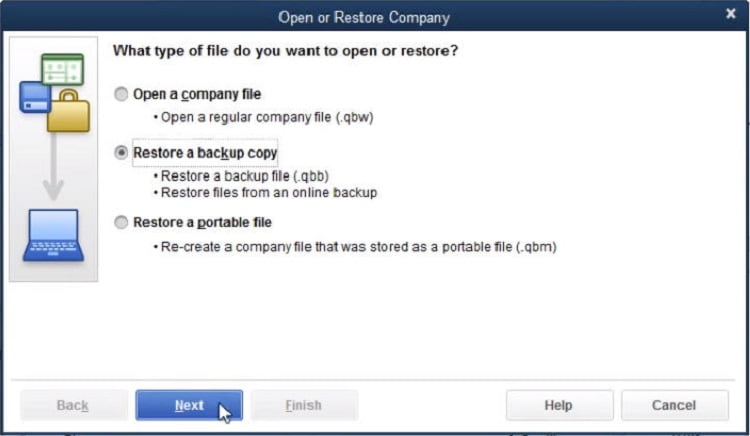
Method 3: Restore a backup
We always recommend you to keep a backup of your QuickBooks company file. A backup created recently may really come handy to restore your accounts. Open QuickBooks and then go to company file. If you have created a backup of your QB company file, proceed to use that to restore your accounts.
Open QuickBooks and then go to your Company File. If QBWin.log error or QuickBooks log file error persists, move to the next troubleshooting method.
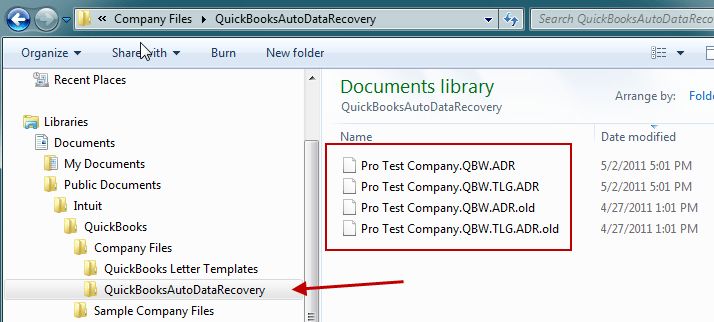
You may require assistance to fix your company file with Auto Data Recovery. Please note that this tool is only available for QB Pro, Premier, and Enterprise for Windows. You can’t use this tool with Accountant Editions. You can learn more about our data recovery services here.
Method 5: Update QuickBooks software
The user can try updating the QuickBooks software to the latest release using the steps below. This can fix the Qbwin.Log: Lvl_error Error: Verify Online Account Information error up to a certain extent.
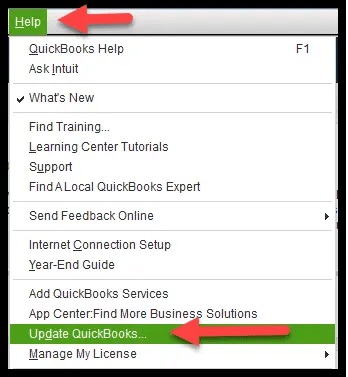
The very first step is to head to the help menu and then choose the update QuickBooks desktop option.
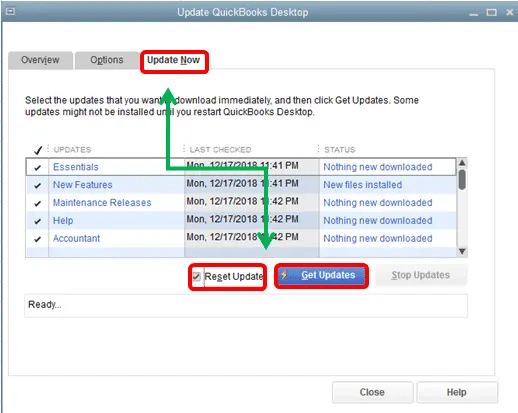
After that head to the update now tab
And choose the reset update checkbox to clear all previous updates
Later on, select get updates to begin with the download
Restart the QuickBooks, when the download completes
The last step is to accept the option to install the new release. And further, opt for Qb log in.
After performing the above-mentioned steps, you should get the desired result. However, if the Qbwin.Log: Lvl_error Error: Verify Online Account Information error still persists or your QuickBooks is not working properly, then you can contact our QuickBooks technical support team who will help you find out the exact reason for the error and will resolve the issue in the least possible time.
Our experts are available round the clock and are highly experienced. Just connect with us today at +1-888-510-9198.
FAQs Related to QBwin.log errors in QuickBooks
Does QuickBooks have an error log?
QuickBooks desktop logs program messages and errors, including information created by verify, rebuild, and condense data utilities, in a specific file. This file is termed as qbwin in Windows.
Where is the Qbwin log in QuickBooks?
You can spot this by: 1. Pressing F2 key. 2. Further, press F3 key. 3. Choose open file tab and scroll down to QBWIN.log.
Can I delete the QBWin.log file?
Yes, it is possible to delete the QBWin.log file, in case you no longer need it or you wish to clear the log history. QuickBooks will create a new QBWin.log file when it runs again.
What are common errors found in QBWin.log file?
The QBWin.log file might contain various types of errors including: 1. Data damage errors 2. Network connectivity errors 3. Installation errors 4. QuickBooks application errors 5. Errors related to third-party applications or services integrated with QuickBooks
Everything you Should know about Print 1096 and 1096 forms in QuickBooks
Professionals like doctors, lawyers, accountants, contractors, etc., who work independently, for a business or firm where they offer their services to the public are generally independent contractors. Though, in some cases, can also be employees. To make a long story short, an individual is called an independent contractor if the payer can control or direct only the outcome of the work and not what how the work is done. This article is created to assist you to set up a 1099 Independent Contractor vendor in QuickBooks Desktop.
What needs to be reported?
If the users pay the vendor more than $600 in a year, the user would have to fill out a 1099 MISC form. Note that the IRS doesn’t permit electronic payments to be reported on 1099 MISC forms. We can take an example to understand the situation in a better way in case the user has paid via credit card, debit card, paypal payments, gift card, etc., then he/she would not require to report those on a 1099 MISC. The reason behind this can be that the QuickBooks desktop software automatically excludes the above-mentioned modes of payment. And the payment companies will report those payments, so the user need not worry.
For whom is the creation and filing of 1099s mandatory
The creation and filing of 1099s are very important for the following:
Filing 1099s is indispensable when the user makes payments to contractors in different forms like cash, direct deposit, and checks.
In case the user is an employer and has hired vendors or freelancers, then in that case, also the filing of 1099 is essential
Under the withholding rules, if you have withheld the federal income tax, then filing 1099s is important.
Prior to establishing a 1099 vendor in QuickBooks Desktop, examine the IRS standards initially to recognize if your vendor falls under the group of an Independent Contractor. Below we have given few important points to start setting up your Independent Contractors:
Set up an Autonomous contractor
Note: We recommend you to check the IRS guidelines before performing this step to determine if your vendor falls under the Independent Contractors’ category.
Open QuickBooks Desktop, go to Edit tab and select Preferences.
Select 1099 for Tax.
Choose company preferences tab.
Click Yes when “Do you file 1099-misc forms?” option.
Select ok in order to save the settings.
Add a vendor in QuickBooks
Open Vendors and select Vendor Center.
Click on the drop-down option and choose New Vendor.
Type a supplier name of your choice to be listed in the Vendor Name field. This will be found under Vendors listing.
Fill details in the tabs.
Supplier can be modified to include additional details.
Select OK.
Set up Vendors to get 1099-MISC in QuickBooks
Open Vendors and select Vendor Center.
Find supplier’s name and do a right click.
Tap on Edit Vendor.
Go to Address info tab and verify the Details.
Set up an expense account for vendor payments.
To set up an expense account in QuickBooks Desktop:
Firstly, you need to choose Edit and then choose Preferences.
Next, Select Tax: 1099 On the left.
Then Click on the Company Preferences tab.
Next to Do you file 1099-MISC forms? click to select Yes on top.
After that, If you intend to map your account to boxes on Form 1099-MISC, you need to click on this link.
The QuickBooks 1099 Wizard will certainly open up.
The QuickBooks Desktop accounts to track payments to your 1099 vendors will be listed.
In the Apply payments to this 1099 box column, click the drop-down menu as well as select the ideal 1099-MISC box.
Most Vendors get paid with Box 7: Non-employment Compensation, although you will certainly intend to ask a tax professional first before choosing which box to utilize.
Please note: The only supported boxes QuickBooks Desktop support remain in this checklist.
You need to Select an 1099-MISC box for each account noted or choose Omit these payments from 1099.
Click Save & Close once the accounts have actually been mapped.
Important Points to Remember:
Put appropriate state abbreviation and postcode in the address field.
In case of an individual vendor, the supplier’s name must appear in first, middle and family name boxes.
Leave the Company Name box empty if you know the business name but not the individual’s name.
Choose the Tax Setup button.
Select the eligible Vendor for 1099
Type in the tax obligation id number of the supplier in the Vendor Tax ID Field and click OK.
Perform the steps (2 to 6) for every 1099-eligible vendor.
Understand how company and vendor names appear on the 1099-Misc form
QuickBooks features three name fields in QuickBooks Desktop:
Vendor/Contractor Name
Company Name
Full Name
Possible Scenarios Based on What’s Entered in 1099-MISC forms
Here are the probable scenes based on details entered in these fields:
Vendor Name as well as Company Name have values in QB Desktop
Outcome: 1099-MISC Form will have both the Vendor Name and Company Name on it.
Blank Vendor Name and a value for the Company Name in QuickBooks Desktop
Outcome: You can’ leave the Vendor Name blank. You have, however, an option to specify the Vendor/Contractor Name and leave the Full Name field blank. In a case like that, just the Company Name will show up on the 1099-MISC Form.
Values for Vendor Name and blank Company Name in QuickBooks Desktop
Outcome: The 1099-MISC Form will only have the Vendor Name.
Different values for Vendor Name, Company Name and Full Name fields in QuickBooks Desktop
Outcome: Just the Full Name and Company Name will display on the 1099-MISC Form.
NOTE: Vendor Name usually auto-populates with the details provided in the Full Name fields, unless you (or someone) changed the Vendor Name manually.
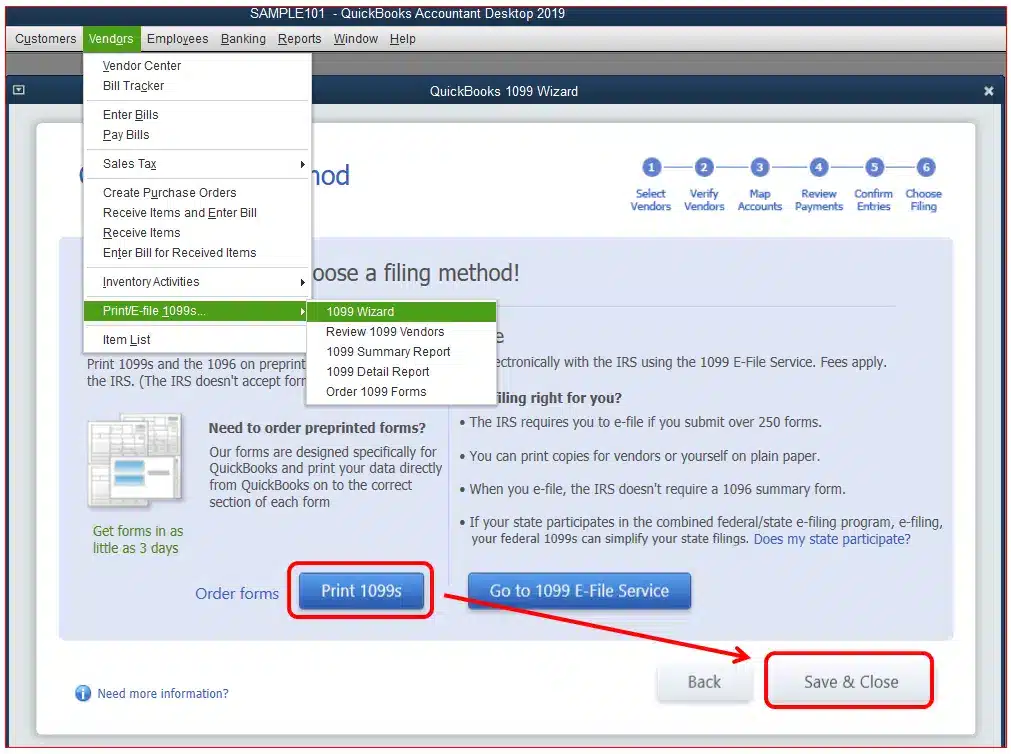
Forms can only be printed in single-user mode, and you must have pre-printed 1099 and 1096 forms to perform this. You can also choose to e-file your 1099 forms to the IRS.
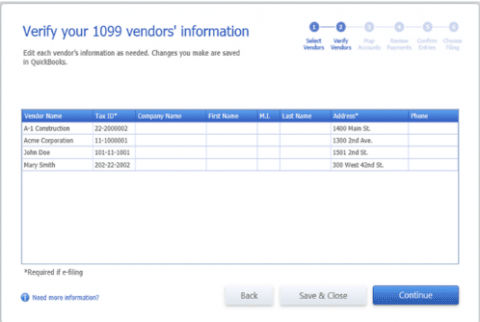
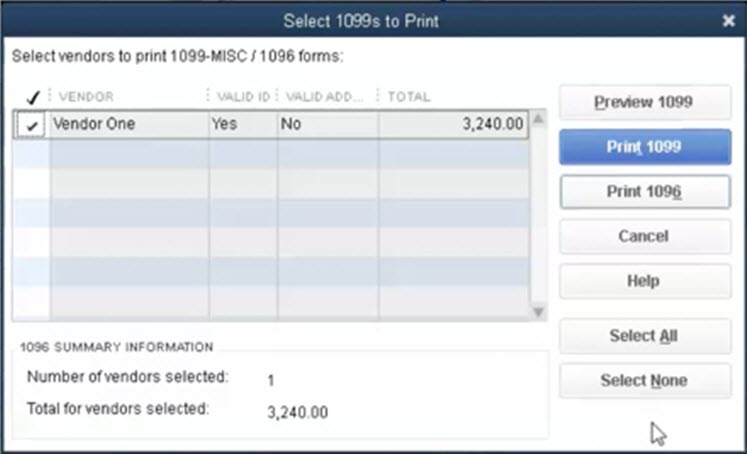
Verify your 1099 details through QB Desktop 1099 wizard.
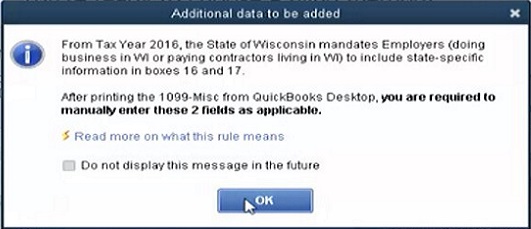
In the wizard, at step 6, choose a filing method and click on Print 1099s. Read the message and click OK to get the print.
The message states “From Tax Year 2016, the State of Wisconsin mandates Employers (doing business in WI or paying contractors living in WI) to include state-specific information in boxes 16 and 17. After printing the 1099-Misc from QuickBooks Desktop, you are required to manually enter these 2 fields as applicable.”
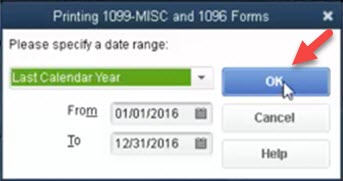
Select the range (of date) the 1099s were paid from and click OK.
Select the form 1099(s) you wish to print and click the Print button.
You can click Preview 1099 and check the alignment. To align the form:
Firstly, Click File on the top menu bar
Then Click on Printer Setup.
Now close 1099s/1096 from the list in Form Name
Click the Align button and adjust alignment as needed.
Click OK, and then OK again to save your changes.
Choose 1099(s) you wish to print and click Print 1099(s).
Few important tips to use while printing 1099/1096
Print separate copies than all at one with a page-oriented printer.
You must not collect your pre-printed forms prior to placing them in your printer. You can first load all the Copy 1 forms. Once all the Copy 1 forms are printed for each vendor, then load and get prints of the Copy 2 forms.
Copy A (non-perforated) is for the IRS and copy B (perforated) is for the vendors/suppliers. A page can only print 2 vendors per page.
Alignment will prompt you to select -1 in order to bring the print down or +1 to bring that up.
This selection can lower or enhance the print 1/100th of an inch.
Verification – The status of filing 1099 needs to be verified
The below steps should be followed to check the status of the 1099s filing:
The very first step is to access the Tax1099 account and log in
Tap the plus sign.
It is located in the page’s upper right corner.
Thereafter, check the status checkbox
The reference number has nine digits.
Hit on check status
We hope that this article provides you will all the details to be able to print QuickBooks desktop forms 1099/1096. In case you need any further assistance, you can call us at +1-888-510-9198. We are available 24×7 and offer our QB users with best in class QuickBooks support. Contact us today..!
FAQ (Frequently Asked Questions)
Question: Is there a way to file 1099/1096 forms electronically from QuickBooks Desktop?
Ans. Yes. You may use QuickBooks 1099 E-File Service to file your 1099/1096 forms electronically from QuickBooks Desktop.
Ans. No, Assisted Payroll does not support filing of 1099/106 forms. The fastest way to file your 1099/1096 forms from QuickBooks Desktop is by using our 1099 E-File Service.
Question: Does Form 1096 prints with 1099-PATR box checked instead of 1099-MISC?
Ans.
Description: When printing type 1096, the checkbox in the bottom of the form for 1099-PATR is examined as opposed to box for 1099-MISC.
This problem has actually been fixed with a program upgrade released around January 26th 2015. Please download as well as install the most up to date QuickBooks Desktop updates: