Have you tried to upload or download a QuickBooks company file to Intuit Customer File Exchange? Well, this process isn’t as daunting as it seems. Intuit, the developer of QuickBooks needs to acquire customers’ company files, in order to attain any information indicating any glitch that is to be rectified. Many users might find this procedure to be a bit confusing. Thus, to help you out with your queries, here we are with this segment sharing the complete steps to download the QuickBooks desktop company file to Intuit Customer File Exchange. To understand the process in detail, stick around this segment, or you can further get in touch with our technical team at +1-888-510-9198, and ask our QuickBooks ProAdvisors to perform the process for you.
In order to send the file to Intuit or for QuickBooks file exchange, you need a secure Personal Identification Number (PIN). The PIN is in the email from Intuit and it usually expires after 48 hours. In case you already have PIN, then you can proceed to the next step. On the other hand, if you do not have your PIN, then make sure to check the spam folders for an email from Intuit. In case you need a PIN or it is not working, then you can contact the professionals.
Steps to Upload QuickBooks Desktop Company File to Intuit Customer File Exchange
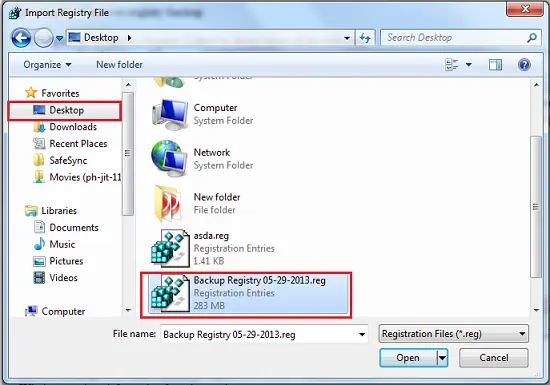
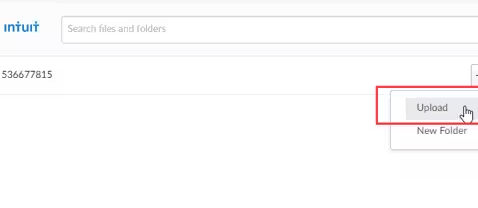
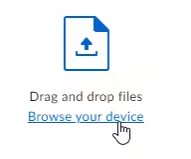
One can send any kind of file to Intuit. Note that, if you upload a file with the same name as an existing file, it will overwrite the original one. Thus, you need to change the file name or create a folder instead. Uploading the data file to Intuit is possible with the help of the steps scribbled below. Let us evaluate.
Create a backup of the company file before you carry out the steps. If you are not able to create a backup, then use the regular file i., qbw file to upload.
Now that you have performed the steps to upload the file, let us understand the steps to download the data file from Intuit. This fileexchange is a corrected data file and it can be retrieved using the below steps: Also note that, you will have to download the files as they are removed from the portal and the server after 20 days.
Note that the PIN is case-sensitive, and you will have to contact professionals in case you lose it.
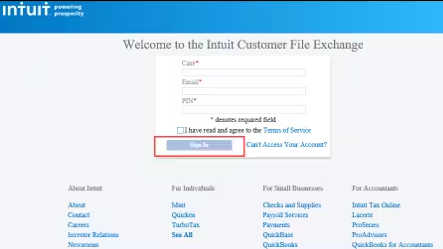
Now, accept the terms of service and click on the sign-in tab.
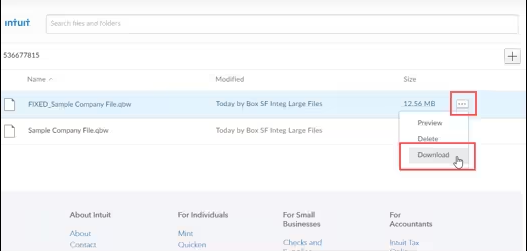
Identify and locate the file. It would be termed as FIXED_(file name)
Furthermore, select the three dots and there click on the download tab.
You will now have to browse the location where you want to save the file.
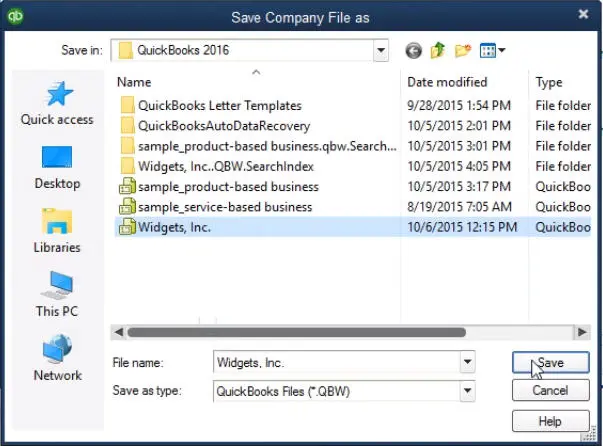
Click on the save option.
Upload and download files from Data Services
If you see the Readme.docx file, then download it. This file carries essential information that you need to start the process of using the repaired file. Save both the data file and readme.docx in the location where you can access it without any issues. Avoid getting the data compromised.
In case you are opening the file over a network or on the server, then restore the file locally before you save it to the location where it is being hosted.
The last step is to head to the conversion process. Note that the data futile might have the extension as .qbb which indicates a backup company file.
Here, you might have to convert the downloaded backup company file to a full company file using the steps below:
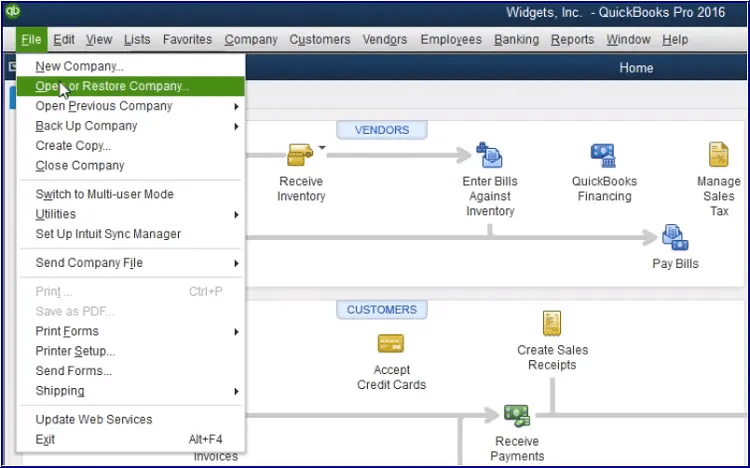
You need to first head to the file menu in QuickBooks.
Select the option termed as Open or restore company.
Downloading and uploading the company file to file exchange QuickBooks doesn’t involve any rocket science. A few basic steps do the work easily. Hopefully, the segment shared the right set of steps, and by implementing them you might be able to successfully upload and download the company file to Intuit customer file exchange. Just in case you are left with any queries, or if you are seeking professional guidance, then do not hesitate in contacting our technical team at +1-888-510-9198, and our certified experts will ensure to answer your queries immediately.
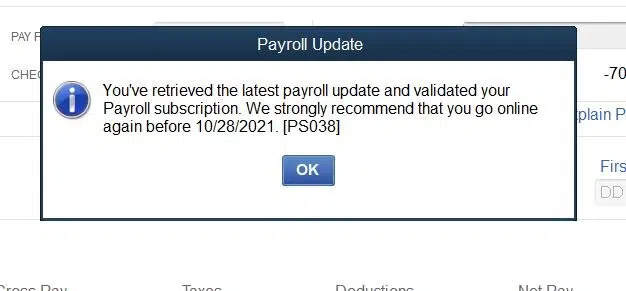
Experiencing QuickBooks error PS038 can be extremely annoying when running payroll. You can come across such an error when trying to install the latest updates for QuickBooks payroll. You can also experience this when installing the latest tax tables. It further shows up on the screen when the paychecks get stuck at the online to send option. When this particular error occurs, it appears with a warning message that states: You’ve retrieved the latest payroll update and validated your Payroll subscription. We strongly recommend that you go online again [PS038]. A bunch of factors can drag you into such an error, which we will elaborate on later in this segment.
Thus, stick around this segment carefully to understand what causes QuickBooks error PS038, along with the measures that can be taken to fix the error. You can also get in touch with our technical support professionals at +1-888-510-9198, and our experts will help you with your queries immediately.
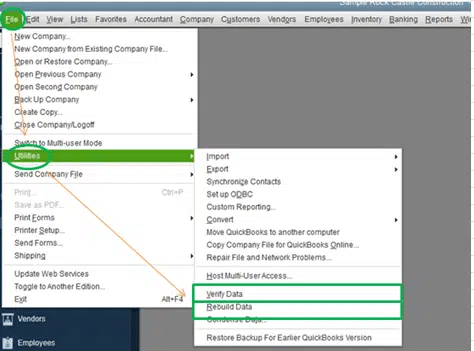
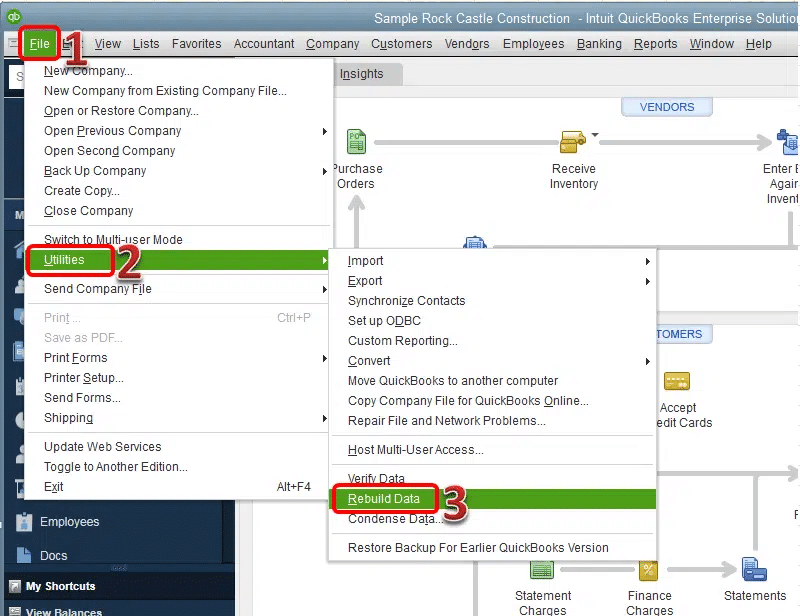
In case the tool diagnoses any issues, then you simply need to use the rebuild data tool.
Steps to use rebuild data tool
Initially, click on the file menu.
Once done with that, go for utilities tab and also choose the rebuild data option.
You are then required to click on the ok tab and head to save the file to a convenient location.
The next step is to wait for the rebuild process to end.
Also, rerun the verify data scan to ensure that the preexisting issues are not showing up further.
This would fix the issue up to a certain extent.
Solution 3: Update and backup QuickBooks data To Fix QuickBooks Error PS038
Here are a few steps that can be taken to update QuickBooks:
Begin the process by clicking on the help tab in QuickBooks.
Once done with that, click on Update QuickBooks desktop and also go for the Update Now tab.
Selecting the reset update checkbox removes all previously downloaded updates.
You now have to choose get updates and let the update download and install successfully.
After that, enable automatic updates.
Also download the updates from the QuickBooks product download page, in case the issue shows in between the process.
Now, open the downloads and updates page.
And select yes, no, or not sure options.
Click on the country, product, and version.
Also, click on the search tab.
Go for the download option.
After the update has been downloaded, you need to navigate to the computer’s downloads folder. Click on the QuickBooks update file to start the process of installing it.
Carry out the onscreen prompts to complete the installation.
The very first step is to head to the file menu in QuickBooks.
Select the switch to single-user mode option.
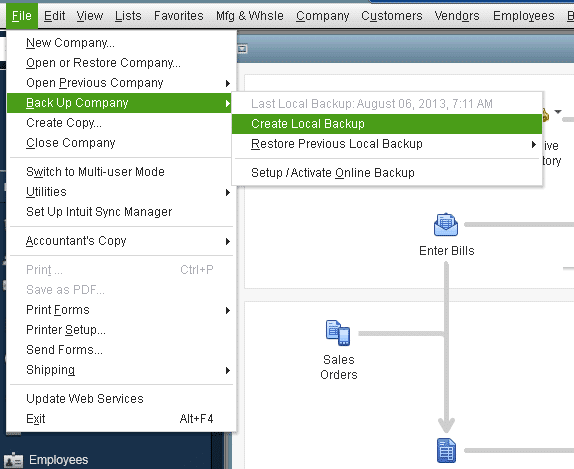
You now have to access the file and click on backup company.
Select Create Local Backup.
Also, go for a browse in the local backup-only section and then decide on a place to the backup file.
You will now have to choose how many backups you need as an additional step.
This will test your company file.
After that, click on the ok tab.
And also tap the save it now option and hit the next tab.
Solution 4: Send payroll data or usage data
In order to update the outdated direct deposit paychecks, you need to send payroll data and usage data. This can be done with the help of the below-scribbled steps:
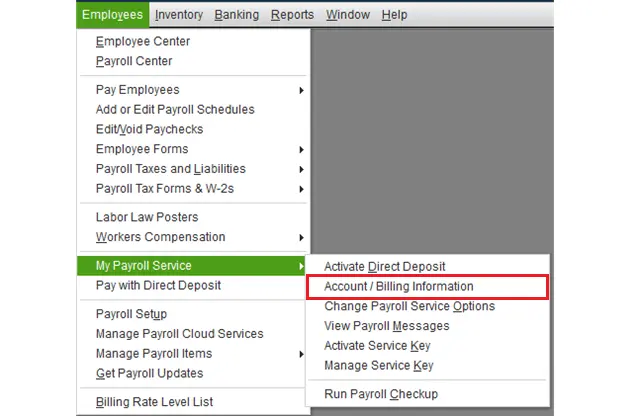
The user needs to first head to the employees tab, select My Payroll service, and choose send usage data.
In case you do not see this option, then move to the next step.
Here, you need to navigate to the employees tab and choose send payroll data.
Once done with that, in the send/receive payroll data window, choose to send all.
Further, enter your payroll service pin in case asked to.
In case it is successful, then try to update payroll again. If you still face the same issue, then proceed with the steps below.
You need to spot the stuck paychecks using the below steps:
At first, click on the edit tab and choose find.
Once done with that, select the advanced tab.
You now have to click on the detail level from the filter list in the choose filter section.
Also, click on a summary only.
The next step is to return to the filter list.
Further, scroll down to choose online status and also click on online to send.
Click on find and you will be able to see paychecks that weren’t sent to Intuit.
Note down the number of matches on the find window and move ahead with the onscreen steps.
Solution 6: Restore a different backup copy
In case possible, try to restore backup files in QuickBooks, preferably the initial one before the error showed up. The steps to be carried out for restoring a backup are:
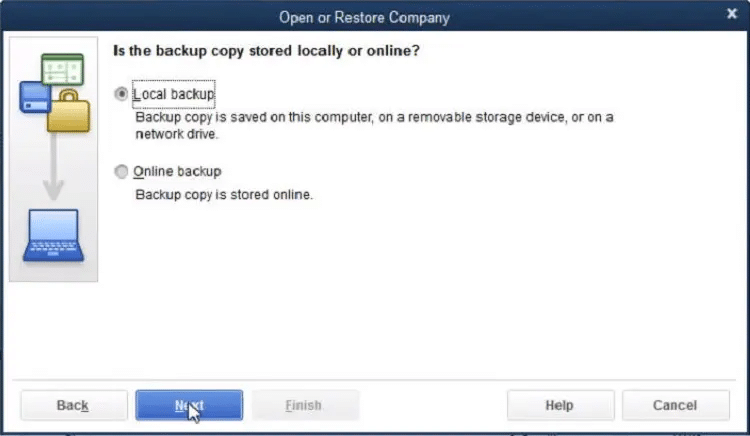
Here you need to head to the file menu and opt for open or restore company in QuickBooks.
The next step is to click on the restore a backup copy option and also click on the next tab.
You now have to select local backup and click on the next tab.
Head to the system to find the backup company file resembling [Your Company name].qbb
Choose a folder to find where to store the restore company file and then click on open.
Avoid overwriting by renaming the existing company file.
Once done, click on the save tab.
At the end of this process, you have a new company file ready for your work.
Solution 7: Disable the antivirus temporarily To Fix QuickBooks Error PS038
In certain cases, the antivirus software might hinder the smooth working of the software by simply creating restrictions. In that scenario, you simply need to perform the below steps:
To start with, you need to open the start menu and look for the control panel.
Once done with that, open it and head to programs.
You will then have to scroll down to find your antivirus software.
The next step is to click on it and also click on the disable option.
Solution 8: Maintaining the accuracy of tax information
Under this process, you simply need to first reboot the system and reopen QuickBooks.
Once done with that, confirm that the account details are current and accurate. In case not, then make necessary updates.
You now have to install the most recent update for the payroll tax table.
Solution 9: Don’t keep the file on a network
Acertaining that your file is not present on the network is also essential. After which you will have to update the company file after disabling the antivirus and Windows firewall.
You now have to right-click and copy the company file from the server system.
And later on, transfer and paste it to the home screen of the system.
You can also disable antivirus and firewalls.
Also, update the new QuickBooks company file to the latest version.
And update payroll to the latest release and turn off cloud payroll services.
The last step is to send payroll data to release the stuck paychecks and toggle them.
Solution 10: Repair QuickBooks
Fixing QuickBooks can help you fix QuickBooks payroll error PS038 up to a certain extent. You can use the QuickBooks tool hub and Quick Fix My Program to repair QuickBooks and fix this issue. The steps involved here are:
Download the QuickBooks tool hub.
After that, open and install the downloaded QuickBookstoolhub.exe file.
And further, run the InstallShield wizards.
Now, accept the license agreement.
Within the QuickBooks tool hub app, select program problems.
And also click on quick fix my program. This will fix the issue up to a certain extent.
Now that you know what measures should be taken to eliminate this particular error in QuickBooks, it is believed that you might successfully be able to fix the issue. Just in case you are unable to rectify the error PS038 at any point in time, or if you need any sort of technical guidance at any point in time, then in that scenario, give us a call at +1-888-510-9198, and our certified QuickBooks ProAdvisors will assist you in getting rid of this issue permanently.
Attempting to export the client-ready payroll reports in QuickBooks and saw an error: Client Ready Reports Compile Error? Well, compile error in hidden module QuickBooks isn’t a common error that doesn’t actually show up on the screen, rather it might show that the user is notified that the process is done, even when it is not. The error is basically associated with a specific company file. A bunch of factors can drag you into such an error, which we have covered in this segment. To understand this error in detail, stick around this segment carefully, or you can also connect with our technical support professionals at +1-888-510-9198, and our team will ensure to provide you with immediate support and guidance related to QuickBooks.
What is Client Ready Reports Compile Error in QuickBooks
QuickBooks users might come across a majority of errors when performing different operations. A common message that might be seen by users is Client Ready Reports Compile Error. This usually occurs when the user tries to export the client-ready payroll reports or when trying to run client-ready reports in QuickBooks, but the process gets failed every time.
QuickBooks compile error in hidden module is related to a specific company file and it might also be seen if Microsoft excel is either outdated or not working properly. To understand this issue better, stick around this segment carefully.
What leads to Client Ready Reports Compile Error in Hidden Module QuickBooks?
Such an error can be seen due to the following factors:
In case there are certain add-ons incompatible with QuickBooks setup, then you can come across such an error.
Another probable reason can be MS Excel and QuickBooks are outdated
You can further come across a similar issue when the Excel version set up on the system is incompatible.
One of the most common reasons can be if the company file is corrupted or partially damaged.
Antivirus applications set up on the system are preventing the transfer of client-ready reports.
Methods to fix QuickBooks Client Ready Reports Compile error in Hidden Module QuickBooks
There are a bunch of measures that can be taken to eliminate this error successfully. Let us understand each of the methods one by one:
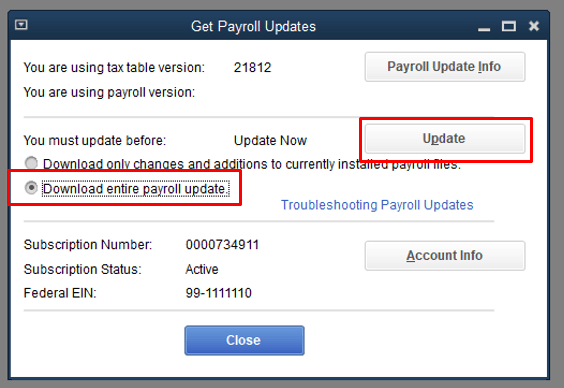
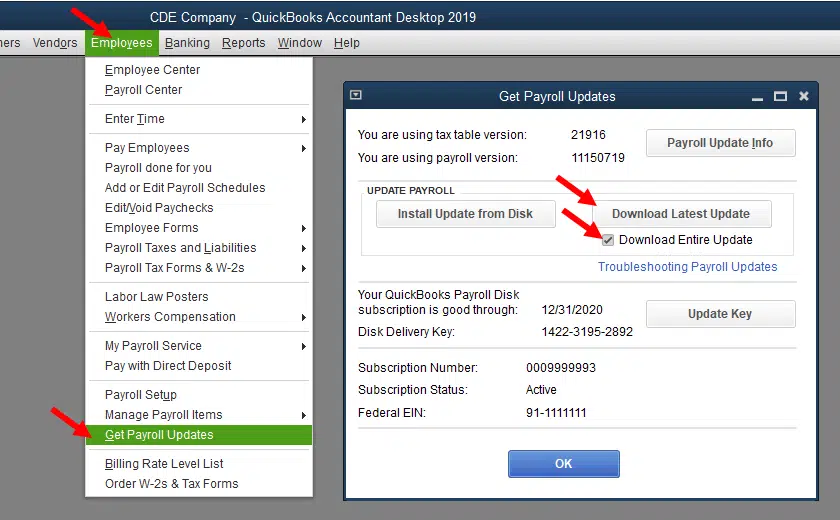
Method 1: Update Tax Table
Under this method, you need to advance to the employees tab in QuickBooks.
Once done with that, you need to click on Get payroll updates.
Followed by clicking on download the entire update.
Also, click on update.
Now, if you come across any error when updating the payroll tax tables, repair QuickBooks and further try to update again. ‘
After the tax table has been successfully updated, you need to try exporting the client-ready reports again to Excel.
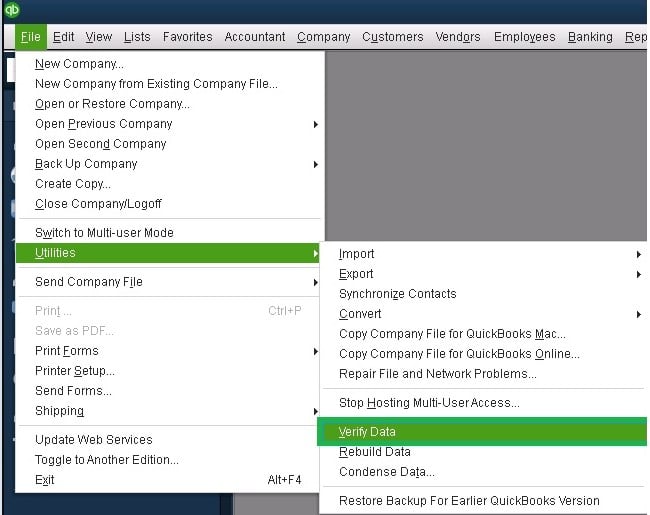
At times, a corrupted company file can trigger QuickBooks client-ready reports to compile errors. In such a scenario, one should try to verify and rebuild tools to diagnose and fix the existing issues with the company files. The steps include the following:
Initially, click on the file menu and further click on the utilities tab.
You are then supposed to click on the verify data option to verify the company file for any errors.
In case any of the error is spotted, then you need to make use of the rebuild data tool.
Wait for the rebuild process to complete.
After that, use the verify tool and check if the errors that were diagnosed earlier were fixed.
Toward the end, try exporting client-ready reports again.
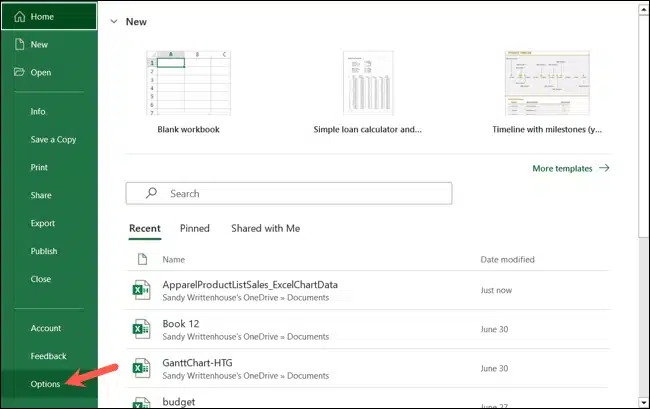
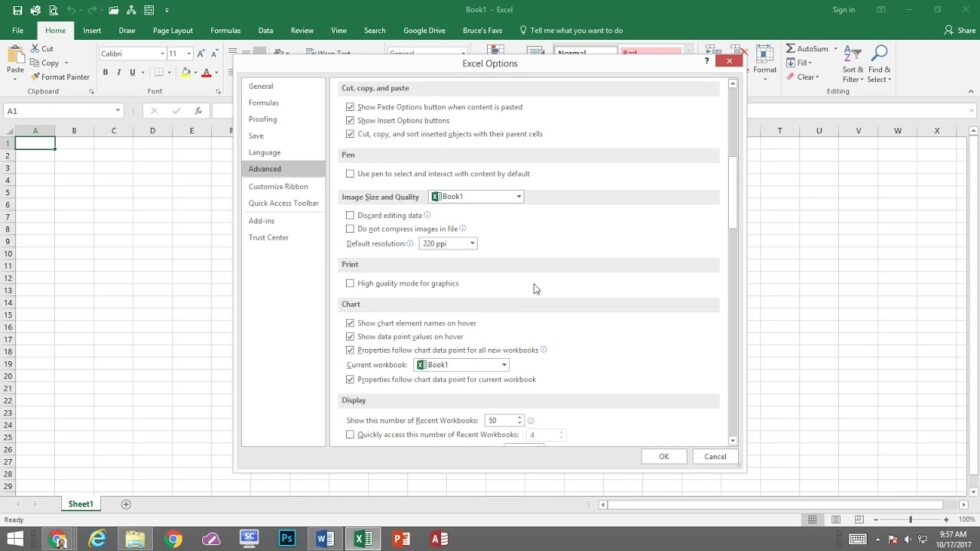
Method 3: Configure Excel
Initially, you need to run M.S. Excel
Once done with that, click on the file tab.
You will then have to go for the options in the list
The user will then have to click on advanced.
Followed by heading to the General section and marking the option to Ignore other applications that use Dynamic data exchange.
To end the process, you need to click on the enter tab to save the changes.
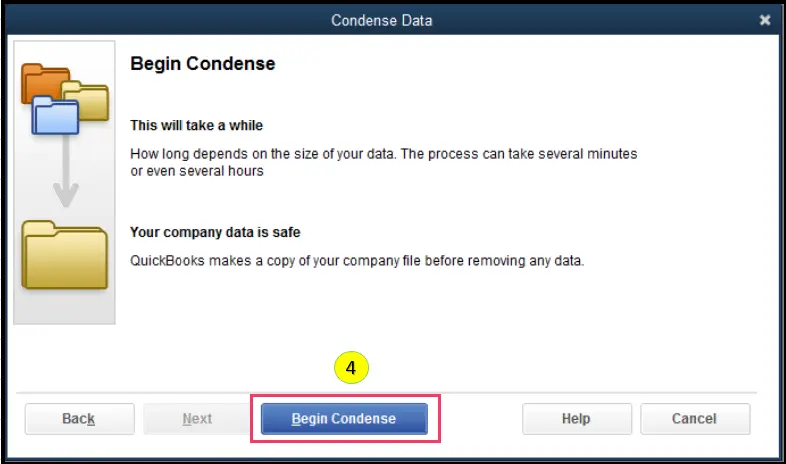
Method 4: Make use of the Condense Data tool to Fix Compile Error in Hidden Module QuickBooks
Try using the QuickBooks condense data repair, as it can fix the error by streamlining the company file data. To run the tool, you can perform the following steps:
Begin by heading to the file tab.
Once done with that, click on utilities.
Later on, head to the condense data tab.
Followed by clicking on the begin condense option
And towards the end, you need to try exporting the client-ready reports to Excel again.
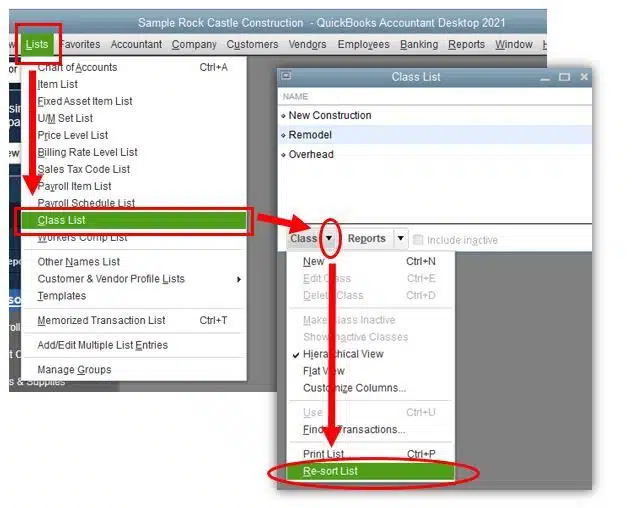
Method 5: Resort the lists
In certain scenarios, resorting the lists and carrying out the export process again can fix the issue up to a certain extent. This can be done using the below steps:
Start the process by heading to the lists menu and selecting the class list.
After that, go for the list of resort.
Followed by clicking on include inactive box.
And then, click on the view menu.
You now have to click on the option to resort list.
The last step is to click on the ok tab and proceed by closing and reopening the company file
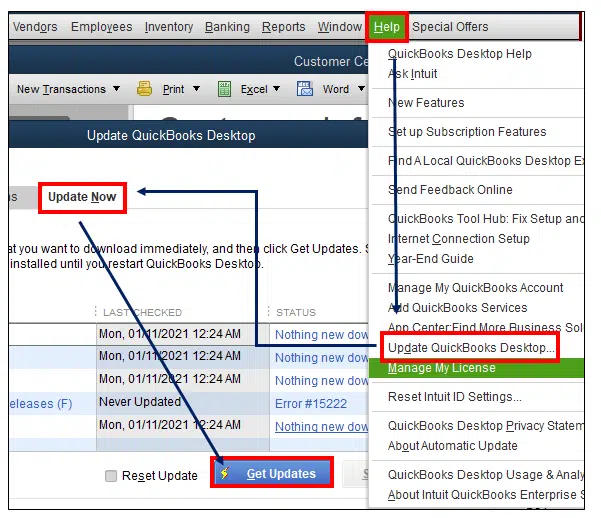
Using outdated software can lead to a bunch of errors in QuickBooks. Update QuickBooks to the latest release to get rid of a bunch of errors successfully. The steps involved here are:
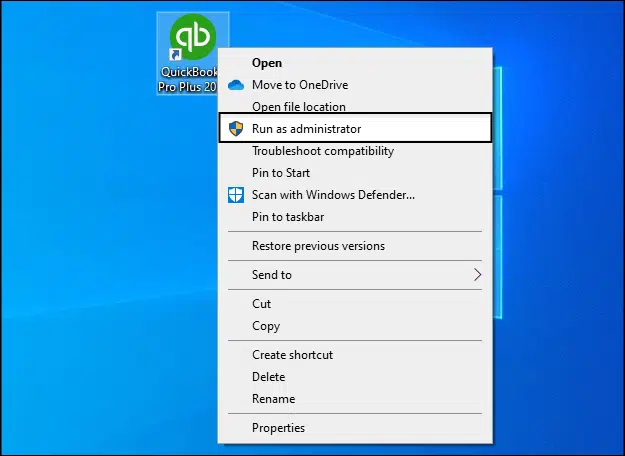
Right-click the QuickBooks icon and click on run as admin
Once done with that, click on the help tab.
Furthermore, click on Update QuickBooks Desktop.
The next step is to mark the reset updates box and then click on the get updates tab.
After the update process ends, reboot QuickBooks allows the automatic installation of the updates.
You will then have to click on the yes tab when asked to.
End the process by exporting the client-ready reports to Excel again.
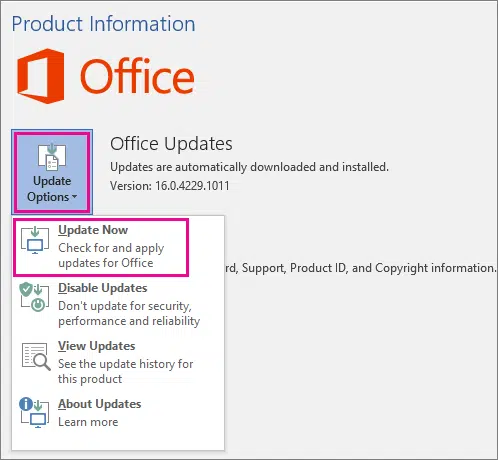
Method 7: Update Excel
You need to head to the official Microsoft Website. There you need to download the latest version of Microsoft Office, which is compatible with the operating system and also with the QuickBooks version currently in use. You can perform the below steps to update Excel to eliminate the issue up to a certain extent.
Client Ready Reports Compile error in hidden module QuickBooks is an abrupt error that might seem to be a bit daunting to tackle. However, reading this segment might help you with the right measures that can be implemented to get rid of the error successfully. Just in case you have any queries, or if you need our technical assistance at any point in time, then in that scenario, connect with our technical support team at +1-888-510-9198, and our certified QuickBooks professionals will definitely help you in getting rid of such errors immediately in QuickBooks.
FAQs Related to QuickBooks Compile Error in Hidden Module
What is client ready report in QuickBooks?
The client ready report in QuickBooks lets users to create professional, customizable reports that can be shared with clients.
What is Condense Data Tool in QuickBooks?
QuickBooks Condense Data Tool is a crucial feature that lets the users to reduce the company file size.
What is resorting of lists in QuickBooks?
Resorting lists in QuickBooks is basically the rearrangement of various entries included in a list on the basis of different criteria.
What is QuickBooks Tax Table?
The tax table in QuickBooks carries essential information for the accurate calculation of taxes.
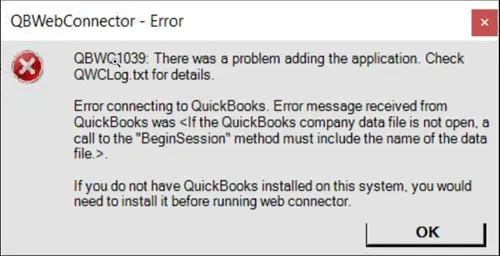
Trying out random fixes for certain errors don’t usually work in QuickBooks. In this segment, we are going to help you spot the correct fixations to the QuickBooks error Error QBWC1039. You might come across Error Unique OwnerID/FileID Required. Well, such errors can often be encountered when you try to connect an app to your QuickBooks software using the web connector. QuickBooks error QBWC1039 can also be encountered when QuickBooks users try to add the same configuration file twice within the software.
A bunch of other factors are also responsible for the occurrence of such an error, which we will try to elaborate on later in this segment. To understand this error further, stick around this segment carefully. Or you can further get on a call with our QuickBooks support professionals. Give us a call at +1-888-510-9198, and discuss your queries with certified QuickBooks ProAdvisors. Having said that, let us understand the QuickBooks error QBWC1039 in detail!
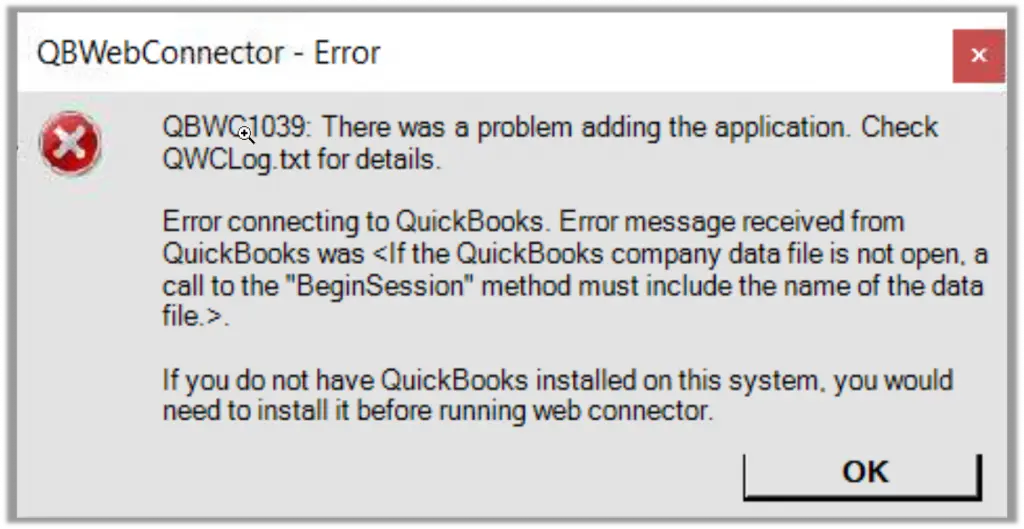
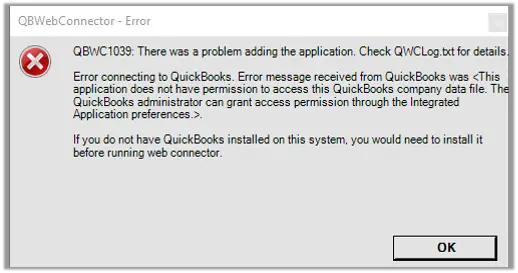
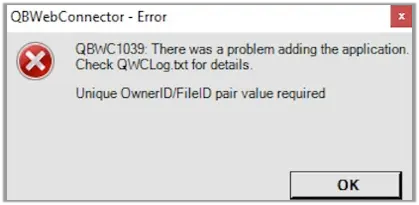
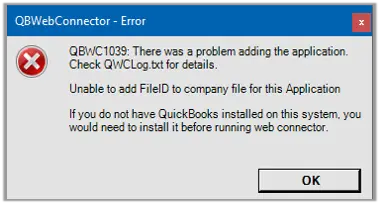
Well, before we jump onto the steps to rectify the error, it is better to first understand what QuickBooks error QBWC1039 is all about. There isn’t a set error message that shows up. A bunch of messages might appear, which include:
Message 1: “QBWC1039: If the QuickBooks company data file is not open…”
Message 2: “QBWC1039: This application does not have permission to access the QuickBooks company data file…”
Message 3: “QBWC1039: Unique OwnerID/FileID pair value required”
Message 4: “QBWC1039: Unable to add FileID to company file for this Application”
Message 5: “QBWC1039: There was a problem adding the application. Check QBWCLog.txt for details”
Any of these error messages might appear on the screen disturbing your smooth working process, especially when you are trying to connect an application to your software with the help of a web connector.
Factors causing QuickBooks error QBWC1039
There are a few factors that can trigger QuickBooks error QBWC1039 or Error Unique OwnerID/FileID Required. Let us understand each of the factors one by one:
Effective Measures to fix QuickBooks error code QBWC1039
Now that you know what reasons can trigger QuickBooks error QBWC1039, it is time to perform the necessary methods to fix such an error. Let us explore the following methods:
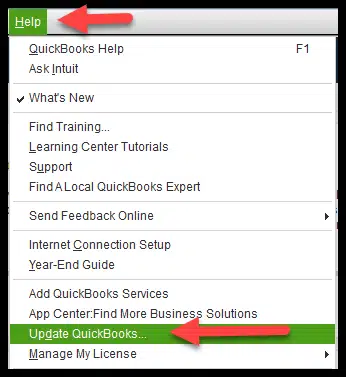
Method 1: Update QuickBooks to the latest release to Fix QBWC1039
Using an old version of QuickBooks can instigate a bunch of errors. Thus, it is essential that you keep your software updated to the latest release i.e., QuickBooks Desktop 2024. Here are the steps that can be performed to update QuickBooks:
Begin with, downloading QuickBooks latest update from the Intuit website.
Furthermore, save the file where you can access it easily
After that, perform the installation procedure by right-clicking the file and selecting run as admin.
You now have to click on the finish tab and reboot the system.
This will update QuickBooks to the latest release, and you can begin using it.
Method 2: Configure web connector to run when QuickBooks is closed
Ensuring that your web connector is configured properly is essential. Thus, these steps can be performed when QuickBooks is closed.
The very first step is to sign in to QuickBooks as an admin user.
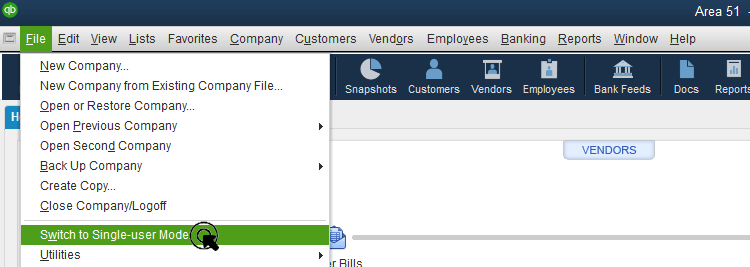
In case QuickBooks is on multi-user mode, then head to the file menu and also choose switch to single-user mode.
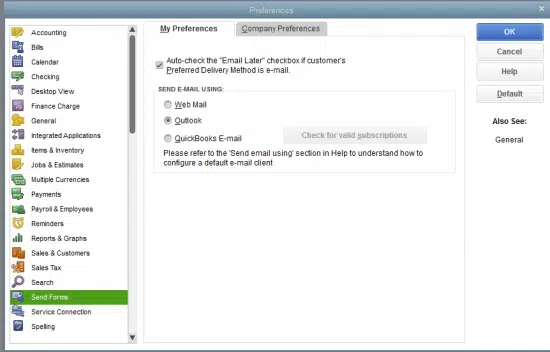
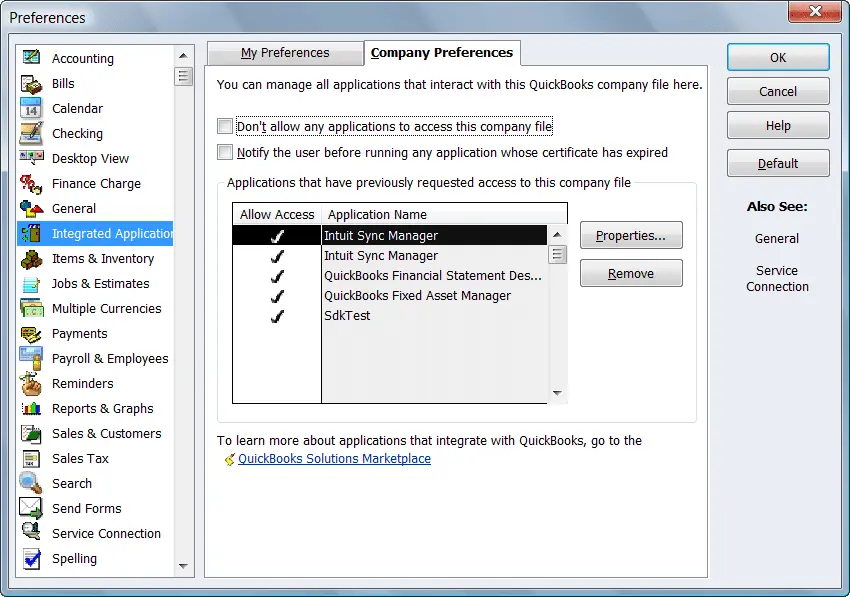
The next step is to select preferences from the edit menu.
You now have to select the integrated application and then select the company preferences tab.
Also, go for the third-party app and select properties.
Now, allow this application to log in automatically.
In the authorization window, select yes.
Furthermore, you need to choose the user to log in and then click on the ok tab.
Method 3: Fix Permission issues in accessing the company file
Having insufficient permissions to access the company file can trigger Error Unique OwnerID/FileID Required in QuickBooks. Thus, you can simply fix the permission issues in accessing the company file using the below steps.
Start by simply signing in to the QuickBooks as admin.
Furthermore, you need to navigate to the file menu and switch to single-user mode, in case QuickBooks is in multi-user mode.
Now, from the edit menu, choose preferences.
Select the integrated application and go for the company preferences tab.
Later on, uncheck the box for don’t allow any application to access this company file.
And in the SDK app authorization, select the yes tab.
Check for the third-party application in order to allow access.
End the process by simply clicking on the ok tab.
Method 4: Unique OwnerID/FileID pair value required
Under this process, you can simply open QucikBooks and download the CP3 tool.
Once done with that, open the CP3 tool and click on the file option.
Later on, look for the QWC file and enter the QBC file location.
Open the file and click on Remove stamp.
This would now show up a warning message, where you need to click on yes.
Select the continue tab and also hit the ok tab in the access confirmation window.
Perform the onscreen prompts and click on oktab.
After the confirmation message shows up, you need to click on the ok tab.
The last step is to close the CP3 tool and add a third-party app.
Method 5: Change the name of the company file
If you are still facing the same issue, try renaming the company file using the below steps:
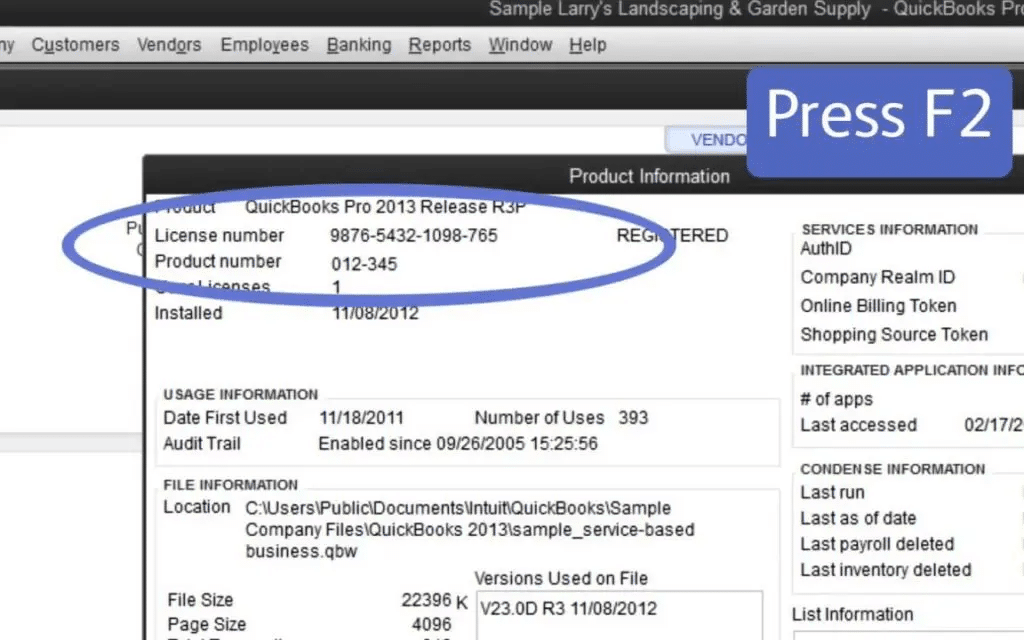
Begin the procedure by opening QuickBooks and pressing the F2 key or Ctrl + 1 keys. This would open the information window.
Note the location from the file information field.
After that click on the start tab.
Furthermore, click on File Explorer only for Windows 8 and Windows Explorer for the rest.
Once done with that, right-click the file and choose rename tab.
Click on the enter tab.
In order to confirm the actions, click on the yes tab.
And further set up QuickBooks use a new file name and click on the file menu.
Toward the end, you need to open the company file and click on the next tab to open the renamed file.
Method 6: Restore the backup file to the previous location
Just in case you have saved the file in any external location like USB or somewhere else, then simply move it to the local hard drive and perform the steps to restore backup files in QuickBooks from the previous location. The steps you can carry out are:
Start the process by clicking on the file menu and launching QuickBooks.
Furthermore, click on open or restore company and choose to restore a backup copy.
The next step is to click on the next tab and go for the local backup tab.
Also, select the next tab and browser backup company file.
You now have to choose a folder to save the restored file.
Later on, you can save the file with a unique name and try not to overwrite the new company file.
The last step is to open and save the restored company file.
Method 7: Create a backup company file
If none of the above methods helped you eliminate QuickBooks error QBWC1039, then simply try to create a backup company file. This can be done by performing the steps enumerated below:
This process requires you to open QuickBooks and the file.
Now, switch to single-user mode.
Click on the file menu and then the backup company option.
After that, choose the Create local backup option and select the local backup.
Now, click on the options tab to open the backup window and click on the browse tab.
You now have to select the local hard drive location of the company backup file copy.
Toward the end, you need to hit the ok tab and save it.
Getting rid of QuickBooks error QBWC1039 becomes easy once you implement the following set of steps and procedures. However, if you are unable to rectify the issue or if you need our technical guidance at any point in time, then in that case connecting with our technical support professionals at +1-888-510-9198is recommended. Our team will help you with all your queries immediately
Did you see QuickBooks error 1618 when trying to install QuickBooks desktop? Well, this particular error shows up when you are installing or updating the programs. There can be a bunch of reasons causing QuickBooks error 1618. This error clearly indicates that there is an issue when installing the Microsoft Runtime library.
To help you get rid of this issue easily, here we are with this segment right here, sharing the complete information regarding the factors causing this issue, signs, and of course the major fixes for the same. To learn more, read this segment carefully. You can further get in touch with our technical support team at +1-888-510-9198, and our certified QuickBooks professionals will ensure to provide you with instant support and services.
What is QuickBooks Error 1618?
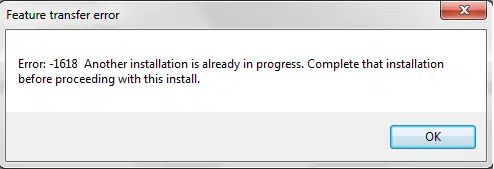
Often when installing QuickBooks or trying to update the software, one might come across QuickBooks error 1618. This error shows up with a warning message: There was a problem installing the Microsoft runtime library.
Feature transfer errorError:
There was a problem installing Microsoft Runtime Library (Error 1618).
Warning
Error 1618. “ERROR_INSTALL_ALREADY_RUNNING” error message when you run the Setup program to install QuickBooks programs.”
Such an error is also experienced when there is more than one Windows installer running at the same time and further blocking the process. Note that the Windows installer is the basic system requirement for installing the program. Thus, it is crucial to install, update, uninstall, and repair the system application.
A handful of methods can help you in getting rid of such an error. Let us explore each of the fixes one by one:
Method 1: Reinstall Microsoft Runtime libraries via Microsoft Visual C++ Redistributable package
We recommend you contact a Windows expert to perform this process, as this might need knowledge of Windows OS.
Initially, download the MS Visual C++ distributable package.
Choose the package Microsoft Visual C++ 2008 Redistributable package for 32-bit computers.
Further, select Microsoft Visual C++ 2008 Redistributable Package for 64-bit system
Now, save the downloaded package on an easily accessible location.
Later on, rename the package s vcredist_X86.exe or vcredist_X64.exe
Perform the onscreen steps.
Toward the end, restart the system and reinstall QuickBooks.
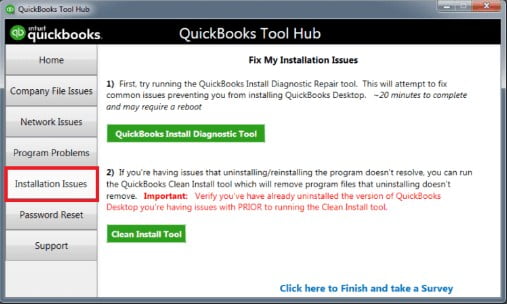
Method 2: Install and Run QuickBooks Install Diagnostic Tool
The QuickBooks install diagnostic tool is designed to fix issues related to the installation of QuickBooks. You can try to fix the error code 1618 using the below-stated steps:
You need to close all open applications and further close QuickBooks.
Now, download the QuickBooks tool hub file and store it in an easily accessible location.
Once done with that, open the QuickBooksToolHub.exe file and then install it.
You now have to agree to the terms and conditions.
Once the installation is complete, double-click the icon.
Move to the tool hub and then select for installation issues.
Now that you know how to rectify QuickBooks error 1618, it is time to implement these steps and successfully fix the issue. On the contrary, if you still face the same issue even after performing the set of steps enumerated above, then in that scenario, give us a call at +1-888-510-9198, and our QuickBooks error support professionals will help you get rid of the issue permanently. We are a team of certified QuickBooks proAdvisors, who work round the clock in providing instant support and guidance.
FAQs – QuickBooks Error 1618
What causes error 1618 in QuickBooks?
A few of the causes behind QuickBooks error 1618 include:
Corrupted QuickBooks software installation
Corruption in Windows registry
Virus Attack on the system
Installed file got delete mistakenly
How do I know if error 1618 has affected the system?
Identifying the error code 1618 becomes easy, once you know the below signs:
If the installer for QuickBooks program continues to freeze
Or if the windows start functioning sluggishly
Also, if the system starts malfunctioning when such an error shows up


![Compile Error in Hidden Module – QuickBooks [FIX]](https://www.hostdocket.com/wp-content/uploads/2024/02/Compile-Error-in-Hidden-Module-QuickBooks-.png)