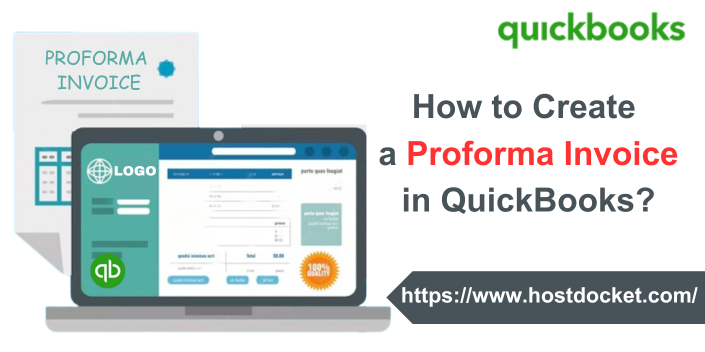
Invoicing is an essential part of running a business. Creating an invoice in QuickBooks, issuing it to customers promptly, and paying invoices from suppliers on time ensures that the cash flows into the business regularly and helps maintain good relationships with the supply chain. One such invoice is a Proforma invoice. It is a type of document that can be accessed as proof of purchase and sales. In this segment, we are going to discuss what is a proforma invoice, along with the complete set of steps that you can carry out to create a proforma invoice in QuickBooks. Thus, stick around this segment carefully, or you can also consult our technical support team at +1-888-510-9198, and we will provide you with immediate support services.
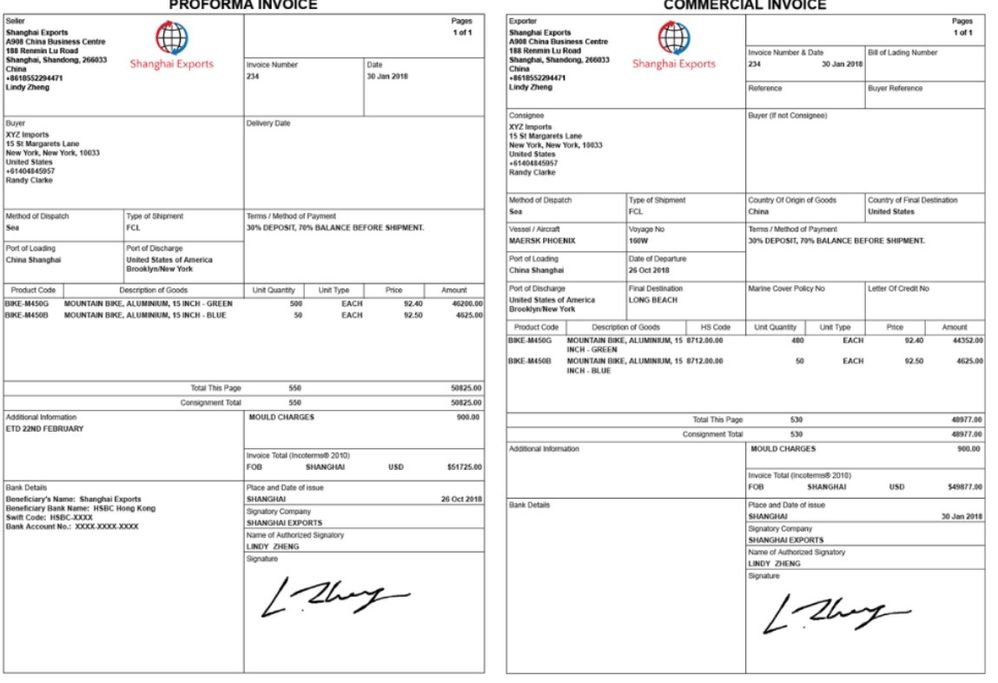
A proforma invoice is basically a preliminary bill of sale sent to buyers in advance of the delivery of goods. It will usually contain details like a description of the items being sold, their price, and the total amount payable along with any taxes and fees incurred. This gives the customer as precise an estimate as possible of the expected cost of an order. Talking about the difference between a proforma invoice and a standard commercial invoice is that, it is preliminary or provisional. This means that the details are subject to change. It further doesn’t need any invoice number and should be clearly labeled with the term proforma.
What is the purpose of a proforma invoice?
Talking about the usefulness of a proforma invoice is basically a useful addition to a business’s sales process. It gives an estimate of the cost of a sale and further reduces the likelihood that they are exposed to any unanticipated charges, reducing the risk of payment disputes when commercial invoices are issued. A few use cases of Proforma Invoice:
When declaring the value of goods to customs when exporting to foreign countries.
Another use case can be when you don’t have all the details to issue a commercial invoice
Or when you need something to act as a formal payment request when a recipient wishes to pay in advance.
What is the difference between an invoice and a proforma invoice?
There are several key differences between a standard commercial invoice and a proforma invoice. Let us have a look:
Key Difference
Commercial Invoice
Proforma Invoice
Time of issue
Issued to customers after goods or services have been received.
Issued to customers before an order has been placed
Objective
In order to inform the buyer of the amount due and how to make payment.
To help customers decide whether or not to place an order.
Details included
An invoice number, contact information, issue date, amount payable, means of payment, billing address, and terms & conditions.
Contact details, date of issue, a description of the goods and services, and the amount due. It needs an invoice number and should be clearly labeled as proforma.
Accounting
A commercial invoice should be recorded as accounts payable and filed for reference.
Proforma invoices are not used for accounting purposes.
What is the difference between a proforma invoice and a quote?
Proforma invoice has more in common with a quote than a commercial invoice. Quotes and proforma invoices are both used at the same time in the sales process and further provide the customer with information about the transaction. The two main differences include:
A quote basically provides information about what a customer can expect from a transaction before it has been agreed upon.
Whereas, a proforma invoice provides full and final details after the customer has committed to a transaction.
When should you send a proforma invoice?
A proforma invoice is basically sent before a sale is completed. There are two main reasons behind this:
Cost estimate – Proforma invoices basically provide customers with a breakdown of the items they have requested and provide an accurate indication of the total amount due. It is not a payment request and can still be adjusted if the goods and services you provide are being negotiated.
International shipping – These invoices are commonly used by export companies and further include details about shipping, packaging, weight, and delivery fees. Moreover, they provide a clear declaration of the value of items so that they can quickly pass through customs.
Is a proforma invoice legally binding?
Even though a proforma invoice is a crucial business document, it is not legally binding. It provides a price estimate for a business’s product or service. However, it is not a legal record of sale and thus, it cannot be used as evidence for a completed transaction.
What should a proforma invoice look like?
A proforma invoice usually includes the following details:
Date of issue
Contact details
A description of the goods and services you provide
QuickBooks offers you with a bunch of proforma invoices, which include the following:
For shipping – This type of invoice is a type of business invoice. However, such invoices do not have any details about VATs and taxes. Note that, both sides can access it to analyze the real cost of the products and services.
For customers – Such an invoice works as a written authentication to the customer end from the seller end which guarantees the delivery of the product. It further comprises the complete description of the payment that assists both sides in monitoring the payment.
What are the essential points to consider before preparing a proforma invoice?
There are three crucial points that you need to consider when preparing a proforma invoice:
Proforma invoices are basically saved as accounts receivable. It simply means you can prepare it to monitor the payments that you are going to acquire.
A Proforma invoice is used as a substitute for a particular invoice. It should be noted as assumed as the original invoice and also the customer should not make any payment depending on it.
Another important point to note is that this type of invoice and QuickBooks payroll are not the same. Thus, as a seller, you do not need to make any payment to the client.
How to create a proforma invoice in QuickBooks?
In order to create a proforma invoice in QuickBooks, you need to perform the following steps:
Click on the gear icon on the right side of the screen.
After that, a window will open where you will be required to search for a custom-form style and then select a new option.
Now, press on the new style drop-down menu and then you will have to choose the estimate tab.
Once done with that, press the content tab.
You now have to click on the edit tab and also select the make default option.
Then, you will see an option to edit the name of the estimate. In case you wish to, you can alter or keep it as it is.
Save the change and exit the screen.
Steps to add a logo to a proforma invoice
You need to perform a few steps to add a logo to a proforma invoice.
For Application
You need to initially click on the settings tab and also select the work info option
After that, click on the edit option and also select the image and upload it in the logo option.
The last step is to click on save the settings.
For Website
You need to head to the invoice section and also press the option to change the invoice.
Once done with that, press the option to edit information.
How to repair payment if they are assisted with the incorrect invoice?
You can try to change the payment that has been applied by you on a particular invoice. The steps involved in here are:
You need to click on create and then head to the other option and choose journal entry.
After that, enter the details like the amount acquired, customer details, and the amount to be paid.
The last step is to enter the same details again, avoid adding the customer name and then save it.
Steps to duplicate a proforma invoice in QuickBooks
For a bunch of reasons, you might have to duplicate a specific proforma invoice in QuickBooks. You can select the clients you wish to send the proforma invoice to. The window for multiple invoices will open and you will be able to review and make changes to clients’ Proforma invoices. You will then have to save changes.
Firstly, choose customers to whom you wish to send the Proforma invoice.
After that, click on the next tab.
Now, on the screen for multiple invoices, you will be able to witness the invoice for all the customers.
It is possible to add and edit the invoices.
Ensure that the invoices have been saved.
It should be noted that a proforma invoice that you choose to replicate will have duplicate lines. In case you have not set any choices regarding taxes or terms that are special to a customer, then it is not mandatory to create several proforma invoices.
Toward the end of this segment, we believe that the information enumerated above is enough to let you understand what a proforma invoice is all about. However, in case you have any queries that remain unanswered, then do not hesitate to connect with our technical support team at +1-888-510-9198, and let our certified QuickBooks ProAdvisors help you with the queries immediately.
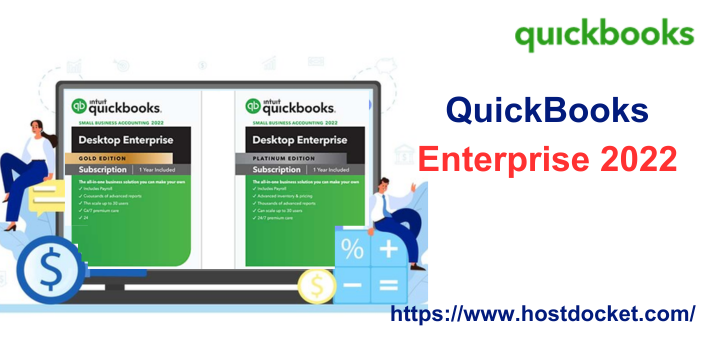
QuickBooks desktop enterprise is by far one of the most powerful and flexible QuickBooks software ever. It is designed in a way to help businesses growing in size or complexity to run their business from end to end. QuickBooks Enterprise 2022 further has specialized industry editions that offer customized capabilities, reports, and features designed for every industry. With this software, you get access to a full suite of services including payroll, payments, time tracking, point of sale, and a robust app ecosystem. If you want better functionalities, simply upgrade to QuickBooks Enterprise 2022.
To give you a better understanding of QuickBooks Enterprise 2022, here is an in-depth guide sharing the complete info. Thus, stick around this piece of writing carefully, or you can also consult our technical team at +1-888-510-9198, and we will provide you with immediate support and assistance.
QuickBooks Enterprise 2022 has rolled out with a bunch of new features and functionalities. Let us find out:
Bill Workflow Approvals – You can now delegate with confidence, manage cash flow, and also boost transparency with customizable bill workflow approvals. This feature further allows you to maintain cash flow with a dashboard that tracks bills that need approval. The employees further get timely reminders, so that they do not miss an approval deadline, and also some unique templates making set up extremely easy.
Cloud Access – The cloud access feature boosts productivity, enhances collaboration, and lets the team work from anywhere with access to the cloud. You get up-to-date information for your team and further lets you track inventory, process payments, and update your books from different locations. Note that, cloud access requires no installation, training, new equipment, or IT capital investment, and the data backup is taken on a daily basis on its own.
Sales Order Fulfilment Worksheet – You can now get paid faster and reduce the billing complexity with this particular feature by simply managing the sales order process from a single location. This feature lets you create invoice in QuickBooks with a prompt when you mark an item as shipped.
Enhanced Computing Power – Another interesting feature is the enhanced computing power that gives you the advantages of 64-bit processors that further enhance the performance and stability of the software which would help you run your business more efficiently and smoothly. QuickBooks meets modern operating system standards that help you work faster and maintain seamless third-party integrations.
E-Commerce Integration – You can manage your online sales and inventory in one place by simply integrating your e-commerce channels with QuickBooks. One can also integrate QuickBooks with industry-leading e-commerce platforms, marketplaces, and shipping solutions to help simplify e-commerce management, avoid stockouts, and gain a clearer picture of profitability. You can enjoy seamless integration with top online stores such as Shopify, WooCommerce, Big Commerce, Magento, and industry-leading online marketplaces.
Upload Bills – Now save your time by having QuickBooks automate bill entries from the QuickBooks desktop mobile app or an email address. Your vendors can send email invoices directly to QuickBooks which automatically drafts bill transactions for your review.
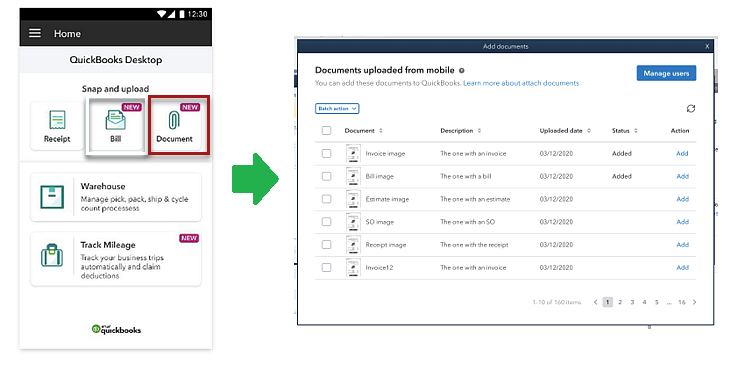
Attach documents to transactions – You can now attach documents to transactions faster by directly uploading them using the QuickBooks desktop mobile app. No need to use archaic scanning and emailing processes anymore. You can save time by directly attaching multiple documents to transactions at once.
Customize bill payment stubs – With this feature, you can maintain professional and consistent communications by emailing customizable bill payment stubs from within QuickBooks. Now, easily email bill payment stubs to one or multiple vendors at once.
Choose from multiple email contacts – You can simply send emails by selecting the right recipients from a list of your customer or vendor contacts. This feature lets you reduce errors and miscommunication resulting from the manual entry of email addresses.
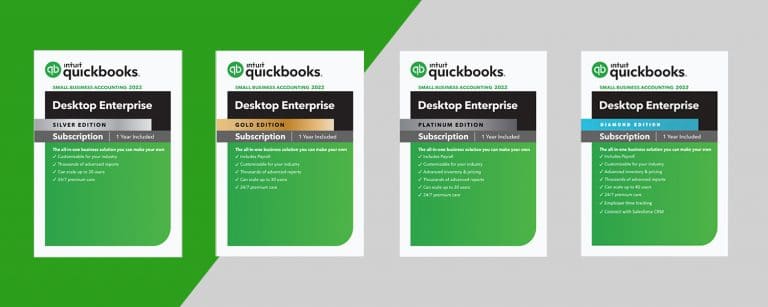
Subscribing to QuickBooks Enterprise 2022 would cost you the following:
QuickBooks Enterprise Silver – $1020/for 1st Year
QuickBooks Enterprise Silver is the only version that is available without payroll. It is the lowest subscription that one can buy easily, in case not using payroll. If you need payroll, then you can switch to any of the subscriptions according to the business requirements.
QuickBooks Desktop Enterprise 2022
Users
Local Access (Annual Subscription)
Cloud Access (Monthly Subscription)
Core
Classic
Deluxe
Gold
Platinum
Diamond
Gold
Platinum
Diamond
Gold
Platinum
Diamond
Gold
Platinum
Diamond
1
1324
1628
3216
178.16
206.06
355.1
188.2
217
365.5
198.16
226.06
375.1
2
1936
2240.8
3859.2
3859.2
288.82
469
309.8
337.7
489.8
328.82
357.62
509
3
2344
2648.8
4281.6
4281.6
380.58
562.2
411.6
440.4
593.4
440.58
469.38
622.2
4
2751.2
3056
4713.6
4713.6
472.34
656.3
514.3
542.2
697.9
552.34
581.14
736.3
5
1776.6
1948.05
2894.4
2894.4
645.4
589.6
517.3
536.6
641.6
565.4
584.6
689.6
6
1948.05
2120.4
3067.2
3067.2
537.84
662.4
600.6
619.8
724.8
657.84
677.04
782.4
7
2120.
2292.3
3250.8
3250.8
610.88
736.4
683.8
703
809.2
750.88
770.08
876.4
8
2292.3
2464.2
3429
3429
683.32
809.8
767
785.6
893
843.32
862.52
969.8
9
2464.2
2636.1
3612.6
3612.6
775.56
883.8
849.6
868.8
977.4
936.36
955.56
1063.8
10
2636.1
2808
3790.8
3790.8
848
957.2
932.8
952
1061.2
1028.8
1048
1157.2
More than 10 to 40 users
Connect with the QuickBooks help desk team
Important points to remember
Note that, your account on file will be invoiced on its own for the first year at the indicated discount for the service you opt for when signing up. The plan includes the following:
All users can save around 40% off the current retail price
In case you get a license for 1-4 people for the first year, then you get around a 10% discount off the current list price.
Also, if you license 5-40 users, then you get a 40% discount on the current list price.
After a year of subscription – Your credit card on file will be charged on a monthly or annual basis at the then-current subscription rate for the plan and service you opt for until you cancel.
It should be noted that this deal is only available to new QuickBooks desktop enterprise customers and cannot be combined with other QuickBooks Enterprise promotions. Discounts are applied to the above-mentioned price. Promotional deals for QuickBooks Enterprise Platinum or any other Intuit software might not be coupled with Diamond package savings.
QuickBooks Enterprise lets you grow the business which helps in easily accessing the company data, further protecting the complete security.
The enterprise helps you enhance and personalize your enterprise to more than 200 apps that would help your business explore further opportunities and boost growth.
Furthermore, it enhances security as it is assigned to certain employees and vendors that would manage the data.
QuickBooks enterprise further increases the software capacity by 6%.
Enterprise software provides the flexibility to the team to work from anywhere, if they have cloud access.
QuickBooks Desktop Enterprise 2022 System Requirements
For QuickBooks Enterprise 22.0, you might require the following system configuration. There are two types of access: Local or cloud access. You have to select any one of them. The system requirements are mentioned accordingly.
For Local Access
Operating Systems – Windows 8.1, Windows 10, or update versions
Windows servers
Windows Server 2012 R2 standard and essentials
Windows Server 2016 standard and essentials
Windows Server 2019 standard and essentials
Processor- Minimum 2.4 GHz needed
RAM – 8 GB for 64-bit and 16 GB is suggested
Disk Space – 2.5 GB required as disk space and additional for data files
Optical Drive – 4X DVD-ROM drive, in case you are doing CD installations
Internet access is crucial for Enterprise, Payroll, and Online Features
Browser – Internet Explorer 11 (32-bit) with internet access
Registration of product is needed
QuickBooks Desktop Enterprise 22.0 needs an active subscription to be used on mobile applications. The device being used must be camera-enabled using Android 5.0, iOS 12, or later
Screen Resolution – 1280*1024 screen resolution needed or higher with around 2 extended monitors. Default DPI settings are optimized for a given computer
Software Integrations
You can simply transfer data from MS Excel 2013 to 2019, QuickBooks Mac 2016 to 2022 Office 365 (32-bit and 64-bit), or Quicken 2016 to 2021
Invoices, email estimates, and other forms with Microsoft Outlook 2013 to 2019, Gmail, Outlook.com, office 365, and many other SMTP-support email clients.
Microsoft Excel and Word Integration require MS Office 2013 to 2019 or Office 365.
Data Management – AES – 1288 for data encryption for all PII and PCI data.
Operational Security
The remainder isn’t applicable as the program is installed in the customer environment without sorting any data on the systems of Intuit.
PCI PA-DSS certified, assessed annually according to the payment of application.
For Cloud Access
In case you wish to have a subscription to QuickBooks Desktop Enterprise of Cloud access, then you simply have to connect using the Microsoft Remote Desktop Connection client. Note that, for this, the system requirements are a bit different. The requirements include:
For Windows
The remote desktop software must be in Windows 8, and Windows 8.1, or Windows 10
An internet connection is essential (around 56K or higher than this)
For Mac OS X
Mac OS X version 10.3 or higher
Display 1280* 1024 or more
Broadband or high-speed internet connection needed
QuickBooks Desktop Enhanced Payroll – This payroll subscription is available in the Enterprise Gold and Enterprise Platinum subscriptions. The charges are applied when you add the payroll to the Enterprise Silver Subscription.
Direct deposit is free – Note that, for the employees of W-2 with the payroll in QuickBooks enterprise 22.0 subscription, this particular service is free, in case it is used by 1099 contractors.
Services of money movement – Here you get the services of money movement like direct deposit that are provided by Intuit Payments Inc.
Easy tax filing and payment – You simply have to set the filing method to process the filing.
Live Assistance – You can connect with the team anytime whenever needed to get the queries or issues fixed.
QuickBooks Desktop Assisted Payroll
Direct Deposit of Next day – Here payroll is processed before 5:00 PM PT. It can also arrive the same business day. Moreover, it needs bank verification and direct deposit setup. The next day, direct deposit is directly on the eligibility criteria.
Services of money movement – The money management services are directly provided by Intuit Payments Inc.
On-time and accurate tax penalty guarantee – The payroll federal and state tax is taken care by Intuit to have payments directly from the accounts. The payments are done on the basis of the data you supply.
Premium customer assistance – 24*7 customer assistance is available. The assisting hours exclude the occasional time because of U.S. holidays, server maintenance, company events, and much more.
U.S.-based setup assistance – The assistance is available Monday to Friday 6 AM to 6 PM PST. The hours exclude the holidays and other events time.
QuickBooks Time Elite
Time Elite Tracking – QuickBooks consists of a time tracking tool that lets the staff keep a note of how much time they spend on each of the activities performed by them. You can further opt for the client that you want to receive the charge of the billable task. The time monitoring feature is included with the Enterprise Diamond basic subscription. Monthly costs are charged per employee and each employee is charged $5 every month. Note that, an internet connection is needed. QuickBooks Time is used by thousands of companies to track and manage employee time for payroll, invoicing, and scheduling.
Sync Desktop Enterprise – The QuickBooks sync app makes it simple to generate and manage a duplicate of QuickBooks data. It further makes it available through standard database tools, software drivers, and analytics.
GPS Tracking – The users of the QuickBooks time mobile app might share their location data when on the clock. The precision of GPS coordinates necessitates the use of a cell phone. To order a clock-in and monitor time using the QuickBooks time mobile app, account managers might need users to set their location settings to Always.
QuickBooks Time Tracker – Basically this is a cloud-based time tracking and employee scheduling program that usually lets the workers clock in and out of work using the devices they already have in their pockets. QuickBooks Time Elite mobile access is available at no extra charge with Enterprise Diamond. Data access is subject to the availability of cellular/Internet provider networks, as well as periodic downtime due to system and server maintenance and circumstances beyond control.
Salesforce CRM Connector
Talking about Salesforce CRM connector, it is basically a kind of service provided that is available as an add-on DBSync. This is actually a subscription-based integration extension that is separately sold by DBSync. The salesforce CRM connector works with a few versions like Enterprise, professional, and unlimited versions. In case you wish to use Salesforce then you have to buy it separately and then integrate it with QuickBooks.
What about the salesforce CRM connector subscription?
Well, the new CRM connection is basically an option subscription service that syncs data from QuickBooks Enterprise Diamond to Salesforce CRM to help eliminate redundant data entry, get insights into the business, and get paid faster. One business file is supported per salesforce CRM connection subscription, which is restricted to one subscription purchased. The account file will be charged from the time you join until you cancel on a monthly basis. The salesforce CRM connector subscription will also be canceled, in case you terminate the QuickBooks enterprise diamond subscription as well.
Setup of Salesforce CRM Connector
The setup is essential to connect Salesforce CRM with QuickBooks. The setup is further provided by the DBSync so that you can implement it with much ease. The packages are available with different steps and the price varies according to the package setup that you bought.
QuickBooks Enterprise 2022 is a robust software that provides you with a bunch of functionalities. Hopefully, reading this segment might help you in some way to make the best use of QuickBooks Enterprise 22.0 and its functionalities. However, if you have any queries regarding the software at any point in time, then feel free to ring us up at +1-888-510-9198, and get answers to all your queries immediately.
When you use online banking, the transactions are recorded. And to download these transactions, a CSV file is required. A CSV file is basically used to import online banking transactions into QuickBooks. You can import CSV files that include bank transactions, general journal entries, accountant’s changes, and batch transactions in QuickBooks. In order to import CSV files, you need to start installing QuickBooks Import Excel and CSV toolkit. To make the import process easier for you, here we are with this segment sharing the complete details as to how to install QuickBooks import Excel and CSV toolkit and how to import CSV files.
Thus, to learn further, stick around till segment till the end. You can also connect with our technical support team at +1-888-510-9198, and we will provide you with immediate support and assistance.
CSV files are basically simple text files that contain tabular data. A comma separates each field in the file from the next in a CSV file. The majority of spreadsheets support this format including Microsoft Excel and Google Spreadsheets. Also, you can create and edit CSV files with any text editor like Notepad. You can also import files related to some of your vendors and customers. CSV files are also termed as Comma Separated Values.
Why import CSV into QuickBooks?
In order to track finances, it is essential to maintain records of all the data. The CSV file is already in a tabular format and is further supported by spreadsheets. In the case of online banking, there are so many QuickBooks transactions and manually Creating transactions in QuickBooks desktop involves a lot of effort and takes time. Moreover, recording manually can lead to inaccuracy. The concept of importing CSV files eliminates the chances of errors due to inaccuracy and saves a lot of time.
Import CSV files
In order to import a list in the CSV format, you simply have to install QuickBooks import Excel and CSV toolkit. This toolkit includes:
Import from Excel and CSV manual – A PDF document with instructions, best practices, and notes.
CSV Example Folder – 4 Sample CSV files, one for each type of list
XLS Example Folder – A sample Excel file that contains 4 worksheets, one for each type of list.
Allowed fields – A reference guide explaining what fields are available for Excel and CSV import.
Steps to install QuickBooks Import Excel and CSV ToolKit
You can try to install QuickBooks Import Excel and CSV toolkit using the set of steps enumerated below.
Initially, open the file download window for the toolkit and then choose the save tab.
The next step is to head to the Windows desktop and choose Save.
Double-click the QuickBooks_Import_Excel_and_CSV.exe on the Windows desktop. This will open the WinZip Self-Extractor window.
After that, choose browse and select the folder where you want to install the toolkit.
Also click on the ok tab.
The next step is to choose Unzip to extract the contents and choose Close to close the WinZip self-extractor window.
You now have to open QuickBooks Import Excel and CSV folder from the location you opted for.
One can try to export a list as a CSV file, in case you do not have MS Excel installed on the system or if you want to view and edit the data using a different format.
Customer and Vendors
The very first step is to open a Customer/vendor Center
After that, choose the Excel drop-down and select
Export customer/vendor list, in case you want to export customer/vendor data such as name, balances, and contact information.
Export transactions, if you wish to export transactions (either by name or transaction type)
Now, in the export window, you are supposed to create a comma separated values file i.e., .csv file.
Furthermore, choose export.
After that, assign a file name, and select the location where you wish to save the file.
The process of setting up QuickBooks Import Excel and CSV toolkit is easy and involves a few basic steps. Hopefully, performing the above steps carefully might be of some help to you in successfully importing QuickBooks Excel and CSV toolkit. However, if you have any queries even after performing the steps above, or if you need any sort of technical assistance, then, in that case, feel free to consult our technical support team at +1-888-510-9198, and our certified QuickBooks ProAdvisors will answer all your queries immediately.
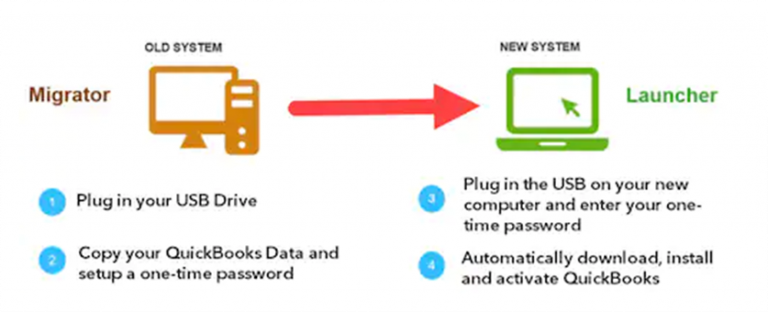
Moving QuickBooks from one system to another, well you will need QuickBooks Migration Tool for this. This tool is designed in a way to make transferring data from one system to another super easy and swift. You can use this tool to transfer data safely from one system to another without much human intervention. It can get the work done in half the time and thus, it saves a lot of time. To help you understand the QuickBooks migration tool better, here we are with this segment sharing the complete set of steps to download and use the QuickBooks Migration tool.
Thus, read this segment carefully. Or you can further get in touch with our technical support team at +1-888-510-9198, and let our certified QuickBooks ProAdvisors help you with your queries.
As the name suggests, the QuickBooks migration tool is an essential tool when you migrate or move QuickBooks from one system to another. This tool eases the process and eliminates the risk of data loss when transferring the data. The migration tool is accessible via your browser, which cuts down the need for a copy of QuickBooks Desktop Pro, premier, enterprise, or Mac on your system to migrate the data files.
Requirements for QuickBooks Migration Tool
There are a few things that you might require when transferring your data using the QuickBooks Migration tool. Let us have a look:
To store your QuickBooks data, you must have a USB flash drive with optimum space.
Another essential thing is that your new computer should be connected to the Internet.
The available space should be at least 150MB to 250MB.
Steps to set up QuickBooks Migration Tool
You will initially have to download and install QB Migration Tool on your system. Let us check out the steps that you need to perform to download, install, and set up the tool successfully.
Begin with logging in to QuickBooks using your admin ID and password.
Once done with that, allow access so that you can easily copy the data into the system.
The next step is to head to the migration tool and click on it.
The migration tool will now ask for a password. Thus, enter the admin password in it.
After accessing the tool, you need to click on the Start or Run tab.
The migration tool will begin the process.
When the tool initiates its process, the flash drive also starts copying and transferring some files.
Note that, after the completion of transferring the data, the tool never formats or erases your data, the data remains as it is in the past. However, if you want to erase it, then you can by clicking on the delete tab.
What data can be transferred using QuickBooks Migration Tool?
Here is a list of data that can be easily transferred using the QuickBooks Migration Tool. Let us evaluate:
QuickBooks Desktop details, including the version and other details needed to install QuickBooks Desktop on your new computer.
Up to the last three company files that you opened on the old computer, including sample files.
Related files, custom templates & forms
QuickBooks letters and templates
Scheduled and memorized reports
Local attachments
Printer Setting (PrintEng.ini, wpr.ini, and QBPrint.qbp)
What data can’t be transferred using the QB migration tool?
Certain data can’t be transferred even after using the migration tool. This includes:
In case you are using QuickBooks in a multi-user setup, then the configuration won’t be copied to the new system.
Also, if you have payroll or payment services set up, then you might have to sign in again on the new computer, as this is something to protect the data.
The user will have to uninstall Intuit Data Protect on the old computer, sign in again on the new computer and go through the setup process. All previous backups will still be available.
Any company files that aren’t used by you recently, won’t be copied. As mentioned earlier, QuickBooks only copies three of the most recently opened company files. Other files will have to be moved manually or you can also restore them from the Intuit Data Protect.
You should also note that any manual backups you created earlier won’t be copied by the Migration tool.
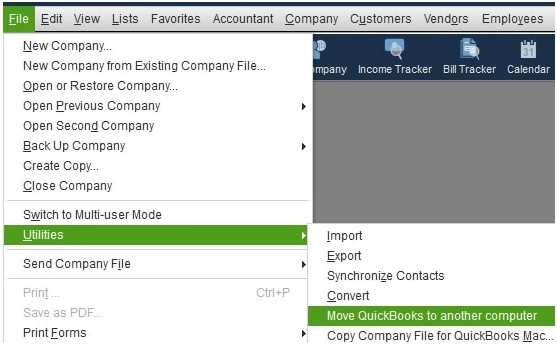
Steps to move data using QuickBooks Desktop Migration Tool
Here are the steps that you need to carry out on your old system.
You need to first connect USB flash drive in your old computer
Later on, launch QuickBooks desktop.
Once done, head to the file menu and click on it.
From the drop-down menu of the file, choose utilities tab.
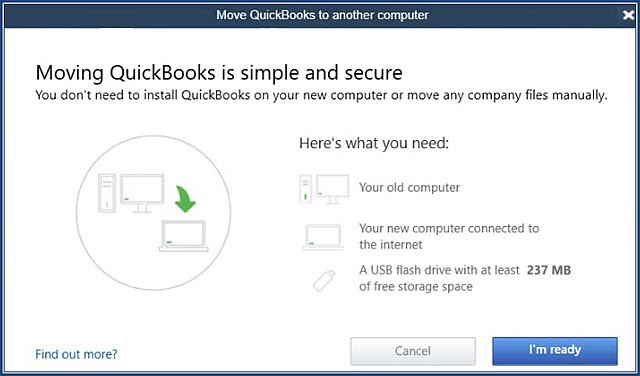
Then, choose Move QuickBooks to another computer option.
Now, go for I am ready and create a unique password.
Follow online instructions and choose your USB flash drive.
The last step is to sit aside and wait for all the files to be copied.
Steps to be followed on the New computer
After you are done copying the files, you now have to launch your new system.
Here, you need to plug in your flash drive in the new system.
The tool will not launch on its own. Thus, you will have to open the flash drive in the new system.
Also, double-click the Move_QuickBooks.bat file.
Furthermore, enter the password that you created in the old system.
After you are done with all the steps above, wait for the migration tool to complete its task.
Other steps to complete QuickBooks setup
Note that, not all the data can be copied using the migration tool. Thus, you need to perform some additional steps to complete the task easily and migrate the entire data successfully.
You need to log in to the payment and payroll services.
Furthermore, log in to Intuit data protect.
Also, configure the entire backup schedule
Take the backup of the company files so that you can skip unexpected issues or problems that might show up in the future.
Steps to manually transfer the data
Transferring the data might seem to be a tough nut to crack, however, a few basic steps can help you in transferring the data manually. Here are the steps that you need to follow to manually transfer the data to the new system.
First of all, create a QuickBooks backup on the old system.
You now have to uninstall QuickBooks from the old system.
Then, move to your new computer and install QuickBooks in your new system.
Using QuickBooks Migration Tool you can migrate the required data from your old computer to the new one without much hassle. The steps enumerated above might be of great assistance in successfully completing the migration process. However, if you aren’t able to do so, or if you have any queries, then in that case, feel free to connect with our technical support team at +1-888-510-9198, and we will provide you with immediate support and assistance.
FAQs Related to QB Migration Tool
Where can I find the Migration Tool?
In order to find the Migration tool, you can perform the below steps:
1. At first, you need to sign in to QuickBooks online using QuickBooks supported web browser 2. After that, enter https://app.qbo.intuit.com/app/exportqbodatatoqbdt 3. Now, head to the export overview screen and click on the tab to start. 4. Download the tool by clicking on the download tab in QuickBooks. 5. After the installer is downloaded, launch and run it. 6. Wait for the installation process to complete, and after that perform the onscreen steps to run it.
What to do after migration of QuickBooks Desktop?
After you are done with the migration, you need to perform the following steps:
1. Sign in to your payroll and payment services. 2. Furthermore, sign in to Intuit data protect and set up the backup schedule 3. Transfer the additional company files that were left when using the tool, from the old system to the new system. 4. Ensure that you always take a backup of the company file.
What if I don’t have my CD?
In case you have your license and product number and not the CD and you need the installation files, then simply download your version of QuickBooks from Intuit directly.
What if I don’t have my license and product numbers?
Will I need to register QuickBooks after I reinstall or move it?
In case you need to move your installation to another system, you will have to register again. This can be done as follows: 1. Head to the help menu and choose Register QuickBooks 2. You now have to enter the info, Intuit detects the registration status of the copy of QuickBooks and records the info for the new computer.
Making an incorrect journal entry mistakenly is pretty common. In such a scenario, you might have to delete or reverse an entry by performing some basic steps. You can simply create journal entries in QuickBooks on your own, and if some issue arises, you can edit or correct a journal entry by reversing it if needed. Any entry made mistakenly can be removed permanently. A journal entry can be created and deleted in both QuickBooks desktop and QuickBooks online. However, the process might differ in both cases. To help you further, here we are with this segment sharing how to delete a journal entry in QuickBooks successfully.
In case you have any queries or if you need any sort of technical guidance at any point in time, then in that case, feel free to connect with our technical support professionals at +1-888-510-9198, and let them help you with your queries.
Before you directly jump on to the steps to reverse or delete journal entries, it is essential to understand the difference between the two.
Reverse a journal entry: This can be done when you need to allocate a transaction between two accounting periods or fix a debit/credit error. Note that, reversing simply reverses the debits and credits and doesn’t delete the original entry.
Delete a journal entry: In case you create it by mistake and need to get rid of the entry permanently.
How to delete a journal entry in QuickBooks Desktop?
The procedure to delete a journal entry in QuickBooks Desktop is different from QuickBooks Online. Let us understand the steps in detail:
Initially, you need to head to the company menu.
Now, choose make general journal entries.
Once done with that, find and choose the journal entry that you want to delete:
In QuickBooks for Windows, choose find and enter the name, date, entry no, or amount, and then choose find.
In QuickBooks for Mac, choose the journal entry you wish to reverse from the list on Make general journal entries window.
In order to delete the journal entry:
You need to double-click the journal entry in QuickBooks for Windows and then choose delete, or void and click on the ok tab.
In QuickBooks for Mac, you need to choose Delete General Journal from the edit menu.
Steps to reverse a journal entry in QuickBooks Desktop
In order to reverse a journal entry in QuickBooks desktop, you need to carry out the following steps:
At first, navigate to the company menu and choose Make general journal entries.
After that, find and choose a journal entry that you want to reverse.
In QuickBooks for Windows: You will have to choose find and enter the name, date, entry no, or amount and choose find.
Whereas in QuickBooks for Mac, you simply have to find and select the journal entry you wish to reverse on the left side of the Make general journal entries window.
Now, go for the reverse option.
And lastly, choose save and close.
How to Delete a journal entry in QuickBooks Online?
Note that, deleting a wrong journal entry can unbalance the accounts immediately. Thus, you must be absolutely sure to delete the journal entry. In case you invited your accountant to review your books, then instead of deleting the entry, it is possible to make an adjusting journal entry. Having said that, let us check out the steps to delete a journal entry in QuickBooks Online.
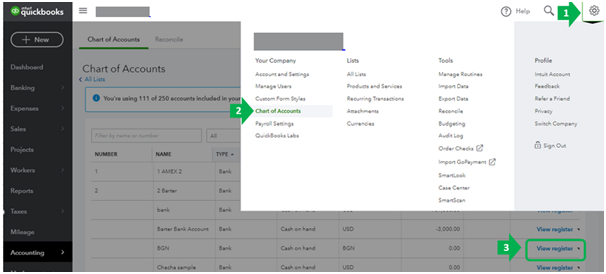
To begin with, you simply need to choose the settings tab and then go for the chart of accounts.
Once done with that, find the account you create the journal entry for.
Now, choose the account history tab.
And find the journal entry in the account register.
The word journal should be present in the Ref no. or type column.
The next step is to choose a journal entry to expand the view.
Then, simply click on delete and yes to confirm.
This would delete the entry successfully.
Steps to reverse a journal entry in QuickBooks Online
Reversing a journal entry usually reverses the debits and credits and doesn’t delete the original entry. The steps involved in reversing a journal entry in QuickBooks online are as follows:
Deleting or reversing a journal entry in QuickBooks desktop and online involves a handful of steps only. However, it is important to ensure that you actually need to delete or reverse the entry or not, as this might trigger balance issues. Hopefully, reading this segment might have helped you in successfully deleting or reversing journal entry in QuickBooks. However, if you have any queries at any point in time, then in that case, feel free to connect with our technical support team at +1-888-510-9198, and we will provide you with immediate support and assistance.