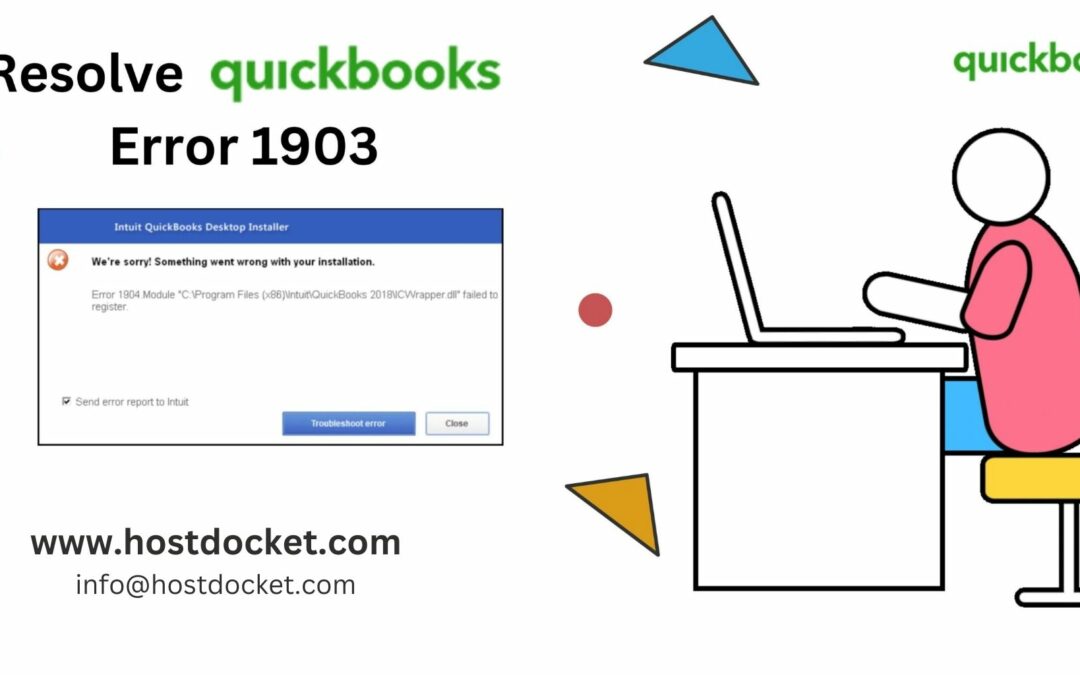
QuickBooks error code 1903 is often experienced when you are trying to install QuickBooks desktop or when opening it after the installation of the software on the system. This error is a technical error can be considered as a runtime error. You can also experience this issue as a result of .Net framework. Moreover, it interrupts in opening the program and also freezes the software.
There can be a bunch of other factors triggering such an error in QuickBooks. To learn what those factors are, along with the steps to eliminate them, make sure to read this segment right away. Or you can also speak to our technical support professionals at our toll-free +1-844-499-6700 and ask our team to eliminate the issue of QuickBooks error on your behalf.
What instigates QuickBooks error code 1903?
In order to eliminate the error from its root cause, it is essential to understand what factors trigger such an error. Let us have a look:
A basic factor causing this issue can be improper QuickBooks installation
Or if the windows aren’t working properly
Another trigger can be if there is any issue with the Microsoft .Net framework
The user can also experience this issue if the components are damaged, which includes the Microsoft MSXML and C++ files
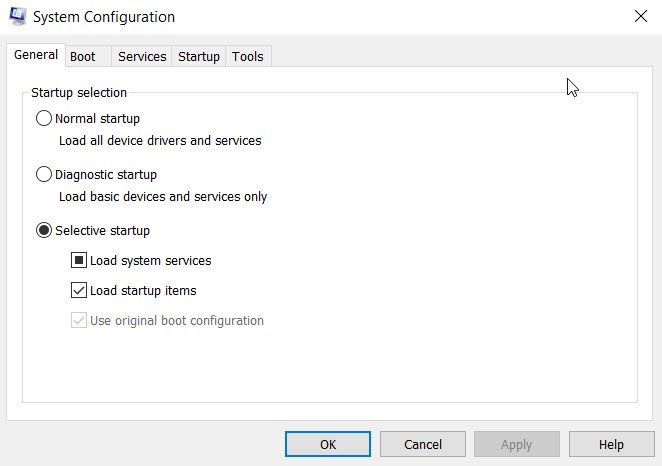
Solution 3: Use the QuickBooks install diagnostic tool
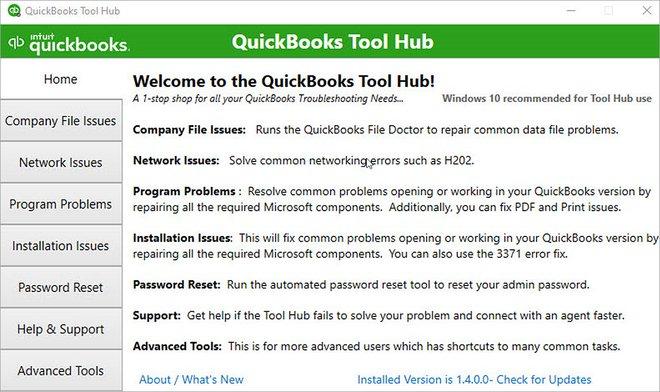
Often the errors can be resolved using the tools provided by the QuickBooks software itself. One can try eliminating this error by using the install diagnostic tool from the tool hub.
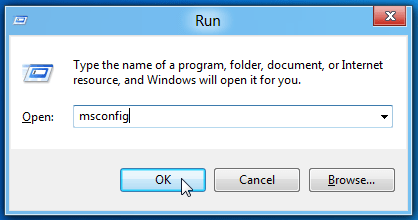
Step 1:Download and install QuickBooks tool hub
Start the process by downloading the QuickBooks tool hub
Once done with that download folder by pressing ctrl + J
Now that you know the steps that are to be performed to eliminate the issue from its root cause, it is the right time to implement the steps to get rid of the issue. However, if you are stuck at any point in time or if you require any further assistance in fixing the issue, then feel free to connect with our QuickBooks tech support professionals at our toll-free +1-844-499-6700 and they will help you in getting rid of the issue permanently. We are a team of experienced QuickBooks professionals who provide immediate support and assistance for all sort of QuickBooks-related issue.
FAQs related to QuickBooks error code 1903
How do I fix a QuickBooks error code?
For this, you need to: 1. Close your QuickBooks. 2. Download our QuickBooks Tool Hub. 3. Open the file you downloaded (QuickBooksToolHub.exe). 4. Follow the on-screen steps to install. 5. When the install finishes, open the tool hub on your Windows desktop. 6. Select Program Problems. 7. Click Quick Fix my Program.
How do I fix QuickBooks desktop installation errors?
Go to the tools hub and select installation issues. Click on QuickBooks Installation Hub and make sure not to close the window while the process is going on. It will take 20 minutes or less. You can ‘Restart your computer’ once the process mentioned above is ‘Complete’.
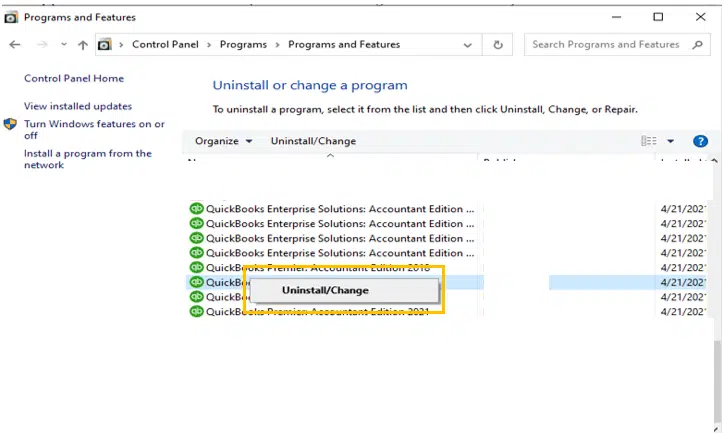
How do I uninstall and reinstall QuickBooks Desktop?
1. Remove QuickBooks a. Open Windows start menu b. Open control panel c. Choose programs and features or uninstall a program d. Choose uninstall or change and hit next. 2. Install QuickBooks Desktop again
How do I reinstall QuickBooks without CD?
You can also install QuickBooks on a new computer without disk installation. To do so, visit https://downloads.quickbooks.com/app/qbdt/products and download your QuickBooks version. Save the download file where you can easily find it to run and install.
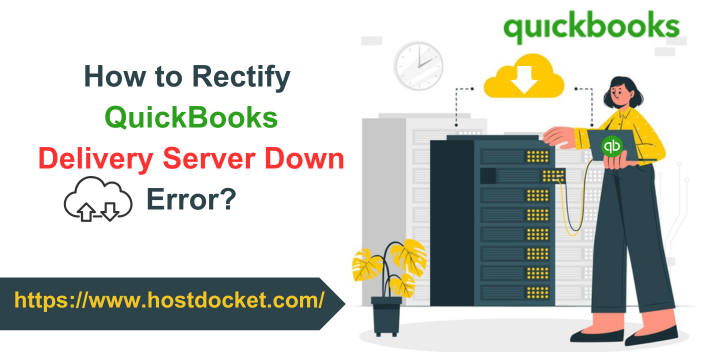
Certain errors in QuickBooks aren’t common and can seem a bit daunting to handle. One such error that you might have heard about is QuickBooks Delivery Server Down Error. This error is often linked with the attachments in the sales or invoice when forwarding it to a customer in QuickBooks. This issue usually prevents users from sending transactions along with the attachments. As this error is a bit unique and uncommon, here we are to help you with its rectification procedures. In this article, we are going to spill the beans on how you can rectify the QuickBooks delivery server down error.
Thus, make sure to stick around till the end, or you can further get in touch with our technical support team at +1-844-499-6700 and they will provide you with answers to all your QuickBooks-related queries.
Procedures to rectify QuickBooks Delivery Server Down error
You can try to eliminate QuickBooks delivery server down error using the set of steps below:
Procedure 1: Configure the print and pdf settings
At times, incorrect printer or PDF configuration can trigger the delivery server down issue in QuickBooks. Thus, to eliminate this issue you need to configure the print and pdf settings. The steps involved here are:
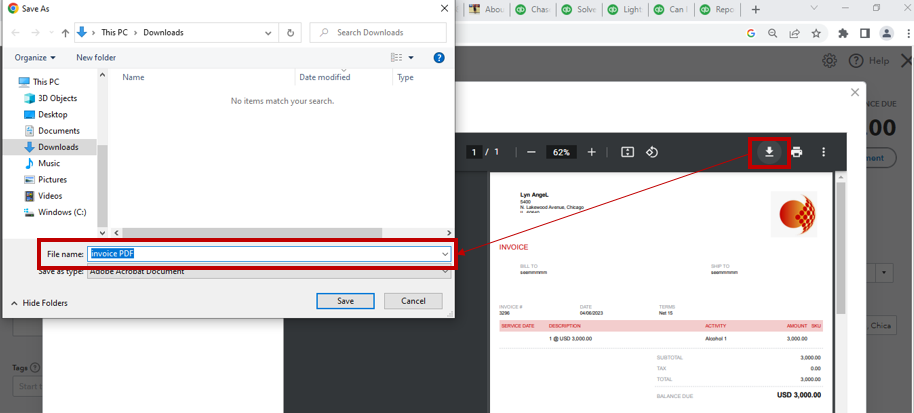
Step 1: Configure Adobe Acrobat settings
You need to select the actual size.
Further, the orientation should be set to automatic
The option to choose paper source by pdf size should be on.
Step 2: Configure the pdf settings of the browser
For Google Chrome users:
Here, you will have to run Google Chrome
Further, make a move to settings
Once done opt for the advanced drop-down and then click on the content settings option.
Click on the PDF documents option.
Disable the option to download PDF files rather than automatically opening them in Chrome.
For Mozilla Firefox users:
You need to run the Mozilla Firefox browser and then move to the options.
Once done with that, click on applications and proceed to the content type option.
You now have to proceed by searching for the portable document format.
Also, click on the option to use Adobe Reader.
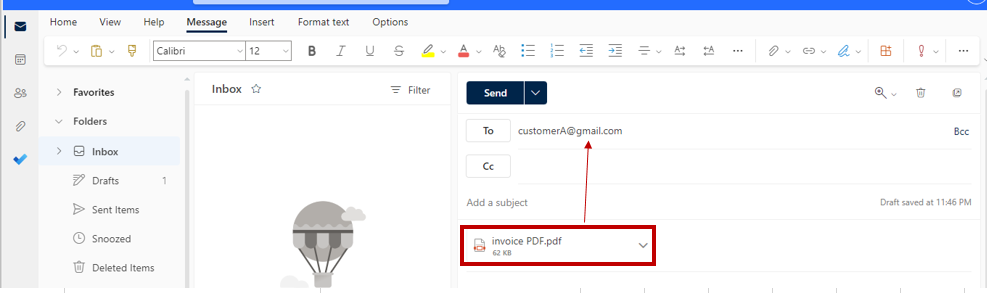
Exit from the options tab and move to QuickBooks Online to retry sending the invoice to make sure that the QuickBooks delivery error no longer exists.
This might rectify the issue up to a certain extent.
Under this process, you need to initially move to settings.
Further, make a move to account and settings and move to sales.
Followed by clicking on the online delivery option.
After that, select or clear the checkbox beside the PDF attached option.
Click on save and then end by clicking on done.
Procedure 3: Rectify the invoice format
You need to access or create invoice and get any special characters from the invoice info removed. The special characters include ! @ # $ % ^ & * ( ) _ – = + : ”. Make sure that the characters are not included in the information like description, message, email id, attachment name, or custom form templates.
Procedure 4: Correct the email address of the location
It is important to double-check the email address format used when sending the sales form. The steps involved here are:
Choose the settings tab.
Further, pick all lists and then locations.
You now have to search for the location used in the invoice.
And then, click on edit.
Check the email address in the section: This location has a different email address for communicating with customers.
And further, make the required changes if needed and click on save.
Procedure 5: Resolve issues with the email address formatting
If none of the above steps didn’t work, then you can try fixing the email address formatting issue. Let us have a look at the steps involved:
You need to first choose the settings⚙.
After that, you need to click on accounts and settings in the settings window and click on account and settings.
The next step is to click on the company option.
Also, click on the company info tab and check the emails for their formatting.
Getting rid of the delivery server error becomes easy using the set of steps enumerated above in this piece of writing. However, if there is any query or if the user needs any sort of QuickBooks support services, feel free to reach out to our technical support team at +1-844-499-6700, and we will provide you with answers to all your queries immediately.
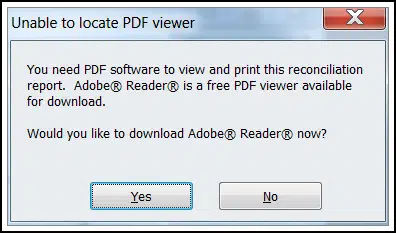
While carrying out daily accounting activities, one might have to print certain documents or pdf. However, at times due to certain factors like improper Windows print components, missing PDF components, or QuickBooks desktop setup, one might face issues with printing payroll tax forms, statements, and other documents. QuickBooks unable to locate PDF viewer is one such error that can be experienced by QuickBooks users. PDF viewer in QuickBooks is an essential component for the software to access the documents and the absence of this component can create issues in opening the essential files.
QuickBooks unable to locate the PDF viewer error can be seen when the Windows print components are damaged or outdated. To further learn about this issue in QuickBooks, sticking around this piece of writing can surely help. However, if you do not want to eliminate the error on your own, then you can simply get in touch with our technical support team at +1-844-499-6700, and they will help you tackle all sorts of QuickBooks-related issues.
What causes QuickBooks unable to locate PDF file error?
There are a bunch of factors causing such an error in QuickBooks desktop, which include:
The Adobe Reader version installed on Windows is outdated.
Another possible reason can be if the QuickBooks doesn’t have Adobe Reader set up as the default PDF viewer app.
You can also come across a similar issue if the QuickBooks desktop software is missing the latest updates.
Also, if the qbprint.qbp file is either damaged or missing from the installation directory.
Effective solutions to fix unable to locate pdf viewer error in QuickBooks
Errors related to pdf like ABS PDF driver install error, PDF and print errors, or unable to locate pdf viewer errors are pretty common in QuickBooks. You can try out the below set of steps and solutions to rectify the error unable to locate the pdf viewer in QuickBooks. Let us explore the solutions one by one:
Solution 1: Repair, update, and reinstall Adobe Reader
Just in case you are unable to open a PDF document after selecting Adobe as the default program, then you might face an issue with the PDF reader software. Here is how you can update, repair, and reinstall Adobe Reader.
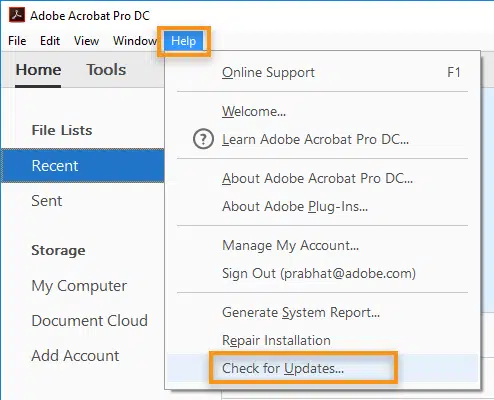
Further, note the version shown on the page and also open the Adobe Reader App
Once done with that, you need to navigate to the help tab and also choose About Adobe Reader.
Heading forward, check if the Adobe version shown on the page and Adobe’s website is the same.
Moreover, if the versions don’t match, then you need to click on the help tab.
Further, choose the check for updates tab.
Carry out the onscreen prompts to update the PDF viewer.
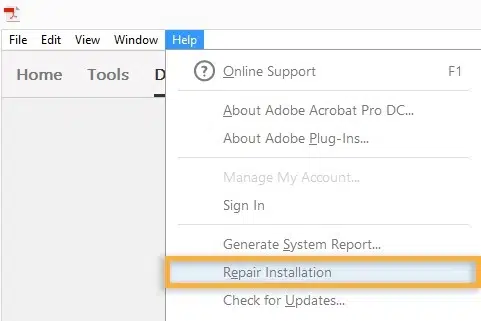
Repair Adobe Reader
Close all running programs and open Adobe Acrobat Reader.
Followed by, heading to the help tab and also click on repair acrobat installation.
Permit the application to repair itself and further, when the repair is complete, reboot the system and check if the users can print the document using QuickBooks.
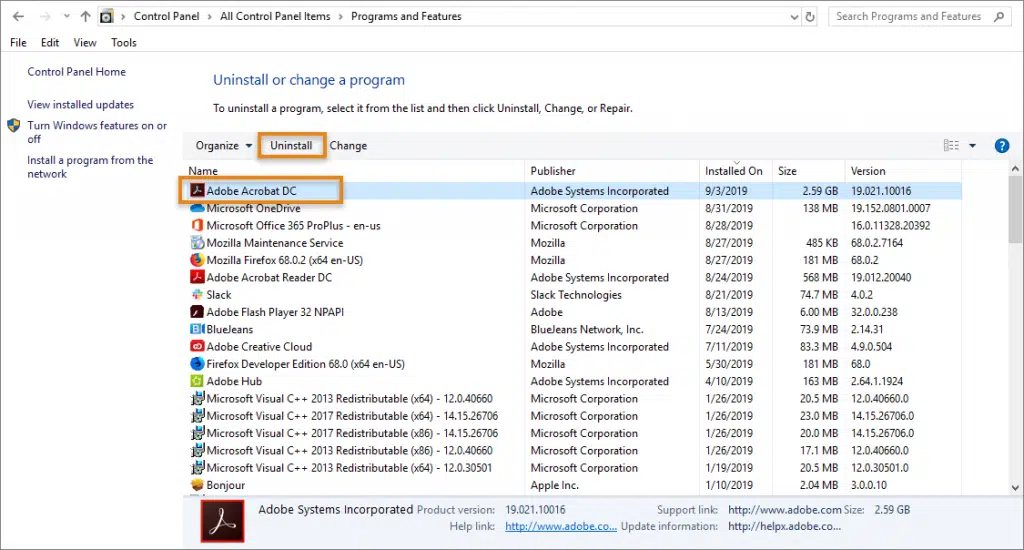
One can use the program and features option in the control panel to uninstall Adobe PDF viewer. The same can be reinstalled later on using the steps below:
First, you need to open the run command and type the command appwiz.cpl to open the program and features window.
Once done with that, choose the option to view installed updates further right-click on Adobe, and choose the option to uninstall.
Also, move to the web page for Adobe Acrobat reader download.
And then, click on the option to install now and choose the correct Windows version from the drop-down list.
Once the update file is downloaded, click on the option to run and hit the finish tab.
Rename Qbprint.qbp file
You can try to rename the Qbprint.qbp file to fix QuickBooks unable to locate the PDF viewer issue. The steps involved in renaming the file are as follows:
Start by opening the Windows file manager
Further, click on the organize option.
You now have to choose the folder and search option.
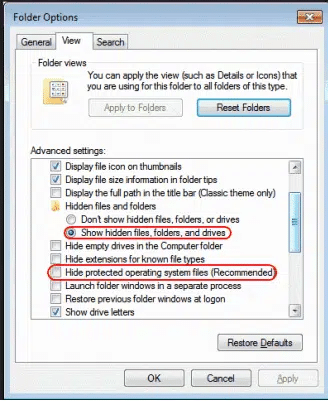
Under the view tab, you need to uncheck show hidden files, folders, and drivers.
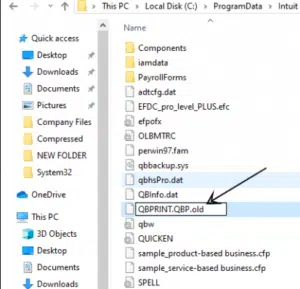
Head to the Program Data folder in the C drive and then open the Intuit Folder.
You will then have to double-click the QuickBooks folder and also right-click the Qbprint.qbp to open it.
After that, choose the option to rename and add old instead of .qbp (qbprint.old)
The last step is to save the file and check if the Unable to locate PDF viewer error continues.
Solution 2: Set Adobe Reader as the default PDF viewer
For Windows 7, 8, & 8.1
If you are a Windows 7, 8, or 8.1 user, then you need to carry out the below steps to set Adobe Reader as the default PDF viewer. The steps involved are:
At first, click on the Windows start menu and choose the control panel from there.
You now have to select programs and click on set default programs
The next step is to find and choose Adobe Reader
Choose set this program as default.
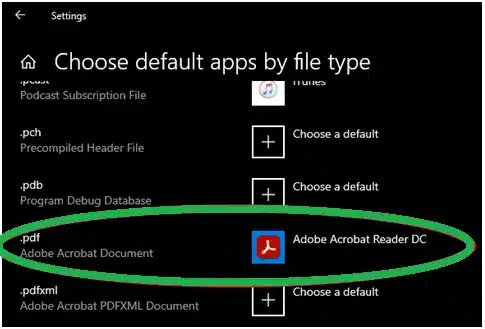
For Windows 10
You need to first click on the Windows start menu
After that, click on the settings tab and choose apps.
Further, click on default apps.
Scroll down to pdf and choose its default program.
Also, choose Adobe Acrobat Reader and click on Switch anyway
Solution 3: Run QuickBooks PDF and Print Repair Tool from the Tool Hub Program
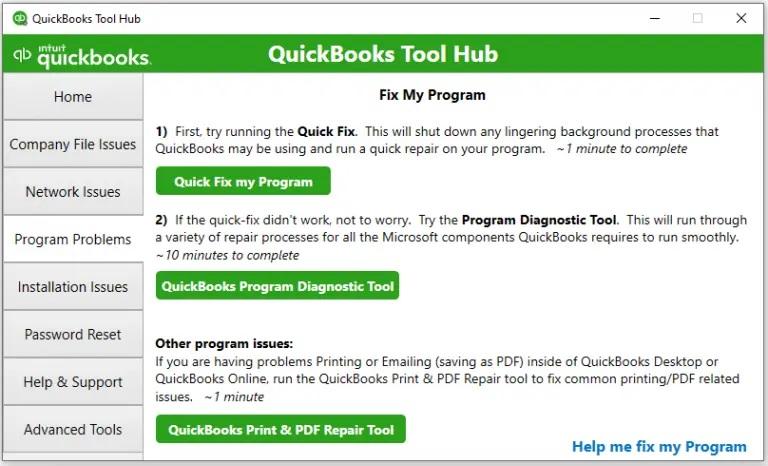
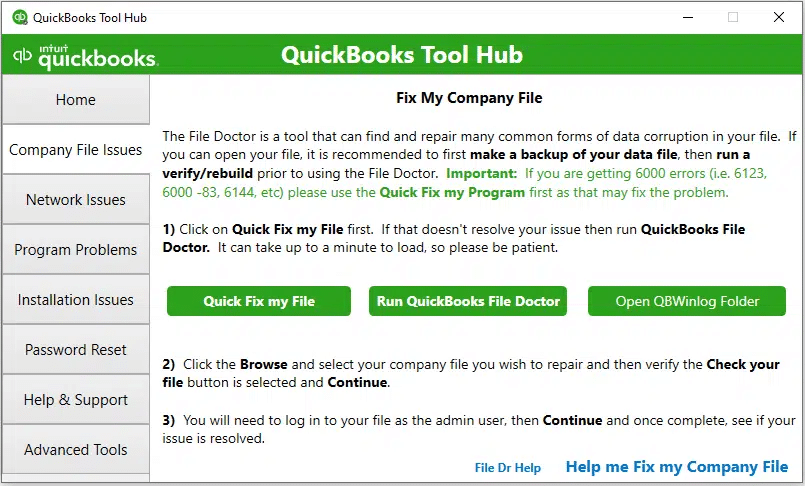
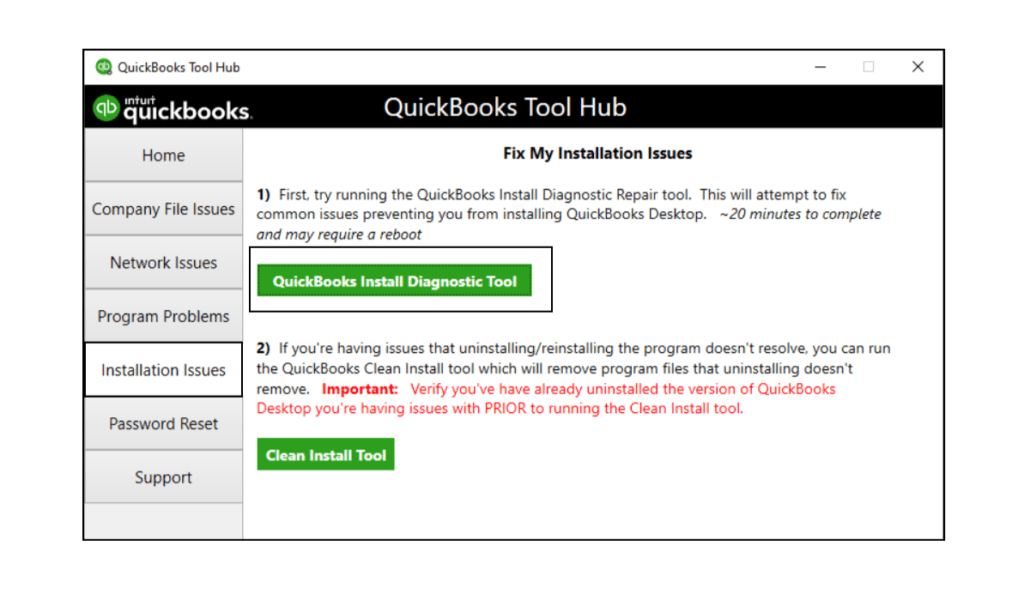
QuickBooks tool hub consists of a bunch of tools that can help you eliminate issues that you come across when working on QuickBooks. You can access the pdf and print repair tool from QB tool hub to eliminate this error successfully. The steps involved in here are:
Initially, close QuickBooks and download the latest version of QuickBooks Tool hub.
After that, open the program and navigate to the program problems tab.
You now have to opt for QuickBooks pdf and print repair tool also note this might take a minute or so to complete.
After the scan process ends, you need to check that the issue with the pdf viewer is fixed.
The last step is to try viewing, printing, emailing, or saving as a PDF from QuickBooks again to check if the issue continues.
QuickBooks PDF viewer not found error can hinder the smooth working of the software, especially when printing pdf and documents. Thus, it becomes essential to rectify the issue as soon as possible. However, if for some reason, you are unable to tackle with the issue, or if you need any sort of technical assistance in dealing with such an error, then in that case, do not hesitate in contacting our technical support team at +1-844-499-6700, and we will provide you with immediate support and guidance.
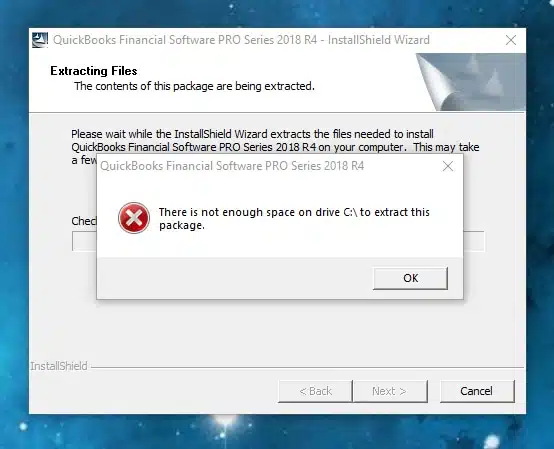
Trying to work on QuickBooks desktop and came across an error QuickBooks not enough space on drive C? Well, this isn’t a huge bug, you can easily rectify this issue by performing some basic steps. Often such errors occur indicating space issues, which require you to clear up disk space for QuickBooks. You might see the following warning message displayed on your screen when such an error occurs:
There is not enough space on drive C:\ to extract this package
To help you out in dealing with such an error, here we are with this segment right here, spilling the beans on how you can clear up disk space for QuickBooks desktop easily using some basic set of steps. For more details, you can stick around this piece of writing, or get on a call with our technical support team, at +1-844-499-6700, and we will ensure that all your queries are addressed properly.
Getting rid of unwanted data can create space for QuickBooks. Here are the steps involved in clearing up disk space for QuickBooks. Let us evaluate these steps one by one in order to fix error QuickBooks not enough space on drive C:
Step 1: Check the hard drive
Before you proceed further, you need to check the free space available at the current moment. Note that QuickBooks requires at least 1 GB of space, so as to run the install process and 2.5 GB of space to work properly. You can carry out the steps below to check the hard drive space available:
You need to first choose the Windows start menu.
Once done with that, enter File Explorer into the search and also open File Explorer.
You now have to select my computer from the navigation bar.
Heading forward, right-click the icon for the hard drive.
Moving ahead, you will see C: drive
Here, you need to go for the properties tab
Followed by, a window showing the available space.
Step 2: Create space on the hard drive to fix QuickBooks not enough space on drive C:
You can clear up disk space using the procedures below. You need at least 2.5 GB of free space to run QuickBooks optimally.
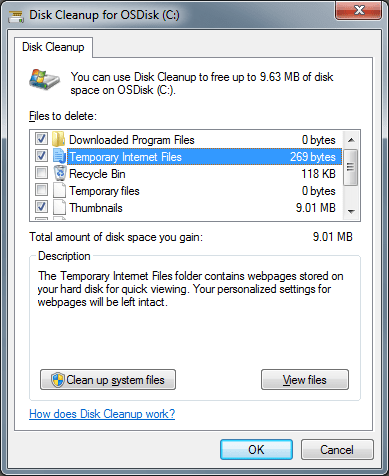
Clean up your disk
Running disk clean-up makes sense when you have lots of files in the downloads folder or recycle bin.
Removing temp folder
You can delete the files in the temp folder to free up some hard drive space. Make sure to sign in to the windows as admin.
Before eliminating the files, check if you can uninstall any of the programs that are no longer in use. This would create more space for you.
Clean up photos and documents
If you have already removed the temporary files and unused programs, and the space requirement isn’t satisfied, then you can move photos and documents to an external hard drive. Note that the photo and media files can make up a lot of space. However, avoid moving any QuickBooks files. They are required to be kept on the local hard drive. Moreover, QuickBooks can’t access files on external hard drives.
Refreshing Install file
If you are trying to install QuickBooks desktop, and still require space, then use QuickBooks tool hub. Or navigate to the installation issues section, and there you will find a few steps that can be performed. Start the installation process again.
Steps for upgrading
In case you have tried all the measures, and are still unable to make space for QuickBooks, then carry out the steps below:
Implementing the set of steps mentioned above might help you clear up disk space for QuickBooks and make optimum use of the software. On the contrary, if you are still unable to do so, then our team of certified QuickBooks ProAdvisors is here to help you. All you need is to ring up to us at +1-844-499-6700, and we will address all your queries immediately.
Suddenly interrupted by QuickBooks error code 12,0? Well, this is a unique error that users might not come across quite often. You can experience this issue when you do not have admin rights. Moreover, if there is any issue in the Windows registry, then experiencing this error is common. As this error can be unique, you might find it difficult to fix it. To know more about this error. All you need is to read this segment carefully.
This article will help you to find out the causes and fixes of this error. You might land into this issue, if you are not having enough admin rights. Just in case, you came across QuickBooks error code 12,0, then stick around and let us find out the right fix for it together. You can also connect with our experts right away using our dedicated support number i.e., +1-844-499-6700, and let the professionals handle the issue for you.
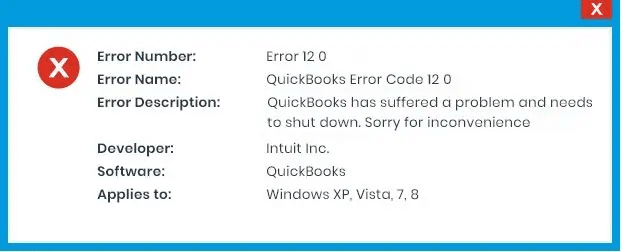
Brief into QuickBooks error code 12, 0
As we discussed previously, this issue isn’t very common and can be experienced due to insufficient admin rights. This particular error can also appear if the system settings aren’t configured properly. It appears on the screen stating: QuickBooks has encountered a problem and needs to close. We are sorry for the inconvenience.
Error Number:
Error (-12 0)
Error name:
QuickBooks error code 12-0
Developer:
Intuit Inc
Software:
QuickBooks
Applies to:
Windows XP, Vista, 7, 8, 10, and 11
Error Description:
QuickBooks has encountered a problem and needs to close. We are sorry for the inconvenience.
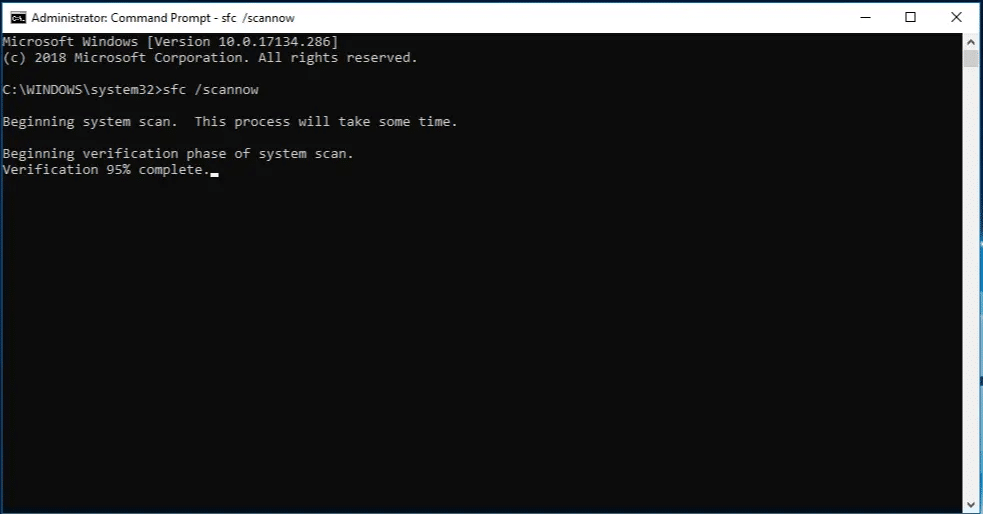
Simply using the scan now command can scan the system for junk files and fix the issue up to a certain extent. The steps to be performed here are as follows:
At first, click on the Start tab.
Now, move to Search box, and then enter ‘Command‘
Click on the Enter key.
Press and hold the Ctrl + Shift keys
Hit the Enter tab
This will open a permission dialog box
Click on the Yes tab.
Now, a black box with a blinking cursor will appear on the screen.
Type in ‘SFC/scannow’ and then click on the Enter tab.
This will scan for errors and other system file issues.
Perform the onscreen steps and end the process
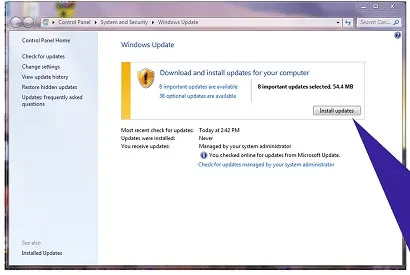
Procedure 2: Update Windows
Here, you need to click on the Start tab.
After that enter the Update in the Search box and hit on the Enter tab.
This will open the Windows update dialog box on the screen.
Click on the Install updates tab and end the process
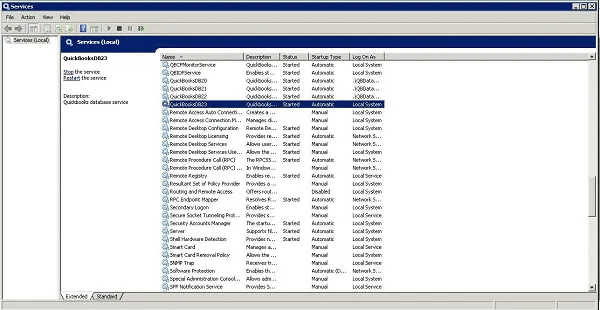
Procedure 3: Enable the QBdatabaseserviceuser23 service
Under this process, you need to first Verify the QuickBooks version.
The service will be QBDatabaseserviceuser23.0, if you are accessing QuickBooks
Head to Services.MSC
Check if the service mentioned has stopped or is still working.
Now, press on QBdatabaseserviceuser23.
Also, right-click QBdatabaseserviceuser23
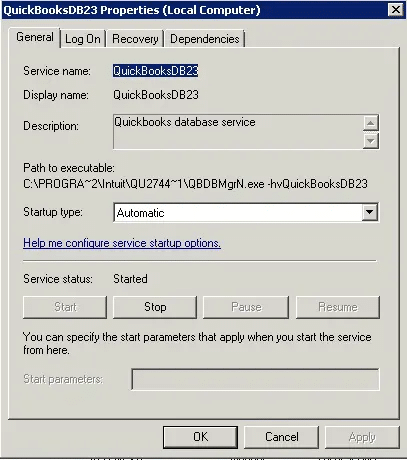
After that head to the Properties tab
Just in case the service has stopped working, make sure to click on the Start service option.
End the process by reopening the company file and checking if the error got resolved or not.
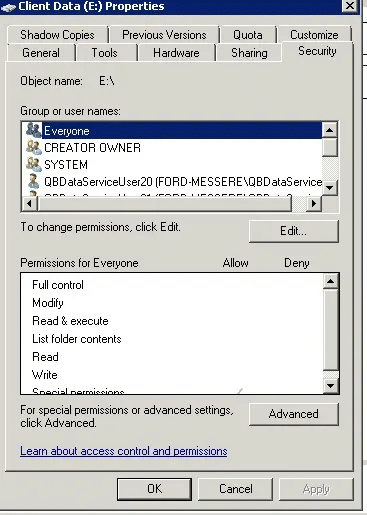
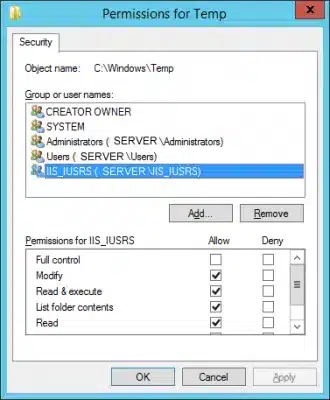
Also check permissions on the folder having the company fileusing the steps below:
You need to right-click on the Client data then select Properties
Now choose Security tab.
And check if you have Permission to access the file or not.
If you don’t have permission to access the folder, get access to the permission and try opening the company file again
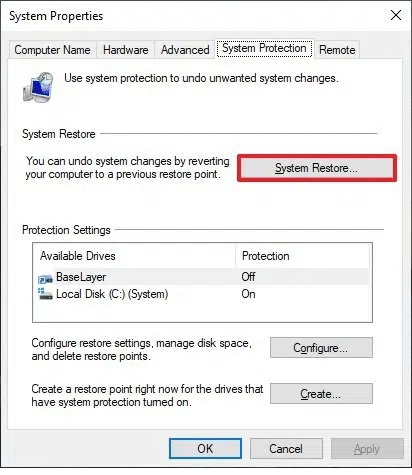
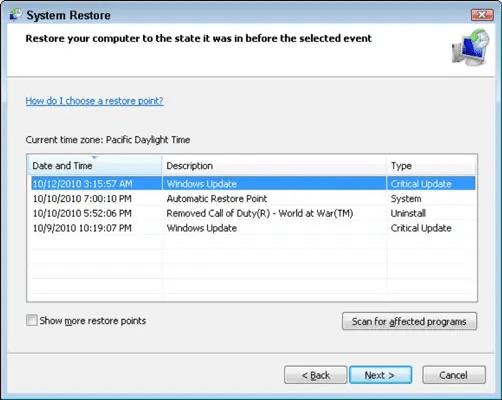
Procedure 4: Select the System Restore
At first, click on Start tab.
Also enter System Restore in the search box
Hit the Enter tab.
Select System Restore tab in the results section
Enter Admin passwords.
Perform all the necessary steps in the wizard to pick a Restore point.
Lastly, restore the system and start working on QuickBooks.
Here you need to right-click the Client data option.
Opt for the Properties tab.
Also, click on the Security tab.
Furthermore, check if you have permission to access the file or not.
If not, then provide the necessary permission.
Now, open the company file and check if the error is fixed or not
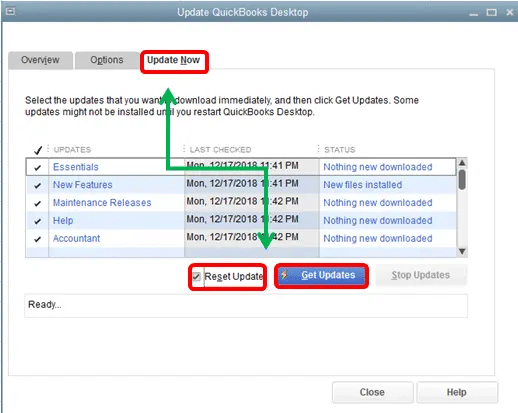
Procedure 6:Update QuickBooks version
The user can try to update QuickBooks desktop using the steps below:
The very first step is to open the QuickBooks desktop and head to the help menu
Furthermore, click on Update QuickBooks desktop
And then, click on the option to update now
Followed by, check marking reset updates box and clicking on get updates tab to start downloading the updates
Conclusion!
We end this segment right here with the hope that the steps listed above might be of some assistance in fixing the QuickBooks error code 12,0. if you continue to come across similar issues again and again, then in that case contacting our tech team at +1-844-499-6700 is suggested. We are a team of certified QuickBooks professionals who work round the clock to provide instant QuickBooks Error support services. Our experts know what it takes to fix issues from their root cause.
Frequently Asked Questions
How do I fix error code 12 0 in QuickBooks?
To fix the QuickBooks error code 12, 0 when opening a company file, one can try to perform the below steps: 1. The user needs to first click on the start tab 2. And then, in the search box type the command and click on the enter tab 3. Hold the Ctrl + shift keys and then click on the enter tab 4. You will see a permission dialog box and click on yes tab 5. Once done with that, a black box with a blinking cursor will appear on the screen 6. Furthermore, type SFC/Scannow and click on the enter tab 7. The system file checker will scan the error and other system file issues 8. You will then have to carry out the on-screen prompts and end the process
How do I fix QuickBooks payroll update error?
The user can try to fix the payroll update error by running Verify and rebuilding Data in your QuickBooks Desktop. Get your QB updated to the most recent version. Now, restart your system in Safe mode and update the QuickBooks payroll tax table.
What is QuickBooks update error 12002?
Some of the reasons behind the QuickBooks Error Code 12002 are: The QuickBooks is not able to access the server due to network timeout. The incorrect SSL Settings. The error also arises due to the internet or firewall settings.

![QuickBooks Unable to Locate PDF Viewer – [FIXED]](https://www.hostdocket.com/wp-content/uploads/2023/12/QuickBooks-Unable-to-Locate-PDF-Viewer.png)