Recently Intuit Inc. has released the new QuickBooks version – QuickBooks Desktop 2019. This new updated and improved QuickBooks edition is packed with more advanced features & bug fixes. According to the developers and software testing unit of Intuit, QuickBooks Desktop 2019 is more reliable, handy, faster, and customer-eccentric product.
Being a QuickBooks user, it is important to know why we need to update QuickBooks desktop 2018. Well, the updated QuickBooks version has dozens of amazing and spectacular utilities especially made for the business leaders & entrepreneurs around the world.
New Advanced & Improved Features of QuickBooks Desktop 2019 for the Windows Users
For the better insight of QuickBooks Desktop 2019, we are providing the list of top and newly introduced features.
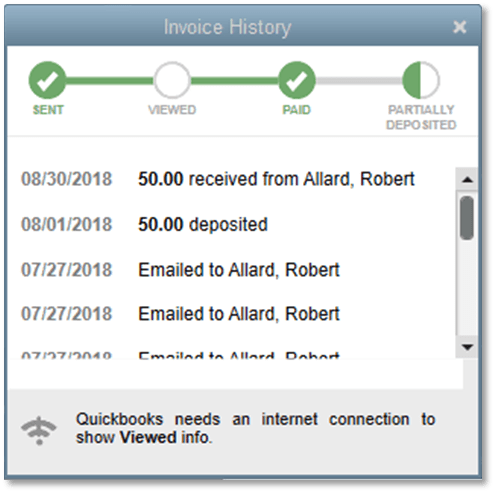
Track Invoice History
This feature is only for QuickBooks Pro, Premier, Accountant 2019, & Enterprise Solutions 19.0.
List of New & Advance Features of QuickBooks 2019
Real-Time Access to track Invoice. This includes the following points:
Due dates of the Invoice & bills.
Ability to create a date.
Enable user to search the email date & customer name. Note: In case, the QB user uses the email to send the invoice.
If the users have a good internet connection, then the user can see the previous Invoice view dates.
The QuickBooks user can access the details of payments received from the customers such as Payment dates & amount.
The new QuickBooks Desktop 2019 record all the information created while depositing an amount.
This features stores the date and amount on which deposit has been made.
Improved tracking status.
Trace & trace every single detail of the invoices.
This feature will help the QuickBooks users a lot in maintaining and managing the invoice history. However, it allows the QB user to extract the invoice information anytime with 100% accuracy. It results to QuickBooks users to take the decision in real-time with proper understanding and communication with their clients.
Important Note: Microsoft Outlook 2010 does not allow and support this feature.
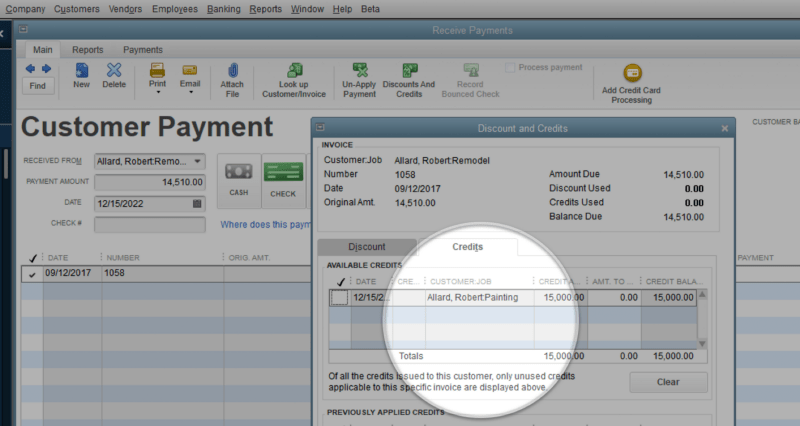
Transfer Credits Between Jobs of the Same Customer
This feature is available only for the QuickBooks Pro, Premier, Accountant 2019, and Enterprise 19.0.
Advance Features:
The QB user can efficiently use the customer credits across all the jobs of the same selected customer. It will be visible to the QuickBooks user that new columns on the applying for credit window show the job & customer. By using this feature, the user can relocate the credit to the other jobs of the same customer and record this transaction as a decay transfer of credits between the jobs.
This feature provides the QuickBooks user a leverage to save time effectively while creating credit memos for all the jobs. QuickBooks develops a special ‘Account for Credit Transfer’. Various other Current Asset account-type immediately using basic entries which tape-record the adjustments which happen ‘behind the scenes’.
Important Note:
QuickBooks Desktop user cannot undone the transfer of credits from one job to other of the same selected customer. You are allowed to undo the transfer by making some additional manual entries.
The first instance of the transfer of credit cannot be done without using the Chart of Account access.
The QB user will be unable to use this feature while using the Accountant’s copy of the client’s data.
Few Improved features in QuickBooks desktop 2019 update
Here below we are going to highlight some of the new and Improved features that will come with QuickBooks desktop 2019 update.
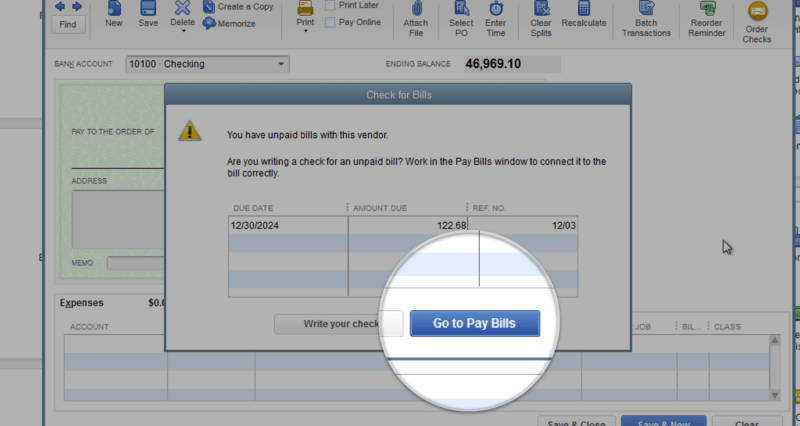
User Prompt to Create a Bill Payment When Using the Write Check
This feature is only available for the QuickBooks Pro, Premier, Accountant 2019, and Enterprise 19.0.
Enhanced & Powered Feature:
This feature allows the user a visibility to see into the unpaid vendors’ bills on the top so that the QB user can manage the payments. It is a momentous feature as it enables the user to link their checks to open bills so that the vendor’s get access to pay the bill quickly and easily.
When the QB user clicks the GO TO PAY BILLS option, the Pay Bills window will appear and show the selected vendor’s unpaid bills.
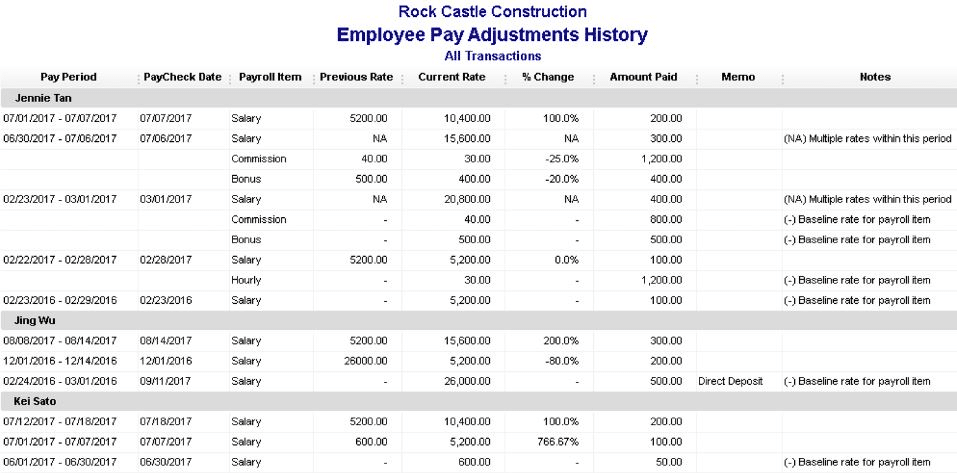
Employee Pay Adjustment History in QuickBooks Desktop 2019
This feature is only available only for the QuickBooks Pro, Premier, Accountant 2019, and Enterprise 18.0. Maintenance release R3 or newer.
The QuickBooks user can use this feature with the Payroll subscription.
Salary
Bonus Items
Payroll items
Commissions
Sick and Vacation Pay Tracking in QuickBooks desktop 2019
This feature is only available for the QuickBooks Pro, Premier, Accountant 2019, & Enterprise 18.0 with an Enhanced Payroll Subscription.
Enhanced Feature:
This feature is an advanced and improved tracking & reporting feature for the sick as well as vacation time.
The QuickBooks users get a warning while saving a paycheck that exceeds the employees sick and/or vacation time.
The second feature consist of details about the Accrued, Used as well as Available sick and vacation hours by reformatting the pay stub.
Sensitive Payroll Permissions
This feature is only available for QuickBooks Enterprise 19.0.
Enhanced Feature:
This feature provides the Admin user an ability to assign a user to access the QuickBooks and sensitive Payroll transaction with a permission pop-up.
Inactive Inventory Items Included in Inventory Report Totals
This feature is only available for QuickBooks Pro, Premier, Accountant 2019, and Enterprise 19.0.
Enhanced Feature:
In QuickBooks Desktop 2019, the QB users are allowed to include the inactive inventory items in the Inventory Valuation Report. And In the previous version, this feature was not available and it used to exclude the inactive items no matter if the stock had quantity on hand.
In QB Desktop 2019 version you can balance your inventory reports against the inventory assets on your annual report and also basic sheet due to the fact that it can consist of non-active product quantities and values.
This simply implies that there would be a huge difference in the amount of inventory value on the reports when compared with the Inventory Asset account total reports.
Easy Upgrade
This feature is only available for the QuickBooks Pro, Premier, & Enterprise 18.0.
Enhanced Feature:
Now the upgrade is quite a simple and easy process, it hardly takes a couple of clicks to install the latest QuickBooks Desktop. The QuickBooks installation process will get done under 3-4 minutes.
The best thing while upgrading the QuickBooks is that the old company files get stored in the No company file after the upgrade. Here’s the improvement where QB Desktop 2019 left the old versions far behind.
Move QuickBooks to Another Computer
This feature is only available for the QuickBooks Pro, Premier, Accountant 2018, & Enterprise 18.0.
Enhanced Features:
This amazing feature is introduced in the QuickBooks 2019 enables the QB 2019 user to move the QuickBooks programs as well as associated files and company data files to any other computer swiftly. The client will need the following component to move the QuickBooks data file seamlessly.
A thumb drive
The device where the QuickBooks data resides
New computer with an internet connection
This improvement assists the user work in an easier means. However, QuickBooks copies vital information concerning your current installation as well as you will create a complicated or a special password that unlocks whatever that is transferred onto the new computer system( for security purpose).
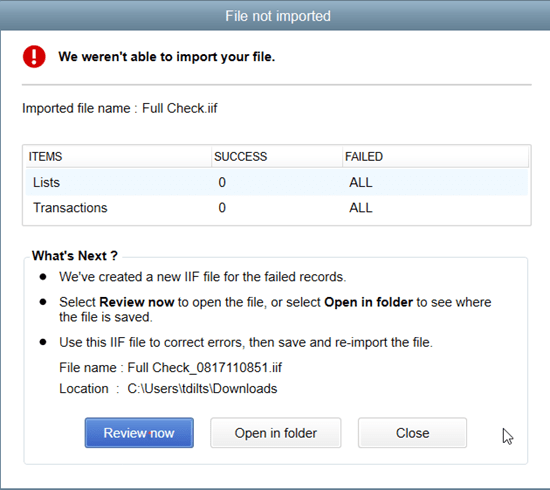
IIF (Intuit Interchange Format) List and Data Imports
This feature is only available for the QuickBooks Pro, Premier, Accountant 2019, & Enterprise 19.0.
Enhanced Feature:
QuickBooks data importing feature is there in the market with the old QuickBooks versions.
Hence, this IIF importing is more advanced and improved feature that allows the QB 2019 user to validate, create, and import the data that cannot be imported by making a list of those data.
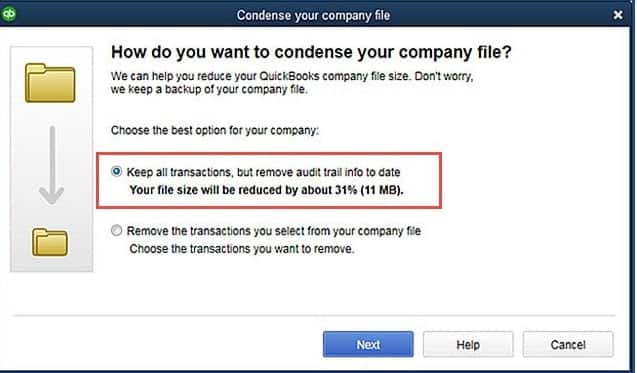
Condense Data File Optimization
This feature is only available for the QuickBooks Pro, Premier, Accountant 2019, and Enterprise 19.0.
Enhanced Feature:
This feature allows the QB 2019 user to reduce the size of QuickBooks company file without deleting or removing any data.
When the QuickBooks 2019 users choose the “Condense Data” option, a choice will appear to keep all the transaction data and only remove the audit trail.
Moreover, the QuickBooks 2019 also automatically clean up the technical information & other performance logs which results in the 32% reduction in the file size.
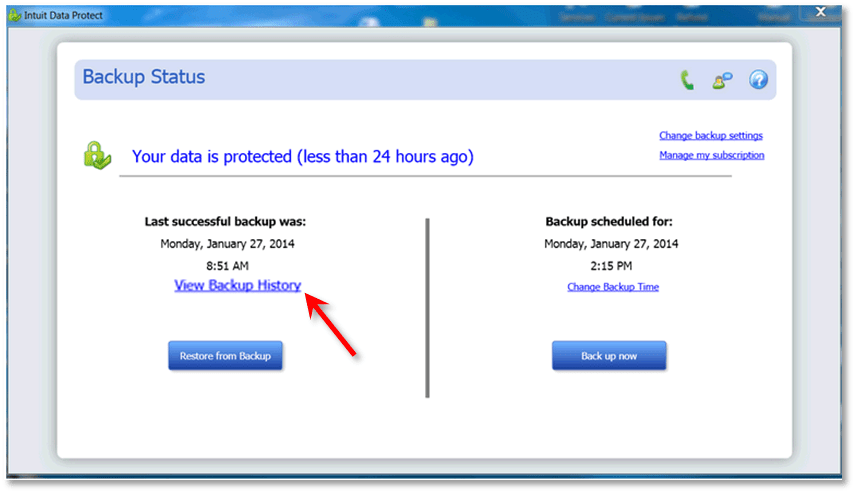
Intuit Data Protect
This feature is only available for the QuickBooks Pro, Premier, Accountant 2019, & Enterprise 19.0.
Enhanced Feature:
In the QuickBooks Desktop 2019, the entire process of setup and QuickBooks backup into the cloud server is automated & streamlined.
As a result the QB 2019 version is an improvement to fix the issues in the previous versions such as backup failure, errors, etc.
Receive Inventory Process – Purchase Order Worksheet in QuickBooks Desktop 2019
This feature is only available for the QuickBooks Enterprise 18.0 Maintenance Release R5.
Enhanced Feature & workflow:
The advance & enhance inventory receiving process assist the QB user to reduce the possibility of data entry errors & increase the efficiency.
The internet connection is mandatory while the QB user connects the mobile device to enable the typical inventory workflow feature. Moreover, it is also compulsory for both QuickBooks Enterprise file & warehouse locations.
The QB users can assign and prioritize the QuickBooks purchase orders to the warehouse workers. Also, it enables the QB users to sync the mobile devices across the warehouse/warehouses.
The assigned worker can log into the mobile device from the warehouse & scan the barcodes, or the serial number barcodes, & can also enter the item quantity received manually.
The warehouse worker allotted or assigned can send or receive the updated information to the QuickBooks Purchase Order in the QB Enterprise files.
In the Purchase Order Management Worksheet, the QB user able to automate Item Receipt or Vendor Bill from the updated Purchase Order information or details.
Note: This worksheet can also be used by manually by taking a printout, no requirement for any kind of kind of mobile app.
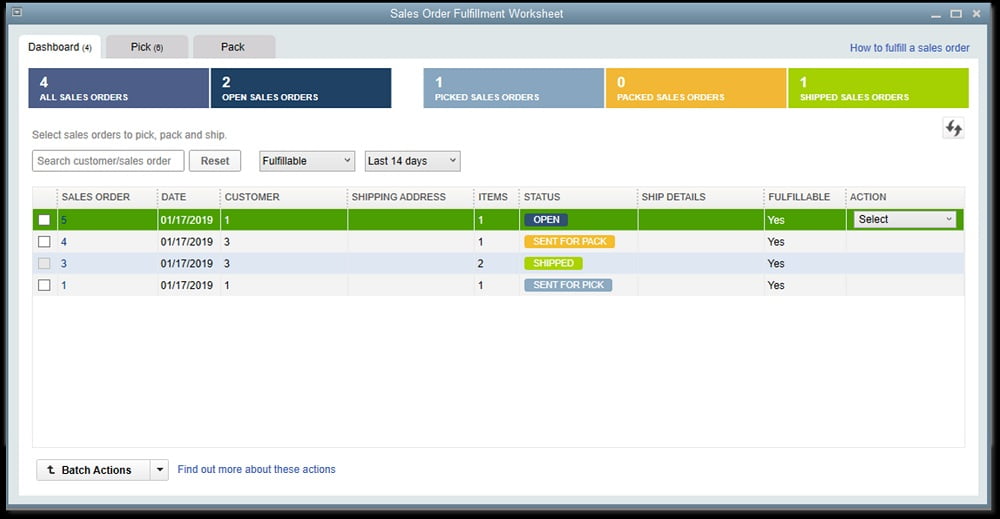
Pick, Pack and Ship Process – Sales Order Worksheet in QuickBooks desktop 2019
This feature is only available for the QuickBooks Enterprise Platinum edition.
This feature allows the QB user to fulfill the sales order from the central dashboard or mobile device.
Accessibility: The Admin user can access the sales order worksheet by following the path mentioned below:
First of all, In the menu bar, go to Edit => Preferences => Items & Inventory => Advanced Inventory Settings => Site Operations.
Finally, Once you enable the Sales Order Worksheet, go to Customers => Sales Order Fulfillment Worksheet.
Existing Pick workflow:
Basic demands are Internet connection without internet connectivity not possible to others.
Pick-lists are focused on in the QuickBooks inventory as well as developed from sales orders.
It designated to a Warehouse worker and synced with the mobile device throughout the warehouse in a proper means.
Sends the updated got details back to the Purchase Order in the QuickBooks Enterprise file.
Warehouse worker now logs right into the mobile app from the warehouse place.
Also they can scan bar-codes or serial number bar-codes and also enter by manually quantity of products obtained.
Pack & Ship workflow:
New & Enhanced Feature:
The internet connection is compulsory for the QuickBooks Enterprise 19.0 Sales Order Fulfillment Worksheet.
In the Sales Order Fulfillment Worksheet Dashboard, the sales order/orders are sent for the packing to the assigned Warehouse workers.
The QB user can integrate the shipping method with shipping documents such as FedEx, USPS or UPS accounts.
The Warehouse worker records the information of the picked items such as pickup time, weight, and dimension of the package.
The entire packed items are synced with the QuickBooks file & update the product line information on the Sales Order.
New and Improved Features of QuickBooks For Mac 2019
Improved Feature:
The latest QuickBooks 2019 version for MAC has new advanced & variety of QB features. Some of the QuickBooks 2019 features are:
Square Import:
The QB 2019 can import the sales data from the Square through .csv file type.
User Password:
Personal details & information are encrypted.
Email Tracking:
In the Vendor or Customer Center, the QB 2019 user can track the date & time of sent emails.
Report Windows:
In this QB 2019 version, there is improved & enhanced spacing as well as readability.
iCloud Document Sharing:
The iCloud Document Sharing feature enables the QB 2019 user to share the QuickBooks for Mac file/files using the iCloud sync. This whole process is quite convenient and effective way of sharing QuickBooks to Mac file.
Bank and or Credit Card Reconcile Discrepancy Report:
This feature helps to user to Identifies changes made to reconciled transactions.
Important Note: We are not completed yet, the post will continue as more updates come for Desktop Version 2019.
Hopefully, this article helps you to know complete insight of the QuickBooks Desktop Edition 2019 software along with its new and advanced features. Furthermore, if you have any confusion or issue related to QuickBooks Desktop 2019. We recommend you to contact the QuickBooks support team. Or you can directly get in touch with Host Docket at their toll-free number +1-888-510-9198. We are U.S Based technical support advisors and provide genuine services across the USA.
How can I get support for QuickBooks Desktop 2019?
For QuickBooks Desktop 2019 support, you can contact our toll-free number +1-888-510-9198. Our team of experts will assist you with any questions or issues you may have with the software.
What are the system requirements for QuickBooks Desktop 2019?
To run QuickBooks Desktop 2019, you will need Windows 7 SP1, 8.1 Update 1, or Windows 10 Anniversary Update, Pro, or Enterprise. You will also need at least 2 GB of RAM and 4x DVD-ROM drive.
Can I upgrade from QuickBooks Desktop 2018 to QuickBooks Desktop 2019?
Yes, you can upgrade from QuickBooks Desktop 2018 to QuickBooks Desktop 2019. The process is straightforward, and our team at +1-888-510-9198 can assist you with the upgrade process if you need help.
Due to the unpleasant experience of QuickBooks Mac 2016, it was a rumor in the air that Intuit is trying to get rid of QuickBooks for Mac. From that time till now, many QuickBooks users have switched to the recent & latest versions of QuickBooks Pro, Premier, Enterprise Solutions, & QB Online versions (QBO). Recently, Intuit gave a huge surprise to the QB users by launching the QuickBooks Mac 2019 with more advanced & new features for their users around the world.
The QuickBooks Mac 2019 allows you to expand & grow your business to the optimum level with easy and simple features. While comparing QuickBooks latest version, QuickBooks Mac delivers limited functionality – especially in terms of report module & app integration while accounting, bookkeeping, and common office workflow.
If you are a QuickBooks Mac 2015 user, it is important for you to know that you received the updates & add-on services such as live support, Online Backup, and Online Banking via QuickBooks Mac 2015 till May 31, 2018. After May 31, 2018, Intuit will no longer support the QB Mac 2015 version. To deal with such a situation, you can purchase the QuickBooks Mac 2016 version at a comparatively low price to extend your usage period. Later, you can buy the upcoming QuickBooks Mac 2019 version.
QuickBooks Desktop upgrade to Mac 2016
If you upgrade the QuickBooks Desktop to Mac 2016, Intuit will provide you an additional 1-year access to the software updates, add-on services, and support till May 31, 2019. This also allows you to get the latest version at a considerably low and economical rate. Hence, by updating the Mac 2016 – you will get full functionality for the coming year.
QuickBooks Mac 2015 upgrade to Mac 2019
Intuit offers a 3-year free upgrade for all the products under QuickBooks product line. Hence, a QuickBooks Mac 2015 user can not upgrade the Mac 2015 to Mac 2019. But there is an economical way to get Mac 2019 at a low rate. The QB user just has to purchase QuickBooks for Mac 2016 version for which Intuit will provide support and upgrade for another 3 years. Therefore, you can buy Mac 2016 at a comparatively low price & upgrade it to Mac 2019.
Switch QuickBooks Mac 2015 to QB Online, Pro, Premier, or Enterprise
Being a QuickBooks user, you can surely switch the Mac 2015 to any QuickBooks version. But the best and appropriate way of switching the version is – at first transfer the data, use the new version, and test it to make sure that you like it or not. If the QB user enjoyed the previous version, then it is sure that you are more likely to feel comfortable with the new version with a little bit of a learning curve.
Important Note: If you are using Mac 2015, you will have to upgrade to Mac 2016. To use Mac 2019, you will have to buy and update your software to Mac 2016.
QuickBooks Mac 2019 Upgrade Issues
There is a slight possibility that QuickBooks users encounter some problem in upgrading the previous QuickBooks version to Mac 2019. In that case, you can directly contact the QuickBooks for Mac Support team instantly. Or you can make a straight call on their toll-free number .i.e. +1-888-510-9198.
Steps to Set up QuickBooks Mac 2019
You can try to download and setup QuickBooks for Mac using the set of steps enumerated below:
Step 1: Ensure QuickBooks desktop for Mac will run on your computer
You can check minimum system requirements for Mac to ensure you can install QuickBooks.
Step 2: Find license and product numbers
In case you have downloaded a digital copy, then the confirmation email should have the license and product number.
In case you have bought a physical copy, then look for scratch-off label on the package. You can scratch off the label to find the license and product number.
Step 3: Download and install QuickBooks desktop for Mac
Download QuickBooks desktop for Mac version or use the CD installer.
In case you are unable to download the installer, then you might have to clear the browser’s cache and cookies or use a different browser.
Close all applications.
And further open the installer or insert the disc into the MAC CD drive.
The QuickBooks installation window will open on its own.
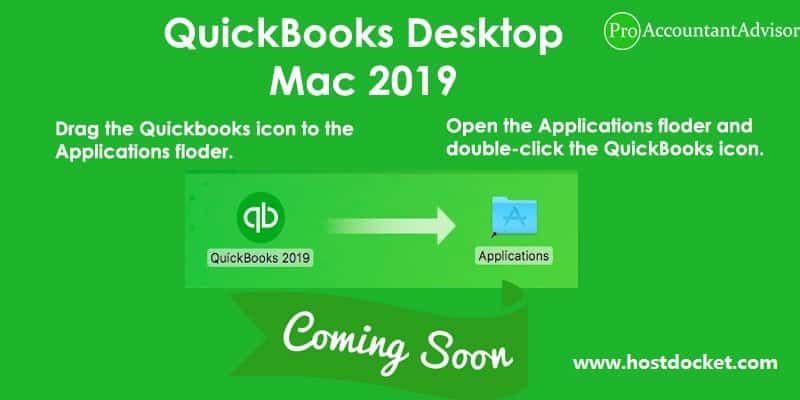
You now have to drag QuickBooks icon to the applications folder.
It will open up on its own.
Choose the QuickBooks icon to open the application.
Step 4: Upgrade your company file
In case you have upgraded from a previous version of QuickBooks desktop for Mac, you will have to update company file to work in the newer version.
At first, open the company file in the newer version
When QuickBooks asks you to update the company file, choose upgrade
Also, choose ok tab.
Check your balances, reports, and accounts to ensure that you updated your company file successfully.
FAQs related to Setting up QuickBooks for Mac
How do I download QuickBooks to my Mac?
You can download QuickBooks to my Mac using the steps below: 1. Head to the QuickBooks.intuit.com and click on download now tab 2. After that, click on download now tab 3. Now, you need to open the downloaded file and perform the onscreen instructions to install QuickBooks 4. When asked to, enter your Apple ID and password to allow the installation.
Is QuickBooks free for Mac?
There are two ways that you can purchase QuickBooks for Mac. You can purchase a desktop version with an annual licensing fee of $349.99 per year or get the online cloud version for $15 per month for the first three months, then $30 per month afterward.
How do I activate QuickBooks on my Mac?
From the QuickBooks menu, pick Register QuickBooks. After that enter the License and Product numbers, and go for Next. Choose either to Register Online or contact us. Select Register Online and follow the steps on screen to complete the activation.
QuickBooks error code 12157 is one of the common QuickBooks errors that occur due to web connectivity issues in the Windows operating system. One can come across such an error when downloading or updating QuickBooks to the latest release. This particular error can be extremely annoying for QuickBooks users. Thus, to ascertain that you successfully eliminated the issue, we have come up with this segment sharing the complete set of steps to fix QuickBooks error 12157.
Make sure to stick around till the end, or you can also contact our technical professionals at +1-888-510-9198, for any sort of expert assistance and we will provide you with answers to all your queries. Having said that, let us further explore the error code 12157 in detail.
QuickBooks error 12157 is basically a 12xxx series error that shows up in case of any sort of web connectivity problem in the Windows operating system with Microsoft Win32 Internet or WinInet API. QuickBooks makes use of API to seamlessly operate the internet protocol. This include, FTP, HTTP, and Gopher. When downloading or setting updates related to the software, such an error can be seen. Another possible reason when you can see QuickBooks error 12157 can be if the date and time settings are incorrect.
Common Internet Connectivity Errors
Due to the internet connectivity, few error codes usually appear. It might be possible that there are no specific warning messages or simply just show any of the error code given below:
What are the causes of QuickBooks error code 12157?
You can have a comprehensive selection of framework conflicts, PC registry errors, and Active X problems
Some Firewall program restricted setups and Internet safety applications
Many QuickBooks software variations released on the same year on the very same computer system such as:
QuickBooks Desktop Pro 2016
QuickBooks Desktop Enterprise Solutions 16.0
Conditional firewall software settings and web protection applications, Specific Internet or Protection apps could appear while updating the desktop computer software of QuickBooks.
Signs of QuickBooks error code 12157
The user can identify this error using the below signs:
One of the basic signs can be if the error itself appears on the screen
Another sign can be if the firewall settings and the internet security apps are giving any sort of pop-up
The user can also spot the issue if the system crashes
Or if the system slows down, then it is a sign of this error
Check out the following methods to remove the QuickBooks error code 12157 given above. However, if you are looking for quick help to resolve QuickBooks errors.
Method 1: Verify the date and time in the computer
First of all, you need to Perform a right-click on the clock in the bottom right corner of the computer
Next, Choose the Adjust Date/Time
After that Select the Change date and time and then, enter the today’s date & time
First of all, Test the secure internet connection by opening the web page of Chase banking.
You won’t be allowed to update QuickBooks, if you are unable to open the Chase banking. It is recommended for you to contact the Internet Service Provider (ISP) for support and Help
If you are able to see the Chase banking page, you can proceed with the steps given below:
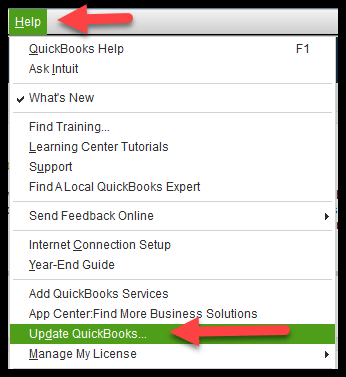
Select the Help => Internet Connection Setup
Next, Choose the Use my computer’s Internet connection settings to establish a connection when this application accesses the Internet, & select the Next
Now Select the Advanced Connection Settings
Next, In the Advanced tab, select the Restore Advanced Settings
After that Choose OK then Done
Lastly Update your QuickBooks Desktop
Method 3: Internet Security or Personal firewall Application Configuration
Make sure that the internet security & personal firewall settings are configured accurately. The Port 80 & 443 must be enabled and access must be provided to the following files:
Place the specific firewall ports according to the version of the QuickBooks Desktop:
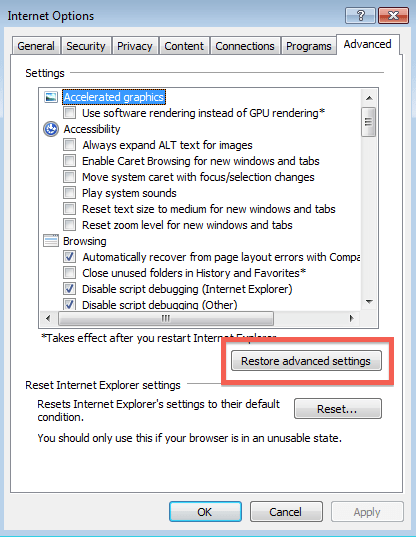
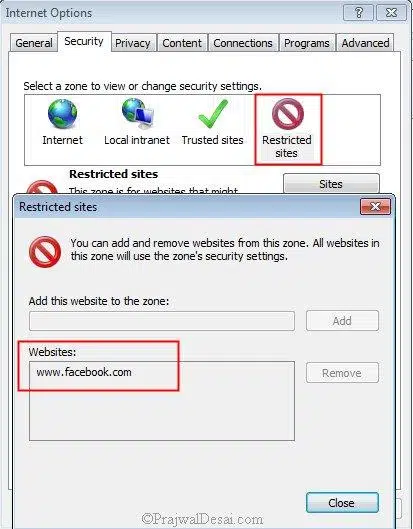
Click on the Tools tab at top right and then from the drop-down select Internet options
Next, press Advanced Tab
Select Restore Advanced Settings option and close the Window
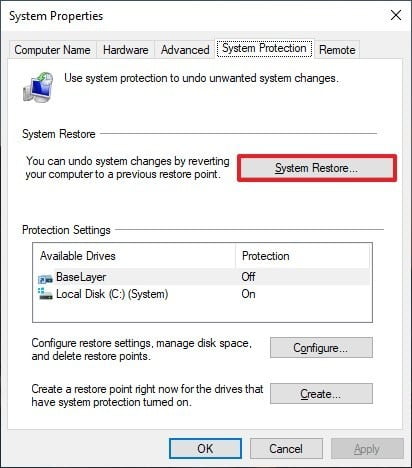
Method 5: Restore the System to fix QuickBooks error 12157
System Restore too can help you fix files and data that may be behind this error. The following are the steps you can perform:
Login to QuickBooks as an Administrator
Press the Windows key on your keyboard or Start button on the bottom-left of your desktop
Select All Programs and then select Accessories
Press System Tools
Press System Restore option
Next, open a new window
Click on Reinstall this PC and then press the Next button
Select system restore point and click the Next button
Click advanced system to restore your computer to that point
Hit Next at the bottom of the confirmation window
Reboot your system for changes to save
Note: It might be possible that all the ports mentioned above are used for some of the other purposes. In that scenario, a fallback port 56719 would prefer to be used for the QuickBooks Database Server Manager.
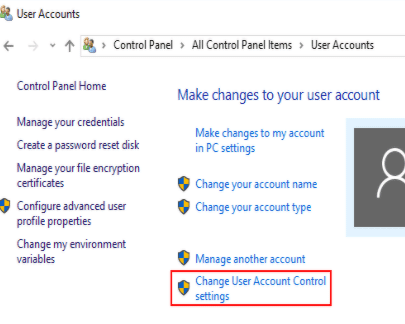
Method 6: Disable UAC
Did you know that restrictive user account control settings can lead to QuickBooks error code 12157? Well, to fix this, you can simply disable the UAC settings temporarily. This is possible with the set of steps you can find below:
At first, launch the run box using Windows + R keys.
After that, enter the control panel and press the enter tab.
You are then required to reach systemand security settings and click on the security maintenance option.
Heading forward, you need to choose the user accounts and further select the option to change user accounts.
Now, conclude the process by selecting the never notify tab in the user account control settings and also click on ok tab to conclude the process.
Method 8: Make sure not to use more than one version of QuickBooks on same PC
Using multiple versions of QuickBooks on the same PC can end up in various sorts of issues. You can proceed with the steps ahead to ensure that no more than one version is present. The steps to perform here are:
Initially, navigate to the downloads and updates page of QuickBooks.
Further, choose your country.
Now, go for the product i.e., QuickBooks.
And select the version and move to search.
You will then have to choose to receive the most recent updates.
And further set up the latest version of QuickBooks software.
After it is finalized that you only have one specific version of the software set up on the system, try opening QuickBooks and check if the issue is rectified or not.
We understand the technical issues through which a user goes. That’s why Host Docket provides expert and professional QuickBooks Help & Support for the entire issues related to QuickBooks software such as Integration, Updates, Data Loss, and QuickBooks related Errors & Issues.
For quick and better technical support, you can contact the team of certified experts at +1-888-510-9198. However, Our Intuit Certified experts are well experienced, polite, and professional so do not hesitate to make a call on our helpline number.
QuickBooks error code 12157 is an error that can be seen when the date and time of the system is set incorrectly. You can also face this issue if the internet and security apps crop up at the time of updating the QuickBooks software.
What causes QuickBooks error 12157?
You can experience this issue due to the following factors: · One of the basic reasons behind the occurrence of this issue can be if the date or time of the system is set incorrectly. · Another possible reason is if the system has multiple QuickBooks installed · You can also come across this issue if there are some restrictive settings of firewall and internet security application.
How do I fix error 12157 in QuickBooks?
You can try fixing the error 12157 in QuickBooks using the steps below: · Verify the date and time in the computer · Verify the internet connection settings · Try to restore the advanced settings · Or can try to restore the system and ensure that only one QuickBooks version is being used in the system.
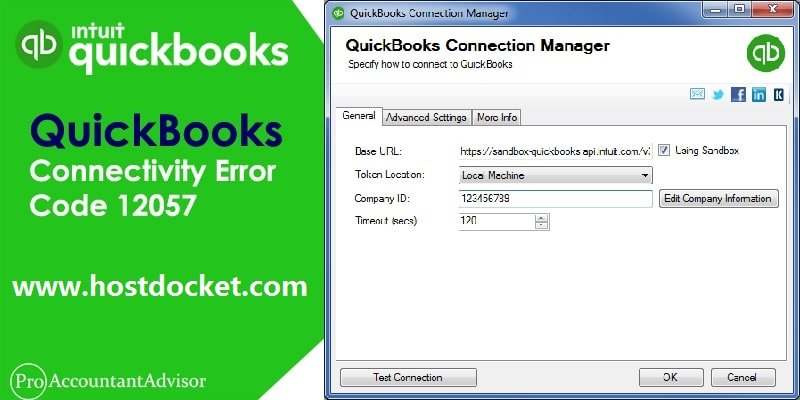
QuickBooks is prone to certain fixable technical snags. One such bug that is often reported by QuickBooks users is QuickBooks error code 12057. The error code shows that it belongs to the 12xxx error series. Such errors are often experienced due to internet connectivity issues, especially when you are trying to update the QuickBooks software. Generally, the QuickBooks error 12000 series is reported by the Microsoft Win32 Internet application programming interface (API). Winlnet API is used by QuickBooks Desktop to access the standard internet protocols such as HTTP, FTP, and Gopher. The 12000 series of errors appear while downloading or receiving the updates. Other than QuickBooks connectivity error 12057, a bunch of other errors belong to this error series.
Just like every other QuickBooks error, the error code 12057 can also be resolved using some set of steps. In this segment, we are going to elaborate on the steps involved in eliminating the error code 12057 from its root cause. Thus, make sure you stick around till the end, or call us at +1-888-510-9198, and let our QuickBooks support professionals help you with the fixation of the error permanently.
Check out the list of QuickBooks 12000 series errors and their causes:
From QuickBooks Error Code 12001 to 12006: These error codes appear when QuickBooks is unable to complete the update. To resolve these errors, you should verify that the internet connection is working properly.
Error Code 12007: The QuickBooks error code 12007 appears when the QB is unable to trace the IP address of the server. To fix this issue, it is recommended that you check the internet connection is fine.
QB Error Code 12008 to 12164: The QuickBooks error code between error 12008 to error 12164 appears when QuickBooks is unable to complete the update. You can fix this issue by simply checking if the internet connection is good or not.
QuickBooks Error 12052: It is a nonspecific error message that can be easily solved by checking the internet connection.
What may cause QuickBooks connectivity error 12057?
There are certain factors triggering such an error in QuickBooks. Let us have a look:
You have an internet connection
Unable to connect with Intuit servers for updates or transmissions
QuickBooks fails to communicate with Intuit Servers
Below are the steps to solve the QuickBooks Connectivity Error Code 12057:
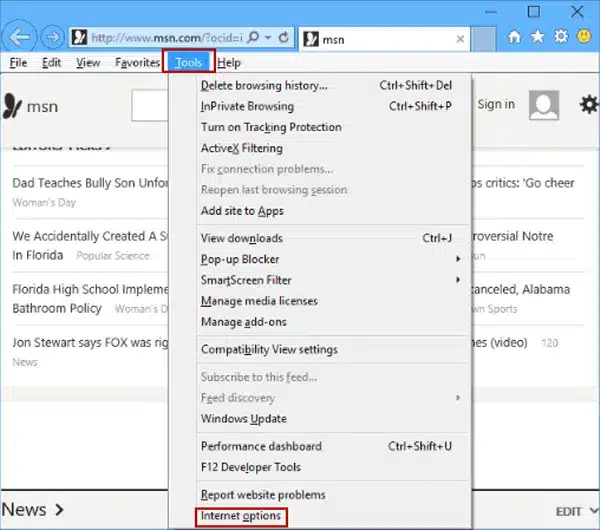
Solution 1: Configure your Computer’s Internet Settings
Close or shutdown the QuickBooks
Open or turn on the Internet Explorer
Go to Tools => Internet Options
Choose the Advanced
Now Go to the Security group & scroll down
Click on the “Check for server certificate revocation” & “Check for publisher’s certificate revocation” to clear the checkbox
Close & reopen the Internet Explorer
Minimize the Internet Explorer
Open the QuickBooks software again
Attempt payroll updates again
After following all the steps mentioned above, open a web browser or website you don’t generally visit to check the internet connection outside of QuickBooks. If you are unable to view the website or web page, the problem is with the Internet connection outside of QuickBooks.
Solution 2: Configure SSL Settings to resolve QuickBooks error 12057
In QuickBooks, go to ‘Help‘ =>’ Internet Connection Setup‘
Choose to ‘Use my computer’s Internet connection settings‘ to establish a connection when this application accesses the Internet. Select ‘Next‘
Go to ‘Advanced Connection Settings‘. Choose the ‘Advanced‘
Go to the ‘Security group‘ make sure that the Use ‘SSL 2.0‘ & Use ‘SSL 3.0‘ options are selected
Choose ‘OK‘. Select ‘Done‘
Check the ‘Internet Security‘ & ‘Personal Firewall setting configuration‘
QuickBooks Updates always come with a date of release associated with them. If the date and time on your system is incorrect, it can restrict the update process and trigger QuickBooks Error code 12057. The following are the steps to fix system date and time.
Close QuickBooks desktop
Open ‘Control Panel’ and then click ‘Clock and Region‘
Click ‘Date and Time‘ and make changes
Open QuickBooks and try Payroll Update again
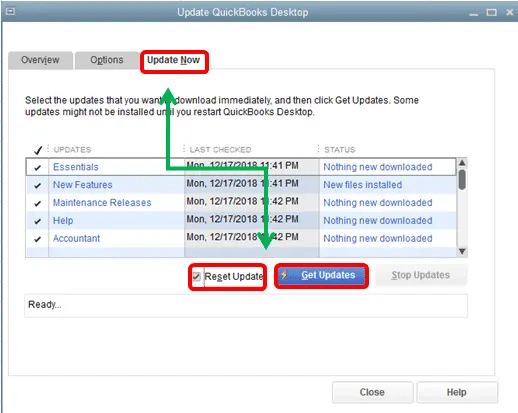
Solution 4: Install Microsoft and QuickBooks Updates
You can install Microsoft and QuickBooks updates, to fix to fix QuickBooks error 12057, as new updates bring in fixes to a lot of errors.
Close any QuickBooks related program
Furthermore, close QuickBooks
Also, Install ‘Microsoft Windows Operating Systemupdates‘
And then, your computer should restart after the installation is over
If the QuickBooks Connectivity Error Code 12057 still persists, then you can contact the QuickBooks Payroll support team instantly. Or you can directly make a call to the certified team of experts at +1-888-510-9198. Our efficient and certified team at Host Docket are here to solve all the issues related to QuickBooks Errors, Installation Errors, Update Errors, QuickBooks data recovery and other.
FAQs Related to QuickBooks error 12057
How do I fix with QuickBooks error code 12057?
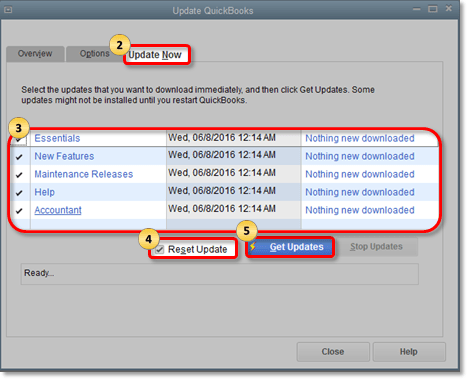
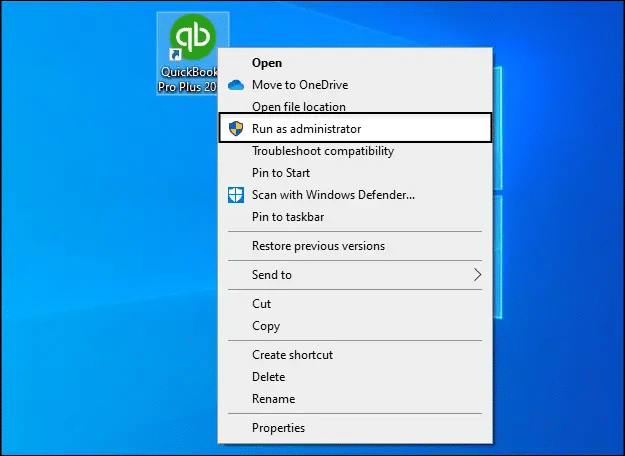
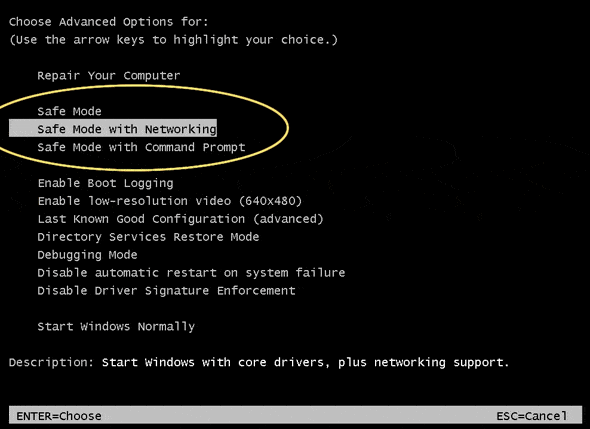
The user can try fixing the error using the steps below: 1. The very first step is to configure the SSL settings correcting the internet settings. 2. After that update QuickBooks in safe mode. 3. The next step is to access QuickBooks and the PC as admin.
What is SSL TLS in QuickBooks?
TLS basically stands for Transport Layer Security. It is a cryptographic protocol employed to enhance the security over the computer networks.
How do I enable TLS 1.2 for QuickBooks?
The user can make use of the below steps to use TLS 1.2. 1. The very first step is to run QuickBooks desktop. 2. After that, click on the help tab. 3. The next step is to choose the internet connection setup. 4. Once done with that, head to the advanced tab. 5. Followed by clicking on the advanced connection settings option. 6. Further, head to the security tab. 7. Also, click on the options to enable SSL 1.2. 8. And also, click on ok tab. 9. The last step is to click on done.
QuickBooks Error 31 : SE_ERR_NOASSOC is a unique error experienced by QuickBooks users. This error can be a bit confusing for QuickBooks users, as it is a bit tricky to handle. There is no definite reason why such an error shows up. However, you might experience this issue at any time such as, while installation, updating or upgrading it. However, it mostly appears while opening payroll reports in Excel. It may slow down your work and impact your productivity. But the good thing is, QuickBooks Error code 31 is fixable.
To help you tackle the QuickBooks error 31, here we are with this article, sharing the quick solutions for the same. Make sure to read this article till the end, or you can further connect with our technical team at +1-888-510-9198, and let them help you with the issues further.
This error mostly appears while opening payroll reports in Excel. Other occasions when this issue may crop up are when you install the software, update it, launch it, sync it, try to open it, delete or remove a file, export a file, print something, or import or add accounts on Microsoft Windows 7, 8, 8.1 or 10. A malicious software, corruption in software, or hardware malfunctioning may trigger this error.
Another major reason behind the occurrence of this error may be the lack of affiliation in QuickBooks report layouts and Excel. A damaged Microsoft Office establishment may also cause Intuit QuickBooks Error Code 31.
Steps to Troubleshoot Intuit QuickBooks Error Code 31
This article is aimed to assist you fix QuickBooks Error Code 31. Here are the steps you can follow (in the given order) to resolve this issue.
The very first step is to find out the reason of this error and that may be with computer equipment, windows, internet connection, security software, or with any third-party software.
To start with, you can check if the Windows operating system is working properly. If your Windows OS is not updated, it may create issues.
Remove all security software that you may have installed recently.
Turn off the Firewall.
Ensure that you haven’t opened any other application while you are trying to fix Intuit QuickBooks Error 31.
In case the application was working fine lately with your security software, check if the security software is updated.
Remove or uninstall and application or software that you have installed of late.
Make use of Windows Explorer to explore the file where error message is found.
Now, double-click the file where error message is found, and you will receive a prompt requesting you to choose a program to connect the file.
Select Excel and click Ok to connect the format with Excel and you should be able to successfully open the payroll report.
Toward the end of this segment, we hope that the information discussed in above might be of some help in getting rid of the QuickBooks error 31. In case the issue still persists, you can contact QuickBooks error support team. You can contact our experts at +1-888-510-9198 for quick and precise solutions. We are available round the clock and offer you the best services that your business deserves.
FAQs Related to QuickBooks error 31:SE_ERR_NOASSOC
How Do I fix a QuickBooks error?
You can run QuickBooks install diagnostic tool to fix common install issues using the steps below: Open QuickBooks tool hub and further choose installation issues. 2. You then have to choose QuickBooks install diagnostic tool 3. After the tool finishes, reboot the system and start QuickBooks and further open the data file.
How do I fix a bank connection in QuickBooks?
You need to first move to bookkeeping and choose transactions. After that go for bank transactions. Also, choose update now link from the Let’s fix this bank connection banner. And perform the onscreen prompts to update the connection.
How do I fix a locked file error in QuickBooks Desktop?
You can check for multiple host computers and stop hosting on all workstations. 1. The first step is to open QuickBooks. 2. And then, from the file menu, choose utilities tab. 3. Also, close QuickBooks. 4. Repeat the steps above on all workstations that do not host the company file. 5. The last step is to open QuickBooks try doing the task that caused the issue.
How do I repair a QuickBooks backup file?
The first step is to move to the file menu and further hover over the utilities tab. You can also choose the rebuild data option. And perform the necessary fixes for the same.