QuickBooks accounting software caters for multiple business and accounting needs of a business person. Furthermore, with some add-ons, the robust software can turn out to be magical. This blog is going to educate you about a QuickBooks Enterprise component called ODBC Driver. In this article, we are going to learn further about the ODBC driver and also the installation and configuration steps for the same. Thus, make sure to stick around this piece of writing, or you can further connect with our technical support team at +1-888-510-9198, for any sort of technical support and assistance.
ODBC is an acronym for open database connectivity. This driver enables different applications to communicate and exchange their data with one another. With assistance of ODBC, you can export complete data from your company file to computer programs such as Microsoft Excel, Microsoft Access, Alpha, Crystal Reports, Filemaker, Python, dot net (.Net) and QlikView to create custom reports.
It allows you to make your own reports, invoices, and as an administrator, access QuickBooks data file through third party applications such as crystal report, Microsoft Access, and Microsoft Excel.
Technical terms that you don’t know:
If you are a user of QuickBooks Enterprise Solutions software and having technical glitches on it then no need to fretted if you are not familiar with the technical terms. If you have the QB software application information than you can apply only those measures that can help them to get the ODBC Driver.
For help contact QuickBooks Enterprise support team and get real-time solutions. For any assistance get in touch with QuickBooks enterprise solution support team and obtain real-time solutions from highly skilled and knowledgeable professionals.
Install and Configure QuickBooks Enterprise ODBC Driver – Advantages
ODBC Driver enables QB company file created by various custom programs to the new database connectivity.
These drivers make all database formats to look like each other.
It enables software such as MS Word to do a customer email merge straight company data file.
ODBC enables MS Access to merge QuickBooks accounting data along with other data source to generate complex reports, or to run mass file updates based on multiple criteria.
A Microsoft Office user can use Excel to draw company accounting or invoice details into a chart or a spreadsheet.
Install and Configure QuickBooks Enterprise ODBC Driver – Requirements
Ensure that your system has MS .Net framework 4.5.
ODBC driver for QuickBooks support Microsoft windows 32-bit and 64-bit.
You should make sure (before installing ODBC driver) that OBCC isn’t installed in your system as these two drivers shouldn’t be installed in your system simultaneously.
Steps to Install and Configure QuickBooks Enterprise ODBC Driver
We have compiled steps to install and configure the QuickBooks enterprise ODBC driver.
Here are the steps to follow:
Install and configure QuickBooks Enterprise ODBC Driver
Run the “Installer Executive” file
Follow the prompts in the installation wizard.
A warning box will pop up on your screen in case you already have Installation folder in your computer.
Click “Yes” to overwrite existing files with the new installation. However, we recommend you to completely uninstall the old, existing files and install new files.
A new page “select component” will appear. Select 64-bit driver version.
Uncheck the box in front of 64-bit if you don’t need that.
Check on the box on the following page to select hemp and mutual.
Select the type of license you require in the license page and activate the product.
For more details, you can also read articles on Driver Activation during Installation.
Put in the licence key.
In case you don’t have the key, select “Trial and use the driver for evolution purpose.
Click Next > Install > Finish.
Important: If selected, detailed information of QODBC will pop up on a window right above the system tray. This window will consist of information like the number of processed records and live activity in QODBC. You can also get speed assessment through optimized as well as non-optimized data to serve as an indicator if the steps to fix the performance of the software are required.
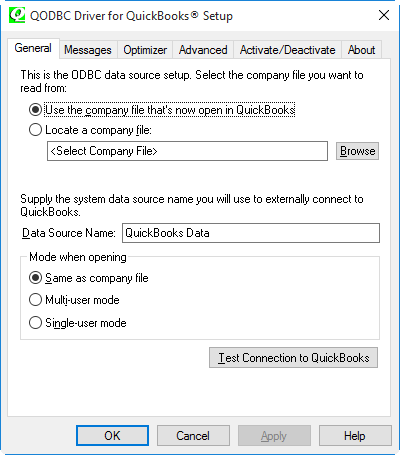
Steps to configure QuickBooks Enterprise ODBC driver
Open QuickBooks Accounting Software.
Select File Menu.
Click Utilities and then Set Up ODBC.
Click General tab.
Choose option that reads “Use the company file that is now open in QuickBooks.”
Type in QuickBooks data in Data Source Name.
Tap on Test Connection to QuickBooks.
Important: You must be logged in as admin to your company file in order to run the run the test connection with ease.
Select the message tab.
If enabled, uncheck the Detail Tracin (Slow).
If disabled, click on the Display Optimizer Status panel checkboxes.
Discretionary: You can select Display Driver Status panel to know the details of QODBC functioning.
Select Apply.
Select the Optimizer tab.
If disabled, check the Use Optimizer Box.
Click on Start of every query and then click on Apply.
Important: Optimization time may increase or decrease depending on the file size. In general, it takes up to 24 hours. Optimization may take longer if more transaction are made. Data connection with QuickBooks will start performing faster after the process is complete.
We hope that this blog post will assist you in installing and configuring OBBC Driver. If you have any query or you need expert support, you can contact us toll free number at +1-888-510-9198. We at Pro Accountant Advisor have a team of U.S based Technical Support team of QuickBooks Experts, CPA’s and accounting professionals are equipped with cutting-edge tools and technologies and help you with any QuickBooks related in the least time possible.
FAQs Related to QuickBooks ODBC driver
How do I create an ODBC connection in QuickBooks?
Connecting to QuickBooks via OBDC driver 1. You need to first open the OBDC data source admin 2. After that choose the user DSN or system DSN tab 3. Once done with that, click on add. 4. Followed by selecting devart ODBC driver for QuickBooks and hit finish tab 5. You now have to click on connect to QuickBooks.
How do I install ODBC drivers?
For this: 1. Press windows + R 2. After that enter odbcad32 and hit ok tab. 3. In the ODBC data source admin dialog box, choose system DSN or user DSN tab. 4. You now have to click on add 5. And further locate the necessary driver in the list and hit finish tab.
What is the full form of ODBC driver?
ODBC stands for Open database connection. It is an open standard application programming interface that allows application programmers to access any database.
QuickBooks is a versatile accounting software trusted by millions of business owners. The software assists business persons to handle their finances and manage their businesses with ease. However, there might be times when a user may come across one or more errors while using the software, despite it being cutting–edge software. One of the most common error codes that QuickBooks users commonly receive is QuickBooks banking error 106, 168 or 324. This error code is described as Online Banking Errors that occur when QuickBooks Online fails to find the account or accounts, while logging in to your online banking on that bank’s website. One reason behind the eruption of these errors can be that your bank has closed your account and thus the detail isn’t displayed on the bank’s site. Also, you can take help from our QuickBooks Error support team by dialing toll-free i.e. +1-888-510-9198.
How to Fix QuickBooks Error 106, Error 168 or Error 324?
The quick fixes for QuickBooks online banking error 106, 168, and 324 are as follows:
Solution 1: Manually Update Bank Account
You can open QBO and then from the left side navigational panel, click on the banking option.
Furthermore, deselect those accounts that you do not want to update as of now. A blue sign indicates that the account is selected and a grey sign indicates that the account is not selected.
After you have selected the required accounts, click on the update tab.
Later on, QuickBooks will ask you to enter the multi-factor authentication number.
And you will get a notification when the update is over.
You can further check whether this method works or not by checking the date of the last up; date and the total number of transactions. In case they are changed, then it indicates that this method works, else you would have to go for the next method.
Essential points to check when performing manual update
There are certain bank and credit card companies that post transactions for download only after a day or the very next morning. Thus, it is suggested to wait for one day and then try to update it on your own i.e., manually.
At times, you might see transactions on the bank website, but you cannot download them till the bank posts them.
In case there are any transactions missing, then wait for around 24 hours.
Solution 2: Check whether you can log in to the Bank’s website through the URL provided by the Bank for online banking or not
Performing some set of steps becomes essential to check that you can connect to the bank through the URL that is used by the QBO for online banking. Let us find out the steps for the same:
You need to first open QuickBooks and further click on the banking option.
Heading forward, go for add account option from the top-right corner.
And, there you will find the name of the financial institution or the bank being used.
Select the bank from the results.
And click on the bank’s URL from the top of the window.
A new window for the bank website will open up on the screen.
Check whether all the functions are working properly or not.
Verify the website by checking the account summary, account details, and the account history.
In case you are able to see all these things without any error, then the bank website URL is working well.
Note that, QuickBooks only supports the connection to the bank account, only in case you are able to log in to the bank account through the link. A handful of financial institutions have multiple logins to different types of accounts, but they usually release one website for the connection to QuickBooks online.
Solution 3: Check if there are changes in security features from bank’s side
It you are able to log in to the bank account, check if there are any notifications, messages or alerts from the bank’s part in regards to the changes causing the errors. The message can be like, you need to update the bank login password due to security reasons or that bank has introduced a new security feature that needs some of your actions before proceeding ahead.
Solution 4: Fix Registry Entries
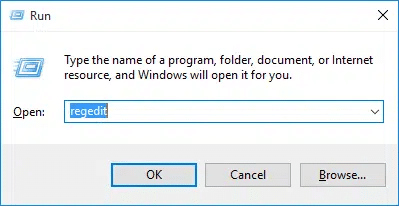
You need to first click on the start tab.
Further, enter the command in the search box to open the run window.
Once done with that, use short key window tab + R and further enter regedit to fix registry entries.
Click on the Ok tab or you can directly press the enter tab.
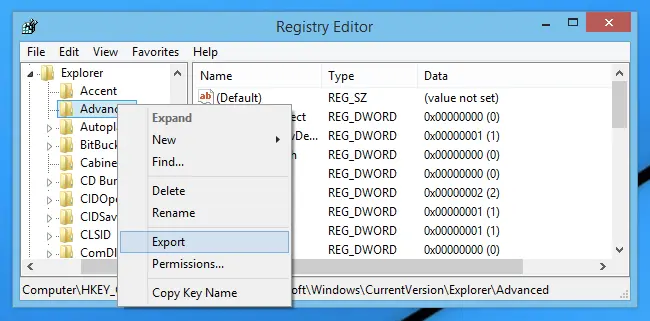
Select the error 324 in the registry editor.
And after performing the steps above, export the file that is included in the file menu.
You now have to save the backup key in the folder by selecting export.
Towards the end, click on the save tab.
Don’t forget to save the file with .reg extension.
Solution 5: Use Reconnect my account link to fix the issue
You can try fixing error 324 by clicking on the reconnect my account link.
This is present after the error message.
You need to perform the steps to select the updated account with the financial institution.
In case you do not see reconnect my account link, try to manually update your account within QuickBooks online.
Further, click on the update tab.
Try running manual updates during the non-peak hours, and also check whether you can log in to the bank’s website through the URL.
When trying to set up the connection to your Well Fargo Business or personal account, this error can occur in the way Well Fargo presents the accounts. In order to see the lost account, and be able to connect to it with QuickBooks online, you can continue with the steps below:
You need to sign in to the account on the Well Fargo Site.
After that, on the first screen display under account summary, choose your business account by using the dropdown arrow, and click on Go.
Select the option set as default view.
Now, login to QuickBooks online and set up the connection in online banking.
Note that, there is no way to show both the business and personal accounts as the default view at the same time. Thus, you will have to toggle these on their site.
Solution 6: Wait for 24 hours and try again
In case you have tried all of the above discussed steps and you are unable to download bank transactions, then it indicates that there are some issues from the bank side. It is suggested to wait at least a day and then try again. This will grant the bank time to fix the errors or issues with the server.
The above-mentioned troubleshooting steps should be able to help you fix QuickBooks Banking Error 106, 168 or 324. If in case the problem exists even after trying all the solutions given, or you have any query, you can contact our QuickBooks support helpline number i.e. +1-888-510-9198. We are available round the clock and are known to offer the best solutions on the first point of contact.
FAQs related to QuickBooks Error 106, 168, or 324
What is error code 324 in QuickBooks banking?
Error code 324 in QuickBooks means that the QuickBooks accounting software is unable to find the account that is set up when it tries to connect to the bank or credit card’s website. This may occur if the bank or credit card company changed or moved the account to a new server.
How do I fix error 106 in QBO?
The user can try fixing such an error using the set of steps listed below: 1. The very first step is to enable management tool access 2. After that disconnect the account. 3. You now have to delete the account. 4. And add the account again.
Cannot link bank account to QuickBooks. What to do?
To fix this, you will have to visit the bank site, copy the bank URL and use it for searching and linking the correct account in QuickBooks. After you have performed the steps to download your most recent transactions, it is suggested to edit, assign, and categorize the transactions.
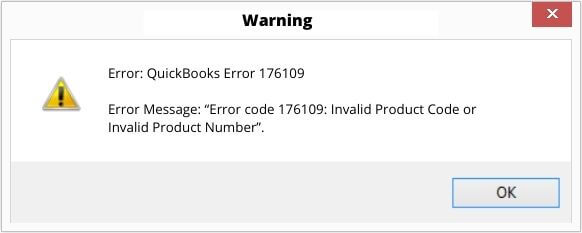
Steps to deal with QuickBooks Point of Sale Invalid product number. While opening or using QuickBooks POS, a user faces this error: “Error code 176109: Invalid Product Code or Invalid Product Number”.
QuickBooks is accounting software which is used widely for its vast features and quick and accurate responses. In other words, QuickBooks is the most loved software among the world’s accountants for any business. When using QuickBooks Point of Sale, the most common error that occurs is Invalid product number QuickBooks POS error 176109.
In this blog today, we have discussed about the the possible ways to resolve the QuickBooks pos invalid product number problem. If you are interested in learning further about this issue, make sure to stick around this piece of writing carefully. You can also take help from our QuickBooks error support team to get the instructions to resolve the problem. All you need is to give us a call at +1-888-510-9198, and we will provide you with immediate support and assistance.
QuickBooks POS error 176109 is often seen when the user tries to open or register QuickBooks desktop POS. This error is further identified as invalid product number issue. It is related to an invalid product number code or product code. It further indicates that the essential authentication files are damaged or corrupted. Note that QuickBooks accounting software requires permissions to write and read the files without any barrier. And in case you are unable to provide proper permissions, then the error code 176109 gets displayed on the screen. Also if the Point of Sale Entitlement folder contains damaged files. Furthermore, this error also means that some authentication files are missing or corrupt.
What are the Reasons of QuickBooks Error 176109
There can be a couple of factors triggering such an error in QuickBooks. Let us evaluate these reasons one by one:
Important points to consider before fixing the error 176109
Before you proceed with the fixes for QuickBooks error 176109, it is better to analyze the below points you need to keep a check on:
It is suggested to create a backup of the company file before initiating the troubleshooting methods. This will surely prevent any sort of data loss.
Further, ensure that QuickBooks POS is updated to the latest maintenance release. In case not, then you should get it completed before trying the fixation steps.
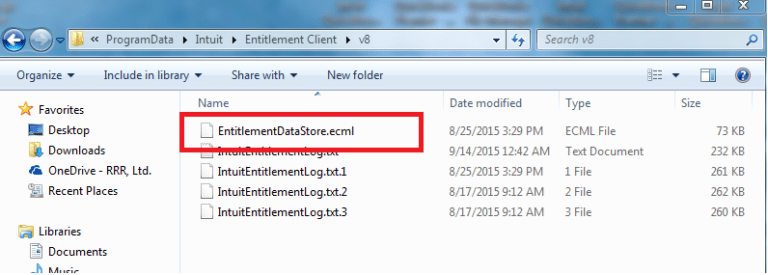
QuickBooks POS entitlement folder is a hidden folder, change the windows settings to show hidden files. Delete this folder to fix the issue.
How to deal with Error: QuickBooks Point Of Sale Invalid Product Number?
There are two solutions to this problem. If any of the solutions solves your problem, then you need not try the another one.
Solution 1: Delete the contents of the Point of Sale entitlement folder and try
For Windows 8:
Right click on ‘Start‘ button and choose ‘File Explorer‘
Click on ‘View‘ and check the hidden items checkbox.
Go to the left window to ‘C:\Program Data\Intuit\Entitlement Client\v8′.
Select all files and ‘Delete‘.
Now, to register yourself, Open point of Sale again and complete the process.
Windows 7 and Vista:
Right click on “Start” button and open “Windows Explorer“
Click organize and select “Folder” option
Click on “View” and select “Show hidden files“
Go in the left window to “C:\Program Data\Intuit\Entitlement Client\v8“
Select all files and ‘Delete‘
Open Point of Sale once again for registration and complete the process.
You can try renaming the files to fix the issue by performing the steps listed below:
You need to first login to the system and then press windows key + E to open windows explorer
Move to the path of C:\Program Data \ Intuit \QuickBooks Point of Sale XX\Ini
Right click the WSActivity folder and choose rename option from the drop-down list.
Add OLD term at the starting of WSActivity and then save it.
The last step is to exit the windows and perform the same set of steps again.
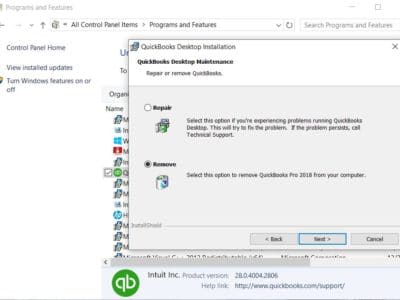
Solution 5: Perform a clean install of QuickBooks Desktop point of sale
Clean install tool for QuickBooks point of sale can help in fixing issue that you might bump into when installing. Perform the below steps to fix the error successfully using this tool.
You need to first open run window by pressing windows + R.
Now, write control panel in the run window and hit enter tab.
Once done with that, choose programs and features.
Followed by clicking on uninstall or change after selecting QuickBooks Desktop Point of Sale 18.0 from the list of programs.
Now perform the onscreen instructions to complete the process.
Make sure to copy the point of sale data folder and paste it to desktop. Towards the end of the folder name, add old. This will prevent QuickBooks from identifying the folder and QuickBooks will create a new one. Now continue with the steps to delete the QBPOSDBSrvUSER windows user:
At first, click on start menu and further head to the control panel.
You now have to choose user accounts and further click on manage another account.
Once done with that, click on continue in the user account window.
After that, select QBPOSDBSrvUser and hit delete tab.
Confirm the deletion process and reboot the system
After performing the steps above, you need to reinstall QuickBooks Point of Sale.
We are a team of highly proficient QuickBooks experts equipped with state of the art tools and technology to offer you the quick and precise solution of any QuickBooks related issue.
FAQs Related to QuickBooks Invalid Product Number Error
Why is my QuickBooks saying Invalid product number?
You can often experience invalid product number issue due to any of the below reasons: 1. Corrupt POS entitlement folder 2. Insufficient Admin Rights 3. Incorrect product code when installing POS
How do I change product number in QuickBooks?
You can try performing the below steps to change product number in QuickBooks. 1. In notepad, choose edit and then replace or press Ctrl + H in qbregistration.dat file. 2. You now need to enter your old product number in the find what field and replace it with the new one in the replace with field. 3. Make use of the format XXX-XXX when you enter the product number. 4. And further, choose replace all. 5. You now have to choose file and then save and close the file.
How do I get my QuickBooks product number?
You can find your product number, license number version and release using the steps below: 1. At first open QuickBooks 2. Press F2 key 3. Now, search for your product name, product number, and license number in the product information window. 4. Look for your release at the end of the product name. 5. And further look for the version in the version used on file section
While using QuickBooks Point of Sale, even the smartest businessman gets irritated when he faces unexpected errors and his work gets hampered. Every business man wants to get the best revenue of his services and goods, thus, it gets quite essential to resolve the QuickBooks Point of Sale unexpected errors. When processing a transaction or opening POS, you might come across the following errors:
Unexpected error happened, please restart Point of Sale. Exception from HRESULT: 0x88980406
Unexpected error happened. The error is: Value cannot be null. Parameter:s
Unable to open the program through the Point of Sale icon
Error: Exception has been thrown by the target of an invocation
These errors can often be encountered when POS isn’t compatible with the system requirements or there is damaged .NET framework. In this article, we will discuss about these unexpected errors that occur in QuickBooks Point of Sale, also we will share best troubleshooting steps for it. For more details, stick around this post till the end, or you can further connect with our technical support team at +1-888-510-9198, and we will provide you with immediate support services.
Resolving unexpected errors when opening QuickBooks Point of Sale (POS)
While opening QuickBooks Point of Sale, you find it difficult to resolve the unexpected errors. Here are some quick methods that you can opt for to fix unexpected errors when opening QuickBooks POS.
Method 1: Make Sure QuickBooks POS is updated
It should be noted that before completing the update process and ensuring issue resolution, you might require renaming the intuit entitlement client folder. You can now go to the product updates page and ensure that point of sale is selected as your product and also follow the instructions to install a manual update. You might have to reboot later on.
Method 2: Make Sure that Configuration of System is essential
To start, check the minimum configurations that re required for your system to run the program.
Click on the Windows logo and right click on Computer.
Go to Properties
Check installed memory, that is RAM [Random Access Memory]
Double click on the saved file and when asked for security prompt, click on Yes.
Now, click Yes on the next two screens as well.
When everything is over, reboot when prompted.
This will take 15-20 minutes to complete and requires a reboot. During this process, a couple of black screens will appear. At that time, you need to just observe and wait when the process is over.
Method 6: Uninstall and reinstall .NET framework and QuickBooks point of sale
Uninstall QuickBooks Point of Sale
Uninstall .NET Framework 4.0 and 4.5
On Programs and features window, choose Microsoft.NET framework 4.0 (or 4.5)
And then, choose uninstall and click on next tab.
Perform the onscreen instructions to uninstall the application.
Reinstall it and ensure to reboot your system after uninstalling .NET framework.
Note: In case you come across any sort of issues when uninstalling .NET framework, please connect with a qualified IT professional or Microsoft as this is a Microsoft component that interacts with operating system, not just QuickBooks.
Installing .NET framework 4.5 (4.0 client and extended built in)
You need to download .NET framework 4.5 (.NET framework 4.5 is a combination of .NET framework 4.0 client and extended) from Microsoft’s website.
You need to then save the file to your desktop and then double click the file and perform the instructions to install.
Restart after the installation.
In case you come across any errors when installing .NET framework, please connect with a qualified IT professional.
I hope all the above steps will be useful to you in order to resolve the QuickBooks Point of Sale Unexpected Errors. For any further assistance, you can call our QuickBooks Point of Sale Support team on our toll-free number +1-888-510-9198.
FAQs Related to QuickBooks POS unexpected errors
How do I fix point of sale in QuickBooks?
You can repair QuickBooks Point of sale using the steps below: 1. Close QuickBooks point of sale 2. You now have to open windows start menu 3. Further, enter control panel in the search and hit enter 4. Once done with that select your version of QuickBooks point of sale. 5. Further perform the onscreen instructions
Where is QuickBooks point of sale data stored?
You can find the POS data file on your computer stored in C:\drive in program data to Intuit folder, the POS data folder usually named by QuickBooks POS XX for version 2013.
How do I clean up company data in QuickBooks point of sale?
From the file meny, choose utilities tab and further select clean up company data. Further check mark on the compress data box and hit ok after the warning message appears.
Did you see QuickBooks error 6144 82? Well, we can help you fix this issue. QuickBooks error 6144 82 basically falls under the 6000 error series. This error usually shows up when you try to access the QuickBooks company file. When such an error occurs, it won’t let you perform any task through the main or other systems. This error can be easily fixed if the steps enumerated below are followed properly. In certain cases, you might have to close your Quickbooks on all systems and disable the antivirus.
To help you out in dealing with QuickBooks Error Code 6144 82, we have come up with this segment right here. Thus, to learn further about how to fix the QuickBooks error 6144, make sure to stick around this segment carefully. Or you can also contact our QuickBooks consulting team at +1-888-510-9198, and we will provide you with immediate support and guidance.
What is QuickBooks error 6144 82?
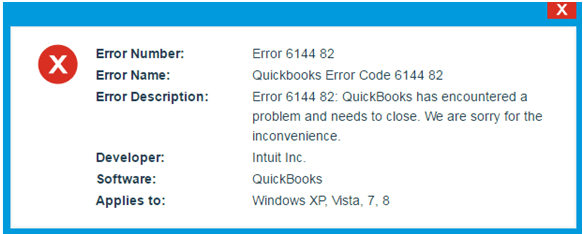
QuickBooks error 6144 82 usually shows up when there is an issue with the data files, when trying to open in QuickBooks Desktop. The data files might be stored on a server, accessed from one and only one PC on the same network. The error message that shows up can be: 6144 82: Is there something wrong with my file setup that is causing these errors? This error creates an issue in restoring data files from the tape back up and re-entering the missing day’s data. A message that would read:
“Error 6144 82:
QuickBooks has encountered a problem and needs to close. We are sorry for the inconvenience”
What are the Symptoms of QuickBooks Error 6144 82?
The following can be the signs and symptoms of QuickBooks error 6144 82. Let us have a look:
In case the active program crashes, or the system comes across frequent crashes when running the software
You can further come across similar issue, when the windows starts running slowly and doesn’t respond to any keyboard inputs
Another probable symptom can be if the system freezes.
Or if the error code itself shows upon the screen.
What causes QuickBooks error 6144 82?
A bunch of factors can drag you into such an error, which include the following:
In case the system consists of network issues.
Or if the Windows system files are corrupted or QuickBooks-related program files are affected due to a virus or malware infection.
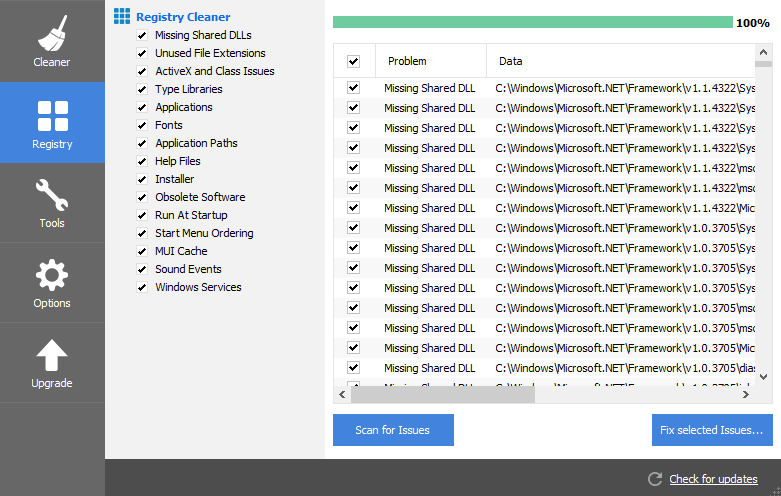
You can further come across a similar issue if there is any corruption in the Windows registry entry.
Or if there is incomplete installation or damaged download of QuickBooks.
Essential Points to Consider
Before you start performing the fixation steps, it is essential to keep a check on the following pointers:
Perform necessary steps on the host system i.e., the server system except the last step.
Also, ascertain that all the systems are shut down properly including the host or others.
You need to further turn off the system security software.
Methods to fix QuickBooks error 6144 82
In order to get rid of the QuickBooks error code 6144 82, you need to carry out the methods enumerated below. Let us evaluate each of the methods one by one:
Solution 1: Repair Registry Entries related to this error
Perform this step only if you are an advanced computer user. Incorrect registry editing can cause irreversible damage to your computer. We recommend you to take assistance from a computer expert or IT professionals.
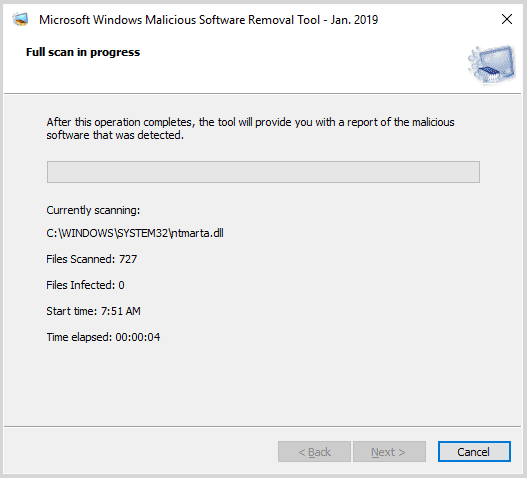
Solution 2: Perform a full malware and virus scan on your computer
Virus or malware infection can cause this error on your computer. These are malicious files that can damage, corrupt, and remove essential files such as Run-time Errors related files. Removing this malicious software and files may fix the issue.
Solution 3: Clean your system junk with Disk Cleanup
Your computer may accumulate junk files from daily internet surfing and use of computer. QuickBooks Accounting Software may go sluggish or receive error 6144 82 if junks files are not cleaned regularly.
These files at times conflict with other files and applications and may also overload hard disk.
Removing these temp files can not only assist you to do away with error 6144 82 but also enhance your system’s speed.
Solution 4: Keep your Computer Device Drivers updated
Corrupt or outdated device drivers may also cause error 6144 82. By updating system drivers you can keep them from abruptly stop working or featuring other issues. However, installing a wrong driver may further increase your troubles and finding the right driver is no easy task thus we recommend you to get in touch with an expert.
Solution 5: Undo all recent system changes using Windows System Restore
Windows System Restore assists you undo the recent changes made on your computer. This step itself may fix multiple issues, including error 6144 82 caused by recent changes.
Click windows key (start button).
Type “System Restore” in the search box and press ‘ENTER‘.
Select System Restore.
If prompted, enter administrator password.
Follow the prompts in the Wizard to reach a restore point.
Restore your computer.
Solution 6: Uninstall and Reinstall the QB program
If error 6144 82 is caused by a specific program, reinstalling QuickBooks associated program can help.
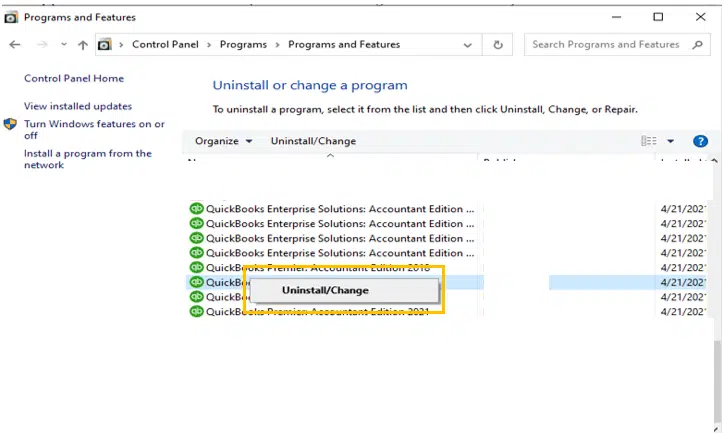
Click start and Open Programs and Features.
Go to Control Panel.
Click Programs and then Programs and Features.
Find program associated to this error under the Name column.
Select QuickBooks-associated entry.
Click the Uninstall on the top menu bar.
Follow the prompts that appear on your screen directions to complete the uninstallation of QuickBooks Error 6144 82-associated program.
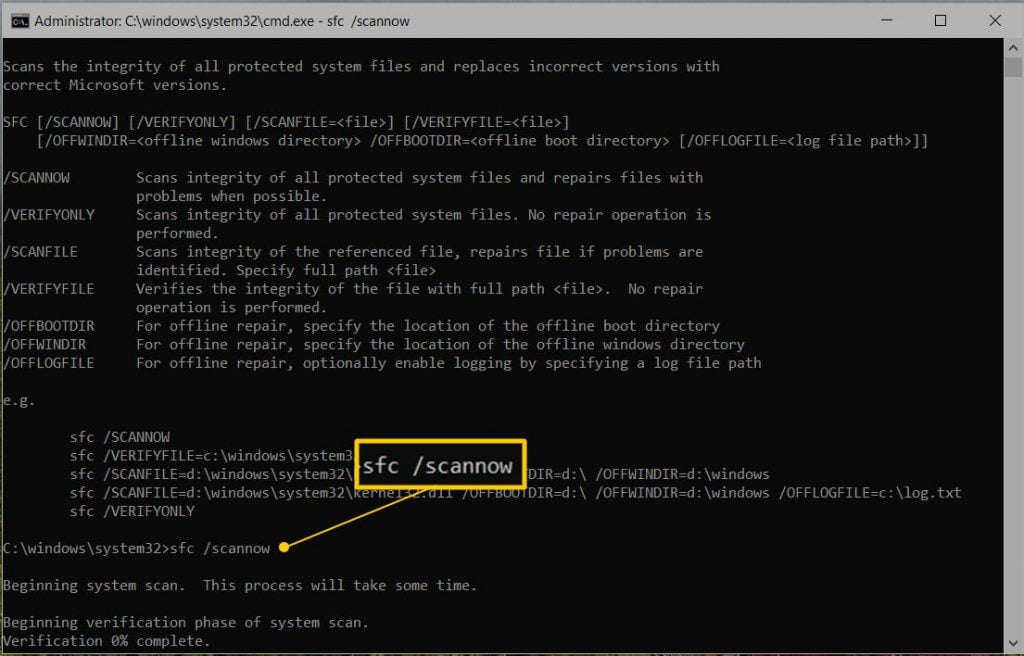
Solution 7: Run Windows System File Checker (sfs/scannow)
System File Checker is a useful Windows tool that helps you scan corruption in Windows system files.
Here is how you run System File Checker:
Click the Start button.
Type “command” in the search box (nut don’t press enter).
Press CTRL and Shift keys together on your keyboard and press ENTER.
A permission dialog box will pop up.
Click Yes.
A black box will appear with a blinking cursor.
Type “sfc /scannow” in the box and hit ENTER.
System File Checker will start scanning for Error 6144 82 and other system file issues (this may take several minutes).
Follow the on-screen commands.
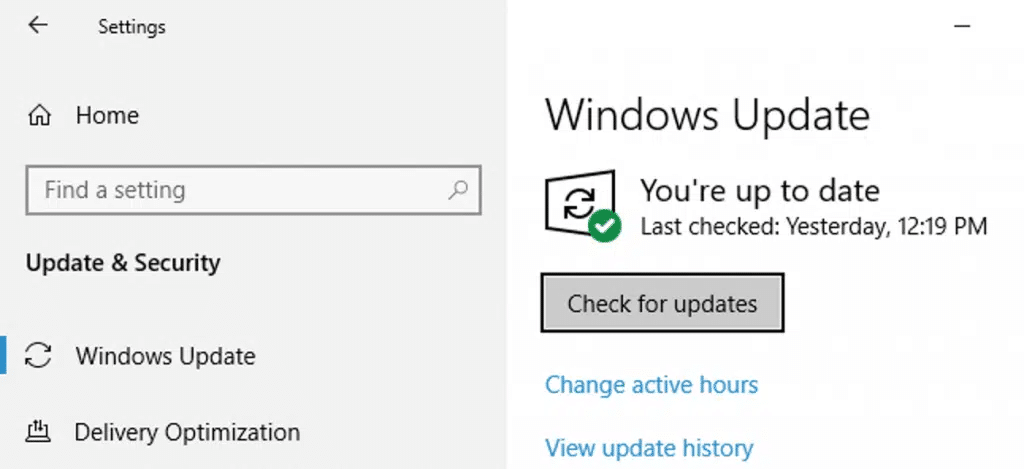
Solution 8: Check and install all Windows Updates available for your system
Sometimes fixing your run-time error such as error 6144 82 can be as simple as updating Windows.
Here is how you can check Windows updates:
Click the “Start” button.
Type “update” in the search box and press “ENTER“.
The “Windows Update” dialog box will pop up.
Click the Install Updates button.
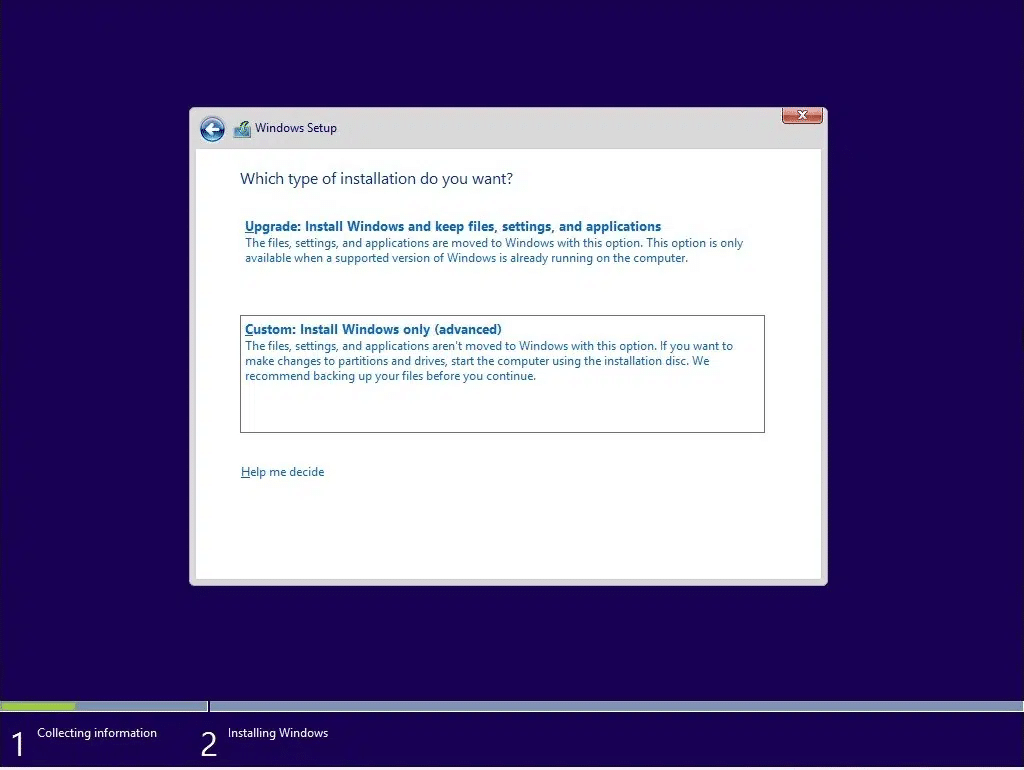
Solution 9: Run a clean installation of your Windows:
The clean install tool in QuickBooks helps in cleaning everything from your computer and you will have to start afresh. This is the final option in your endeavor to fix QuickBooks Error 6144 82. It will also remove all junk accumulated in your computer through your regular use of computer.
Hope, you find this article handy and useful. If the QuickBooks Error Code 6144 82 still persists or you are not comfortable in performing any of the above-mentioned troubleshooting steps, you can contact QuickBooks Support team also you can take help from our QuickBooks enterprise support phone number .i.e. +1-888-510-9198. We will provide you with quick and precise solutions of the error.
QuickBooks Error Code is a runtime error that occurs when the user tries to access a company file that is located on a different computer. This error message can also appear if the company file is damaged or if there is a problem with the network connection.
How can I fix QuickBooks Error Code 6144 82?
You can try the following steps to resolve the error: Check the network connection and make sure it is stable. Ensure that the company file is not damaged. Make sure that the correct version of QuickBooks is installed on all computers. Try opening the company file in single-user mode. If these steps do not resolve the error, you can contact our QuickBooks support team at +1-888-510-9198 for further assistance.
What are the common causes of QuickBooks Error Code 6144 82?
The common causes of QuickBooks Error Code 6144 82 are: Damaged company file Network connection issues Incorrect QuickBooks installation Incorrect folder permissions Firewall blocking the access
How do I prevent QuickBooks Error Code 6144 82 from happening again?
To prevent QuickBooks Error Code from happening again, it is recommended to: Regularly back up your company file Keep your QuickBooks software and network connection up to date Check your firewall settings If you encounter any issues or need help, you can call our QuickBooks support team at +1-888-510-9198.
What should I do if I am still encountering QuickBooks Error Code 6144 82?
If you are still encountering QuickBooks Error Code 6144 82 after trying the steps mentioned above, it is recommended to contact QuickBooks support for further assistance. Our support team is available 24/7 to help you resolve the error. You can reach us at +1-888-510-9198.