Want to record and classify refunds easily in QuickBooks? If yes, then this segment is surely something you need to go through. Refunds usually happen when a client has to refund you for an overcharge, returns an item, or cancels a service. The QuickBooks accounting software helps in managing refunds in many ways. You need to record a refund depending on various scenarios. This ensures that your books are up-to-date. To help you out in recording customer refunds in QuickBooks, here we are with this segment sharing the complete set of steps that can be implemented. To learn more, stick around this segment carefully. Or you can also consult our technical support team for any sort of technical guidance and to find out how to record refund in QuickBooks. Dial +1-888-510-9198, for any sort of technical guidance.
Record and Categorize Refunds in QuickBooks Desktop
You can perform the below set of steps to record and categorize refunds in QuickBooks. Let us have a look:
Step 1: Launch QuickBooks
Initially, you need to launch QuickBooks software and then sign into the account.
Step 2: Make a new customer
Before you issue a refund, you must have a customer refund. If the customer is not present in your database, then you need to add them using the steps below:
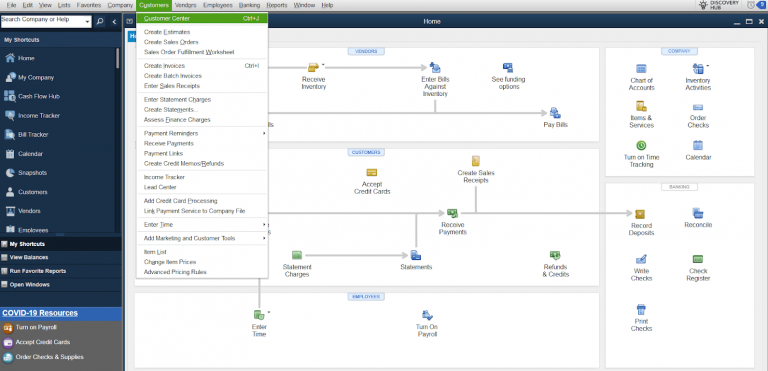
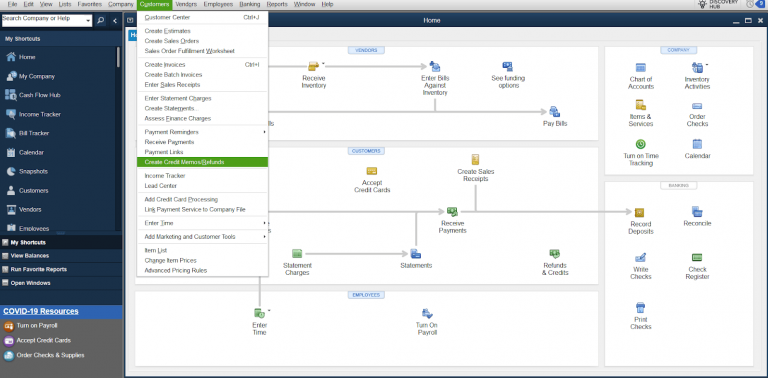
Head to the customer menu.
After that, choose Customer center
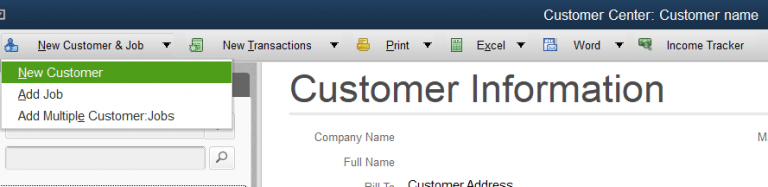
You need to then press new customer and job option.
Also, select a new customer.
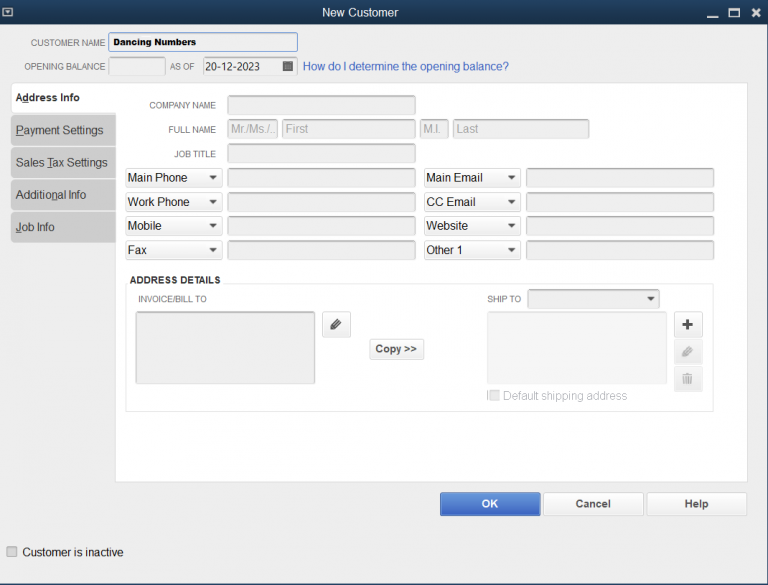
Complete all the customer details like the address, name, contact details, etc.
You need to now click on ok tab.
Step 3: Create a refund receipt
Here, you need to record the money that you are giving back to the customer. The steps involved in here are:
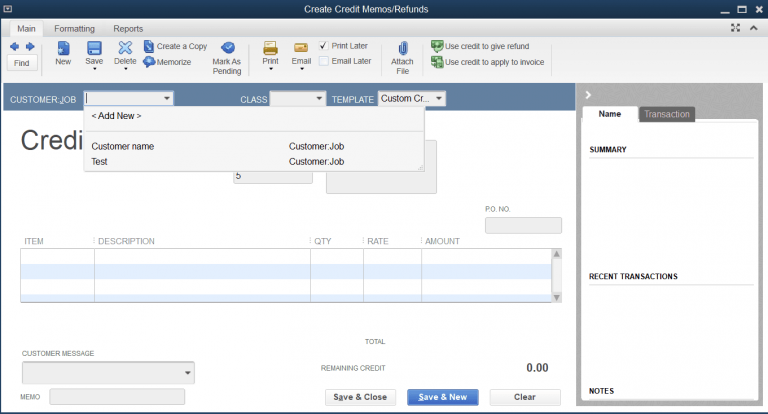
The very first step is to head to customers menu and select create credit memos/refunds.
You now need to select the customer you are refunding.
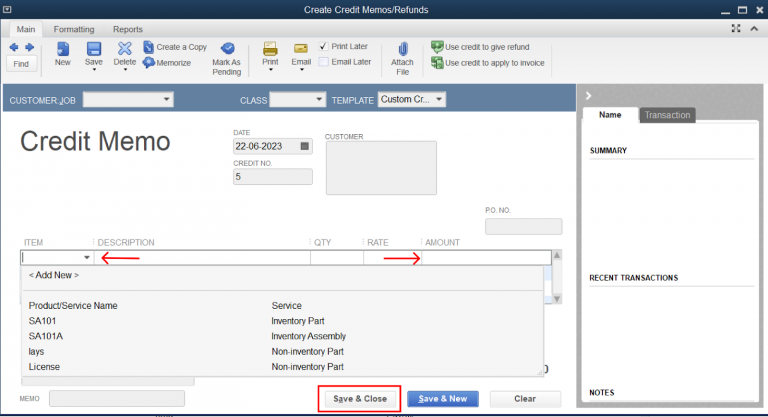
In the section for item, select the items that are refunded.
After that, type the amount of the refund in the particular account column.
Step 4: Issue a refund check or implement the refund to the customer’s balance
After preparing the credit memo, you can either apply it to the balance of the customer for future purchases or can refund the amount immediately with the help of the steps below:
After the credit memo is saved, a screen will ask you how you wish to handle the refund. Now, select apply to an invoice to use the refund for future purchases.
Now, select the option, and give a refund to refund the amount now.
Just in case you select the option give a refund, you will get notified to select the payment method for the particular refund along with the account the money will be taken from.
Now, click on ok tab.
Step 5: Review the Refund
The last step here is to review the refund to ensure that it has been categorized in the right way.
Head to the reports menu.
Select the customers and receivables and then opt for customer balance details.
You need to reimburse a client or vendor for an overpayment or returned items, which includes precise paperwork and prompt processing while issuing a refund in QuickBooks.
Partial Refunds
You can reimburse a partial of the initial payment using partial refunds in QuickBooks online. This gives you options when handling refund requests from customers or vendors. This includes determining the refund amount based on the percentages of the original payment being repaid. In order to ascertain transparency in financial transactions and properly represent the partial reimbursement, adjustment entries can be made in QuickBooks online.
Refunding to a Customer
When you receive a refund in QuickBooks, the overcharged amount must be returned or a return request must be processed. Proper documentation and on time compensation are guaranteed. The process involves customer filing a refund request which the authorized staff then examines and approves. Once you get the approval, the payment must be reconciled in QuickBooks to ensure that the amount reimbursed is the same as the initial transaction. After the reimbursement is processed on time, the consumer is informed in full via email. This maintains transparency and confidence. QuickBooks lets a smooth refund management process that lets businesses to maintain both financial accuracy and customer happiness.
Refunding a payment
When refunding a payment in QuickBooks, reversing the associated transaction, updating financial records, and guaranteeing an exact reconciliation of the refunded amount are essential. Initially, you need to find the original payment transactions in QuickBooks and select the suitable refund processing option. Accounting changes must be made when the refund is started, so that the financial records reflect the refund properly. You further need to check that the updated transaction information matches the financial statements. Businesses can guarantee accuracy in the financial records and transparency in their refunding processes by following the protocols.
In order to get the accuracy of the financial reporting and maintain clean financial records, one needs to accurately record and categorize refund in QuickBooks.
The above-discussed steps were related to recording a refund in QuickBooks Desktop. Let us now check out the steps that discuss how to refund a customer in quickbooks online.
Customer refund if invoice has been paid
Here is how to issue a refund in QuickBooks. Let us have a look:
Step 1: Enter a credit memo
Begin with by simply selecting +New tab and choose Credit memo
Once done with that, select the right customer in the customer field
You now have to enter the credit memo date, amount, tax, and product/service.
It should be noted that in case you choose an inventory item, then QuickBooks will put it back into inventory. In case the item is defective or if you do not wait it added back to inventory, then make an inventory adjustment.
The last step is to choose save and close tabs.
In case the customer has overpaid, then you d not need the credit memo as you will already have an unapplied credit that acts as your credit memo.
Step 2: Make a refund
Here you simply need to choose + New and then go for expense
After that, in the payee field, choose or enter the desired customer.
Furthermore, in the payment account field, choose the bank the money is being refunded from.
Also, in the category field, choose the debtors account.
And in the amount field, enter the amount of the refund.
The next step is to choose the appropriate tax in the tax field.
Choose save.
And also, head to + new and select receive payment.
After that add the customer and choose payment method and deposit to.
The balance should be 0 as they will cancel each other out.
You now need to choose save and close
In case you have online banking, head to transactions and then bank transactions.
Also, match the record you found.
Refund for goods or services that didn’t satisfy the customer
You can make use of refund receipts, in case a customer asks for a refund for an item or service. In case they used a credit card, then you can perform the steps related to refunding a credit card payment. It should be noted that, in order to avoid a double refund, ensure that you haven’t already entered a credit memo yet.
At first, choose new
And also, go for refund receipt or give refund.
The next step is to choose customer dropdown and then opt for customer you wish to refund.
Now, go for refund from drop-down and then choose the bank you deposited the payment for the invoice to.
After that, add all products or services the customer returned in the product/service column.
And then, ensure to fill the date, quantity, rate, amount, sales tax, and other fields.
Once done with that, choose save and close
Refund a customer’s overpayment or credit
One can record a refund to the customer using check or expense, in case:
They want to redeem their open credits
They made a prepayment for an older but canceled it before receiving the goods or services.
They wish to reimburse an accidental overpayment
Making use of a check or expense to record the refund reduces the bank’s balance and offsets the customer’s open credit, overpayment, or prepayment.
Step 1: Record the refund for your customer
You need to first choose +new
After that, opt for expense, add expense or check.
In case you are in a business view, follow the steps to switch to accountant view first.
Now, choose the customer you wish to refund from the payee dropdown
And then, from the payment account dropdown, select the bank account where you deposited the overpayment to.
On the first line of category column, select accounts receivable.
After which, you need to enter how much you want to refund in the amount field
The next step is to enter in other field as you see fit, and choose save and close.
Step 2: Link the refund to the customer’s credit or overpayment
The very first step is to choose +New tab
And then, select receive payment
Also, choose the same customer you used for the check or expense when recording the refund
Enter in the details
And in the outstanding transaction section, go for the checkbox for the expense or check you created when recording the refund.
It should be noted that in case you have automation to apply bill payments turned on, then this step is done for you.
Ensure that the payment is equal to the open balance, and choose save and close.
Recording a customer refund in QuickBooks isn’t a tough nut to crack. We hope that the information shared in above might be of some help in recording refund in QuickBooks successfully. However, in case of any queries, or if you are unable to record refund even after performing the steps above, then in that case, consult our technical support professionals right away by dialing our technical support number i.e., +1-888-510-9198. Our support professionals will provide you with instant guidance.
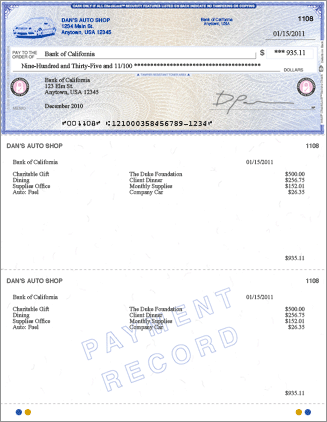
Voucher checks are basically kept to keep a record of payroll deductions. QuickBooks voucher checks automatically capture payroll deductions and invoice payment details, which saves a lot of time and reduces data entry errors. You can print voucher checks easily in QuickBooks online using basic steps. To help you with the process to print voucher checks, here we are with this piece of writing sharing the complete steps to print voucher checks in QuickBooks online.
However, if you need any sort of technical assistance at any point in time, then feel free to give us a call at +1-888-510-9198, and we will provide you with immediate support and assistance.
Different types of voucher checks in QuickBooks Online
QuickBooks offers three different ranges of voucher checks. Let us evaluate each one of them one by one:
Secure plus voucher checks – The price range of secure plus voucher checks is $71.68 for 5. You get a built-in alarm system for your checks and by far it is one of the most preferred voucher checks that provide exclusive tamper-resistant security coating. If the addressee or payment amount is tampered with, then it produces a visible stain on the secure plus check. These checks are advanced protection against fraud with 23 security features.
Secure premier voucher checks – The starting range for secure premier voucher checks is $78.10 for 50. These maximize your protection against fraud and counterfeit activity with QuickBooks. These checks have a security hologram embedded in the check that makes verification fast and simple.
Basic voucher checks – The basic voucher checks start at $46.24 for 50. It saves time and maintains accuracy. They are designed to work specifically with QuickBooks on laser printers. The payroll stubs present on a voucher check track deductions and payment details that further help in easy recording keeping.
Reasons for printing voucher checks in QuickBooks
The need to print a voucher check might occur for a type of payment. This form of payment is official and aids in creating audit trails from the data entered. One can print this check to keep it on file and it has the following dimensions: 8.5 x 11.5. Other than this, you might need to print a voucher check in the following cases:
For keeping a record of the deductions that you made on the payroll, printing voucher checks is a quick solution.
Furthermore, you can get the invoice payment data using the printer voucher checks.
Also, to save time and minimize data input errors you can automatically print these checks
You might find printing check vouchers in QuickBooks online helpful for accounting tasks or any record in QBO. With the help of this software, you can head to the banking tab before opting for the write checks option. Later on, you need to head to the write checks page and also click on the print tab. In case you want to print just one check, select the check option. On the other hand, if you are printing several checks, then choose batch.
Let us check out the steps to print voucher check in detail:
You need to first log in to QuickBooks online
Once done with that, click on the banking option from the menu.
Then, choose write checks from the menu.
And enter in necessary data.
After that, head to the write checks window.
Click on the print icon.
In case you have to print a single check, then click on check.
Now, enter the printed check number
If more than one check is to be printed, you need to click on batch.
This will redirect you to the select checks to print page.
After that, opt for the checks you want to print.
Opt for the printer’s name and type from the print checks window.
Now, from the list of available check styles, choose a voucher.
Also, check your company’s name and address printed on the pre-printed checks.
After verifying all the information, you simply need to uncheck the print company name and address. Review the decisions you made and proceed further.
Make sure that the details on the check have been precisely aligned, and the check stock paper must be oriented properly.
The next step is to click on print.
And furthermore, your voucher checks will print in QBO.
Towards the end of this segment, we believe that the information shared above might be of some help in printing voucher checks successfully. However, if you have any queries or if you need any sort of technical assistance at any point in time, then in that case give us a call at +1-888-510-9198, and we will provide you with instant support and assistance.
FAQs related to Print voucher checks in QuickBooks Online
Is a voucher check a payroll check?
Even though one can use voucher checks for any type of payment, voucher checks that come with one check and two pay stubs on a single sheet of perforated paper, make an ideal solution for paychecks and vendor payments.
Do I need secure checks if banks cover check fraud?
Well, banks don’t treat losses for business check fraud the same way they treat personal checking account fraud.
Will voucher checks work with QuickBooks payroll?
QuickBooks voucher checks are designed in a way to work with QuickBooks software and services, including payroll.
Which voucher check is right for my business?
You can choose the voucher check that provides the level of security that you require to help protect your business from counterfeiting and fraud.
Can I add my company logo to voucher checks?
Along with other customizations, one can add the company’s logo to voucher checks for a more professional look.
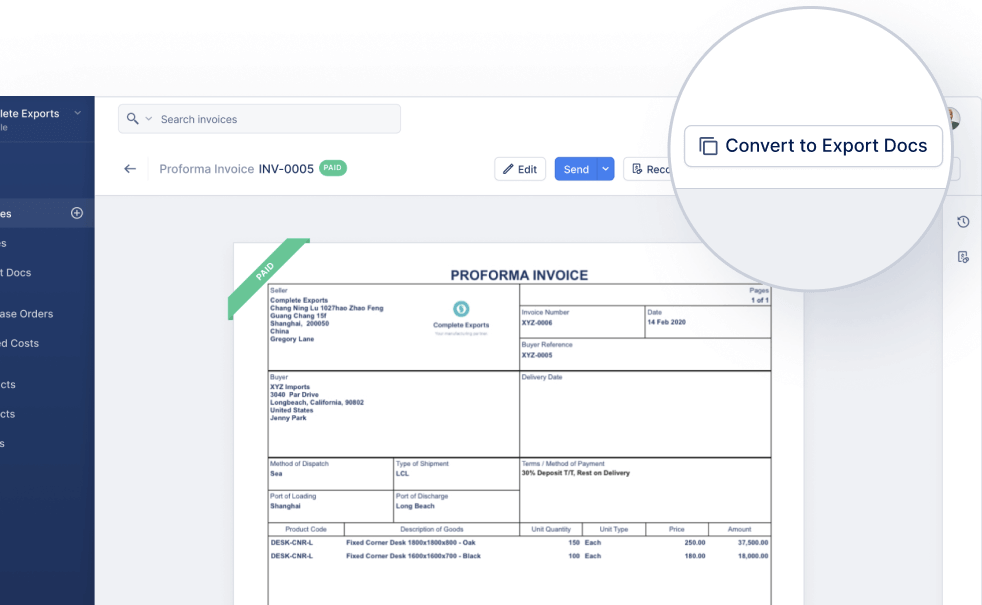
Invoicing is an essential part of running a business. Creating an invoice in QuickBooks, issuing it to customers promptly, and paying invoices from suppliers on time ensures that the cash flows into the business regularly and helps maintain good relationships with the supply chain. One such invoice is a Proforma invoice. It is a type of document that can be accessed as proof of purchase and sales. In this segment, we are going to discuss what is a proforma invoice, along with the complete set of steps that you can carry out to create a proforma invoice in QuickBooks. Thus, stick around this segment carefully, or you can also consult our technical support team at +1-888-510-9198, and we will provide you with immediate support services.
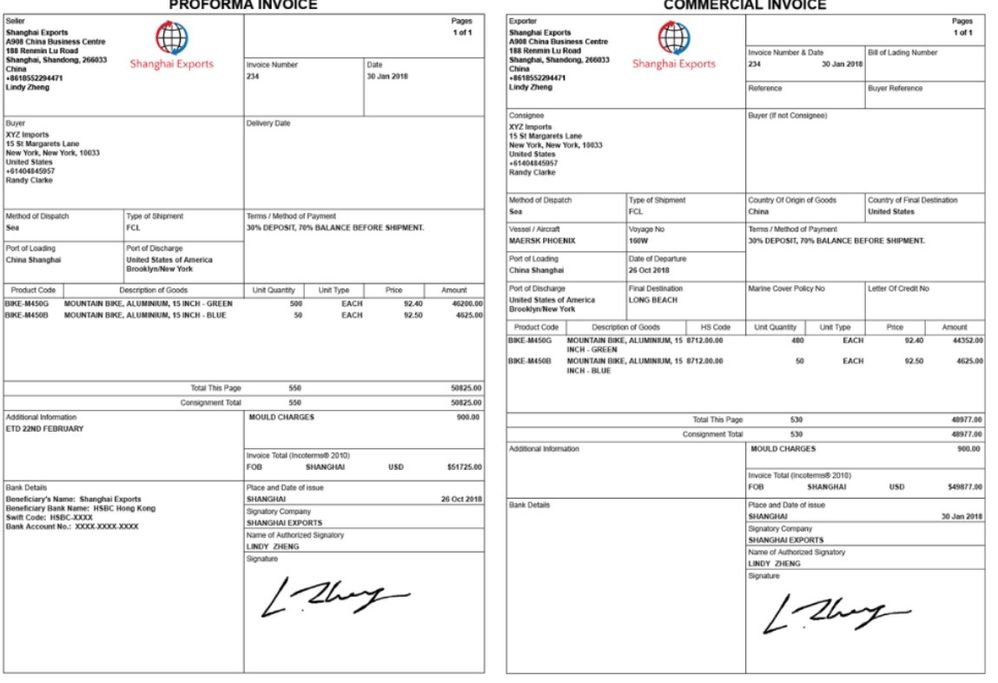
A proforma invoice is basically a preliminary bill of sale sent to buyers in advance of the delivery of goods. It will usually contain details like a description of the items being sold, their price, and the total amount payable along with any taxes and fees incurred. This gives the customer as precise an estimate as possible of the expected cost of an order. Talking about the difference between a proforma invoice and a standard commercial invoice is that, it is preliminary or provisional. This means that the details are subject to change. It further doesn’t need any invoice number and should be clearly labeled with the term proforma.
What is the purpose of a proforma invoice?
Talking about the usefulness of a proforma invoice is basically a useful addition to a business’s sales process. It gives an estimate of the cost of a sale and further reduces the likelihood that they are exposed to any unanticipated charges, reducing the risk of payment disputes when commercial invoices are issued. A few use cases of Proforma Invoice:
When declaring the value of goods to customs when exporting to foreign countries.
Another use case can be when you don’t have all the details to issue a commercial invoice
Or when you need something to act as a formal payment request when a recipient wishes to pay in advance.
What is the difference between an invoice and a proforma invoice?
There are several key differences between a standard commercial invoice and a proforma invoice. Let us have a look:
Key Difference
Commercial Invoice
Proforma Invoice
Time of issue
Issued to customers after goods or services have been received.
Issued to customers before an order has been placed
Objective
In order to inform the buyer of the amount due and how to make payment.
To help customers decide whether or not to place an order.
Details included
An invoice number, contact information, issue date, amount payable, means of payment, billing address, and terms & conditions.
Contact details, date of issue, a description of the goods and services, and the amount due. It needs an invoice number and should be clearly labeled as proforma.
Accounting
A commercial invoice should be recorded as accounts payable and filed for reference.
Proforma invoices are not used for accounting purposes.
What is the difference between a proforma invoice and a quote?
Proforma invoice has more in common with a quote than a commercial invoice. Quotes and proforma invoices are both used at the same time in the sales process and further provide the customer with information about the transaction. The two main differences include:
A quote basically provides information about what a customer can expect from a transaction before it has been agreed upon.
Whereas, a proforma invoice provides full and final details after the customer has committed to a transaction.
When should you send a proforma invoice?
A proforma invoice is basically sent before a sale is completed. There are two main reasons behind this:
Cost estimate – Proforma invoices basically provide customers with a breakdown of the items they have requested and provide an accurate indication of the total amount due. It is not a payment request and can still be adjusted if the goods and services you provide are being negotiated.
International shipping – These invoices are commonly used by export companies and further include details about shipping, packaging, weight, and delivery fees. Moreover, they provide a clear declaration of the value of items so that they can quickly pass through customs.
Is a proforma invoice legally binding?
Even though a proforma invoice is a crucial business document, it is not legally binding. It provides a price estimate for a business’s product or service. However, it is not a legal record of sale and thus, it cannot be used as evidence for a completed transaction.
What should a proforma invoice look like?
A proforma invoice usually includes the following details:
Date of issue
Contact details
A description of the goods and services you provide
QuickBooks offers you with a bunch of proforma invoices, which include the following:
For shipping – This type of invoice is a type of business invoice. However, such invoices do not have any details about VATs and taxes. Note that, both sides can access it to analyze the real cost of the products and services.
For customers – Such an invoice works as a written authentication to the customer end from the seller end which guarantees the delivery of the product. It further comprises the complete description of the payment that assists both sides in monitoring the payment.
What are the essential points to consider before preparing a proforma invoice?
There are three crucial points that you need to consider when preparing a proforma invoice:
Proforma invoices are basically saved as accounts receivable. It simply means you can prepare it to monitor the payments that you are going to acquire.
A Proforma invoice is used as a substitute for a particular invoice. It should be noted as assumed as the original invoice and also the customer should not make any payment depending on it.
Another important point to note is that this type of invoice and QuickBooks payroll are not the same. Thus, as a seller, you do not need to make any payment to the client.
How to create a proforma invoice in QuickBooks?
In order to create a proforma invoice in QuickBooks, you need to perform the following steps:
Click on the gear icon on the right side of the screen.
After that, a window will open where you will be required to search for a custom-form style and then select a new option.
Now, press on the new style drop-down menu and then you will have to choose the estimate tab.
Once done with that, press the content tab.
You now have to click on the edit tab and also select the make default option.
Then, you will see an option to edit the name of the estimate. In case you wish to, you can alter or keep it as it is.
Save the change and exit the screen.
Steps to add a logo to a proforma invoice
You need to perform a few steps to add a logo to a proforma invoice.
For Application
You need to initially click on the settings tab and also select the work info option
After that, click on the edit option and also select the image and upload it in the logo option.
The last step is to click on save the settings.
For Website
You need to head to the invoice section and also press the option to change the invoice.
Once done with that, press the option to edit information.
How to repair payment if they are assisted with the incorrect invoice?
You can try to change the payment that has been applied by you on a particular invoice. The steps involved in here are:
You need to click on create and then head to the other option and choose journal entry.
After that, enter the details like the amount acquired, customer details, and the amount to be paid.
The last step is to enter the same details again, avoid adding the customer name and then save it.
Steps to duplicate a proforma invoice in QuickBooks
For a bunch of reasons, you might have to duplicate a specific proforma invoice in QuickBooks. You can select the clients you wish to send the proforma invoice to. The window for multiple invoices will open and you will be able to review and make changes to clients’ Proforma invoices. You will then have to save changes.
Firstly, choose customers to whom you wish to send the Proforma invoice.
After that, click on the next tab.
Now, on the screen for multiple invoices, you will be able to witness the invoice for all the customers.
It is possible to add and edit the invoices.
Ensure that the invoices have been saved.
It should be noted that a proforma invoice that you choose to replicate will have duplicate lines. In case you have not set any choices regarding taxes or terms that are special to a customer, then it is not mandatory to create several proforma invoices.
Toward the end of this segment, we believe that the information enumerated above is enough to let you understand what a proforma invoice is all about. However, in case you have any queries that remain unanswered, then do not hesitate to connect with our technical support team at +1-888-510-9198, and let our certified QuickBooks ProAdvisors help you with the queries immediately.
QuickBooks desktop enterprise is by far one of the most powerful and flexible QuickBooks software ever. It is designed in a way to help businesses growing in size or complexity to run their business from end to end. QuickBooks Enterprise 2022 further has specialized industry editions that offer customized capabilities, reports, and features designed for every industry. With this software, you get access to a full suite of services including payroll, payments, time tracking, point of sale, and a robust app ecosystem. If you want better functionalities, simply upgrade to QuickBooks Enterprise 2022.
To give you a better understanding of QuickBooks Enterprise 2022, here is an in-depth guide sharing the complete info. Thus, stick around this piece of writing carefully, or you can also consult our technical team at +1-888-510-9198, and we will provide you with immediate support and assistance.
QuickBooks Enterprise 2022 has rolled out with a bunch of new features and functionalities. Let us find out:
Bill Workflow Approvals – You can now delegate with confidence, manage cash flow, and also boost transparency with customizable bill workflow approvals. This feature further allows you to maintain cash flow with a dashboard that tracks bills that need approval. The employees further get timely reminders, so that they do not miss an approval deadline, and also some unique templates making set up extremely easy.
Cloud Access – The cloud access feature boosts productivity, enhances collaboration, and lets the team work from anywhere with access to the cloud. You get up-to-date information for your team and further lets you track inventory, process payments, and update your books from different locations. Note that, cloud access requires no installation, training, new equipment, or IT capital investment, and the data backup is taken on a daily basis on its own.
Sales Order Fulfilment Worksheet – You can now get paid faster and reduce the billing complexity with this particular feature by simply managing the sales order process from a single location. This feature lets you create invoice in QuickBooks with a prompt when you mark an item as shipped.
Enhanced Computing Power – Another interesting feature is the enhanced computing power that gives you the advantages of 64-bit processors that further enhance the performance and stability of the software which would help you run your business more efficiently and smoothly. QuickBooks meets modern operating system standards that help you work faster and maintain seamless third-party integrations.
E-Commerce Integration – You can manage your online sales and inventory in one place by simply integrating your e-commerce channels with QuickBooks. One can also integrate QuickBooks with industry-leading e-commerce platforms, marketplaces, and shipping solutions to help simplify e-commerce management, avoid stockouts, and gain a clearer picture of profitability. You can enjoy seamless integration with top online stores such as Shopify, WooCommerce, Big Commerce, Magento, and industry-leading online marketplaces.
Upload Bills – Now save your time by having QuickBooks automate bill entries from the QuickBooks desktop mobile app or an email address. Your vendors can send email invoices directly to QuickBooks which automatically drafts bill transactions for your review.
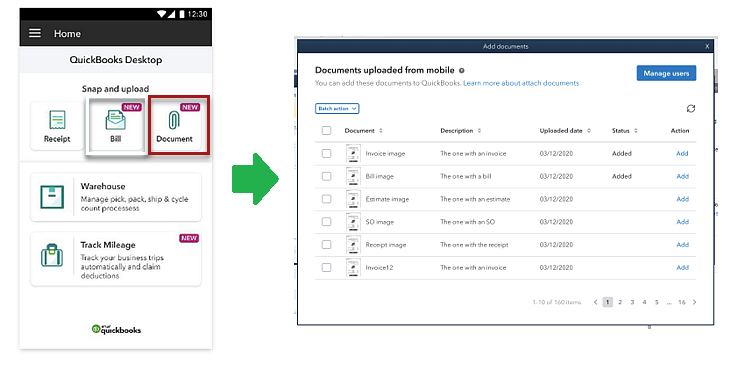
Attach documents to transactions – You can now attach documents to transactions faster by directly uploading them using the QuickBooks desktop mobile app. No need to use archaic scanning and emailing processes anymore. You can save time by directly attaching multiple documents to transactions at once.
Customize bill payment stubs – With this feature, you can maintain professional and consistent communications by emailing customizable bill payment stubs from within QuickBooks. Now, easily email bill payment stubs to one or multiple vendors at once.
Choose from multiple email contacts – You can simply send emails by selecting the right recipients from a list of your customer or vendor contacts. This feature lets you reduce errors and miscommunication resulting from the manual entry of email addresses.
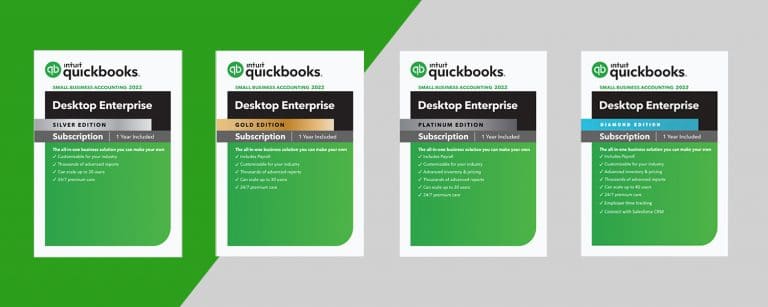
Subscribing to QuickBooks Enterprise 2022 would cost you the following:
QuickBooks Enterprise Silver – $1020/for 1st Year
QuickBooks Enterprise Silver is the only version that is available without payroll. It is the lowest subscription that one can buy easily, in case not using payroll. If you need payroll, then you can switch to any of the subscriptions according to the business requirements.
QuickBooks Desktop Enterprise 2022
Users
Local Access (Annual Subscription)
Cloud Access (Monthly Subscription)
Core
Classic
Deluxe
Gold
Platinum
Diamond
Gold
Platinum
Diamond
Gold
Platinum
Diamond
Gold
Platinum
Diamond
1
1324
1628
3216
178.16
206.06
355.1
188.2
217
365.5
198.16
226.06
375.1
2
1936
2240.8
3859.2
3859.2
288.82
469
309.8
337.7
489.8
328.82
357.62
509
3
2344
2648.8
4281.6
4281.6
380.58
562.2
411.6
440.4
593.4
440.58
469.38
622.2
4
2751.2
3056
4713.6
4713.6
472.34
656.3
514.3
542.2
697.9
552.34
581.14
736.3
5
1776.6
1948.05
2894.4
2894.4
645.4
589.6
517.3
536.6
641.6
565.4
584.6
689.6
6
1948.05
2120.4
3067.2
3067.2
537.84
662.4
600.6
619.8
724.8
657.84
677.04
782.4
7
2120.
2292.3
3250.8
3250.8
610.88
736.4
683.8
703
809.2
750.88
770.08
876.4
8
2292.3
2464.2
3429
3429
683.32
809.8
767
785.6
893
843.32
862.52
969.8
9
2464.2
2636.1
3612.6
3612.6
775.56
883.8
849.6
868.8
977.4
936.36
955.56
1063.8
10
2636.1
2808
3790.8
3790.8
848
957.2
932.8
952
1061.2
1028.8
1048
1157.2
More than 10 to 40 users
Connect with the QuickBooks help desk team
Important points to remember
Note that, your account on file will be invoiced on its own for the first year at the indicated discount for the service you opt for when signing up. The plan includes the following:
All users can save around 40% off the current retail price
In case you get a license for 1-4 people for the first year, then you get around a 10% discount off the current list price.
Also, if you license 5-40 users, then you get a 40% discount on the current list price.
After a year of subscription – Your credit card on file will be charged on a monthly or annual basis at the then-current subscription rate for the plan and service you opt for until you cancel.
It should be noted that this deal is only available to new QuickBooks desktop enterprise customers and cannot be combined with other QuickBooks Enterprise promotions. Discounts are applied to the above-mentioned price. Promotional deals for QuickBooks Enterprise Platinum or any other Intuit software might not be coupled with Diamond package savings.
QuickBooks Enterprise lets you grow the business which helps in easily accessing the company data, further protecting the complete security.
The enterprise helps you enhance and personalize your enterprise to more than 200 apps that would help your business explore further opportunities and boost growth.
Furthermore, it enhances security as it is assigned to certain employees and vendors that would manage the data.
QuickBooks enterprise further increases the software capacity by 6%.
Enterprise software provides the flexibility to the team to work from anywhere, if they have cloud access.
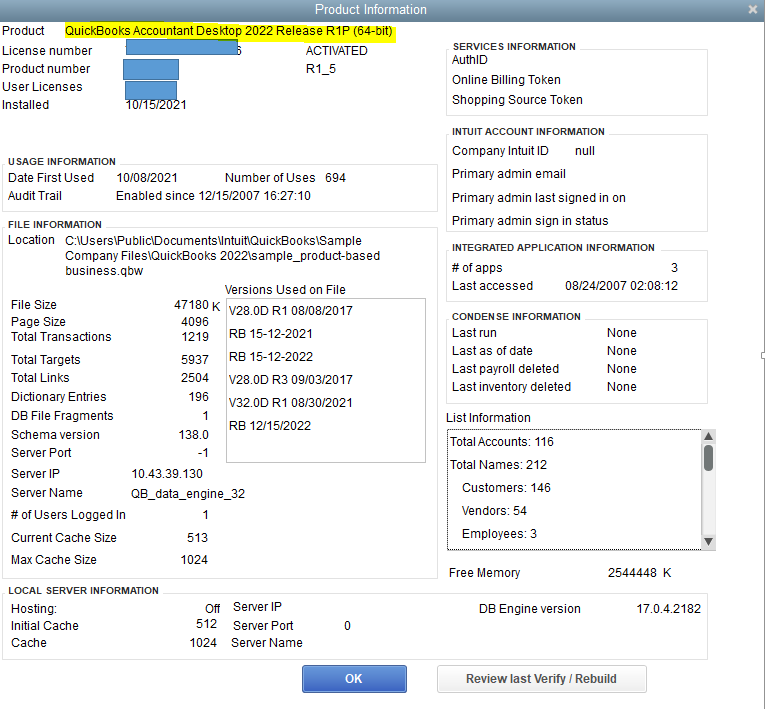
QuickBooks Desktop Enterprise 2022 System Requirements
For QuickBooks Enterprise 22.0, you might require the following system configuration. There are two types of access: Local or cloud access. You have to select any one of them. The system requirements are mentioned accordingly.
For Local Access
Operating Systems – Windows 8.1, Windows 10, or update versions
Windows servers
Windows Server 2012 R2 standard and essentials
Windows Server 2016 standard and essentials
Windows Server 2019 standard and essentials
Processor- Minimum 2.4 GHz needed
RAM – 8 GB for 64-bit and 16 GB is suggested
Disk Space – 2.5 GB required as disk space and additional for data files
Optical Drive – 4X DVD-ROM drive, in case you are doing CD installations
Internet access is crucial for Enterprise, Payroll, and Online Features
Browser – Internet Explorer 11 (32-bit) with internet access
Registration of product is needed
QuickBooks Desktop Enterprise 22.0 needs an active subscription to be used on mobile applications. The device being used must be camera-enabled using Android 5.0, iOS 12, or later
Screen Resolution – 1280*1024 screen resolution needed or higher with around 2 extended monitors. Default DPI settings are optimized for a given computer
Software Integrations
You can simply transfer data from MS Excel 2013 to 2019, QuickBooks Mac 2016 to 2022 Office 365 (32-bit and 64-bit), or Quicken 2016 to 2021
Invoices, email estimates, and other forms with Microsoft Outlook 2013 to 2019, Gmail, Outlook.com, office 365, and many other SMTP-support email clients.
Microsoft Excel and Word Integration require MS Office 2013 to 2019 or Office 365.
Data Management – AES – 1288 for data encryption for all PII and PCI data.
Operational Security
The remainder isn’t applicable as the program is installed in the customer environment without sorting any data on the systems of Intuit.
PCI PA-DSS certified, assessed annually according to the payment of application.
For Cloud Access
In case you wish to have a subscription to QuickBooks Desktop Enterprise of Cloud access, then you simply have to connect using the Microsoft Remote Desktop Connection client. Note that, for this, the system requirements are a bit different. The requirements include:
For Windows
The remote desktop software must be in Windows 8, and Windows 8.1, or Windows 10
An internet connection is essential (around 56K or higher than this)
For Mac OS X
Mac OS X version 10.3 or higher
Display 1280* 1024 or more
Broadband or high-speed internet connection needed
QuickBooks Desktop Enhanced Payroll – This payroll subscription is available in the Enterprise Gold and Enterprise Platinum subscriptions. The charges are applied when you add the payroll to the Enterprise Silver Subscription.
Direct deposit is free – Note that, for the employees of W-2 with the payroll in QuickBooks enterprise 22.0 subscription, this particular service is free, in case it is used by 1099 contractors.
Services of money movement – Here you get the services of money movement like direct deposit that are provided by Intuit Payments Inc.
Easy tax filing and payment – You simply have to set the filing method to process the filing.
Live Assistance – You can connect with the team anytime whenever needed to get the queries or issues fixed.
QuickBooks Desktop Assisted Payroll
Direct Deposit of Next day – Here payroll is processed before 5:00 PM PT. It can also arrive the same business day. Moreover, it needs bank verification and direct deposit setup. The next day, direct deposit is directly on the eligibility criteria.
Services of money movement – The money management services are directly provided by Intuit Payments Inc.
On-time and accurate tax penalty guarantee – The payroll federal and state tax is taken care by Intuit to have payments directly from the accounts. The payments are done on the basis of the data you supply.
Premium customer assistance – 24*7 customer assistance is available. The assisting hours exclude the occasional time because of U.S. holidays, server maintenance, company events, and much more.
U.S.-based setup assistance – The assistance is available Monday to Friday 6 AM to 6 PM PST. The hours exclude the holidays and other events time.
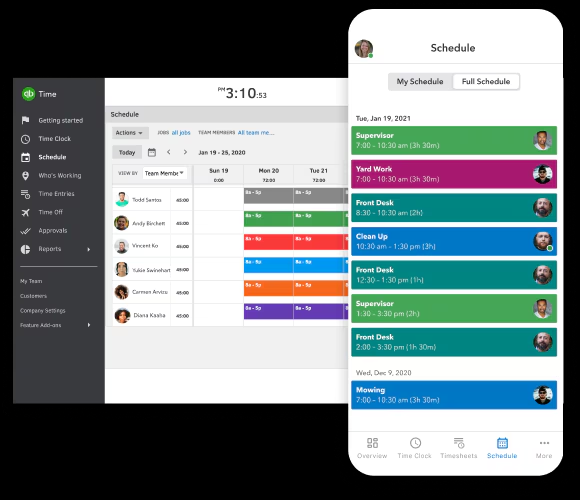
QuickBooks Time Elite
Time Elite Tracking – QuickBooks consists of a time tracking tool that lets the staff keep a note of how much time they spend on each of the activities performed by them. You can further opt for the client that you want to receive the charge of the billable task. The time monitoring feature is included with the Enterprise Diamond basic subscription. Monthly costs are charged per employee and each employee is charged $5 every month. Note that, an internet connection is needed. QuickBooks Time is used by thousands of companies to track and manage employee time for payroll, invoicing, and scheduling.
Sync Desktop Enterprise – The QuickBooks sync app makes it simple to generate and manage a duplicate of QuickBooks data. It further makes it available through standard database tools, software drivers, and analytics.
GPS Tracking – The users of the QuickBooks time mobile app might share their location data when on the clock. The precision of GPS coordinates necessitates the use of a cell phone. To order a clock-in and monitor time using the QuickBooks time mobile app, account managers might need users to set their location settings to Always.
QuickBooks Time Tracker – Basically this is a cloud-based time tracking and employee scheduling program that usually lets the workers clock in and out of work using the devices they already have in their pockets. QuickBooks Time Elite mobile access is available at no extra charge with Enterprise Diamond. Data access is subject to the availability of cellular/Internet provider networks, as well as periodic downtime due to system and server maintenance and circumstances beyond control.
Salesforce CRM Connector
Talking about Salesforce CRM connector, it is basically a kind of service provided that is available as an add-on DBSync. This is actually a subscription-based integration extension that is separately sold by DBSync. The salesforce CRM connector works with a few versions like Enterprise, professional, and unlimited versions. In case you wish to use Salesforce then you have to buy it separately and then integrate it with QuickBooks.
What about the salesforce CRM connector subscription?
Well, the new CRM connection is basically an option subscription service that syncs data from QuickBooks Enterprise Diamond to Salesforce CRM to help eliminate redundant data entry, get insights into the business, and get paid faster. One business file is supported per salesforce CRM connection subscription, which is restricted to one subscription purchased. The account file will be charged from the time you join until you cancel on a monthly basis. The salesforce CRM connector subscription will also be canceled, in case you terminate the QuickBooks enterprise diamond subscription as well.
Setup of Salesforce CRM Connector
The setup is essential to connect Salesforce CRM with QuickBooks. The setup is further provided by the DBSync so that you can implement it with much ease. The packages are available with different steps and the price varies according to the package setup that you bought.
QuickBooks Enterprise 2022 is a robust software that provides you with a bunch of functionalities. Hopefully, reading this segment might help you in some way to make the best use of QuickBooks Enterprise 22.0 and its functionalities. However, if you have any queries regarding the software at any point in time, then feel free to ring us up at +1-888-510-9198, and get answers to all your queries immediately.
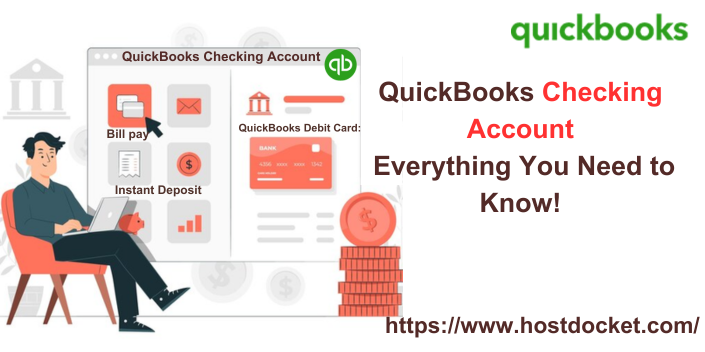
If you run a small business, then a QuickBooks checking account is something that you need to know. QuickBooks checking is a monthly fee-free checking account where all customer payments are deposited. You can use your QuickBooks checking account to save money or make use of features like envelopes to save proactively. It is a business account with no monthly fees, minimum balances, or instant deposit fees. With a QuickBooks checking account, your business gets complete financial management, cash flow forecasting, and interest-earning potential. To give you a better insight into QuickBooks checking account, here we are with this segment sharing the details related to QuickBooks checking account, along with the procedure to use it.
Thus, make sure to read this segment carefully, or you can also connect with our technical support team at +1-888-510-9198, and we will provide you with instant support services.
QuickBooks checking is a business account designed for small businesses to let them have financial freedom. QB users can open a bank account that lets them get fast payments with no monthly minimum requirements. Just like other checking accounts, you will get a debit card. The significant difference is that you can immediately start spending your funds with an instant deposit instead of waiting for incoming funds to clear. You further get access to a virtual debit card till you get your physical card.
In order to open a checking account, you just need basic information, such as business name, employer identification number, address, and phone number. QuickBooks checking is free, but you need a QuickBooks online account to access QuickBooks checking account.
Features of QuickBooks Checking Account
Free to Access
Qualified balance requirements or monthly fees.
Cash flow forecasts and analysis
ACH transfers are free of charge
Save money for expenses in envelopes to earn 1.25% APY.
QuickBooks Debit Card: A debit card makes it possible to make purchases using the cash balance in QuickBooks. It further links to QuickBooks cash business bank account and reconciles with QuickBooks without many issues.
QuickBooks Checking Account: A business bank account gives complete financial management, cash flow access, and interest-earning potential.
Access to Instant Deposit: With instant deposit, one can process incoming cash using QuickBooks payments without having to wait for them to clear. Instant deposit offers free, instant access to funds from QuickBooks payment in QuickBooks cash account for approved transactions.
Google Pay and Apple Pay: You can connect your QuickBooks debit card to Google Pay and Apple Pay to skip lengthy online checkout forms and quickly pay in person within one touch.
Seamless QuickBooks Integrations: You can use your money in the checking account to run payroll, accept payments, and create invoices in QuickBooks online and then send them directly via checking account because QuickBooks checking seamlessly integrates across the QuickBooks online platform. All these activities are reconciled and accounted automatically for in their QuickBooks file for a complete money-in and money-out view.
Envelopes: Business owners can use envelopes to set money away for specific planned or unexpected expenses, preventing unintentional use of their future spending.
Bill pay: Small businesses can plan vendor payments and manage all their money-out transactions in one location. They have QuickBooks set up to record the transactions, so their books are automatically reconciled.
Cash flow planner: This feature offers a complete view of the company finances via a dashboard that shows how much money is inflowing and outflowing. This end-to-end analysis gives an overview of the financial inputs to predict the business’s cash flow over the following 90 days.
Mobile check deposit: Businesses can collect checks from customers or vendors and deposit the money directly into their accounts. In the coming days, QuickBooks checking customers will be able to receive mobile check deposits.
Now that you know the basic information related to QuickBooks checking account, it is time to perform the necessary steps to use QuickBooks checking.
Step 1: Set up your QuickBooks Checking Account
You need to register QuickBooks payments and QuickBooks checking, in case you haven’t already. If you are accepted, then you will be given a QuickBooks checking account within 7 to 10 business days, and your QuickBooks debit card will arrive in the mail.
Step 2: To QuickBooks checking connect a bank Account
To begin with, you simply need to head to business overview and then select cash flow, and then click on QuickBooks checking.
Now, in order to transfer money between your accounts, first, choose transfer. To send money, you will have to start the connection.
After that, add a bank.
Once you have entered the bank’s name, you need to choose the type of the account.
Enter the account number and routing number
After that, choose the next tab when you are ready to connect.
After this, within the next three days, QuickBooks will make two small deposits to the account. You need to recheck the transactions in QuickBooks when you see the deposits in the account.
Step 3: Transfer Money in and out of the QuickBooks Checking Account
You can simply view the balance of the QuickBooks checking account at the top of the cash flow menu. The accountants having read-only access to QBOA can view the QuickBooks checking account for their clients. They can further access other documents, download statements, and verify transaction information. You need to access the client view to access the read-only QuickBooks checking section.
Fill up your QuickBooks checking account with money
You need to first select QuickBooks checking from cash flow under business overview.
After that, select transfer and then right option to transfer money between accounts.
You now have to enter your desired transfer amount.
Pick + in the from field, and then select your connected bank account.
Once done with that, you need to select QB checking account in the to field.
You need to then enter the desired transfer amount.
Withdraw money from your QuickBooks Checking Account
Withdrawing funds from QuickBooks checking account is possible in a few ways. You need to choose cash flow from the business overview and then go for QuickBooks checking. Here are the steps that you can perform to transfer money out of the checking account.
The very first step is to choose move money between your accounts after selecting transfer money.
After that, the amount to be moved from the checking account should be entered.
The next step is to select your QuickBooks checking account in the form field.
Also, click on the plus + icon and select a bank account.
The last step is to select finalize transfer when you are ready.
Using QuickBooks checking account to pay bills
You need to first start by selecting Pay a bill
After that, follow the steps that show up on the screen to schedule and pay by paper check or ACH.
In order to withdraw money from ATMs and make purchases, you can use your debit card.
Step 4: Categorize your transactions
QuickBooks can categorize as many QuickBooks checking transactions as possible on its own. However, it can’t classify everything. In order to categorize your QuickBooks checking transactions, you must access the bookkeeping menu and choose transactions.
Well, QuickBooks checking is basically a no-cost, no minimum balance, no required daily balance business checking account with a debit card. It further has no monthly service charges and for eligible users, the quick deposit is available at no additional cost. Moreover, small business owners can now access all in one business bank account that is effortlessly integrated with the books. This further lets small businesses manage their finances, see their full financial picture, pay their employees and invoices, accept payments, and also access financing.
QuickBooks cash business checking
The QuickBooks business checking account was added to the product line of QuickBooks online in the year 2020. It provides standard business checking functions like ACH transfers, a debit card, and access to AllPoint ATM network, along with offering 1% interest on all balances. What makes it even better is that there are no fees or minimum balance requirements when opening an account. The users can have an unlimited number of transactions, but the volume of those transactions is set up to a certain limit. With a debit card, one can make purchases around $10,000 per day and ATM withdrawals up to $1,000 per day and $5,000 per month.
The remaining QuickBooks and QuickBooks cash are meant to work together without any sort of issue. To understand it better, here is an example: the money might be in the checking account within minutes if users receive payment using QuickBooks payments. One can anticipate gaps using a dashboard that shows the most recent transactions and uses machine learning to forecast cash flow for the following few months. The users can also create envelopes inside the bank account to keep money away for particular uses like payroll or debt payments. It should be noted that a check deposit is not yet an option. Thus, customers who regularly deal with checks may wish to search elsewhere for a business banking service. You must enter the recipient’s details online before the bank sends the check on your behalf. Also, you do not have an option for wire transfers.
Why QuickBooks cash is ideal for small businesses?
Firstly, small businesses don’t use checks.
They prefer to manage most of their finances digitally and value the insights that their digital solutions can provide, such as cash flow forecasts.
They get interest on the checking account balance.
Towards the end of this segment, it is believed that the reader might be able to make the most of a QuickBooks checking account. Just in case there are any sort of queries, then in that case, consulting our technical support team at +1-888-510-9198 is suggested. Our certified QuickBooks ProAdvisors will definitely answer all your queries immediately.