Get to know all about QuickBooks Online Sync Error
QuickBooks is an avant-garde software that has changed the way bookkeeping is finished. Today, this product is being utilized by medium and small sized business, bookkeepers and even individual as it accompanies numerous advantages.
However, as it is a software it often has issues affecting the business processes. QuickBooks Online Sync error is one such problem that users often face. The online sync error in QuickBooks happens when a vendor credit in Bill.com attempts to sync to QuickBooks Online but the reference number is greater than the maximum character to be provided. You can contact our QuickBooks online support number .i.e. +1-888-510-9198 if you have any queries related to your QuickBooks.
Sync Settings for Resolving quickbooks online sync error
In jopper, if you want to sync QuickBooks
Click on ‘QuickBooks Icon’s Sync Settings‘.
To sync an item, the above item needs to be checked off. For example , you want to sync, Services and products in order for invoices must be checked off.Timesheets is the only exception.
Clients
Assume, two customers in Jobber “Alle Pascal“, in the both clients can be synced with QuickBooks.
In above assumption we would consequence be able to that you have an equivalent customer of this customer in Jobbler. For this very reason the system can’t send over the information to QuickBooks. Delete the client with no Sync Icon on it to reduce this issue.
One of the important thing is that only active clients in QuickBooks software can get synced with the jobber.
In case you want to make modification to a client that is in sync then you need to make a change in QuickBooks. It is more effective for QuickBooks client than over jobber.
If you want to ‘Add a new client‘ in jobbler as well as include the email address, so it will sync with QuickBooks with the reliable delivery method set to ‘Print’.
It often happens that you have the same client both in jobbler and in QuickBooks before you sync them together. This can lead to duplicate client profiles and to avoid this one account should be freed of the client either jobbler of QuickBooks
Billing Address to Remove QuickBooks Online Sync Error
The billing address is leading to QuickBooks. You want to edit the billing address for a client choice which is sync and this can be very easily done in QuickBooks.
Company Person
A very important feature of QuickBooks is company or person. When we want to move a client from QuickBooks to jobbler during that time in the jobber the client is either created as a company or person.
When there is no company present in the QuickBooks profile, it is better to keep the person in jobber.
Client can be set easily if there is no company name appears with no name or last name.
For example the display name in QuickBooks is same as the first and the last name then the client will be made as a person in the jobber. Often the first and the last name is different from the one displayed then the jobber can make the client as a company.
Invoices
Invoices are that in which we can sync from jobber to QuickBooks. In this jobber will import the memo, issued date, due date, and line items. In QuickBooks invoices made so that they don’t sync to the jobber.
Use Sync settings so that once an invoice is sent it will immediately be flagged to sync to QuickBooks
Below are the follow ways to use sync settings
First click on QuickBooks icon and then press on Sync Settings. Verify the selected invoices and Push to QuickBooks when marked sent.
In case your selection is only invoicing then select sync to QuickBooks you can mark Sync Selected invoices.
Maintaining records of payments is an important task and it is necessary in QuickBooks to sync payments in jobbler.
If you are syncing your invoices with QuickBooks and to record all payments for these invoices in jobber and then syncing the payments to QuickBooks.
Once the procedure gets done and the payment successfully synced, then the changes made to the payment or deposit in either jobber or Quickbooks will never be sync. These changes will need to be made in both jobber as well as QuickBooks.
Products and Services
Products and services are available to sync from jobber to QuickBooks and also the other way round.
These are available to sync from jobber to QuickBooks and from QuickBooks to jobber vice versa. If you want to sync, all effective items from QuickBooks will be fetched by jobber and then names of these items will be compared to the names of items in jobber.
Many a times matches are not found, then new record within jobber are created. If any product and services in jobber which are not in QuickBooks are then moved to QuickBooks.
Properties and Clients
In this, the jobbers match up finished clients and sub-clients from QuickBooks. A customer in QuickBooks syncs over as a client, while the sub-customer sync over as a property to the jobber.
If the the properties are created by jobbler then do not sync them with QuickBooks. When the sub-customer doesn’t have a mailing address it doesn’t get imported to jobbler account.
Time-sheets
Timesheets includes all the entries in jobbler and is also able to sync time tracking in QuickBooks. Only authorized timesheets can be used with QuickBooks. Teams can be allotted by specific hours by clicking on management and then Approve Timesheets section.
The best part is that usernames can be exactly the same in QB and jobber to sync the Timesheets.
When the Timesheets is synced with QuickBooks the program will provide the total hours the users worked for the day.
Now after reading the short article, I wish that you understand every little thing regarding QuickBooks online sync errors. For any type of additional information contact us at our toll-free QuickBooks Support Number .i.e. +1-888-510-9198 or mail us at [email protected] and we can help look into it for you.
What are the common causes of QuickBooks Online sync errors?
Some of the common causes of QuickBooks Online sync errors include incorrect login credentials, poor internet connection, outdated software, and server downtime.
How can I resolve QuickBooks Online sync errors?
If you are facing QuickBooks Online sync errors, you can try the following steps: check your internet connection, update QuickBooks to the latest version, and ensure that your login credentials are correct. If the issue persists, please feel free to call our toll-free number +1-888-510-9198 for assistance.
Can I still access my QuickBooks Online account if there is a sync error?
Yes, you can still access your QuickBooks Online account even if there is a sync error. However, some features may not be available until the sync error is resolved.
What should I do if I encounter a QuickBooks Online sync error multiple times?
If you encounter a QuickBooks Online sync error multiple times, it is recommended that you reach out to QuickBooks support for assistance. You can call our toll-free number +1-888-510-9198 for a quick and easy resolution to your sync error issue.
How long does it take to resolve QuickBooks Online sync errors?
The time it takes to resolve QuickBooks Online sync errors can vary depending on the cause of the issue. Some sync errors can be resolved quickly, while others may take longer to fix. If you need help resolving a QuickBooks Online sync error, please call our toll-free number +1-888-510-9198 for assistance.
Over the past few years QuickBooks has become one of the most trusted accounting software in the world. Right from small and medium businesses to accountants to even individuals are using this software as it comes with many perks. Packed with powerful features, this accounting program can handle bookkeeping, payroll, manage sales and finances and also helps with inventory. This software also helps in tracking payments and finances. Even after being the best accounting program, it does have problems. In this article, we are going to share the complete details about QuickBooks banking error 9999, to help you culminate such issue successfully. However, if you are seeking for any sort of professional guidance, you can reach out to our technical support team at +1-888-510-9198, and our certified ProAdvisors will answer all your queries.
Many a times, QuickBooks face error and of such common issue that users face is banking Error 9999. Error 9999 is a script error that can block your internet connection of your bank and QuickBooks Online. When this error happens the system hangs, responds slowly or just stops working. This situation can really affect the business operations.
QuickBooks banking error 102 happens when you try to update your bank information. The best thing is that when this issue comes up you can report the error by yourself or seek advice from QuickBooks online support professionals.
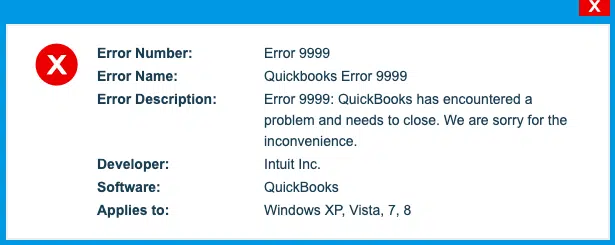
You might see the following error messages on your desktop screen:
Error Message: “Sorry, we can’t update your account. Please try updating again later. (9999)”
Or
Error code 9999 – Can’t update
To Report Regarding the Error 9999, you have following options
All about reporting regarding Banking error 9999.
On the banking transaction screen, you have to click on the “Report” Issue which is there on the error.
Provide your “Registered name” as well as “Email address” and then click on “Submit“.
There are a bunch of factors that trigger QuickBooks banking error 9999. Let us have a look:
The link between the bank and the Server is too slow, as a result of poor internet connection.
Or in case there is any antivirus or firewall application hindering the connection between the QuickBooks server and the bank’s website.
Excessive browser cache files can trigger such an error.
If the windows firewall is blocking the bank website
Moreover, some issues with the bank’s end can trigger such an error.
QuickBooks files mistakenly deleted can trigger such an error.
Fixing QuickBooks Banking Error 9999
There are a bunch of solutions that you can try to perform one by one to fix the banking error 9999 in QuickBooks. Let us explore each of the methods one by one:
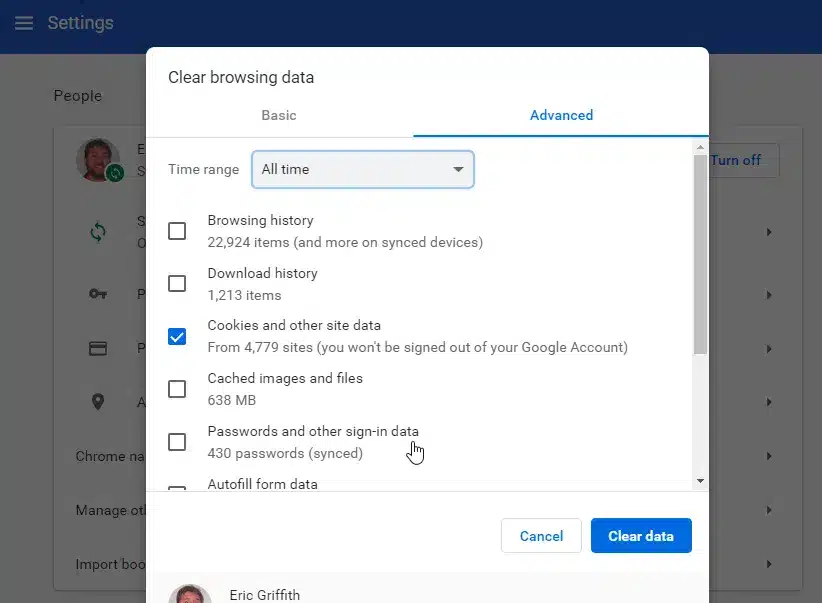
Method 1: Clear Browser’s Cache Files
For Google Chrome
You can launch Google Chrome and head to settings tab and click on clear browsing data.
Move to cached images and files option
Also, click on clear data tab
Furthermore, the cache files will be deleted
For Firefox
Enter About: preference#privacy in the address bar and click on enter tab
Further, select the clear recent history tab
Followed by clicking on clear now and select cache from the list
For Internet Explorer
Click on ctrl + shift + delete tab
You now have to head to the temporary internet files and website files from the delete browsing history page.
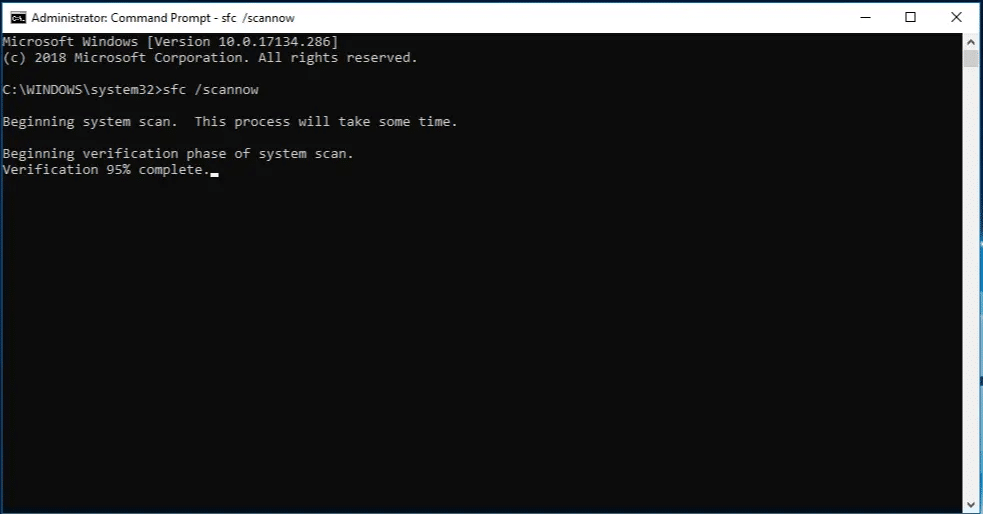
You can check your system files with windows system file checker. The command prompt window can be used using the below steps to complete the operation.
You need to first click on windows key
Now, in the search bar and enter command
Furthermore, select run as admin by right clicking the command prompt tab
Type the following command in the command prompt: SFC/Scannow
Click on enter tab.
You can restart the computer
And later on check if the issue is fixed or not
Method 3: Repair the registry files
Windows registry can be extremely essential for running various functions. It is crucial to fix any damaged windows registry files at the earliest. The steps below can help in fixing the registry files successfully:
The very first step is to select the start menu
After that enter command in the search box.
Press ctrl + shift and click on enter tab
If asked, click on yes
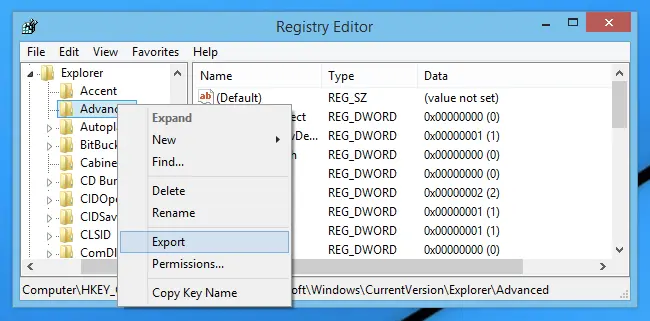
You now have to enter regedit
And further click on enter tab.
You will then have to right click teh key associated with the issue in teh registry editor
Also, proceed to the file menu.
Hit the export tab
The backup key should now be saved in the folder
Choose selected branch in the export range
And click on save tab
Ascertain that the .reg file extension is used to save the file
Make a backup of the registry entry and check if the issue is rectified.
By following these simple steps if still the issue doesn’t get resolved then worry not seek assistance from the QuickBooks Error Support Helpline Number at +1-888-510-9198. You will get an instant solution as well as some advice on how to avoid such errors in the near future.
FAQs related to QuickBooks banking error 9999
How do I fix QuickBooks Error 9999 in online banking?
You can perform the below steps to fix the online banking error 9999″ 1. The first step is to click on updates tab and run it three times to see the results 2. Clear cache 3. Disconnect and reconnect the feed 4. When you disconnect the feed there shouldn’t be any transaction listed in the list.
What is QuickBooks error 9999?
Error 9999 is a script error that causes interruption between the connection of your bank and QuickBooks Online (QBO). You can bring in your transactions through WebConnect.
How do I fix a bank error in QuickBooks?
You can sign in to QuickBooks online and head to bookkeeping and choose transactions and further select the bank transactions. Choose the blue blank square for the account you want to update. Go for edit tab in the bank account you want to update.
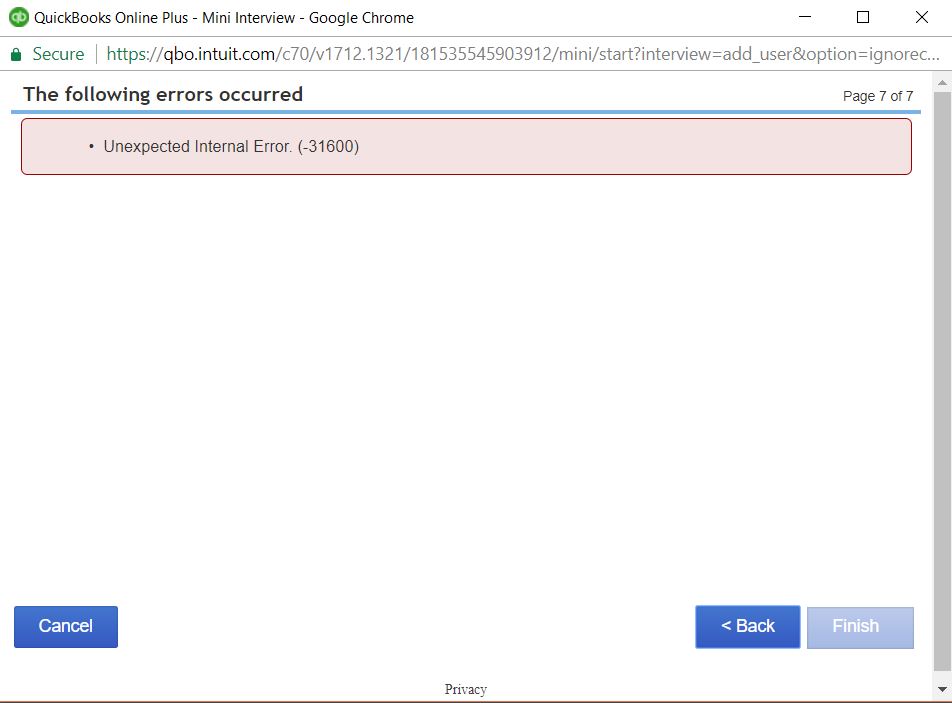
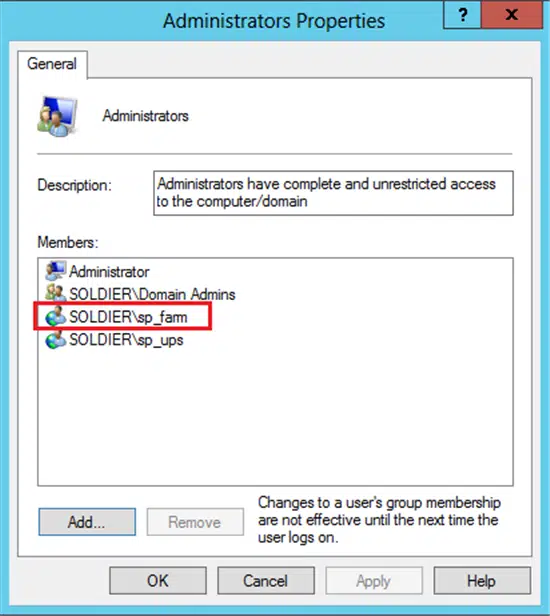
QuickBooks Error code 31600 is an unexpected internal error that can appear when you try to set up or remove access for the accountant. As a result of this glitch, the software might stop working or might not respond to any inputs. Such errors can further end up in data loss and further technical glitches. Not just that, when you try to create a portable company file or backup a file, you might land into such an error.
The image as shown above is similar to what appears on your desktop.
Experiencing this issue can be annoying. Thus, if you want to identify the possible triggers and also the quick fixes that you can implement, it is recommended to stick around this piece of writing, or you can also connect with our technical support team at +1-888-510-9198 and we will cater you with instant support and guidance.
QuickBooks error 31600 happens in various situations and they are listed below. Often understanding the reason or situation can help in finding a solution to this error.
Now that you have unleashed the causes of QuickBooks error 31600, it is the right time to perform the necessary steps to eliminate the issue successfully. let us explore each of the method one by one to get rid of the error in QuickBooks.
Solution 1: Press your QuickBooks Desktop
Press desktop when you are starting QuickBooks.
Press and hold the ‘Control Key’.
Then double click on the ‘QuickBooks icon‘.
When you have company open window, hold down the ‘control key‘
Click on desktop when opening the company file
First thing to do is click and select the ‘Desired company file‘ and not make any company open window.
Now hold the ‘Alt key‘ on your keyboard.
After this click ‘Open‘.
Now if you are asked to login in then release the key and enter your ‘login details‘.
You shouldn’t ‘Alt key‘ until and unless the file is completely open and now hold down the ‘Alt key‘ and click on ‘OK‘.
Once you do this you will get a blank screen on QuickBooks.
If you can highlight a ‘QuickBooks menu‘ though your pointer, your QuickBooks file will open.
From the company menu select ‘Set up users‘ and ‘Password‘.
Now click on ‘Set Up Users‘.
For Enterprise users click on ‘Company‘ and then choose ‘Users‘.
After this click on ‘Set Up Users and Roles‘.
Once done, click on ‘Add Users‘ and provide the ‘Username and Password‘.
Now click on ‘Next‘ option.
As required customize the ‘User‘
Now click ‘Finish‘.
Once down, with the new ‘Login details‘ login to the company file.
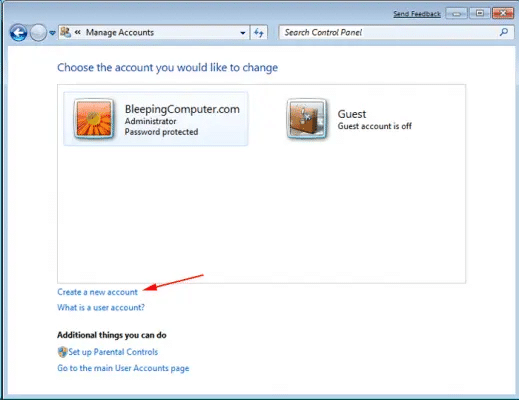
Solution 3: Create a Windows Administrator and fix QuickBooks error code 31600
You can try eliminating the error by creating a windows admin. The steps for creating an admin might differ for different windows versions. To further understand the process, continue reading the steps below:
For Windows 10:
Firstly click on ‘Start‘ button.
Now click on ‘Settings‘
After this select ‘Accounts‘ tab.
Click on ‘Family and Other users‘
Under other users you have to select ‘Add‘ someone else in the PC.
Once done you have to choose ‘I do not have sign in information for this person‘.
Now click on ‘Add a user without Microsoft account‘.
After this enter the name of the ‘New Account‘.
Click on ‘Finish‘.
Now select the newly made account.
Click on ‘Account Type‘
Click on ‘Administrator‘ and click on ‘OK‘.
Steps for Windows 8.1
To open the Run Window, Press ‘Windows + R‘ keys on your keyboard.
Now select the ‘Control Panel‘ and click on ‘OK‘ button.
Click on ‘User Account‘ and select ‘Manager another account‘.
Now select ‘Other accounts‘ and click on ‘Add an account‘.
You need to click on ‘Sign in without a Microsoft Account‘.
Choose the ‘Local account‘ and enter the ‘Username, Password and Password prompt‘
Click on ‘Next‘ tab.
After this the screen will return to manage other accounts screen.
Choose the ‘Account‘ which is newly made and click on ‘Edit‘
Click on drop down option and choose ‘Admin‘
Finally Click ‘OK‘ button.
For Windows 8, 7 and Vista
Open ‘Run‘ dialogue box Window by Pressing ‘Windows +R keys‘ on your keyboard.
Now click on ‘Control Panel‘ and click on ‘OK‘ button.
Now click on ‘User Accounts‘
After this choose the ‘Manage another account‘.
Now hit on ‘Create a New Account‘
Now type the name of the ‘New account‘ to be created
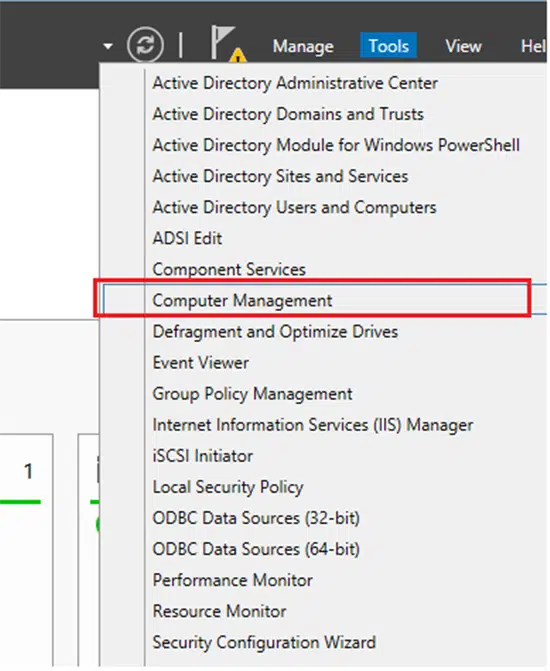
Another possible method is that you can try to create a new server using the steps below and try fixing the error.
The first thing to do is open the ‘Server Manager‘.
Now click on ‘Tools‘
After this select on ‘Computer Management‘
Increase ‘Local Users and groups‘
Now select the ‘Groups‘
Double-click the ‘Administrator group‘ to open the Administrator properties windows.
Now Hit on ‘Add‘ option.
In the Select User section choose ‘Computers, Group Windows and Service Accounts.’
Now type the name of the accounts that you want to add in the local admin groups.
Finally Click on ‘OK‘.
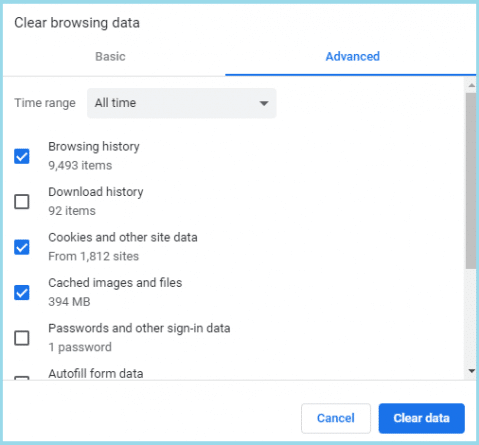
Solution 5: Browser Inspection to fix QuickBooks error code 31600
QuickBooks error 31600 can be seen if there is any issue with the browser. You can try performing the steps below and inspect the browser for any configurations. The steps involved here are:
Just in case you are using QuickBooks online, make use of the updated version of any of the search engines like Mozilla Firefox, or Google Chrome.
Once you have checked the browser version, clear all your search history and remove the cache.
Close the browser and further log in again.
Moreover, press ctrl + shift + del together while the browser is open.
The history window will open and you now have to choose all the boxes.
In case you are using Google Chrome, set the timing to – The beginning of time, or for Firefox, you can choose everything option.
By the end of this segment, we believe that the user might be able to turn down the error code 31600 in QuickBooks successfully. On the contrary, if the user is unable to or comes across a similar error again even after implementing the set of steps enumerated above, then in that case, it is suggested to connect with our QuickBooks Technical help @ +1-888-510-9198. Feel free to reach us and get answers to all your queries immediately.
FAQs related to QuickBooks error 31600
How do I fix error code 31600 in QuickBooks?
You can try fixing the error code 31600 using the steps below: 1. Create an admin 2. Create a new server 3. Browser Inspection 4. Check for the affected user
How do I fix QuickBooks files?
You can repair your company file using the rebuild data utility. The steps involved here are: 1. Move to the file menu, hover over utilities and choose rebuild data. 2. Choose ok on the QuickBooks information window 3. After that let the tool repair your file 4. You now have to choose ok tab 5. Go to the file menu 6. And let the tool check your file for data issues
How does a QuickBooks file get corrupted?
A QuickBooks company file can get corrupted due to hardware or software issues, abrupt system shutdown, network connection errors, large file size, virus attack, and much more.
How do I fix a reconciliation error in QuickBooks?
You can try fixing a reconciliation error in QuickBooks by entering the correct amount. 1. Select edit info in the reconciliation window 2. Review the ending balance and ending date 3. You now have to check your bank statement and make edits 4. Choose save once done.
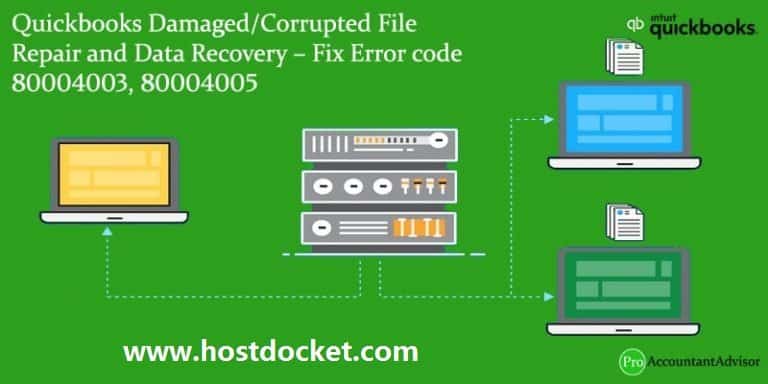
Fix Error Code 80004003, 80004005 – QuickBooks Damaged/Corrupted File Repair and Data Recovery
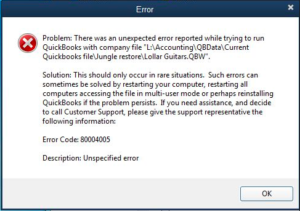
Troubled by QuickBooks condense data errors and can’t find an ideal way dump them? Well to save you from such a situation, we are here with this piece of writing. You might shockingly bump into condense data errors, when using QuickBooks accounting software and especially when trying to archive the data file. The condense data errors like 80004005, 80004003 in QuickBooks can hinder the smooth working procedure midway and might not let the file be condensed. The condensation process basically indicates the process to reduce the company file size. This feature further helps in reducing the size of the company file to a considerable degree restoring QuickBooks performance. You can land this this issue depicting a bunch of warning messages on screen, which include:
Warning 1- QuickBooks encountered a system error when trying to archive your data file. QuickBooks will not condense your data file. The error is – an unspecified error. Please try the operation again.
Warning 2- QuickBooks encountered an error and was unable to successfully complete the condense process. Your company file has been restored to its original state.
Warning 3- Unable to run QuickBooks Clean up data utility
Warning 4- Not enough storage is available to complete this operation Illegal operation error
You can come across these errors due to damaged company file at the time of attempting to condense the QuickBooks company file. Also, the issue QuickBooks Error 80004005 can be fixed by Intuit data services tools as it can scan and repair company files. The process will eradicate all the damaged files. To help you culminate these errors successfully, we have drafted this piece of writing with the complete details regarding these errors. You can call our QuickBooks Data Repair Support teamon +1-888-510-9198 to obtain these QuickBooks errors solve shortly. Having said that, let us delve in deep and unleash further about condense data errors!
QuickBooks Condense Data Error shows up a different error code, for example, QuickBooks error code 80004005, 80004003. These codes indicate that company file repair in detail is required and keeps users from facing company data loss in condensing utility process or later. The troubleshooting for these errors may also not be the same. If you are performing the troubleshooting steps for QuickBooks error code 80004005, please ensure that you keep a portable backup of your company file.
How to Resolve Error 80004005 and 80004003 – QuickBooks Condense Data Errors?
What makes QuickBooks an ideal software even after being prone to certain errors is the fact that the users can implement some set of steps to rectify the errors successfully. And the same theory applies in case of condense data errors. Let us explore each of the methods that can be implemented to culminate the condense data error in QuickBooks.
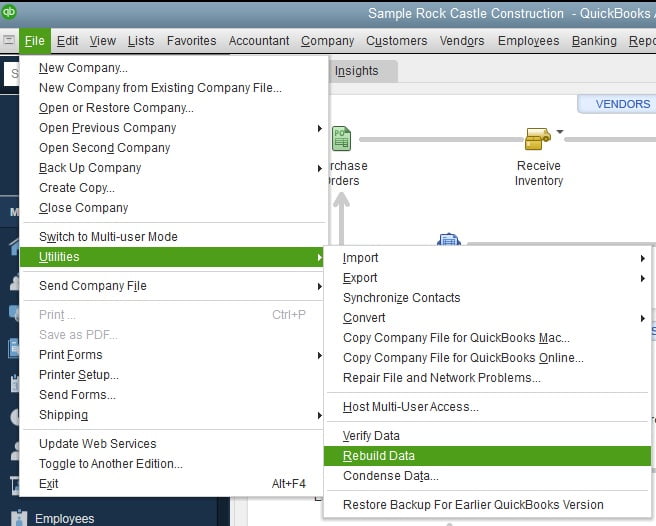
Technique 1: Use Rebuild Data Tool
First of all, ‘Reboot database server‘ or your computer system.
In case the step mentioned step doesn’t work, check if ‘QuickBooks is configured appropriately‘ and if the PC that hosts the data file is working properly
Verify and Rebuild to fix QuickBooks Condense Data Error 80004005
Tips to verify and rebuild to repair QuickBooks Condense Data Error 80004005
Firstly, Login to your QuickBooks and run it as a ‘System Administrator‘
Go to your ‘Company file‘
Choose ‘Utilities‘
Select the prompt that will allow you to back up your file.
Select ‘Verify‘ to check if the company file is hosted right.
At times, a mere reinstallation of QuickBooks can rectify the issue to a certain extent, and clean installation is a more advanced version of the same. You can try performing the below procedure to clean install QuickBooks.
Step 1: Remove QuickBooks
You can try opening the windows start menu at first.
Eventually, search for the control panel.
Choose the programs and features tab or uninstall a program.
You would then have to select the version of QuickBooks desktop you want to remove.
Go for the option to uninstall/change, remove.
Furthermore, select the next tab.
In case you are able to spot this option, try to sign out and sign in back to windows as admin.
Step 2: Install QuickBooks Desktop Again
Once you are done, install QuickBooks desktop, and when you install again, QuickBooks will automatically install new folders and rename the old ones.
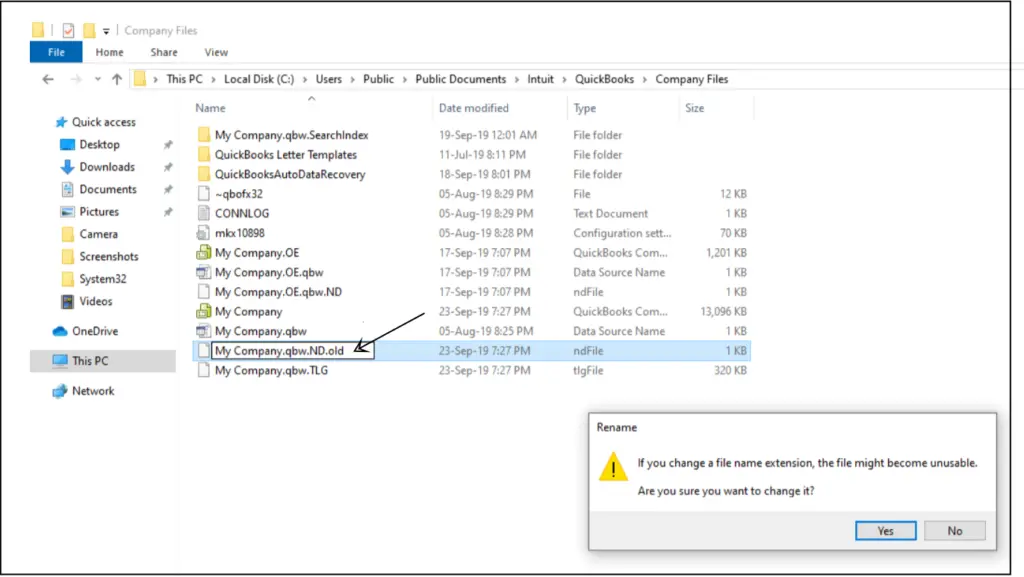
Technique 3: Change the name of QBWIN.LOG file
In case you are facing an issue when condensing the file, try to rename the file. You simply need to add old in the file extension and then condense the company file.
Start off by opening the QuickBooks folder in the Drive C.
Furthermore, you need to right click the QBWIN.LOG file.
Heading forward, choose Rename tab.
And then, add .old at the end of the file name.
After renaming the file, try to launch QuickBooks program and try condensing the company files.
Other than the above discussed procedures, you can try performing the below shared methods to eliminate the condense data errors in QuickBooks.
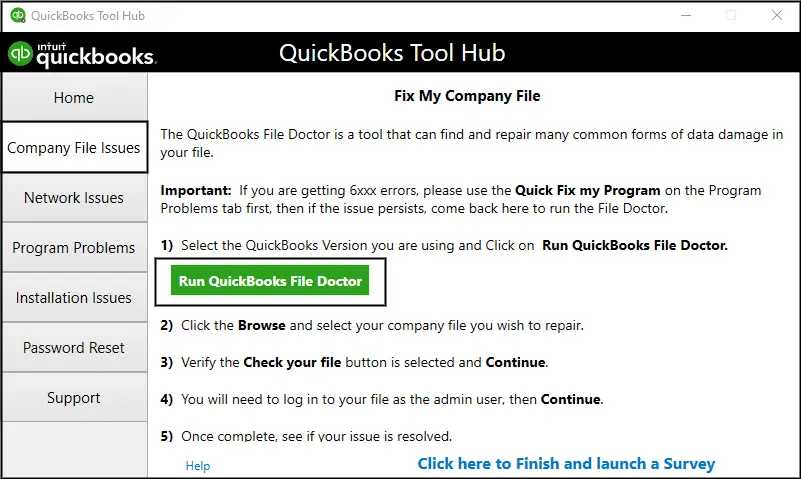
Method 1: Run QuickBooks File Doctor Tool
As the name suggests, QuickBooks file doctor tool is designed to eliminate all sorts of file related issues in QuickBooks. You can try performing the below set of steps to run the file doctor tool.
Method 2: Fix Negative Entries in QuickBooks Company file
To start off with, explore QuickBooks Installation, and further open the qbwin.log file.
You will then have to scroll down to the bottom of the file and search for the error and type the error in the text.
Heading forward, the text in the file will show the transaction and entries that are having a negative value or any other type of issue.
You will then have to note the invoice number and look for the same in the company file.
Perform the necessary changes to the value of the transaction or the entry and save the file.
Towards the end, you need to try condensing the company file again and check if the issue is rectified or not.
Method 3: Start Windows in Safe Mode
Entering safe mode helps in eliminating various errors hindering the smooth working process. In order to enable the safe mode on windows, perform the following instructions:
Simply begin by pressing shift key and then restarting the system.
You will find the Advanced Boot options there on the startup screen.
Make sure to choose the troubleshoot option.
And further click on the advanced options. This will provide you with some advanced options, one of which is the startup settings.
There you need to click on the Restart tab.
When Windows starts, you will see the active boot options list.
You need to press F4 key to enable safe mode.
After you enter the safe mode, the system will itself prevent the third-party application from performing, ultimately preventing the errors.
If the Error 80004005, 80004003 persists or any new error code shows up you can contact our round the clock QuickBooks error support number at +1-888-510-9198. We are a team of highly trained and experienced QuickBooks experts and can help you fix any QuickBooks related issue in the least possible time.
FAQs
What happens when you condense data in QuickBooks?
When you condense the data file in QuickBooks, it reduces the size of the company file. It further converts individual point data for each calendar month into a single summarized entry. Condensing data conserves disk space. Not just that, it removes data points from the Single Test Point Data Entry dialog box and adds them to the Single Test Summary Data Entry dialog box.
How do I delete a transaction from QuickBooks condense data?
For this, you simply need to: 1. Click on the File menu. 2. After that, choose Utilities. 3. Now, select Condense Data. 4. Go for, Remove the transactions you select from your company file and click on Next. 5. Choose what transactions do you want to remove and click on Next. 6. Opt for how transactions should be summarized.
Can I undo the QuickBooks Condense data process if I encounter errors?
No, the condense data process cannot be undone. Thus, it is suggested to keep a backup of the company file before condensing the file.
QuickBooks Condense Data Utility often assists in streamlining the company data file and enhancing performance. Intuit, lets the QuickBooks users to make use of the condense data utility feature and reduce the size of the company file to make it more compatible and easy to use. To use this utility, you simply need to use the QuickBooks condense data tool. This tool comes in handy, when the file size is way too large and causing issues. This particular tool was introduced in the year 2019. The tool keeps the data intact and ensures that your overall file size is usable.
To help you understand QuickBooks condense data utility better, we have drafted this segment right here. Thus, stick around this article and find out the quick ways that can help you condense your data using the tool. However, if you need any technical guidance, you can contact our team at +1-888-510-9198, and let our certified professionals help you fix the issue.
Condense Your Data using QuickBooks Condese Data Utility
Now that you have an idea about what QuickBooks Condense Data Utility is, it is time to understand the right steps that can be performed to condense your data. Let us have a look:
Condense QuickBooks Data While Keeping All Transactions
Here you simply have to opt for File and then go for Utilities
Now, choose Condense Data
After that, go for Keep all transactions, but remove audit trail info to date
The next step is to click on Next
Once done with that, choose Close.
Condense QuickBooks Data by Removing Selected Transactions
Under this procedure, you will have to opt for File tab.
Later on, choose Utilities
Once done with that, go for Keep all transactions, but remove audit trail info to date.
The next step is to choose Next.
Lastly, let the process complete, and choose Close.
Condense Data by Removing Selected Transactions
The very first step is to choose File and then go for Utilities
After that, choose Condense Data
You now have to choose Remove the transactions you select from your company file.
Now, select Next tab
The next step is to choose the transactions you would like to remove and then hit Next.
Choose how transactions would be summarized, and then click on Next
Select how inventory should be condensed, and click on the Next tab
After that, choose the recommended transactions you would like to remove and then hit the Next tab
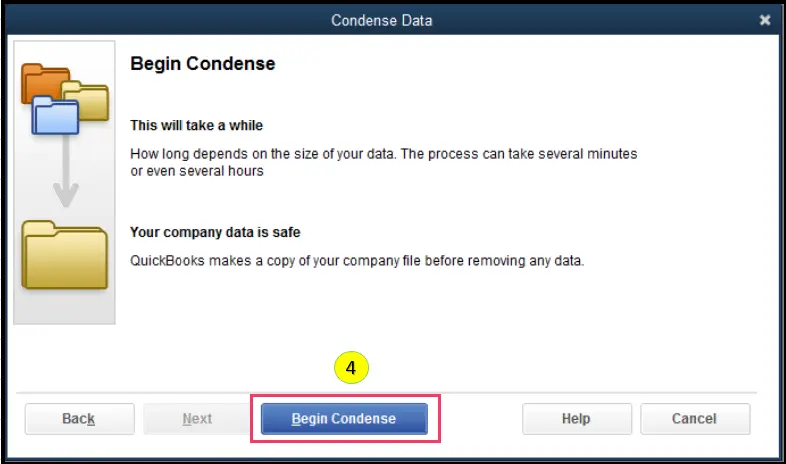
You now have to go for the list entries you would like to remove and click on the next tab
The last step is to choose begin condense and wait for the process to complete.
Understand QuickBooks Condense Data Utility Better!
There are a few factors that you can know to understand the QuickBooks Condense Data Utility in a better way. Let us Explore:
QB Condense Data Repair isn’t Reversible
After you condense your company file, note that it can’t be undone. You can try other solutions first, before you perform the steps related to condensing the data. Here are some quick reasons to do so:
Having a large data file
You have close to a list limit
In case you have upgraded your hardware
Your Accountant and technical support have discussed other options and are willing to proceed with condensing
Condense Data Utility in QuickBooks may or may not affect the size of the company file
It might reduce the size as it’ll remove transaction details and list entries.
Furthermore, open transactions won’t get condensed and the file size won’t be affected
The condense won’t be available, in case there is no significant change to the file size.
Condense Data Repair might not fix Data file damage
There can be scenarios, when QuickBooks condense data repair might fail in fixing damaged files, in such scenarios, you need to try the following:
Fix data damage on the QuickBooks desktop company file
QuickBooks Condense Data Repair doesn’t remove certain transactions
Transactions
Description/Reason
Payroll Transactions
In case the condense date is before 12/31/2018 or if an employee’s W2 isn’t reviewed.
Invoices, payments, credit memos, and refund checks
In case they are not linked to each other in a proper manner.
Payments recorded to Undeposited Funds
If they haven’t been deposited to a bank account.
Bills, bill credits, and bill payment checks
In case they are not linked to each other in a proper manner.
Estimates linked to invoices
Estimates are non-posting entries and can’t be condensed into journal entries, which are posting transactions.
Sales tax not paid in Pay Sales Tax
Paying sales tax with checks leaves invoices open which are non-condensable.
Transactions linked to a non-condensable transaction
Example: You entered an invoice on 12/15/2015 and the corresponding payment on 1/15/2016, then ran the Condense Data utility through 12/31/2015. Both won’t be condensed. This is because the invoice is linked to a payment made outside the period.
The account-based reports will be accurate due to entries on accounts aren’t affected:
Profit and Loss (accrual)
Balance Sheet (accrual)
Statement of Cash Flows (accrual)
Trial Balance (accrual)
The item-based reports will be blank due to all of the item data is gone.
Sales and Purchase reports
Job Costing reports
Accounts Receivable and Accounts Payable Aging report
Cash Basis Reports
Cash basis reports for the condensed period will not be accurate. There aren’t any links from cash into income or from cash out to expenses.
Reports filtered by Class
Note that, any transactions summarized by the utility won’t have classes assigned. When you run a profit or loss by class report will show amounts in the unclassified column.
Sales Tax Liability Reports
It is important to note that the invoices with sales tax no longer exist. A condensed journal entry basically has an amount credited to income accounts. QuickBooks will not be able to identify what part of the income is taxable and which part is nontaxable. Moreover, the tax collected comes from the invoices, which no longer exist, so it will show zero.
The reports draw their data from items on invoices and bills. As there are no more invoices and bills, there will be no more items and the reports will be empty.
A/R Collections Reports
The A/R collection report will usually show the condensed journal entries under No Name. The entries will contain the entries to A/R that aren’t linked to closing transactions and are considered as open. The total is zero as all of the invoices in the file are paid.
A/R reports won’t show the condensed journal entries as they have a default filter of Names All Customer: Jobs. You need to remove this filter and the A/R aging reports that will show the condensed journal entries.
Audit Trail Reports
Only edited, voided, and deleted transactions are removed from the audit trail report when condensing.
Moreover, the condense data doesn’t remove the audit trail report.
The audit trail report info option will be available in case a company file has a significant amount of edited, voided, or deleted transactions.
Reconciliation
Note that the opening balance for your next reconciliation will be correct as the condensed journal entries are cleared transactions
The checks and deposits no longer exist, so the reconciliation reports might be incorrect or gone.
The statement date gets incorrect as the last reconciliation ismissing.
Note: Before you condense, and reconcile all accounts, print all reconciliation and discrepancy reports, or save these reports in PDF format. Also, backup the company file.
Toward the end of this segment, we believe that the reader might be able to successfully condense QuickBooks data file using the condense data utility. However, in case of any queries, or if the user needs our technical assistance at any point in time, then in that case contact us at +1-888-510-9198, and our certified ProAdvisors will help you with your queries immediately.


![How To Fix QuickBooks Error Code 31600? [Solved]](https://www.hostdocket.com/wp-content/uploads/2018/05/Ways-to-Resolve-error-code-31600-in-QuickBooks-1.jpg)