All You Need to know about Enter and Delete Transactions by batch in QuickBooks Desktop
QuickBooks accounting software is loaded with various features and functionalities, and one such feature is that it lets the user to quickly add or delete multiple transactions at once using the batch delete/void transactions utility. This particular feature is only available in QuickBooks Desktop Accountant 2018, Enterprise and Enterprise Accountant 18.0 and later versions. As a user, you will have to sign in as an Admin or External Accountant user. With this feature, one can perform batch entry of Deposits, cheques, Credit Card charges or invoices, Credit Memos, Bills and Bill Credits. Another crucial point to note here is that the batch delete/ void transaction tool doesn’t support multi-currency. The process to enter and delete transactions by batch in QuickBooks involves a couple of steps.
To make it easier for you, we have designed this piece of writing that shares the complete information about batch entry utility. Thus, stick around this piece of writing and learn the steps to perform batch entry of transactions successfully. However, in case you have any query or if you need any sort of technical assistance at any point in time, do not hesitate in connecting with our technical support team at +1-888-510-9198, and get answers to all your queries immediately.
Copy multiple transactions from one company file to another, to export transactions from another company file.
In case you have QuickBooks desktop accountant 14.0 and the later versions, then make batch entries of checks, invoices, credit memos, bills, credit card charges, and bill credit.
Features of entering and deleting transactions by batch
Here are the features and benefits of entering and deleting transactions by batch:
Batch Enter Transactions Feature
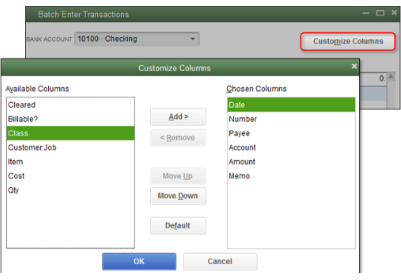
Select the order in which you want to display the data of columns and from the multiple data fields.
Enter the transactions into a personalized data entry grid.
Paste more than 1000+ transactions from excel and save them at one place.
Batch Delete Transactions Feature
Hide or show transactions having other linked transactions.
In all other storing systems, it is unattainable to see whether an invoice has a payment attached to it.
Filter by date range, based on last modified date or entered date.
A cleared column is something we suggest, as it helps you to decide whether you can actually delete it or not.
List of entering and delete transactions by batch in QuickBooks Desktop
Checks
Payees including Customers, Jobs, Vendors, Employees and other names
Steps to Entering and Deleting Transactions by batch in QuickBooks
Below are the steps to enter and delete transactions by batch in QuickBooks Desktop. Before you proceed with the steps, ensure that you backup your company file.
Enter transaction by batch in QB:
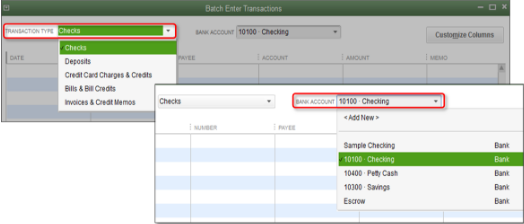
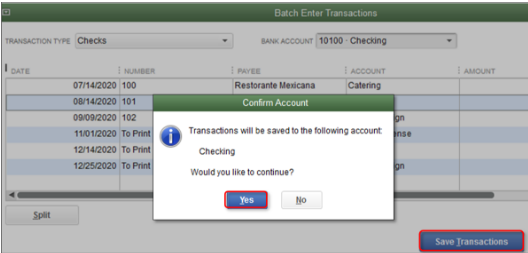
First, go to the Accountant menu and then tap on batch enter transactions.
Now choose the Transaction Type and Account.
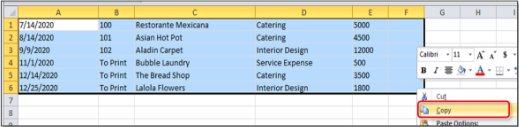
Open the spreadsheet which contains that transaction that you need to record in QuickBooks column.
Now categorize the columns in your spreadsheet to check the arrangements of the column in the Batch Transaction Screen.
After this click on Ctrl +A the information you want and rich click and then choose copy.
Finally in the Batch Enter Transaction screen, right-click the first date field and now choose Paste.
Important Note: Kindly note that if the name and account is not listed in the company file they will be displayed in red. So, click on the name or account and then choose Quick Add or Set UP.
Add Multiple Split Lines in the Transaction
The split transactions actually permit to add a single or more secondary split line to a transaction.
First thing to do is select the transaction which you want to add split line.
Now click on the Split tab
After this you have to type the needed details for each of the splits on a separate line.
Click on OK so as to return to the main batch Enter Transaction screen.
Finally, keep on doing this step for every transaction with multiple split lines.
This feature is presently available only in QuickBooks Premier Accountant, QuickBooks Enterprise Solutions 16.0, and QuickBooks Enterprise Accountant 2016 and the latest versions.
QuickBooks Enterprise Solution, QuickBooks Premier Accountant, QuickBooks Enterprise Accountant 2016 and newer.
QuickBooks Desktop Pro or Premier 2015, QuickBooks Enterprise Solution 15.0 and earlier.
Click on CTRL + D to delete faster.
Important Note: Untick the alert when removing a transaction or unused detail item to remove the warning pop up when you press CTRL + D.
This can also be done from the account register.
If you are trying to replace all your transactions, then visit the Intuit Marketplace for a third-party application that can help you remove all unwanted transactions at once.
Steps to delete the transaction by batch
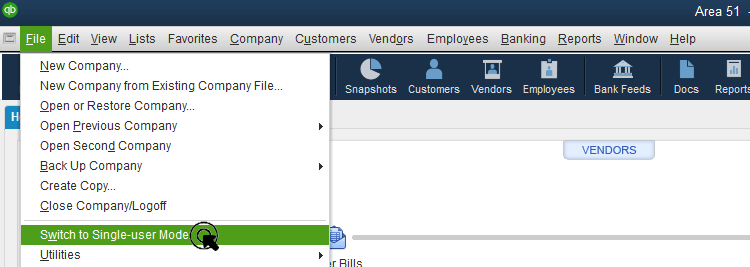
Find out whether the single user mode is applied or not. If you find yourself in multi-user mode, then head to the file menu and also switch to single user mode.
After that, head to the accountant menu and also select the batch delete/void transactions.
Select the transactions you want to delete or void from the available transaction list
The next step is to choose review or delete
After that, on the review batch, delete transactions screen, click on backup and delete option.
Hit the yes tab on the confirmation window
The last step is to select the option view deleted/voided transaction report.
Steps to file a batch invoice
The first step is to move to the customers tab and then go for create batch invoice.
After that, ensure the terms, sales tax rate, and dispatch method are up to date for all customers you send batch invoices to select each customer.
Double click the customer and open the additional info tab and change the information needed.
Search for the customers by selecting billing group
The user is then required to click on next tab
Once done with that, select the desired line item and template
After that enter custom message and click on next tab
Review the list of invoices and create invoice
The last step is to print or email as appropriate and click on close tab
Towards the end of this article, it is believed that you might be able to deal with the process to enter and delete transactions by batch in QuickBooks. On the contrary, if you have any queries, then seek assistance from our QuickBooks Enterprise Support team. We have top-notched experts with the latest technology to solve all issues that arise in QuickBooks software. Contact us today at +1-888-510-9198 and speak with one of our representatives.
FAQs Related to Batch Transactions in QuickBooks
How do I batch enter transactions in QuickBooks desktop?
In order to enter transactions by batch in QuickBooks, you can perform the below steps: 1. From the accountant menu, enter batch transactions. 2. Now, choose the appropriate transaction type and account. 3. Once done with that, open the spreadsheet containing the transactions you need to record in QuickBooks. 4. After that arrange the columns in your spreadsheet to match the order of the columns in the batch enter transactions window.
What are batch transactions in QuickBooks desktop?
In case you want to copy multiple transactions from one company file to another, then simply use the enter batch transaction feature in QuickBooks. This feature can help in saving and managing your time efficiently.
Can you remove transactions from QuickBooks?
Yes, if you void a transaction, the record of it remains in QuickBooks, but it won’t actually affect the books. However, when you delete a transaction, it is entirely removed from your books and won’t appear in the reports or accounts.
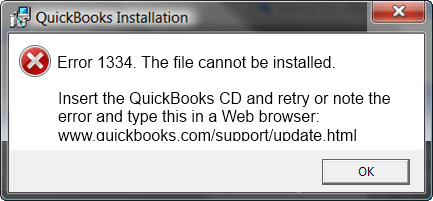
QuickBooks is an innovative accounting software that has helped millions of users attain their business goals. An incomplete, damaged or corrupt QuickBooks Installation file or .NET framework, however, may cause error 1334 or other similar error that may keep QB users from working on it. This error occurs with a warning message i.e., Error 1334. Error writing to file [file name]. Verify that you have access to that directory. Or Error 1334. The file cannot be installed. Insert the QuickBooks CD and retry.
You can experience this issue when program that you are running gets crashed. This error might further end up in system freeze or sluggish windows response. You can often come across similar issue when installing a program, or during windows startup or shutdown. In today’s segment, we are going to discuss about the error code 1334, its causes and fixes. Thus, if you are experiencing similar issue, then reading this segment is recommended. However, if you require expert assistance, then feel free to consult a team of technically sound QuickBooks professionals and let them help you with your queries.
QuickBooks issues should be fixed immediately as sometimes they may be irreversible. Here are some of the most credible solutions to QuickBooks Error 1334:
If the error Appears while Opening or Launching QuickBooks
Search and open QuickBooks Company file.
Locate file ‘extension .qbw’.
Double-click the company ‘.qbw file‘.
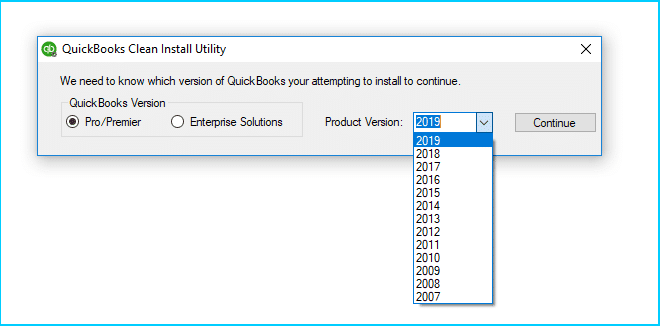
Solution 1: Clean Installation of MS Windows
Uninstalling and reinstalling Windows erases all the saved data from computer’s hard drive and your system will be starting afresh.
You can rather clean install windows to clean out all the junk and unnecessary log files accumulated on your system over the time from web surfing and other usage.
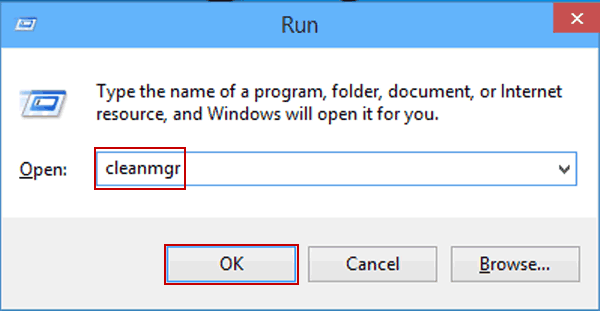
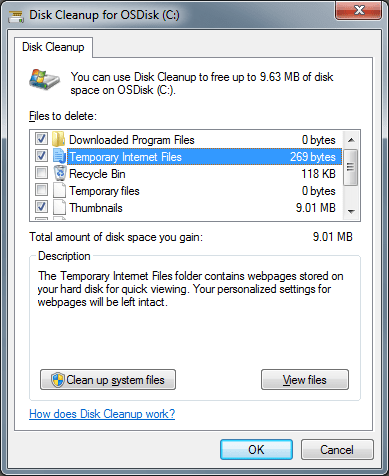
Cleaning system junk with Disk Cleanup
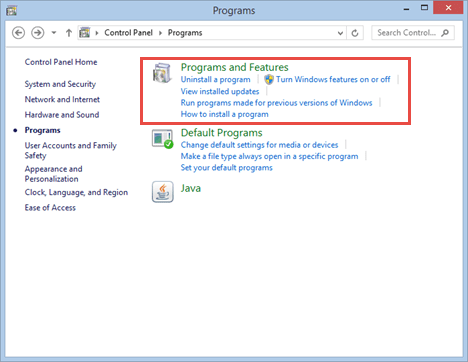
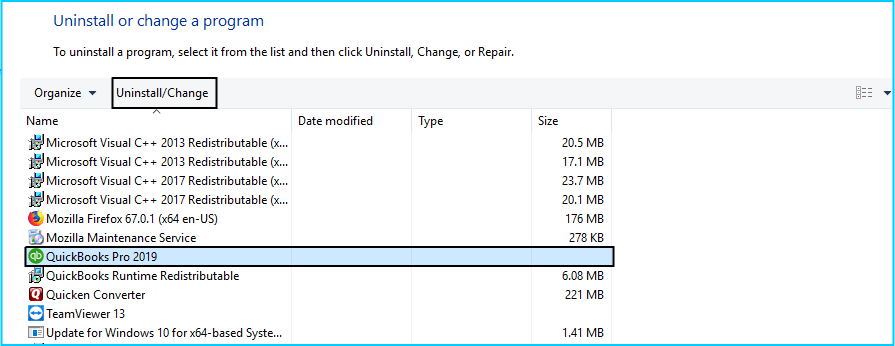
Solution 2: Add or Remove Program
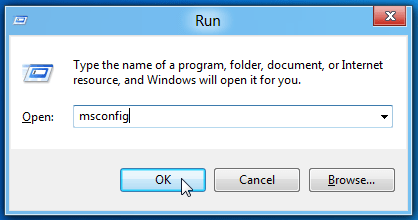
Firstlt Press Windows key and type ‘MSConfig‘ in the ‘Search programs and files‘ box.
Choose the ‘Boot tab‘.
Select ‘Safe Boot’ and then ‘Network‘.
Click ‘Ok‘ and select ‘Restart‘.
Allow your system to start in ‘Safe Mode‘.
The programs you choose to run will start up.
This process will allow you the opportunity to open and run QuickBooks software without any obstruction.
In most cases, the above-mentioned troubleshooting steps should be able to assist you fix QuickBooks Error 1334. In case the Error 1334 still persists, you can call our 24*7 QuickBooks Support Number .i.e. +1-888-510-9198. With cutting-edge tools and technology, we will fix this error as well as any other QuickBooks related issues in least time possible.
FAQs
Can I delete QuickBooks nd file?
The QuickBooks ND file is basically a configuration file that QuickBooks uses to connect to your company file. This file contains information such as the location of your company file and your login information. If you are having trouble connecting to your company file, you may need to delete this file and recreate it.
How do I run QBDBMgrN?
QBDBMgrN is a QuickBooks Database Manager designed to keep your QuickBooks data file organized and running smoothly. To run QBDBMgrN, open the QuickBooks software on your computer and go to the File menu. Click on “QBDBMgrN.” and the program will open.
How do I fix error 1334?
To fix QuickBooks error code 1334, the user can simply clear the temporary files. The steps involved here are: 1. The first step is to hold the windows key and then press R and type %temp% and also click on ok. 2. After that, press ctrl and press A. 3. Now, press delete and click on yes.
QuickBooks is a versatile accounting software that is used by millions of business owners and accountants across the planet. There is no doubt that it consists of various cutting-edge tools and technologies, but it sometimes receives errors and glitches that may cause it to freeze functioning. One error which users face while using the software, updating it, or while fixing an issue is QuickBooks Error 1335.
Here, in this blog, we will give you a detailed information of the causes, impacts and solutions of this error. Thus, make sure read this article till the end. Or you can also get in touch with our technical support professionals at +1-888-510-9198, and let them help you with all your QuickBooks related queries.
QuickBooks Error 1335 means the cabinet file (data1.cab) needed for ongoing installation is corrupt or damaged. Plus, the cabinet file (2), which is another vital file for this installation is not usable. QB Error 1335 is indeed a Microsoft Windows error that takes place while updating the accounting software or repairing its installation. You may get one of the following Microsoft Windows errors occurs when updating QuickBooks or repairing a QuickBooks installation:
Error 1335: The cabinet file [data1.cab] required for this installation is corrupt and cannot be used.
Error 1335: The cabinet file [2] required for this installation cannot be used.
What Causes QuickBooks Error 1335?
Here are some other reasons that trigger QB Error 1335 and their solutions:
Make sure that your software CD has no scratches and dust as they can cause issues in reading.
You can clean the CD softly and retry the installing it.
Installation issues normally appear because of insufficient installation memory settings on your system.
The system requirements of your computer for QuickBooks accounting software installation and refer the MS knowledge base for particulars on changing these settings.
You can temporarily disable some software. Including anti-virus software at the time of installing QuickBooks.
You can follow these solutions mentioned below to resolve your Error Code 1335. However, If you are not good in technical aspects or want a quick solution of this error then you can contact our QuickBooks Support team to get a feasible solution for this error.
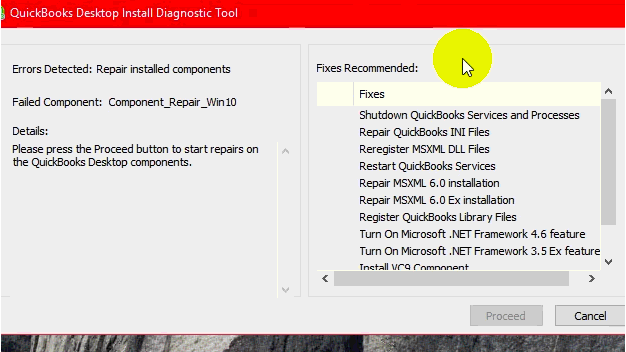
In case the error is not fixed even after running the QuickBooks Diagnostic Tool, you can try fixing the error using the below mentioned manual steps:
Get a hard drive installation of QB software to copy the installation folders from your QuickBooks CD to your hard drive and use copied files to install QuickBooks from your hard drive simply.
If in case you continue receiving errors from the CD on a second computer, the CD may reduce in size. You can download QuickBooks and then follow the QuickBooks software from your hard drive through the copied files.
If you still receive errors, then clear the temporary folder and reattempt to install it.
Solution 3: Clean the temporary folder
Here, the user needs to “reboot” the system and login to the system with admin rights
After that, head to the path that says: “For Windows 8,7, or Vista: C:\Users\username\AppData\Local\Temp “
We hope that you find this article helpful and resume working after fixing QuickBooks Error Code 1335. In case the issue still persists, you can call us at +1-888-510-9198 to save time and efforts. We are Host Docket, a leading QuickBooks Support & Help Service provider. With us on your disposal, you can rest assured of the best-in-class services in the least time possible.
Frequently Asked Questions!
What are the symptoms of QuickBooks Error Code 1335?
Here are some common symptoms of this error: 1. The following error message pops on the screen “Error 1335: The cabinet file [filename] required for this installation is corrupt and cannot be used.” 2. The installation process stops abruptly and fails to complete 3. The computer crashes all of a sudden. 4. QuickBooks crashing or responding slowly.
How to install the missing or damaged file manually?
The steps to install the missing or damaged file manually is elucidated below: 1. At first, access the Run Box (Use the short key – Windows + R). 2. Type “cmd” and press Enter. 3. Head to the folder containing the installation files using the CD command. 4. Type “msiexec /i [filename].msi” and hit Enter. 5. Perform the on-screen instructions to complete the installation.
Can I fix QuickBooks Error 1335 on my own?
Yes! One can fix QuickBooks Error 1335 on your own by following the troubleshooting steps: Step 1: Delete the temporary files. Step 2: Run QuickBooks Install Diagnostic Tool. Last Step: Disabling the antivirus program.
Trying to identify what triggered QuickBooks error code 6069 and what can be done to eliminate it? Well, we can help you out with this. QuickBooks error code 6069 is basically a 6000 series error that is often related to the company file. It can be seen when you try to make an invoice on a particular account or when trying to save it and the system shuts down for some reason. As a result of this error, one might lose the crucial data. QuickBooks Error 6069 happens in the following operating systems:
Windows 10
Windows 2000
Windows 7, 8
Windows Vista
Windows XP
Windows ME
The error code 6069 usually appears in QuickBooks with a warning message:
QuickBooks has encountered a problem and needs to close. We are sorry for the inconvenience”
This error might be encountered when trying to access the company file. To learn further about this error in QuickBooks, make sure to stick around this piece of writing till the end. Or you can further connect with our dedicated support team at +1-888-510-9198, in case of any queries related to QuickBooks.
Generally, the QuickBooks error 6069 occurs when users try to make an invoice in a particular account and when attempting to save it the QuickBooks program shuts down. This leads to loss of data thereby causing more trouble for the users.
Below are some of the possible causes behind this error:
QuickBooks software not downloaded completely.
Damaged or corrupted download of QuickBooks software.
Damaged Windows registry that is affecting the software.
Virus or malware adversely affecting QuickBooks application or any of its related files.
Interference of third-party applications with the QuickBooks software.
Symptoms of QuickBooks Error 6069
You will receive a message on the screen and your active program will crash.
The computer will slow down and often hang.
The computer will freeze
Solutions to QuickBooks error code 6069
Error code 6069 can easily be fixed through the below-mentioned solutions:
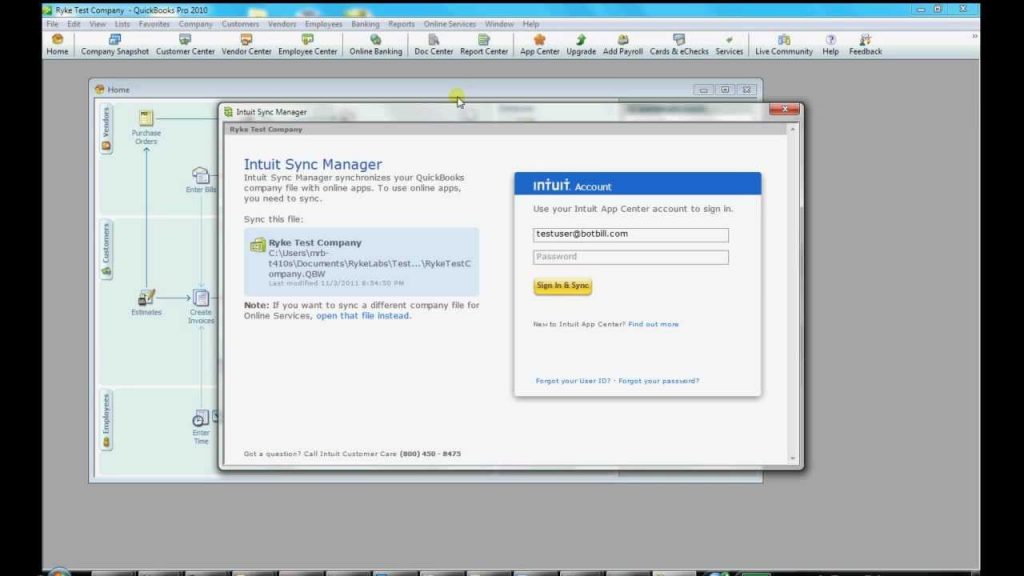
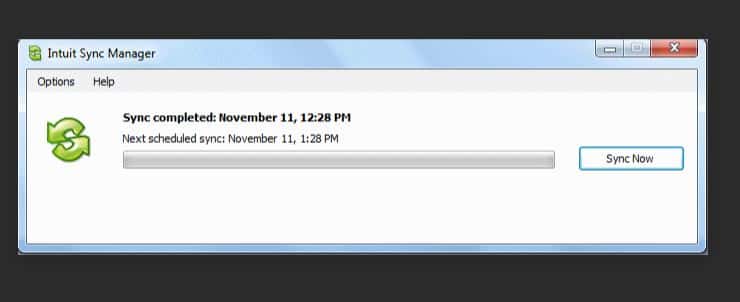
Solution 1:Use Intuit Sync Manager
The first thing to do is log in to the system as the ‘Administrator‘.
I hope you are able to fix error 6069 from your QuickBooks software, if still the issue persists then you have to take the help of QuickBooks error support providers. You can reach us on our toll-free number i.e., +1-888-510-9198. However, If you need further assistance regarding this, don’t hesitate to connect with our experts through mail or our chat service.
What is QuickBooks Error 6069, and why does it occur?
QuickBooks Error 6069 is an error code that appears when users try to open a company file in QuickBooks Desktop. It usually indicates a problem with the file itself, such as a damaged or corrupted file, or a problem with the network connection. QuickBooks Error 6069 can also occur due to third-party software or hardware conflicts, or issues with the QuickBooks installation.
How can I fix QuickBooks Error 6069?
The solutions for this error can vary depending on the underlying cause of the error. Some common troubleshooting steps include running the QuickBooks File Doctor tool, verifying file permissions and network connectivity, restoring a backup of the company file, repairing the QuickBooks installation, or seeking assistance from a QuickBooks expert. Additionally, some causes of the error may require advanced technical knowledge or the assistance of an IT professional.
Can QuickBooks Error 6069 be prevented in the future?
While there is no guaranteed way to prevent QuickBooks Error 6069 from occurring, there are some best practices that can minimize the risk of encountering the error. These include regularly backing up QuickBooks company files, ensuring that all network connections are stable and secure, keeping QuickBooks and antivirus software up to date, and avoiding third-party software or hardware conflicts. Additionally, it’s important to maintain good communication with your IT team or QuickBooks support provider to promptly address any issues that may arise.
QuickBooks Desktop Update errors are among those errors that may pop-up anytime while downloading updates or latest upgrades. Often you open the software, a critical QuickBooks update is waiting for installation. However, sometimes, certain errors might prevent QuickBooks from being upgraded and also installing the new features of QuickBooks. If you are a QuickBooks user, you would know that the software releases new updates all year round. The motive of these updates is to automatically fix the errors that trouble users. Considering this, QB users might receive issues in downloading updates that might not take place due to the software.
In this blog post, we are going to inform you of some credible solutions for QuickBooks desktop update errors. We hope you will be able to get rid of the update errors using these troubleshooting steps given here. However, you can also get in touch with our QuickBooks error support team via our toll-free number i.e. +1-888-510-9198 and discuss the issue with our team. Our team will resolve the issue for you without any hassle.
QuickBooks update errors can largely affect QuickBooks performance. Thus, eliminating these errors as soon as possible is crucial. When updating or downloading the latest version of QuickBooks, one might land into a bunch of update errors. These errors include:
Rectifying QuickBooks won’t open without update error or QuickBooks update errors becomes easy using the set of steps enumerated below. Let us explore each of the measures one by one:
Solution 1: Check the system date and time on the computer
At times, incorrect time and date settings can trigger some sort of QuickBooks issues. Thus, we recommend you to configure the date and time settings using the set of steps below:
Firstly, Check the clock at the bottom right corner of your screen
Now Do a right-click on it and choose adjust Date/Time
Solution 2: Check your Internet Connection Settings
Your internet connection settings can surely trigger update errors in QuickBooks. Thus, it is important to check the internet connection settings and configure them properly. You can abide by the below set of steps to check the settings for your internet connection.
Firstly, Check if your Internet connection is secure
Open a Web browser (Such as internet explorer and Google chrome) and go to Chase banking
If you are not able to open the Chase banking page, QuickBooks won’t update. You can contact your Internet Service Provider (ISP) for support if this situation occurs
Open QuickBooks and continue follow the below given step if the website is visible to you
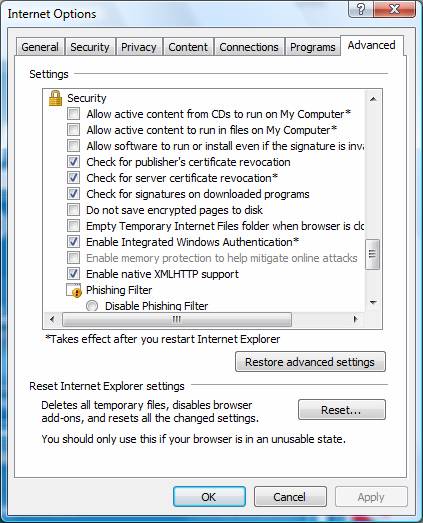
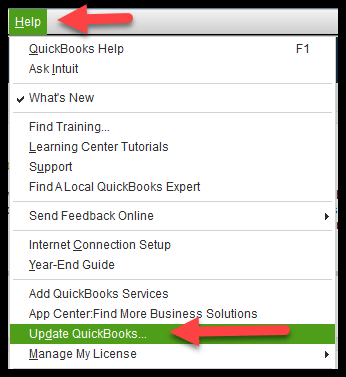
Go to Help and select Internet Connection Setup
Select “use my computer’s Internet connection settings” to set up a connection and click Next
Click Advanced Connection Settings, and then Advanced tab
Now Select the Restore Advanced Settings button
Click OK and then done
Finally, Update QuickBooks Desktop
Important Notes:
Users, who use America Online (AOL), log on to their AOL account with the master login id, if possible, and should ensure that the parental controls settings are disabled. Users can refer to AOL’s online support for more information.
QuickBooks users, who use a dial-up connection should make sure that the minimum internet speed they receive shouldn’t be less than 28.8 kilobytes per second (Kb/s).
Users who regularly use the download accelerator should ensure that such software is not enabled while the QuickBooks updates are downloading. Else, the software will interfere with the new QB updates.
Solution 3: Change internet security and firewall application settings?
Sometimes, default setting and limitations set by the QuickBooks user for internet security software and personal firewall might conflict with each other and prevent the software updates from being downloaded as they may take them as a threat to the computer. Always recheck your computer setting and verify that is not the case. You need to verify your Internet security configuration and personal firewall software settings. Continue with the steps below to change internet security settings:
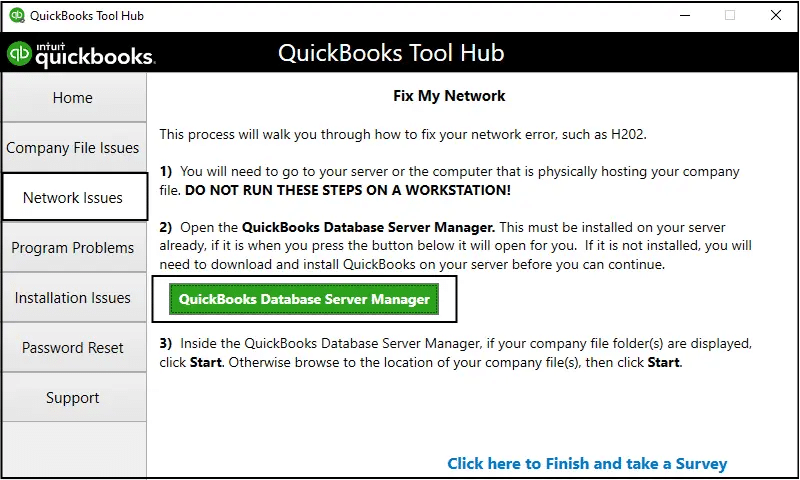
You now have to click on the QuickBooks database server manager from the list and pick the port monitor tab.
Further, note down the port number of the versions of QuickBooks desktop.
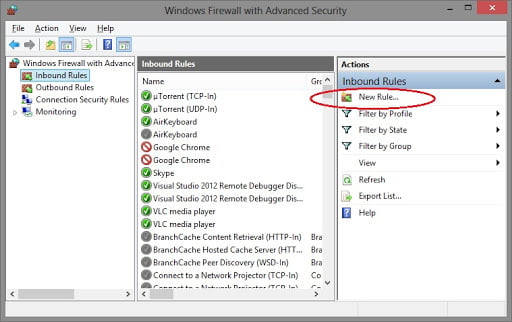
Click on the start tab and follow it up by searching for the windows firewall.
You now have to choose the windows firewall and click on the advanced settings tab.
Right click the inbound rules option and click on the new rule.
Further click on port and hit next.
You now have to enable the TCP option.
Checkmark the specific local ports and enter the port number.
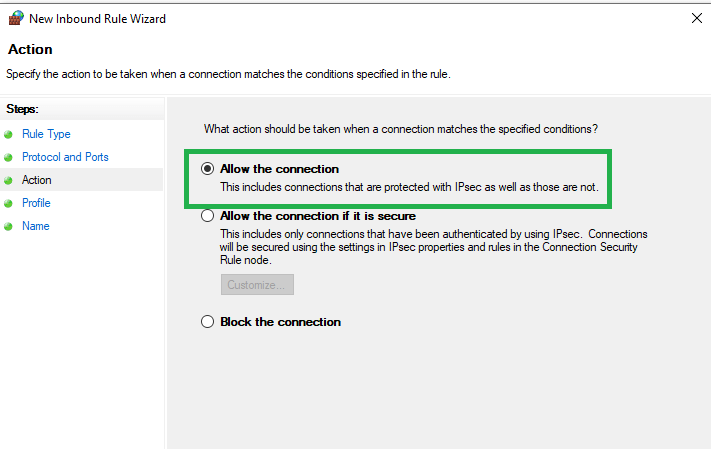
Further click on next and select to allow the connection.
Followed by clicking on the next tab and naming the new rule.
Conclude the procedure by performing the same steps for outbound rules.
Ensure that ports 80 and 443 are enabled, and access to the following files is provided with you. Set the specific firewall ports for your version of QuickBooks Desktop:
AutoBackupExe.exe
DBManagerExe.exe
FileManagement.exe
FileMovementExe.exe
IntuitSyncManager.exe
Dbmlsync.exe
QBCFMonitorService.exe
QBDBMgr.exe
QBDBMgrN.exe
QBGDSPlugin.exe
QBLaunch.exe
QBW32.exe
QuickBooksMessaging.exe
QBServerUtilityMgr.exe
Important: If you are using all these ports in other processes, then port 56719, which is a fallback port, be used for the QuickBooks Database server.
Owing to the complexities and various firewall programs, Intuit, the makers of QuickBooks, cannot offer support for particular firewall issues. In case you need further help in configuring your firewall, contact with your computer or network administrator, who sold to you the firewall software or hardware, the website of the manufacturer or software developer, or a local expert.
Please note that updating QuickBooks is different from upgrading the software. Your QuickBooks desktop can be updated to the latest manually as well as automatically. The easy way is to turn on Automatic Update that enables QuickBooks to auto download the latest updates, no matter if the program is running or not. In case you wish to keep this feature off, you can go with updating QuickBooks software manually, at least once a month. In case you are experiencing error stating Quickbooks won’t open without update, then make sure to perform the steps below:
You need to first close all company files in QuickBooks.
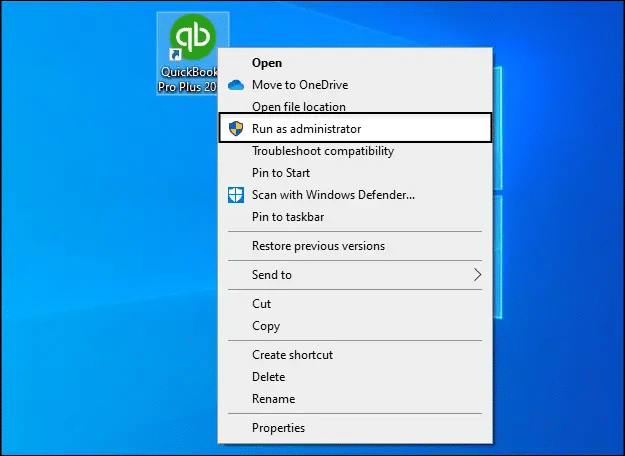
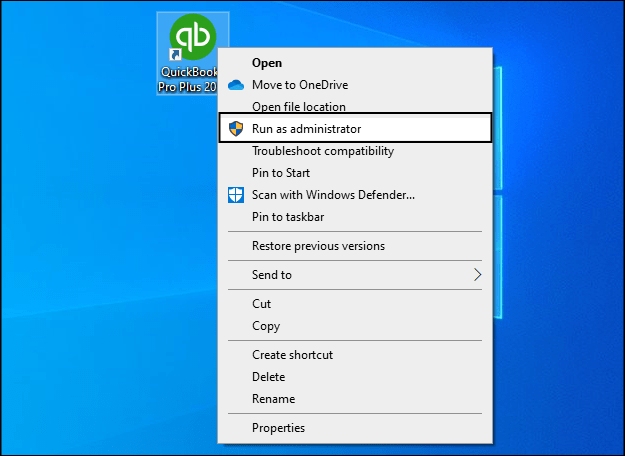
Further, check for QuickBooks desktop and right click on the same.
Go for the run as administrator option.
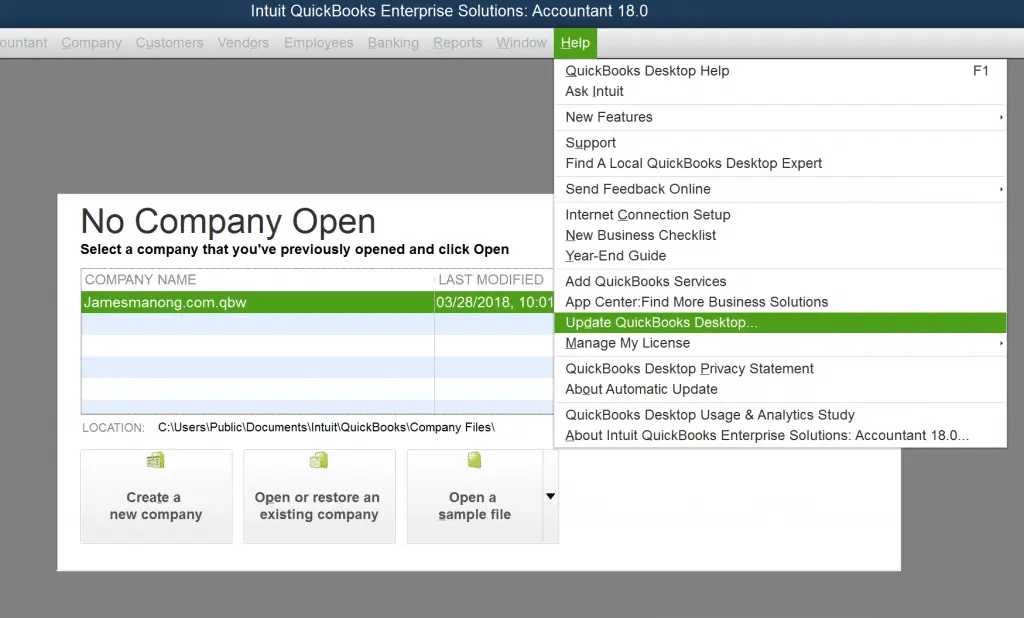
Now in the no company window, you need to move to the help menu.
Further, select the update QuickBooks tab.
You now have to choose the options tab.
And further click on the mark all option.
Heading forward, you need to click on save.
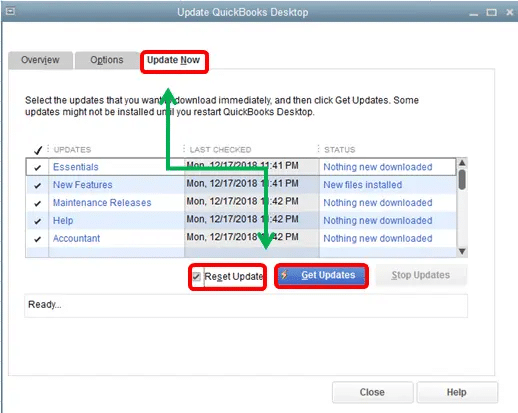
And later on, head to the update now tab.
You will then have to click on reset update option.
And also click on get updates to start the process.
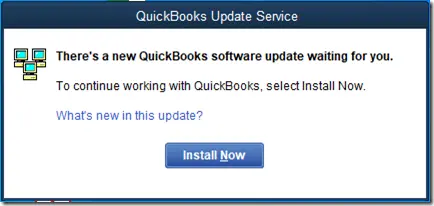
After the QuickBooks support update html is complete, close QuickBooks and reopen it.
In order to install the updates, click on the yes tab.
And after the installation is complete, reboot the system.
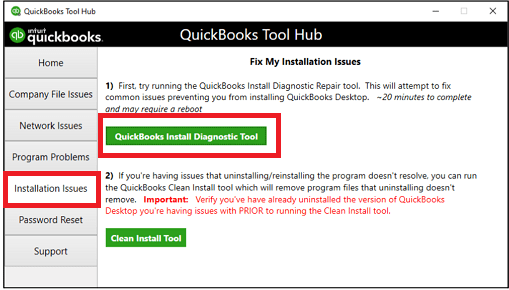
Solution 5: Run QuickBooks Install Diagnostic Tool
You need to first install QuickBooks tool hub from Intuit website.
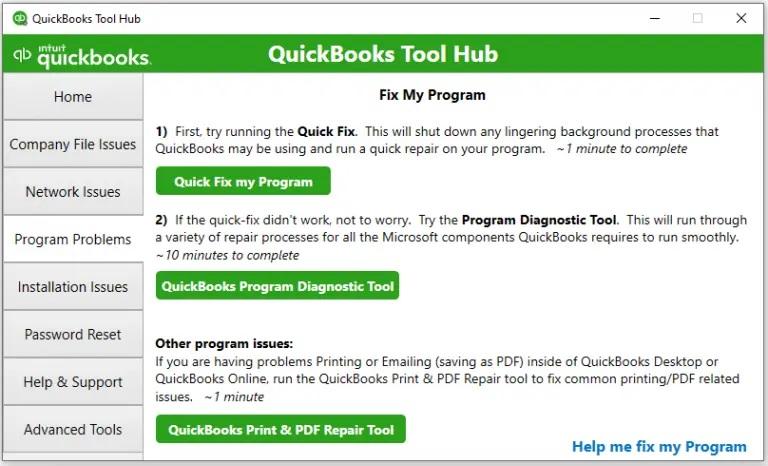
Furthermore, head to the tool hub program and choose the program problems tab.
Once done with that, click on Quick fix my program and let the tool scan your software for issues.
Let the scan process end and reopen QuickBooks and the company file when the scan ends.
Install the update after downloading it and check if the error gets fixed or not.
Solution 7: Download updates in safe mode
You should download the updates in safe mode to try eliminating the errors successfully. The steps you can perform here are:
Initially, access the system in safe mode.
After restarting, press F8 key repeatedly till the advanced boot options appear on the screen.
Once done with that, select the safe mode with networking option and click on the enter tab.
Re-download the update.
In case the update is downloaded successfully, reboot the system in normal mode and download the update again.
Solution 8: Install Digital Signature Certificate
You can end up with update errors in case of an outdated digital signature certificate. Thus, we suggest you to update your certificate using the set of steps listed below:
Move to C:\Program Files\Intuit\QuickBooks.
After that, click on QBW32.exe and select the properties tab.
Navigate to the digital signature tab and ascertain that Intuit is selected in the signature list.
Select the details option.
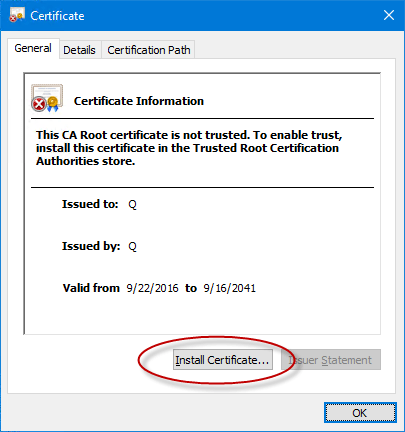
And further, in the digital signature window, click on view certificate option.
Select the Install certificate option.
Later on, click on the next tab till the finish option appears. You need to then click on the finish tab.
And reboot the system.
Lastly, open QuickBooks and re-download the update.
Solution 9: Access QuickBooks as Admin
QuickBooks update issue can appear in case you do not have admin credentials to install the most recent version. Thus, try performing the below steps to access QuickBooks as admin. Let us have a look:
At first, exit QuickBooks desktop.
After that, switch off the computer.
You now have to find QuickBooks and right click for the menu.
Also, select Run as admin option.
And perform the activity you want to and check if the issue continues.
We hope that you now have detailed information of QuickBooks desktop update errors by the time you come to the end of this article. In case any of your query remained unanswered, or you need any assistance for QuickBooks problems and solutions, contact us at +1-888-510-9198. Our QuickBooks support & help team will provide you with a quick and precise solution to your issue.
FAQs Related to QuickBooks Update Errors
Why is QuickBooks desktop not updating?
At times the internet security or firewall can interfere with the updates restricting the software from updating. Also, if the verify the configuration of the internet security and personal firewall software settings are misconfigured, then QuickBooks might not update or fail to update.
How do I automatically update QuickBooks?
You can turn on automatic updates in QuickBooks by heading to the task manager and further click on the startup tab. Now, look for QuickBooks automatic update and pick the enable option.
How do I fix QuickBooks desktop update errors?
You can fix QuickBooks update errors using the steps below: 1. Open QuickBooks tool hub. 2. Click on the installation issues tab. 3. Once done with that, choose QuickBooks install diagnostic tool. 4. Furthermore, the tool will run to fix the installation and update errors. 5. Lastly, restart the system after the tool repairs the installation issues.


![QuickBooks Error Code 1335: How to Fix? [Easy Solution Steps]](https://www.hostdocket.com/wp-content/uploads/2018/07/How-To-Troubleshoot-QuickBooks-Error-1335-1.jpg)