Experiencing errors in QuickBooks are extremely annoying, especially when these errors hinder smooth working of the software. One such error that might seem to be a bit confusing for you can be QuickBooks error code 15203. This is a unique hexadecimal partition error that can be seen due to a bunch of reasons. You might find this error a bit complicated, but need not to worry, as we are with this segment sharing the entire information related to the QuickBooks error 15203. However, if you are looking for a quick resolution of this error or you want to speak with certified QuickBooks technical support ProAdvisors you can dial our toll-free number i.e. +1-888-510-9198. We will be more happy to help you out in this matter.
Error 15203 is caused by hexadecimal partition error. So, this format has actually become to be a common type that software designers employee for Windows platform files. Also the drivers as well as software applications of Windows compatible components. Each hexadecimal code suggests an additional memory address space that packs instructions on the error that is occurred.
However, the QuickBooks error 15203 message appears to be a lengthy code with a special description of its reason. In most scenario, an additional error code may have QuickBooks error 15203 parameters. Therefore, manufacturers and also developers of this software applications and component drivers generally use different codes to suggest various sorts of errors. When users encounters QuickBooks error code 15203 they may see the following complementary error messages linked to this matter:
During the computer loopholes QuickBooks Error code 15203 is common. These incidents generally result in removal or corruption of Windows system files. Hence, when the system files are disappeared or corrupted then important information cannot be linked to executing software applications.
Signs of QuickBooks error code 15203
There can be a bunch of factors that can help in identifying the error in QuickBooks. A few of these signs include:
One of the basic signs can be if the digital signature certificate is not valid
Another sign can be if the internet connection is weak
Windows crashed and the screen turned blue
Or if there is any sort of virus attack
Corrupted QuickBooks file or incomplete installation
Understand the Specific Causes for QuickBooks Error 15203
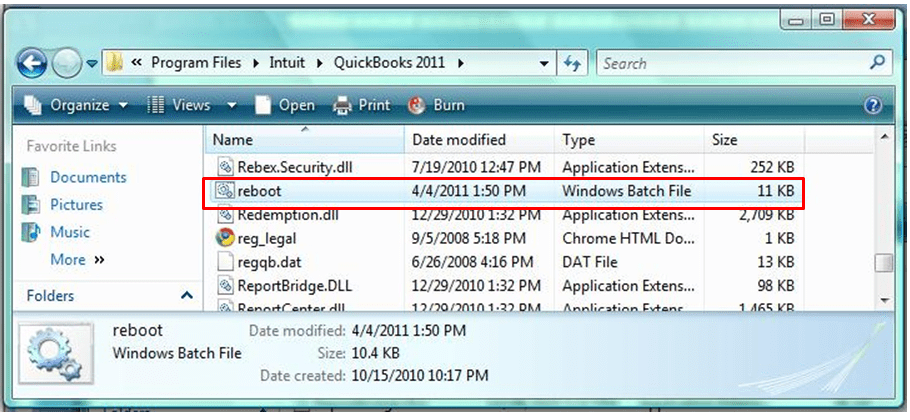
Reboot your computer: System Memory errors can be resolved by rebooting your computer system once.
Insufficient RAM: Make sure that there is enough RAM in your machine to work the software objectives. As process requirements are generally included in that transaction. The program comes to the software manufacturer’s website. It records beneath the CD “documentation” or similar title.
Software Program Problems: Special program must be executed or the software itself is possible on a mistake. Operate an internet victim and then install stain or any update.
Insufficient disk space: Verify that minimum 100MB of space of your computer is left before installing some new software.
Program memory defects: If memory-related error codes are not solved in the methods listed above the memory of your computer system is the culprit. Because defective memory will result in software memory errors and this may cause the program to crash.
Memory miss-management needs the installation of some software memory control programs. Uninstall the memory management software if your system consists it, and see if the steps helps.
Check your HD Free Space on Windows 95, 98, NT, 2000, ME, XP, Vista and 2007 and then open “My Computer“. Left click on “Properties” on the popup menu. A dialogue box will open showing the amount of full storage capacity and vacant space.
Instructions to find a memory
Restart your RAM and temporarily sync or remove any installed memory stick. Special Programs are easily available to diagnose system memory difficulties. Windows Vista and Windows 7 both have a pre-installed memory diagnostics program.
To provoke it, click on the “Start” tab and then enter “Memory” in the “Operate” topic. You will be asked to do a quick reboot to perform a memory test.
Troubleshooting Steps to Fix QuickBooks Error 15203
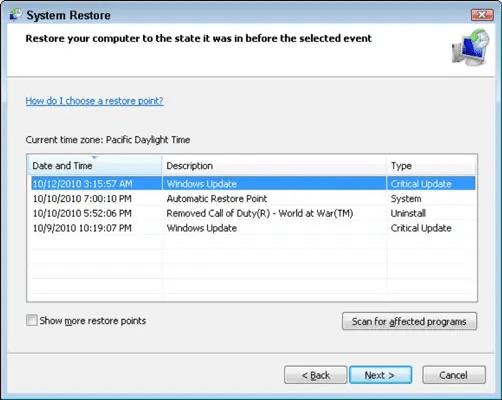
This error may also appear due to incorrect Internet Explorer settings and system date and time. Check them both, and restart your computer. If the issue still persists, try the following methods to fix this QuickBooks Error 15203.
Method 1: Automatic Response for Amateur PC Users
Download QuickBooks Error 15203 Repair Software
Install the software once the download has been completed
Click on the “Scan” tab
Once the automatic scan has ended click on “Fix Error” icon which appears
This can be fixed by temporarily eliminating the Installed memory stick from the RAM sync. And then the user is recommended to restart the system. The user can make use of special programs to diagnose system memory difficulties. In Windows Vista & Windows 7, there is a pre-installed memory diagnostic program. To make use of the program, the user can simply press start and select memory. After that reboot the system.
Method 6: Verify Internet Explorer settings
Here, the user should first make the IE your default browser for the system
After that check date and time in the system
The next step is to update settings of IE from the internet options
And also Install Digital Signature
Now, look for the QBW32.exe file from the Windows search. You will find this file in the C drive
Also, right click on the File
Move to Properties
And click Digital Signature &ensure that Intuit Inc is selected in the signature list.
Head to digital signature details window & select on view
In the certificate window, go for the ‘Install Certificate’.
And perform the onscreen steps and end all currently running QB Windows
Reboot system
The last step is to download the updates and check if the issue is fixed
I hope the above given troubleshooting steps helped you to fix the QuickBooks error code 15203. However, If still the error persists in your QuickBooks application then you can get in touch with our 24/7 QuickBooks enterprise support team by dialing toll-free +1-888-510-9198.
Our professionals have latest edge-cutting tools and technology with years of experience in this industry to handle all type of accounting and bookkeeping related problems.
Frequently Asked Questions
What are the reasons for QuickBooks error 15203?
There are a bunch of factors causing such an error. Let us have a look: 1. You have deleted hardware drivers 2. Software Applications have been deleted 3. Installation of the software is not completed
How can I prevent QuickBooks payroll error 15203 from happening again?
In order to prevent this error from happening again, you should regularly update QuickBooks to the latest version, maintain a stable and strong internet connection and avoid installing conflicting or incompatible programs on your PC.
How do I fix error 15227 in QuickBooks?
The user can to fix the error code 15227 in QuickBooks using the steps below: 1. Firstly, reinstall QuickBooks 2. After that, a screen will appear where you can see the transactions 3. Just go down then tap on more and click on void option
Did you see QuickBooks error 6105 and can’t find an ideal fix to it? Well, this particular error shows up when the company file is damaged or corrupted. As a result of this issue, one might not be able to store or save the file. This error might seem to be a bit annoying to many QuickBooks users. Thus, to fix that, here we are with this segment sharing the complete information related to QuickBooks error 6105.
If you are experiencing this issue, make sure to stick around this segment, or you can also consult our technical support team at +1-888-510-9198, and our experts will help you answer your queries immediately.
QuickBooks Error 6105 is quite common while using QuickBooks desktop. This error is known as Condense Data Error as it occurs when the company file is destroyed. To create space for the new files in the system, this step is taken. But in this process, some files do get damaged. Books error code 6105, you may have also faced unspecified error like 80004005 or 80004003. These codes vary as their troubleshooting methods are different.
Causes of QuickBooks Error 6105
When the company file is not visible in the system.
QuickBooks is not authentic with the server.
There is a problem with the installation of the program.
Now that you know what can lead to QuickBooks error code 6105, it is better to find out the fixes for the same. Let us have a look:
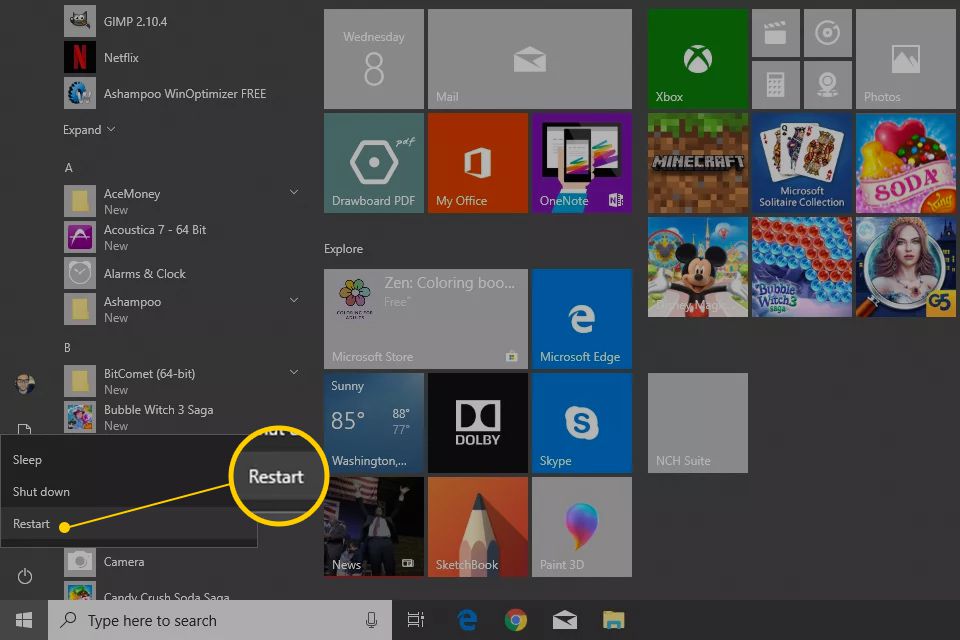
Solution 1: Restart Computer:
Sometimes, restarting the system resolves many errors. So, just shut down your computer and database server, and then, restart them to check if it resolves the error.
Now, copy the QuickBooks data file on your system and open it. In case you are able to open the company file, it indicates that the error isn’t present anymore.
Solution 3: QuickBooks Clean Installation
Sometimes, none of the above methods work and then, you should try to repair or reinstall QuickBooks. Follow the steps below:
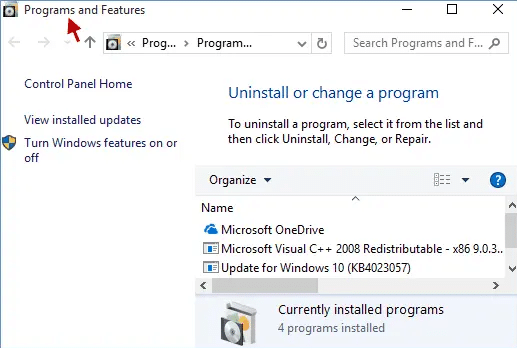
Click on Programs and Features in the Control Panel
Now, find QuickBooks in Programs and Features and Uninstall it
While uninstalling, an option to repair QuickBooks will appear, click on that
Now, run the prompts
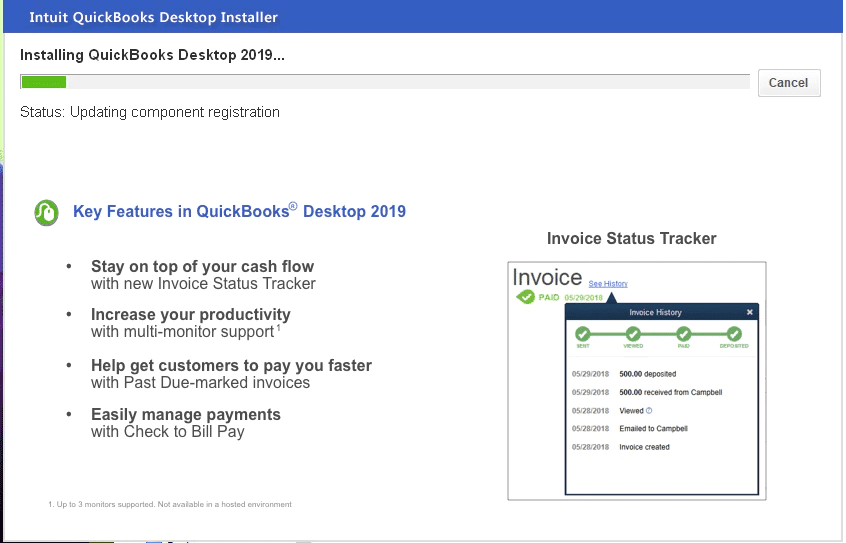
After that, reinstall QuickBooks desktop
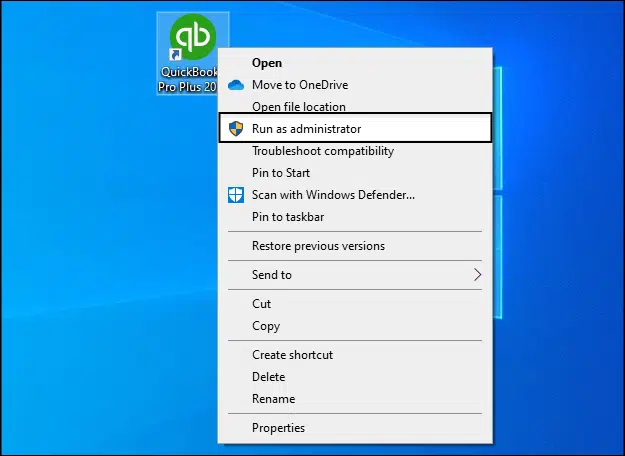
Once done with that, launch the software as admin
Try opening the company file.
Solution 4: Basic Troubleshooting steps
The very first step is to copy the particular company file to your desktop
And then try to open the file in QuickBooks
Also, try to rename the files that relate to QuickBooks and reboot the system
In certain situations, damaged or corrupted company files can trigger certain errors, and the same theory is applicable in the case of QuickBooks error code 6105. You can try verifying and rebuilding the data utility, in order to get rid of the QuickBooks error code 6105 permanently.
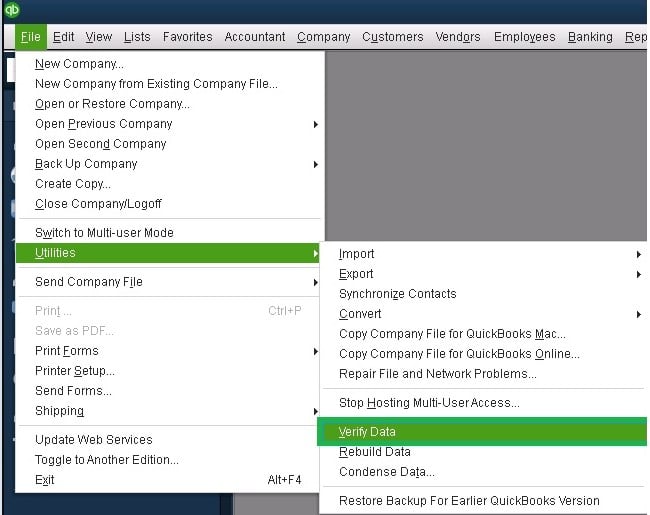
Start by opening the file tab and head to the utilities option there.
Later on, go for the verify data option and click on the ok tab to run the tool.
Note that this process might take time to complete.
After the process ends, you will the following message on the screen:
QuickBooks detected no problems with your data, which means there is no issue. A particular error message will ask you to perform the on-screen prompts.
Your data has lost integrity
Furthermore, you need to head to the file again and then go for utility.
Make sure to choose rebuild data this time.
Heading forward, create a backup for the file and let the tool start running.
After the message “rebuild has completed” appears on the screen, you can close the window and launch QuickBooks.
Solution 6: Change the extension of the QuickBooks support files
Any sort of damage in the QuickBooks files can be eliminated if the current files are made void and new ones are created. Thus, it is suggested to perform the steps to alter the extensions of the QuickBooks support files to avoid any sort of further issue. The steps that can be performed in this process are as follows:
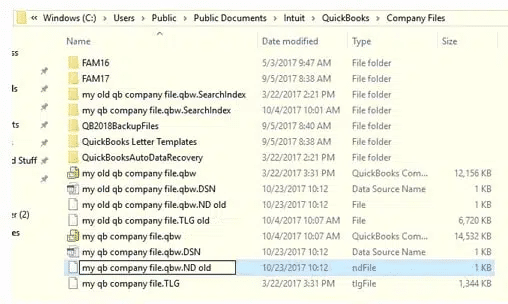
You need to first open the folder that holds the QuickBooks files.
After that, look for the below-stated support files-
Network data file – company file name .nd
Transaction log file – company file name .tlg
Choose the file among them and then right-click and select rename.
Heading forward, enter .OLD extension at the end of the file name, and perform the steps for the other support file:
Company file name.nd.OLD.
Company file name.tlg.OLD.
You can now save the change and close the window.
Furthermore, try to access the company file in QuickBooks and check if the error persists.
The next step is to choose the file and verify the host file.
After that, allow the verification process to complete.
Conclusion
After completing the steps above, restart the system. This will save the changes you made. Hopefully, performing the steps above might help you in getting rid of the error permanently. In case you find the error is not resolved or the troubleshooting steps are not working for your case, contact the experts at our QuickBooks Support Phone Number+1-888-510-9198 for proper guidance.
We offer expert solutions and easy steps to combat the data related and other errors related to QuickBooks and protect them.
QuickBooks error code 6105 associates with a damaged company file. You can come across similar issue due to creating space by archiving the company files. As a result of this issue, you might not be able to compress the company files.
How do I fix a corrupted company file in QuickBooks?
It is possible to fix a corrupted company file by performing the steps related to using rebuild data tool. · Begin with heading to the file menu. · Further, hover over the utilities tab and choose rebuild data. · You can now move to the QuickBooks information window and hit ok tab. · Later on, let the tool repair your file. · And also, after the tool finishes, choose ok tab. · Head to the file menu and let the tool check your file for any data issues.
How do I fix error code 6150 in QuickBooks?
You can try fixing this issue by performing the set of steps listed below: · At first, check for CryptoWall. · You can also try to create a new QuickBooks company file to fix the issue · Moreover, you can try restoring the backup of the company file. · Another possible step is to use the ADR tool and the file doctor tool to fix the issue.
QuickBooks error code 557 isn’t a common error. Thus, it might get a little confusing for QuickBooks users to tackle through it. This error generally occurs when downloading payroll updates after updating QuickBooks to the latest release. This error usually occurs due to incorrect syntax or commands that might be seen due to low quota within the disk or lack of area.
Error
Description
Error Code:
Error 557
Error Name:
QuickBooks error 557
Description:
Error 557: QuickBooks has encountered a problem and needs to close. We are sorry for the inconvenience
Developer:
Intuit Inc.
Software:
QuickBooks
Applies to:
Windows XP, Vista, 8, 7
Getting rid of this error manually gets quite tiresome, one has to be extra careful else there is a risk of the loss of the information and data. Maintaining a correct and exact record of the data and other things is quite difficult but this is a legal requirement and has to be done. So, let’s start with understanding the error and then moving ahead to resolve it. However, if you need any sort of technical assistance at any point in time, feel free to reach out to our technical support team, by ringing us up on +1-888-510-9198, and our technical support team will help you out with all your QuickBooks queries.
QuickBooks Error 557 is a common error which when occurs, your screen receives a message saying ‘QuickBooks has encountered a problem and needs to be closed. We are sorry for the inconvenience’. It applies to Windows XP, Vista, 7, and 8.
However, QuickBooks is quite easy to use but there are some errors which need a lot of troubleshooting. A couple of steps can help us get rid of this error. These errors can occur because of the wrong syntax, or commands which may have occurred because of the low quota within the disk or lack of area. In the same way, some errors are designed, associated with payroll, and Error 557 is one of them.
Why QuickBooks Payroll Error 557 occurs?
QuickBooks makes it easy for you to pay your workers as this is the most important things for your business and QuickBooks becomes your partner in that. We need to keep in mind that with each alternative computer code, QuickBooks updates itself so that it can satisfy the needs of all users. In this case, if a wrong configuration setting has been done, QuickBooks will face Error 557. Other potential causes behind the occurrence of QuickBooks error code 557 are:
In case you mistakenly or knowingly abort the installation process.
Another potential cause behind the occurrence of such an error can be if you have deleted the QuickBooks directory file.
Just in case the system gets damaged due to any sort of virus or malware attack.
Sudden power surge or unplanned system shut down.
Important Points to Remember
You need to keep the following points in mind:
Make sure that the QuickBooks payroll subscription is still active
Another essential point is to ascertain that the payroll tax table is updated
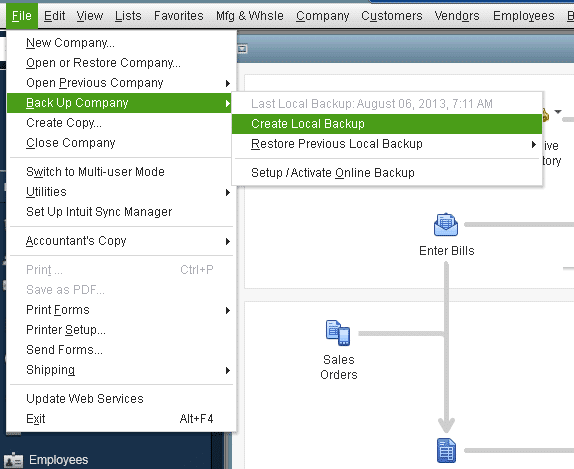
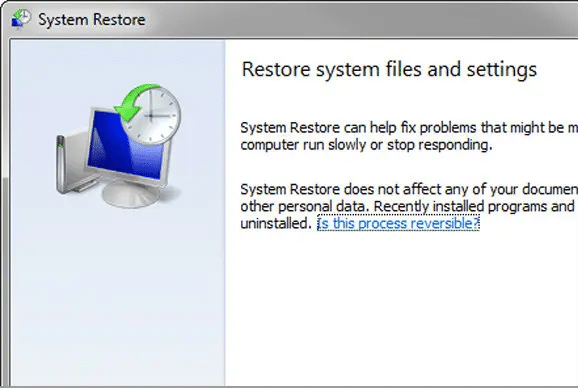
You also need to keep in mind that always create a company file backup before restoring the system to avoid any sort of data loss
Furthermore, install the latest QuickBooks updates after windows restoration to prevent further issues
Moreover, verify that your system meets the minimum system configuration requirements for the application to function properly
Just in case your QuickBooks subscription is expired, then make sure to reactivate it. process involves the following steps:
Method A: Subscription Activation through QuickBooks
You need to first launch QuickBooks on your system.
After that, click on the help tab in the top menu bar
Once done with that, activate Quickbooks from the dropdown menu
Now, enter the product and license information in the provided fields in the new window
And then, click next to continue with the activation process
Complete the activation by performing the onscreen instructions
After you have activated it, you will regain full access to QuickBooks functionalities.
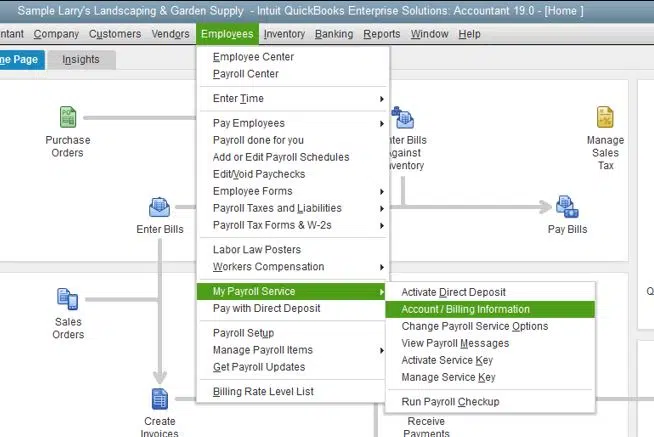
Method B: Subscription Activation via QuickBooks official website
You need to first open the web browser and navigate to QuickBooks official website
After that click on the sign in tab and enter the login credentials
Now, select products and services from the main menu
Select the subscription you wish to activate from the list of products
And then, enter the necessary information including product and license details.
Now, click on activate to complete the process
Towards the end, the subscription will be active and ready for use.
Conclusion!
All the steps above can resolve your error. In case you are seeking any further assistance, you can connect with the best QuickBooks professionals in the industry. Our QuickBooks payroll customer service professionals will help you find the reliable and easiest solution to your problem.
QuickBooks Error 557 is a runtime error that occurs when the software encounters a problem while trying to access the company file. This error can prevent users from accessing their financial data and cause significant inconvenience.
What causes QuickBooks Error 557?
QuickBooks Error 557 can be caused by several factors, including incorrect configuration settings, outdated software, damaged or corrupted company files, and conflicting software or hardware.
How can I fix QuickBooks Error 557?
To resolve QuickBooks Error 557, you can try a few troubleshooting steps such as updating QuickBooks to the latest version, repairing the company file, and disabling any conflicting software or hardware. If these steps do not work, you can also try reinstalling QuickBooks or contacting QuickBooks support for assistance.
Can I prevent QuickBooks Error 557 from happening again in the future?
To prevent QuickBooks Error 557 from occurring again in the future, it’s important to regularly maintain and update your QuickBooks software, as well as regularly backing up your company files. Additionally, you should avoid installing conflicting software or hardware, and keep your computer system free from malware and other harmful programs.
Often when you try to update QuickBooks Desktop Pro, you might come across an error that states update failed or a bunch of different update errors. The QuickBooks Desktop Pro update errors usually hinder the update process and create unnecessary delays. The updates and new versions of the software turn out to be really helpful in fixing various bugs and issues, but while downloading the updates the user may also receive some issues.
In this article, we will be discussing the quick fixes to the QuickBooks Desktop Pro update errors that the user might encounter while performing the update process. However, you can also contact our toll-free QuickBooks support number i.e. +1-888-510-9198, in order to get help from accounting experts to save your time and effort.
What are update errors in QuickBooks?
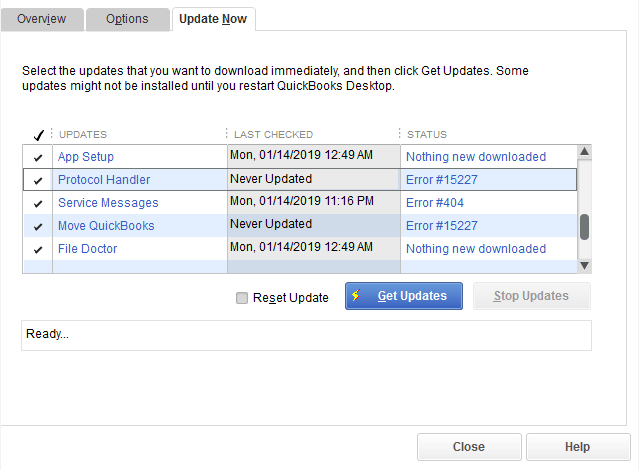
QuickBooks update errors are seen when you try to update QuickBooks, as we mentioned earlier. Often when a new update is available, you might get a reminder from the software itself. However, once you try to download the updates, you might bump into a bunch of errors. A few are noticeable, whereas other can be not much noticeable. You can experience the errors like:
Not just these errors, but there can be a bunch of other errors as well that can be seen when updating the software.
What causes QuickBooks desktop pro update errors?
QuickBooks update errors are common errors, and can be triggered by a few basic factors. Let us evaluate.
One of the most common reasons why these errors appear while downloading updates is the firewall or anti-virus that blocks the computer from installing QuickBooks updates
In case the Internet connection is slow, the user might end up in encountering QuickBooks update errors
Multiple instances of QuickBooks on the same computer might also turn out to these type of errors
First of all, the user is required to open Windows Firewall from the windows search bar
After that hit Advanced Settings
Moving ahead, right-click Inbound Rules and select New Rule
And then, opt for the Port, followed by clicking on Next
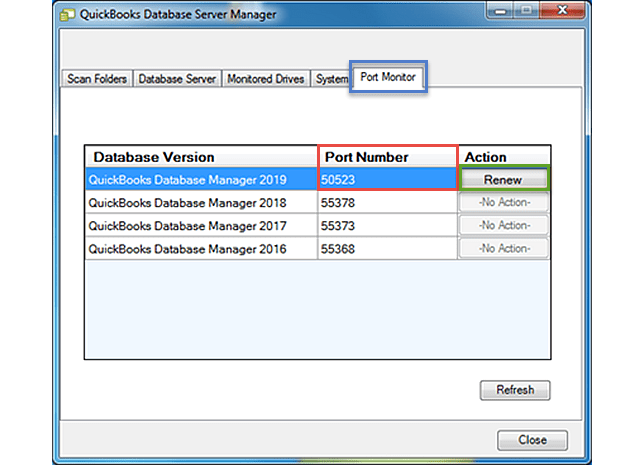
The user must further select TCP. Enter the particular ports required for your QuickBooks year version and select Next button
QuickBooks Desktop 2019: 8019, XXXXX. (XXXXX represents the assigned port number found in Database Server Manager of QuickBooks)
QB Desktop 2018: 8019, 56728, 55378-55382
QuickBooks Desktop 2017: 8019, 56727, 55373-55377
QB Desktop 2016: 8019, 56726, 55368-55372
Moreover, click “Allow the Connection” and hit Next button
If you receive a prompt, verify that all profiles are marked and then select Next
Give a name to the rule, for example, QBPorts (year). Click on Finish
Repeat the above-given steps for the Outbound Rules (for step 3, you’ve to choose Outbound Rules rather than Inbound). Make an attempt to open QuickBooks desktop again in multi-user mode. You can also try over your network to check if the issue has been fixed
If you’re receiving errors or issues with connectivity, you shall create exceptions to programs QuickBooks uses in Windows Firewall.
Perform this step only if you are aware of the process and steps of configuring firewall, antivirus and other third-party programs. If you require assistance for this, you can consult with our certified QuickBooks ProAdvisors or talk to your IT professional.
Sometimes default setting of systems and antivirus security which is set by the user for Internet security and firewall may stop and prevent the QuickBooks or other important components from downloading the updates as they might consider them as a threat or malicious file. So here, you need to recheck your settings and validate that is not the case.
What steps should you take for this?
You need to further verify the configuration of your Internet security and personal firewall software settings
Ensure that the Ports 80 and Port 443 must be enabled, and the access must be provided to the following files
AutoBackupExe.exe
Dbmlsync.exe
QBDBMgrN.exe
FileManagement.exe
DBManagerExe.exe
QuickBooksMessaging.exe
IntuitSyncManager.exe
FileMovementExe.exe
QBServerUtilityMgr.exe
QBDBMgr.exe
QBCFMonitorService.exe
QBLaunch.exe
QBGDSPlugin.exe
QBW32.exe
Important: If all these ports are used by some other processes (which is not very likely), the QuickBooks Database server manager utilizes a fallback port, 56719.
In File menu, select Close Company/Logoff. (If you open more than one company file in QuickBooks Desktop, do this step for every company that is open.)
Return to the File menu and click Exit
Moreover, select QuickBooks icon on your desktop and do a right click, now click Run as administrator
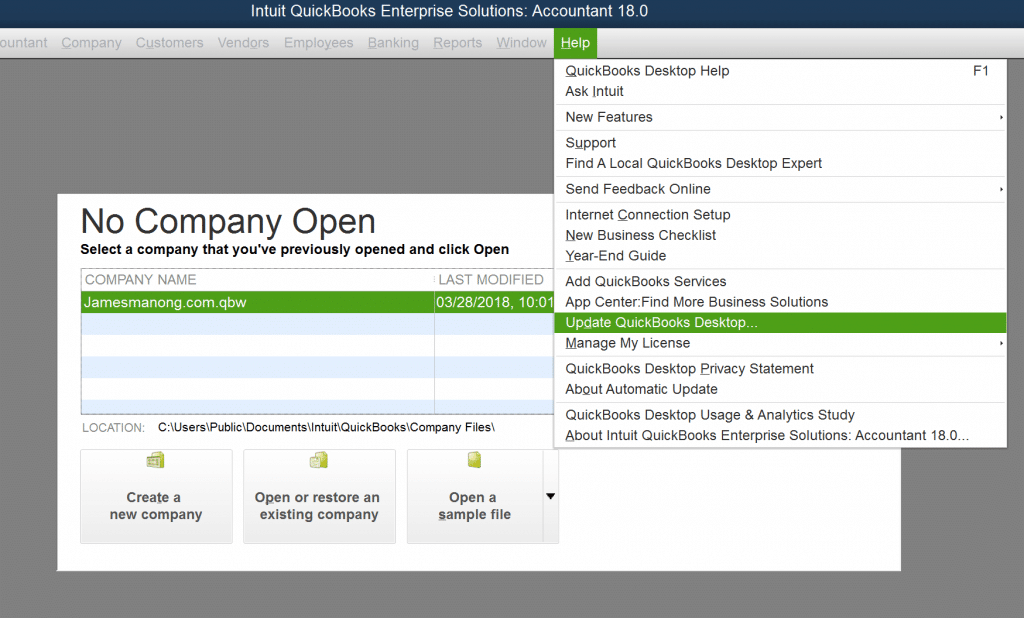
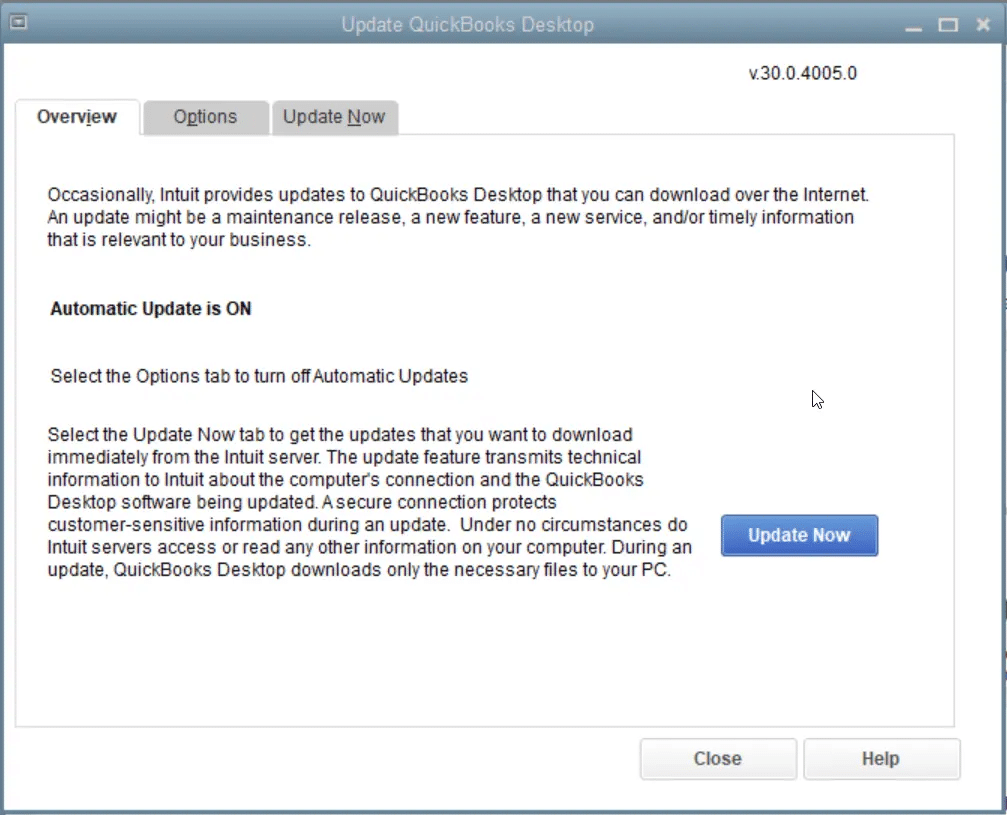
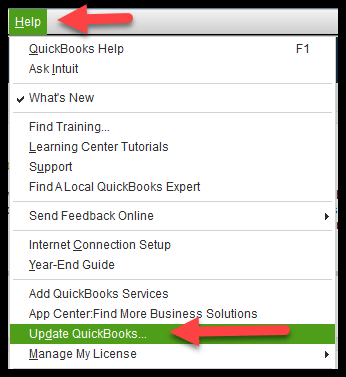
While you are on the No Company Open screen, open Help menu and select Update QuickBooks
Go to the Options button and select Mark All and then click on Save
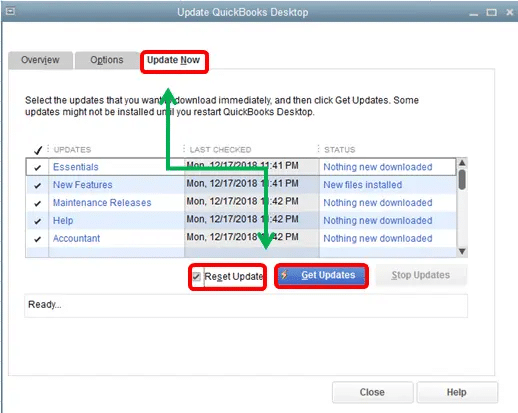
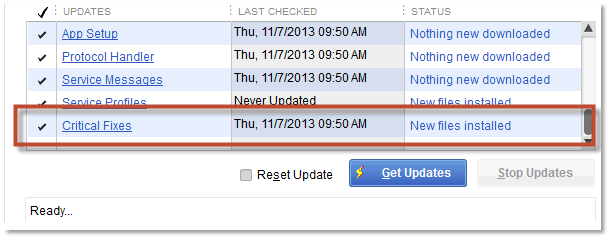
Tap on Update Now and then check the Reset Update box
Click Get Updates button
After you receive “Update Complete” on your screen, close QuickBooks Desktop
Reopen QuickBooks Desktop and if prompted to get the message to install updates, click Yes
After the installation is over, restart your computer
Solution 4: Accessing QuickBooks desktop as admin
Often the update errors in QuickBooks pro can be experienced if the user isn’t having admin credentials to install the latest QuickBooks version. Thus, it is suggested to run QuickBooks as admin. The steps you can perform here are as follows:
The first step is to exit the QuickBooks desktop
After that, turn of the computer
Once done with that right click menu and find QuickBooks
Now, select run as admin
And perform the steps that appear on the screen
Solution 5: Configure the internet settings
Initially, the user needs to head to the help menu and then select the internet connection settings
After that select use my computer’s internet connection settings to establish a connection when this application accesses the internet
The next step is to click on next tab
Head to the advanced connection settings
Followed by heading to restore advanced settings
Now, click on done
To end the process update QuickBooks desktop software again
Solution 6: Checking the date and time on PC
Under this process, the user needs to right click the system clock on the desktop screen and then select adjust date/time option.
Once done with that select the change date and time and also write the current date and time.
After that click on ok twice.
Now, close and open the QuickBooks program again
Followed by running the update process of QuickBooks.
Solution 7: Closing multiple instances of QuickBooks on the same system
QuickBooks update errors can be seen if the user has more than one installation of the QuickBooks desktop software of the same version year installed on the same system. Here, the user is recommended to download and install a manual update for one or more versions.
Solution 8: Installing digital signature certificate
Often outdated digital signature certificate can trigger this issue in QuickBooks. The steps to eliminate this are as follows:
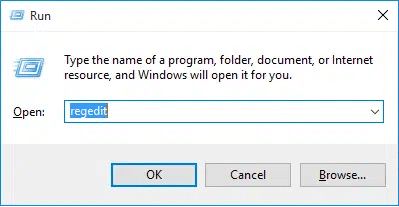
Under this process, the user needs to first move to C:\Program Files\Intuit\QuickBooks.
After that click on QBW32.exe and also choose the properties tab
Once done with that head to the digital signature tab and also ensure that Intuit is selected in the signature list
Select the details tab
Now click on view certificate option in the digital signature window
And choose the install certificate option
The next step is to click on next tab till the finish tab appears.
Hit finish tab
And restart the system
The last step is to redownload the update for QuickBooks
Solution 9: Use Quick fix my program
This process requires you to install QuickBooks tool hub from the intuit website
After that, move to the QuickBooks tool hub and then move to the program problems tab
Now, click on quick fix my program tab
And let the scan process end
The user needs to reopen QuickBooks and the company file after the scan ends
The last step is to install the update after downloading it and check if the issue is rectified.
The above-mentioned steps shall help the users to fix QuickBooks desktop pro update errors. However, if you have any query or you require any suggestion, you can dial our QuickBooks support helpline i.e. +1-888-510-9198 for quick and precise solutions.
Our team will provide you with the best possible information related to any kind of QB associated issue.
Frequently Asked Questions
How do I reset QuickBooks update?
To reset update in QuickBooks, one simply needs to open QuickBooks Desktop. And then, head to the Help, and choose Update QuickBooks Desktop. After that go for Update Now. And choose the Reset Update checkbox. This will reset the update.
How to fix QuickBooks installation errors?
Installation errors are often visible when installing QuickBooks. You can fix the installation errors by using the install diagnostic tool.
What is QuickBooks tool hub?
Intuit the developer of QuickBooks offers tons of tools to eliminate issues when using QuickBooks. QuickBooks tool hub is a one-stop destination for all the tools. One can easily download it from the official Intuit website and access to different tools.
How to fix errors in QuickBooks?
Experiencing errors in QuickBooks is quite common. There are certain set of steps that you can perform to eliminate every error in QuickBooks. You can also contact our QuickBooks support team for any technical assistance.
Did you just re-sorting QuickBooks lists or planning to do it? In this article, we will discuss the process and benefits of QuickBooks re-sorting. Re-sorting QuickBooks is a simple way to fix a number of issues that occurs in QuickBooks for Mac or Windows operating systems. While using QuickBooks, one may face a lot of errors disturbing the work of the business and causing unnecessary delay. Sometimes, rebooting the system, restoring a company files, rebuilding data helps to resolve the issue but these are not of rescue all the times.
For queries you can get on a call with our experts using our helpline number i.e. +1-888-510-9198.
Edition list which is to be toggle from and to (Re-sorting QuickBooks lists)
The following is the list which you need to toggle:
The GeneralList
The Accountant
For the Contractor
The Manufacturing and Wholesale
The nonprofit list
All the Professional Services
The Retail
Re-sort master name list in QuickBooks for Windows
This is the list of your customers’ jobs, vendors, employees, and other names. You can re-sort them in different ways.
From the Banking menu
Vendors, Customers, Employees and other Names
QuickBooks is the software that contains a master name list that has the names of vendors, customers and employees. These lists can also be re-sorted separately. You can find the master name list easily:
Open ‘Write Checks‘ window from the Banking menu, put cursor in ‘pay to the order of field’ press ‘Ctrl + L‘ keys and open the list. This will open the master name list. Check the Include Inactive checkbox and click Name ▼ dropdown button, select ‘Re-sort list‘. Now choose OK button and close the company file. At last, open the company file.
From the General Journal Entry window
When you find that the user account does not have any banking permissions, then you can do this in ‘Make General Journal Entries‘ window from the Company menu, After that choose the Name column, then press Ctrl+L keys on your keyboard. Now choose the Include Inactive checkbox. In case it displayed as grayed out, there are no inactive names. Next, choose the Name ▼ dropdown and then choose the Re-sort List. At last, hit a click on OK key
Time/Enter Single Activity Window or Advanced Find window. This will help you re-sort the individual customer, vendor, and employee list.
From the Find window
You can use this if you don’t have banking permission.
From the Edit menu and choose the Find opt.
After that choose the Advanced tab.
Next, now from the Filter list, choose Name opt and choose the Name ▼ dropdown and then press Ctrl+L keys on your keyboard.
You need to choose the Include Inactive checkbox. In case if it is grayed out then there are no inactive names.
After than choose the Name ▼ dropdown and then choose Re-sort List again and hit a click on OK.
Finally close your company file and reopen it again.
There are many lists in the Lists Menu which can be sorted by opening them from the Lists menu, selecting the re-sort List, clicking the List button, and include inactive checkbox. In case, you do not find the re-sort option in the Lists menu, you would definitely find it in the View menu.
In case you have saved your Item List or Chart of Accounts numerically, QuickBooks re-sorts them based on their first three digits.
To make sure to sort them in order, you can add 1 to 3 digit number prefixed to each item or account number.
From the Lists menu you need to choose the list you need to re-sort
After then choose the Include Inactive checkbox.
Next, navigate to the View menu and then choose Re-sort Lists.
After that hit a click on OK button and close and reopen your company file.
Memorized Reports
Memorized Reports also face re-sorting problem and sometimes, this can be troublesome in QuickBooks.
Select Reports and then Memorized Reports in the main menu bar
Click on the Reports button in the lower left corner and select Resort List
Memorized Transaction List
The below set of steps can be performed to sort the memorized transaction list.
The first step is to click on the lists tab in the top menu bar
After that, click on memorized reports from the list of options
The last step is to click and hold the keys once you choose the memorized transactions list
I Hope you found this article helpful. However, if you are unable to re-sort QuickBooks lists, then we can help you with this. Just contact us at our QuickBooks support number i.e. +1-888-510-9198 and our experts will guide you the right way.
FAQs
How to create resort lists in QuickBooks desktop?
The below set of steps can help in creating resort lists in QuickBooks. Let us have a look: · The very first step is to head to the list menu and choose it · Now, select one from all either chart of accounts, items, or classes · After that click on all names checkbox · And select the edit tab · Click on re-sort list option · Also choose the resort list · And click on ok tab to save the changes
How to sort category in QuickBooks?
Check out the steps below to sort the category in QuickBooks: · The very first step is to head to the expenses tab · And choose the filter option · Now, from the drop-down category to select the type of category as per the requirement · The last step is to click on the apply tab to apply all the changes
Which lists are included in QuickBooks lists?
The lists are where the things you use in just about any transaction live. For example. The “Bill to” name, item, description, rate, tax, payment terms, customer message, anything you select from a pull-down list, are all set up on a list.