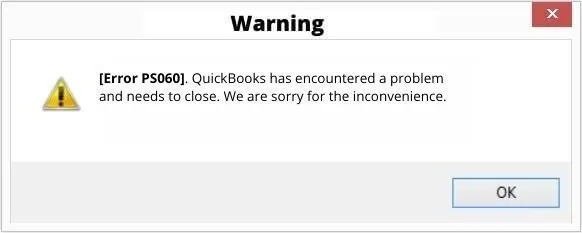
QuickBooks error PS060 is an error that shows up with a warning message: “Current Enhanced Payroll Service is Unavailable”, then the error code PS060 can be the reason. This error occurs often while using the payroll service in QuickBooks. If you are also facing QuickBooks payroll error PS060, then this article can be a savior for you. In today’s article, we will be discussing the relevant causes, as well as the quick fixes to the error code PS060. However, if you want an expert team to resolve the issue for you, then in that case, you can simply make a call at our toll-free number i.e. +1-888-510-9198, and our QuickBooks payroll support executives and certified professionals will help you in get rid of the issue in no time.
QuickBooks Error PS060 is a common error that accounting software users may receive. An error message “Current Enhanced Payroll Service is Unavailable” might pop up on the screen, disrupting the smooth working of payroll. Though this error is not very critical, it is not very easy to fix it either. Besides, you will not be able to access QuickBooks until you get this payroll error taken care of.
What leads to Payroll Error PS060
No single factor leads to this type of error, which means that there are more than one reasons that might end up causing QuickBooks error code PS060. In order to fix this error, it is necessary to know the root cause of this error. We have listed below the factors causing the error code PS060. Let us have a look:
Note: A major cause of this error is settings with the expiry date. QuickBooks Payroll periodically checks the expiration date of the subscription by connecting to QuickBooks. Your billing information should be updated to keep accessing QuickBooks accounting software without any hassle.
This error may show up on the screen if Intuit’s server is down
Intuit doesn’t offer support to old versions of QuickBooks. This payroll error might also be seen, in the case of an old version of the payroll
There can be situation, when the third-party security software might block QuickBooks
Malicious software such as Virus and Malware may also cause Payroll Error PS060
In case the error is caused due to a server issue of Intuit, then the user will be required to have some patience and wait until the website server of Intuit starts working once again.
Solution 3: Download and install the latest version of software
Solution 4: Check the settings of 3rd party software
If the reason behind the error is any sort of third party application interference or any kind of malware infection, then in that case, the user is supposed to get the entire ADPS scanned. The problem can also be resolved by the customer support.
Solution 5: Check for connectivity issues
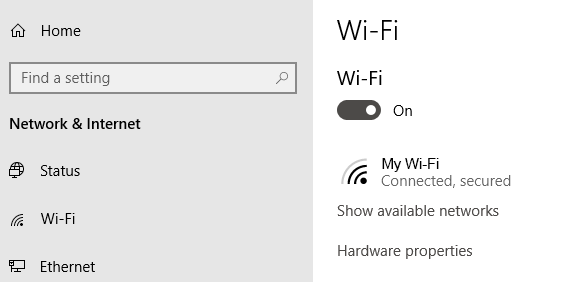
Check if your computer is connected to the internet. Internet connectivity issue is one of the most common causes behind the occurrence of this error. Speak to your internet service provider if it can’t be fixed at your end. The steps to be performed here are as follows:
Start the process by opening the internet explorer and try to access a safe website
In case you access the website successfully then head to the steps below
In case the error occurs when accessing the website, then check the internet connection settings for any misconfiguratons
Ensure to set date and time correctly on the system
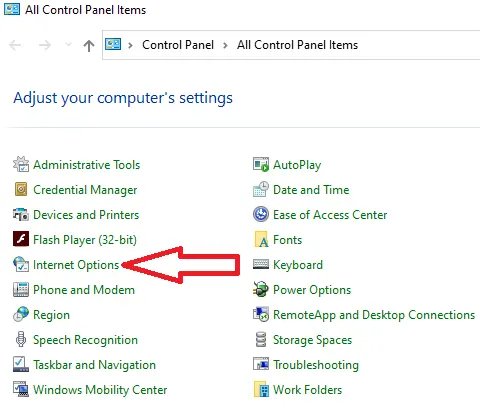
And now, open the internet explorer
Followed by selecting the tools tab
And also, choose the internet options
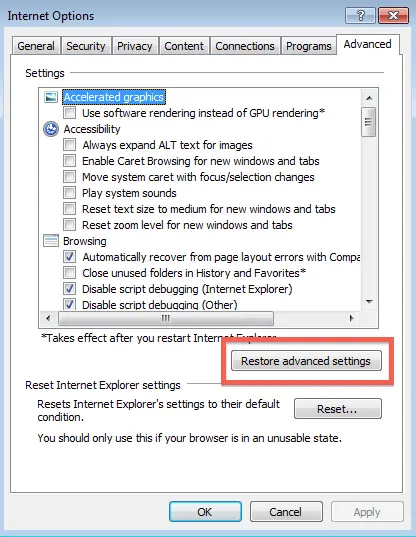
The user will then have to click on the option reset/restore default under the advanced menu
Implementing any of the above stated methods might help the users to fix QuickBooks Payroll Error PS060. However, if by any chance none of the methods work in your favor, then in that case, the user can get in touch with our experts, or speak to our 24×7 QuickBooks error support experts team at +1-888-510-9198 for quick and precise solutions.
Some FAQs Related to QuickBooks payroll error PS060
How to fix payroll errors in QuickBooks?
To fix the payroll errors, one needs to perform the steps below: 1. The very first step is to click on the help menu 2. After that, select about QuickBooks 3. Once done with that press Ctrl + Alt + Y and then click on next tab 4. Choose the employee that was underpaid in the employee summary information window 5. Now, double-click the employee’s name 6. And review the ytd adjustment details 7. The last step is to click on ok tab
How to reset payroll in QuickBooks?
You can reset the payroll which will undo the payroll data saved. The steps you need to perform are: 1. The first step is to head to the employee tab and then choose the pay employees 2. Now, choose scheduled payroll or unscheduled payroll 3. The next step is to choose resume scheduled payroll 4. After that right click the employee’s name that is highlighted in yellow 5. The last step is to choose revert paychecks
How to fix QuickBooks error PS036?
To resolve QuickBooks Error PS060, you can try updating the payroll tax tables manually. If the problem persists, you can contact our QuickBooks Payroll Support team at +1-888-510-9198 for assistance.
What is payroll error in QuickBooks online?
Payroll errors in QuickBooks online occur when you have recently made changes to your payroll, like if you add a new employee or create a new pension scheme. This can be fixed by deleting the new employees before deleting the pay run. Once you’ve made changes to the final period of the final tax year, you can add the employees back in QuickBooks.
What should I do if I receive QuickBooks Error PS060 while updating payroll tax tables?
If you receive QuickBooks Error PS060 while updating payroll tax tables, you should immediately contact our QuickBooks Payroll Support team at +1-888-510-9198 for assistance. Our team of experts will assist you in resolving the issue quickly and efficiently.
Ever been in the middle of your QuickBooks payroll update, and suddenly the software throw an error code 12152 disrupting the entire process? Well, if you find this relatable, then you are not only the one. The QuickBooks error 12152 has been bothering a lot of QuickBooks users lately. The error pops up on the screen out of nowhere and makes it not so easy for the QuickBooks user to connect to the server. You might be bothered by such error when you either update QuickBooks payroll or when opening the software. In order to deal with this error, it is crucial to keep a check on the internet connection, as it can be one of the core reasons behind the occurrence of such an error.
To help you understand this particular error better and to help you deal with this issue, we have come up with this segment sharing the complete information related to QuickBooks payroll update error 12152 in detail. If you are looking for Instant help then you can speak with one of our experts to quickly resolve to your QuickBooks Problems. Our QuickBooks Live experts are available at Toll-Free +1-888-510-9198. Feel free to discuss your queries with us and we will help you with all sorts of QuickBooks errors.
QuickBooks Error 12152 typically stands out when you have problems with the Internet Connection setups that make it difficult for the software to connect to the servers and give concerns with the updates. Before continuing to the solution of QuickBooks payroll error 12152 make sure your Internet connection is established as well as permits you to connect to verified websites.
Symptoms of Payroll update error 12152
Identifying QuickBooks payroll update error 12152 becomes easy with the signs listed below. Let us check it out:
This error 12152 appears when a program crashes the dynamic windows
When similar programs running on your system, the device crashes along with having error 12152
Error 12152 displays on a screen & this react when gradually to a mouse
As occasionally a user find their device gets freezes for a couple of a moment
Causes of QuickBooks Update Error 12152
A bunch of factors can drag you into such an error. These factors include:
Some new windows have API keys but are not working as legally
A few quite common reasons that incorporated wrong or fizzled installation in QB software
An un-installation of programming that may have left invalid sections in your registry windows
Any consequences of an infection or malware assault
Improper framework shutdown it is just because of a power disappointment or have some another factor for this error code
Deleting an important framework document or registry section, and in addition various different causes
The prompt reason for this error in QuickBooks software that mistake is an inability which effects to run all typical operations by a framework or a part of an applications.
Check out the solutions for QuickBooks Error Code 12152 as:
Solution 1:Check Date and Time
At times, incorrect date and time can trigger a lot of errors in QuickBooks. One such error can be QuickBooks error 12152. Thus, it is recommended to check the date and time of the system. The steps involved here are:
First of all, check its date as well as time on your system
On the clock, give one right-click on it
Now let us adjust your date & time
After this restart your QB desktop software & check for all error codes
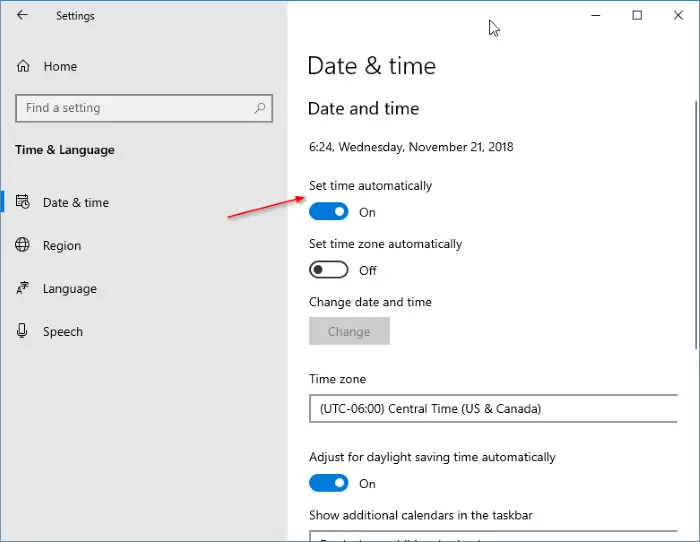
In case you are Windows 10 user, then perform the steps below:
You need to first head to settings and click on time and language.
Furthermore, move to date and time option.
Also, to set the current time, select the set time automatically option.
Now in the time zone section, enter the correct time zone.
In case the daylight saving time applies to your time zone, then enable the adjust for daylight saving time automatically.
In case the software isn’t accessed using the admin credentials, then facing this issue is possible.
Start your Computer
Then login as administrator tab
Click on the start key button
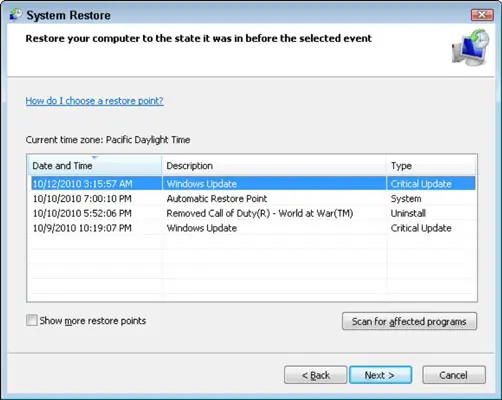
Then click on all programs > accessories > system tools & after this finally, click to the system as to restore
Under the new window, choose to restore my PC as earlier time option tab
Now click to the next heading
In the given list, just click on to ‘restore the point’ list. Select the latest system to restore that point from a displayed screen. After this just press to the next tab.
Into a confirmation window, give a single click on the next key button
When restoration process is completed, then restart your PC system
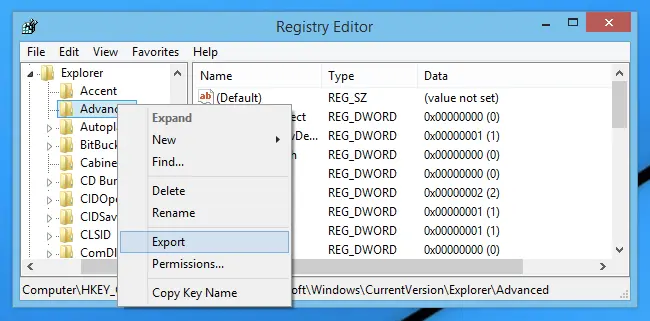
Solution 5:Fix registry entries
Select or click on the Start key button
Enter or type as Command in the given dialog search box. Remember don’t hit the enter key yet!
On a system keyboard, hold the Ctrl+ shift keys instantly & then press or hit the enter key
With the help of a permission dialog box, it will asks as prompted
Then click to the yes option
If the cursor of your mouse blinks, this opens the black box
Now type or enter as regedit. After doing so, hit the enter key
If want to take back up then choose the error 12152 related keys as instructed
Now select export from the main file menu
Then select the folder type and save into the list as where the client wants to save their IE backup keys
Under the File Name box, now type a name for a backup file for instance, IE backup. If need any technical assistance, ask expert guidance
Make sure that under the Export range box just type as selected branch is chosen by the user
Apply to save all changes that you have been made recently
Along with a .reg file extension. This file has been saved now
For a related registry entries, Take now a back up into your Internet Explorer web browser
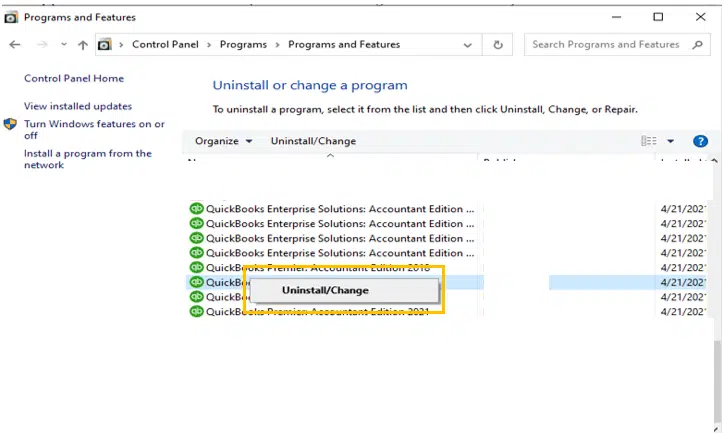
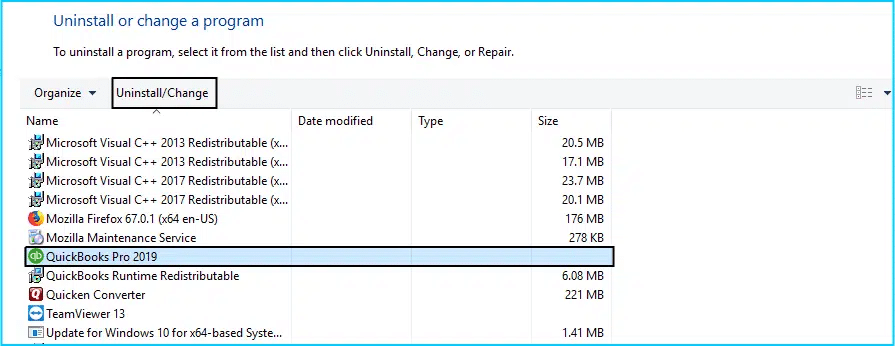
Solution 6:Uninstall and Reinstall QuickBooks
The very first step is to move to uninstall and download QuickBooks
After the software is established on the system, and then open it
Now, find the scan option and run it
The user will then see a list of issues or errors
The last step is to click on repair all option to eliminate them
Solution 7:Head through Microsoft Windows Framework along with time displayed
The user will have to verify the framework of the system is authentic and the time displayed is correct
The user is suggested to repeat the steps and also verify the framework through the settings tab.
The last step is to reboot the software and access it again.
Solution 8: Use System Restore
If none of the above solutions helped you in fixing QuickBooks error 12152 successfully, then simply use system restore feature. The steps involved in here are:
Begin with rebooting the system.
After that, log in to the system using Windows admin credentials.
You now have to search for the option that shows Restore computer to a previous time and date.
Once done with that, select the above option and head to the next tab and click on it.
The next step is to head to the latest one from the list of restore points.
The next step is to confirm the choice by again clicking on next tab.
Towards the end, wait for the restoration process to complete and also reboot the system.
Solution 9: Clean Installation of QuickBooks
Another effective solution is to clean install using QuickBooks clean install tool. This process is an advanced version of rebooting and reinstalling that can fix the issue up to a certain extent. You will have to perform the following steps:
You need to first uninstall QuickBooks.
Download QuickBooks clean install tool from QuickBooks tool hub.
Run the clean install tool and let it perform the necessary steps.
Furthermore, download the same from official Intuit site.
The next step is to install QuickBooks and launch.
Fixing QuickBooks error code 12152 becomes easy, once you implement the right set of steps enumerated above. Hopefully, you will now be able to get rid of this particular error in QuickBooks without much hassle. If still you are facing the same error then get in touch with our QuickBooks Error Support team by dialing toll-free +1-888-510-9198. Our certified ProAdvisors will ensure to provide you with immediate assistance for all your QuickBooks related queries.
FAQs Related to QuickBooks error 12152
What is payroll error 12152?
This issue belongs to the 12xxx family of error codes that are related to the installation issues in QuickBooks. This error typically appears when updating QuickBooks to newer versions.
What are the causes behind such payroll errors?
This installation error may be encountered for several reasons, including: 1. Erroneous internet settings. 2. Using an older version of QuickBooks. 3. License data not identified by QuickBooks. 4. Technical issue with API keys in Windows. 5. Virus intrusion in the system.
How do I fix payroll error codes in QuickBooks?
These errors can be resolved with the help of following steps: 1. Configuring the internet settings. 2. Also, Correcting system date and time. 3. Restoring the system. 4. Attempt updating QuickBooks in the Safe mode. 5. Clean install QuickBooks desktop
No doubt, QuickBooks is an exceptional accounting and bookkeeping software made possible by Intuit. This software possess all functionalities that every business regardless of the size and type requires. One of the most important functions that is offered by QuickBooks is payroll. But it has always been a debatable topic to decide whether Weekly Payroll is better or Monthly Payroll is better. To help the users in this confusion, we have tried to project the purposes of both payroll methods. Along with unbiased pros and cons with the help of this article. Thus read the article till the end, or for any further information, you can make a call at our toll-free number .i.e. +1-888-510-9198.
Empowering employees is a symbol of growth. But at the same time it comes with important decisions and responsibilities, including payroll. Once the user sort out the legal requirements, you’re left with the settlement of how often to run payroll. Weekly, biweekly, and monthly payroll are the most common choices with some pros and cons of each to consider. So, without further delay, let us begin with the discussion.
Sending out weekly pay cheques follows in processing payroll 52 times per year and incurring the relevant service fees each week, whether you run payroll in-house or outsource it. Employees earn their pay-cheques on the same day each week, usually on Friday, for the salaries, hourly, and/or overtime pay they received over the seven-day span the cheque covers.
Pros of Weekly Payroll
A large number of employees enjoy getting paid every week. And also, it keeps a patterned movement of money reaching into their bank accounts. This makes it easier to budget household finances. In situations when an hourly employee works overtime, they are paid for those extra hours sooner preferably than having to pause two weeks or even till the end of the month to get the extra money. That can be particularly helpful if the weekly schedule alters significantly.
For instance, if an employee manages to reach 65 hours one week and only 25 hours the next week, this method is helpful to have that extra overtime pay way before heading into the lighter schedule week. If the user recommend weekly payroll, then this could be considered as high employee happiness.
On the user’s end, calculating overtime is an honest process, especially when there is hourly employees on staff. Since the pay period tallies with the work week, it becomes much easier to calculate any additional pay. With monthly pay periods, the first and last week of the month is typically partial weeks, which can hamper the calculations. Weekly pay periods also make it smoother to comprehend when timecards or time reports are payable.
In this method, the payable date remains the same every week as the user will run payroll on the same day each week. Whereas, on a monthly inventory, the cut-off for turning in pay may vary from one month to the next depending on end of the month.
As it is rightly said, everything comes with its pros and cons, and talking about weekly pay, there are certain cons of this as well. One of the biggest disadvantages of weekly payroll for the employer is the time plus cost. Since the employer is following weekly payroll, that can take the employer away from other duties, or it indicates the staff member appointed to handle payroll gets drawn away from other duties. If someone is picked to do payroll, they get paid each time it’s run, improving the overhead.
Distributing pay more often might at times come at a cost if you issue conventional paper cheques, wasting money on the cheque forms and the ink to print them. If the user makes use of direct deposit, he/she might have to pay a small fee per deposit depending on the service that is practiced. Paying those fees every week adds up to the total cost. That fees can be cut off in half by preferring biweekly or monthly pay periods.
When the user runs payroll every other week that results into 26 pay times per year, as maximum months have two paydays, but some months have three. Similar to weekly pay period structure, the bi-weekly structure means that the employees will get paid on the corresponding day of the week each time, but only all another week.
Thus, the employer might pay them all Friday, just for an example. The biweekly option is a bit different than paying employees semimonthly, where they always get just two paycheques per month, for a total of 24 pay periods. In general, a semimonthly plan typically pays employees on the 15th and the last day of the month rather than paying every another week.
Pros of Biweekly Payroll
Biweekly payroll brings in certain pros, a few of which are mentioned in this paragraph. Balanced to a weekly payroll schedule, bi-weekly payroll frees the employer a notable amount of time since they simply have to run it every other week. This method saves money on direct deposits and cutting cheques, since these tasks are done half as many times per year. Running payroll less frequently also signifies less risk of error.
Running payroll weekly means that the employer has more possibilities to include human error into the equation. Not only this, the biweekly payroll also adjusts well with the work weeks, which makes it easy to add overtime for the two weeks that fall into each pay period.
Cons of Biweekly Payroll
Talking about the disadvantage, biweekly payroll adjusts the monthly expenses with the pay periods. This means that when the employer runs payroll monthly, it becomes easy for him to determine monthly thoughts. Whereas with weekly and biweekly payroll, the first and last paydays of each month often actually span two separate months, which creates disturbance.
The first pay cheque in March may include a few days from February, while the last pay cheque might cover a few days of April. (For example, adding some complexity to concluding calculations.)
Now comes the monthly payroll, and if the employer uses monthly payroll, then payroll is run only once a month. And the employees solely receive one paycheque per month that makes a total of 12 cheques per year. Also, the precise date gets altered. For instance, the user runs a payroll each month on the 20th. Monthly payroll isn’t as prevalent anymore.
Employers don’t receive any huge benefits for only running payroll once per month, and it’s offensive with employees as it might create complications in budgeting.
Pros of Monthly Payroll
One of the most significant fact about monthly payroll is that, it is easy to handle and the employer is required to invest his time in payroll only once per monthly. Not only this, but also it adjusts well with all the payroll deductions that are required, such as taxes, Canada Pension Plan contributions, as well as Employment Insurance premiums. This would otherwise be divided over various cheques per month, whereas with the help of monthly payroll, the employer can use the full amount out of the single cheque for each of the employee.
Cons of Monthly Payroll
The monthly payroll lacks behind as there are certain regions that wish to pay their employees more frequently. In British Columbia, as per the rules the companies have to pay their employees at least double per month. This suggests that the employer needs to at least opt for a semimonthly pay period, which means to pay the employees twice per month, which is in general on the 15th and the last day of the month. There are many other laws for salaried versus hourly employees in other regions. Such as in Saskatchewan, if the employers employ monthly salaried employees, then they can pay them on a monthly basis, however, for all other employees, paying at least semi monthly is mandatory.
The issue with monthly payroll doesn’t end over here, it adds up to employee redemption. Most of the times, employees find it difficult to stretch their money out over the complete month. Most bills get due on a monthly basis. For this the employees should be ready to pay their bills when they get their pay cheque. And further budget the rest for the other expenses, but this sounds too theoretical. In actual, it becomes challenging for the employees to proportion their money for the entire month. Especially for the ones who live pay cheque to pay cheque. If the employee faces trouble establishing a monthly budget routine, they might find it difficult to manage until they are paid again, which piles up to their difficulties.
Deciding Between Payroll Options
As stated before, deciding between the two has always been confusing for the employers. But before jumping on to any conclusion, the user should make note of the payroll ordinances in that particular region. Where they have set up their company. If the employer is situated in a region that demands two pay periods per month, then in that case monthly payroll might not be a better option. Once the employer gets familiarize with the laws, the user can measure the pros and cons of the particular events. Moreover, a frequent payroll period assists the employees avoid having “more month at the end of the money”.
Staring at the costs and time involved in many payroll options can help you pick what’s best for you. A biweekly pay structure is oftentimes a good balance amid keeping employees happy and balancing your costs without scoring to your bookkeeping or financial burden.
If the user have employees but are considering payroll frequency, then take some time to handle the change. The move may turn the math. If you’re using payroll software, then the program controls the calculation changes for the employer. This is one of the significant perks of using computerized payroll systems. Likewise, in case of outsourcing payroll, the vendor would manage the changes in calculations. The user is required to keep in mind that he/she might have to pay more. If he/she boosts the frequency of payroll as the provider may charge for every run.
Prepare the employees for any adjustments in payroll. It is a sensible idea to let the employees know at least a month in advance about the various aspects. In case the employee is moving to a shorter pay period. Such as shifting from monthly to biweekly, the employees are expected to acknowledge the change. And won’t need a long lead time before the switch. Whereas, moving from paying weekly to biweekly requires presenting the employees ample notice. So that they’re qualified to go longer within paycheques.
At the time of deciding on the frequency of pay periods, the employer eventually should attempt to gain a balance among a cost-effective solution for employer and a schedule. This would keep the workforce comfortable. Considering the pros and cons of various regularities would help the employer to find that balance. And finding the right payroll solutions makes it simpler to process payroll no matter how frequently it is done.
Did you know you can pay employees in QuickBooks? Simply Add Payroll today. However, in case any of your queries remained unanswered, then feel free to seek help and guidance from our QuickBooks payroll customer service team by calling them on their toll-free number at +1-888-510-9198.
They are Intuit Certified ProAdvisor and the industry’s best accounting experts, they provide round the clock service. We would love to be your support partner!
FAQs Related to Weekly, Bi-Weekly or Monthly Payroll
Is it better to get paid monthly or bi-weekly?
Even though the pay frequency changes, the amount remains the same. However, a biweekly pay schedule makes it easier to reduce debt or save more money.
What is the difference between bi-weekly and bi monthly?
Bi-weekly and bimonthly can mean the same thing, which means occurring twice in a week or month respectively. Bi-weekly means twice in a week or every other week. Whereas, Bimonthly means every other week, if it’s twice a month or it can mean every other month.
What is the best payroll frequency?
Due to the consistency and cash flow predictability offered by semi-monthly, it is best suited for salaried workers. Hourly employees should be paid biweekly or weekly
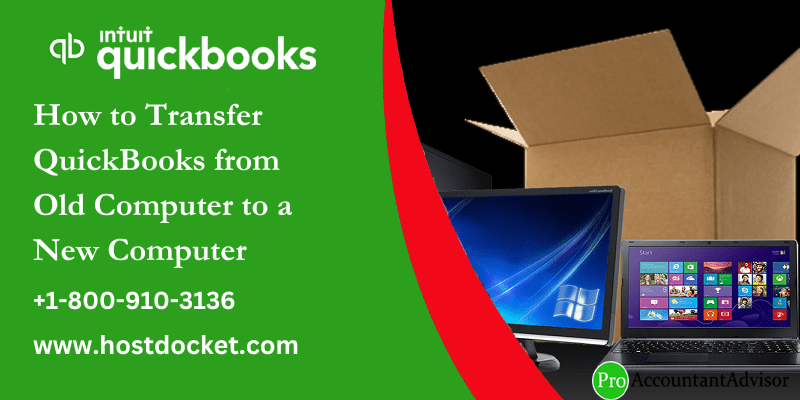
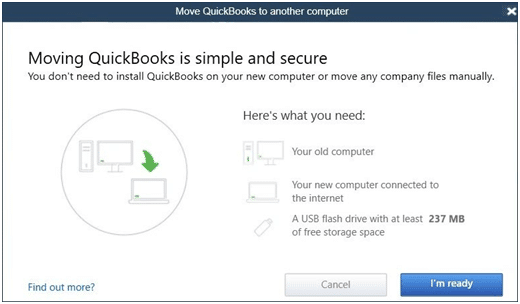
Switching computers? Want to transfer QuickBooks from old computer to a new computer? Well, all this is possible by performing some basic set of steps. To assist in this migration process, Intuit offers a QuickBooks migrator tool that helps in transferring QuickBooks software from their old to new computer with maximum three files, and if the user is using a US version of single-user QB desktop. Not just that, we have designed this piece of writing, sharing the complete details about transferring the software to the new computer. Thus, make sure to stick around the article till the end. Or you can further connect with our tech support team at +1-888-510-9198, and we will provide you with immediate guidance to all sorts of QuickBooks related queries.
Requirements for transfer QuickBooks to another computer
The user system needs a few things to transfer QuickBooks desktop to a new system. Let us have a look:
Make sure to register for the software after the installation and also ensure that the new system is connected to proper internet connection
Also, uninstall QuickBooks desktop from the old system, but before that create a backup of the QuickBooks company file
Keep the QuickBooks software installation disk or the setup file stored on an external device
The license and product registration details are other important things
External storage device to store the QuickBooks desktop files
Make sure to have a USB flash drive with enough free space to hold QuickBooks files.
Learn to move or reinstall QuickBooks files to another computer
You can perform the below discussed set of steps to move or reinstall QuickBooks files and data successfully from your old computer to new computer. Let us explore:
How to transfer QuickBooks from one computer to another using Migrator Tool?
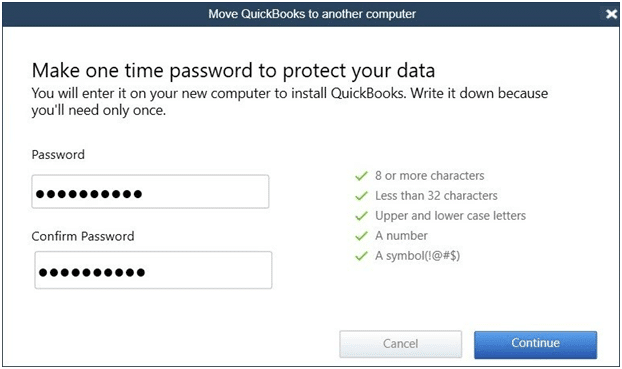
Migrator tool is one of the great features of the QuickBooks software. A user can complete the process of transfer in just a few clicks due to this feature only. The transfer will be processed in two parts. However, before beginning the process make sure that you have access to the admin user, as the steps can be performed only the admin users.
How does migrator tool work to transfer QuickBooks from one computer to
another?
Migrator Tool is also known as Move QuickBooks tool. This tool can be accessed only if you are an Admin user. You will need to create a complex password and need to remember it by writing it somewhere, however, it is required only once.
The migratory tool will allow you to copy max three company files in the USB flash drive along with the supporting documents. The pen drive will physically move the files and the migratory tool will do technical work in background. The tool will also download the right version of QuickBooks Desktop in the new computer and will aid in setting up all the files.
Note: Using migratory tool will not delete any file or reformat your system.
Requirements of migratory tool to transfer QuickBooks to new computer:
There should be an internet connection to the new computer.
The pen drive should have a good amount of empty space. Free space around 150-200 MB is usually required.
Data which gets copied through migratory tool while moving QB to new
PC:
All the data required to run QuickBooks Desktop gets copied, however, the list is as below:
Version and other QB Desktop details
Recent company files- max 3 files with supporting documents
All other related files and custom templates and forms
We have tried to sumnmarized the steps for old and new computers below. Let us evaluate them one by one:
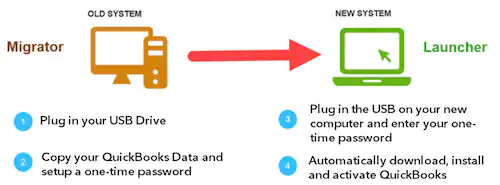
Step 1: On the old Computer
At first, you need to download and save the QuickBooks Migrator tools on a USB flash drive.
After that, you can download it from the official Intuit Website.
Once done with that to the old system plug in the USB drive.
The next step is to open QuickBooks and move towards files> utilities> move QuickBooks to another system.
And further select the option I’m ready.
QuickBooks will now ask you for creating a complex password in order to secure the company files in the USB flash drive.
Also, remember that it is a one time password and you will require this password when you plug in a USB into the new system.
You now have to pay attention to the steps that are visible onscreen.
This might take some time, as it mainly depends upon the size of the company files.
Step 2: On the new computer
Here you need to insert the USB drive. The Migrator tool won’t run all alone because of the windows security protocols and this is the explanation that you want to manually run it.
To start the migrator tool, you can open the flash drive and search for Move_QuickBooks.bat file record and later on run it.
Now, enter the one-time password made before, and wait for the tool to finish the process.
QuickBooks migrator tool file will delete upon the completion of the process and other data in the USB will stay untouched.
You can change the name of the files on the old system.
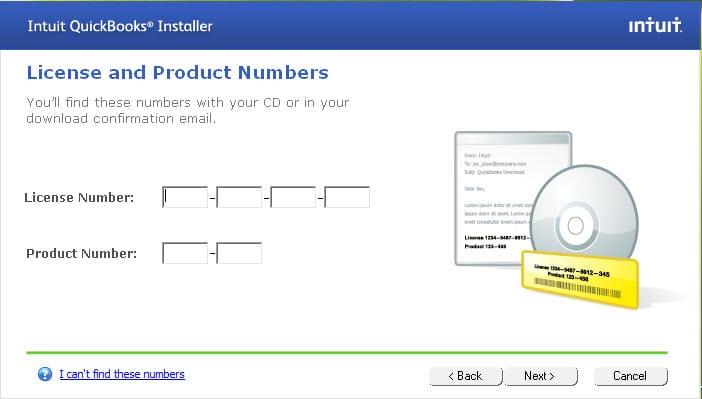
And can further move to the help menu and click on the register QuickBooks.
You can enter all the necessary details like phone number, postal code, and license key for finishing the registration.
What is not copied using migratory tool when QuickBooks is transferred from old to new computer?
Multi-user set configuration.
Payroll or payments services set up in QuickBooks will not be copied as per Intuit policy to protect data.
Intuit Data Protect needs to be uninstalled in the old PC and reinstalled in the new PC
Company files which have not been recently opened will not be copied.
Manual backups created by the user will not be copied.
Manual Procedure to transfer QuickBooks desktop from old computer to a new computer
The users can manually transfer QuickBooks from old computer to new computer. The steps involved in this process are as follows:
Step 1: Create a backup of the company files and QuickBooks license
The first step is to create a backup of company files and QuickBooks product license to the external storage device
The next step is to install the latest or current QuickBooks version to the new system
Once done with that, download and restore the backup file to the new system
After that uninstall the QuickBooks software
Step 2: Restoring the backup of the company files on the new system
Initially, the user needs to install the QuickBooks on the new system
And then, insert the storage device
Followed by opening QuickBooks and navigating to the file menu
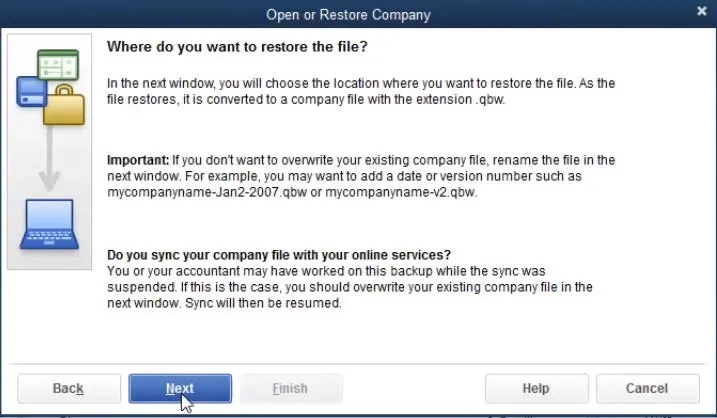
Later on, choose the open and restore company option
Also, click on restore a backup copy and also click on next tab
After that click on local backup option and head to the backup file created in the old system
The last step is to pick a location in the new system for saving the backup and also click on save tab
Winding Up!
There is no fix time on how much time will it take to complete the process. It completely depends on the internet speed and size of company file. In case you face any issue while following these steps, you can contact our QuickBooks enterprise support team or accounting consulting professionals at toll-free number. i.e. +1-888-510-9198.
FAQs Related to transfer QuickBooks from old computer to new computer
Can I transfer QuickBooks from one computer to another?
You can try to transfer QuickBooks from one computer to another using the steps below: 1. Move to file menu from QuickBooks. 2. Choose utilities and further go for QuickBooks to another computer. 3. Go for I’m ready and then create a one-time password. 4. Perform the on-screen instructions to choose the USB Flash drive you’ll use
Can QuickBooks be installed on two computers?
QuickBooks with a single license can be accessed on multiple computers. However, files are only accessible to a single user, a maximum of two computers, but one at a time.
How long does QuickBooks migration tool take?
90% of conversions are processed in under 12.5 minutes. Whereas, 100% is completed in 72 hours. This usually completes within 45 minutes. However, the data is held in secure AWS servers during migration and destroyed once the conversion is approved.
How do I transfer data from old QuickBooks to new?
To do this, you need to perform the steps below: 1. At first open your new version of QuickBooks desktop 2. Move to the file menu and then choose open or restore company. 3. Choose open a company file and further hit next. 4. In case you have a backup company file instead of a company file, then choose restore a backup copy.
Are you a small or mid-sized business holder? Or an entrepreneur?? You should take a gaze upon the frequent QuickBooks Payroll and Bookkeeping Mistakes. Suppose if you present the gift card to the business employee’s & reckon them as a cash payment. Are you sure that you have a fast and easy payoff system for the taxes whilst you overpaid the employees?
It might be possible that you are using the vendor payments as payroll before receiving the Form W-9? If you don’t, then IRS would probably penalize you with some serious fines. Now read this technical article to avail complete insight on this topic. To learn further about this, make sure to stick around till the end, or you can get in touch with our QuickBooks support team of certified accounting professionals, who can help you with all your accounting and bookkeeping activities. Give us a call at ++1-888-510-9198, and get answers to all your queries.
Avoid 11 Common QuickBooks Payroll and Bookkeeping Mistakes
Avoid these 11 common payroll and bookkeeping problems that small company holders tend to make.
1. Failure to Issue Form 1099 Correctly
Be sure that Form 1099 be supposed to be issued only to self-governing or independent contractors & also to the vendors who endow the business with over $600 in services. If you fail to do so, you could tend to steep penalties.
2. Classify Employees as Independent Contractors
Your staff members may usually be either independent or self-governing contractors or employees. Selecting the correct classification is essential. Different forms are involved (1099 versus W-2), & some staff may be subject to tax preservation.
3. Proper Fringe Benefit Value Not Included Appropriately
You can take into account company cars, spousal travel, country club fees, and also housing benefits into the Taxable Fringe benefits. But it can be complicated to analyze fringe benefit value accurately.
4. If You Are Not Including the Fair Market Value of Prizes, Gift Cards, and Awards in Employee Income Totals
The majority awards are noticed as a taxable fringe benefit & the Gift cards are identified as cash should be assumed as a taxable wages.
5. Excluding Travel and Commuting from Employee Income
In numerous cases, commuting & travel expenditures are not measured as taxable income for a worker. But there are a number of unique cases such as travel expenses for short-term coursework that lengthened can be subject to income tax.
6. If You Are Doing It All Alone
There is a crisis with small business owners & entrepreneurs. They at all times struggle to deal with payroll tasks on their own. But they end up experiencing more pressure, stress, and may make costly errors.
7. Exclude Reimbursements for Expenses from Re-portable Wages
The correct exclusion of reimbursements for expenses depends upon an accountable plan where operating costs are reimbursed. Only if there is a business relationship, other reimbursements should be built-in in the taxable salary.
8. Executive Income is Not Including in Non-qualified Deferred Compensation
Here is the thing that maybe Executive compensation is a subject matter to an excise tax. You be familiar that if this is neglected, there is a relief program. But only certain oversights are eligible.
9. Neglect Backup Withholding for Vendor Payments
You probably know this very well that a company pays the vendor before receiving the Form W-9 (Request for Taxpayer Identification Number and Certification). It could be subject to a payment of 28 percent for backup withholding.
10. Not Depositing Withheld Taxes in a Timely Manner
Withheld taxes are supposed to be deposited in regular payment terms on a semi-weekly or monthly basis. However, some amounts need a deposit on the next business day. If you are unable to deposit it appropriately…! This can lead to late fee deposits, penalties, and also interest charges ranging from two to 15 percent.
11. Thinking your way through the task
Entrepreneurs will as a whole theory their way via accounting when they aren’t entirely specific what they’re doing. The problem is mystery mixes after time, potentially leaving a year of books that you have to fix at evaluation time.
Few Examples include:
Not categorizing costs properly
Overlooking tax deductions
Missing filing on declaring target dates since guides weren’t done in a timely manner
In case, you are also facing some unnecessary penalties from the IRS – you should Hire a professional bookkeeping service to handle your business payroll tax concerns and reporting…! Because the bookkeeping services give you tension-less accounting experience and also help you to grow your business.
To know more on QuickBooks Payroll and Bookkeeping mistakes or to hire a specialized bookkeeper for your business – you can dial our toll-free QuickBooks payroll helpline number with no hesitation .i.e. ++1-888-510-9198. Our Certified accountants and bookkeepers are ready there to help you out with your accounting and payroll related problems. We have covered a large area all over the USA and other countries.
FAQs Related to Payroll and Bookkeeping
What are the mistakes in payroll?
A common mistake that might be seen in payroll can be miscalculating pay. Poor time tracking capabilities can contribute to miscalculated pay. Moreover, if the company doesn’t have a reliable way to track employee hours or paid time off, then your chances of making a payroll overpayment or underpayment mistake skyrocket.
What are common bookkeeping mistakes?
A few common bookkeeping mistakes include: 1. Not hiring an experienced bookkeeper and professional accountant 2. Improper record-keeping of financial transactions. 3. Inaccurate categorization of income and expenses.
How do I fix payroll mistakes in QuickBooks desktop?
You can simply perform the below steps: 1. In the show paychecks from and through, enter the paycheck date. 2. Choose the paycheck that has the incorrect pay period and double click to open. 3. Once done with that, choose paycheck detail. 4. In the review paycheck window, enter the correct pay period dates.