Often QuickBooks users get confused between the terms upgrade and update. Upgrading QuickBooks generally means upgrading to the latest release like moving from the 2023 version of QB to QuickBooks Desktop 2024. However, switching the versions is considered as updating as well by a majority of QuickBooks users. In case you need to upgrade QuickBooks Pro, Premier, or Enterprise, then here is how you can do it. After buying QuickBooks, you can simply start using the upgrade tool.
This article will brief you on the procedure to upgrade QuickBooks software and other important aspects related to QuickBooks upgrades. However, if you need any sort of technical assistance related to QuickBooks at any point in time, feel free to contact our technical support team at +1-888-510-9198, and they will provide you with instant assistance.
We have listed a few reasons related to the upgradation of QuickBooks software:
In order to enable yourself to enjoy the latest versions of QuickBooks like QuickBooks Desktop 2023, it is essential to upgrade the software. It is known to all QuickBooks users that a new product is introduced every consecutive year by QuickBooks that has all the new, stimulating, and exclusive features. These features not only make your work easy but enhance your performance as well.
Microsoft keeps on updating its versions and thus, QuickBooks updates its versions to maintain compatibility with the operating system. We suggest you do not ignore upgradation for a longer period.
Moreover, it is important to remember that every QuickBooks Tech Support comes with the latest versions and that too with the service discontinuation policy, thus, to get optimum and reliable tech support, you would need to upgrade to the latest version to get all the support facilities.
Users have an advantage with the availability of an amazing feature- a free QuickBooks upgrade. You can get this free upgrade if you have launched the latest series within 60 days when you have obtained QuickBooks. Along with this, you can also get a free upgrade if you register for QuickBooks within 60 days of the launch period of the latest version.
After all this, you would fill in the criteria, you can do this. But in any case, if you are facing any problem, then you can connect to our QuickBooks Customer Service at toll-free +1-888-510-9198 for assistance.
When a new version of QuickBooks is out in the market, you will surely get a message when you open QuickBooks. This makes upgrading easier for QuickBooks users.
Once you are ready, you can opt for the Upgrade Now tab.
Followed by selecting Keep the old version on my computer, in case you want to keep your current QuickBooks.
Further, choose let’s go.
Now, QuickBooks will download, install, and activate the new version for you.
After the upgrade is done, choose Open QuickBooks.
Note that the upgrade might take some time. It completely depends upon your internet speed and the size of your company file.
In case you do not see a prompt to upgrade your QuickBooks subscription:
Bring back all one-time messages – In case you don’t get a prompt to upgrade then simply change your one-time message prompts. This can be done as follows:
Move to the edit tab and further choose preferences.
Once done with that, go for general.
And also opt for My preferences.
Now, select Bring Back all one-time messages and hit the OK tab.
Close and reopen QuickBooks.
You will have the prompt to upgrade your QuickBooks subscription.
You can get the latest version of QuickBooks Desktop from the QuickBooks desktop manager. Further, choose and install all your QuickBooks products.
Upgrade QuickBooks Desktop without a Subscription
In case you do not see a prompt upgrade, need not worry. This simply means that you have made a one-time purchase of QuickBooks. You can upgrade with an easy upgrade tool. This can be done as follows:
Choose help and further move to upgrade QuickBooks.
Now, go for the version you want to upgrade to and also choose upgrade now.
You can keep a copy of your current version of QuickBooks.
And also choose keep the old version on my computer and then select Let’s go.
QuickBooks downloads, installs, and activates the new version for you. It will further update the company file as well.
Here, you need to open the discovery hub, and further choose upgrade to QuickBooks 2022.
Once done with that, choose Proceed to upgrade and click on upgrade now.
In case you want both versions, then opt for keep the old version on my computer. Or else leave it blank.
After that, choose open QuickBooks.
Upgrade Tool Can’t Find my QuickBooks Desktop Purchase
Find and enter your license number
Just in case you do not get a prompt to select a new QuickBooks version, then simply enter your QuickBooks license info. This happens when you buy QuickBooks with a different email than you use for your QuickBooks account. You need to continue with the steps below:
Find the purchase confirmation email that you received from QuickBooks.
After that, enter the license number and product number and hit continue to complete the upgrade.
In order to find the license info, you need to sign in to the customer account maintenance portal (CAMPs). You can also get the latest version from QuickBooks Desktop Manager. And further you can also choose and install all your QuickBooks products.
Upgrade QuickBooks within the RightWorks hosting environment
As the account admin, you can install QuickBooks for others as well as for yourself. In case you are a standard user, then you do not have the right to install it for others. You can install QuickBooks RightWorks account owners and admins using the steps below:
First, sign in to the RightWorks My account with your email address and password.
Once done with that, opt for users.
You now have to choose the specific user you want to apply for the license.
Now, within the user detail page, choose apps you can install.
Also, note that RightWorks displays all QuickBooks versions available to you.
You can use the search bar to quickly find the version.
After that, select the correct QuickBooks version, and choose install.
After it installs, you will receive a prompt and you will see a shortcut on your desktop.
Lastly, sign off and on again to access the new QuickBooks installation.
Install QuickBooks for RightWorks standard users:
This can be done by signing in to RightWorks My account with your email and password.
After that, select Apps you can install.
Now, use the search bar to quickly find the QuickBooks version you need to install and choose the app.
After that, select the Install App option.
After it installs, you will get a prompt and you will see a shortcut on your desktop.
The next step is to sign in to the remote environment, you will see QuickBooks on your desktop. In case not, try re-adding the app. You might also be required to sign off and on again to access the new QuickBooks installation.
QuickBooks is the best accounting software that also provides a few add-on services which are upgraded once every three years. These services can include QuickBooks Number services, tracking, reporting, remote access, online banking, bill payments, credit card processing, QuickBooks merchant service, treasury software positive pay for QuickBooks, and many more.
For every user, it is also important to know that QuickBooks comes with a strict sunset policy that provides support services for the latest versions. This service is provided only for the first two years thus, to use these initial free support services, you must ensure that QuickBooks is upgraded within the stipulated time frame.
What are the benefits of upgrading QuickBooks to the latest version?
Upgrading to the latest version of QuickBooks offers several advantages, such as improved performance, enhanced security features, and access to the latest tools and functionalities to streamline your business operations. With regular updates, Intuit ensures that your accounting software remains compatible with the latest technological advancements and compliant with the most recent tax regulations.
How do I know when it’s time to upgrade my QuickBooks software?
Intuit typically releases new versions of QuickBooks annually, so it’s recommended to consider upgrading at least once a year. However, it’s essential to assess your business needs and check for any critical updates or features that could impact your operations. If you’re unsure about the right time to upgrade, feel free to reach out to our support team at our toll-free number +1-888-510-9198, and our experts will guide you through the process.
Will upgrading QuickBooks affect my existing data and settings?
No, upgrading your QuickBooks software will not affect your existing data and settings. The upgrade process is designed to preserve your company file, ensuring that your financial data, reports, and settings remain intact. It’s always a good practice to create a backup of your company file before upgrading, in case you need to revert to the previous version for any reason.
Can I upgrade directly from an older version of QuickBooks to the latest one?
Yes, you can upgrade directly from an older version to the latest version of QuickBooks. However, if you’re using a version that’s more than three years old, you might need to perform intermediate upgrades to ensure a smooth transition. If you need assistance with the upgrade process, call our toll-free number +1-888-510-9198, and our QuickBooks experts will be more than happy to help you.
How can I ensure a smooth and hassle-free QuickBooks upgrade experience?
To ensure a smooth QuickBooks upgrade, follow these simple steps: a. Check your system requirements and ensure that your hardware and software meet the minimum requirements for the latest version. b. Create a backup of your company file before starting the upgrade process. c. Follow the step-by-step instructions provided by Intuit for upgrading your QuickBooks software. d. After upgrading, verify your data and settings to ensure everything is working correctly. e. If you face any issues or have questions, don’t hesitate to reach out to our support team for assistance.
QuickBooks has a huge demand in the market be it small or big businesses. This accounting software has benefited many businesses and has earned them huge profits. It has triggered the success of many companies by helping businesses organize accounts of their business and generate great results. This helps businesses take big decisions with good efficiency. When someone closely looks at the structure of the software, then one notices that it is very difficult to maintain the efficiency of the software. This is due to the occurrence of QuickBooks Reporting problems. And thus, there is a dire need to optimize the software. If you are not a regular user of the software, it will be tough for you to resolve the issues. Reports are a crucial element in QuickBooks, often used for different purposes, and if this feature fails to work, performing the right set of steps becomes essential. To further understand QuickBooks reporting problems, make sure to go through this article, or you can further connect with us at +1-888-510-9198, and we will provide you with instant support and guidance.
When there is a reporting problem, you get results based on a preset date range that can be today or tomorrow or some recent pay period. At that time, you can follow the below tips to fix this problem:
Generate reports on regular basis’
If you want to use the QuickBooks software and desire to generate accurate reports, then it is imperative for you to generate a good number of reports every week. This method will keep a check on erroneous results. Moreover, QuickBooks a product by Intuit has a feature to streamline a report when many reports are generated at a time. You can do this by following the below steps:
Memorize the reports
Besides generating a number of reports, it is also necessary to memorize the reports. Along with this, you would also require to optimize the reports very frequently in order to make the reporting feature of the software more efficient. If you find any problem doing that, do connect with our team at +1-888-510-9198 and we will present you with the great and quick solution.
Process Multiple Reports
Process Multiple Reports is a feature that allows a user to print the reports as per their requirements. This feature helps you give command to directly print the reports for a specific day or a period. The process is as follows:
Go to Reports -> Memorized Reports ->Memorized Report List
Select a new group in the pop-up list
Then, give a name to your reports and click OK.
Send reports in a secured manner
A businessman or a professional is aware of the fact that reports should be shared with others in an encrypted manner. This is done because the reports are quite confidential. No one is allowed to view the reports if they do not have authority. You would be glad to know that QuickBooks comes with a feature that allows you to send encrypted reports to others.
Ensure the usefulness of the reports
It is of great importance for the user to ensure that the data shared and inputs given to prepare the reports are correct or not. Usefulness of report also needs to be checked. Many a times, reports are rejected because of their usefulness. This will help you avoid unwanted results and will definitely act towards enhancing the efficiency of the software.
All the above steps help a user to increase efficiency and are quite easy to implement. In case of any difficulty, you can connect with our technical team at QuickBooks help number .i.e. +1-888-510-9198 or you can visit our website for further information at www.hostdocket.com
FAQs Related to QuickBooks Reporting Errors
What is reporting in QuickBooks?
Report in QuickBooks is basically a set of instructions that the program uses to display data from your company file. All available reports can be accessed through the QuickBooks Reports menu. This article is part of a series that covers basic information about reports in QuickBooks Desktop.01-Dec-2022
What are the two main reports in QuickBooks?
There are two main types of reports in QuickBooks–Summary reports and Detail Reports. Summary reports are designed to provide you summary information about customers, sales, expenses and more. On the other hand, the detail reports give you an in-depth analysis of the data.
What does script error mean in QuickBooks?
You can face script errors in QuickBooks when there is a problem in executing a command that involves our applications on the system trying to access a web-based feature.
A company file is a core element of QuickBooks and it is a must for every QuickBooks user to create one. It consists of all the crucial financial information of the company. QuickBooks lets a user to save multiple company files for multiple businesses separately. Creating a company file in QuickBooks or setting up a new company file in QuickBooks involves a bunch of steps. To help you setup a new company file in QuickBooks successfully, here we are with this segment. Stick around this segment to understand QuickBooks company files in a better way. On the contrary, if you are new and don’t want to risk your crucial data, simply reach out to our technical support team at +1-888-510-9198, and let our certified team professionals help you with your company file creation.
Having said that, let us unleash the entire process to create a company file in QuickBooks.
Setup a new company file in QuickBooks from scratch
This process will work if you are looking forward to create a new company file from scratch. However, if you already have an existing company file saved on your system, then make sure to use a different name for this one. Using the same name can cause to data loss as it might overwrite the existing file. The steps involved in this process of creating a new company file are:
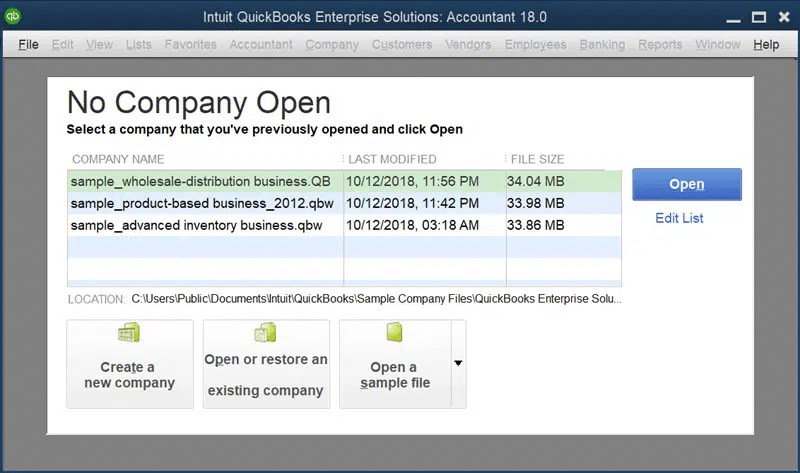
Open QuickBooks initially.
Further, go for Create a new company option in the no company open window.
This will further lead you to two different options i.e., Express start and Detailed start.
Let us understand the steps involved in both cases.
Option 1: Express Start
In case you go for an express start, you simply need to choose express start to get it started right away.
Further enter only the business name, industry, and type to setup a new company file in QuickBooks.
You will have to open QuickBooks
Further, click on Create a new company on the no company open window.
Another option that you can opt for is a detailed start process, where you will have to perform the steps in a more detailed manner and enter all the information from the very initials.
Begin by opening QuickBooks.
Head to the no company open window.
Click on create a new company.
Further, opt for the detailed start tab.
Enter the information on the easy-step interview screen and click on the next tab.
Select the industry type and go for the next tab.
You will then have to spot the type of business entity and further click on the next tab.
The next step is to set the fiscal year for which you want to create a company file and click on the next tab.
After that, set up the QuickBooks admin password and click on the next tab.
Choose the location to save the company file and click on the save tab.
The last step is to customize the QuickBooks software by clicking on the next tab and do it later by clicking on leave.
After selecting any of the above options, perform the onscreen steps and complete the setup. Ensure to keep the earlier points in mind.
End the process and start working on your company file.
Setting up a new company in QuickBooks
Towards the end of every year, QuickBooks accounting software permits the users to create new company file from existing in QuickBooks desktop. This is to cut down on the necessity to enter the data in every initial company file setup. Note that, it is not essential to close a company file at the end of every year. However, a few QuickBooks users prefer it to maintain proper records and avoid a pile-up of transactions over the course of years ultimately hampering the system’s productivity. Before beginning with the procedure to QuickBooks set up new company, let us unleash the benefits of starting a new company file at the end of the year.
Is creating a new year-end company file in QuickBooks beneficial?
Well, there are a few basic perks that are associated with the creation of a new company file toward the end of the year. Let us find out what those benefits are:
Large files usually deteriorate the performance of a system. Thus, creating a new file at the end of the year divides the data into different files making it easy to store and avoiding any hamper to the system’s productivity.
Another perk associated with this procedure is that it adds up to the data security against accidental data tempering, as it prevents any changes in the previous year’s tax reporting data.
This feature can further be helpful in restructuring and cleaning up the current data by simply removing the unused items, accounts, and names.
Important points to implement before starting a new company file
Before you begin the process, it is essential to keep a check on the following pointers. Note that, you need to have an active subscription of either standard, basic, or enhanced payroll. Moreover, you will further have to print the reports mentioned later on December 31st of the closing year. These reports might be required when you recreate the year-end balances of the account receivables and accounts payable in the new company file. Not just that, these reports might further be required when you are recording the opening balances for all the balance sheet accounts. Also, you will have to enter the outstanding banking transactions, stock status, and inventory values.
Customer balance detail report
Here you need to head to the reports menu
Move to Customers and Receivables option
Select customer balance details
Vendor balance detail report
Navigate to the reports menu
Choose vendors and payables and also select the vendor balance details option
Standard balance sheets
Head to the reports menu for standard balance sheets
Go for the company and financials and select the balance sheet standard option.
Setup a new company file in QuickBooksPro and Premier
Below are some steps that would help you setup a new company file in QuickBooks Pro and QuickBooks Premier:
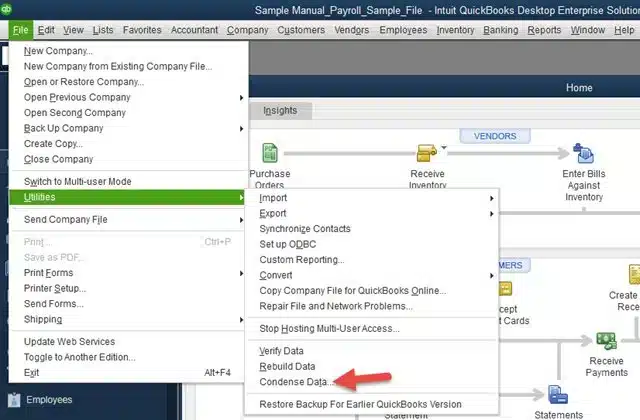
Go to the ‘File’ menu, select utilities, and click on ‘Clean Up Company Data’
Rebuild all the outstanding balances in the accounts receivable either by re-creating individual invoices or you can create balance forward invoices for a lump sum customer balance.
From the ‘Vendors menu‘, recreate all the vendor balances along with the Enter Bills option.
These bills will be directly charged to the ‘Uncategorized Expense Account‘ as opposed to individual expense accounts.
The feature will not be available to payroll users due to critical payroll information in payroll files.
The feature is not available to QuickBooks online banking users due to the security and time-related data from financial institutions.
Further steps are as below:
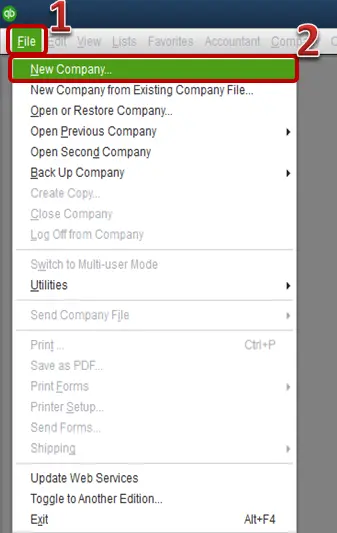
Choose File > New Company
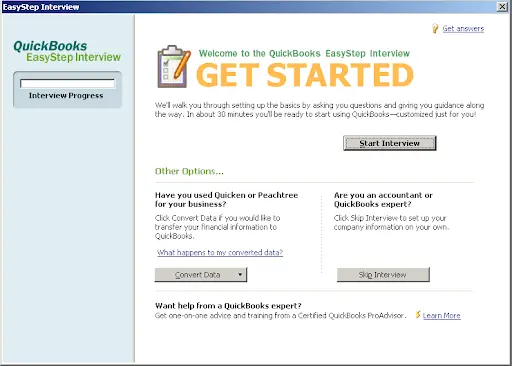
Click on Start Interview in the window of EasyStep Interview.
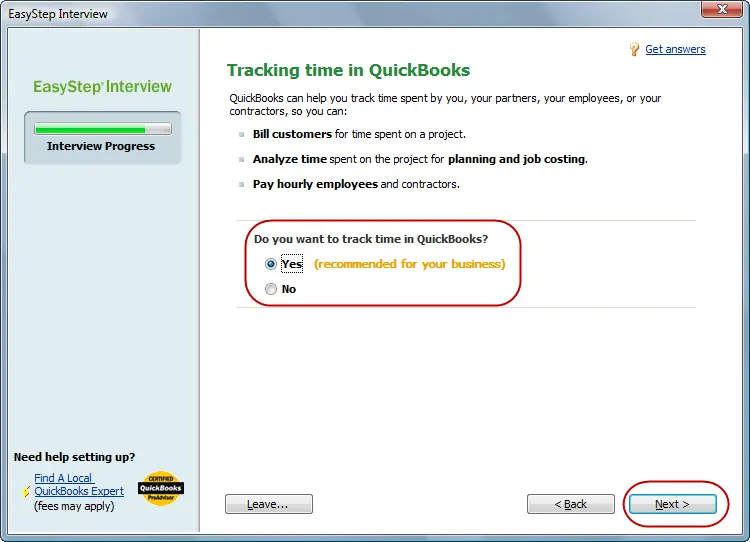
Follow all the instructions given on-screen and enter the information for your new company file.
This brings us to the end of this particular segment sharing details about how to set up a new company in QuickBooks successfully. Creating a company file isn’t a tough nut to crack if you have gone through the right steps to implement it. On the contrary, if you are still unable to create a company file or if you are dicey with the procedure, then do not hesitate in connecting with our technical support professionals using our toll-free QuickBooks support number i.e., +1-888-510-9198, and our expert will ensure to answer all your queries immediately.
FAQs Related to Set up a New Company File
Can you have 2 company files in QuickBooks?
You can have multiple companies under the same QuickBooks online account. Each company file is its own paid subscription. However, you can access them with the same sign-in info.
How do I open another company file in QuickBooks?
To open and use a secondary company file in QuickBooks. You can perform the below steps: 1. Double-click the second company file’s name. 2. After that, double-click the QuickBooks icon. 3. You now have to head to the file menu. 4. Further, choose open second company.
What is a QuickBooks company file?
When you create a company file in QuickBooks, it creates a file with a .qbw extension. This file further holds your company file and the account info.
How do I set up multiple companies in QuickBooks?
You can do this by performing the steps below: 1. Move to the file menu and further choose new company. 2. You now have to perform the onscreen instructions to set up a new company file for each business or location. 3. Once done with that enter the necessary information such as the company name and the contact information.
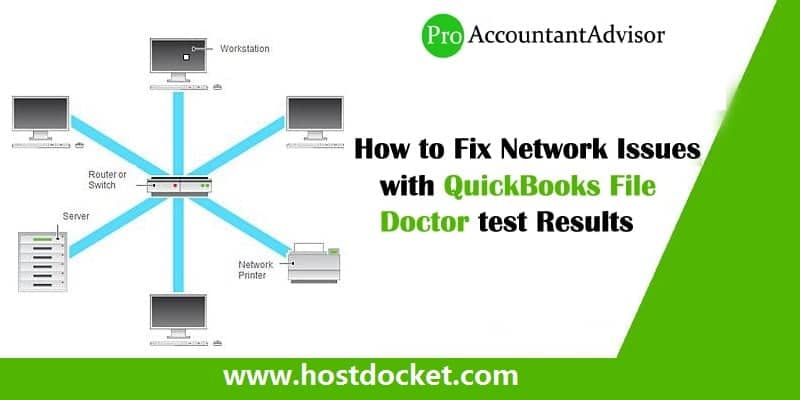
Intuit has launched QuickBooks File Doctor tool (QBFD) in 2012. QuickBooks File Doctor is a tool that has been designed to recover the damaged company files and also helps in solving the network issues with QuickBooks. There are test results as well each of the result has a section in it where all the result is described in detail along with the resources that can help fix the problem. To learn more about fixing network issues with QuickBooks file doctor test results, make sure to stick around to this piece of writing till the end. Or you can further give us a call at +1-888-510-9198, and get answers to all your queries immediately. Our technically up-to-date professionals will ensure to make fixing network issues in QuickBooks much easier for you.
Here are the results of file doctor test that would help you eliminate network issues with QuickBooks. To access your QuickBooks files, turn on the Hosting.
Note: You can ignore this warning if you are working on a workstation computer.
Now turn on the hosting!
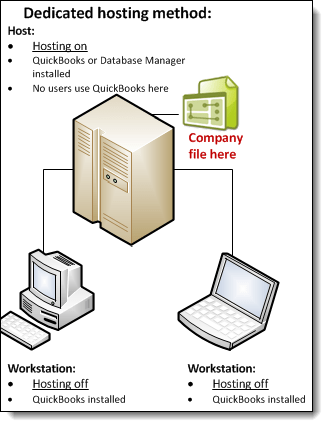
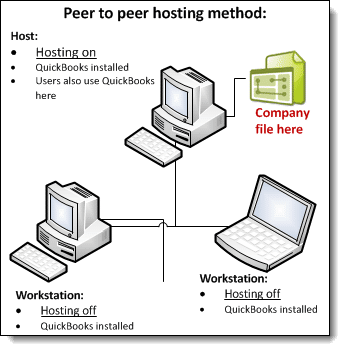
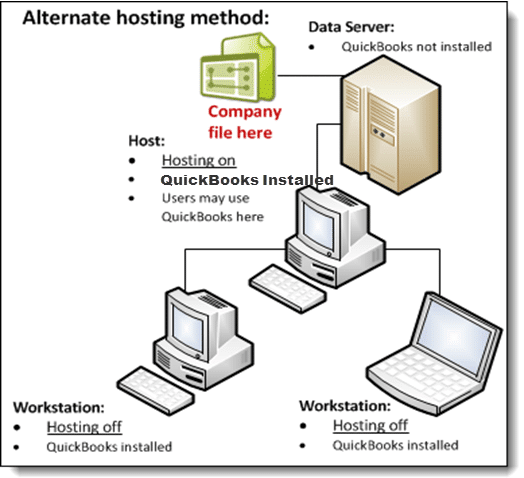
When you are hosting QuickBooks Company Data Files in multi-user mode:
QuickBooks Company Data File Hosting means that you allow other computers or workstations to access the file. This file is easily accessible to the host (main computer) as only this host contains the company data file.
The following services are used by QuickBooks Desktop to manage company file access:
You can also find this service in the Windows Control Panel. Now, you are required to look for the service that corresponds to the version of QuickBooks Desktop you are using.
The following diagrams illustrate QuickBooks hosting modes.
Dedicated hosting diagram
Peer to peer hosting diagram
Alternate hosting diagram
Ways to Access the Company Files
In order to access the company file, make sure that your system meets following conditions:
Database Server Mode: The company file can be easily and successfully opened by the database server.
QuickBooks User Login: Make sure that each user has a user login and password.
Windows File Permissions: Ensure that if a user is log in, then he must have the permissions to Full Control. These permissions also include permission to modify the files and to look at the file.
You need to know that the hosting mode is set for the versions of QuickBooks Desktop as well as for other computers. But this hosting mode is not set for the company file. The hosting mode settings go independent when multiple versions of QuickBooks 2016 or later are used simultaneously. Usually, there are a total of three hosting modes:
Multi-user mode is not supported by the Not Hosting Mode. To communicate with QuickBooks, shared memory is used by this hosting mode. Moreover, database server to access a file can be used only by the QuickBooks user who is running QuickBooks on the local computer.
Hosting Local Files only
A Windows service namely QuickBooks DBXX is run by QuickBooks Database Server (Here XX is a number from 17 to 32 that indicates the version of QuickBooks). And also as the Windows user QBDataServiceUserXX (where XX is a 2-digit number from 17 to 32).
The service QuickBooksDBXX runs until the computer is on.
To communicate with the QuickBooks software, multi-user mode is supported using TCP/IP. Note that QuickBooks users who are on remote computers can access the company file using a database server which runs in Hosting Local Files only mode.
A computer that runs on this mode can host the files that are located on that computer.
Hosting Local & Remote Files mode
QuickBooks Database Manager runs as a normal process just like the currently Windows user. This process starts when the user logs into the Windows and the process stops as soon as the user logs out.
If a computer is running in this mode, then it can support multi-user mode in order to communicate with QuickBooks. However, do this using TCP/IP. QuickBooks users who work on remote computers can access company files using the database server.
In addition to this, a local computer that is running in this mode can also host the files that are stored on it and located on remote computers. These files can also be opened on the local computer.
How QuickBooks determines which database server to communicate with?
The ways in which QuickBooks Desktop determines the database server to communicate with, are as follows:
QuickBooks looks for .nd file and this file is a small text file which has the same name as the company file but has an .nd file extension. Moreover, this text file is located in the same directory where the company file is located. The company file has the extension- .qbw. The details like IP Address and port, to contact the server are also available in the directory.
QuickBooks Desktop also determines whether the .qbw file is in use or not.
When QuickBooks Desktop find this text file, i.e. .nd file, then it also detects the company file that is in user. After this, the QuickBooks software tries to communicate with the server in the following manner:
If communication is successful, the company file will open by QuickBooks.
If communication is not successful, then an error message comes which describes the ways to resolve this issue. You can take a look at the Multiple computer receive error H101, H202, H303 and Error H505.
When the folder that contains file is not writable and is not shared
Make sure that the folder that contains the company file is available to the other users.
Important: If you are on a workstation then you should ignore this warning.
When there is no network connectivity:
Even when there is no network, one TCP/IP adapter that is working and that the hostname of the local machine is resolvable.
Run IPConfig:
The IPConfig tool is very useful in verifying the TCP/IP configuration of the computer you are using. This tool helps to troubleshoot the problems by using QuickBooks on the network.
Some of the most common IPConfig commands are as follows:
Command
Description
Ipconfig
Basic TCP/IP information
Ipconfig/ all
Detailed TCP/IP information
Ipconfig/ renew
Renew the IPv4 address for all network adapters
Ipconfig / release
Renew the IPv4 address for all network adapters
Steps to run the ipconfig:
To verify the TCP/Ip configurations of your computer, you may find the IPConfig tool. This tool helps you to resolve & troubleshoot problems while using QuickBooks on a network.
Here’s how
Select the Windows Start button.
Enter CMD in the search field.
From the list of results, choose Command Prompt.
At the Command prompt, enter ipconfig and then, press Enter.
If you need any more information regarding this, then you can enter ipconfig/? At the command prompt or visit support.microsoft.com.
When there is network problem: IP reverse lookup is failed:
Check whether the Windows can produce an IP address from a hostname and reverse the process.
If QBCFMonitorService/ QBDBMgrN is not running or if Firewall is blocking the QuickBooks
These are the common errors that you will encounter when firewall block Internet access that you require for a specific QuickBooks program. You can resolve this issue by updating your firewall to the latest release or you can configure exceptions and ports required for the firewall software.
When QBCFMonitor Service is not running
To open 8019 port for the tool and QuickBooks applications on the client and server, configure your firewall.
Make sure that the hosting of the server is on.
Now, ping the server and that should succeed from both the server and the client.
QBDBMgrN is Not Running:
In order to open all the QuickBooks applications and Dynamic database port for the QuickBooks File Doctor, you should configure your firewall. Configure the firewall on all the client computers and your server as well.
Make sure that the hosting is on the server.
Ensure that you are able to ping the server both with the IP and hostname on the server.
We hope that this article might helped you to fix network issues with QuickBooks . If you have any questions or queries or you need any type of help related to your QuickBooks software, feel free to contact our QuickBooks Help Number at +1-888-510-9198. We provide you a feasible solution for all your concerns.
FAQs Related to fixing Network Issues with QuickBooks File Doctor test Results
How do I fix network connection failure in QuickBooks?
You can fix connection failure by removing the network error message using the steps below: 1. Choose the reload tab. 2. Press F5 or press command + R for Mac to download the entire page. 3. In case the problem continues, reboot the browser and log in to QuickBooks online.
How do you resolve potential data issues in QuickBooks?
You can do this by performing the steps below: 1. Under QuickBooks file menu, also choose utilities tab. 2. You now have to pick the verify data option. 3. Now, click on ok tab. 4. Furthermore, continue using the file. 5. However, if the verify rebuild utility finds any issue with the data, you will get an error message.
Why is my QuickBooks file Doctor not working?
This can happen if you try to use damage files. The error might show up on the screen stating that you have lost your files. And file doctor is further unable to open them.
How do I know if my QuickBooks file is corrupted?
You can try running the QuickBooks verify data utility. This will confirm the corruption in QuickBooks and will further suggest you to rebuild data.
QuickBooks Enterprise is a robust accounting software which makes handling business easier for small and mid-sized business owners. Using QB Enterprise is very simple as it’s highly user-friendly and any business person can use it. Though, with multiple installation variables, it’s not as easy for anyone to install this innovative software. If you are installing QuickBooks Desktop Enterprise for the first time or trying to upgrade it from any other QuickBooks version, here is our installation guide. Note: It’s advisable that the installation process is performed by skilled system administrators who thoroughly know enterprise software installation and configuration process. You can contact our QuickBooks Enterprise technical support team if you are not comfortable performing the following steps.
Are you running our QuickBooks desktop enterprise for the first time? if yes, then follow these step-by-step instructions to install the software and get set-up. Here is your step-by-step guide to install and set up QuickBooks Enterprise
Prepare and test your network before you start the installation
Install QuickBooks Enterprise
Set-up multi-user hosting
Configure QuickBooks for your organization
Step 1: Prep and Test your Network
It’s mandatory for a user to know about Networking, File Sharing and Permissions. Also, if you wish to continue installing QB Enterprise on your own. You must create a backup of all your previous accounting work. You can set up your network by too many options. Now, here are three ways that will enable you to set up your network:
Central Server option
The Central Server Option will have a pre-installed QuickBooks database manager that also incorporates the company files.
Peer to Peer Option
The software, QuickBooks Enterprise, is installed on every system. In this method, one system will have the company file and rest of the systems access the company files on the network.
Remote Desktop Service Option
This option will have QuickBooks Enterprise installed on a central server. Unlike other methods, QB Enterprise is not installed on systems. Remote Desktop Service can access the application and company file. If you find any error in setup, installation you can take help from our QuickBooks Error Support team.
Disable all active programs, including antivirus and anti-spyware.
Find and click on the downloaded file.
Follow the prompts popping up on the screen until you see the choose installation type window.
Choose one option from the options you receive.
Follow the prompts showing up on your screen until installation is complete.
Once the installation is complete, you will have to configure the QuickBooks database server manager. After the configuration is complete, you can access the company file stored on the server.
Please remember that just one computer can host multi-user access in a multi-user hosting. Enabling multi-user hosting on the server is not required if you lately installed QuickBooks database server manager.
Multi user hosting will be “on” in server and “off” in workstation in Central Server.
Multi-user hosting will be “on” in server and not applicable on the workstation in Remote Desktop Server.
Multi-user hosting will be “on” in server and off in workstation in Peer-to-Peer option.
Make sure that multi-user hosting is enabled on the server:
Find and open QuickBooks desktop enterprise on the server.
Go to file and tap on Utilities.
See if Stop Hosting Multi- Access is displayed in the Utilities.
If you see Multi-Access displayed, do the following
Select Host Multi-Access.
Click “Yes” upon receiving a prompt to confirm starting multi-user access.
Close and reopen the company file id asked
Click “Yes” in next prompt.
Step 4: Configure Enterprise to your business
Now is the easiest part – QuickBooks set up. You just have to follow the commands appearing on the screen and click Start Working button.
Quick Start Center is used to creating invoices, bills, paychecks, sales receipts, and more. This feature will allow you and other users to view customer and vendor account balance.
Review your Chart of Accounts is a chart of accounts created on the base of your business during the set-up process of QuickBooks Enterprise. You can review the chart and edit it as per your business requirement.
Payroll subscribers are required to add a year-to-date payroll information. Not doing so may lead to inaccurate payroll tax information.
Backup your company file is a significant online service to backup company file. A part of the active subscription, this service works very safely.
We hope you find this blog post helpful and informative. If you still face any trouble in installing or setup QuickBooks Enterprise or you are not comfortable performing it on your own and need assistance, you can speak to our 24*7 QuickBooks Error Support team or Dial our QuickBooks enterprise support number i.e., +1-888-510-9198, and we will be glad to offer quick and precise assistance. Also you can find the additional details from direct Intuit website.
Some FAQs Related to QuickBooks Enterprise Solutions
What is QuickBooks Enterprise Solutions, and how does it differ from other QuickBooks products?
QuickBooks Enterprise Solutions is a powerful accounting software designed for businesses that require more advanced features than what is offered in other QuickBooks products. It differs from other QuickBooks products in its ability to handle larger amounts of data, provide more customizable reporting, and support multiple users with advanced user permissions.
How can I get technical support for QuickBooks Enterprise Solutions?
If you require technical support for QuickBooks Enterprise Solutions, you can contact the QuickBooks Enterprise support team at our toll-free number +1-888-510-9198. Our team is available 24/7 to assist with any technical issues or questions you may have.
Can I migrate my data from another accounting software to QuickBooks Enterprise Solutions?
Yes, QuickBooks Enterprise Solutions allows for easy migration of data from other accounting software. You can import data from Excel spreadsheets, QuickBooks Desktop, and other accounting software.
Is QuickBooks Enterprise Solutions suitable for my industry-specific needs?
QuickBooks Enterprise Solutions is designed to be flexible and customizable to meet the specific needs of various industries. It includes features such as job costing, advanced inventory management, and customizable reporting that can be tailored to meet the needs of your industry.
How does QuickBooks Enterprise Solutions help with inventory management?
QuickBooks Enterprise Solutions includes advanced inventory management features such as barcode scanning, serial number and lot tracking, and bin location tracking. These features help you track inventory levels, reduce errors, and optimize your inventory management processes.