QuickBooks Payroll is an eminent tool to manage and maintain the financial transactions. In the past few years, QB Payroll productivity has immensely increased due to its great demand in the market. This software enables you to create your employees’ payroll, salary, and insurance while deducting the holidays & leaves accurately. In this post we will demonstrate how to fix payroll service server error.
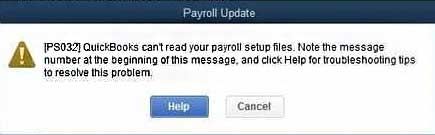
But it has been reported that QuickBooks Payroll users encounter a problem while sending data or direct deposit paychecks. These errors usually appear with an error message:
Payroll service server error. Please try again later. If this problem persists, please contact Intuit Technical Support.
Payroll Connection Error
Error: QuickBooks Desktop has encountered a problem sending your usage data.
In this article today we are going to explain you about these payroll server error/connection error also we have provided quick fixation methods for these payroll service error.
What Causes QuickBooks Payroll Server Error?
This payroll server error can be caused due to one or more reasons that are given below:
Invalid security certificate.
While sending data in multi-user aptitude.
Common Internet Connection issues.
When the system date & time properties are incorrect.
When the Internet security & firewall setting configuration is not correct.
Quick Fixation Steps to Resolve Payroll Service Server Error
Important Note: If the Be Safe application is installed into your computer, it will make you unable to send the information. This application will block the entire financial details/info that is sent or received by the computer.
Reboot the computer & retry.
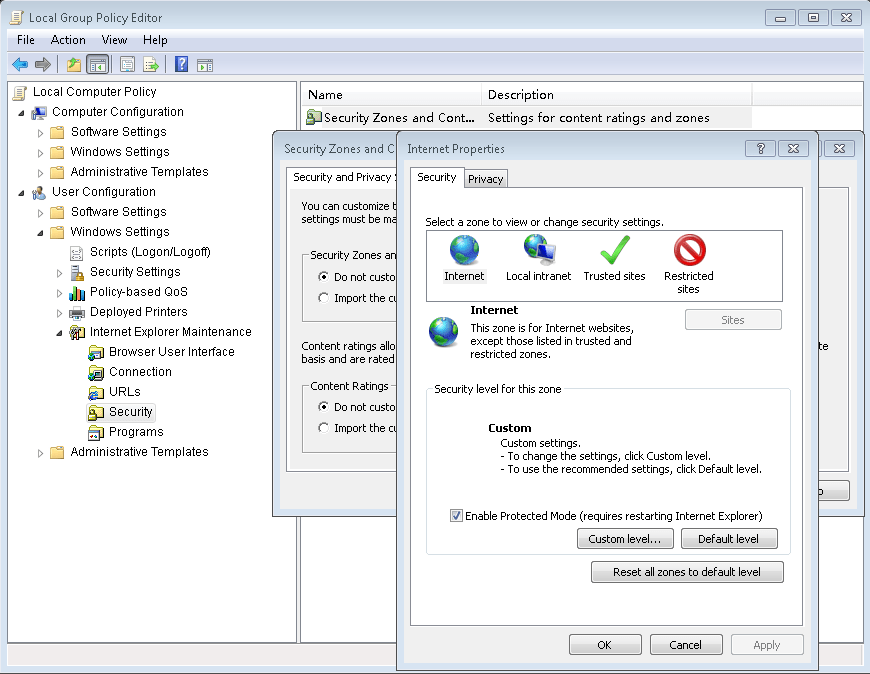
In the Internet options window of the Internet Explorer, ensure that the Use TLS 1.0 is checked where the Use TLS 1.1 & Use TLS 1.2 are unchecked. Finally, restore the Internet Explorer Advanced Settings.
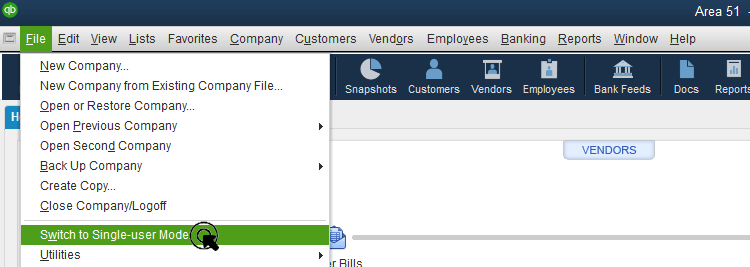
Ensure the single-user mode while transmitting the payroll data.
Ensure that nobody else except you logged into the QuickBooks Desktop.
If anyone else logged in to it, you need to ask them to sign out.
In the QuickBooks File menu, hit the Switch to Single-user Mode.
Follow the command prompt to continue to switch & log in again.
Try an attempt to resend the payroll. If in any case, it doesn’t work then proceed with the steps given below.
Update the payroll.
First of all, Select the Employees > Get Payroll Updates.
After that, Hit the Update
Once the update is completed, restart the QuickBooks Desktop.
Again, try an attempt to resend the payroll information. If it’s still unsuccessful, follow the next step given below.
Verify the system date & time properties.
In the Microsoft Windows taskbar, double-click the time display.
Make sure that the date, time, year, and time zone in the Date and Time properties are correct. If it’s not, then correct them and press OK.
Now, restart the computer.
Finally, resend the payroll information. If it doesn’t, proceed with the following steps.
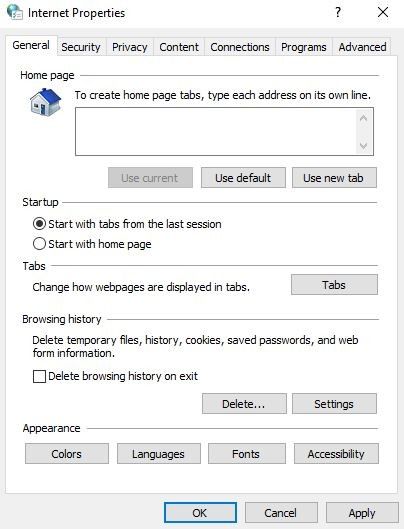
Ensure that the Internet Explorer is set as the default browser.
Once you set the Internet Explorer as a default web browser, try to resend the payroll information again. If it doesn’t, then proceed with the following steps.
Ensure that you can access the secure web pages or websites .i.e. your personal banking institution’s website. Again, resend the payroll details/info and if it sent unsuccessfully – proceed with the next step given below.
Make sure that you have downloaded the latest QuickBooks & tax table released updates. Later, resend the payroll information. If it doesn’t send, follow the steps mentioned below.
Hit the Options Select the Yes or No for Shared Download.
Later, try to resend the payroll information.
Re-validate the payroll subscription.
Verify the QuickBooks Internet Connection.
Firstly, go to the Help menu, select the Internet Connection Setup.
Now Choose the Use my computer’s Internet connection settings to establish a connection when this application accesses the Internet.
Now Select the Next
Select the “Advanced Connection Settings”.
Choose the LAN Settings. Ensure that the Automatically Detect Settings box is chosen but not the Proxy Server checkbox.
Select the OK tab twice. Hit the Done
Again, try to resend the payroll information.
Ensure that the personal firewall & internet security software is configured correctly.
Winding Up
If you are facing any trouble related to QuickBooks Payroll Server or Error associated with it, you can immediately contact the QuickBooks Payroll Customer Service team.
We are one of a well-renowned and top globe QuickBooks software, services and technical help provider from last 7 years. Also, we have an efficient and certified expert team of QB accounting experts to solve the entire QuickBooks issues such as QuickBooks Installation, QuickBooks Updates, QuickBooks Integration, and QuickBooks Error Codes. In case you need an urgent support, you can call on our toll-free support number i.e. +1-888-510-9198 with no hesitation.
Frequently Asked Questions!
What is QuickBooks payroll service?
Talking about QuickBooks Payroll Service, it is basically a subscription that you can activate to enable the payroll features in your QuickBooks Desktop Software. Depending on the features you need, you can choose from Basic, Enhanced, or Assisted Payroll. However, it should be noted that the QuickBooks Payroll service does not work with QuickBooks Mac
How do I fix QuickBooks payroll errors?
QuickBooks payroll errors can be experienced due to a bunch of factors such as insufficient permissions or file corruption. One can try to rectify these issues by simply accessing the software using admin access or can edit the windows permissions.
How to update QuickBooks desktop?
Intuit the developer of QuickBooks releases the latest version of QuickBooks software from time to time. QuickBooks users are always recommended to update their QuickBooks software to the latest release, in order to access the new features and functionalities. One can easily update the QuickBooks software by heading to the help menu and checking for available updates.
How to deal with firewall issues in QuickBooks?
At times, QuickBooks users might face firewall configuration issues, or the firewall might be blocking the communication of the software with the server, in that case, one can take the assistance of the QuickBooks file doctor tool. Other than the file doctor tool, firewall issues can be eliminated by creating firewall port exceptions.
Simple steps to fix banking error 9995 in QuickBooks online
Often one might come across some or the other issue in QuickBooks. One such error can be ‘QuickBooks Error Code 9995‘. In this article, we are going to discuss this error in detail. This technical error is one of the most common banking errors faced by QuickBooks Users.
The occurrence of “QuickBooks Error 9995″ denotes that your bank is not working with QB currently. In this blog we have explained the possible causes of this error with the complete solution steps. In the meanwhile, you can take help from our QuickBooks Error Support team by dialing +1-888-510-9198 (toll free number).
The very first step is to head to the ‘Navigation menu‘, and click on ‘Banking‘ option.
And also click the ‘Add Account‘ tab from the ‘Banking screen‘ in the top-right corner.
Browse for your ‘Bank’s name‘ in the list.
After that check for the name of your bank in the available search list.
And also click on your ‘Bank’s website URL‘ at the top of your screen.
Furthermore, allow it to open in a new window.
Check if you can access your bank accounts through QuickBooks and confirm by checking the presence of any errors in ‘Accounts Summary, Accounts History, and Accounts Details‘.
Method – 3
After you enter your bank name or other related data in QuickBooks, you may receive a notification window with a message, “Hmm, we can’t find this bank in our list of supported banks.”
If this happens, you will have to approach your bank for support.
Method- 4
You need to choose banking option
After that, click on update tab in the upper right hand
Now, ensure that you clear all unwanted to accounts by clicking them in case you want to update some of the accounts
Further, click on update now
After that enter the multi factor authentication MFA credentials if asked.
We hope that you find this blog post helpful in fixing Error 9995. If you need personalized service for this issue or any other QuickBooks related issue, you can reach us at our QuickBooks online support number .i.e. +1-888-510-9198. We will be glad to assist you.
Some FAQs Related to Banking Error 9995 in QuickBooks
What is QuickBooks Error 9995?
QuickBooks Error 9995 is a banking error that occurs when there is a problem with the bank’s connection while downloading transactions in QuickBooks.
How can I resolve QuickBooks Error 9995?
There are a few steps you can try to resolve this error, such as checking the bank’s website for any maintenance or downtime, updating your QuickBooks software to the latest version, and clearing the temporary internet files. If you still face the issue, feel free to call our toll-free number +1-888-510-9198 for assistance.
What causes QuickBooks Error 9995?
QuickBooks Error 9995 can be caused by a variety of factors such as a temporary outage at the bank, an incorrect login or password, outdated QuickBooks software, or an issue with the bank’s server.
Can QuickBooks Error 9995 be prevented?
To prevent QuickBooks Error 9995, it is recommended to regularly update your QuickBooks software, check the bank’s website for any maintenance or downtime, and make sure to use the correct login credentials. If you need any help, please don’t hesitate to call our toll-free number +1-888-510-9198.
What should I do if QuickBooks Error 9995 keeps reoccurring?
If you keep encountering QuickBooks Error 9995 even after trying the troubleshooting steps, it may be a more complex issue that requires professional assistance. Contact our QuickBooks support team by dialing our toll-free number +1-888-510-9198 for a prompt resolution.
Aren’t you worried about the error that showed up on your screen out of a sudden? This error might show up as QuickBooks OL & OLSU bank feed errors. Well, we understand this isn’t something like your previous errors that would have showed up on the screen when you tried to work with your QuickBooks. Talking about the bank feed errors, these are basically the issues that show up when there is some sort of issue with your bank.
What is OL and OLSU Bank Feeds errors in QuickBooks Desktop?
Did you receive OL and OLSU Bank Feed Errors? Don’t worry, this blog post is intended to discuss the troubleshooting steps to fix these common QuickBooks online banking and connection errors. These errors include OL-202, OL-206, OL-221, OL-231, OL-249, OL-334, OL-203, OL-393, OLSU-1011, OLSU-1016, and OLSU-1014.
Most of the banks and financial institutions need identity confirmation before accessing any data from Personal Finance Management software (PFM). To meet the bank requirement, you should log in to your bank account using a system other than QuickBooks Desktop and verify your Message Center or inbox for more details. Banks can also be contacted if needed.
Check the Given Terms Before Proceeding Further
You will have to meet the given criteria and check them.
1. Are you connected to the internet?
No: Being connected to the internet is mandatory in order to download online banking transactions.
Yes: Diagnose and fix the connectivity issue. Check firewall and internet security settings.
2. Do you have a version supported by QB Desktop and Internet Explorer?
How to Fix OL and OLSU Error in QuickBooks Desktop?
Here are the quick hacks to resolve OL and OLSU errors in QuickBooks desktop while downloading or importing transactions. Please perform these steps in the order as mentioned and try your download after every step:
Step 1: Enable TLS 1.2 Security Protocol, If available
Step 3: Run account setup with the Ctrl key suppressed
This step can bypass previously failed connections and can assist you to do away with partial, incomplete or unsuccessful connections with your bank. You can access details of step by step description with the help of QuickBooks experts or by visiting the official website of Intuit.
Once you perform this step and the issue disappears, it would translate to the successful troubleshoot of QB Desktop online banking and connection error, and you will be able to download transaction. Move on to the next step if the issue still exists.
Step 4: Create a new account and merge accounts
In several cases, there can be hassles/problems associated with setting up the account or downloading the financial transactions too. These steps assist you to conclude if the issue occurs due to that account.
Prior you implement the following procedure, you should clear all the pending financial transactions/reports. This may entails matching any formerly downloaded financial transactions/reports that have not been matched.
Navigate to the “Chart of Accounts” option; perform right-click on the account associated with the issue.
Choose the “Edit Account” tab.
Emphasize the “Account Name” icon, and then hit onto the “Copy” tab.
In the account name enter an asterisk (*) mark at the end.
In the “Bank Feed Settings” option, and then select the “Deactivate All Online Servicesradio” tab.
Choose the “Save” icon & then the “Close” icon.
In the “Chart of Accounts” section, create or build a new account.
Copy & paste the Account name without the asterisk (*).
In the “Chart of Accounts” tab, perform the right-click on the ‘account’ with the asterisk (*) mark, and then choose the “Edit Account” tab.
Eradicate the asterisk (*) mark & then, choose the “Save” icon& later “Close” icon.
When the warning message appear in the dialogue box. It will prompt you to choose the “Yes” icon.
Set up/create an account for the ‘Bank Feeds’ purpose.
Download financial transactions from the new merged account.
Important Note: The incapability to ‘Edit’ or ‘Sync’ an account may signify the damage in the QB data file. Contact the QuickBooks Technical Support for any further help. In such situation, Data Services fees are usually applicable. You can even go through the QuickBooks Data ServicesFrequently Asked Questions to avail answer of any query.
In case, you do ‘NOT’ receive any QB error message: This implies that you have resolved the technical hassle/error associated with the account. Your financial transactions have been downloaded & you can discontinue the fixation process.
In case, you encounter the same error warning message: This shows that the technical glitch did not initiate or associated with this account. If there are multiple account set up for online banking then, continue with the Step 5.
Step 5: Deactivate all accounts with online services.
If you own more than one account set up for online banking services, these steps will help you identify the source accounts in your company file. Sometimes, if you have only one account with an error that keeps it from connecting to the bank, this may not allow your online accounts to work.
Note: This process can be time consuming if you have multiple accounts set up for online banking.
Firstly, choose the Include inactive checkbox at the bottom of the Chart of Accounts window.
For all inactive accounts, deactivate Bank Feeds and close and reopen the file.
After that Set-up every account for Bank Feeds.
Contact QuickBooks technical support (users in the USA and Canada), in case you are not able to deactivate Bank Feed settings for your accounts. It may happen because of corrupt or damaged data.
Move to step 6 if the above solution didn’t fix the error.
Step 6: Get in touch with your bank
QuickBooks users receive assistance in recovering errors from their end from all banks and financial institutions that support QB online banking. Here are some basic things you should know:
Before contacting your bank to seek any assistance, you should collect all the log files of bank feeds.
QuickBooks performs online banking, and thus, most of the OL and OLSU series online banking and connection errors should be fixed through financial institutions.
If the error still remains unsolved, you should ask bank executive to contact and transfer the concern to online connectivity group of Intuit.
This blog post is created to offer you all the possible solutions to get rid of from OL and OLSU errors. However, if you need any assistance regarding the same error or any other QuickBooks related issue, you can always contact our QuickBooks payroll support team anytime by dialing @ +1-888-510-9198. Our availability is round the clock.
What is a QuickBooks Desktop OL and OLSU bank feed error, and how do I fix it?
A QuickBooks Desktop OL and OLSU bank feed error occurs when there is a problem with downloading transactions from your bank account into QuickBooks. To fix it, you can try updating your QuickBooks Desktop software to the latest version, refreshing your online banking information, or contacting our customer support team at +1-888-510-9198 for assistance.
Why am I receiving a QuickBooks Desktop OL and OLSU bank feed error message, and what should I do?
You may be receiving a QuickBooks Desktop OL and OLSU bank feed error message if there is a connectivity issue with your bank account or if your bank has changed its online banking credentials. To resolve it, you can try resetting your online banking connection, updating your bank login information, or calling our toll-free number at +1-888-510-9198 for further assistance.
Can I manually import bank transactions into QuickBooks Desktop to avoid OL and OLSU bank feed errors?
Yes, you can manually import bank transactions into QuickBooks Desktop to avoid OL and OLSU bank feed errors. To do so, download a bank transaction file from your bank’s website and import it into QuickBooks Desktop by following the appropriate steps. However, it may be more convenient to use the bank feed feature to automatically download transactions from your bank account.
How can I prevent QuickBooks Desktop OL and OLSU bank feed errors from occurring in the future?
To prevent QuickBooks Desktop OL and OLSU bank feed errors from occurring in the future, you can ensure that your online banking information is up-to-date and accurate, update your QuickBooks Desktop software to the latest version, and regularly review and reconcile your bank transactions in QuickBooks. You can also contact our customer support team at +1-888-510-9198 for further tips and advice.
What should I do if I continue to experience QuickBooks Desktop OL and OLSU bank feed errors despite trying all the recommended solutions?
If you continue to experience QuickBooks Desktop OL and OLSU bank feed errors despite trying all the recommended solutions, you can contact our customer support team at +1-888-510-9198 for further assistance. Our experts can help troubleshoot the issue and provide customized solutions to resolve the error.
Simple Steps to Fix Overflow Error in QuickBooks Desktop
QuickBooks is an accounting tool that is instrumental in assisting business owners, accountants and tax professionals in meeting their business goals. This is an advanced software. But like any other computer software, QB too receives some errors and glitches that may compel professionals to pause their work. This article is created to discuss Overflow Error in QuickBooks Desktop. Further, in this post, you will be informed of some of the most common reasons for the occurrence of this error and some useful tips to fix it. For more details, feel free to connect with our technical support team at +1-888-510-9198, and we will provide you with immediate support and assistance.
This is a data error of a specific type. When this error occurs, all the measurements unit merge with one another to overreach the maximum limit of a particular field. Some of the general cases of Overflow Error in QuickBooks Desktop are as follows:
When attempting to access or open any data, report or file and one or multiple fields of a column feature this error message.
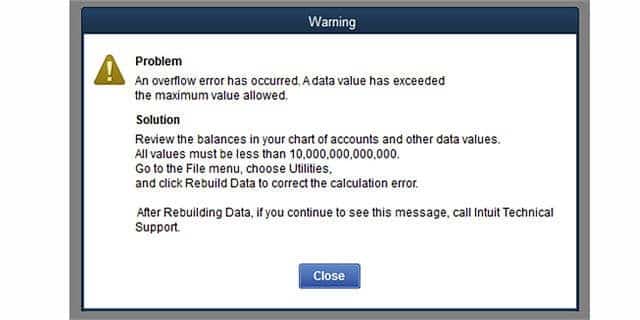
Overflow Error in QuickBooks Desktop may also show up at the time of running the Verify Data utility. The error text may read “Problem: An overflow error has occurred, one of your accounts has crossed the max limit allowed.”
This error has more probability of happening with “the chart of accounts.” If this is the case, the overflow will show up on one or more balance sheets instead of an amount.
“Problem: An overflow error has occurred. One of your accounts has exceeded the maximum value allowed.”
What causes Overflow Error in QuickBooks Desktop?
There might be one or more of the following reasons behind the occurrence of this error:
The account balance of your company or other fields is more than $9,999,999,999,999.99.
A damaged or corrupted transaction data in your company data.
In case you convert a large amount on a group item to a different large amount, this error may appear by the component item of the group.
If the inventory has a value larger than the items number.
If the format mismatches with the format accepted by the QuickBooks Accounting Software.
Important Note: Before performing any of the solutions, it is recommended to verify that your computer meets the QuickBooks Desktop Editions (2022, 2021, 2020, 2019, 2018, 2017, 2016, 2015) system requirements. Things to check in particular are Regional Settings, Disk Space and available RAM.
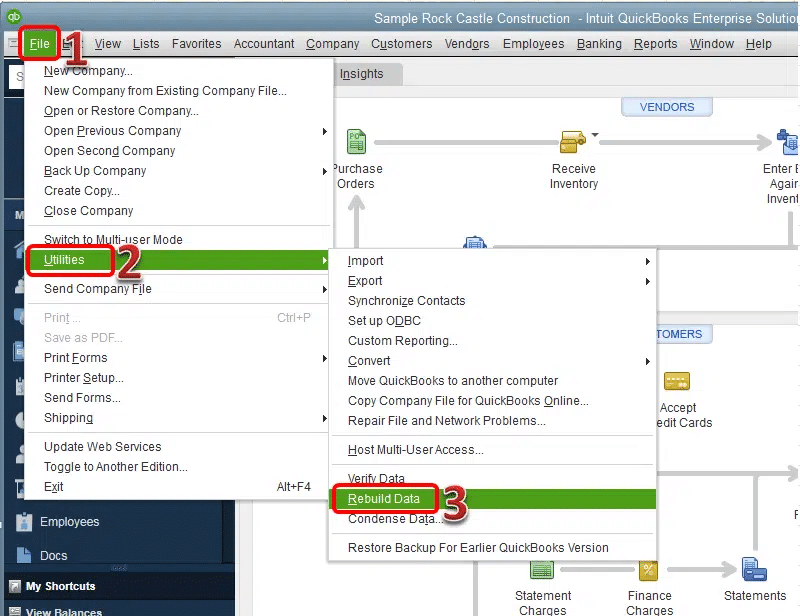
The very first step is to navigate to the File menu in QuickBooks.
You now have to go for Rebuild Data option.
If any warning message appears on the screen and asks you to back up a company file, then click on the Ok tab.
This will show up QuickBooks not responding to error message, but if you are able to move the cursor, then the method can be ignored and you can wait for the process to end.
Once done with that, wait for the backup process to complete.
Towards the end, click on ok tab, after you receive message – Rebuild is complete.
Solution 2: Export your QuickBooks file to Microsoft Excel to discover overflow
Step 1: The very first step is to export lists to desktop
You need to first sign in to the company file as system admin.
Once done with that, head to the file menu and select switch to single user mode.
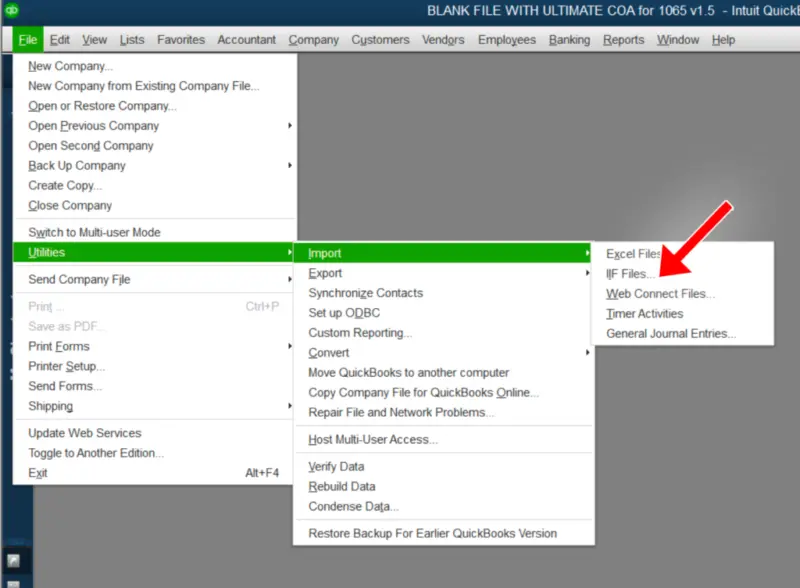
You now have to choose the file menu and select utilities tab and click on export option.
Once done with that, select export IIF files option.
Now, from the save in dropdown menu, select the location you want to save the IIF file on.
After that, enter a name in the file name field and click on the save.
You now have click on Ok tab.
Step 2: Minimize QuickBooks software
Step 3: Right click export file
Step 4: Move ahead, and choose open with excel from the list that appears.
Step 5: Spot the transaction having overflow value.
You need to now press control and F keys.
Enter *overflow*
And further click on find next option.
Step 6: Now minimize QuickBooks again
Step 7: Head back to QuickBooks and fix the data for the Account, name, item or any other field that contains it.
Here is how to fix the overflow error triggered by this cause:
You need to set the Group Item Quantity to naught.
Close the field.
Again, put the exact Group Item Quantity.
Solution 4: If Only 1 Item Is overflowing
If while working on QB you receive a warning that one item is overflowing, it may be the one, in most cases, that has been added recently. Though there might be some exceptions, an already existing item may also be the cause of the error.
Case 1: if the error was caused by the newly added item, you can remove that from the list and recreate that.
Case 2: If it’s an old item –
Check the item and fix the transaction causing an overflow.
Type in Adjust Quantity/Value on Hand file in order to adjust or rectify the average cost in case you find the existing transaction causing the error. In the meanwhile, if you need technical assistance, you can contact the QuickBooks Error Support team.
Solution 5:The balance or another field of an account is too large
It may happen that the account balance field or other fields are exceeding their max limits due to some unidentified reasons. The maximum limit in QuickBooks is $9,999,999,999,999.99. In case any account balance crosses the max limit, the field will itself show the overflowing error.
You can fix your company file with the Rebuild data tool.
Now, repair your company file through QuickBooks data file.
And further, repair your QuickBooks file manually to fix the data damage.
The first two processes might take some time. Wait for some time, and let the tools do their work. In case the repair tool find no error, then go on and use your file. In case not, then perform the troubleshooting manually. However, you might need to have a good computer knowledge.
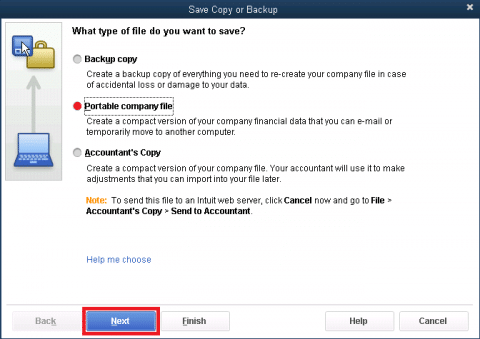
Step 2: Create a portable file and restore the created file to a new working file
You now have to choose Create Copy and portable company file options.
Once done with that, click on next and also enter a name.
Save it to desktop or any location you want.
After that choose save and ok tabs respectively.
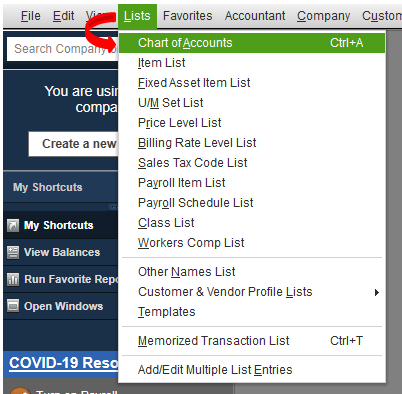
Step 3: Verify your charts of accounts.
Go to List menu and tap on Chart of Accounts.
Spot the account having balance equal to or more than 10,000,000,000,000.
Minimize the balance of the account.
Follow the steps below if the issue still exists.
Step 4: Overflow on memorized reports
In this case, go to Reports menu to run the report.
If you don’t see overflow in new report, delete it and recreate the memorized report.
Move to the following steps if you see overflow.
Step 5: Search all fields in all lists that have an amount or total. You may require to add the inactive items while going through your lists.
Go to the Lists and select Add/Edit Multiple List entries.
Click Customize Columns and choose any field that has an amount, for example, Cost, Price, etc. Find Overflow and the correct, change or remove the amount.
Check all lists available.
In case you are using an updated version of QuickBooks, go to Edit, find overflow, search for list elements and then transactions.
Edit the amounts and keep checking them until the error message stops appearing.
Solution6: Error triggered by Corrupted Transaction
In case the error is triggered by a corrupted transaction, follow the give steps:
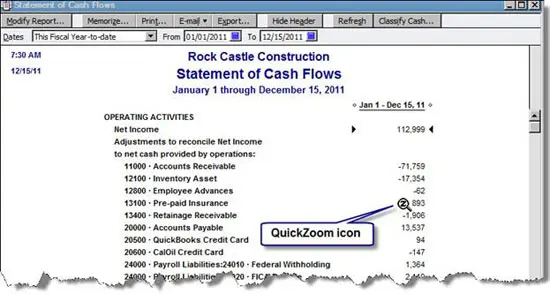
Run various QuickBooks reports, including Financial Statements, Custom Transaction Detail, Sales by Customer, Sales by Item, etc., till you see overflow.
After that, move the transaction level by the way of QuickZoom on overflow.
The last step is to fix the transactions.
You need to run verify and rebuild data utilities
And then spot the damaged transactions based on QBWin.log.
After that apply the appropriate fix on the transactions.
We hope that this article will assist you in fixing the Overflow Error in QuickBooks Desktop. In case the issue persists, or you need assistance in regards to any other QB related issue you can contact our efficient QuickBooks Customer Support team at our toll-free number +1-888-510-9198.
FAQs Related to QuickBooks Overflow Error
What is QuickBooks Desktop Overflow Error?
QuickBooks desktop overflow error often occurs when the items in the list, like chart of accounts, vendor list, or customer list, surpass the maximum limit.
How do I fix a corrupt QBW file?
You can try repairing the company file using rebuild data tool. The steps to be performed here are: 1. Move to the file menu at first, and then hover over utilities and choose rebuild data. 2. Once done with that, click on ok tab on the QuickBooks information window. 3. Let the tool repair your file. 4. And further, click on ok tab when the tool finishes. 5. You now have to head to the file menu. 6. And then let the tool check for data issues.
How to spot QuickBooks Desktop Overflow error?
You can identify this issue by easily spotting the error message “Overflow error: More than 100,000 accounts, customers, and other names or items”.
Get to know the possible reasons and troubleshooting of QuickBooks error code 15227
QuickBooks is a robust accounting software that has helped small and mid-sized business owners attain their business goals. Though QB is a state of the art software, it sometimes receives errors and glitches like any other software. One common error that the users have been recently reporting is QuickBooks Error Code 15227.
This error code may appear if your computer crashes, gets stuck every now and then, or if a software is running. The error may also appear while installing QuickBooks software, while a system is starting or shutting down, and while installing MS Windows Operating System.
This blog post is created to assist you in fixing QuickBooks Error Code 15227 and here are some facts about this error that you should know before continuing with the troubleshooting steps. In the meanwhile, if you need any technical assistance you can contact the QuickBooks enterprise support team at +1-888-510-9198 to get instant help from the experts.
Generally, Error Code 15227 appears if your computer is unstable or essential files do not respond to your commands or go missing. There might be multiple reasons that may trigger this issue. Please remember that knowing when this error appeared is a crucial detail that may help you fixing QuickBooks Error Code 15227. There might be one or more of the following reasons behind the occurrence of Error 15227:
Corrupt or damage QuickBooks software download.
Incomplete or partial installation of the software.
Software package modifications related to QB caused corruption in Windows registry.
Virus or Malware infection.
Another program by mistake or maliciously deleted necessary QuickBooks related files.
Follow these tips to fix QuickBooks Error Code 15227. We recommend you to fix this issue as soon as possible. However, you can take help from 24X7 QuickBooks error support team to save your time and efforts.
Step 1: Reinstalling QuickBooks update
It is suggested to delete the files related to the previous update and reinstall QuickBooks updates. The user can try performing the steps below to reinstall QuickBooks update.
The user needs to first reboot the system
After that, open the QuickBooks desktop by right clicking on its desktop icon and select run as admin
Install the updates, if it is indicated to you. Or if the update isn’t installed, then one can move to the C:/Documents and Settings\All Users\Application Data \Intuit\QuickBooks versionxx\ Components and then delete the file.
The user needs to then relaunch the QuickBooks desktop and select the update QuickBooks option in the help menu
Once done with that, the user needs to click on the install now tab when the QuickBooks desktop update services show up.
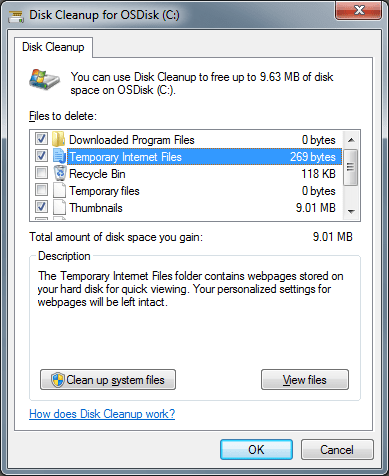
Step 2: Perform a disc clean up
The user needs to first start a disk cleanup along with a complete scan for viruses and malware for the system files
Now, get back to the recent updates and check if there are any issues.
The system file checker tool can be effective in identifying and repairing any files on the system.
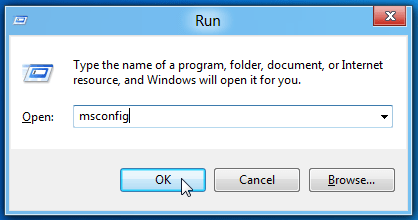
Step 3: Reinstalling QuickBooks software
The very first step is to open the run window the windows through windows + R
Now, when the run box displays, type msconfig and click on enter tab
The user is then required to click on services tab, after the system configuration window appears.
Hide all microsoft services and disable all the remaining services
Move to the selective startup and load system services in the general tab
Make sure that the windows installer is checked and then hit on restart
Perform the steps with QuickBooks clean install
You can uninstall QuickBooks desktop manually via the control panel
The last step is to open the system configuration window and then select the normal startup after that select reboot
Step 4: Windows should be updated to the latest version
An outdated operating system can trigger certain errors like QuickBooks 15227. It is recommended to ensure that the operating system installed on the system is equipped with the latest updates.
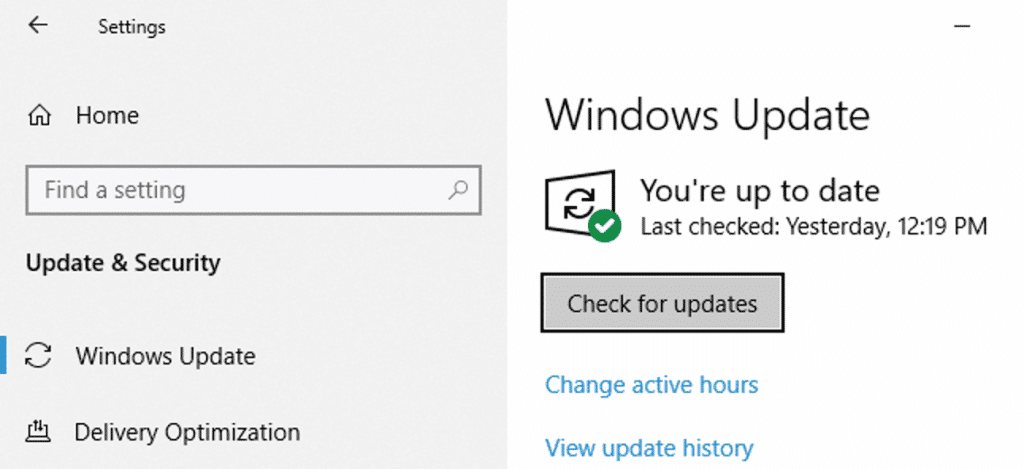
Here, the user needs to access the settings from the windows start menu
After that, choose the update and security tab
Now, click on check for updates
The user needs to ensure that he/she has downloaded all the relevant updates essential for the system.
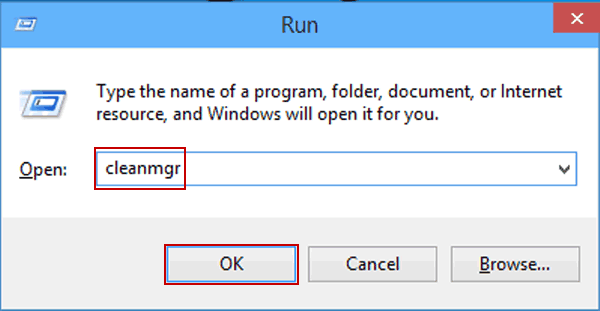
Under this process, the user needs to click on the windows + R to access the run box
After that, type cleanmgr.exe
Now, select ok or alternatively click on enter tab to launch the disk cleanup tool
Click on the clean up system files
Cleaning system junk with Disk Cleanup
Once done with that click on yes tab
A list of files to remove will appear on the screen
Check al of the items and click on ok tab
Select the delete files option to wipe off the system
Remove the temporary files to launch the run command window and enter %temp% followed by clicking on enter tab
After the folder appears, the user needs to select al the files through Ctrl + A
Now click on delete tab and eliminate unnecessary temporary files
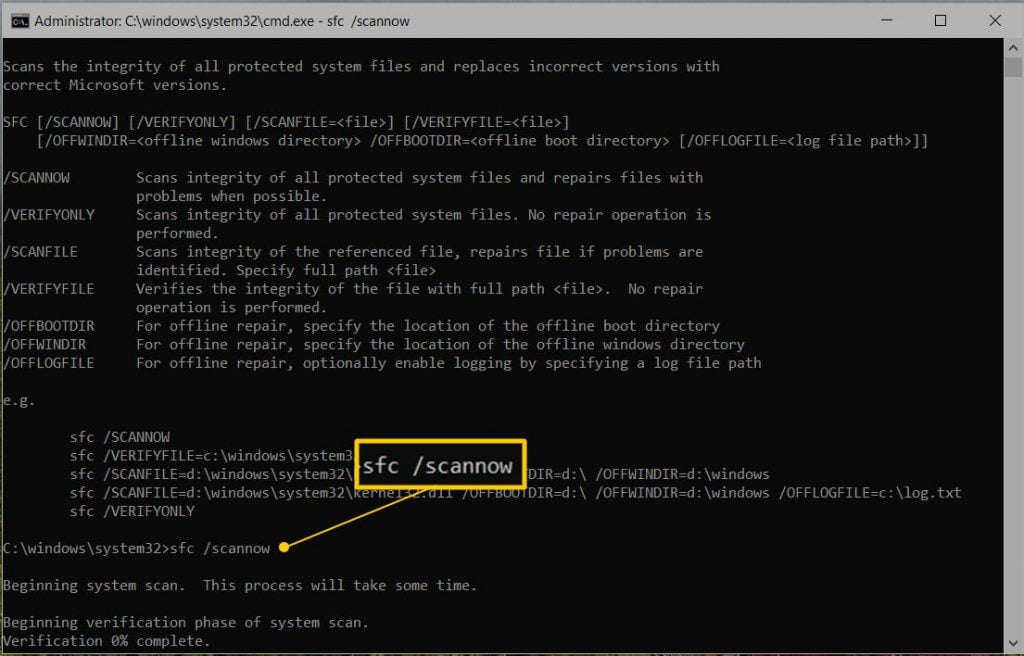
Step 6: Using system file checker
The user will have to check if the files are having any sort of error or not. This can be done by heading to the command prompt and then SFC command. The steps involved here are:
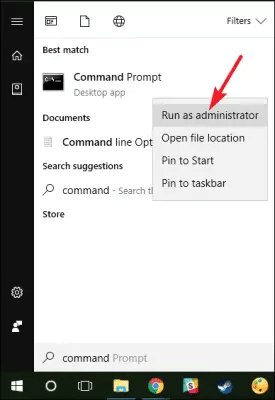
Start with clicking on the windows key
And then, in the search bar, click on the start tab and type prompt
Select run as admin after right clicking the command prompt
Hit the enter tab and let it scan
Lastly, let the process end and launch QuickBooks and verify if the error is resolved.
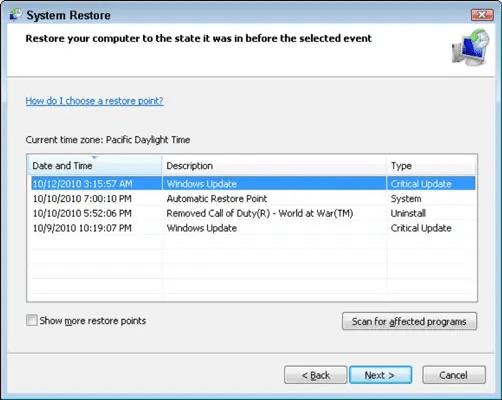
Step 7: Opt for windows restore
The user needs to click on the windows start tab
And then, search for restore and click on the windows restore icon
The window will open when required to choose a restore point
Continue the process of restoring the system
The last step is to restart the system and start with the QuickBooks desktop
Implementing the above stated set of steps can help in getting rid of the error in QuickBooks successfully. However, if you are unable to deal with the issue even after performing the steps above, then make sure to consult our tech team. For personalized assistance on QuickBooks Error code 15227 or any other issue, you can call our QuickBooks Error support team @ +1-888-510-9198. We boast of the cutting-edge tools and technology and offer our clients with quick and precise solutions.
FAQs
How to close the Background Programs of QuickBooks to fix QuickBooks Error Code 15227?
One can close the background programs using the steps below: Open the Task Manager, Hit and hold Ctrl + Alt + Delete keys together and after that, choose the option Task Manager Hit on the Processes tab in the Task Manager window Here at this step, verify and look for the QuickBooks processes Post that chooses the Process and hit on the End Task option Adhere this step for the entire processes of QuickBooks.
How to Uninstall QuickBooks using the Control Panel to Reinstall it and resolve the QuickBooks Error Code 15227?
One can try to uninstall the software using the steps below: Look for the Control Panel in Windows system. Then hit the Enter key and Control Panel opens up Hit on the Programs or Uninstall a Program option Now, Select the QuickBooks software Post that, Click right on it and hit on the option Uninstall/Change It opens up the uninstallation Wizard Adhere the instructions to uninstall the software In the end, It is completed so hit on the finish option and now uninstallation is completed.
Does the System Requirement of the QuickBooks Software also Cause the QuickBooks Error Code 15227?
Yes, It also causes errors in your system. When the user updates the software version or the software normally then do verify that if it needed different or additional system requirements. If yes, then you are required to complete it, or it causes the problems in software update.