If you use QuickBooks for your accounting needs, you may need to update or manage your Intuit account from time to time. Fortunately, Intuit offers a user-friendly portal called the Customer Account Management Portal (CAMPs) that makes it easy to manage your account. With Intuit CAMPs, you can manage your accounts, products, contacts, billing, and user ID Access. Not just that, you can review charges, update payment methods, change credit cards, as well as update billing information and email addresses. It further provides an easy way to download the products, find license number or cancel your subscription.
In this blog post, we will walk you through the steps of using CAMPs to change, manage or update your Intuit CAMPs account. Intuit CAMPs is also an easy way to get in touch with QuickBooks Customer Support or if you face any trouble at any point in time you can directly seek help from the QuickBooks Support team by dialing our toll-free number +1-888-510-9198.
Advantages of using Customer Account Management Portal (Intuit CAMPS)
User-friendly interface: CAMPs have a user-friendly interface that makes it easy to manage your Intuit CAMPs account. The dashboard is easy to navigate, and you can quickly find the information you need.
Centralized management: With CAMPs, you can manage all aspects of your Intuit account in one place. You can update your payment information, manage your subscriptions, and add or remove authorized users all from the same dashboard.
Customizable access: CAMPs allow you to grant access to other users, such as an accountant or bookkeeper, and you can choose to grant them full access or limited access to your account. This makes it easy to collaborate with others while maintaining control over your financial data
Automatic notification: CAMPs will send you automatic notifications when your subscription is about to expire, when a payment fails, or when there are any other billing issues. This helps you stay on top of your account and avoid any interruptions in service.
Uses of Customer Account Management Portal (CAMPs) for QuickBooks Desktop
You can try performing the following activities using Intuit CAMPs account:
You can simply edit or change the email.
Moreover, it allows you to locate the license number.
Furthermore, you will be able to easily download products that you have purchased.
Product orders, transactions and chargers can easily be checked.
The primary contact can also be changed
You will also be able to add, edit and further remove other users.
Not just that, you can even change business phone number and address can also be easily done in CAMPs
Features of Customer Account Management Portal (Intuit CAMPS)
In addition to the advantages of using CAMPs, there are several features that make this portal a valuable tool for managing your Intuit account. Let’s take a closer look at some of these features:
1. Manage subscriptions and billing:
With CAMPs, you can manage your subscriptions and billing information in one place. You can view your invoices, update your payment information, and manage your subscription plan all from the “Billing & Subscriptions” tab.
2. Add and remove authorized users
CAMPs allow you to add and remove authorized users from your Intuit account. You can grant full access or limited access to your account, depending on the user’s needs. This makes it easy to collaborate with others while maintaining control over your financial data.
3. Access notifications and alerts
CAMPs send automatic notifications and alerts to keep you informed about your account. You will receive notifications when your subscription is about to expire, when a payment fails, or when there are any other billing issues. This helps you stay on top of your account and avoid any interruptions in service.
4. Track your account history
CAMPs allow you to track your account history, including changes to your subscription plan, billing history, and authorized users. You can view this information from the “Account History” tab, which provides a complete record of all account activity.
5. Manage your profile
CAMPs also allow you to manage your profile information, including your name, email address, and contact information. You can update this information from the “Profile” tab, ensuring that your account information is always up-to-date.
How to use the Customer Account Management Portal (Intuit CAMPs) in QuickBooks?
Now that you know various advantages and features of CAMPs to manage your Intuit CAMPs account, let’s take a look at how to use this portal:
Step 1: Access CAMPs
To access CAMPs, go to the QuickBooks Online login page and click on the “Sign in” button. Enter your login credentials, and you will be taken to your QuickBooks Online dashboard. Click on the “Settings” icon, and then select “Account and Settings.” This will take you to the “Billing & Subscription” tab, where you will see a link to “Manage your QuickBooks Account.” Click on this link to access CAMPs.
Step 2: Navigate CAMPs
Once you have accessed CAMPs, you will see a dashboard with several tabs, including “Billing & Subscriptions,” “Authorized Users,” and “Notifications.” You can use these tabs to manage different aspects of your Intuit account.
Step 3: Update your account information
To update your account information, click on the “Billing & Subscriptions” tab. Here, you can update your payment information, view your invoices, and manage your subscription. To update your payment information, click on the “Edit payment info” button and follow the prompts.
Step 4: Manage your subscriptions
If you need to change your subscription plan or cancel your subscription, you can do so in the “Billing & Subscriptions” tab. Click on the “Change plan” or “Cancel subscription” button, and follow the prompts to make the necessary changes.
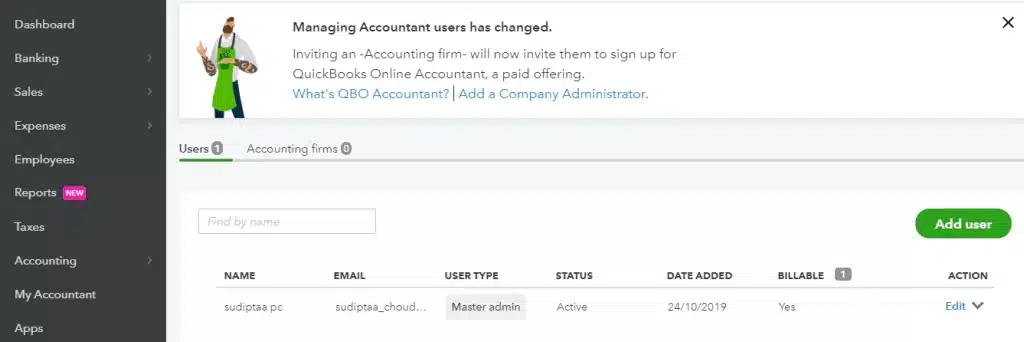
Step 5: Add authorized users
If you need to grant access to other users, such as an accountant or bookkeeper, you can do so in the “Authorized Users” tab. Click on the “Add user” button, and enter the user’s email address. You can choose to grant the user full access or limited access to your account.
Step 6: Remove authorized users
To remove an authorized user from your account, go to the “Authorized Users” tab and click on the “Delete” button next to the user’s name. Confirm that you want to delete the user, and they will no longer have access to your account.
Add, Remove, or Edit Authorized Users in My Account (QuickBooks CAMPs)
One of the key features of CAMPs is the ability to add and manage authorized users for your Intuit account. Authorized users are individuals who have access to your account and can perform certain tasks, such as managing your financial data or running reports. Here’s how to add, edit, and remove authorized users in CAMPs:
Add an authorized user
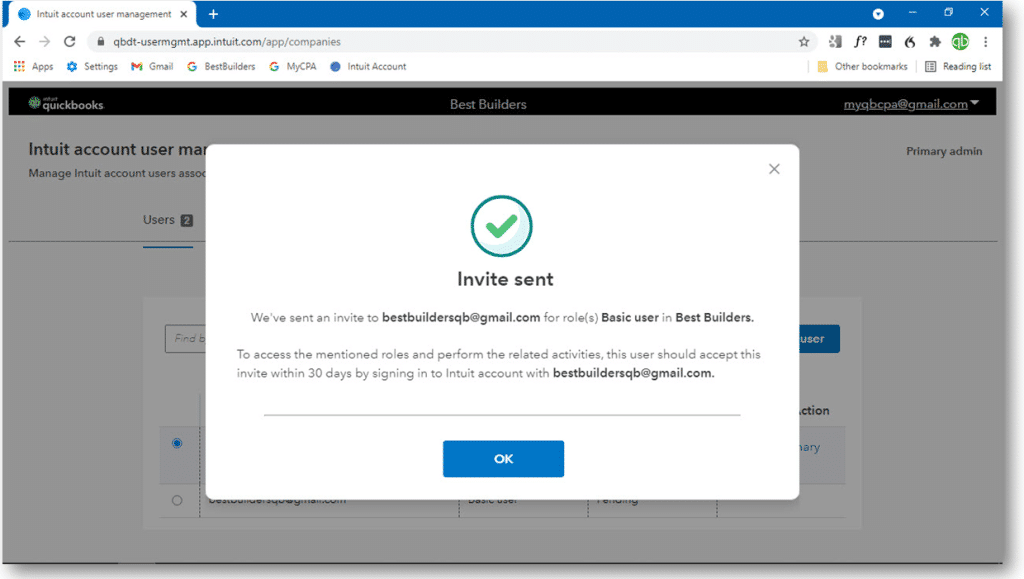
To add an authorized user, go to the “Authorized Users” tab in CAMPs and click on the “Add user” button. Enter the user’s email address and select the access level you want to grant them. You can choose to grant full access or limited access to your account. Once you have entered the user’s information, click “Save” to add them to your account.
Edit an authorized user
To edit an authorized user, go to the “Authorized Users” tab in Intuit CAMPs and find the user you want to edit. Click on the “Edit” button next to their name, and make the necessary changes. You can change the user’s name, email address, or access level. Once you have made your changes, click “Save” to update the user’s information.
Remove an authorized user
To remove an authorized user, go to the “Authorized Users” tab in CAMPs and find the user you want to remove. Click on the “Delete” button next to their name, and confirm that you want to remove them from your account. Once you have confirmed, the user will no longer have access to your account.
the Customer Account Management Portal (CAMPs) is a valuable tool for managing your Intuit account. With CAMPs, you can update your account information, manage your subscriptions, and add or remove authorized users all from one central location. The user-friendly interface, customizable access, and automatic notifications make CAMPs a great choice for small businesses and individuals who want to stay on top of their finances. So, if you use QuickBooks for your accounting needs, be sure to take advantage of this powerful tool to manage your Intuit account with ease and efficiency. Here are a few tips to keep in mind when using Intuit CAMPs to manage your Intuit account:
Set up notifications and alerts
Make sure to set up notifications and alerts in CAMPs to stay on top of your account activity. This will help you avoid any interruptions in service and stay informed about any billing issues.
Review your authorized users regularly
It’s a good idea to review your authorized users regularly to ensure that only those who need access to your account are granted it. This will help keep your financial data secure and reduce the risk of any unauthorized access.
Keep your profile information up-to-date
Make sure to keep your profile information up-to-date in CAMPs. This includes your name, email address, and contact information. This will ensure that Intuit can reach you if there are any issues with your account.
Take advantage of the support resources available
Intuit offers a variety of support resources for CAMPs users, including help articles, community forums, and customer support. If you have any questions or issues with your account, don’t hesitate to reach out for help.
What if unable to see all the products?
At times, you might not be able to all the products due to certain factors, in such scenario, you can perform the below steps:
At times, the user might have registered different products with different emails, in such a scenario, it is suggested to sign out of CAMPs and again visit camps.intuit.com.
Furthermore, you can try claiming an account, instead of signing in.
This generally helps in connecting the accounts with different emails.
You will now be able to see all the other products successfully.
Steps to locate license number using CAMPs
You can perform the below shared steps to locate the license number using CAMPs. Let us have a look:
You need to first login to the intuit.com CAMPs page.
Once done with that, locate your subscription in the list of Products and services.
Heading forward, you need to select the details tab and choose download option.
You will now have to install the QuickBooks desktop program
Final Words!
In conclusion, Intuit CAMPs is an essential tool for managing your Intuit account. By taking advantage of the features and functionality it offers, you can streamline your account management process and ensure that your financial data is secure and up-to-date. With Intuit CAMPs, you can manage your subscriptions, update your billing information, and add or remove authorized users with ease. So, if you haven’t already, be sure to check out Intuit CAMPs. Even if after reading this article you have any confusions or queries, then our support team of highly professional QuickBooks Tech Support team is available to help you round-the-clock just by dialing our toll-free number i.e. +1-888-510-9198.
When you have more than one users for QuickBooks, you need to get extra license depending upon your edition of QuickBooks. However, if you need even more users to access QuickBooks on their systems, then setting up the multi-user network is the right procedure to follow. Multi user network in QuickBooks is one of the finest features available. It lets multiple users access QuickBooks and manage a file at the time, that too on the same network. This saves time and improves collaboration. If you want to share your QuickBooks desktop for windows data with multiple users, then you can simply set up a multi user network to access your company files from other computers.
The set up multi-user network in QuickBooks process requires you to adjust settings in QuickBooks desktop, windows, and your server. To learn further about multi user networks, especially the procedure to install and set-up multi user network in QuickBooks, make sure you read this piece of writing till the end. Furthermore, you can simply reach out to our technical team at +1-888-510-9198. Or can also click on the chat button to talk to one of our QuickBooks Support live chat agents. Having said that, let us first take a look at what multi-user mode is in QuickBooks and understand the procedure to set up multi-user network in QuickBooks.
A multi-user network in QuickBooks Desktop refers to the ability to have multiple users access the same company file at the same time over a network. This feature allows multiple people to work on the same set of financial data simultaneously, which can be particularly useful for businesses with several team members who need to access and update the company’s accounting information. With multi-user access, different users can have different levels of permissions, allowing them to view and edit only the information that they are authorized to access. For example, some users may be restricted to viewing reports and other financial data, while others may be able to enter transactions and make changes to the company file.
To set up a multi-user network in QuickBooks Desktop, the company file needs to be stored on a shared network folder or server, and each user needs to have a unique login and password to access the file. The number of users who can access the file at the same time will depend on the version of QuickBooks Desktop being used and the capabilities of the network infrastructure.
Requirements to Set up multi-user network in QuickBooks Desktop
To set up a multi-user network in QuickBooks Desktop, you will need the following requirements:
QuickBooks Desktop Software: You will need to have a licensed version of QuickBooks Desktop software installed on each computer that will be accessing the QuickBooks company file.
Network Configuration: You will need to have a properly configured network that allows multiple users to access the same company file simultaneously. This can be achieved by either setting up a peer-to-peer network or a client-server network.
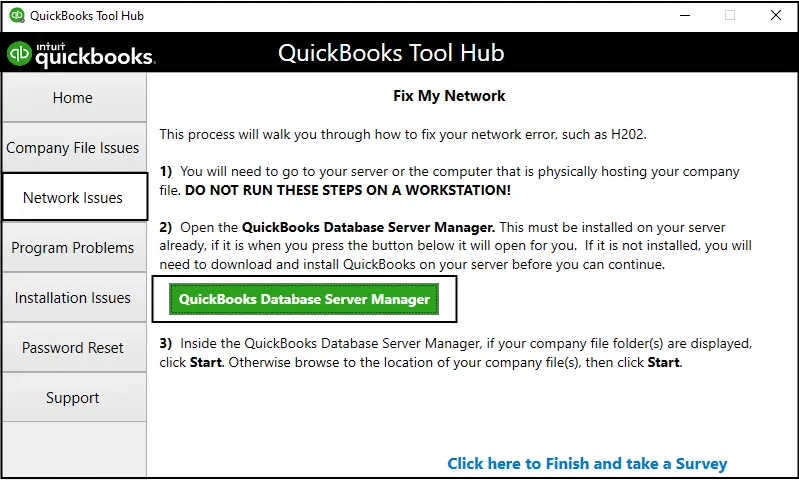
QuickBooks Database Server Manager: QuickBooks Desktop requires the installation and setup of the QuickBooks Database Server Manager on the computer that will be hosting the company file. This tool enables the computer to act as a server and allow multiple users to access the same company file.
User Access Rights: You will need to grant user access rights to the company file. Each user will need their own login credentials with permissions to access and modify the company file.
Internet Connection: If you plan to use QuickBooks Desktop’s online features, you will need a reliable internet connection.
Compatible Operating System: QuickBooks Desktop is compatible with Windows 10, Windows 8.1, Windows Server 2019, Windows Server 2016, and Windows Server 2012 R2. Make sure that the operating system on each computer meets these requirements.
Overall, setting up a multi-user network in QuickBooks Desktop requires careful planning and execution. It is recommended to seek the help of a QuickBooks ProAdvisor or IT professional to ensure that the setup is done correctly.
Setting up a multi-user network in QuickBooks Desktop can offer several benefits for businesses, including:
Improved collaboration: QuickBooks Desktop multi-user network allows multiple users to work on the same company file simultaneously. This means that employees in different departments or locations can collaborate more efficiently and work on the same file at the same time, making it easier to keep track of changes and updates.
Increased productivity: With a multi-user network, users can work independently without interfering with each other’s work. This helps to reduce wait times for other users and reduces the chances of conflicts or data loss. As a result, productivity increases, and users can complete their tasks faster.
Enhanced security: QuickBooks Desktop multi-user network allows administrators to control who has access to company files and what level of access each user has. This helps to ensure that sensitive financial data is secure and only accessible to authorized personnel.
Reduced errors: When multiple users are working on the same file simultaneously, it is easier to identify errors and inconsistencies in data. This can help to reduce the likelihood of errors and make it easier to correct them before they cause more significant problems.
Cost-effective: A multi-user network is a cost-effective solution for businesses that have multiple employees who need to access QuickBooks Desktop simultaneously. Instead of purchasing multiple copies of the software, businesses can purchase a single license and install it on a server that can be accessed by multiple users.
Overall, setting up a multi-user network in QuickBooks Desktop can help businesses improve collaboration, increase productivity, enhance security, reduce errors, and save costs.
Steps to Set up Multi-User Network in QuickBooks Desktop:
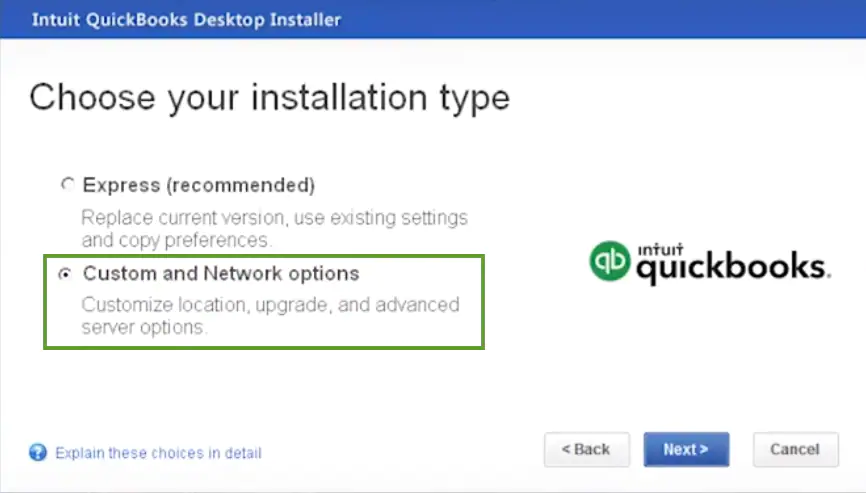
Step 1: Download and Install QuickBooks Desktop
The first step in setting up a multi-user network is to install QuickBooks Desktop on each computer that will access the company file. You can either purchase multiple licenses of QuickBooks Desktop or use the same license on multiple computers, as long as you only have one user accessing the company file at a time. The steps involved here are:
You can first download QuickBooks and further save the file.
Once done with that, head to the installation of the software by performing the steps:
You need to choose custom and network install as the install type.
After that, choose I’ll be using QuickBooks desktop on this computer, AND I’ll be storing… in case you want the full version of QuickBooks desktop on the server system.
Or if you want the server system to the host files, then choose the other option.
Perform the onscreen prompts to complete the installation.
You will then have to select the multi-user host installation.
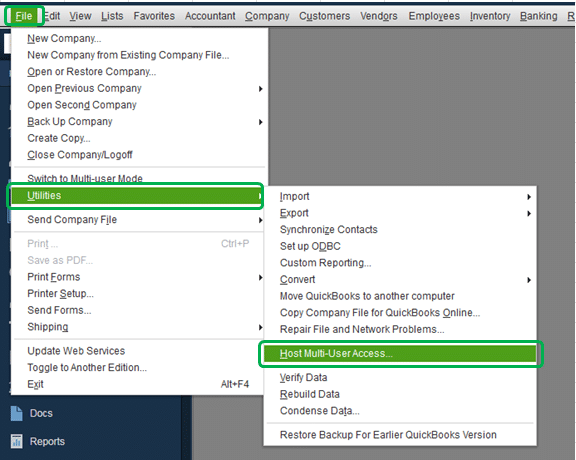
Step 2: Switch to multi-user hosting
Open QuickBooks Desktop.
Now, update the QuickBooks company file to the newer version, if needed.
Click on File > Utilities > Host Multi-User Access. This will allow other users to access the company file on the server computer.
Follow the on-screen instructions to complete the setup process.
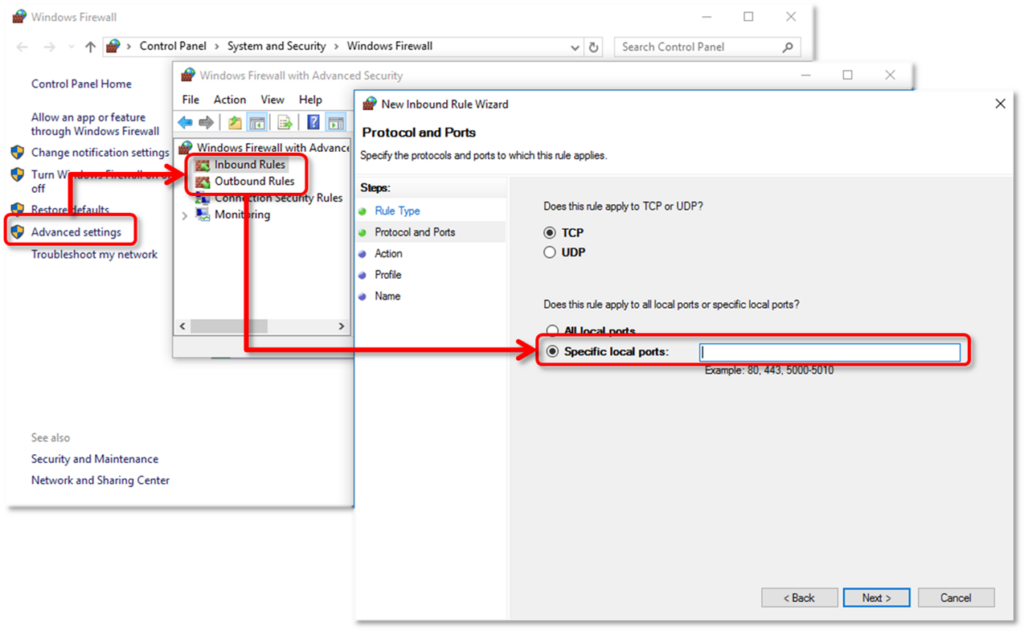
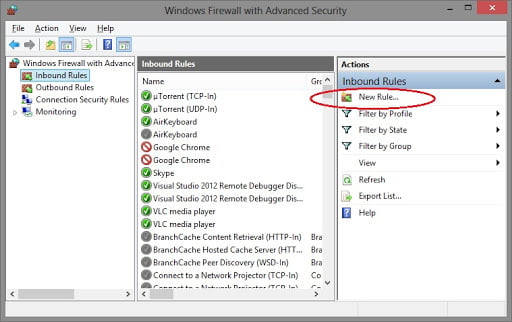
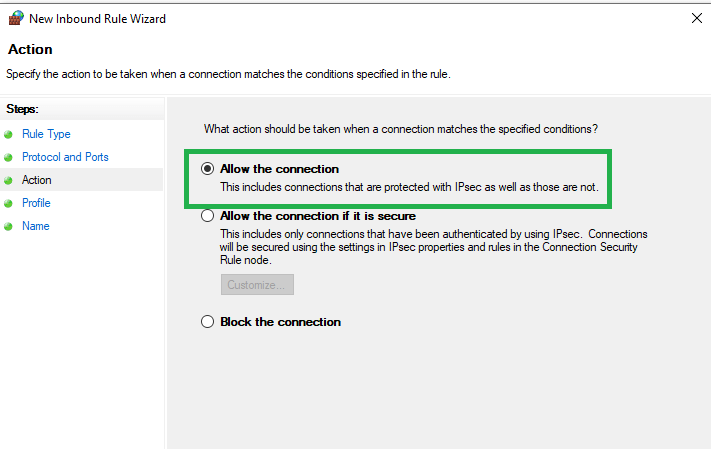
Step 3: Configure the firewall and security settings for desktop
To start with, search for the firewall.
You now have to choose the windows firewall and also go for the advanced settings tab.
Once done with that, click on inbound rules and select the new rule option.
You will now have to choose the port, and opt for next tab.
Once done with that, check out the TCP option and then type in the ports that are required for QuickBooks year version.
Click on allow the connection option.
Check mark all the profiles and switch to the next step by clicking on the next tab.
You now have to assign a name to the rule and click on the finish tab.
The last step is to open QuickBooks in multi user mode.
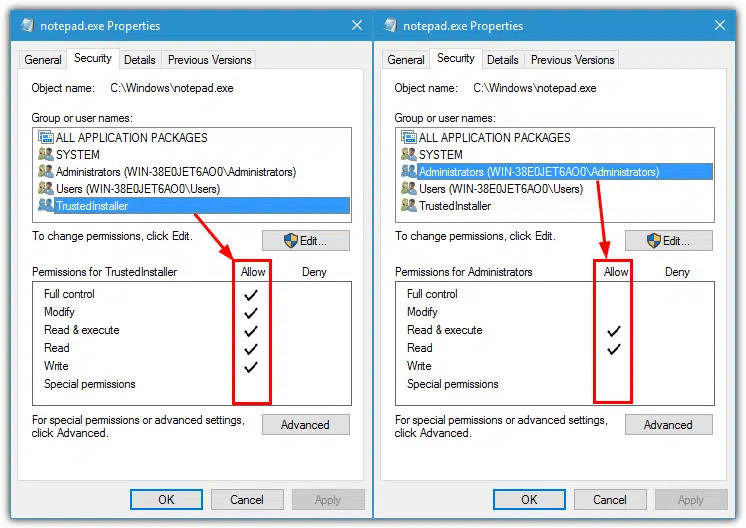
Step 4: Move on to the folder and windows access permissions to share company files
Here, you will have to right click the folder having the company file.
And further move to the properties option and choose security.
Once done with that click on the edit option.
And further choose QBDataServicesUserXX and further choose full control option, before clicking on the allow option.
The next step is to click on the apply tab and hit ok tab respectively.
And lastly, set up windows access permissions for sharing your company files.
On Windows 10, 8, 7
If you are Windows 10, 8, 7 user, then simply open file explorer by pressing Win + R.
Now, look for the folder containing the company fi8les.
After you have located, right click on it.
Also, click on the properties and sharing options, followed by clicking on the share option.
Now, choose the corresponding QBDataServiceUserXX.
And lastly, select the full control option and choose the share option.
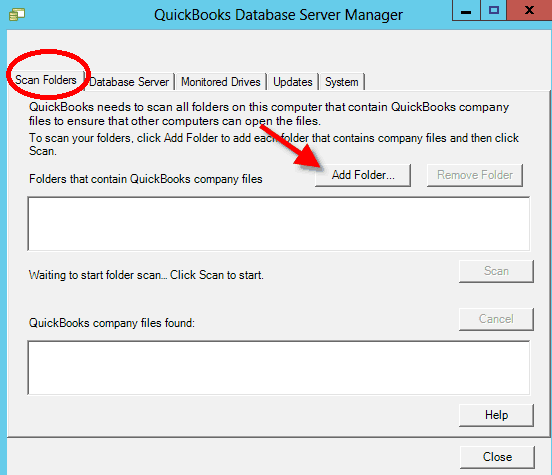
Step 5: Check file and set up database server manager
Under this process, you need to click on the start tab and further choose programs.
Once done with that, select QuickBooks.
And further go for QuickBooks database server manager.
You now have to click on scan folders tab.
And also click on add folder option.
Choose the folder having the company file and click on ok tab and also choose the add folder option.
The next step is to click on the scan tab and also start the scanning process.
The last step is to click on close option
Step 6: Insert Windows Admin right to permit configuration to multi-user access
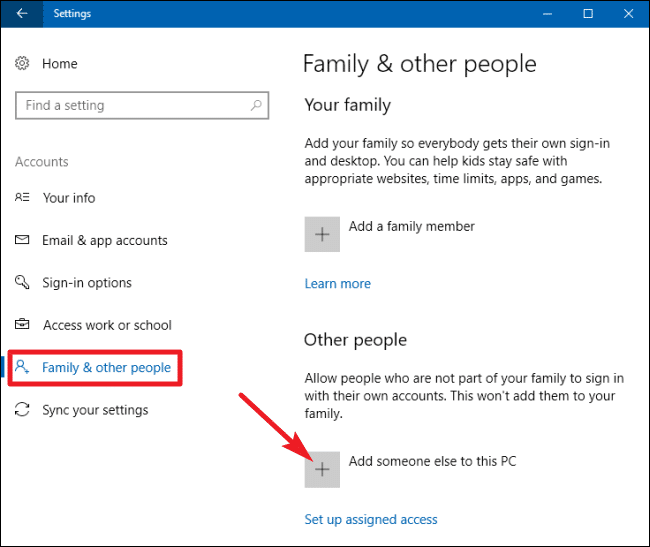
On Windows 10:
You need to first click on start tab and further click on settings, accounts, family and other users respectively.
Once done with that, choose the option labelled add someone else on this computer.
Choose I don’t have this person’s sign in information and also insert a user without a Microsoft account.
You now have to assign a new name and password to the account.
And further click on finish tab.
Provide admin rights to the new user and also select the newly created account and further select account type.
You now have to click on admin tab.
And click on ok and save options respectively.
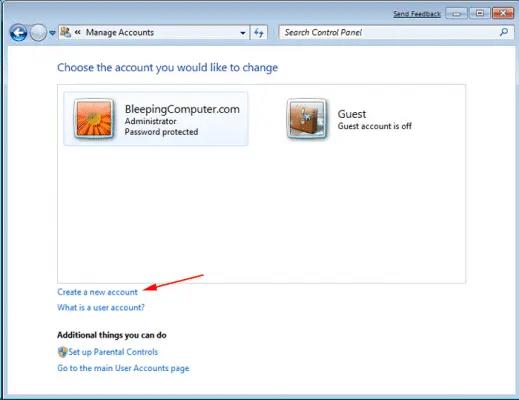
Windows 8 and 7:
At first, you need to press ctrl + R and open control panel.
Once done with that choose user accounts, manage another account, and create a new account respectively.
Further, enter in the username and choose admin tab and also click on the create tab.
Step 7: Start with company file located on a remote computer
At first, you need to visit the QuickBooks file menu and choose the switch to multi user mode option.
Once done with that choose yes in multi user set up hosting window.
Followed by clicking on ok tab in the multi user setup information window.
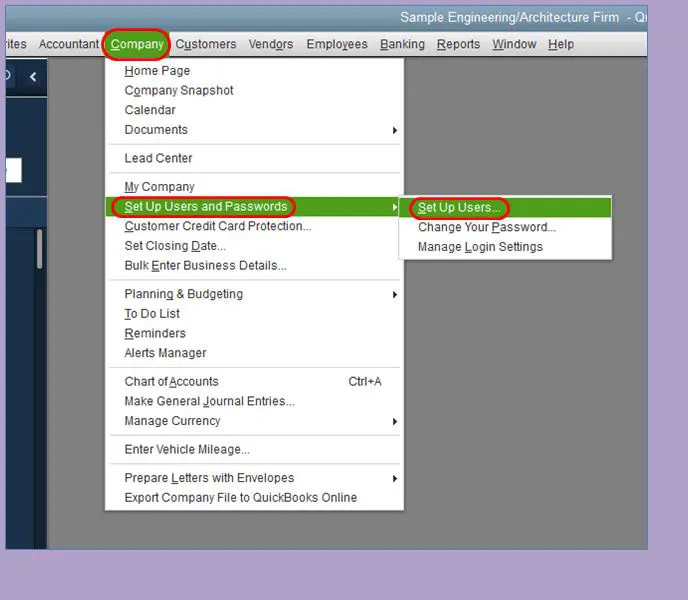
You can end the process by adding expected users by visiting the company> set up users and passwords> set up users> add user respectively.
To Conclude!
In conclusion, setting up a multi-user network in QuickBooks Desktop is a great way to improve collaboration and efficiency in your business. By following the steps outlined above, you can easily set up a multi-user network and start reaping the benefits of this powerful feature. This brings us to the end of this blog, however, if you still need any assistance in setting up or installing multi-user network in QuickBooks Desktop, you can always reach our QuickBooks ProAdvisors team at our toll-free number +1-888-510-9198.
FAQs Related to multi user mode in QuickBooks
How do you switch to multi-user mode on a network Quickbook installation?
You need to click on the file menu in the upper left corner of QuickBooks and further click on the option switch to multi user mode. It should be noted if you are trying to switch to single user mode, then the file menu option will say single user mode.
What is multi-user mode in QuickBooks desktop?
Multi user mode usually lets multiple users work on the company file at once, from different workstation. It works on a shared network environment and further requires a host computer to share the company file.
Can QuickBooks desktop have multiple users?
QuickBooks desktop premier lets 5 users work in the same company file. Whereas, QuickBooks pro lets 3 users work in the same company file. In case you need more than 5 users, then check out QuickBooks desktop enterprise solutions.
Can you connect multiple accounts to QuickBooks?
You can have multiple companies under the same QuickBooks online account. However, each company file is its own paid subscription, but you can access them with the same sign-in info.
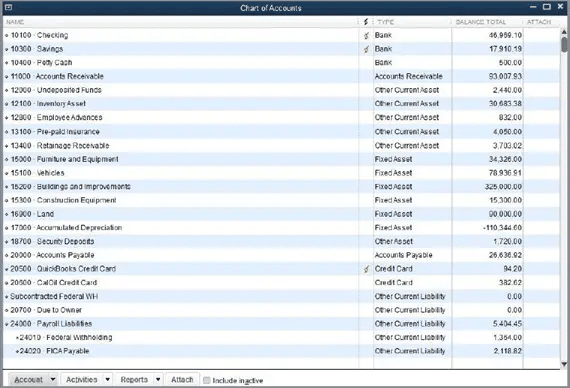
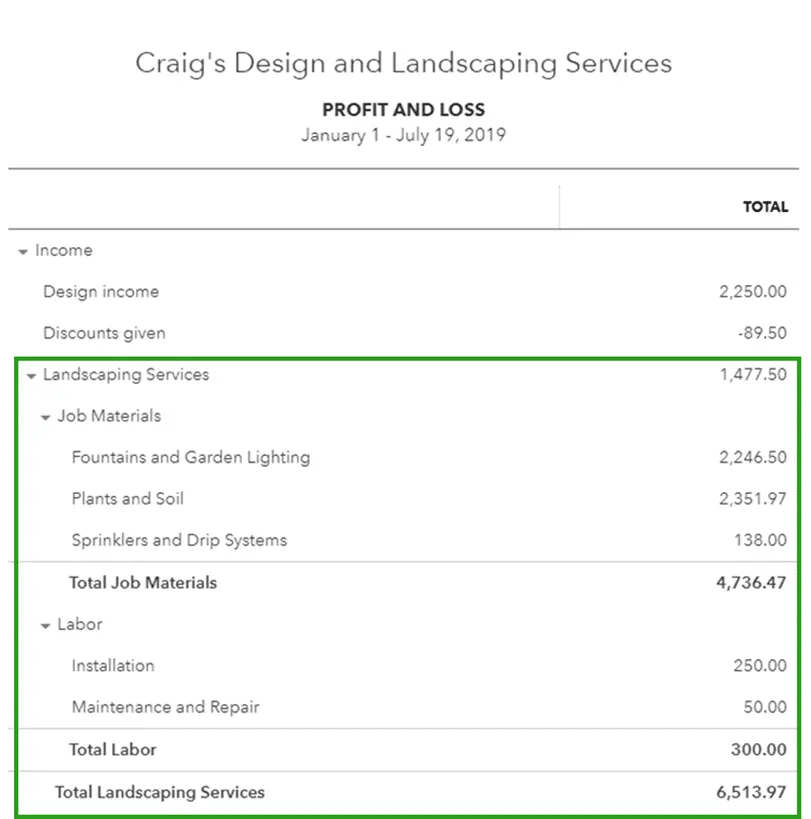
QuickBooks Chart of Accounts is basically a list of accounts that helps in categorizing assets, owner’s equity amount, liabilities, and income. To understand it better, you can say that it is a list of balances and chart of accounts in QuickBooks of the company, which further assists in understanding the amount of money a company has, how much it owns, and the amount it owes. It provides a full-proof financial report. This is an important feature for businesses, as it helps in analyzing the financial aspect of a business and reviewing its financial performance.
Setting up a chart of accounts in QuickBooks is quite easy, as it involves some basic set of steps, which we will be elaborating on later in this segment. So, if you are interested, then make sure to go through the segment carefully. For any kind of professional or technical assistance, you can simply connect with our tech professionals at +1-888-510-9198. Our certified QuickBooks professionals have years of experience and expertise in dealing with issues related to QuickBooks.
What is Chart of Accounts (COA)?
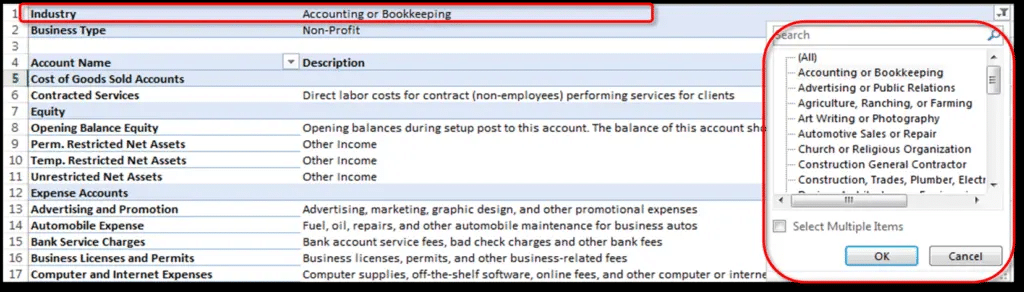
Before you dig in deep to learn the steps to setup chart of accounts in QuickBooks, it is sensible enough to understand a little more about the chart of accounts in QuickBooks. Well, as mentioned earlier, chart of accounts is basically a list of account numbers and names that are relevant to the company. It is majorly categorized into these four standard accounts namely:
Asset accounts
Liability accounts
Income accounts
Expense accounts
Within each of the categories, the line items will distinguish the specific accounts. Moreover, each line item represents an account within each category. It should be noted that a few charts of accounts also display equity accounts. This represents anything that remains after accounting for all operating expenses and revenue accounts.
There are basically four types of charts of accounts. Let us understand each one of them in detail:
1. Asset Accounts
The very first category is asset accounts. These accounts basically contain everything having a value like buildings, vehicles, land, inventory, valuables, etc. This type of Chart of Accounts helps in tracking the amount a user paid for a property and also other factors like depreciation. Items that are in liquid forms, like cheques and other bank accounts, also fall in this category.
2. Liability Accounts
Second comes the liability accounts. It consists of things like mortgages, payroll taxes, promissory notes, credit card balances, bank loans, personal loans, and income tax payables. When users add a loan to this account, it is recommended to ensure that users have also added the sum of the loan.
Here, the users will have to log just the principal amount and forgo the interest owed. When one reaches each monthly payment and enters the payment in the accounting system, the user would have to split the payment into an amount subtracted from what is owed and an amount of interest paid, which will go into an expense account.
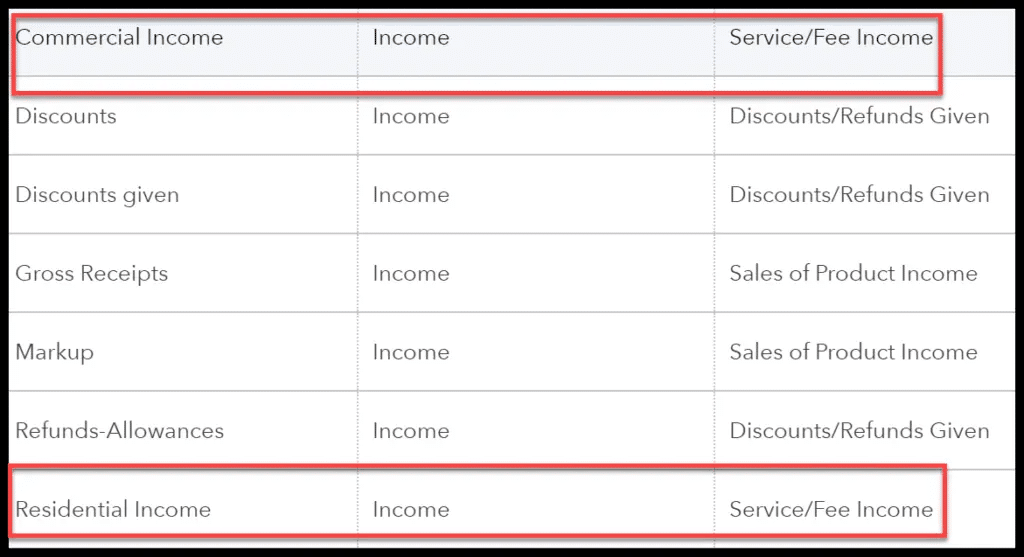
3. Income Accounts
Another type if the income Accounts. This encompasses expenses, revenues, additional incomes or expenses, and cost of sales. Some of the accounts are the same for all businesses, while some accounts are definite to a particular business type.
It is recommended to create a separate line item in the chart of accounts for different types of income. Make sure to consider what various profitable activities may be and sort them by income type instead of limping all the income into one account. After the user is able to identify the locations or events bringing the most cash flow, then it is possible to manage things more properly.
The last type of account is the expense account. It keeps users informed about the amount of money that they have spent. It further allows them to track the cash that is not with them.
Effective points to organize and set up chart of accounts in QuickBooks
Before you perform the steps discussed ahead, make sure to go through the below pointers:
It is recommended to keep the line items simple in the first go. Also, make sure that the line items have titles that are understandable to the accountant and also to them.
Majority of accounting systems are preset with a chart of accounts. The lines of preset accounts have numbered headers like 1430.2 and 530.8. And these numbers can be effective for large scale businesses but are usually a waste for entrepreneurs and small firms.
We recommend avoiding creation of a new line item for each transaction. This is to ensure that it doesn’t litter entire chart of accounts.
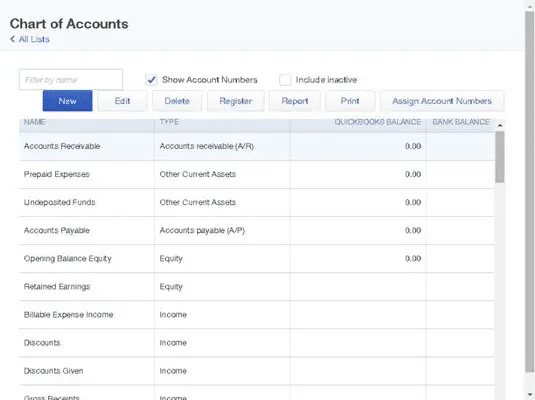
How to access the QuickBooks chart of accounts?
The steps to access the QuickBooks chart of accounts in QuickBooks desktop and online differ. So, make sure to perform the steps accordingly. The steps involved in the process are as follows:
On QuickBooks Desktop:
The user is supposed to pick up the Chart of accounts from any of the QuickBooks menus.
And then head to the company and click on lists or accounts.
Go to the Company and then click on Lists or Accountant.
On QuickBooks Online:
Under this software, you need to click on the settings icon and select chart of accounts directly.
You can perform the below set of steps to setup chart of accounts in QuickBooks. Let us explore the steps in detail:
Step 1: Go for the lists – Chart of Accounts Command
The QuickBooks software will display the Charts of Accounts window on the computer screen.
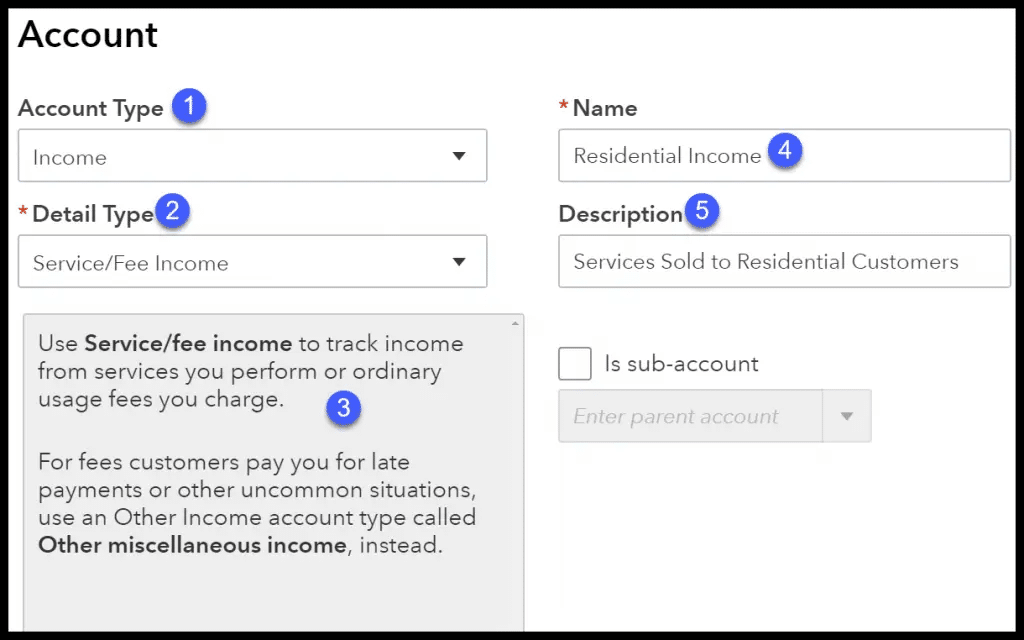
Step 2: Now, click on the Account Button
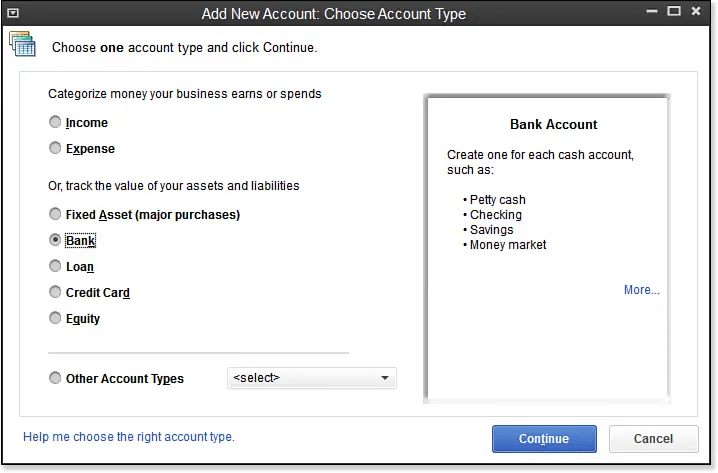
Furthermore, on the screen, QuickBooks will display the Account Menu. The user is required to click on the tab stating ‘Account menu option New’. And this will open up a window on the screen.
Step 3: Add New Account by opting for Account and then new tab
Note that the QuickBooks software will showcase the Add New Account window on the screen.
Step 4: Make use of the Account Type buttons
The QuickBooks accounting software offers different accounts types which include income, loan, fixed asset, Expenses, Credit Card, equity, Accounts Payable, Other Income, Costs of Good Sold, Accounts Receivable, Other Assets, Long Term Liability, Other Expenses, and more. Via the accounts, one can find the location where their data is getting reported.
Step 5: The next step is to click on continue
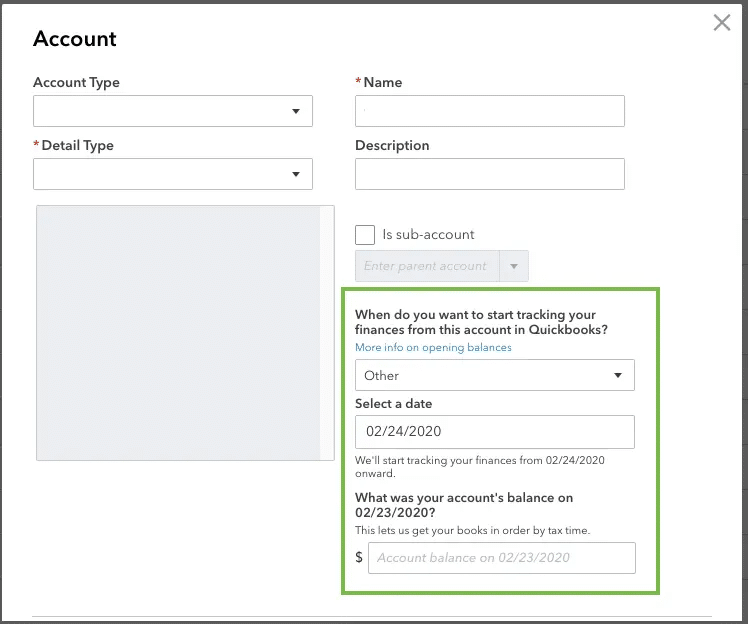
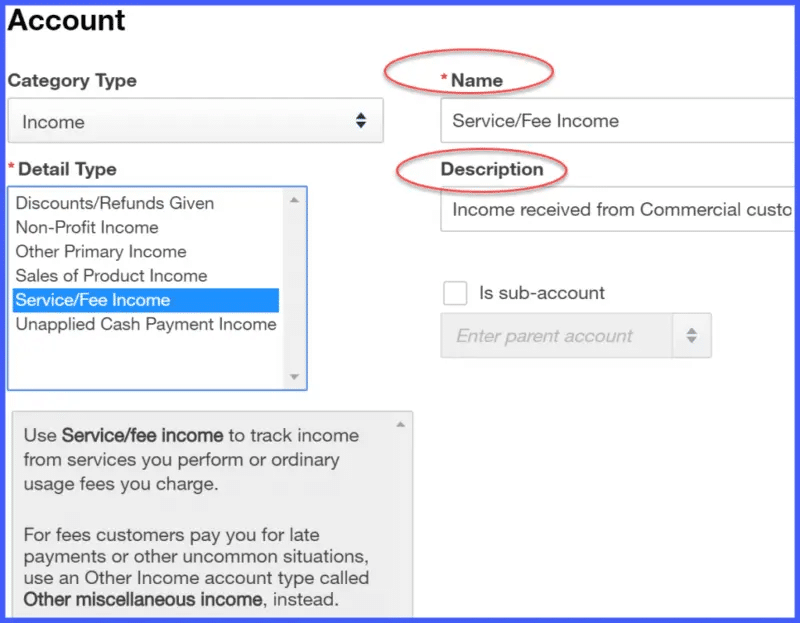
After the user clicks on the continue tab, the QuickBooks software will show the second Add Account window on the computer screen. It should be noted that the name of the account will appear in the financial statements. Thus, you would have to use the Account Name Box to give a distinctive name to the new account in order to setup chart of accounts in QuickBooks.
After you have opted for the sub-account checkbox, it is suggested to assign a name to the parent account.
Step 7: Head to the Bank Account
In case the QuickBooks software is compatible with working in different currencies, then it will prompt the users to look for all those customers, bank accounts, vendors, etc., who use different currencies.
Step 8: The next step involves the description of the new account
There is no need to describe the new account. QuickBooks software makes use of the account name in the financial statements and so no description is required as such.
Step 9: Get Account Info
Now, the user is supposed to get the info about the credit card account type version of the Add New Account window. This will help in storing all the card details.
Step 10: Recognize the Tax Line
On the corporation’s Tax return, the cash account balances will get recorded. In case the user wants to add a bank account, then using the Tax-Line Mapping drop-down list can help.
Lastly, the user is supposed to click on the next tab to save the account information and move to the add new account window. After both the accounts have been setup, the new accounts will appear on the chart of accounts list.
How to Modify an Account from the Chart of Accounts List?
One can try to modify an account from the chart of accounts list by performing the steps below:
Choose an account to setup chart of accounts in QuickBooks
At first, you need to choose the account that you wish to modify. Furthermore, you can modify the accounts regardless of the time. Now, from the chart of accounts, scroll down to the account that is to be modified. Click on the drop-down arrow next to run report.
Choose the edit option.
Make modifications to the account
This will now lead you to the window, where you can make changes to the account name and the account description fields. Note that the users should not change the category type in case they have already entered transactions using the account.
This can lay a serious impact on the financial statements.
Save and close
It is recommended to save the changes before exiting the account.
Conclusion!
Now that you know the steps that can be performed to set up a chart of accounts in QuickBooks, it is time to perform those steps. Whereas, if you get stuck at any point in time, or if you require any sort of technical assistance in performing those steps, then, in that case, consulting our tech support professionals is something that we suggest. We are a team of certified QuickBooks professionals who provide you with instant QuickBooks support services. Our experts have years of experience in helping QuickBooks users with issues related to the software. For more details, get in touch with us at +1-888-510-9198 and we will provide you with the best guidance possible.
What exactly is a Chart of Accounts in QuickBooks, and why is it important for my business?
Setting up a Chart of Accounts in QuickBooks involves several steps. First of all, you’ll need to access the Chart of Accounts feature and add or edit accounts as per your requirements. QuickBooks allows you to customize your Chart of Accounts to match your business structure, industry, and reporting needs. You can add new accounts, edit existing ones, and even organize them hierarchically for better organization.
What are the steps for setting up a Chart of Accounts in QuickBooks, and can I customize it to suit my business needs?
Setting up a Chart of Accounts in QuickBooks involves several steps. First, you’ll need to access the Chart of Accounts feature and add or edit accounts as per your requirements. QuickBooks allows you to customize your Chart of Accounts to match your business structure, industry, and reporting needs. You can add new accounts, edit existing ones, and even organize them hierarchically for better organization.
Can I import a Chart of Accounts into QuickBooks?
Yes, QuickBooks provides the option to import a Chart of Accounts from an external source like a spreadsheet or another accounting system. To do this, you’ll need to format your data according to QuickBooks’ import requirements, which typically involve preparing a CSV or Excel file. Then, you can use the import feature within QuickBooks to bring in your Chart of Accounts, saving you time and reducing the risk of errors during manual entry.
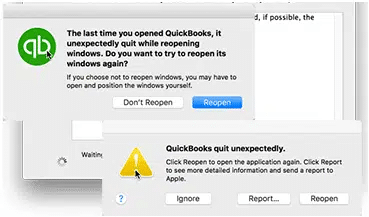
Experiencing technical glitches in QuickBooks is not something new. The reason is loads of code and algorithms. One such error that we are going to highlight in this piece of writing is QuickBooks keeps crashing issue. This is quite an annoying error and does not let the user perform any activity on QuickBooks. As a consequence of such an error, one might lose the unsaved data, which can be frustrating at times. There can be multiple reasons behind the occurrence of such an error, which we will be trying to discuss later in this segment along with the steps associated with them to chuck off the issue successfully.
If you are also facing QuickBooks crashing issue any such error and want an immediate fix for the same, then going through this piece of writing is all that we recommend. However, if the reader wants any sort of technical assistance, then getting in touch with our team professionals at +1-888-510-9198, can also be of great assistance. We are a team of technically sound QuickBooks professionals who work round the clock to provide the best possible support assistance.
Updated to Sonoma, QuickBooks keeps crashing? Well, recently a few users have reported this issue where they updated to Sonoma, and QuickBooks keeps crashing showing compatibility issues. QBD 2019 is outdated and update patches for the same won’t be released anytime soon. Thus, it is recommended to immediately install the trial version of QBD 2022 and or 2023 and using the workaround to get it running on Sonoma.
Another quick solution to fix the QuickBooks is crashing after updating to Sonoma is to put your existing QuickBooks version to an older computer and it would fix the issue successfully and will let you operate the software easily. You can try the following workaround on QBD 2022 and 2023:
Press and hold the COMMAND key immediately after entering your password.
Now, click on OK tab.
And whatever you do, make sure to avoid clicking home afterwards.
The Home screen is what crashes QB.
Moreover, you also have an option to remove Sonoma off the Mac. Also keep a note of the fact that subscribing to QB online won’t work in such case, as QB online will not recognize the .qb2019 file.
Another fix to QuickBooks is crashing after updating to Sonoma
This particular solution works for 2023 and 2022 QuickBooks.
To get the app to launch without opening any company file, press and hold the option key when launching the app.
This will QuickBooks from opening your previously used company file.
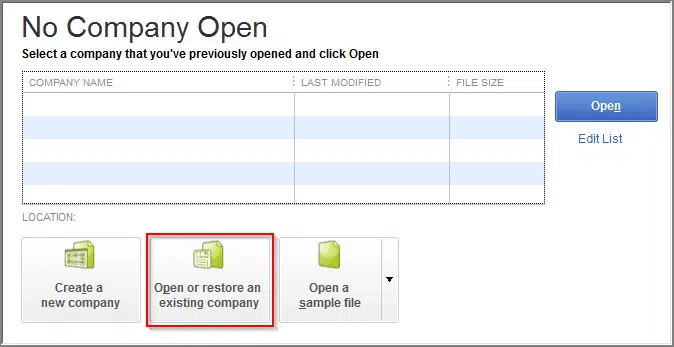
You now have to choose the company file from the No company open window.
Once done with that, hold down the command key when opening the file.
This will prevent the latest used windows from opening.
Now, move to QuickBooks and choose preferences.
Further, choose toolbar and tabs icon in the 3rd row down.
After that uncheck the use tabbed windows checkbox.
And avoid opening the home page.
Note that, an update to QB Mac Desktop 2023 was released recently that fixes the Sonoma crash issue. You can try updating, and expect things to work normally. There is also an upgrade to QV2024, which also works and is free for an already paid license. The crash problem for QB2023 and 2024 is not fixed.
Coming towards the end of this article, it is believed that the above-stated information might work in eliminating the QuickBooks crashing issue in windows 10. Just in case, the user isn’t able to deal with the error even after performing the above-discussed steps, then all that we recommend is to get in touch with our QuickBooks support team right away at +1-888-510-9198 and let our technically sound experts help you in eliminating the issue from its root cause. We are a team of technically sound experts who work round the clock to provide the finest possible support services immediately.
Why does QuickBooks crash frequently while I’m using it?
QuickBooks may crash due to various reasons such as outdated software, corrupted company file, insufficient system resources, or a conflict with third-party applications. To resolve these issues, ensure you have the latest version of QuickBooks installed, perform regular company file maintenance, and close any unnecessary programs running in the background.
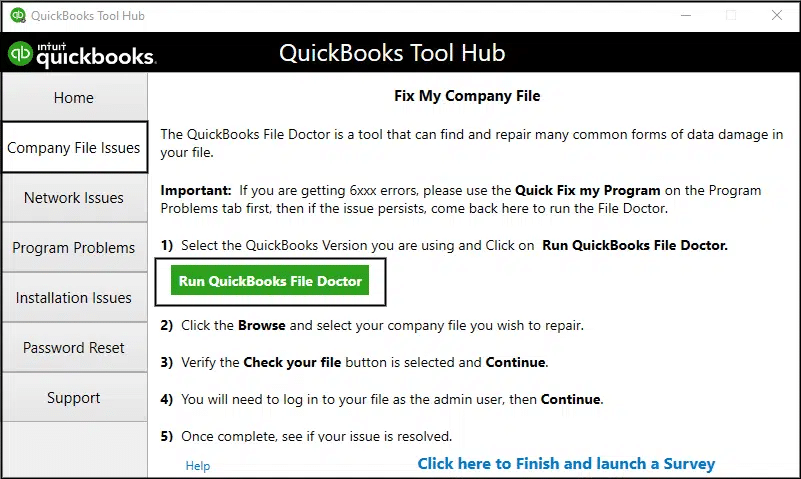
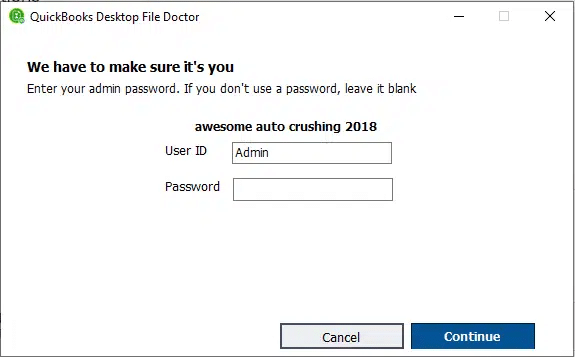
How can I fix a QuickBooks crash caused by a damaged company file?
To repair a damaged company file, use the built-in QuickBooks File Doctor tool. If the issue persists, you can contact our QuickBooks support team at +1-888-510-9198 for further assistance.
What steps should I take if QuickBooks crashes when sending invoices or processing payments?
First, ensure that you are using the latest version of QuickBooks and your system meets the software’s minimum requirements. If the problem persists, try disabling any third-party applications or add-ons that may be causing a conflict. If you still experience crashes, reach out to our support team at +1-888-510-9198 for expert help.
Can I recover lost data after a QuickBooks crash?
Yes, you can recover lost data by restoring a recent backup of your company file. If you don’t have a backup or the backup doesn’t contain the required information, call our toll-free QuickBooks support number +1-888-510-9198 for assistance in recovering your data.
How can I prevent QuickBooks from crashing in the future?
To minimize the risk of future crashes, keep your QuickBooks software up-to-date, maintain your company file regularly, and ensure your computer meets the system requirements for QuickBooks. Additionally, monitor third-party applications and add-ons that may cause conflicts. For personalized support and guidance, contact our QuickBooks experts at +1-888-510-9198.
Bad debts are the debts that become unrecoverable and are required to be written off, in order to avoid miscalculations in the end. The QuickBooks accounting software allows the users to write off bad debts in QuickBooks by performing some set of steps. To help you in writing off bad debts successfully, here we are with this segment sharing the steps to write off in detail. Note that, the steps for QuickBooks online users and QuickBooks desktop users differ.
Thus, to learn further about writing off bad debts, stick around this segment till the end. Or you can further give us a call at +1-888-510-9198, and discuss your queries with our technical support team. Having said that, let us check out the steps to write off bad debts in QuickBooks.
What is the need to write off bad debts in QuickBooks?
Bad debts are basically recorded when the amount that was supposed to be received from the customer fails to be recovered. Businesses using QuickBooks can consider bad debts as invoices that become uncollectible over the course of time. Thus, writing off these bad debts makes it easy for the business to record the actual profit and the average net turnaround. Writing off bad debts manually might seem to be a tedious task, but QuickBooks makes it a lot easier.
Important Points to Note
Before we proceed with the process of writing off bad debt in Quickbooks Desktop, it is crucial to keep the following points in mind:
Well, a user can write off bad debts as deductions.
Another essential point to consider is that you can get acquainted with all the different types of bad debts and unpaid invoices upon creating a bad debt account.
You can use QuickBooks to write off overpayments.
Steps to Write Off Bad Debts in QuickBooks
The user can try performing the below set of steps to successfully write off bad debts in QuickBooks.
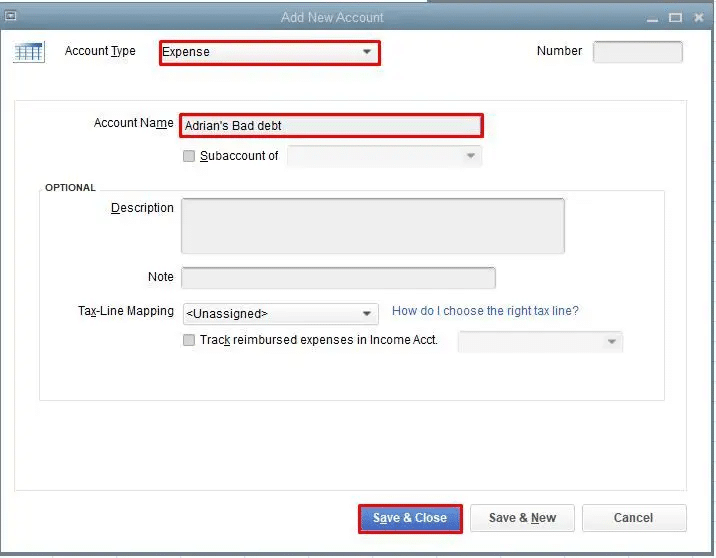
Step 1: Creating a Bad Debts Expense Account
At first, the user needs to open QuickBooks desktop and head to the settings tab
Once done with that click on charts of accounts from the list of options
The next step is to choose new to create a new account
The user should then click on expense option from the account type dropdown
Also, click on the bad debts option in the detail type drop-down
Once done with that click on save and close tabs and you are done
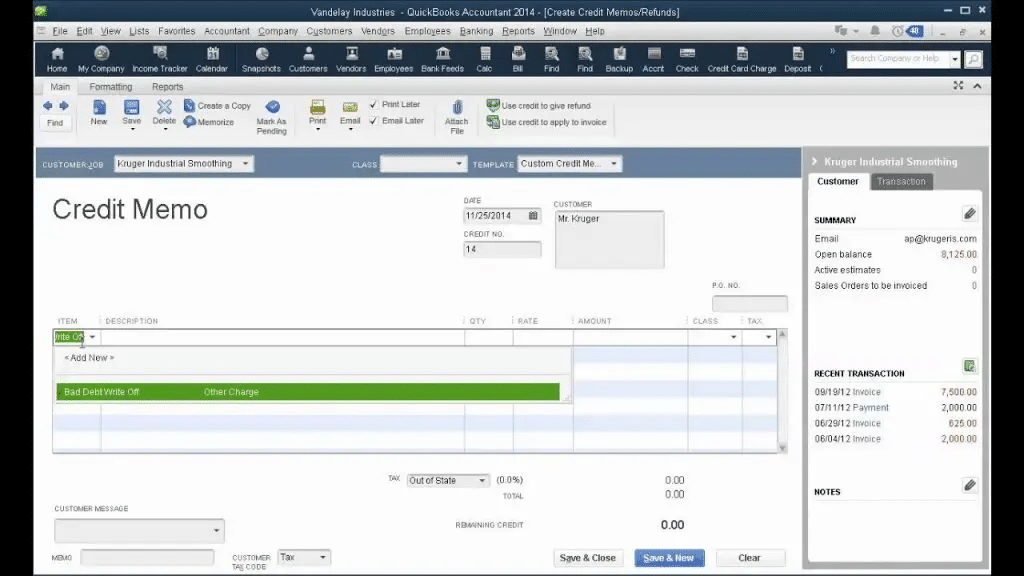
Step 2: Closing Out the Unpaid Invoices
Under this step, the user is supposed to open Customers menu and go for Receive Payments
Once done with that the user should enter in the customer’s name in the Received from field
After that, in Payment amount space type in $0.00 and go for Discounts and credits.
The next step is to enter in the value that is to be written off in the amount of Discount field
After that, for Discount Account, choose the account you added in the previous step, and press Done.
Steps to Write Off Invoices in QuickBooks Online Accountant
You can handle the invoices that you can’t collect with tools to how to write off an invoice in QuickBooks online. QuickBooks on its own applies discounts to zero-out bad invoices and further posts them to the write-off account. This balances both the accounts receivables and expense account. The clients can manually write off bad invoices too. Here is how to write off invoices in QuickBooks online.
Move to the Accountant Tools and further choose Write off invoices
The next step is to set the invoice age, to date, and balance less than filters.
You now have to choose Find invoices.
Also, review the name in the customer column.
Choose the checkboxes for the invoices you want to write off.
And also, go for the write off option.
After that, in the account ▼ dropdown, you need to choose the account you use for bad debts.
And also click on Apply tab.
Also, note that you do not need to enter your closing date password in case you are writing off invoices dated before your closing date. This is how do you write off an invoice in QuickBooks, hope this works for you.
This drives us to the end of this article where we hope that the reader might be successfully able to write off bad debts in QuickBooks. If in case there is any query or if the user needs our assistance at any point of time, then getting in touch with our QuickBooks support team is all that we suggest. Give us a call at +1-888-510-9198, and let our experts handle the issue for you and help you in writing off bad debts successfully in QuickBooks.
FAQs Related to Write off Bad Debts in QuickBooks
How Do I write off an amount in QuickBooks Desktop?
You can write off an amount using the steps below: 1. From the vendors menu, choose pay bills 2. After that, pick the bill that has the balance that you need to write off. 3. Now, choose set discount. 4. Once done with that, choose discount tab and further enter the amount in the amount of discount field. 5. You now have to choose pay selected bills to close the pay bills windows. 6. Choose done in the payment summary window.
How do I write off in QuickBooks online?
Your clients can manually write off their bad invoices. 1. Move to the accountant tools and choose write-off invoices. 2. Set the invoice age, to date, and balance less than filters. 3. Select Find invoices. 4. Review the name in the customer column. 5. Choose the checkboxes for the invoices you want to write off. 6. The last step is to choose write-off.
How do you account for bad debt write off?
The direct write-off method usually takes place after the account receivable is recorded. You must further credit the accounts receivable and debit the bad debts to write it off.