Learn the updated QuickBooks ProAdvisor program, membership, training and certification
What is QuickBooks ProAdvisors? What actually they do? And why the users need it? Well, these questions commonly arise in the minds of QuickBooks users. If you have similar questions, then you have landed in the right place. Today, we will be discussing each and every aspect associated with QuickBooks ProAdvisors, just like the ProAdvisor program, membership, training, certification, and many other things.
Thus, stay tuned with the article and explore further. Or you can also get in touch with our QuickBooks consulting team at our toll-free number .i.e. +1-888-510-9198, and they will clear all your clouds of confusion.
What do you mean by QuickBooks ProAdvisors?
Basically, QuickBooks ProAdvisors are an accountant, a bookkeeper, or a CPA, who generally have a certification and along with that offers a large variety of services which includes, accounting, tax and financial planning, computer consulting, bookkeeping, etc. After exploring and analyzing the exact position of the business and also what is required for reaching on top, the QuickBooks ProAdvisors provide the strategic tools. In simple words, it can be said that QuickBooks ProAdvisors are there to assist the businesses in improving the accounting and bookkeeping management of the business, with the ultimate goal to increase the growth of the business.
Coming to the QuickBooks ProAdvisor Program, it can be said that it is a program that enables the experts in accounting and bookkeeping to provide expert advice and suggestions with the best tools and strategic methods. This program comprises of software, tools, and resources for all the accountants and the bookkeeper. It has almost everything that the user required for supporting the QuickBooks clients and improve their practice.
This program allows the accounting professionals to augment their skills, as well as improve the growth of their firm, and also to become an expert by providing certain benefits, such as strategic marketing tools, customer care, training, and also the product discounts. Many QuickBooks users wish to take the membership of this ProAdvisor Program, as it offers amazing benefits. Let us have a look at the benefits of this program:
Benefits of QuickBooks ProAdvisor program membership
Checkout the benefits of ProAdvisor program membership of QuickBooks:
1. QuickBooks Online Accountant
This is a platform provided for all the accountants and QuickBooks users, where they can manage as well as practice their accounting skills under one roof. This is especially designed to enhance the accounting skills and the business. It is an all-in-one portal, that keeps the Desktop, as well as the Online benefits with each other under a single roof.
The features of QuickBooks Online Accountant include:
Regardless of the location, QuickBooks users can get Certification Courses from QuickBooks ProAdvisors. It should be noted that all the memberships come up with certification courses, where one can make the best of use of one’s knowledge and also earn CPE credits. Free memberships provide QuickBooks Online certifications, whereas the deluxe and the Premium memberships add certifications for Desktop Software.
The user can also access the certification page in QuickBooks Online simply by selecting ProAdvisor in the left-hand navigation menu, followed by clicking on certification.
3. Find a ProAdvisor listing
Each and every version of this program includes a listing on the Find a ProAdvisor site, which is a directory of accounting professionals used by countless businesses to find and connect with the ProAdvisors. If the user completes at least one current certification, the user will be eligible to publish their own profile so that the prospective clients is able to discover the QuickBooks user.
Every ProAdvisor membership comprises of infinite access to chat and also phone support. While the support is convenient to all the ProAdvisors, completing the certification courses makes you eligible for much better support from some of the experts.
5. Rise according to the Rank
In the process of becoming a ProAdvisor, the user can avail numerous benefits. This generally depends on the points, which means the number of points that they have earned. These points will help the user to become a ProAdvisor.
Marketing Tools
Silver
0-199
points
Gold
200-799
points
Platinum
800-1,599
points
Elite
1,600+points
In Find-a-ProAdvisor Directory list
✔️
✔️
✔️
✔️
Constant contact Email marketing tool
✔️
✔️
✔️
✔️
Squarespace website builder
15%
20%
25%
30%
Intuit Marketing Hub
✔️
✔️
✔️
✔️
QuickBooks ProAdvisor merchandise store
✔️
✔️
✔️
Product
Support
Chat and phone support
✔️
✔️
✔️
✔️
Priority Chat and phone support
✔️
✔️
Training
Online certification and training
✔️
✔️
✔️
✔️
In-the-know webinars
✔️
✔️
✔️
Professional QuickBooks online training for your clients
Complete advanced certification is there for
QuickBooks online.
Intuit has launched Redesigned QuickBooks ProAdvisor
As the recent press release by Intuit, it has launched a redesigned QuickBooks ProAdvisor that provides further support to the accountants and bookkeepers. This program not only offers customer support, training, and software discounts, but also it offers plentiful other benefits such as:
In order to display their expertise, QuickBooks users can access gold, silver, or Elite membership.
There are guides obtainable, along with templates and other marketing resources of the new Intuit Marketing Hub, that can be accessed only by a ProAdvisor.
Also, in this program, there are a few grow your practice workshops and masterclasses that might assist in improving the business.
Special discounts are also available for the ProAdvisors who want a deeper connection with the clients.
QuickBooks Advanced Certification and its importance
It should be noted that all the QuickBooks Advanced Certified ProAdvisors are required to complete 9 CPE credits of Advanced Continuing Education (ACE) approved training. The above mentioned thing is to be completed within 3 years of getting the certification. Thus, after every 3 years, the QuickBooks users will have to again earn 9 CPE credits. The reasons why anyone should attend QuickBooks Advanced Certification include:
By attending this, the user becomes a professional by acquiring in-depth knowledge of QuickBooks online.
The user also obtains the Advanced Certified ProAdvisor status and be awarded by a certificate and a logo.
Below we have shared a list of membership type with their benefits and description.
Membership Type
Price
Benefits
Description
Free
Free
QuickBooks Online Accountant (QBOA) with a free set of books for your company, Client file management tools, Practice management tools, Technical support, Free online payroll subscription, QuickBooks online certification courses
Adds Desktop accountant and everything you need to support Pro and Premier desktop clients.
Deluxe
$349
per year
It includes everything from the free membership. Also comes with:
QuickBooks accountant desktop, Technical support, Certification courses for QuickBooks desktop, Discounts for Pro and Premier software
Adds Desktop accountant and everything you need to support Pro and Premier desktop
Premium
$549
Per Year
This plan includes everything from the free membership deluxe membership, also it comes with:
QuickBooks point of sale, QuickBooks enterprise solutions, QuickBooks for Mac, Free technical support, Certificate courses for enterprise and point of sale, You will get discounts for variety of QuickBooks products.
Adds Desktop accountant and everything you need to support Pro and Premier desktop
Add-ons (Deluxe and Premium)
Price
Benefits
Description
Enhanced Payroll for Accountants with ProAdvisor discounts
$249
Per Year
You can run your payroll in QuickBooks desktop for up-to 50EIN’s, You can also access all variants federal and state forms
Run Payroll for your desktop clients at a sharp discount
Steps to download the software?
Downloading the QuickBooks ProAdvisor software doesn’t involve any rocket science. It is simple procedure, all you need to do is follow some simple steps:
With this we come to the end of this article. Continuing the QuickBooks ProAdvisor practice is a sign of smart entrepreneurs, as this improves business growth at large. I end this post here, with the hope that it might work in your favor. If you want further discussion on this topic, or if you have any query, you can dial our toll-free number .i.e. +1-888-510-9198, and talk to our certified QuickBooks online support executives and QuickBooks professionals.
FAQs Related to QuickBooks ProAdvisor Program
Can Anyone Become a QuickBooks ProAdvisor?
Yes, anyone can become a ProAdvisor, as long as he/she is willing to prepare for and pass the exam. In case you are an accountant or bookkeeper, then becoming a ProAdvisor is something suggested, as it would further help in advancing the career and obtain QuickBooks benefits.
How to become a QuickBooks ProAdvisor?
In order to become a ProAdvisor, you must first sign up for QuickBooks online accountant and further study for and pass the certification exam. You need to score 80 percent or higher in order to pass the exam.
Is there a fee to obtain a QuickBooks ProAdvisor Certification?
No, obtaining QuickBooks online ProAdvisor certification is free. All you need is to sign up for a free QuickBooks online accountant subscription, and study the training materials to pass the exam.
Will my QuickBooks certification expire?
Yes, it will, the expiration of the certificate depends upon the type of certification you hold. QuickBooks online ProAdvisors need to recertify by June 30 each year, in order to maintain their certifications.
Comprehensive Guide to merge Vendors in QuickBooks
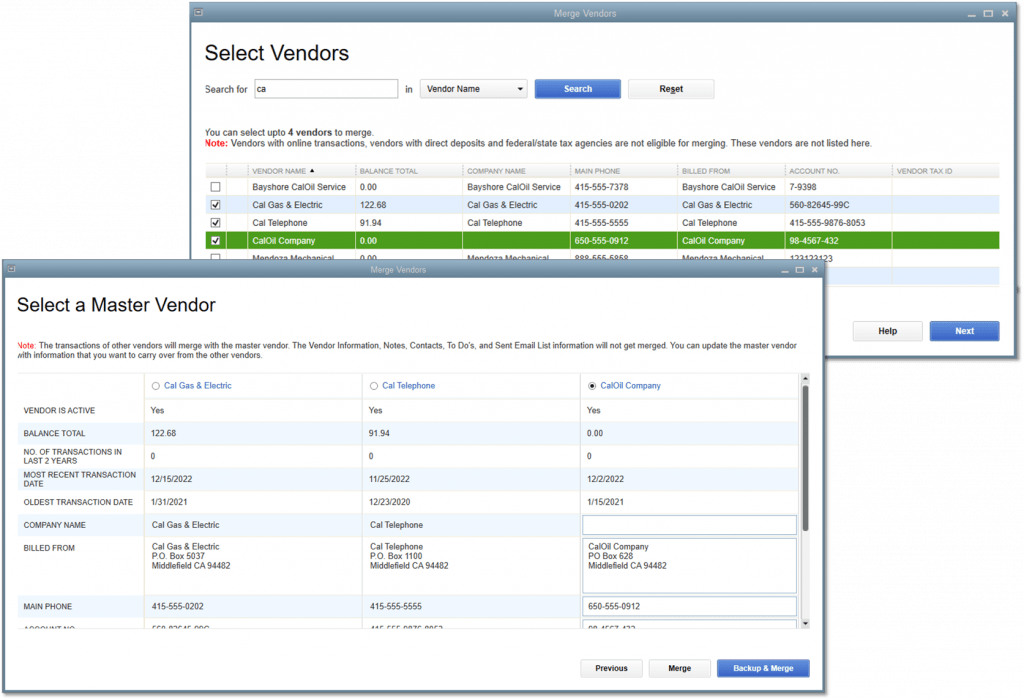
QuickBooks accounting software is packed with features and functionalities loved by entrepreneurs all across the globe. This software comes with manifold constructive features, and one such feature is allowing the users to merge vendors. As per the latest feature of QuickBooks, the user can merge up to four vendors at a time with much ease.
We have come up with this blog with an aim to answer some of the most commonly asked questions such as: Can I merge Vendors in QuickBooks? How many vendors can be merged in QuickBooks? How to merge vendors in QuickBooks Online? What do you mean by merging vendors in QuickBooks? If you are also having any such query, then stay tuned with the article and clear all your clouds of confusion. However, for expert assistance, you can also reach out to our QuickBooks support team by dialing our toll-free number .i.e. +1-888-510-9198.
Many QuickBooks users doubt whether it is possible to merge vendors or not. Well, it is very much possible to merge vendors in QuickBooks. The process of merging vendors permits the users to consolidate all the transactions. The best part is that the users are not required to enter the transactions over and over again, one after the other. The merging process basically deletes one vendor and at the same time, reassigns the entire relevant data to the other vendor. You cannot make any changes after performing the above steps. This means that everything is permanent, from deletion of one vendor to transfer of the data to another.
Points to remember before beginning with the merging procedure
Well, before you begin with the merging procedure, it is better to update yourself with certain pointers that you should definitely keep in mind. To make it easier for you, we have jotted down a few of them:
Always ensure that you are in single-user mode, and if by any chance you are using the multi-user mode, then don’t think much simply switch to the single-user mode.
The next point that requires your attention is to turn off the Multi-currency feature.
Ensure that he/she is not merging paid through online banking vendors, tax authorities vendors, and also the direct deposit vendors.
Another matter to be considered is that the merging process can’t be reversed once performed. Thus, double-check before merging the vendors and ensure that you are merging the accounts that really need to be merged.
Why do you need to merge vendors in QuickBooks Desktop?
Merging vendors in QuickBooks gives an extra edge to business, as it resolves the issue of duplicacy. When you merge vendors in QuickBooks, it simply lets you combine transactions. The users need not to add the transactions, again and again, one after one. Merging vendors means that you delete a vendor and at the same time, assign the entire data that is relevant to other vendors. After all the steps are done, the process cannot be reversed. This indicates that the merger process is permanent same as the deletion of one vendor’s data.
Merge Vendors in QuickBooks Desktop
You can avail of QuickBooks merge vendors feature using the steps below.
Initially, in your QuickBooks account, head to the Vendor Center and choose vendors.
After that note the vendor that you want to merge.
The next step is to find the vendor that needs merging and also right-click on it.
The user will then have to choose the edit tab and add the name of the vendor with whom you wish to merge it.
The last step is to choose the ok tab and then after the confirmation screen shows up, choose the Yes tab.
There can be two alternatives, one for the QuickBooks Desktop Accountant Edition: In this, the user has to visit the Accountant menu and then select the Client Data Review, followed by visiting the Merge Vendors option
For QuickBooks Desktop Enterprise, the user has to visit the company menu and then select the Accounting tools, followed by visiting the merge vendors option.
Moving ahead, in the merge vendors window, select the vendors to be merged, and then tap on the Next option.
Now, select the Master Vendor option and then click on the Merge option
The last step is, on the confirmation prompt Yes, on the Merge Complete Window, the user is required to select the OK option.
Merging vendors in QuickBooks Desktop 2018 and below
The very first step is to select the Vendors menu and then opt for the Vendor Center.
Moving ahead, right-click on the Vendor’s name to keep, followed by selecting Edit Vendor.
Now, the next step is to copy the vendor’s name.
After that, tap on the Cancel option to return to the vendor center.
After following the above steps, right-click on the vendor’s name to merge. And further, choose the Edit Vendor.
In the next step, the user needs to replace the vendor name with one copied.
After that choose the OK option.
The last step is to tap on the Yes option, at the time when a prompt is displayed to proceed to merge.
With this, we come to the end of this article, with the hope that this article might be helpful to you in any manner. By following the above-scribbled steps, the user can easily merge vendors in QuickBooks.
Use the Merge Vendors tool in Accountant and Enterprise Editions
In the QuickBooks desktop accountant edition, you need to first go to the accountant menu.
After that, choose client data review, and further click on merge vendors.
For QuickBooks desktop enterprise, move to the company menu, choose accounting tools, and then merge vendors.
Once done with that, choose the vendors you want to merge and choose the next tab.
The next step is to choose a primary vendor and click on merge.
The last step is to choose yes to merge the vendors and further hit the ok tab.
However, if you are finding difficulty in merging vendors, even after following the above steps, then all you need to do is dial our toll-free number .i.e. +1-888-510-9198. And our QuickBooks accounting and bookkeeping experts and highly qualified professionals will be there to assist you in a single call. Do not hesitate to call our technicians anytime, as they remain active round the clock to provide the best possible services to our clients.
FAQs Related to Merge Vendors in QuickBooks
How do I merge two clients in QuickBooks?
In order to merge duplicate clients, you need to sign in to QuickBooks online accountant as an admin. You further needs to choose the gear icon and merge duplicate clients. And choose get started.
Can you merge accounts in QuickBooks?
Yes, you can merge two accounts in QuickBooks online by simply selecting the accounts that you want to merge. And further specify which account you want to keep and which account you wish to delete.
What accounts Cannot be merged in QuickBooks?
QuickBooks makes use of some accounts as the default for certain features. These, like accounts connected to online banking, cannot be merged or deleted. In case you are merging accounts that have reconciliation reports, then save those reports first. The account being merged may not keep the reconciliation history.
Why do we merge an account in QuickBooks?
Just in case you have duplicate accounts, customers, or vendors, you can simply merge them. This further moves all the data into the one you want to keep and also makes the duplicate one inactive.
Unleash the new features and improvements in QuickBooks Desktop 2020
QuickBooks has created a huge buzz around the corners of the world. In a very short span of time, this accounting software has covered a broader market place. And owing to its popularity and augmented utilization, Intuit and its developers are always indulged in updating it to a greater extent, in order to perk up its credibility. Each year, QuickBooks users and entrepreneurs eagerly wait for the latest update for QuickBooks desktop.
The most awaited QuickBooks update got released on September 16th, 2019 i.e. QuickBooks desktop 2020. Every entrepreneur as well as QuickBooks professional had an eye for the features and improvements that would roll in with this update of QuickBooks. Technology comes with a price, and in case of QuickBooks it is the errors. But ironically, it is the technology itself in the forms of updates that comes to the rescue when the QB user is almost about to drown in the pool of errors.
Update often open a new chapter in the book of innovation for the end user. And so has happened with QuickBooks and its latest update. QuickBooks desktop 2020 has been recently released by Intuit, and over the next few days or weeks, a notification would be provided to the QuickBooks ProAdvisors, Enterprise Users, and other users regarding the availability of the initial release of the software and soon this software will appear on retailers’ shelves.
If you want to know what this software update has got for you, then take out some time from your busy schedule and read this article once. For expert assistance, call us at +1-888-510-9198, and enjoy seamless QuickBooks desktop support round the clock.
What are the latest features in QuickBooks Desktop 2020?
Features that rolled in with QuickBooks Desktop Pro, Premier, and Accountant 2020
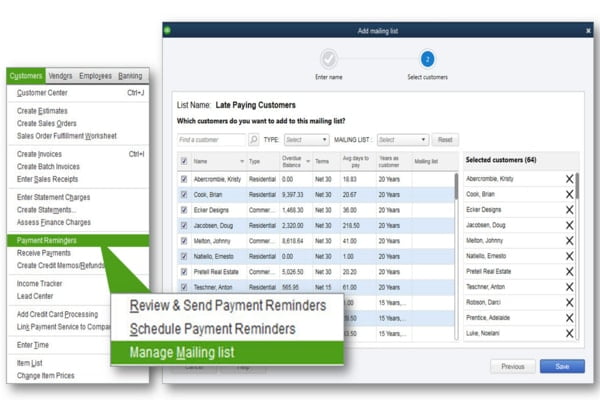
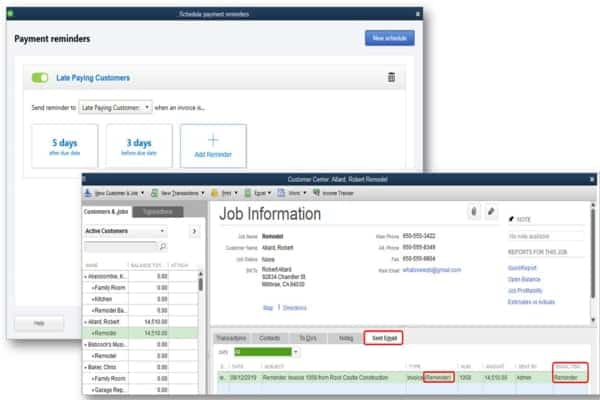
1. Automated payment reminders
Managing accounts receivables, payment reminder, composing mail, identifying overdue, etc, can consume a lot of time. The automated payment reminders feature in QuickBooks 2020 eliminates the time that the users used to spend in chasing the outstanding payments, as this feature permits the QuickBooks software to automatically generate the reminder emails. The content that each email should contain can be easily tailored and controlled by the users. This means that the user can easily customize the message to be sent to specific customers. Also, this feature offers an opportunity to review the entire content before it is sent in just a few clicks. Along with that, the QuickBooks users can now schedule the reminders in advance. And the software will provide the user with a prompt whenever it would be time to send the mails.
Another point that adds up in this feature is that the users can schedule the reminder based on the number of days the invoices are late.
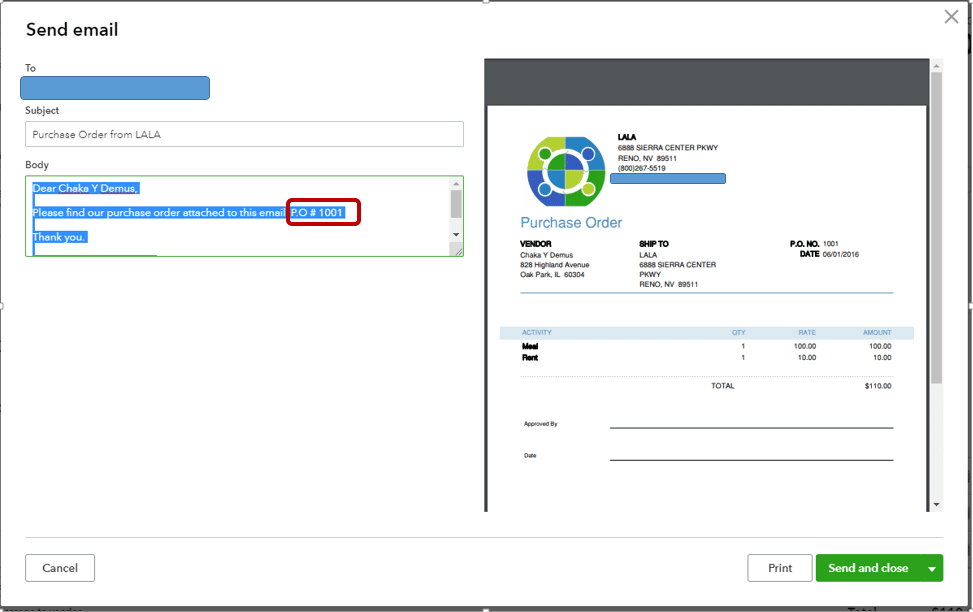
2. Adding the customer’s purchase order number to the subject line of the email
Another feature that has successfully made to the feature list in QuickBooks 2020 is adding the customer’s purchase order number in the subject of the email. There is now an option to add the customer’s purchase order number to the email’s subject which is supposed to be sent to the customer with the invoice attached. What makes this feature attractive is that it permits the customers to search their email by purchase order number, and there is no need to open up each attachment individually.
In order to explore this feature, the QuickBooks users are required to follow the steps below:
Visit the menu bar
After choose Edit
Then opt for preferences option
The next step is to select the send forms option
And lastly hit the company option in the list.
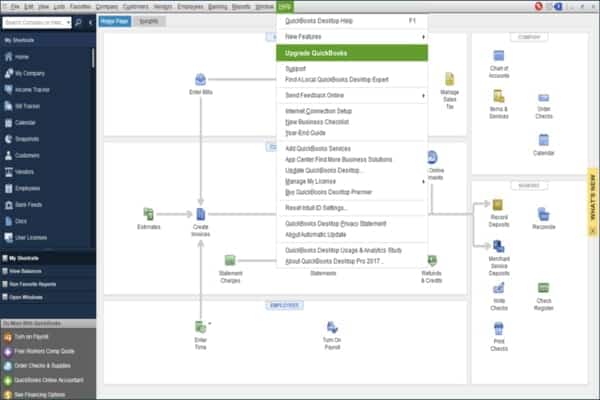
3. Improvisation in QuickBooks Version Up-gradation
The third feature that could be seen in this new update of QuickBooks is that now upgrading the software has become much simpler than earlier. A large number of improvisations could be seen in the up-gradation of QuickBooks version. This newly introduced feature in QuickBooks desktop 2020 has largely reduced the number of actions that the users were supposed to take, in order to upgrade their product. Talking about, how this feature is beneficial, then it is analyzed that this features allows the users to save much of their time in upgrading their software to the newest version.
Accessible in- QuickBooks desktop pro, Premier 2017 and in newer, along with that it is available in Pro and Premier Plus 2017, and Enterprise 17.0 But the catch here is that, this feature will be offered automatically when the latest update would be released.
How to access this feature?
To avail this feature, the QuickBooks desktop pro, Premier 2017 or newer users can visit the Menu bar, followed by picking up the Help > upgrade QuickBooks options respectively.
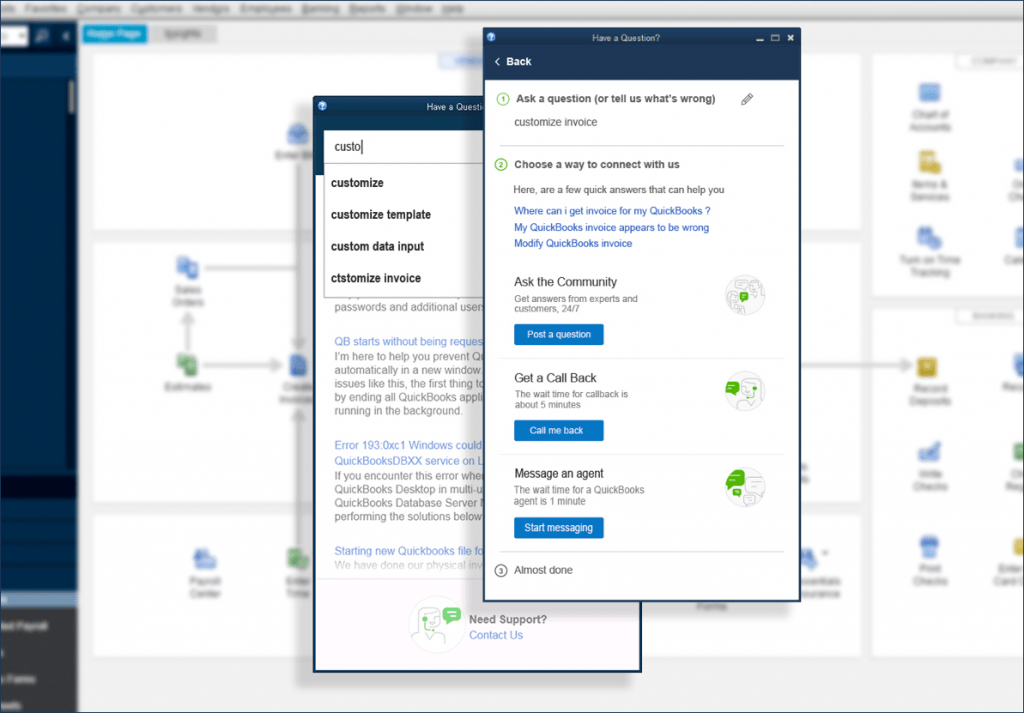
The next feature that adds life in this version of QuickBooks is enhanced smart help. The user can simply press F1 for much more advanced help content and search experience, or also for accessing the live experts via messaging and calling back options. This feature adds to the flexibility of help via searchable content that too within the software. In simple words, using this feature within the software, the users are directed to Intuit help content, request for a live call back, community content, and the enterprise users get a special access to the Chat support.
Accessible in – QuickBooks desktop pro, Premier, Accountant 2017 or newer version, and Also Enterprise 17.0 or newer
How to access this feature?
In order to utilize this newly introduced feature, the QuickBooks users can select the F1 key at the time when the QuickBooks file is open, or from the menu bar, then can choose the help option, followed by clicking on to QuickBooks desktop help option.
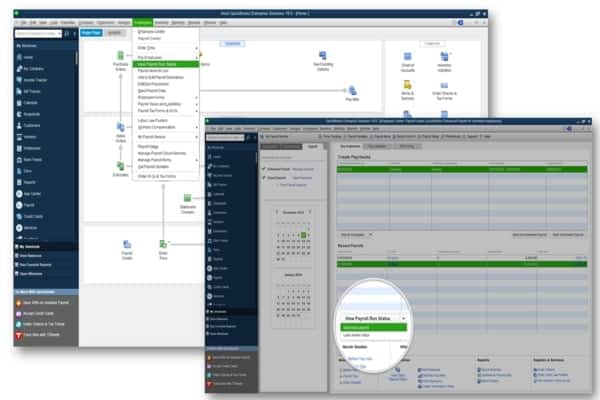
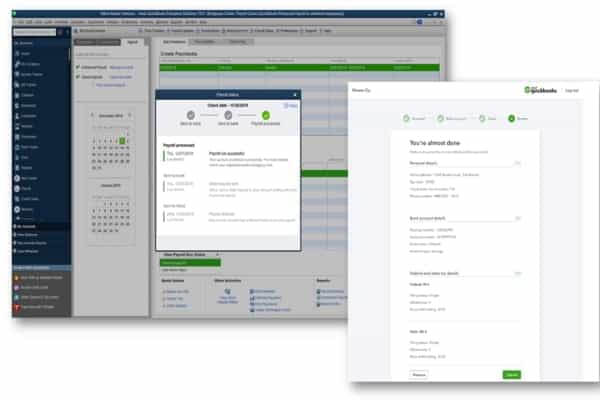
5. Payroll status for direct deposit
Now the QuickBooks users can be much more confident of their payroll run, by simply analyzing the detailed status of direct deposit payroll run. The best part is that, now the users are not required to check the emails or calling support. This feature allows the business owners who opt for direct payment to the employees, to spot their status of the transaction without any hassle.
Accessible in- QuickBooks Pro, Premier, Accountant 2020, as well as in Enterprise 20.0
How to access this feature?
The simple steps to enjoy this feature in QuickBooks desktop 2020 version is to visit the menu bar, look for ‘Employees’ option and select the same. And the an option stating view payroll run status will be visible on the screen, simply select the option and you are good to go.
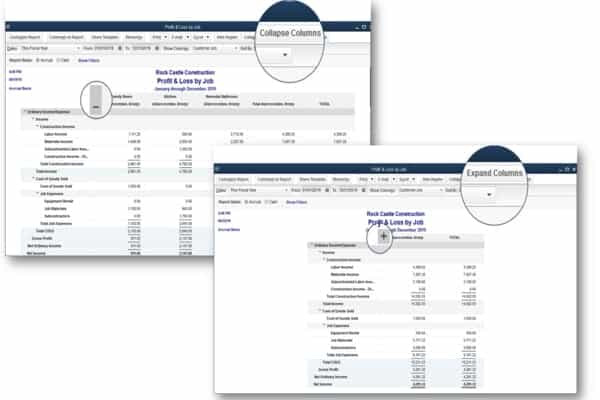
6. Newly introduced! Horizontally collapsible columns in job or class reports
With this new feature, the users can easily hide or unhide multiple columns of data in a displayed QuickBooks report with manifold columns. With this feature, it is possible for the QuickBooks users to avoid exporting lengthy reports to excel for customizing the columns that are to be displayed. This feature also offers improved navigation of customer summary details, which means less time consumed in scrolling through the exports or lengthy reports. Not only this, but this feature also saves time by smoothly and swiftly displaying the customer information that the user is looking for.
Accessible in- QuickBooks desktop pro, Premier, Accountant 2020, and also in Enterprise 20.0
How to access this feature?
In order to explore this feature, the users are required to choose the collapse columns button on the top right for the displayed multi-column report. Once done with that, opt for minus or plus options or + & – symbols, for expanding or collapsing the specific set of the columns respectively, as per the requirement of the user.
7. Resetting Admin password becomes easier with QuickBooks 2020
Earlier QuickBooks users faced difficulty in resetting the admin password, whereas with the advent of QuickBooks desktop 2020, the process of resetting the admin password got simplified. With this feature, it has become easier to reset the admin password, as the user is not required to fill in the long list of information in order to prove the ownership. All they need to do is just pick up the email id from the list and then they will be provided with an OTP, and then all you need to do is to enter the OTP for resetting the password.
How to access this feature?
The user is required to select the option stating I forgot my password, in the company’s login window.
Followed by selecting the mail id that would available in the drop down list and then hit Next.
The user will then receive an OTP through mail, in order to reset the password. If by any chance or for any reason, the user is not getting the mail id in the drop-down list, then the user is required to follow the on-screen prompts.
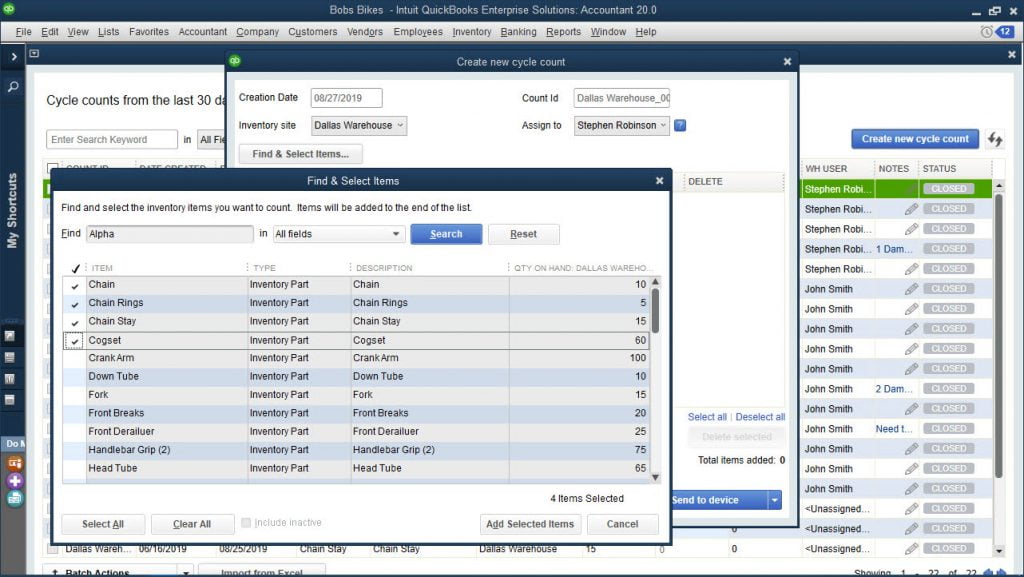
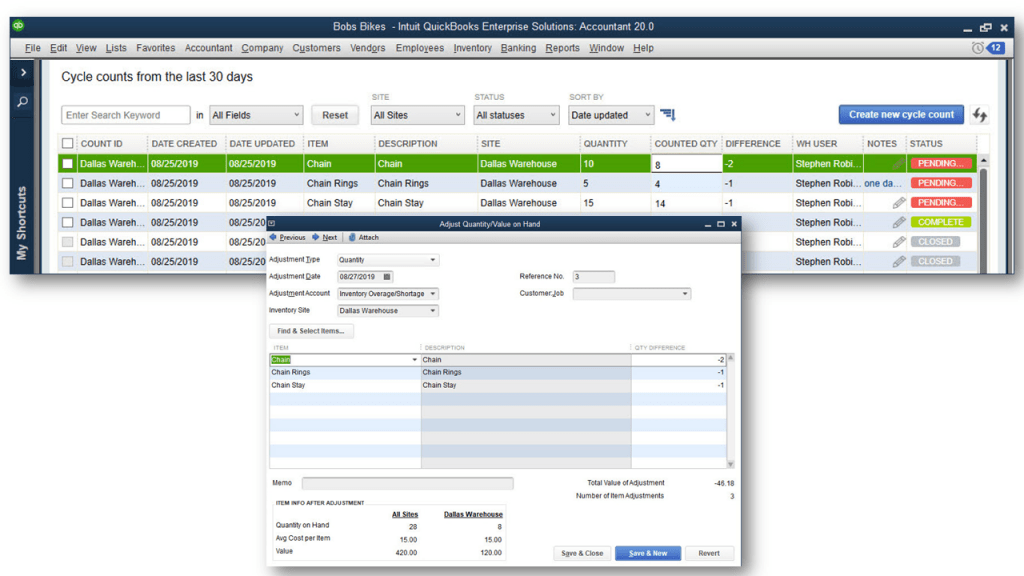
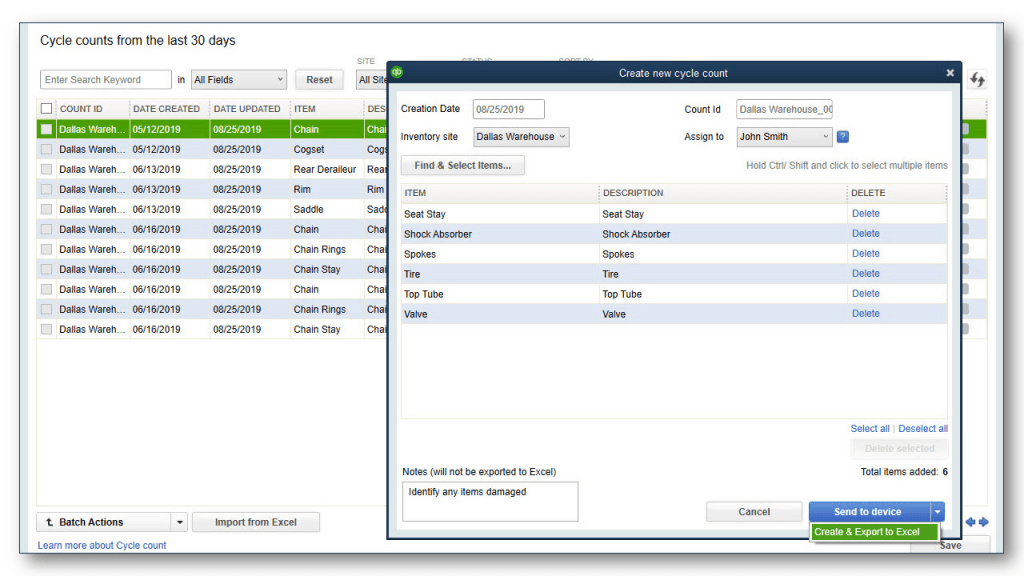
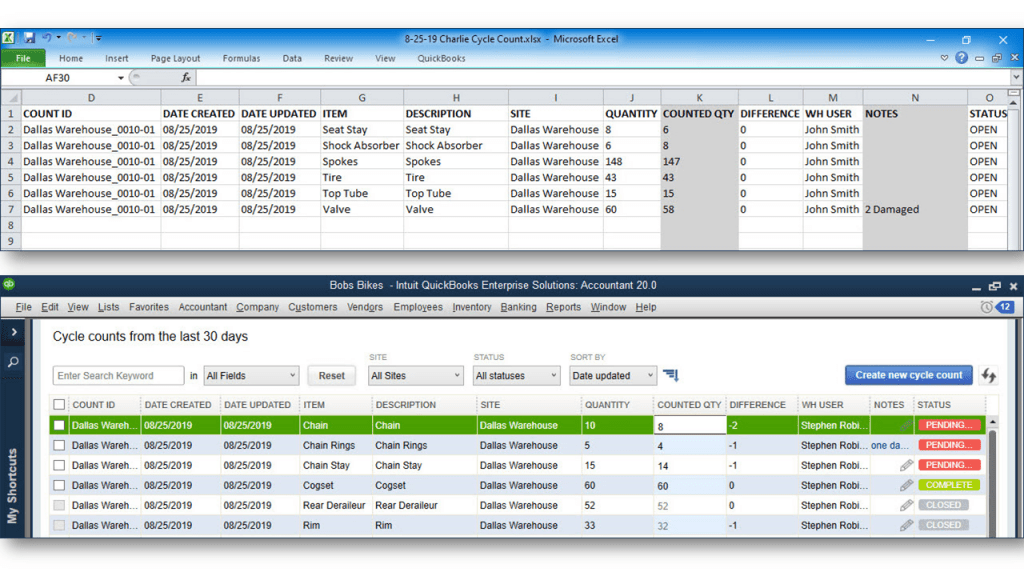
The most constructive feature that is introduced in this latest update of QuickBooks is the inventory cycle count. Cycle counting in QuickBooks enterprise adds bonus inventory management efficiencies based on the amount of inventory that a company is supposed to manage. This feature has largely attracted many QuickBooks users. Basically, cycle counting is a small subset of the inventory products that are in stock at present, and in contrast to a traditional physical count of inventory, where the operations are halted to count all the inventory items in stock. It should be noted that the cycle counts are not as much of troublesome to daily operations, providing an ongoing measure of inventory accuracy. Along with that, it can be customized to the specific high value inventory items. This feature adds to the new management efficiencies at large.
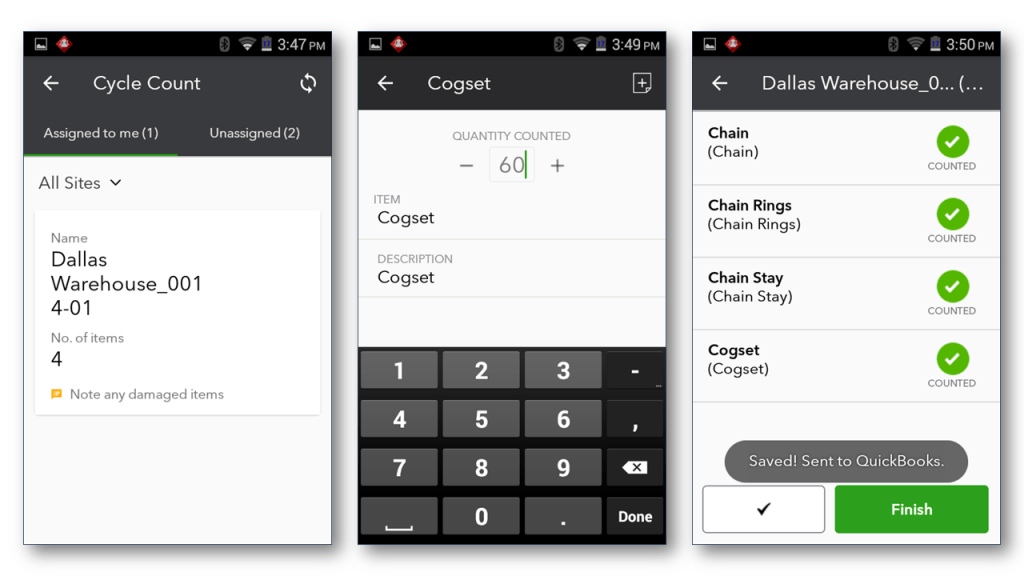
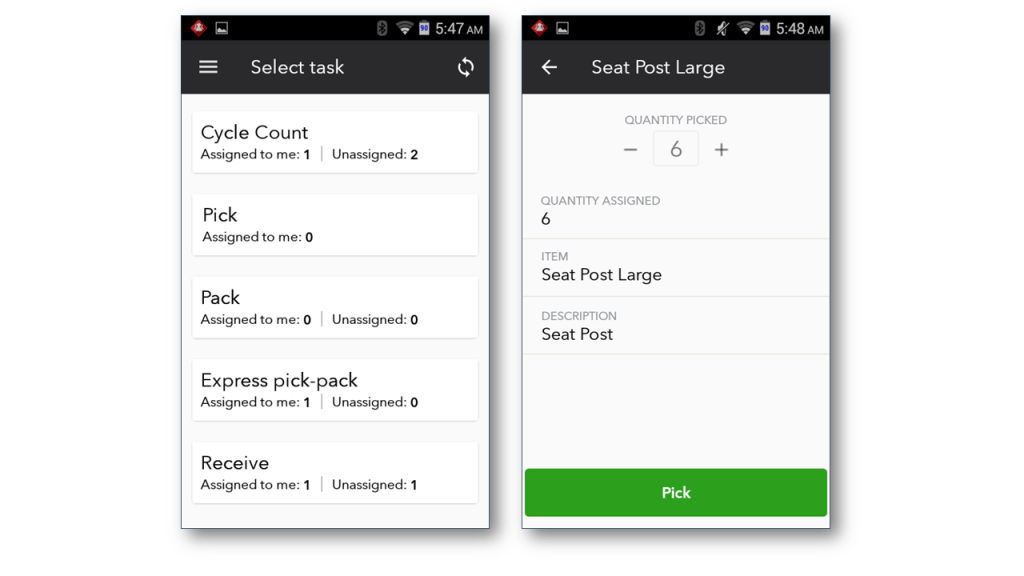
Inventory cycle count work-flow summary with advanced inventory can be prepared using a mobile scanning device:
The QuickBooks enterprise users can craft a Cycle count by merely selecting the inventory items.
After that the selected items are to be sent to the connected mobile device in the warehouse.
Then the warehouse user counts and scans the quantity on the device itself. Later on, the counted quantities are sent wirelessly to the Enterprise file individually for every item.
The Enterprise users are supposed to choose the counted items that are to be added to the automatically populated inventory adjustment transaction. Then the users are required to approve the details and then save that particular record.
After doing that, the QuickBooks enterprise user will mark the cycle count as closed.
Accessible in-QuickBooks desktop enterprise 19.0 maintenance release R3 or newer, gold, silver, or platinum subscriptions for using cycle counts with Microsoft excel.
How to access this feature?
In order to access this feature, the QuickBooks users are required to visit the menu bar and then choose the Inventory option, followed by picking up the cycle count option.
9. Inventory cycle count work-flow summary without Advanced Inventory
By selecting the inventory items, the enterprise user can craft a cycle count.
After that, the items that the user selected in the above step can be easily exported to Microsoft Excel worksheet from the cycle count window.
Also, the item floor counts that was selected can be updated in the Microsoft excel worksheet and then it can be imported into the Enterprise Cycle count window.
The enterprise user can choose the item that they need to add to the automatically populated inventory adjustment transaction. After which, the enterprise user will approve the details and saves the record.
At the end of the process, the user will be required to mark the cycle count as closed.
The list of newly introduced features in QuickBooks Pro, Premier, and Accountant doesn’t end over here. It includes other compelling features as well, such as:
Latest Features in QuickBooks Desktop Enterprise 20.0
Below we have provided some of the latest features of QuickBooks desktop enterprise 2020.
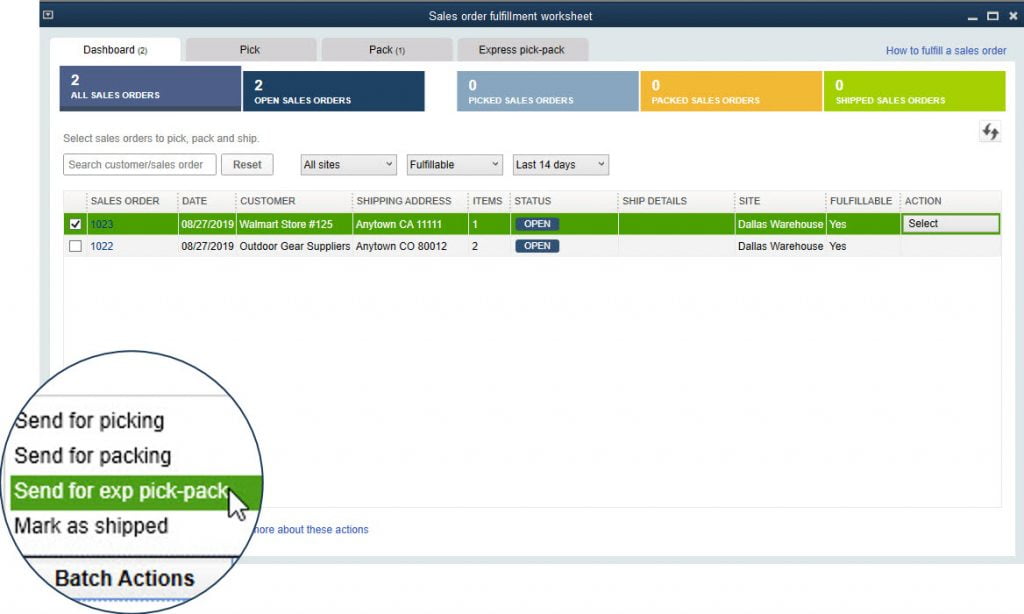
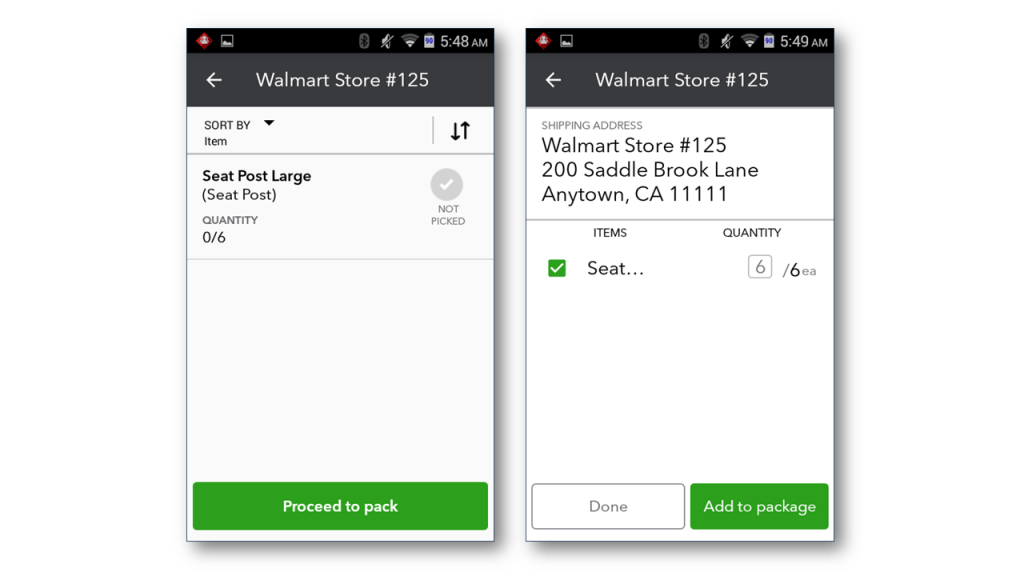
1. Express pick-pack
The express pick-pack feature helps in saving time in sales order worksheet fulfillment process, by simply consolidating the picker/packer roles, actions, and approvals. The entire process of Express pick-pack comes in a single task. Earlier the pick, pack, and ship sales order fulfillment, was done individually. But with the introduction of this feature, the QuickBooks users can complete the entire process as a single task.
How to access this feature?
In order to make the best use of this newly introduced feature, the QuickBooks users are required to follow the simple steps enumerated-below:
The very first step is to visit the File menu.
After that choose the Edit option.
Followed by selecting preferences tab.
Once done with that, the QuickBooks user is required to tap on the items and inventory option.
And then, move to the company preferences option.
Move ahead, by selecting the advanced inventory settings.
Followed by tapping on to the site operations option.
Then lastly select the Enable sales order fulfillment worksheet.
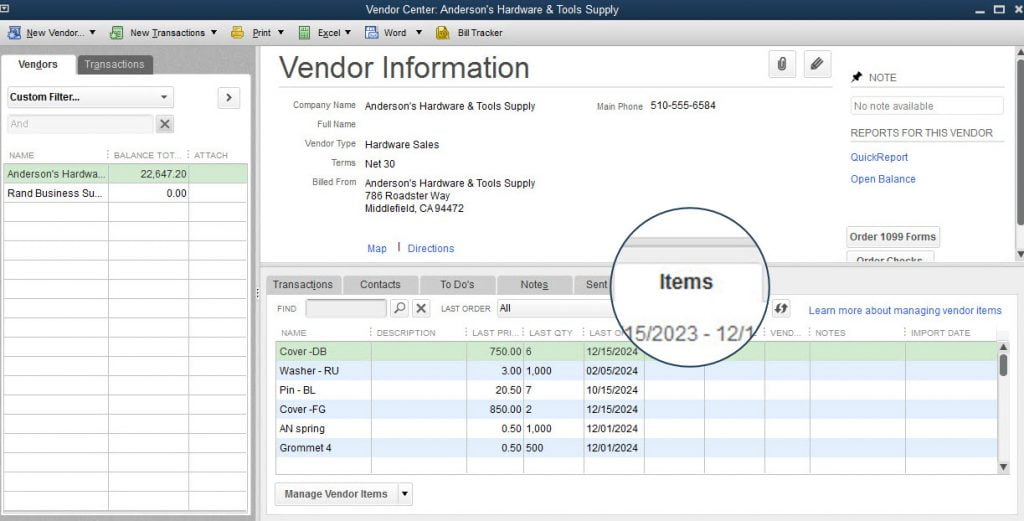
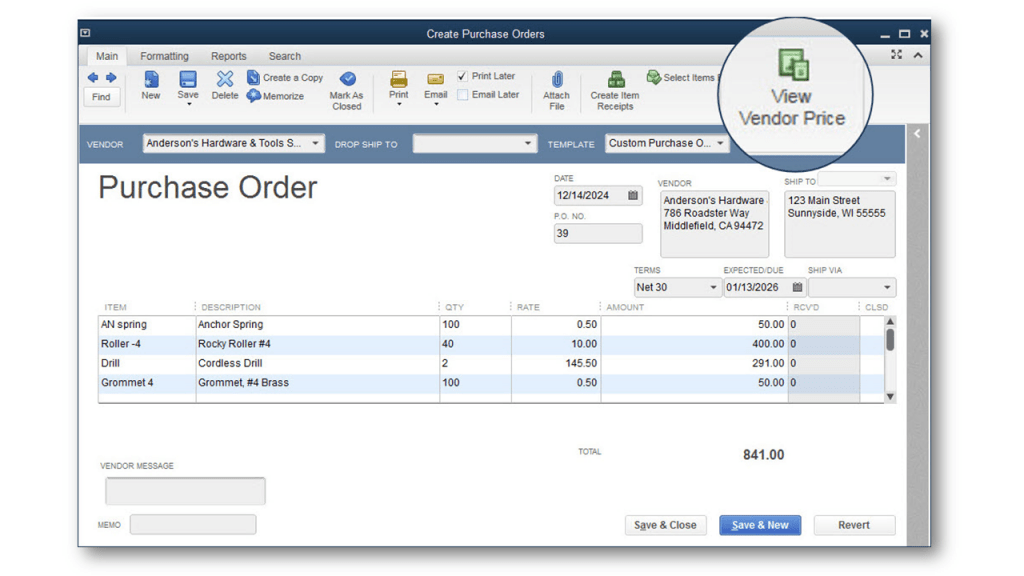
If you want to manage contact and cost data related vendor, then this feature can work wonders for you. This feature helps the users to make more informed purchase decisions. Along with that, the users can also craft the purchase order with vendor information that might be included in it in advance. The catch here is that the users are required to be very attentive while selecting the vendor. And they are required to select the right vendor in QuickBooks enterprise solution.
How to
access this feature?
The user is required to choose the vendor center and then tap on to the items tab, from the menu bar. This would help the users to utilize this amazing feature.
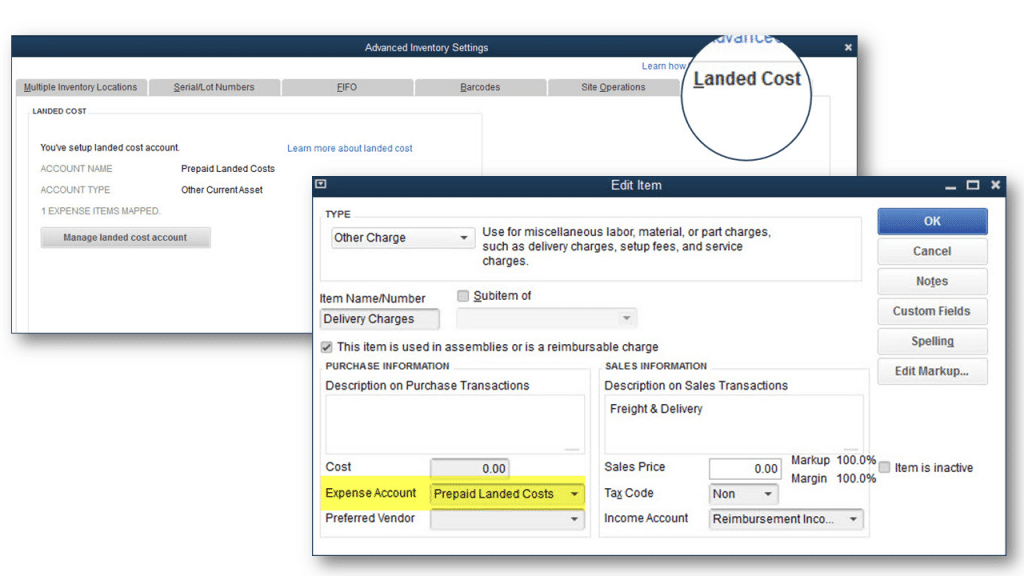
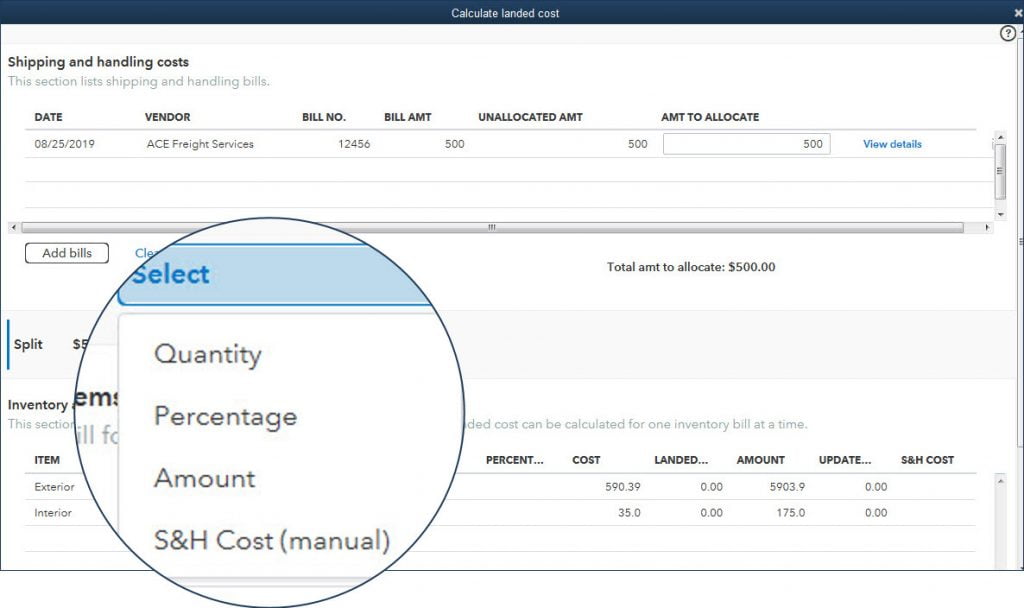
3. Landed cost
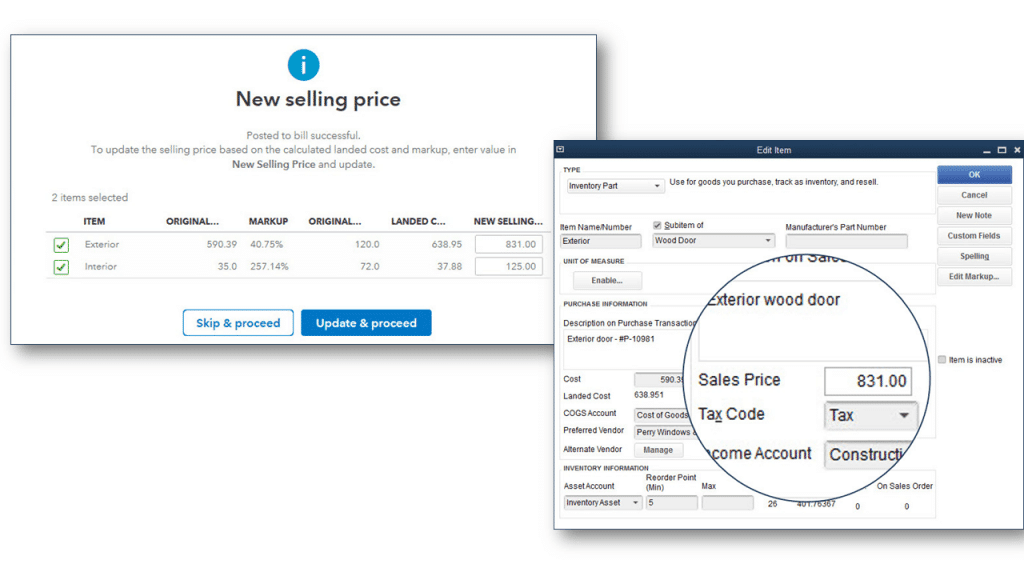
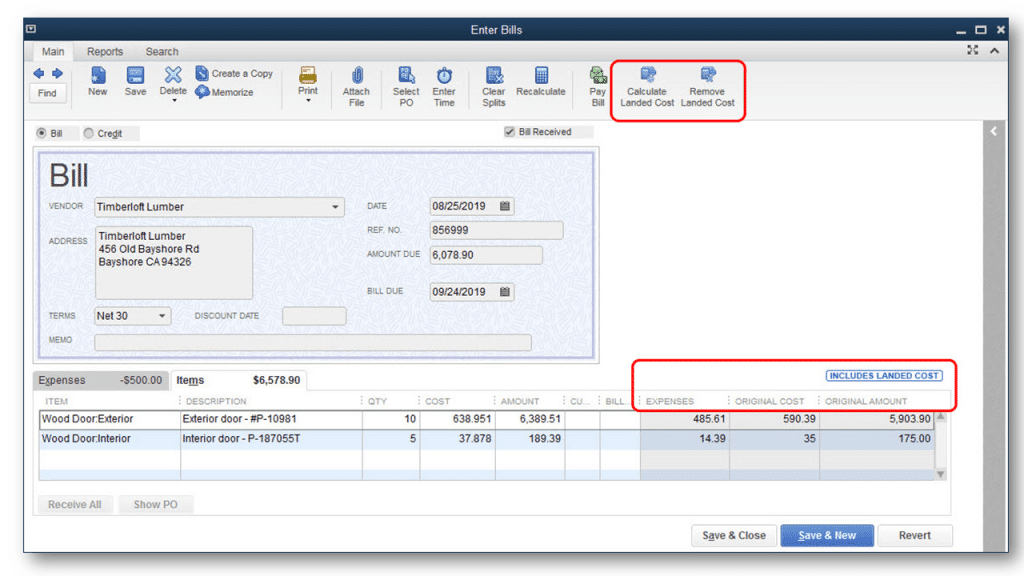
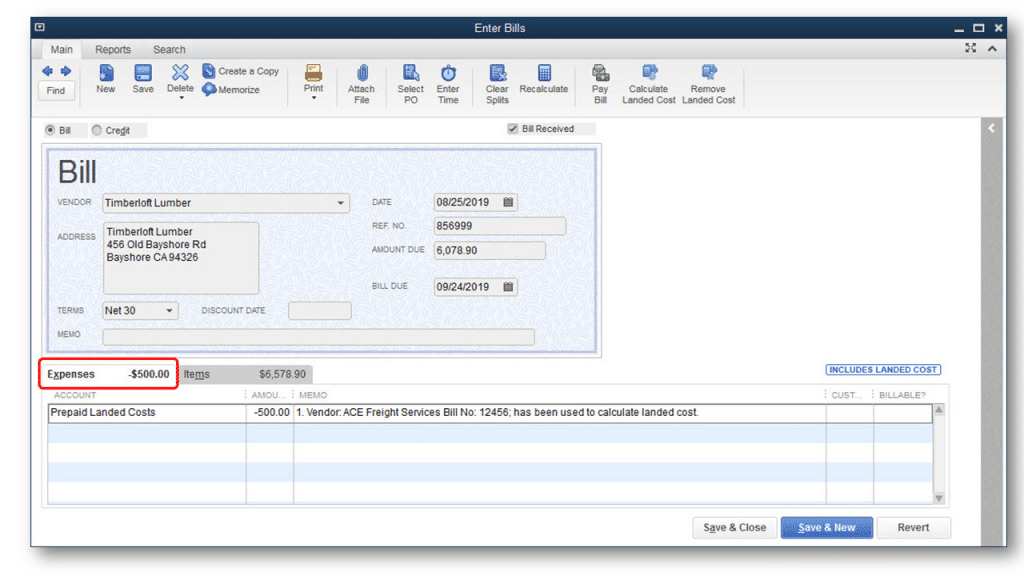
Another feature that could be seen in the new version is the landed cost feature. Basically, this feature displays the clarity in the actual cost of the product by factoring in duties, freight, duties, and other miscellaneous costs. The cost of obtaining the inventory stock consists of more than just the material costs of the items. The new landed cost feature enables the QuickBooks enterprises users to have a greater visibility into the overall costs of the product. Also, the cost is calculated here by quantity, value, weight, or volume.
Landed cost work-flow summary
In the landed cost work-flow summary, the Enterprise user will be needed to setup the Landed costs in advanced inventory preferences. Other current asset account is also created by this process. After that the user is required to select any other charge item types currently used for recording freight, duties, or import fees, and then the setup changes the currently assigned expense account in the item record defaults on its own, to this newly crafted other current asset account.
During the setup, the bills are entered for freight, duties, import fees and various additional product prices increasing the other current asset account created during the setup.
Moving ahead, the enterprise users will be required to select the freight bills that are to be allocated to the product costs and also the process for calculating the amount that is supposed to allocated, the choices would include: Quantity, Percentage, Amount or S&H Cost (Manual).
At the time when the allocations are picked, the QuickBooks enterprise users will be required to keep a check on the total product costs calculated by simply adding the landed costs to the default cist in the item record.
It should be noted that the Enterprise automates
the reduction of the other current asset account and at the same time it
augments the cost of goods sold account or the Inventory asset account.
Features introduced into QuickBooks Pro for Mac 2020
Following are the latest features of QuickBooks desktop Pro for MAC version.
1. Bounced check processing
The very first feature that is newly introduced in QuickBooks Pro for Mac 2020 is bounced check processing. This amazing feature enables the QuickBooks users to handle the bounced checks with much ease. The loss of extra money can be avoided, that the users used to pay to the accountant to clear the bounced check.
2. iPhone scanner
Talking about another feature that is introduced in the QuickBooks Pro for Mac 2020 is iPhone scanner. With the help of this feature, the users can save time as well as their money by simply using an iPhone camera for uploading text searchable images. With the help of iPhone scanner, the users with iPhones can easily scan the documents using this feature.
3. Dark mode
If you are using the Mojave operating system, then this feature can be much beneficial for you, as this feature works on this operating system. Also, this feature permits the user to have a tailored view mode in QuickBooks Mac.
4. Modernized reporting
Modernized reporting improves the usability, presentation, navigation, as well as customization. This feature creates tailored reports with much ease and also it offers an option to facilitate real-time report updates that would display changes on its own.
5. Invoice e-payments
The invoice e-payments make the payment process much easier and also time consuming. The users get many options to do the online payments such as ACH, credit card, or e-check invoice payment.
6. Improved company snapshot
The feature of improved company snapshot centralizes the dashboard for making it clearly visible. Also, this feature offers customizable data ranges, layouts, and widgets. The best thing about this feature is that it allows the QuickBooks users to see the most critical data with much ease.
Well, this was all about QuickBooks Desktop 2020 and its newly introduced features. If you haven’t switched to this version of QuickBooks, then it is high time for you to use this version of QuickBooks. If you want to reap out the benefits QuickBooks desktop 2020 offers, then update your software today. Not only this, but you can also get an edge over your competitors by switching to this software upgrade. For any QuickBooks desktop for Mac queries you can consult with our QuickBooks for Mac support team today!
You can also talk to our QuickBooks enterprise support team for any further information. Just pick up your phone and make a call at our toll-free number .i.e. +1-888-510-9198. We will be happy to help you!
QuickBooks Desktop 2020 is the latest version of the popular accounting software from Intuit. It is designed to help small and medium-sized businesses manage their finances, track expenses, and create invoices with ease.
How do I install QuickBooks Desktop 2020?
You can install QuickBooks Desktop 2020 by following these steps: Purchase a license for QuickBooks Desktop 2020 from Intuit or an authorized reseller. Download the installation file from the QuickBooks website. Double-click the installation file and follow the on-screen instructions. If you face any issues during the installation process, you can call our toll-free number +1-888-510-9198 for assistance.
What are the new features in QuickBooks Desktop 2020?
QuickBooks Desktop 2020 comes with several new features, including: Automated payment reminders: This feature allows you to set up automatic payment reminders for your customers. Enhanced accessibility: QuickBooks Desktop 2020 has improved accessibility features to help users with visual or hearing impairments. Landed cost calculations: This feature enables you to calculate the true cost of goods sold, including shipping and other expenses. Customer Purchase Order (PO) number in Emails: Now, you can easily add the Customer PO number on subject and body of your invoice emails. Company file search: You can now search for a company file on your computer or network from within QuickBooks Desktop.
Can I upgrade from an older version of QuickBooks to QuickBooks Desktop 2020?
Yes, you can upgrade from an older version of QuickBooks to QuickBooks Desktop 2020. However, it is recommended that you consult with an expert before upgrading to ensure that your data is properly transferred. If you need any help with upgrading your QuickBooks software, you can call our toll-free number +1-888-510-9198 for assistance.
Startups and small- and medium-sized businesses all around the globe are picking QuickBooks for their bookkeeping and accounting needs. The software helps their users save time and increase productivity without a lot of staff members or a diligent finance team. It also comes with a wide selection of templates to be used in invoices and receipts. But from time to time, like any other accounting software, QuickBooks too faces unavoidable errors and glitches. In this blog post, we will discuss the ways to fix invoice formatting issues with QuickBooks. To learn further about this error in QuickBooks, stick around to this piece of writing till the end. Or you can further connect with our technical support team at +1-888-510-9198, and our technically sound professionals will surely help you with all your QuickBooks related queries.
Steps to Fix the Invoice Formatting Issues with QuickBooks
As already mentioned above in this article, QuickBooks comes with a wide selection of templates to be used in invoices and receipts. And sometimes you may face issues while using these templates, mostly related to formatting. To fix this invoice formatting issue with QuickBooks, you can follow the methods below. However, you can take help from our QuickBooks error support team in order to resolve the problem swiftly.
The above steps prove highly useful in fixing this issue. You can easily fix invoice formatting issues with QuickBooks through these methods. In case, the steps do not help you resolve this issue, you can contact our representatives at our toll-free QuickBooks online support number i.e. +1-888-510-9198. Our QuickBooks experts are available round the clock to help you.
FAQs Related to QuickBooks Invoice Formatting issues
How do I change the format of an invoice in QuickBooks?
You can customize invoices, estimates, and sales receipts in QuickBooks using the steps below: 1. At first, move to the go get paid and pay or sales, then choose invoices. 2. After that, choose to create an invoice to create a new invoice. 3. Or, to edit an existing one, find the invoice from the list and choose view/edit from the dropdown ▼ under the action column.
Does QuickBooks have invoice templates?
You need to first choose a downloadable invoice template in the file format and style that suits your business requirements. Select a standard invoice template or choose one specific to your industry and business.
What format does QuickBooks send invoices?
The recipients of files sent through QuickBooks receive an attachment called Winmail.dat, instead of a .pdf file.
How do I fix an invoice in QuickBooks?
To edit an invoice, you need to head to the get paid and pay option. You are then required to scroll to the invoice you wish to edit and click on it to open it up. Also, make the required changes and click on save and close.
Did you just receive QuickBooks Error 16638 85757? It’s a common error especially if you are using an older version of QuickBooks. This error mostly pops up when you try to open a company file that has been corrupt or damaged. You may also receive this unexpected error while login to online banking. It’s easy to spot this error as Error 16638 85757 shows up on your screen. If you are wondering how, you can get read of this error, read on this blog post. However, you can get help from our QuickBooks error support team to save your previous time and efforts. You can read this article carefully to fix the QuickBooks unexpected error 16638 85757. Or if you need any sort of professional assistance at some point in time, then feel free to connect with our tech support professionals at +1-888-510-9198, our technically sound professionals will answer all your queries immediately.
One or more of the following reasons may trigger QuickBooks Error 16638 85757:
QuickBooks company file is corrupt or damaged
You are trying to access the company file on a network instead of a local drive on your computer
QuickBooks Desktop is unable to access the company file while using online banking
Troubleshooting QuickBooks Error 16638 85757
The QuickBooks Error 16638 85757 only appears in older versions of QuickBooks thus, if possible, you can switch to the latest versions of QuickBooks and avoid this unexpected error for good. If upgrading to the latest version of QuickBooks isn’t possible immediately, you can try the following troubleshooting steps:
Try reopening the company file (.qbw), on which the error is generated, again
Go back and check the path of the company file
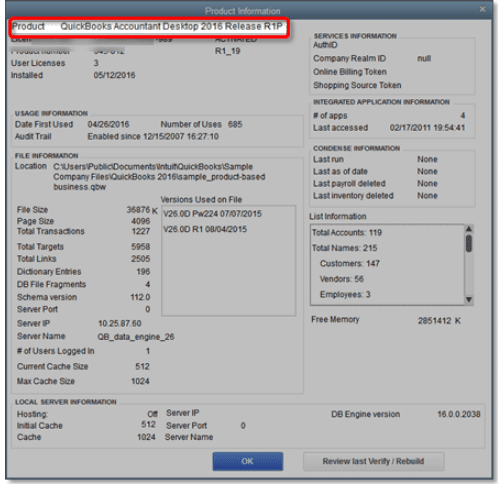
Verify if QuickBooks file path is the same as the company file location provided on the Product Information Screen
To open the Product Information Screen, open QuickBooks and press F2 key on your keyboard
Open and review Production Information and verify the path of the QuickBooks company file
Important: In case your company file is stored on a network drive of your system, follow the given steps:
The user is required to open the folder where your company file is located on the network drive
Now, copy (Ctrl + V) keys your company file
And paste (Ctrl + V) keys the file on any local drive
After that repair your online banking function that may have generated the error before
If you receive the same error again, it denotes that your company file (.qbw) is damaged
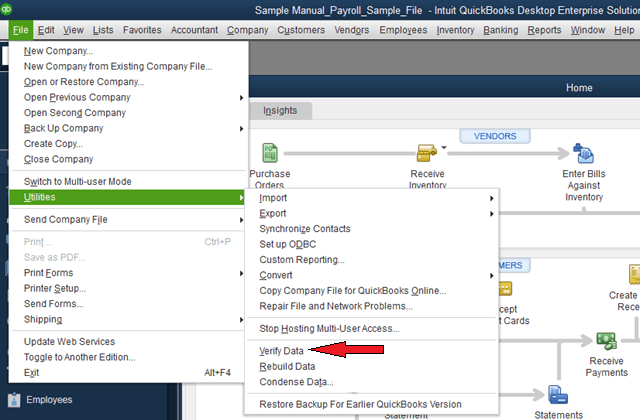
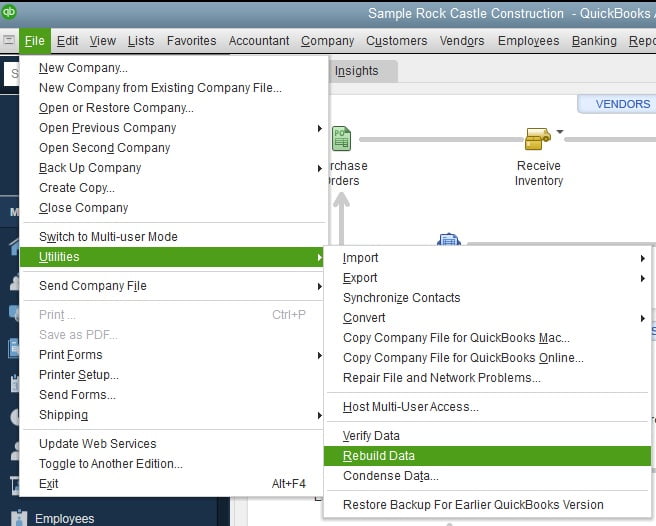
Why and how do you verify QuickBooks company file on QuickBooks?
The verify and rebuild utility in QuickBooks can help you identify and fix damages in QuickBooks company files. You should verify your company files frequently to keep from receiving errors related to QuickBooks files. The following are the steps to verify QuickBooks files:
The very first step is to open your QuickBooks desktop
After that head to the main menu and click File > Utilities > Verify Data
After that choose verify option and the verification process will start
In case the process shows no issues then the current window will itself get closed
Now, click on any message that you receive
In case the process finds some issues, you will receive a warning message which will elaborate on the issue and offer steps to fix the issue
Now perform the Rebuild Data feature for resolving the issue found in the process. Let’s assume the error still persists then chances are that your entire database has got corrupted
The above discussed set of steps are said to be enough to fix this particular error in QuickBooks. However, in case you have any queries or if you require any sort of professional guidance, you can call our 24×7 QuickBooks premier support number at +1-888-510-9198 and seek an expert’s advice.
FAQs related to Error code 16638 85757
What is QuickBooks unexpected error 16638 85757
This error mostly pops up when you try to open a company file that has been corrupt or damaged. You may also receive this unexpected error while login to online banking.
What is error code 800070057 in QuickBooks?
QuickBooks error 80070057 typically occurs when a user tries to open a company file without the appropriate permissions or when there is an issue with the file path
Can I fix error 16638 85757 by updating QuickBooks?
Yes, updating QuickBooks to the latest version can help in fixing this particular error in QuickBooks. As QuickBooks update fixes the majority of the errors that occur.
What is QuickBooks tool hub?
QuickBooks tool hub is one stop destination for all your QuickBooks related tools. You can access multiple tools using tool hub and fix various errors in QuickBooks successfully.