When you are on the verge of beginning your business, it is of great importance that you fine-tune all your financial and marketing strategies. As an individual professional of a small business with high commitments to meet, it is of tremendous help if you hire a bookkeeper who keeps a record of all your finances, manages your bills and invoices, and keeps your earnings and expenses balanced. No doubt, handing over the accounts work to a bookkeeper provides you with ample opportunities to give your time to other important business decisions. Moreover, it also reduces the risk of error that you might do in hurry. In this article we will discuss about best Bookkeeping services.
Make sure to read this article till the end for any further details. However, you can also get in touch with our technical support team in case you require our assistance. Give us a call at +1-888-510-9198 and get all your queries resolved by professionals immediately.
Proper bookkeeping management is not just important in order to comply with the federal laws and tax regulations but is a good opportunity to understand the business operations and financial operations and figure out the ways to invest and earn more. You need to make sure that you do not fall into the trap of poor accounting else your business is bound to fail, making it quite unavoidable. So, it is necessary to find the bookkeeper but how are you going to do it. Below are some ways which can help you find the right bookkeeper for your organization:
Hiring an Employee:
Hiring a dedicated employee for bookkeeping work of a business is a good way to keep a control of your finances and its related things. It is obvious that without expertise, it is difficult for businesses to manage bookkeeping properly and with the right accounting software, the work gets quite easy.
But if a business fails to hire an employee, then it is like a true disaster for a business handling bookkeeping without any expertise. Moreover, if you have an internal bookkeeping staff, you will soon realize that it is subjected to a myriad of information security, errors, mistakes and frauds which can take place while doing financial entries. So, when hiring a bookkeeper, make sure that you keep an eye on him and related circumstances.
Hiring a freelancer for Best Bookkeeping Services:
When a businessman thinks of hiring a freelancer, many questions pop up in his mind which includes the qualification of the freelancer, his reliability, experience, track record and much more. Insurance, license and certification are three important things a freelancer needs to possess and these things need to be investigated before hiring a freelancer.
If your freelancer makes a mistake while working, there are chances that at the end, you are left with no option. Along with this, it is also necessary that you provide an adequate oversight in order to prevent serious mistakes and accounting mismanagement on the freelancer’s part.
Competent freelancers do exist in the market but you are required to be very diligent to find the right one for your business. Your bookkeeper should know how one can balance and manage books at the same time while providing an insight into the problems he is facing. So, make sure that the freelancer is equipped with relevant resources to keep the things in place.
When looking for a freelancer, make sure that you have got a custom quote fixed which implies that you value money. Prices can vary from person to person depending on their experience and reliability, but you need to choose the one that suits not just your requirements but also budget, obviously with no hidden costs.
Prefer personalized service:
Make sure that the bookkeeping service you choose is well-experienced and is willing to work for you with complete dedication. Also, it is necessary that they meet your specific expectations. This is an assurance that you prioritize your business, and are respectful of your time. Also, ensure that the bookkeeping service understands the goals and objectives of your business, which will help them do the work accurately.
Accessibility:
A dependable service provide is the one who is readily available even throughout the peak hours of demand. A great, customized client service is necessary for lasting health and wellness, professional relationship. Additionally, it will provide you the self-confidence of holding trust fund on the provider. However, large bookkeeping corporations are reliable, but the majority of the moments they fail to provide personalized services. If you are seeking a devoted representative choose a local business.
There are many bookkeeping services which manage daily accounts for a variety of business at that you are required to employ CPAs for management roles to counsel the bookkeeper if he/she falls into a problem. Since the bookkeeping service providers work with various clients with different requirements and expectations, you may also get the right bookkeeper for your business as well who has a well understanding of your business and expectations. Moreover, such providers have great linkages in the industry which you can also leverage to expand your connections. This method of leveraging connections will benefit your business in the long run.
In addition to all the above aspects and benefits, a bookkeeping service will also identify potential risks and opportunities for your business. Thereby ensuring the integrity of your accounting and financial data.
Hire a Certified bookkeeper
We, at Hostdocket, provide you with accurate bookkeeping services. Our services give you a true value of investing your time and money. We have a team of experienced and understanding professionals who dedicatedly work for your business. Many thanks for visiting here.
Availing of a bookkeeping service can help you in maintaining your accounts properly. It is a must to learn about the certification and licensing before you choose a bookkeeping service.
What are the three types of bookkeeping?
The three types of bookkeeping include, cost, managerial, and financial. These are essential for a healthy functioning of business.
How to do easy bookkeeping?
For easy bookkeeping, you can simply purchase QuickBooks accounting software. Or you can also connect with our accounting professionals at +1-888-510-9198.
What are the 5 accounts in bookkeeping?
The 5 Types of Accounts in Financial Accounting Assets. Liabilities. Equity. Expenses. Income (Revenue)
QuickBooks won’t open or doesn’t start error can be extremely annoying. As a result of this error, QuickBooks might stop working, stuck on loading screen, or not responding at all. Often when trying to open QuickBooks, QuickBooks desktop does not start error shows up on the screen. In case QuickBooks won’t respond or you get an error that says it stopped working, then this segment is surely going to help you. It should be noted that if you choose your QuickBooks desktop icon multiple times, sometimes, it won’t open. Let QuickBooks take enough time to load before you continue.
Note that, if you see the message, that QuickBooks needs a subscription, then you are either in an unsupported version of QuickBooks Desktop or your subscription has expired. You can simply download a supported version or check out your subscription status from the Customer Account Management Portal.
To help you fix the QuickBooks desktop won’t open or not responding error, we have come up with this segment sharing the complete steps to fix the issue. However, if you have any queries or if you need any sort of technical assistance, give us a call at +1-888-510-9198, and we will provide you with immediate support and assistance.
What Causes QuickBooks Desktop Doesn’t Start Error?
When one clicks on Quickbooks or company file, but the program doesn’t start or won’t open, such an error shows up. It is important to identify what factors can lead to such an error, in order to perform the right set of steps. Let us have a look:
Very long company name
Corrupted Hard disk
Improper installation of QuickBooks Desktop
Missing or damaged QBWUSER.INI file
Out of date operating system
Symptoms of QuickBooks desktop does not start
The software freezes.
The QuickBooks company file doesn’t open.
Windows runs slowly
The computer hangs every now and then.
Computer responds very slowly to mouse and keyboard
Important Note: When you click on QuickBooks icon many times (double clicking repeatedly), it can result in QuickBooks desktop not responding or not working. It is better to wait for a while and give time to launch QuickBooks again. Don’t click too many times to send multiple requests.
Important tips before troubleshooting the error
The user is suggested to perform the following things before carrying out the fixation steps.
The user is recommended to update the software to the latest version
Also turn off the hosting on the system
Ensure to Suppress the QuickBooks Desktop software
Change the name of the .TLG and .ND files
Repair the QuickBooks Desktop Software installed on your PC.
Methods to rectify QuickBooks Desktop does not start or won’t open error
This issue of QuickBooks can be easily solved and below are some of the solutions to this problem. However, if you want expert’s help to resolve these errors quickly then you can get in touch with our QuickBooks support team anytime.
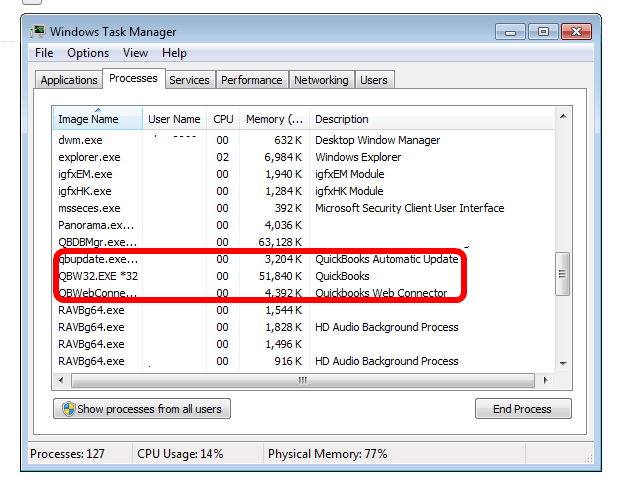
Solution 1: Close QBW32.exe process
First thing to do is Right-Click on the “Windows taskbar” in the system and then select “Start Task Manager” option.
Now click on the “Process tab” and then click on “Image Name” header so as to arrange the processes alphabetically.
Then locate and select “EXE“.
Finally click on “End Process” to close the “exe process“
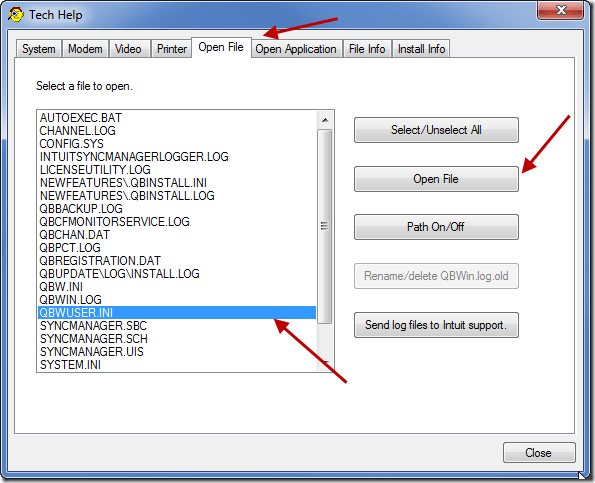
Solution 2: Renaming the QBWUSER.ini. file
Try accessing the folder where ini file is there and if you cannot trace it then enable hidden folders and file.
Once the folder is found then click on the “QBWUSER.ini.file” and then select “Rename” option.
After this type “Insert.old” in the last file name.
Now change the name of “ecml.file“. After renaming the file if QuickBooks works then the issue is solved.
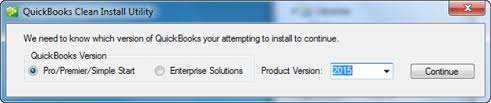
First of all, you have to uninstall the QuickBooks software and after then reinstall the QuickBooks software using clean install and then rename the installation folders.
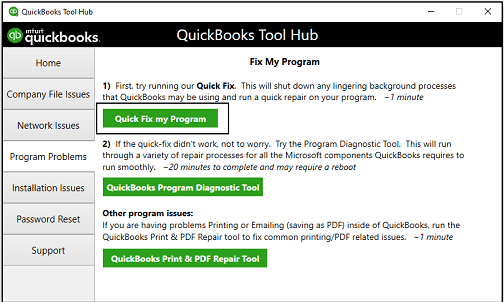
Solution 8: Use Quick Fix My Program tool
Under this process, the user is first recommended to download and install the tool hub
After that save the file where it can be accessed easily
Once done with that, the user should install the tool hub and double click on the icon when installation ends
Now choose Quick Fix my program tool under the program problems tab and run it
Once done with that run QuickBooks and check if the issue is resolved or not
Solution 9: Access the company file from different location
The very first step is to hit the windows + E
This will open up the windows explorer
After that look for the file with qbw file extension
When you look for a file location on a network server, do it in the Network drive on which the data file is located.
Right click the file and select copy
After that locate the C: drive and make a new folder
Rename it as QbTest
Open the folder and paste the company file in it
Now, open QuickBooks while holding ctrl
And access the company file you copied
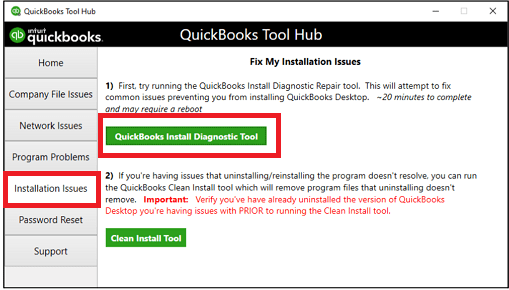
Solution 10: Run the QuickBooks install diagnostic tool
The very first step here is to open the QuickBooks tool hub
And then head to the installation issues tab
Also, select the QuickBooks install diagnostic tool
Run the tool and let it perform the necessary scan
After the tool identifies the issue, it automatically performs the necessary steps to rectify the issue
Hope this small article help you to resolve this error. If you are looking for further help and QuickBooks Enterprise customer support then contact Hostdocket to get instant solution from U.S based best accounting experts, feel free to dial our helpline i.e. +1-888-510-9198.
Some FAQs Related to QuickBooks Desktop doesn’t Start Error
What should I do if QuickBooks Desktop won’t launch on my computer?
First, check if your computer meets the system requirements for QuickBooks Desktop. If it does, try rebooting your computer and then launching QuickBooks Desktop again. If the problem persists, try repairing or reinstalling the software.
Why is QuickBooks Desktop not responding when I try to open it?
This could be due to several reasons such as damaged or missing files, compatibility issues with your operating system, or a software conflict with another program installed on your computer. If you are unable to resolve the issue, feel free to call our toll-free number at +1-888-510-9198 for assistance.
How do I fix the “QBW32.EXE has stopped working” error when trying to open QuickBooks Desktop?
This error is usually caused by outdated or corrupted Windows files. Try updating your operating system and then repair or reinstall QuickBooks Desktop. If the problem persists, it may be a good idea to consult a professional.
My QuickBooks Desktop company file won’t open, what should I do?
If your QuickBooks Desktop company file won’t open, it may be damaged. Try using the QuickBooks File Doctor tool to repair the file. If the problem persists, you can also try creating a backup of your file and then restoring it. If you need further assistance, give us a call at +1-888-510-9198.
How can I troubleshoot QuickBooks Desktop does not open due to a missing component?
If QuickBooks desktop does not start due to a missing component, try repairing or reinstalling the software. If the problem still persists, it may be due to a damaged Microsoft .NET framework. In this case, try repairing or reinstalling the framework and then launch QuickBooks Desktop again. If you need further assistance, our support team is always available at +1-888-510-9198.
Checkout the Latest features of QuickBooks Desktop 2018
With the most recent QuickBooks version out in the market, you could be confused that you ought to upgrade to the most up to date version or not. In this article, we will have a quick glance of numerous benefits of using QuickBooks Desktop 2018 for different sectors.
Intuit has revealed the new and updated features for QuickBooks Desktop 2018. All the updated options are available on QuickBooks Pro, Premier, Accountant 2018 and Enterprise 18.0. The new QuickBooks desktop is the perfect Christmas gift for all users. This software concentrates on new and enhanced features that aid accounting professionals and their customers complete tasks with less effort.
The new software comes with a lot of upgrades in the existing features and in this article we are going to tell you all about the new and improved features in QuickBooks Desktop 2018.
QuickBooks Desktop 2018 version is available for business owners and professionals to use and meet their business goals. Like always, the new version consists of various advanced features. So, here in this article we will discuss about the latest and improved features of QuickBooks Desktop 2018. Also you will see what benefits you will get after upgrading the QB desktop 2018 edition.
QuickBooks Desktop 2018 Features Available for Windows OS
Below we have listed those new features which are offered in all Windows variation QuickBooks Desktop 2018.
Multi-Monitor Support
Level 3 data in QuickBooks Payroll
Stay logged in preference
Secure E-mail Support
Changes for QuickBooks Add-ons
Payroll reminder badge in QuickBooks Payroll 2018
Additional columns for inventory
Search in the Chart of Accounts
Internet Explorer Support
Copy/Paste line item shortcut
Cash/Accrual Toggle on Reports
Valuation summary and inventory stock status reports
Mobile inventory scanner support (QuickBooks Enterprise
Accountant and Enterprise Platinum Editions only)
Enhanced sales order fulfillment with android app
(QuickBooks Enterprise Accountant and Enterprise Platinum Editions only)
Added feature of Mobile Barcode Scanning for Order fulfillment in QuickBooks Enterprise 2018
Available only to US users this is a new additional feature by Intuit in the updated version of the software.
It enables users to work with remote devices like bar-code scanner and connect them easily to the desktop or a laptop.
New Security features in all QuickBooks 2018 Edition
Security is one of the most important things to keep in mind while dealing with company files, information and important data. Thus, Intuit has updated the security features in all editions of QuickBooks 2018 as an added enhancement from their previous years QuickBooks Desktop Security Updated Hullaballoo.
More on PII Encryption
Unlike in the previous software the new QuickBooks Desktop 2018 comes with the feature of personally identifiable information (PII) that can be encrypted as well.
Security on Web Mail
Now save on work integrity with Intuit’s new feature that enables QuickBooks to securely work with web mail accounts.
Latest version of Internet Explorer
For all users of the latest QuickBooks Desktop 2018, it is mandatory to use the most recent version of Internet Explorer for smooth functioning of all the features.
Changing QuickBooks Add-ons
In the previous versions of QuickBooks any third party app working with QuickBooks in the background had to change preference setting to keep the working connectivity with QuickBooks.
The newer version absolutely relieves you of such additional efforts.
Easy Payroll reminder in QuickBooks Payroll 2018
Reminding users for any upcoming payroll deadlines, the QuickBooks Payroll 2018 has the new and improved Payroll Reminder Badge feature.
Level 3 Data for QuickBooks Payroll user
This new feature in QuickBooks desktoop 2018 enables users with commercial credit cards to access level 3 data. It helps customers to trust and thus release fund easily.
Recent Changes, Improvements and Fixes in QuickBooks Desktop 2018
QuickBooks Desktop 2018 concentrates on new and enhanced features that assist accounting professionals as well as their clients total tasks with less effort. Understand the new and improved features:
Multi Monitor Display
Previously without the Multi Monitor Support users found it difficult to work on same QuickBooks file running on two monitors simultaneously. And addressing this issue, the new QuickBooks Desktop 2018 comes with a very interesting feature that allows users to work on Multiple monitors at the same time.
To enable the Multi Monitor display, click on the View Menu => and then switch to Multi Monitor Mode.
It improves work efficiency besides saving time.
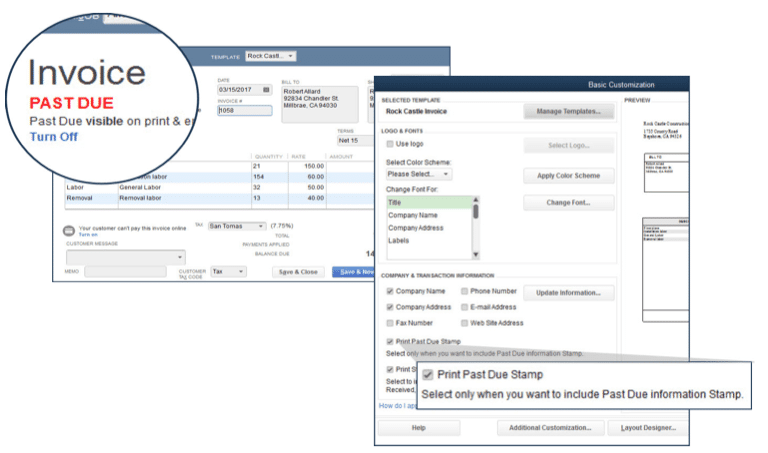
Past Due Invoice Stamp
The new feature in QuickBooks desktop 2018 has the Past Due Stamp for all the Invoices as well as on the display message on the viewing copy of the GUI.
With this feature upon re-sending copies of past-due invoices to the customer, the system automatically notifies you that they are past due. However, this feature can only be used in QuickBooks invoice when you turn it on through the following steps.
Create a New Invoice option.
Select Formatting
Select Templates
Click on the lower left Template drop down menu and select Edit Templates
Click on the “Print Past Due Stamp” option
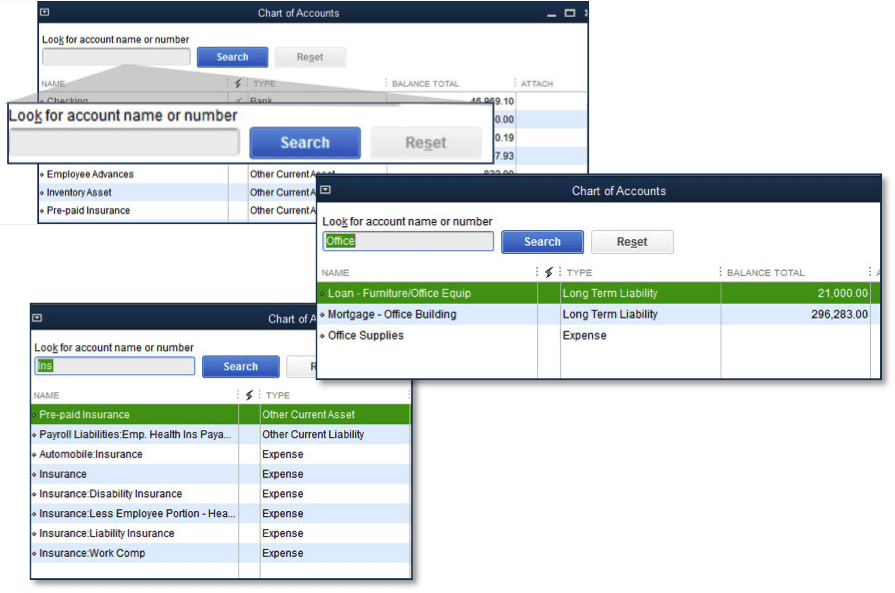
Charts of Accounts Feature
The new QuickBooks 2018 comes with the Chart of Accounts of feature that helps users to easily locate and open a selected chart of account or sub-account with the help of only the account number, account name.
To use this feature just follow the following steps as:
Go to Lists and select the Chart of Accounts
Go to the Search Box at the top left of Chart accounts list
Type a portion of account name or number
Click on the Search Button to generate Accounts Chart
Cash and Accrual Toggle for Reports
To easily toggle between displayed reports on the basis of Cash or Accrual, the new QuickBooks Desktop 2018 comes with the Cash/Accrual Toggle. This helps to view QuickBooks report on the basis of cash very easily as all reports are computed and displayed on an Accrual Basis by default.
Also for the summary report you can change the settings in which you would like to display the report and graphs.
Enhancing the Inventory Reports Customization
By far one of the best updated features in QuickBooks 2018, this recent update allows users to easily add or remove columns from the Inventory Reports within QuickBooks Premier and QuickBooks Enterprise solutions.
This also helps in Inventory Valuation Summary, detailing of Inventory Valuation, sort inventory status by Item reports and Assembly Shortage by Item report in QuickBooks Enterprise.
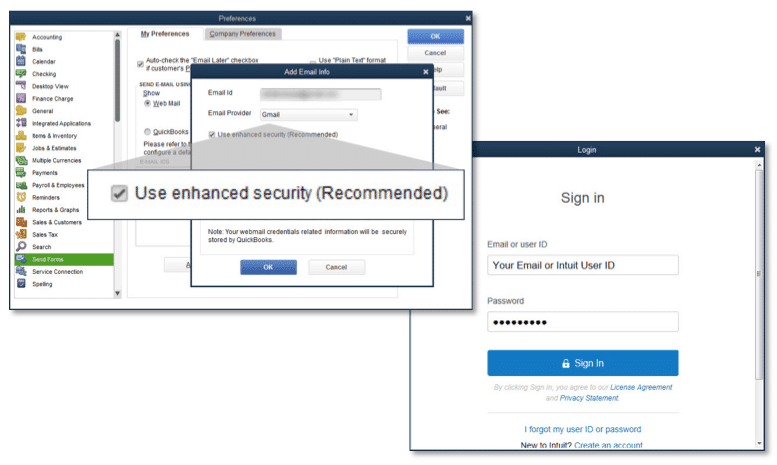
Security on Web Mail
The new QB desktop 2018 update allows users to send emails over Gmail, Outlook, Hotmail, MSN and Windows Live accounts securely, thereby improving work efficiency and multi factor authentication.
To use this feature just follow the steps as:
Go the Menu Bar and click on Edit button
Select Preferences
Click on Send Forms and then My Preferences
Select the Webmail option
Select “Use enhanced security” setting while setup
Note: To complete the Set Up users need to have their Intuit Id and Password.
Ability to stay Logged in
QuickBooks Desktop 2018 comes with the new update that allows users to stay logged in to their QuickBooks account without having to enter user id and password every time they open or switch company files.
To use this feature the following steps are:
Go to the Company and then click accountant
Select Manage Login Settings and click on “Keep User logged in for.”
Specify the time period from the option range from up-to two days to 90 days.
Better Sales order fulfillment with Android
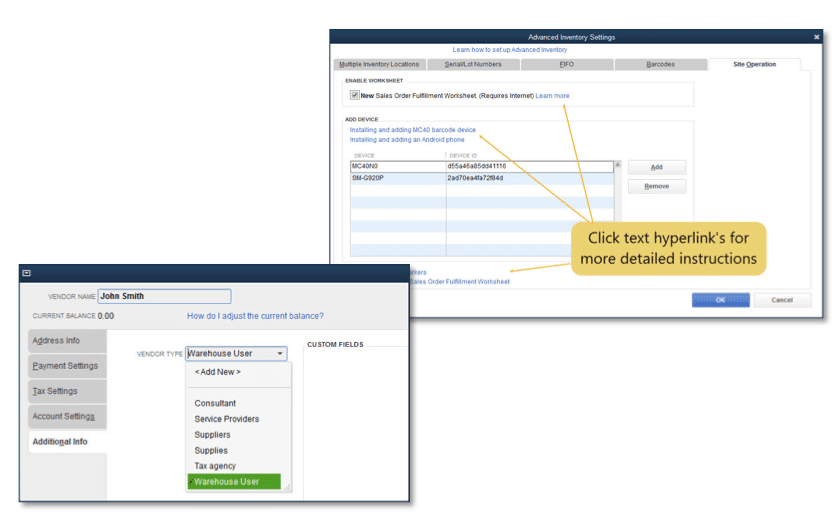
For enhanced sales order fulfillment on worksheet and connectivity with a portable bar-code scanner, QuickBooks 2018 has now improved compatibility with Android App. So if you are using sales order and need to quickly access your warehouse pick list or improve speed and accuracy then this feature would be very useful.
Mobile Inventory and Scanner Support
One of the best features to have been added in QuickBooks 2018 that helps you save time, reduce manual error and make quick business decisions with real-time inventory data.
Connect Mobile Bar Code device or Android phone to QuickBooks Enterprise with Advanced History via a Wireless network.
Create Vendor record for each Warehouse picker and assign new vendor type: Warehouse User.
Enterprise Users With Advanced Inventory Can Enable Mobile Scanners
Quick Merging of Duplicate Vendor details
To avoid confusion and combine up to four vendors under a master vendor and update information as required, the new feature allows quick merge of duplicate vendor details. This helps in saving a lot of time in vendor management as well.
But before you merge Vendor details make sure that:
Your Company files are used by Single User
You are Not working on Accountant’s Copy File.
Multi-Currency is turned OFF.
The Vendor you want to merge have NO: tax authorities, Tax exempt, Online Banking payment and Direct Deposit Vendor.
Follow the below steps to Merge Vendors:
Open the Merge Vendors Window.
For Accountant Edition: Select Client Data Review from the Accountant Menu and click on Merge Vendors.
For QuickBooks Desktop Enterprise: Select the Accounting tools from the Company Menu and click on Merge Vendors.
On the Merge Vendor’s Window, click on the vendors you want to merge.
Select a Master Vendor.
Click Yes on the confirmation prompt and then OK on the merge complete window.
QuickBooks Accountant Desktop 2018 to Prior years – A Quick Comparison
Key Features by Version Year
2018
2017
2016
2015
Quickly merge duplicate vendors Search and sort to identify duplicate vendors, designate the master vendor, and merge up to four records at a time.
✔
Increase productivity with Multi-Monitor support Increase your efficiency and visibility into your QuickBooks files through multi-monitor viewing.
✔
Search faster within Chart of Accounts Quickly find an account by typing in the full or partial account name or number in the search box.
✔
Complete tasks quickly with keyboard shortcuts Copy and paste whole lines in invoices and elsewhere with Ctrl+Alt+Y and Ctrl+Alt+V.
✔
Easily switch between cash and accrual basis With one click in the report window you can switch between cash and accrual basis
✔
Stay on top of deadlines with Payroll Liability Reminder (Payroll-Only): Get reminded of various payroll liabilities, like federal and state payroll taxes, and workers’ comp.
✔
Save time with easier, faster search Search for transactions using a range of values instead of exact amounts, and allow QuickBooks to auto-fill partial search terms for you.
✔
✔
Improved report filters Easily see which filters have been applied to a report, reproduce memorized reports, and toggle back and forth between reports.
✔
✔
Easily view credit card charge statuses Quickly see if a credit card charge or refund has cleared, without having to check reports or the register
✔
✔
Get more detail on deleted users Give clients a more detailed audit trail by easily tracking and matching transactions back to deleted users
✔
✔
Delete or void transactions in bulk Easily filter transactions to see which ones are linked, and find the right ones to delete or void.
✔
✔
✔
Help clients manage vendor expenses Track all vendor-related bills conveniently and efficiently in a single window.
✔
✔
✔
Accountant Toolbox Unlock access to powerful accountant tools on-thego.
✔
✔
✔
✔
Send Portable Company File Clients can send you a portable company directly from QuickBooks. No more technical support.
✔
✔
✔
✔
Insights on Home Page See a snapshot of the health of your client’s business so that you can make insightful recommendations
✔
✔
✔
✔
Time and Expenses block in Income Tracker View unbilled hours and take immediate action.
✔
✔
✔
✔
Send Multiple Reports in Email Easily choose and attach multiple reports in one email.
✔
✔
✔
✔
Enter multiple transactions at the same time Batch-enter checks, deposits, or credit card transactions on one screen.
✔
✔
✔
✔
Let clients access journal entries with a click Email journal entries from QuickBooks with ease and let clients import them with a single click with Send General Journal Entry.
✔
✔
✔
✔
Send files securely Send Accountant’s Copy files through secured Intuit servers with Accountant’s Copy File Transfer Service.
✔
✔
✔
✔
Find and Fix errors fast Find and Fix client entry errors faster with Client Data Review
✔
✔
✔
✔
Take a cross-edition expedition See what your clients see with instant access to all QuickBooks editions in one software package.
✔
✔
✔
✔
Make asset management your best asset Stay on top of acquisition, depreciation and disposal with Fixed Asset Manager.
✔
✔
✔
✔
Find all your balances in one place Gather beginning balances, period transactions and adjustments, and ending balances for any time frame with Working Trial Balance.
✔
✔
✔
✔
Free features and improvements.
✔
✔
✔
✔
Conclusion!
The latest version of QuickBooks desktop 2018 is perfect for business and really ease to use. It comes with the best features to manage your business efficiently, more securely and with minimum human error. Although if you are an accounting expert and professional in this field and want to test this new product, you should surely try the latest released version 2018 of QuickBooks. For more information you can contact to our QuickBooks toll-free number that is +1-888-510-9198.
QuickBooks Payroll tax tables play a vital role in getting your payroll process extremely smooth. To provide the users with the proper knowledge of QuickBooks Payroll tax tables, we have come up with this article. At the end of this article, the reader would be well versed in downloading, installing, and verifying QuickBooks Payroll Tax Table. Therefore, stick to the article until the end. However, for any query associated with QuickBooks Payroll tax tables, you can simply consult our QuickBooks Payroll customer support team at +1-888-510-9198.
Before digging in deep and exploring the steps to download, install, and verify QuickBooks Payroll Tax Tables, it is better to understand what it actually means. To define Payroll tax table, it can be stated that it is a chart that characteristic different columns, assisting to find out the apt taxes to be suspended from the employee’s paycheck.
It should be noted that the withholding taxes are generally affected by numerous factors just like, the income sum, the marital status of the worker, and also the payment schedule, just like bi-weekly, monthly, etc.
Important points to remember
Before downloading, installing, and verifying the QB Payroll Tax Table, the user is required to keep in mind certain factors, such as:
The user is required to have an active payroll subscription, if they wish to update the tax table.
It is recommended by Intuit that the user should download the tax table at least within 45 days, or they can update the same every time they make payment to their employees.
Lastly, the user is required to turn on the automatic updates feature in QuickBooks Desktop, if they want to receive the payroll tax table updates automatically, the moment the update releases.
Procedure to download the QuickBooks payroll tax tables updates
Undoubtedly, it is essential to download or install the newest available QuickBooks Payroll Tax Table updates, in order to safeguard that the Payroll has precise information. Being a QuickBooks Payroll user, all you need to do is follow certain steps, and you are good to go.
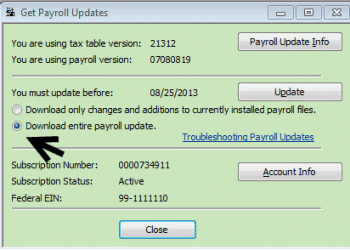
To begin with, opt for ‘Employees‘ and after that select ‘Get Payroll Updates‘.
Moving forward, the user is required to select ‘Download entire payroll update‘.
Tap on ‘Update‘ button
Once the downloading procedure comes to an end, a pop-up message will appear stating “A new tax table and updates to your payroll tax forms have been installed on your Desktop. Click OK to read about the modification.”
Considering the prompts, hit ‘OK‘ and you are good to go.
Steps to Install a Payroll Tax Table update from a CD (Disk Delivery Service:)
To start with, the user needs to insert the ‘Payroll Update CD‘.
Once done with that, open the ‘Get Payroll Updates‘ option.
QuickBooks Desktop Pro and Premier: The user is required to choose the ‘Employees‘ option and after that the option stating ‘get payroll updates‘.
Moving forward, if the user is prompted to locate the ‘update.dat‘ or ‘data file‘ in the ‘Install Payroll Update window‘, then he/she is required to take the necessary actions and respond to the prompts.
Moreover, once you have completed that, tap on ‘Browse‘.
Furthermore, tap to choose CD drive from the ‘Look in the drop-down arrow‘, in the install from window.
Now, either select the ‘date or update3.dat‘ from the ‘Payroll Update Disk‘ and after that click on ‘Open‘ to proceed.
Also, choose between the ‘update.dat or update3.dat‘.
Additionally, hit the ‘Open‘ option.
After that, the user is required to move on to the ‘Payroll Update Window‘, and then tap on ‘OK‘.
Note: In case the user receives a pop-up message displayed on the screen which says “File Not Found” go through your CD drive by following the below-enumerated steps:
Firstly, the user is required to ‘close‘ the QuickBooks Desktop and after that hit the ‘Start Button‘, once done with that, select ‘My Computer‘.
Moving ahead, right-click the ‘CD drive‘ and after that select the option “If you cannot see the files, test the CD on a second desktop.” In case the files are visible on the second desktop, then there might be some issue with the hardware on the first desktop.
Whereas, if the user is unable to see the file on both the desktops, then he/she is required to order a new payroll update disk.
The user is required to authenticate, in the ‘install confirmation window‘ that the user is installing the accurate location and that the ‘tax table versions‘ in the current and new fields are precise.
The next step is to click when the update is complete, or a message appears stating ‘A new tax table has been installed on your desktop‘.
The next step is to click ‘OK‘ in order to read about the modification.
The last step of the verification process is that in case the tax table version has not modified, a pop up message will appear on the screen stating that “You have successfully installed payroll update”.
How to Download the latest payroll tax table update?
The payroll tax table update will provide the user with the accurate and updated rates and calculations for:
E-file options
Supported provincial and federal tax tables
Payroll tax forms
How to find out the version of QuickBooks?
Included in the new update: July 2018 payroll tax tables updated
Current Version: Version 108
Release date: June 28, 2018
Effective date: July 1, 2018, to December 31, 2018
To check the version of QuickBooks, the user is required to follow the following steps:
The first step is to go to the ‘Employees menu‘ in QuickBooks, after that select the ‘My Payroll Services‘.
In the next step, the user is required to select the ‘Tax table information‘.
The first three number reflects the tax table version in “You are using Tax table version”.
Note: The user should be QuickBooks 2018 or QuickBooks Desktop 2018 or QuickBooks Desktop Enterprise Solution 18.0 to download the tax table update.
Check out the Current and historical TD1, CPP & EI amounts:
TD1 Amounts:
Effective
date
7/1/2018
1/1/2018
7/1/2017
1/1/2017
7/1/2016
1/1/2016
7/01/2015
1/1/2015
Tax
table version #
108
107
106
105
104
103
101
100
TD1 Amounts
Federal
11,809
11,809
11,635
11,635
11,474
11,474
11,327
11,327
AB
18,915
18,915
18,690
18,690
18,451
18,451
18,214
18,214
BC
10,412
10,412
10,208
10,208
10,027
10,027
9,938
9,938
MB
9,382
9,382
9,271
9,271
9,134
9,134
9,134
9,134
NB
10,043
10,043
9,895
9,895
9,758
9,758
9,633
9,633
NL
9,247
9,247
8,978
8,978
8,802
8,802
8,767
8,767
NT
14,492
14,492
14,278
14,278
14,081
14,081
13,900
13,900
NU
13,325
13,325
13,128
13,128
12,947
12,947
12,781
12,781
ON
10,354
10,354
10,171
10,171
10,011
10,011
9,863
9,863
PE
9,160
8,160
8,320
8,000
8,292
7,708
7,708
7,708
QC
15,012
15,012
11,635
11,635
11,550
11,550
11,425
11,425
SK
16,065
16,065
16,065
16,065
15,843
15,843
15,639
15,639
YT
11,809
11,809
11,635
11,635
11,474
11,474
11,327
11,327
ZZ (employees outside Canada)
0
0
0
0
0
0
0
0
Canada Pension Plan (CPP)
Effective
date
7/1/2018
1/1/2018
7/1/2017
1/1/2017
7/1/2016
1/1/2016
7/01/2015
1/1/2015
Tax
table version #
108
107
106
105
104
103
101
100
Canada Pension Plan (CPP) – outside Québec
Maximum Pensionable Earnings
55,900
55,900
55,300
55,300
54,900
54,900
53,600
53,600
Basic Exemption
3,500
3,500
3,500
3,500
3,500
3,500
3,500
3,500
Contribution Rate
4.95%
4.95%
4.95%
4.95%
4.95%
4.95%
4.95%
4.95%
Maximum Contribution (EE)
2,593.80
2,593.80
2,564.10
2,564.10
2,544.30
2,544.30
2,479.95
2,479.95
Maximum Contribution (ER)
2,593.80
2,593.80
2,564.10
2,564.10
2,544.30
2,544.30
2,479.95
2,479.95
EI amounts:
Employment
Insurance (EI) – outside Québec
Maximum Insurable Earnings
51,700
51,700
51,300
51,300
50,800
50,800
49,500
49,500
Premium EI Rate (EE)
1.66%
1.66%
1.63%
1.63%
1.88%
1.88%
1.88%
1.88%
Premium EI Rate (ER) (1.4*EE)
2.62%
2.62%
2.62%
2.62%
2.62%
2.62%
2.62%
2.62%
Maximum Premium (EE)
858.22
858.22
836.19
836.19
955.04
955.04
930.60
930.60
Maximum Premium (ER) (1.4*EE)
1,201.51
1,201.51
1,170.67
1,170.67
1,337.06
1,337.06
1,302.84
1,302.84
Québec Pension Plan (QPP)
Maximum Pensionable Earnings
55,900
55,900
55,300
55,300
54,900
54,900
53,600
53,600
Basic Exemption
3,500
3,500
3,500
3,500
3,500
3,500
3,500
3,500
Contribution Rate
5.40%
5.40%
5.40%
5.40%
5.33%
5.33%
5.25%
5.25%
Maximum Contribution (EE)
2,829.60
2,829.60
2,797.20
2,797.20
2,737.05
2,737.05
2,630.25
2,630.25
Maximum Contribution (ER)
2,829.60
2,829.60
2,797.20
2,797.20
2,737.05
2,737.05
2,630.25
2,630.25
Employment Insurance (EI) – Québec only
Maximum Insurable Earnings
51,700
51,700
51,300
51,300
50,800
50,800
49,500
49,500
Premium EI Rate (EE)
1.30%
1.30%
1.27%
1.27%
1.52%
1.52%
1.54%
1.54%
Premium EI Rate (ER) (1.4*EE)
1.820%
1.820%
1.778%
1.778%
2.13%
2.13%
2.16%
2.16%
Maximum Premium (EE)
672.10
672.10
651.51
651.51
772.16
772.16
762.30
762.30
Maximum Premium (ER) (1.4*EE)
940.94
940.94
912.11
912.11
1,081.02
1,081.02
1,067.22
1,067.22
Québec Parental Insurance Plan (QPIP)
Maximum Insurable Earnings
74,000
74,000
72,500
72,500
71,500
71,500
70,000
70,000
Contribution Rate (EE)
0.548%
0.548%
0.548%
0.548%
0.548%
0.548%
0.559%
0.559%
Contribution Rate (ER) (1.4*EE)
0.767%
0.767%
0.767%
0.767%
0.770%
0.770%
0.782%
0.782%
Maximum Contribution (EE)
405.52
405.52
397.30
397.3
391.82
391.82
391.30
391.30
Maximum Contribution (ER) (1.4*EE)
567.58
567.58
556.08
556.08
548.81
548.81
547.40
547.40
Commission des normes du travail (CNT)
Maximum earnings subject to CNT
74,000
74,000
72,500
72,500
71,500
71,500
70,000
70,000
Fix QuickBooks Payroll update issues:
If the TD1 amounts are not updated even after installing the latest tax table update, the user is required to perform the following checks:
The user is required to ‘confirm the tax table effective date‘, whether it is on or after the date.
After downloading the product update that contains the new tax tables, the user is required to start with payroll, or open and close the QuickBooks Desktop for the TD1 amounts to update.
If in case the user has ever manually updated the TD1 amounts for an employee, the new tax table would not dominate any previously adjusted amounts.
Employees set up over the basic TD1 amounts? ‘Yes‘, or ‘No‘
The reason is that the QuickBooks Desktop will update TD1 amounts on its own, only for the employees with the basic amounts for the previous tax tables.
Payroll tax
table is now out of date: One of the most commonly encountered error
When the user opens the payroll tax table on the computer, he/she might encounter the pop-up stating the Payroll tax table is now out of date. It should be noted that any of the calculations that the users perform using this tax table will be either zero or will show as $0.00. There can be various reasons behind this error, a few of which are listed below:
The very first reason can be that the QuickBooks Desktop is not updated to the latest payroll tax table release.
The last reason can be that not all the versions of QuickBooks located within the network might have been updated to the latest tax table.
How to rectify this commonly encountered error?
The very first thing is to analyze the QuickBooks Desktop and check whether it is using the latest product update or not. The next step is to check whether all the versions are located on the network or not, especially in the case you have the multi-user network.
The next thing the user has to do is to equate the product release number of the currently installed product with the product update page at the time when the user is working in QuickBooks. After that, the user is required to press F2 key to view the release reference number.
Lastly, if the user hasn’t updated its product to the latest release, it would be better to update it first, in order to resolve the error. The user can get rid of the error and backup the file first, by clean uninstall and reinstall of QuickBooks Desktop.
We conclude this article, with the hope that it might help you to download the latest QuickBooks Payroll tax table and also get a better insight into the same. After reading this article, you might be able to deal with the errors that you may stumble upon and many other related information. However, in case of any difficulty, our QuickBooks support team is there to guide you. You can consult our team of experts at our toll-free number .i.e. +1-888-510-9198.
How do I update my QuickBooks payroll tax tables to ensure accurate tax calculations?
To update your QuickBooks payroll tax tables, simply navigate to the “Employees” menu, select “Get Payroll Updates,” and follow the prompts. Regularly updating your tax tables ensures that you are using the most current tax rates and calculations, allowing for accurate payroll processing. Don’t forget to keep an eye on tax-related news and announcements to stay informed about changes to tax laws.
What if I encounter issues while updating my QuickBooks payroll tax tables?
If you experience any difficulties or have questions while updating your payroll tax tables, don’t hesitate to reach out to our expert support team at our toll-free number +1-888-510-9198. We are available to assist you and ensure that your payroll tax tables are up-to-date and functioning correctly.
Can I manually edit the payroll tax tables in QuickBooks?
QuickBooks payroll tax tables are designed to be automatically updated through the “Get Payroll Updates” feature. However, if you need to make manual adjustments, we recommend consulting with a tax professional or contacting our support team for guidance. Making manual changes without proper knowledge can result in inaccurate payroll calculations and potential compliance issues.
How often should I update my payroll tax tables in QuickBooks?
It’s essential to update your QuickBooks payroll tax tables at least once every 45 days to ensure the most accurate tax calculations for your employees. Keep in mind that tax rates and regulations can change frequently, so staying updated is crucial for maintaining compliance and avoiding potential penalties.
How can I verify that my QuickBooks payroll tax tables are up-to-date?
To confirm that your QuickBooks payroll tax tables are current, navigate to the “Employees” menu, select “Get Payroll Updates,” and check the “You are using tax table version” section. The displayed version should be the most recent one available. If you’re unsure whether you have the latest tax table version, feel free to contact our support team at our toll-free number +1-888-510-9198, and we’ll be happy to assist you.
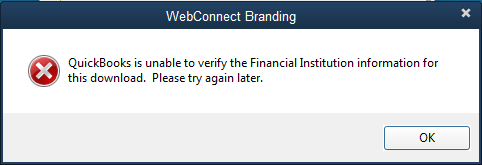
“QuickBooks is unable to verify the Financial Institution information for this download. Please try again later.” Have you received this pop up on your screen while providing a bank ID? This error generally happens when QuickBooks does not accept a specific bank ID. So Here, in this article, we will discuss in details the causes and solutions of this error. This error appears on the screen stating “QuickBooks is unable to verify the Financial Institution Information for this download, when importing a webconnect file from Chase.” There can be a couple of factors triggering such an error in QuickBooks, which we will try to elaborate later in this article.
The image as shown below is similar which appears on your desktop.
For more details, make sure to stick around this piece of writing till the end, or you can also connect with us at +1-888-510-9198, and we will provide you with immediate support and assistance. Our technically sound QuickBooks ProAdvisors will ensure to answer all your queries related to QuickBooks.
Reasons and impacts of financial institution error
This error generally arises when QuickBooks accounting software denies accepting any particular Bank ID. There can be a handful of factors causing this issue, which include:
When your QuickBooks copy is three years older, then it will not import .QBO files.
Moreover, if you update to the advanced version or use CSV2IIF converters, or use Bank2IIF file rather than QBO files, then you can experience this particular error.
Another possible factor causing such an error can be if the credit card company or bank is not allowed through QuickBooks.
You can further come across similar issue if you use Bank2QBO to create your QBO file from the allowed banking institutions.
Such an error can also be seen when you have created incorrect .QBO file.
Also if QuickBooks online file is downloaded from a US bank and it is being imported to Canadian version of QuickBooks.
Solution for ‘Unable to verify the financial institution’ Error
Sometime, even QuickBooks users may come across some issues while using it. When you get this financial institution error it is advised that initially, you should get in touch with QuickBooks error support team so that they can guide you to fix the error.
If you receive the financial institution error, you can try to fix it by changing the affected Bank ID that you were trying to provide and use a recognized QuickBooks fix error code in QuickBooks Online.
Note: Open QuickBooks Online Files in excel or notepad and follow the bellow mention tips to fix financial institution error.
Open QuickBooks Online file in excel or notepad
Select line ‘20 – <INTUIT.BID>2002‘.
Change last four digits to ‘3000‘.
Save the file using keyboard or mouse, so that the changes are preserved.
If you are short of time and need a quick and temporary solution, you can do the following:
Find the ‘fidir.txt‘ that is found in the first Folder.
Open the ‘file‘ with the notepad.
If you are using MS Windows Vista, 7 or 8, open – C:\ProgramData\Intuit\QuickBooks20XX\Components\OLB\branding\filist
If you use windows XP, open C:\Documents and Settings\All Users\Application Data\Intuit\QuickBooks20XX\Components\OLB\branding\filist
Next, find the bank’s name ‘MB Financial‘, you will find 4 sets of number, that will appear like this “XXXXX XXXXXXXXXXXXXXX”
Note the numbers.
Open the file ‘.QBO‘ with notepad and search for ‘<FID>, <BANKID> or <BID>‘ and proceed to change the number next to the characters with the number given in ‘FIDIR‘.
Save the Changes as ‘.QBO‘
Open your Company file in QuickBooks and import it.
Solutions to error “Unable to verify the financial institution”
You can try fixing the error unable to verify the financial institution information error using the steps enumerated below. Let us explore:
Method 1: Download the web connect
You need to first login to your respective bank’s website.
After that, locate the web connect to file and download it.
You are then required to open QuickBooks and open the company file.
Once done with that, start importing the .QBO file by performing the onscreen instructions.
In case the error continues, perform the steps below or reach out to your bank.
It is essential to ensure that the file which you have downloaded from the bank’s site has the file format to that of a .QBO file.
You can proceed to the next solution, if it is .QBO file.
In case not, then login to your bank’s site and download the file in .QBO format.
Method 3: Review bank notification
Just in case your bank has made any changes in how it supports the QuickBooks application, then you have received some sort of notification related to the same. You are suggested to login to your respective bank’s site and locate for such notification and perform the instructions mentioned there. In case asked to, verify your identity before accessing the QuickBooks data.
These steps should help you to get rid off from the QuickBooks unable to verify financial institution error. If the error still persists, you can contact 24*7 QuickBooks online Support team or you can dial our toll free support number +1-888-510-9198. We can look into the issue and offer you the quickest solutions.
FAQs Related to QuickBooks Unable to Verify Financial Institution
What does QuickBooks is unable to verify the financial information for this download?
You can come across such an error when QuickBooks has been denied from accepting a particular bank ID.
How do I verify my bank account in QuickBooks?
For this: 1. After you find the cleared test transaction in your bank statement, open QuickBooks online and sign in. 2. Once done with that, choose payroll and select overview. 3. You now have to find the check your bank account item in the TO DO list and hit edit. 4. Now, select verify amount.
Why is QuickBooks not connecting to my bank account?
The user can experience issues when linking or finding bank account, if your bank has multiple names on the list. Or if the bank doesn’t connect to all types of accounts.
How do I activate my bank account in QuickBooks?
This can be done as follows: 1. You need to choose continue tab. 2. And further, enter your online banking user ID and password. 3. Once done with that, go for connect to connect your QuickBooks to the bank’s server. 4. After that, choose the bank account you wish to connect to your account in QuickBooks 5. And choose finish after the connection finishes.