QuickBooks, being the most preferred accounting software, is loaded with tons of features and functionalities. However, these functionalities trigger different technical glitches here and there. Users often panic when they come across a different set of errors. If that is the case with you, then you need not worry anymore. We have drafted this segment with the sole intention of helping you deal with the QuickBooks Error Code C=51. This isn’t a commonly encountered error, but can be a bit troublesome. This particular error can block your screen to warn you when QuickBooks is unable to find the TxList. You can witness the same error even at the time of working on transactions in QuickBooks company file.
To unleash the causes, fixes, and further information about the QuickBooks error code C=51, stick around this piece of writing. Or you can further get on a call with our QuickBooks tech personnel at +1-888-510-9198, and they will clear all your clouds of confusion.
Insight into QuickBooks Error Code C=51
Before you dig in deep and explore further about this issue, it is more sensible to get a brief about what this is all about. QuickBooks error code C=51 usually gets displayed on the screen with a notification:
“QuickBooks is not able to find the TxList file”.
This type of error can also be seen when the user tries to get rid of txList from txLists list, but QuickBooks is unable to find it. The user might also encounter this type of error message while they are removing a transaction file from any report. You can further observe such an error when you try to delete the txList and are unable to identify it. In order to fix this issue, you might have to close this application, shut down the windows, or reboot the system. Other than that, if you have also stumbled upon Error code C=51 and are looking for an instant solution, continue reading this segment carefully.
You can come across such an error in QuickBooks due to the below scribbled reasons:
Any sort of issue with QuickBooks verification or QuickBooks rebuild error can trigger this particular glitch in QuickBooks.
The probability of coming across this issue increases if the company file gets damaged for some reason.
You can further land into such a situation, if the QuickBooks database is corrupted or damaged.
Be prepared to bump into such an error if there are issues with updating QuickBooks desktop.
Perform these quick steps to fix the error:
When QuickBooks error code C=51 occurs, it stops your QuickBooks functioning. Also, this error can delete your important data files so we recommend you create a backup of your company files. Below we have shared a few quick steps to resolve this error. However, you can correct this error with the help of our QuickBooks data recovery support team.
When you face this error, you need to turn off your QuickBooks desktop.
After that terminate all running windows within QuickBooks.
Once done with that, the user is supposed to restart the QB software.
Moving ahead, the user needs to repeat the action in which the C=51 error was received.
To begin with, the user is required to exit the QuickBooks accounting software.
The next step is to close all the windows within QuickBooks.
Followed by again starting the QuickBooks.
Once done with that, the user is required to repeat the action in which the C=51 error was encountered.
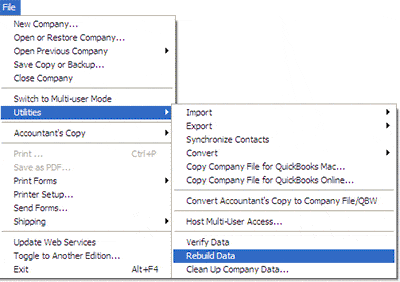
For release 7 or later, rebuild the data in a format.
Note: The point to be noted is that the data recovery process is available for all files from all versions of QuickBooks. In order to use these repaired files, the user need not upgrade the QuickBooks version.
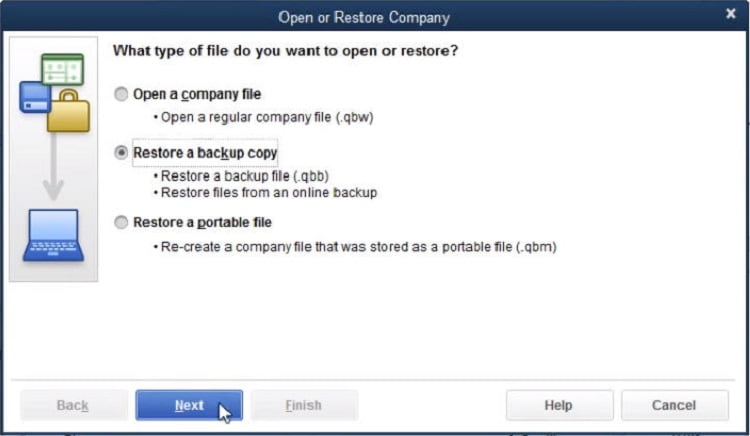
Restore all your backup files, and then copy it by pressing Ctrl +C keys into a new folder.
The user needs to check the file size once the backup is created, and make sure the file size is not less than 6 MB.
In order to check the file sizes and make sure that they are accurate, the user needs to right click the file and select Properties option.
In case the file size is less than 6 MB, then the file is not a true backup file, the user now needs to create a new backup file from the working file.
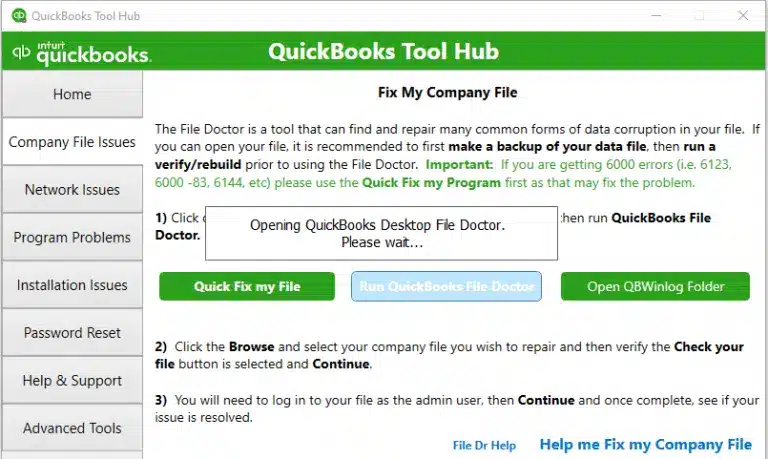
Solution 5: Use QuickBooks File Doctor tool
Many reasons are here that affect your company data file.
Solution 6: Try to access the lost or deleted transactions
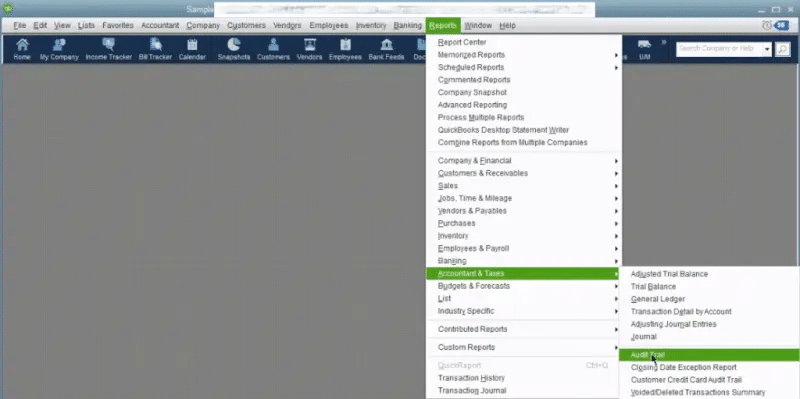
At times, the user might not be able to find a transaction or list of transactions that might have become inaccessible or got deleted by mistake. The user is suggested to restore the deleted or altered transactions. The user can perform the steps below related to using the audit trail report, which will show the transactions that have been entered in that particular company file.
The very first step is to open the reports menu
After that select the accountant and taxes, along with that click on the audit trail
The next step is to restore the transactions that are lost as a consequences of a technical issue
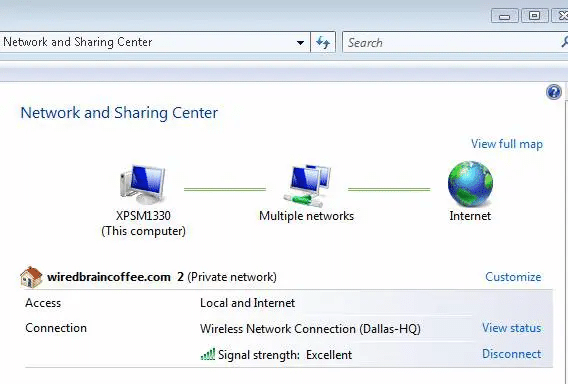
Solution7: Checking Network Connectivity
Network connectivity-screenshot
At times, the error could be experienced simply due to network connectivity issues. This might prevent the transactions from being downloaded. Thus, the user is suggested to check the internet connection, before starting the download process.
We expect that these troubleshooting steps might help the user to fix QuickBooks Error C=51. Sometimes by following above steps, the error might not get resolved and user may get frustrated. At this moment Hostdocket team can help you to get rid of these types of errors.
Feel free to consult with one of our experts at our QuickBooks premier technical support number i.e. +1-888-510-9198 and resolve all types of QB errors with the help of USA best accountants, CPA’s and Intuit Certified ProAdvisors. Don’t fret, ask expert advice by calling our helpline number that is available 24/7. We offer 24*7*365 services with a complete resolution guarantee within the stipulated time period.
QuickBooks error code C=51 indicates that the QuickBooks software is not able to find the TxList. This error could be viewed when the user tries to remove the transactions from a report but is unable to do.
How do I fix C=51 error in QuickBooks?
You can try fixing the QuickBooks error C=51 using the steps below: 1. Update QuickBooks to the latest version. 2. Close all QuickBooks processes. 3. You can verify and rebuild data in QuickBooks 4. Restore the backup files to fix the issue. 5. Check the network connectivity.
Why QuickBooks error C=51 occurs?
The reasons behind the occurrence of QuickBooks error C=51 are as follows: 1. Interrupted network connection 2. Lost of deleted transactions 3. Damaged transactions
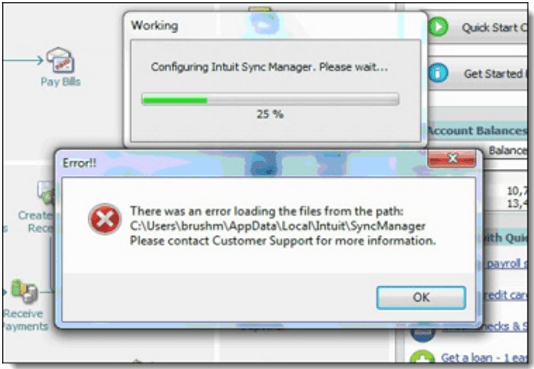
Came across QuickBooks error code 5502 and can’t decide what can be done to get rid of it? Well, QuickBooks Error 5502 appears on the screen stating ‘Sync is not completed properly’. Unfortunately, a user works on their QB accounting software and may encounter error code 5502, this message is received on users’ desktop – QuickBooks data has been uploaded, but failed to connect via the server. In this blog context, we are going to share some simplest troubleshooting steps that might resolved. There are a handful of factors triggering this sort of issue in QuickBooks, which we will be elaborating on later in this piece of writing. To learn further, make sure to go through this piece of writing. You can also talk to our QuickBooks support professionals at +1-888-510-9198, and let our technical support professionals help you with the fixation of your errors.
What Causes Error Code 5502 in QuickBooks?
QuickBooks Error 5502 Causes due to many reasons as described here:
Error Code 5502 is caused due to matter that is grasped through online services. The information was given by QB Company file that was uploaded with a success.
A Company file augmentation has been changed, so QuickBooks is not ready to peruse which a Company has recorded.
Error 5502 results of the matter grasp online services. Or it occurs when the third party in the developer application connections to the QuickBooks.
The information in your QuickBooks company file was uploaded with success. However, a slip occurred when downloading the changes created by applications’ mistreatment grasped online services.
After applying these troubleshooting steps we really hope that you can able to fix this QuickBooks error code 5502 by your own. If the error still exists there or the sync manager is not functioning properly, do not worry we are always there for you to fix all your QB related concerns. For any help, you can take advice and assistance directly by our certified QuickBooks ProAdvisors team.
Ask expert guidance proffered by our diligence expertise through online. We are here to resolve your hindrances and clear all your doubts in just a few minutes. Thus, connect us at QuickBooks Error support number i.e. +1-888-510-9198 at which expertise are highly trained & have an amazing work experience in deploying countable hurdles as 24/7.
QuickBooks Error 5502 occurs when you try to change the file size of the company file, or in case the Intuit Sync manager has damage.
How do I fix Error 5502 in QuickBooks Pro?
There are a bunch of methods to resolve Error 5502 are: 1: Rename the .ND file. 2: Change the location of the company files. 3: Update Sync Manager 4: Update QuickBooks Desktop.
What is QuickBooks Sync Manager?
The QuickBooks Sync Manager permits users for easy creation and maintenance of their duplicated QuickBooks data files. This makes it convenient to access the data from a single database.
How do I fix a QuickBooks company file that won’t open?
Solution 1: Update QuickBooks and check your file type. Solution 2: Don’t save the desktop when you close QuickBooks. Solution 3: Turn off hosting on your workstations. Solution 4: Open a sample company file. Solution 5: Move your company file.
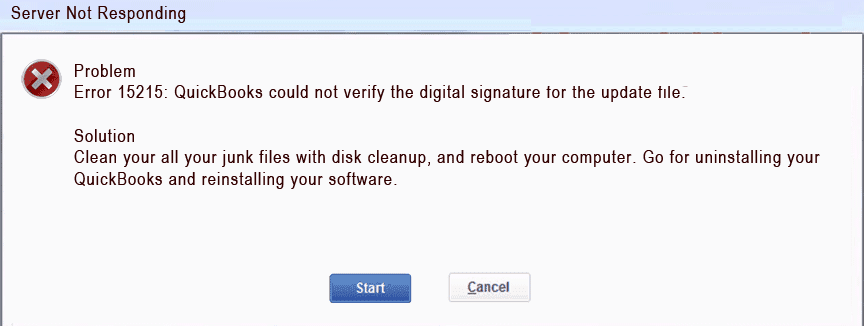
Did you see QuickBooks error 15215 and don’t know what can be done to fix it? Well, QuickBooks error code 15215 usually occurs when updating QuickBooks to the latest version or when downloading payroll updates. This error appears on the screen when performing payroll updates or when carrying out a maintenance release. When receiving such an error, the server might stop or you might have limited access. When downloading payroll updates, one might see the following error message:
Problem
Description
Server Not Responding
Problem Error 15215: QuickBooks could not verify the digital signature for the update file.
Error 15215:
Unable to verify the digital signature.
To help you in dealing with QuickBooks error code 15215, here we are with this segment sharing the complete information related to the error causes, and fixes. To learn more, stick around this segment, or you can also consult our technical support team at +1-888-510-9198, and we will provide you with immediate support and assistance.
What is QuickBooks error code 15215?
QuickBooks payroll update error 15215 is usually shows up when you try to download payroll updates. It shows up when there is any kind of conflict with another application running in the system during the payroll upgrade. The software running in the background application mighty use excessive bandwidth, causing the error. This error can also be seen when the firewall setup is blocking the software from connecting with the server.
Problem
Description
Error number:
Error Code 15215
Description:
Error 15215: Unable to verify digital signature / Incorrect Configuration of Microsoft Internet Explorer
Developer:
Intuit QuickBooks Inc.
Applies to:
Windows XP, Vista 7, 8, 10 & 11
Possible Solution
Clean junk files using disk cleanup, uninstall and re-install QuickBooks.
Checkout the potential signs that indicate that QuickBooks software suffering from Error 15215:-
When the error code 15215 occurs – it crashes all the active programs & applications
System gets corrupted while running the same program simultaneously
“Error 15215: Unable to verify digital signature” message is displays
Slow & sluggish performance of the windows
System responds leisurely on the mouse & keyboard input
Computer ‘freezes’ after fix time span
What Causes QuickBooks Update Error 15215?
QuickBooks error code 15215 may caused due to an incorrect configuration of Microsoft Internet Explorer (IE). To protect your computer and its contents, QuickBooks attempts to verify the digital signature on all files that are downloaded through the program. If it is unable to verify the digital signature of a file that you are trying to download, this error will occur. Looks like it’s a conflict in the system.
Here are some of the potential reasons that drag the QuickBooks desktop to this error code:-
Troubleshooting Methods to Fix QuickBooks Update Error 15215
Error 15215 is normally triggered by a conflict with another application running in the background when you attempt to download and install a payroll update. The application might be a program that requires a lot of bandwidth, avoiding QuickBooks Desktop Payroll from creating a connection to the web server.
Below we are going to provide you step by step instruction to solve this error. However, you can contact to support team to resolve your problem instantly.
Method 1: Reboot the System
At first, you have to restart the computer.
Due to this, the application that protect the QB Payroll force to shut-down or
prompt to reset its setting in order to remove the blocked connection by
reconfiguration.
Restart the desktop and if the problem resolve but the error code appear after regular intervals…! In such scenario, you must see and confirm that no program is running on the system. If it does then it could be a reason of this error. To fix this issue once and for all, you have to follow the steps mentioned below.
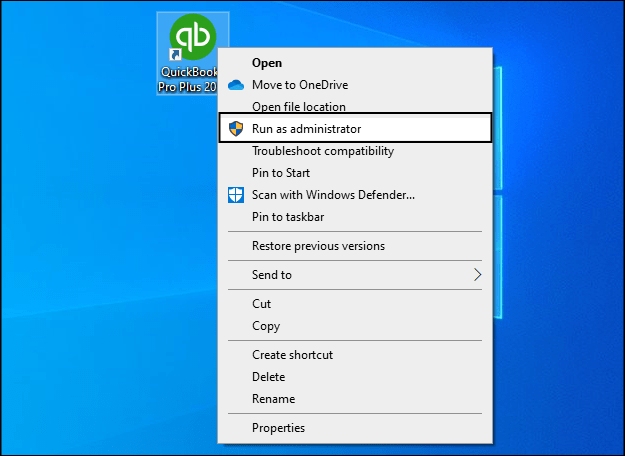
Method 2: Run QuickBooks as a Windows Administrator
Running QuickBooks as a Windows Administrator enables the QB application to take authority over every possible windows application. It also let the QuickBooks to take the necessary resources in order to run properly.
At first, confirm that the QuickBooks application is close
Hit onto the “Desktop” icon.
Choose the “Run as Administrator” option
In case, it redirects you to a dialogue “Do you want to allow this program to make changes to your computer?” then select the “Yes” icon.
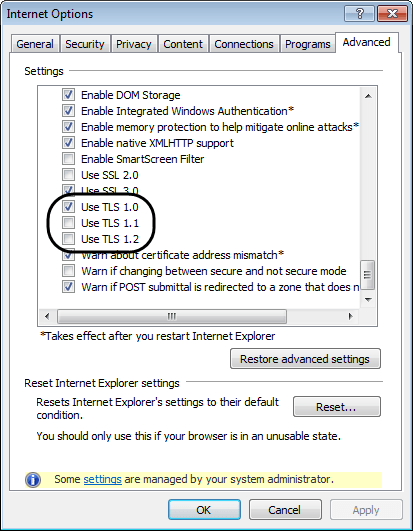
Method 3: Verify Use TLS 1.0 is checked, and Use TLS 1.1 and Use TLS 1.2 are unchecked in the Internet Options window of Internet Explorer
Shut-down the ‘QuickBooks’ application.
Access/open the “Internet Explorer” browser.
Now Go to the “Tools” icon => “Internet Option” tab.
Hit onto the “Advanced” tab.
In the “Advanced Settings” tab, search for the option ‘Use TLS 1.0, Use TLS 1.1 and Use TLS 1.2’. (Note: You may not find these options in your Internet Explorer version)
Later, check if the Use TLS 1.0 is marked.
Confirm that theUse TLS 1.1 & Use TLS 1.2are not checked.
Hit onto the “OK” icon to close the windows.
Shut-down the Internet Explorer.
Reboot the system once you restarted or reopen QuickBooks.
Method 4: Restart the Windows in Selective Startup
If the error pertains, verify the
system for running programs and applications that probably conflicted with
QuickBooks payroll update download, example CA Security Center, which has been
identified as the cause of conflicts with the QuickBooks software:
At first, turn-off the QuickBooks application.
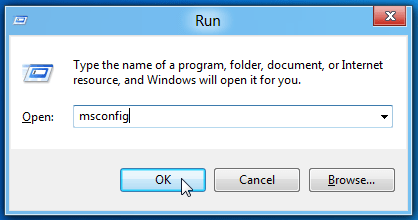
In the computer, open the ‘Run’ windows:-
For Windows XP: Click on the “Start” icon => “Run” icon.
For Windows 7 & Vista: Click on the “Start” icon => “All Program” tab => “Accessories” tab => “Run” tab.
Windows 8 & 10: Press the “Windows” + “R” key simultaneously on the keyboard.
In the “Run” field, type-in the msconfig and click on the “OK” icon.
It will open the “System Configuration Utility” window.
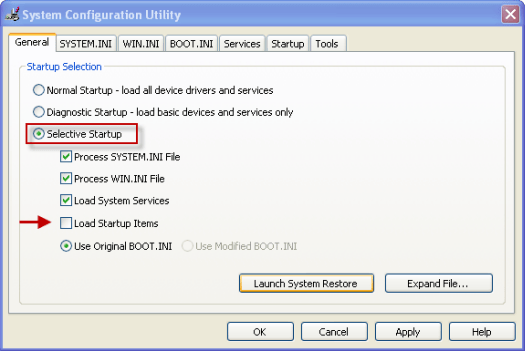
In the current page, choose the ‘Selective Startup’ & clear the ‘Load Startup’ item checkbox.
In case, you are enabled to successfully download the update, simply follow steps 1 to 4 to get back to the “System Configuration Utility”
Choose the “Normal Startup” tab.
Now, Hit onto the “OK” button
Finally, restart the system or machine again.
This action makes sure that the system functions in a normal working environment. However, If there are items you want to be removed permanently, you might need to go to the Microsoft website and search for how to clean boot Windows.
If you were able to successfully download the update by clearing your Startup items, this indicates that one or more of the programs in your Startup items are conflicting with downloading the QuickBooks Desktop Payroll update.
Method 5: Install Updates Manually
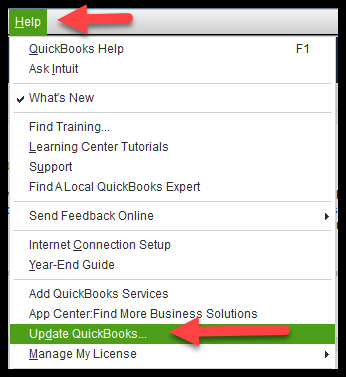
The very first step is to head to the update QuickBooks option
Now, ensure that product is selected
The user is then required to click on change tab and then choose the QuickBooks product
Once done with that choose the update option and select the location for the file to be saved
Now, ensure to choose the save tab
The next step is to locate the downloaded file
After that, double click the install the update tab and then restart the windows
The last step is to open QuickBooks to check if the latest update has been downloaded or not
Method 6: Configure the firewall
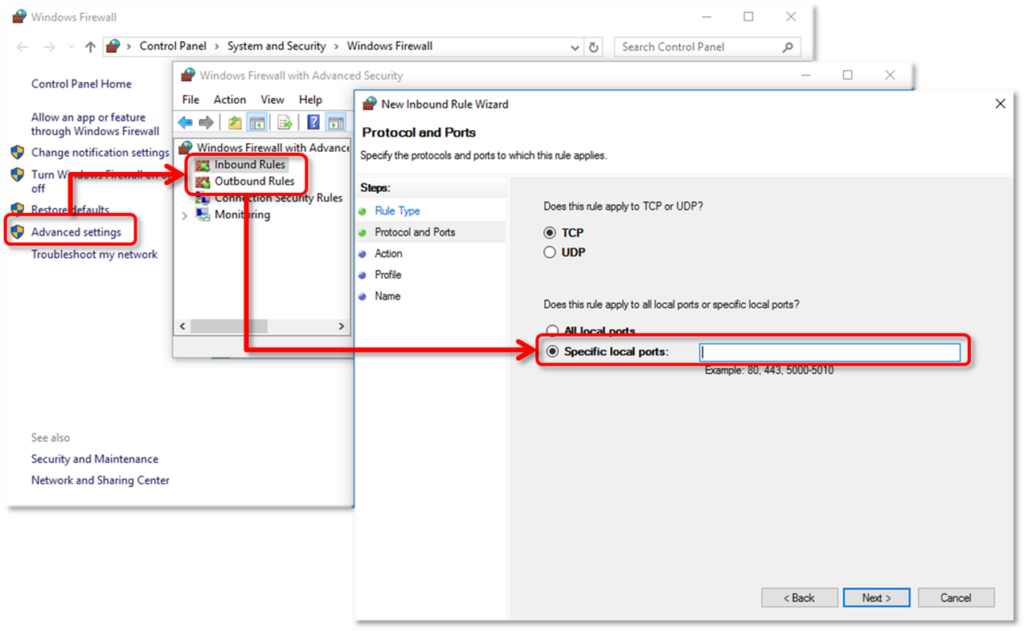
The user needs to start by clicking on the control panel from the start menu
And then click on the system security and also click on windows firewall
Choose the option to view the large or small icons and choose the windows firewall instantly
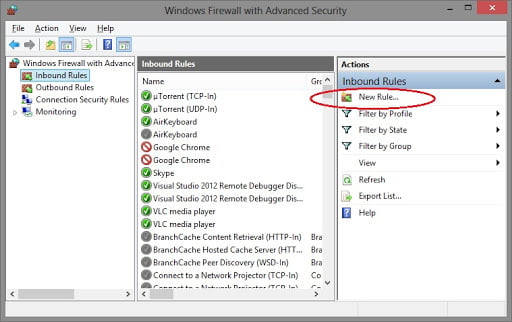
The next step is to select the advanced settings tab and then in the left section, highlight the inbound rules
The user will then have right click the inbound rules and click on new rule option
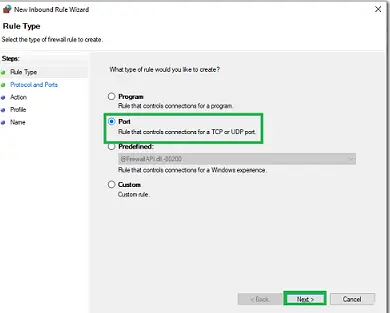
After that, select port from the rule type section
And also, click on the specific local ports
Ensure to separate by a comma and click on the next tab
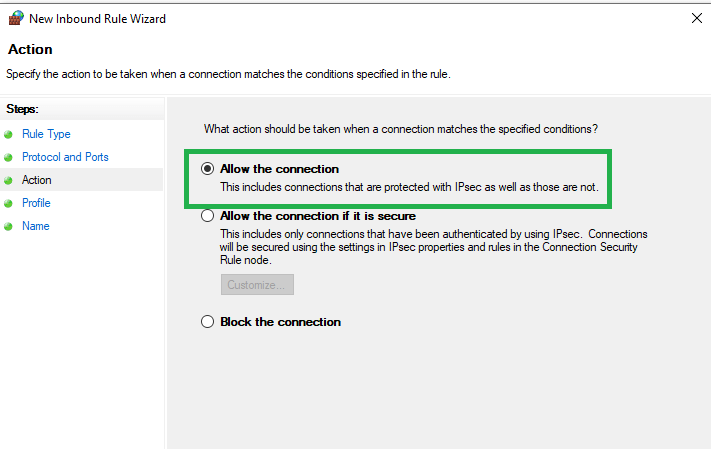
Click on the next tab and select the option to allow the connection
Select the network type
Make sure to keep all the options checked before clicking on next
We hope that this technical blog would be helpful for you to resolve the QuickBooks Update Error Code 15215. But, in any case, you encounter the same error or any other problem associated with the QuickBooks – you can instantly contact to our QuickBooks error support experts at our toll-free number i.e. +1-888-510-9198.
We regularly post our technical blogs and articles related to QuickBooks software errors to deliver the best solution to our clients.
FAQs
What is error 15215 in QuickBooks?
QuickBooks Error 15215 is an installation error in QuickBooks and belongs to the 15xxx series of QuickBooks errors that hamper the installation process of QuickBooks.
What causes Error 15215?
The major causes behind the error are: Incorrect configuration of Microsoft IE. The file being downloaded during the update process is unable to verify. The QuickBooks Installation is incomplete. Windows is virus or malware-infected. The source of the installation, like the CD, might be corrupted.
Does an Update of the QuickBooks Tax Table is required to Fix the QuickBooks Error 15215?
Yes, You can try to get rid of the QuickBooks error 15215 by updating the Tax table. At times, When the tax table is not updated, It starts creating an issue in the QuickBooks account.
Technical errors can be extremely challenging to handle only if you do not have sufficient resources to get done with them. Unable to rectify QuickBooks Error 15102? Well, this error can often be seen when downloading a payroll or update QuickBooks desktop. This payroll update error can be a bit confusing for QuickBooks users to handle. You can come across this issue in case your internet connection isn’t working properly, or if you do not have enough admin rights. To learn further about this issue, make sure to read this article till the end. Or you can also connect with us at +1-888-510-9198, and seek assistance from our technically sound QuickBooks professionals.
What is QuickBooks error code 15102?
QuickBooks error 15102 is basically an update error that can be seen when getting QuickBooks payroll updated. It appears on the screen due to different factors. This error stops the payroll update and can show up with a warning message that states: Error 15102: Failed to reset update. There can be a few factors causing such an error in QuickBooks, which we will be discussing below. Thus, make sure to read ahead carefully.
What causes QuickBooks error code 15102?
The reasons behind the occurrence of QuickBooks error code 15102 can be limited only. Here are the common factors that derive such an error in QuickBooks.
When QuickBooks Desktop is running in a terminal services environment in the multi-user mode.
When a specified download location is inaccessible or invalid and the shared Download is turned on.
This issue also happens if the user is not logged in as a Windows Administrator or running the application as an Administrator and using Windows Vista.
The signs listed below can indicate QuickBooks error code 15102:
The error itself shows up on the screen when trying to update the payroll
The update for your QuickBooks payroll subscription service cannot be downloaded
Or the QuickBooks freezes periodically for a few seconds and the PC performs slowly
The system responds slowly to the keyboard or mouse inputs
How to resolve QuickBooks Payroll Error 15102?
Below are the steps you need to follow to resolve this issue. Once it fixes you will be able to download the latest payroll update and QuickBooks Desktop update. And you also need an active payroll subscription.
Important: The error may happen if you are not using the latest version of QuickBooks Desktop. In that case, you have to reset your program then update and download the latest table tax again.
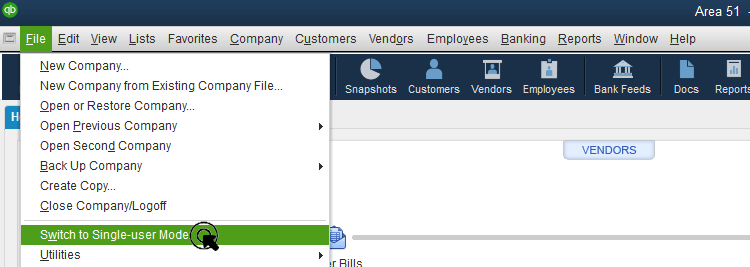
Method 1: If you are using multi-user mode then switch to the single-user mode
The very first step is to log out every user on the network before using the QuickBooks in multi-user mode
Launch the QuickBooks on the system that is having issues with the payroll updates
Now, hit the file menu and opt to switch to single-user mode
The last step is to update QuickBooks payroll and observe whether the solution helped in fixing the issue
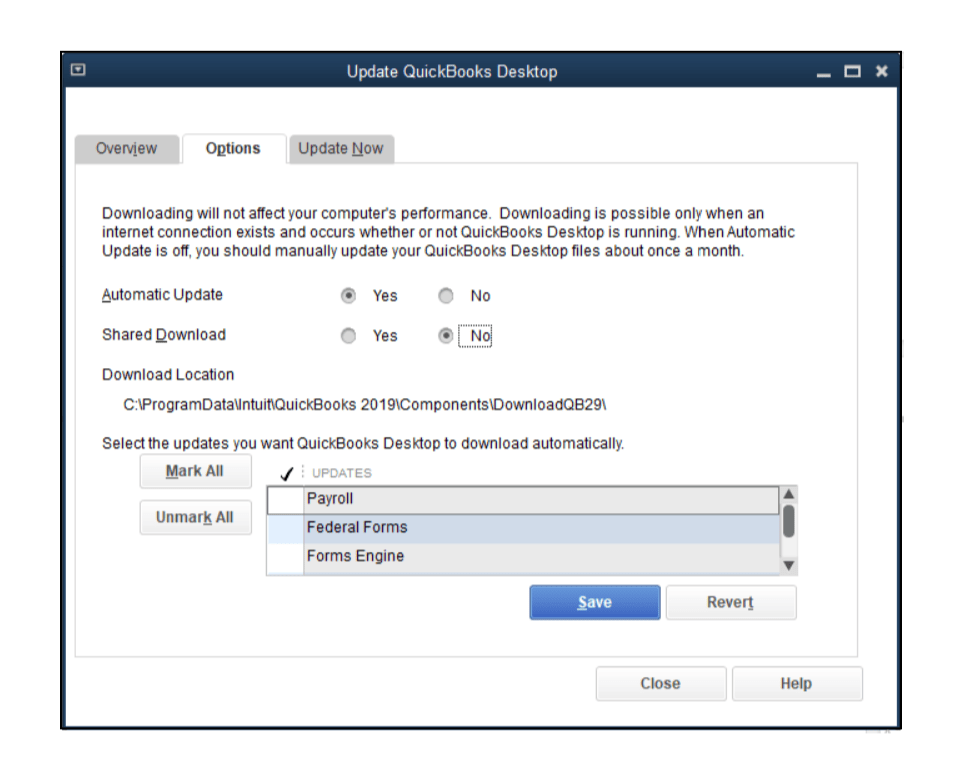
Method 2: Do ensure that the mapped file location is correct
In order to open the Product Information window press ‘CTRL +1‘ and then find the mapped path for example ‘[x]:\[folder name]\[data file name]‘ and write it down.
Select ‘Help‘ and Update QuickBooks.
Now you have to click on the ‘Options tab‘ and ensure that the information in Download location is correct.
Also note that the drive in the download location should be the same drive that appears in the Product Information window if shared Download is set to ‘Yes‘.
Even the directory in the ‘Download Location‘ should be the same as the QuickBooks Desktop Installation directory and when shared it is set to ‘NO‘.
In case the location is incorrect then change the state of the location and choose one of the following.
Select ‘No‘ for Shared Download if ‘Yes‘ is selected for Shared Download. Click on ‘Save‘ but if ‘No‘ is selected for shared download then choose ‘Yes‘.
Now click on ‘Save‘.
After this Click close and download the latest tax table again.
Method 4: If you continue to have issues with Windows Vista, run QuickBooks Desktop as an administrator
First, right-click on the QuickBooks icon and choose ‘Run as Administrator‘ from the Desktop.
Now click on continue when the ‘User Account Control‘ asks you to run this application.
After this reset the QuickBooks updates.
Method 5: Try updating the QuickBooks payroll in safe mode
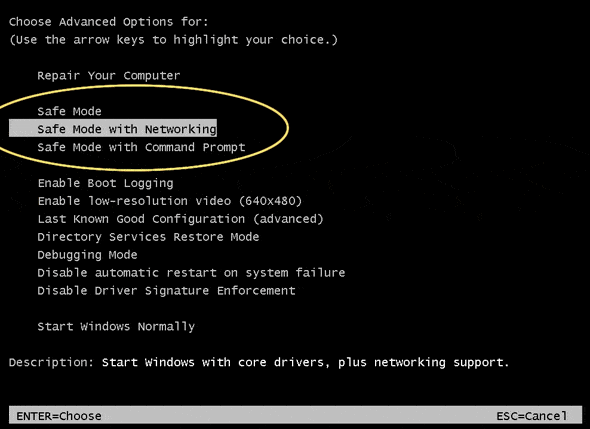
This method will ensure that any third party software doesn’t affect the update process. In order to access the system in safe mode, restart the system and keep clicking on the F8 key until the Advanced Boot Options window appears on the screen. One can type ‘’msconfig’’ in the start menu and then opt for Safe Mode, followed by restarting the system. After that, select Safe Mode with the Networking option and also click on the Enter key. Head as usual by launching the QuickBooks software and attempting to update the QuickBooks payroll.
Method 6: Resetting all existing update
The user needs to open the QuickBooks and thereafter proceed to the help option and choose the update QuickBooks desktop
Now, select the reset update QuickBooks desktop option and unselect all the mentioned options to get rid of all previous updates
The last step is to close the QuickBooks desktop and also reboot the system
I hope this article helps you to resolve the QuickBooks Error 15102, If still the problem persists then you can give us a call in our toll-free number i.e. +1-888-510-9198. Our QuickBooks Payroll Support experts will help you by giving a quick solution to it.
FAQs – QuickBooks error 15102
How to fix payroll errors in QuickBooks?
One can try to fix the payroll errors in QuickBooks using the steps below: 1. The first step is to click on the help menu 2. And choose the about QuickBooks 3. The next step is to press Ctrl + Alt + Y and then click on next tab 4. Now, in the employee summary information window and choose the employee that was underpaid 5. Double-click the employee’s name 6. Review the YTD adjustment details 7. The last step is to click on ok tab
How does QuickBooks payroll work?
QuickBooks Payroll is a cloud-based payroll software that permits to pay employees, file payroll taxes and manage employee benefits and HR in one place. The software saves time by automatically calculating, filing and paying federal and state payroll taxes.
How to fix QuickBooks payroll update error 12152?
The user can perform any of the processes below: 1. Uninstall/Reinstall QuickBooks desktop 2. Restore your system 3.Verify the system’s date and time 4. Make changes to the internet options 5. Make use of the registry editor
How to reset my QuickBooks payroll update?
The user needs to first open QuickBooks desktop and head to the help menu. After that choose update QuickBooks desktop and choose update now tab. Also, choose the reset update checkbox.
QuickBooks error code 6129 usually belongs to the 6000-error series and is often related to the company file. This particular error is a common company file error that can be seen when accessing a company file. It can be seen for a bunch of reasons. So, if you are interested in unveiling further QuickBooks error code 6129, its causes, and fixes, scrolling through this segment will brief you with the right fixes that you need to adopt. Just in case you are not interested in performing the steps on your own, our tech support professionals can help. Get on a call with us at +1-888-510-9198 and leave the rest our QuickBooks ProAdvisors.
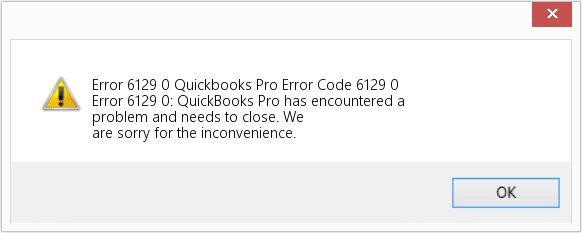
Before we jump onto the factors triggering this error and the fixes for the same, it is better to first understand what this error is all about. Talking about QuickBooks error code 6129, you can come across this error when database connection verification fails. You can land upon this error with a warning message i.e., “Error 6129, 0: QuickBooks pro has encountered a problem and needs to close. We are sorry for the inconvenience”. The database connection verification failure increases when you use QuickBooks to manage the company’s payroll and streamline the accounting management. Let us go through the further information about this error.
Below you will get the quick troubleshooting steps to resolve the Error code 6129, 0. You can also checkout the infographic and understand the ways to fix this error easily:
Before executing the solutions listed below, we recommend trying out a couple of things first:
Choose the “Exit or leave” option, On the easy action Interview window.
You need to be triggered to “Save the file“, just choose “Yes” option.
Enter a different file name, then choose the “Save” option.
Important: If changing the file name doesn’t work, try transforming the file location.
Condition 2: If you are opening or updating your company file:
Firstly, Open a sample company file to recognize if the problem is file related or not. If the issue is happening to all your company files, go with below given solution methods.
Log in as a Windows System Administrator before adhering to the actions in this section.
To fix the QuickBooks Error 6129, 0, there are multiple troubleshooting steps that needs to be followed. Below, we will let you know about the steps in detail as follows. However before proceeding to the given steps, make sure that all the computers used have been updated to the latest version of QuickBooks release.
Solution 1: Running clean install tool and database server manager in tool hub
Step 1: Start with clean install
At times a reinstall can fix the error, but when the reinstall doesn’t work, you can simply perform a clean install.
Start off by simply downloading and installing the QuickBooks tool hub program
Furthermore, you need to open the tool hub
Later on, head to the installation issues tab
You are now required to select the clean install tool
A clean installation will commence on the system
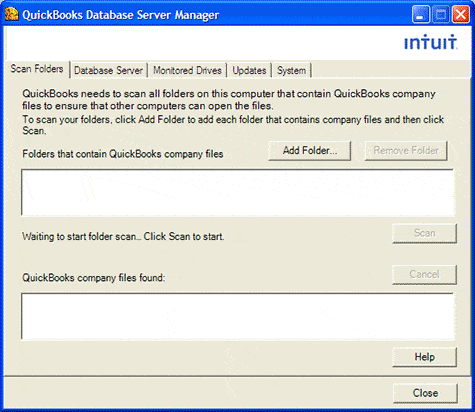
Step 2: Use QuickBooks database server manager
Under this process, launch the tool hub
Heading forward, visit the Network issues tab
Now, select the QuickBooks database server manager
The communication between the software and the server will also be improved.
You are now required to wait for the process to complete and reboot the system
Solution 2: Login as windows admin
At times one might come across such an error if the user hasn’t logged in as admin. In such scenario, it is recommended to try logging to windows using admin credentials. Let us have a look:
Try to open the company file.
Log in as windows admin by selecting the run as admin option and update the company file
In case you are unable to log in as windows admin, then get in touch with the windows support IT professionals.
Solution 3: Create another folder and navigate to the QuickBooks company file
Start off by simply creating another file folder
Later on, transfer the QuickBooks company files to the new folder
This would make it easy for you to open QuickBooks company file using the new folder if you have been using one system
Just in case you are using the same file on more than one system, head to the next step.
Click on start tab and choose the programs option
Furthermore, click on QuickBooks and select QuickBooks database server manager
Select the scan folder option
In case there is no folder with the company file, then click on add folder option
Click on scan now tab
Further, you need to click on close after the scanning process completes
Towards the end of this process, open the QuickBooks company file and ensure whether th same is working or not.
Solution 4: Disable Antivirus and other Software in case you use Windows on Safe Mode
Solution 7: Ensure that all the connected Computer are working on one single Domain
Be sure to contact a “Network Administrator” or an “IT professional” to connect all the computer systems on one single domain.
Solution 8: Run file doctor
The very first step is to download QuickBooks tool hub
After that choose the company file issue section and also choose the run QuickBooks file doctor
Once done with that the tool will run to diagnose the problem, and check if the issue is resolved
Solution 9: Update QuickBooks software
Often certain errors can be resolved by a simply update of the software. In case the user is making use of the an older version of QuickBooks, then updating it to the latest is suggested, as the older version can show up different errors in QuickBooks.
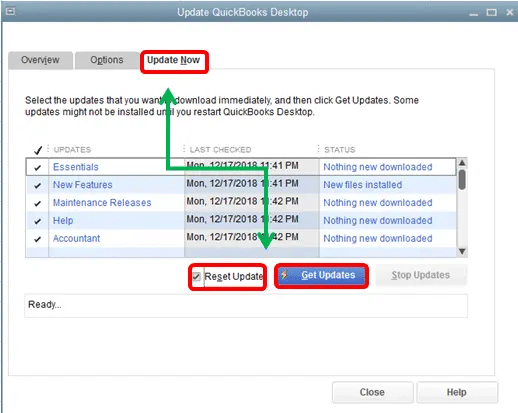
You need to open the software and choose the help menu and go for the update QuickBooks desktop option
Furthermore, you need to click on the update now tab
Select the get updates option to start the download process
Reboot the QuickBooks desktop
Perform on-screen instructions to accept the option for installing the new release
Solution 10: Run the system in selective startup mode
You need to first open the run window and enter MSCONFIG
After that, click on selective startup mode and also click on the General tab
The next step is to click on load system services and choose load startup items
The user is then required to click on the services tab
Once done with that, you need to disable the hide all Microsoft services option, check mark the Windows installer box, and click on the ok tab.
You now have to restart the system and reinstall QuickBooks after uninstalling it.
The last step is to make and save the changes in normal startup mode and reboot the system.
Now that you know what steps can be performed to eliminate this error permanently, it is time to perform those steps manually and get rid of the error permanently. Just in case you do not find any of these solutions helpful, then feel free to contact the QuickBooks Enterprise support team and receive step by step guidance to fix the issues. We are easily reachable at +1-888-510-9198.
The error code 6129 is often seen due to a failed database connection verification. It can also be seen when opening company files.
How to know if Error 6129 occurred?
This particular error is often experienced with a warning message that states: “QuickBooks pro has encountered a problem and needs to close. We are sorry for the inconvenience.
How to Fix QuickBooks Error 6129?
The fixes for Error 6154 include: 1: Disable the antivirus. 2: Rename the .ND files. 3: Update QuickBooks 4: Run QuickBooks as admin. 5: Use QuickBooks Database Server manager